Bittium Respiro User manual

Bittium Respiro™
Operating Instructions for healthcare
professionals

Respiro
2 (48)
Operating Instructions
© Bittium Biosignals 2022
Table of Contents
1General ......................................................................................................... 4
1.1 Respiro intended use .................................................................................... 4
1.2 Notes and warnings ...................................................................................... 5
1.3 Adverse events ............................................................................................. 7
1.4 Indications .................................................................................................... 7
1.5 Contraindications.......................................................................................... 8
2Using Respiro................................................................................................ 9
2.1 Respiro Carry case contents.......................................................................... 9
2.2 Carry case packing ...................................................................................... 12
2.3 Configuration options ................................................................................. 12
2.4Equipment needed in recording ................................................................. 14
2.5 Respiro indicator LEDs and power button functions................................... 14
2.5.1 LED indications in idle state ..................................................................... 14
2.5.2 LED indicators during recording ............................................................... 14
2.5.3 LED indicators while charging Respiro...................................................... 15
2.5.4 Power button functions ........................................................................... 16
2.6 Before recording......................................................................................... 16
2.6.1 Charging Respiro ...................................................................................... 17
2.6.2 Attaching the pulse oximeter’s wristband................................................ 17
2.6.3 Checking the device pairs......................................................................... 19
2.6.4 Connecting Respiro and the pulse oximeter ............................................ 20
2.7 Recording types .......................................................................................... 24
2.7.1 HSAT recording mode .............................................................................. 24
2.8 Recording configuration ............................................................................. 26

Respiro
3 (48)
Operating Instructions
© Bittium Biosignals 2022
2.9 Starting and ending a recording.................................................................. 26
2.10 After the recording ..................................................................................... 26
2.10.1 Uploading the recording data after HSAT recording ................................ 26
2.10.2 Cleaning ................................................................................................... 30
2.10.3 Other actions............................................................................................ 31
3Maintenance............................................................................................... 32
3.1 Changing the Respiro Device Manager language........................................ 32
3.2 Updating Respiro firmware......................................................................... 32
3.3 IT network................................................................................................... 33
3.4 Battery replacement................................................................................... 34
3.5 User responsibility and warranty................................................................ 34
4Troubleshooting.......................................................................................... 36
5Device disposal ........................................................................................... 39
6Product safety and regulatory information................................................. 40
6.1 EU Declaration of Conformity ..................................................................... 40
6.2 EMC ............................................................................................................ 40
7Technical information................................................................................. 41
7.1 Respiro dimensions and weight .................................................................. 41
7.2 Device IP classifications .............................................................................. 41
7.3 Operating and storage conditions............................................................... 41
7.4 Respiro specifications ................................................................................. 42
7.5 Electromagnetic emissions ......................................................................... 43
7.6 Immunity test levels.................................................................................... 43
8Symbols and labels...................................................................................... 46
Manufacturer ........................................................................................................ 48

Respiro
4 (48)
Operating Instructions
© Bittium Biosignals 2022
1GENERAL
These instructions cover the correct and safe use of the Respiro™sleep apnea
screening device. Respiro provides reliable recordings of selected sleep apnea-
related biosignals in home sleep apnea testing (HSAT).
1.1 Respiro intended use
The device is intended to be used as a screening device for brief overnight pol-
ygraphy, which is always carried out by doctor’s prescription. Use of Respiro for
any other purpose is prohibited. Respiro is used either in a hospital or at patient’s
home. The device records patient’s biosignals. The device does not actively moni-
tor the patient’s status, make diagnoses or treat the patient and it cannot be used
as a life-sustaining device. Device does not record EMG, EOG, or EEG signals re-
quired in an extensive sleep study (polysomnography). Device is not designed to
be used with children. The device is operated by healthcare professionals (hospi-
tal), the patient or another person at the patient’s home. A healthcare profession-
al gives instructions to the patient or the device operator on using the device and
starting the recording before using it at home. The patient is provided with an il-
lustrated quick guide for home use.
Respiro
5 (48)
Operating Instructions
© Bittium Biosignals 2022
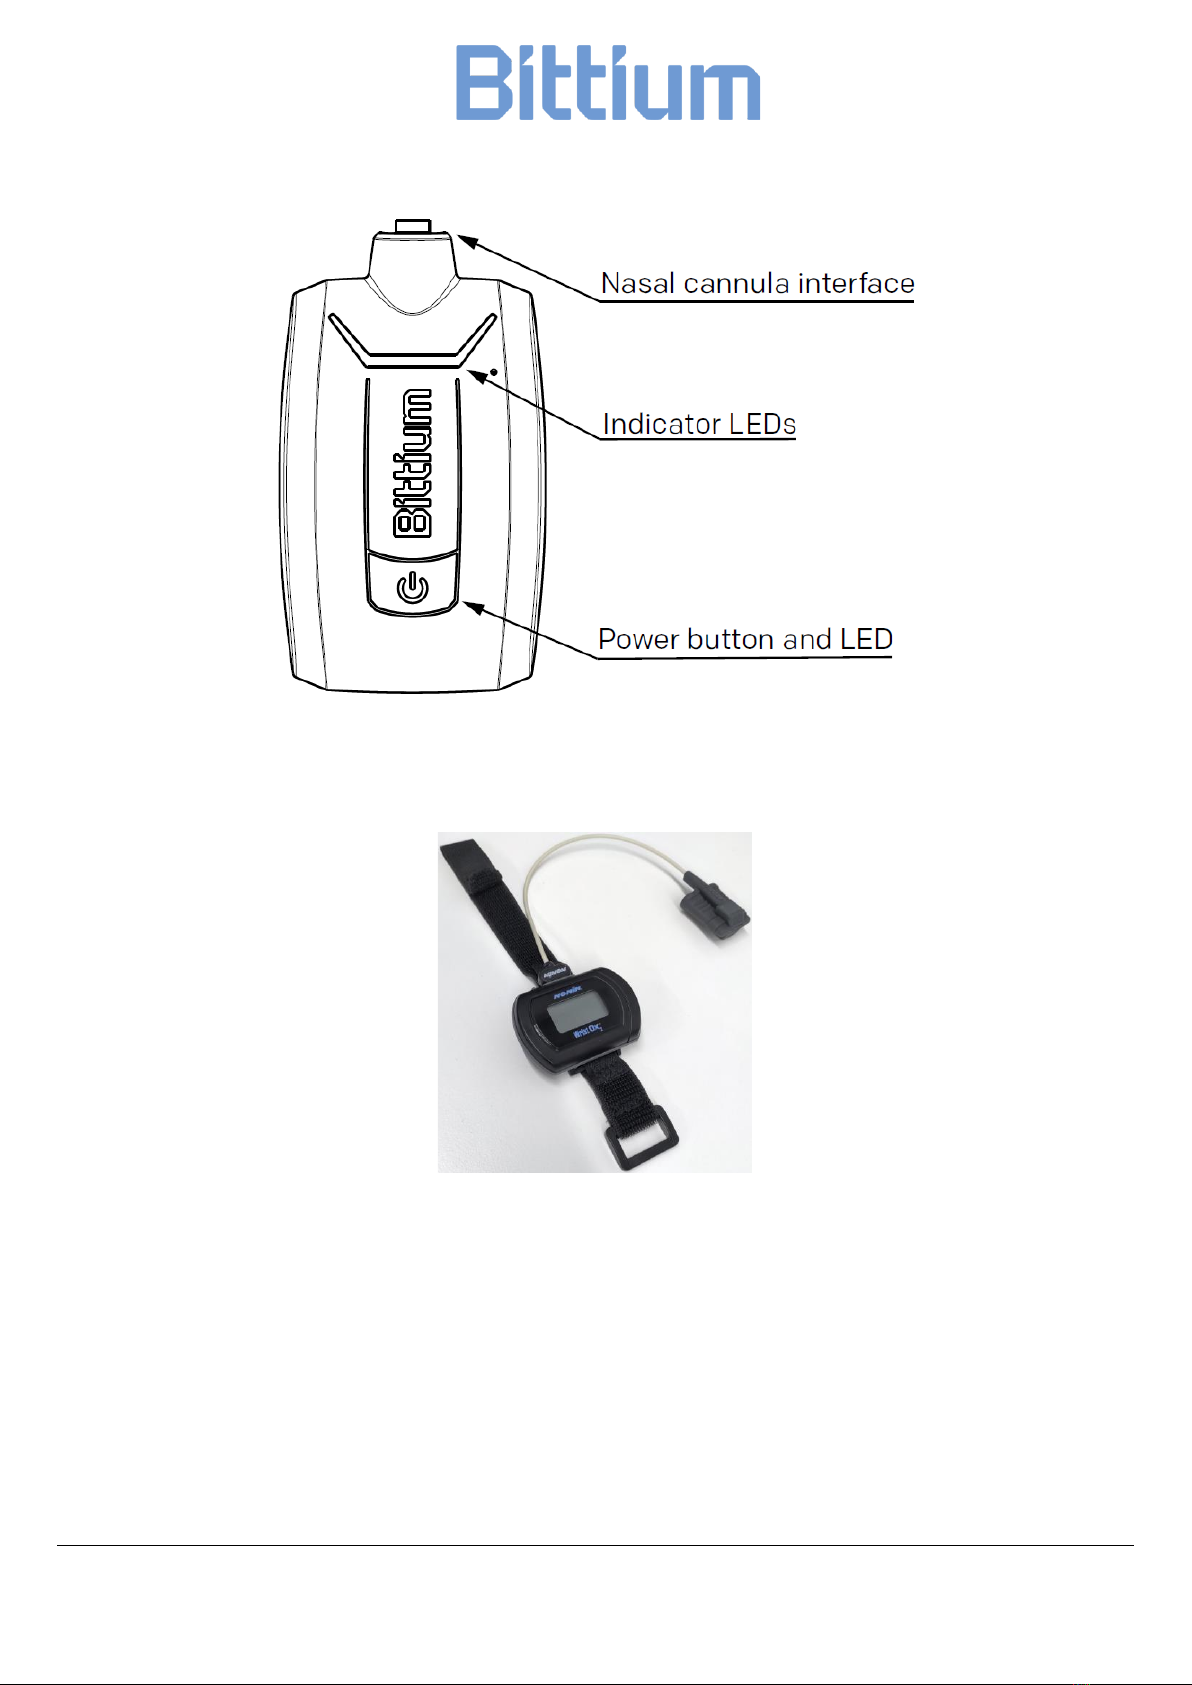
Image below gives an overview of the device and its interfaces.
Figure 1 Respiro screening device interfaces
Figure below presents the pulse oximeter and the sensor.
Figure 2 Pulse oximeter and sensor
1.2 Notes and warnings
•Do not use a broken device or electrodes/cannulas whose packing is opened.
•Use only the included charger and the charging dock when charging Respi-
ro™.
•The connector for the pulse oximeter is a push-pull connector. Do not twist
or bend the connector when connecting the pulse oximeter sensor.

Respiro
6 (48)
Operating Instructions
© Bittium Biosignals 2022
•Ensure that the pulse oximeter’s batteries have sufficient charge.
•Nasal cannula, ECG adapter and ECG electrodes are for single-use only. Re-
use between patients is strictly prohibited. The reuse of single-use parts may
lead to contamination.
•Do not use excessive force when connecting the nasal cannula.
•RIP belts must not be worn against skin.
•Respiro device’s internal pressure sensor is very sensitive. Do not produce
excessive pressure to nasal cannula’s pressure hose.
•Use only mild detergents when cleaning the devices. Immersing the devices
in liquids is prohibited.
•Contact nursing staff if the devices and sensors are damaged.
•Damaged or detached parts lead to incorrect recording results.
•Nail polish and artificial nails must be removed before recording as they in-
terfere with the pulse oximeter.
•Do not open and/or modify the equipment.
•Keep the devices and accessories out of reach for children and pets.
•Do not use the devices in shower or sauna.
•EMC disturbances may cause interference and/or noise to recording data.
•Use the device only with accessories provided by Bittium Biosignals Ltd. Oth-
er accessories may negatively affect the device performance or cause non-
recognized issues and non-conformities or break the device.
•Portable RF communications equipment (including peripherals such as an-
tenna cables and external antennas) should be used no closer than 30 cm (12
inches) to any part of the Respiro device, including cables specified by Bit-
tium Biosignals Ltd. Otherwise, degradation of the performance of this
equipment could result. Examples of such devices include: mobile phone,
laptop computer, activity band, smart ring.
•Respiro is not suitable for use in MRI environment.
•Respiro is not intended to be used at the same time with high frequency (HF)
surgical equipment or with a defibrillator.

Respiro
7 (48)
Operating Instructions
© Bittium Biosignals 2022
•Respiro device should not be used adjacent to or stacked with other electri-
cal equipment. If adjacent or stacked use is necessary, the device should be
observed carefully to verify normal operation.
•Body and hand creams as well as sunscreens can damage the device.
•Skin must be intact, clean, and dry in the area where the ECG electrode is at-
tached (applicable only in ECG use case).
•Body-worn parts (eg. medical tape) may irritate skin, but there are no other
known adverse events due to using the Respiro device. If the patient has lots
of body hair it must be shaved from the area where the ECG electrode is at-
tached (applicable only in ECG use case).
•Any serious incident that has occurred in relation to the device must be re-
ported to the manufacturer and the competent authority of the country in
which the user and/or patient is established.
See also pulse oximeter’s operator’s manual: Operator’s Manual Model 3150
WristOx2® Pulse Oximeter BLE and USB: https://www.nonin.com/support/3150-
ble/. Operator’s Manual can also be found from device’s memory.
1.3 Adverse events
Body-worn parts (eg. medical tape) may irritate skin, but there are no other
known adverse events due to using the Respiro device.
1.4 Indications
•Suspected sleep-related breathing disorder (obstructive sleep apnea, central
sleep apnea, mixed sleep apnea, Cheyne-Stokes respiration)
Table below lists the biosignals and sensors used in Bittium Respiro:
Signal
Sensor
Airflow
Nasal cannula+ air pressure sen-
sor
Respiratory effort (abdominal)
Respiratory inductance plethys-

Respiro
8 (48)
Operating Instructions
© Bittium Biosignals 2022
mography (RIP) belt (abdominal)
Respiratory effort (thorax)
Respiratory inductance plethys-
mography (RIP) belt (thorax)
Oxygen saturation & pulse rate
Wrist-worn pulse oximeter
ECG monitoring
1-channel ECG electrode
Body position
Integrated accelerometer
Snoring
Integrated microphone for audio
volume
1.5 Contraindications
•The product is not intended for pediatric patients. Age limit 18 years.
•Outstandingly big physical size. Sensor adjustment out of control.
•Amputation –missing fingers / both hands (SpO2 measurement not possible)
•Unfeasible to use sensors for any reason (sensitive skin)
•Artificial nails / thick fingernail painting prevents SpO2 measurement
•Acute respiratory infection, which might be a confusing factor in symptoms
and interpretation.
•A person who is unable to perform self-directed / independent recordings at
home
A doctor always assesses the requirement for a night polygraphy and whether the
patient is suitable for home recording. Only an expert can interpret and analyze
the results of night polygraphy recording and be responsible for the given state-
ments and care.

Respiro
9 (48)
Operating Instructions
© Bittium Biosignals 2022
2USING RESPIRO
2.1 Respiro Carry case contents
Table below lists the carry case contents as illustrations.
Table 1 Carry case contents
Item
Image
Bittium Respiro™screening device (applied
part)
Charger dock
Medical Power Supply 7W USB
Pulse oximeter Nonin 3150 with batteries
(type AAA), 2 pcs (inserted)
RIP (Respiratory inductance plethysmogra-
phy) belt(s) for attaching Respiro to body
(applied part). Two sizes are available, M
and L.
•Size M: length 80 cm, chest circum-
ference max. 160 cm. Default size.
•Size L: length 120 cm, chest circum-
ference 150 - 240 cm

Respiro
10 (48)
Operating Instructions
© Bittium Biosignals 2022
Respiro patch for 1 RIP belt
(applied part), 2 pcs
Respiro patch for 2 RIP belts
(applied part), 2 pcs
Respiro ECG Adapter (applied part, single
use)
Bittium OmegaSnap™ECG electrode
(applied part, single use)
Bittium Respiro Quick Guide
Bittium Respiro Notes and Warnings
Medical tape (applied part, single use)

Respiro
11 (48)
Operating Instructions
© Bittium Biosignals 2022
Cannula (applied part, single use), (eg. Pro-
Tech or SleepSense®).
Do not open the packing of the patch, the ECG adapter or the ECG electrode
before use.
Make sure that the cannula length is optimal for each patient. Avoid using too
long cannulas to ensure patient safety.

Respiro
12 (48)
Operating Instructions
© Bittium Biosignals 2022
2.2 Carry case packing
Figure below show the Respiro carry case contents in HSAT™recording.
Figure 3 Carry case packing, HSAT
2.3 Configuration options
Respiro polygraphy recording can be carried out as an HSAT™recording with three
configurations:
•1 RIP belt configuration (abdominal application):
Respiro
13 (48)
Operating Instructions
© Bittium Biosignals 2022
Figure 4 1 RIP belt configuration
•2 RIP belts configuration (thoracic and abdominal application):
Figure 5 2 RIP belts configuration
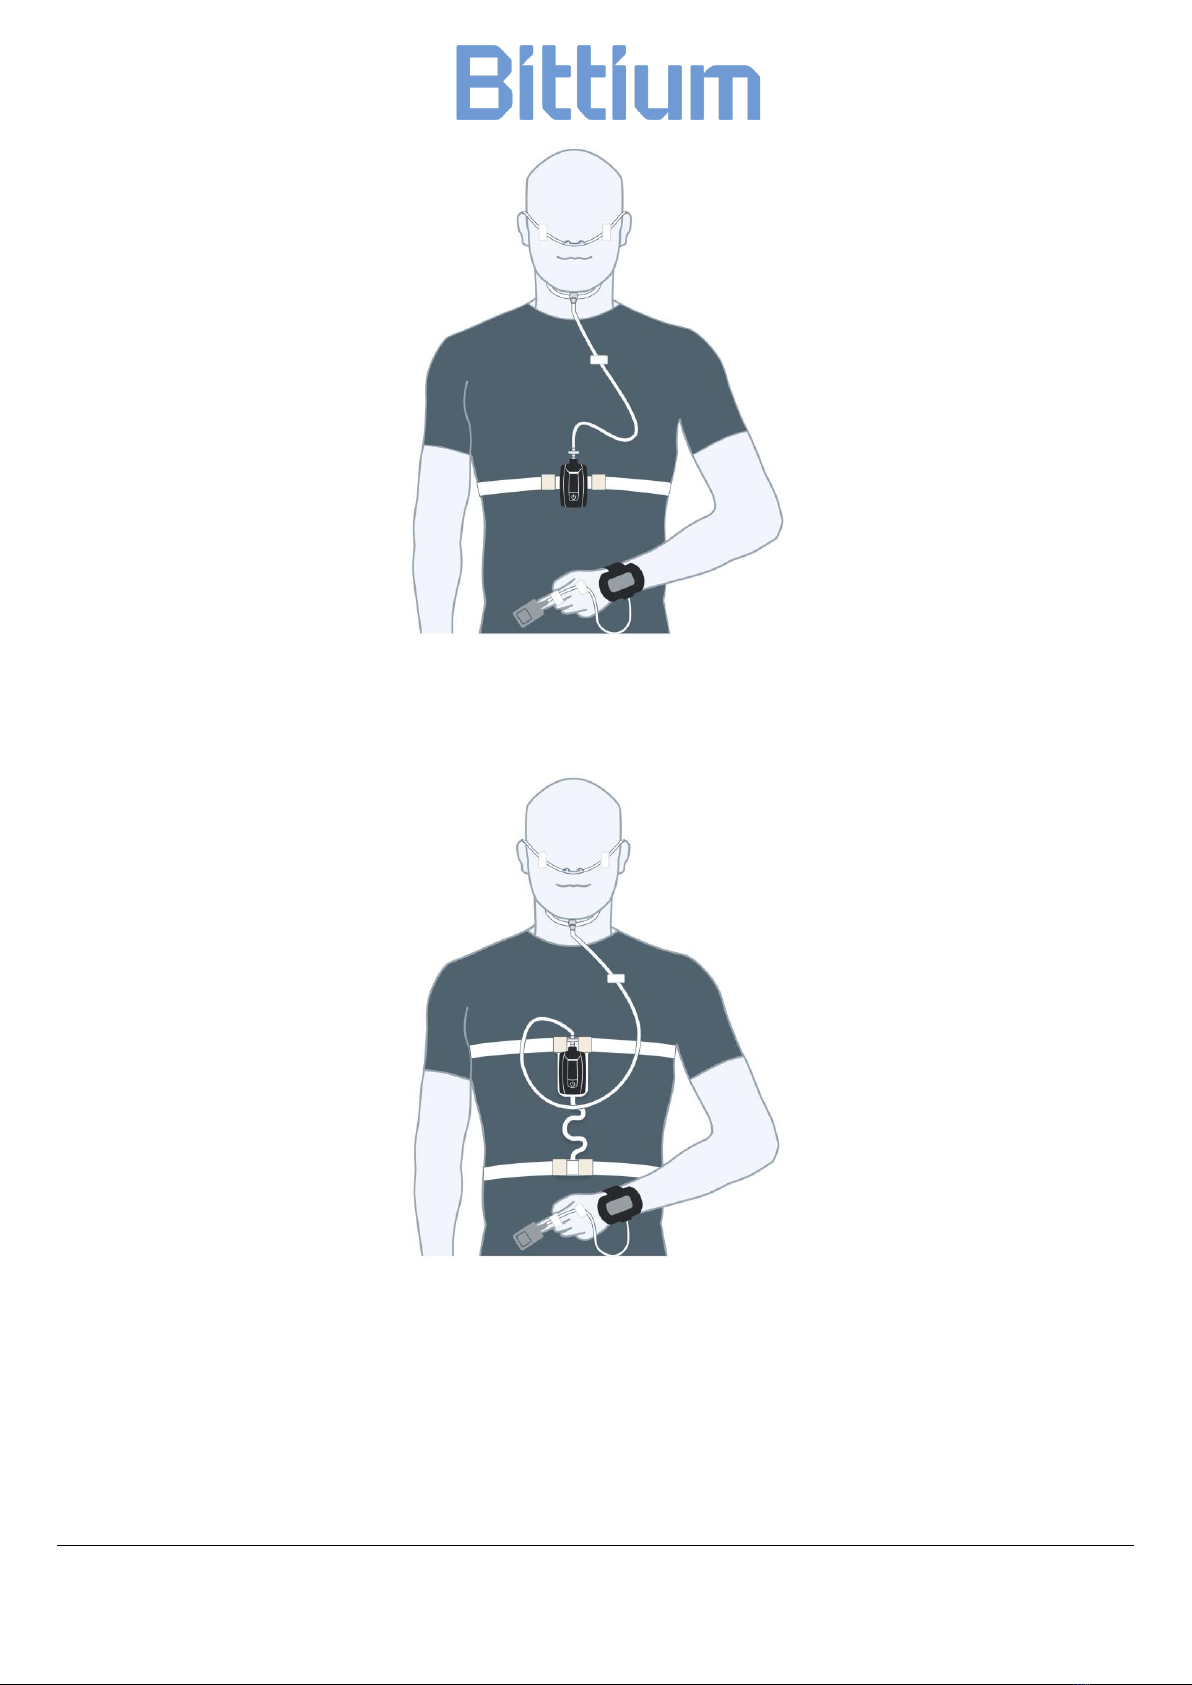
•2 RIP belts configuration with ECG (thoracic and abdominal application with
ECG electrode):

Respiro
14 (48)
Operating Instructions
© Bittium Biosignals 2022
Figure 6 2 RIP belts configuration with ECG
2.4 Equipment needed in recording
See Chapter 2.1.
2.5 Respiro indicator LEDs and power button functions
2.5.1 LED indications in idle state
Respiro LED indications in idle state are as shown in the figure below:
Figure 7 Respiro indicator LEDs in idle state
In this state there is no recording ongoing and the device is idle. This is the basic
state. If no activity occurs in 5 minutes Respiro will shut down. In that state Respi-
ro has no LED indications.
2.5.2 LED indicators during recording
Respiro LED indicators show recording status as described in Table 1 during re-
cording. For potential error situations refer to Chapter 4.
Respiro
15 (48)
Operating Instructions
© Bittium Biosignals 2022
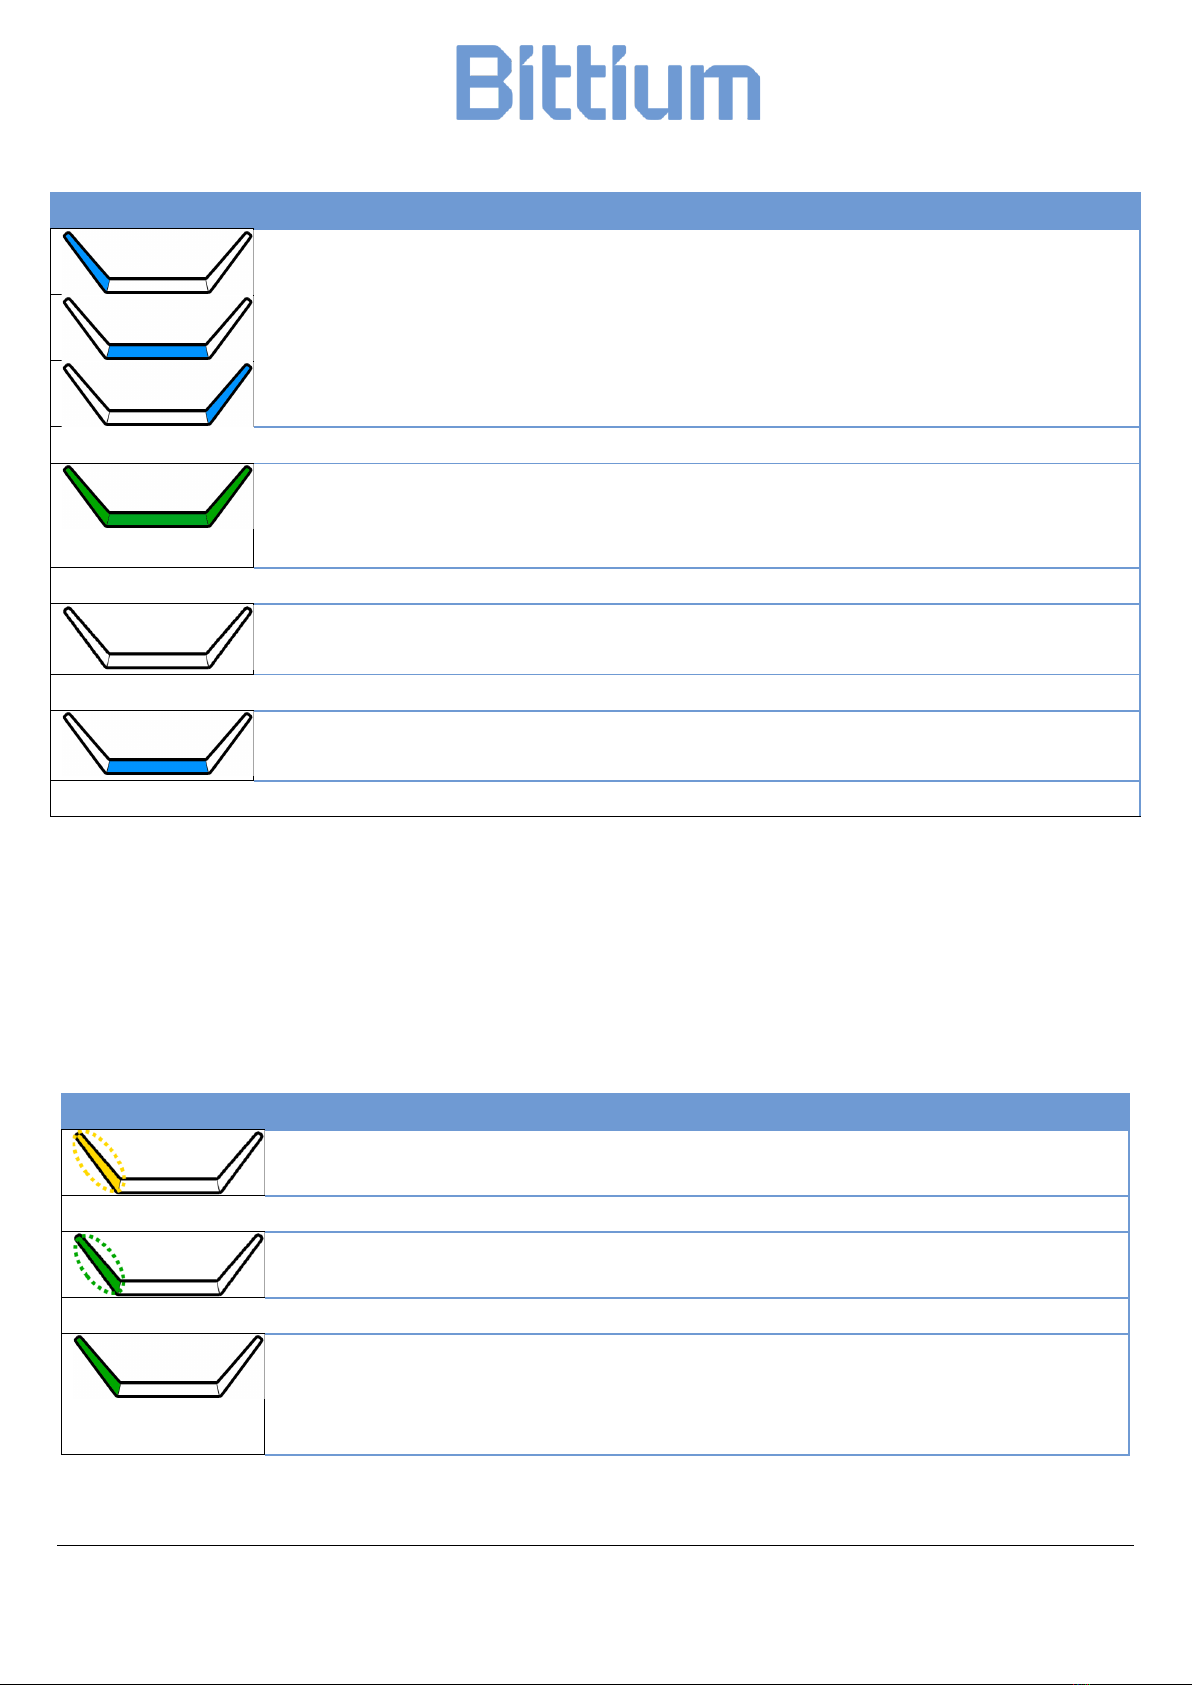
Table 2 LED indicators during recording
Color
Meaning
Cycling blue lights: Respiro vibrates once, recording start ongoing
When recording is ended, Respiro vibrates 3 times and the LEDs flash once.
Green LEDs on after recording start for 30 seconds: All sensors ok.
Indication is same if patient stands up during recording or if patient has first
entered a patient marker indication.
No LEDs on: Respiro in sleep mode, recording ongoing. Patient in supine
body position.
Middle LED blue for 3 seconds: Patient marker indication when power but-
ton is pressed once.
2.5.3 LED indicators while charging Respiro
Respiro LED indicators blink as described in Table 2 when Respiro is charged in its
charging dock.
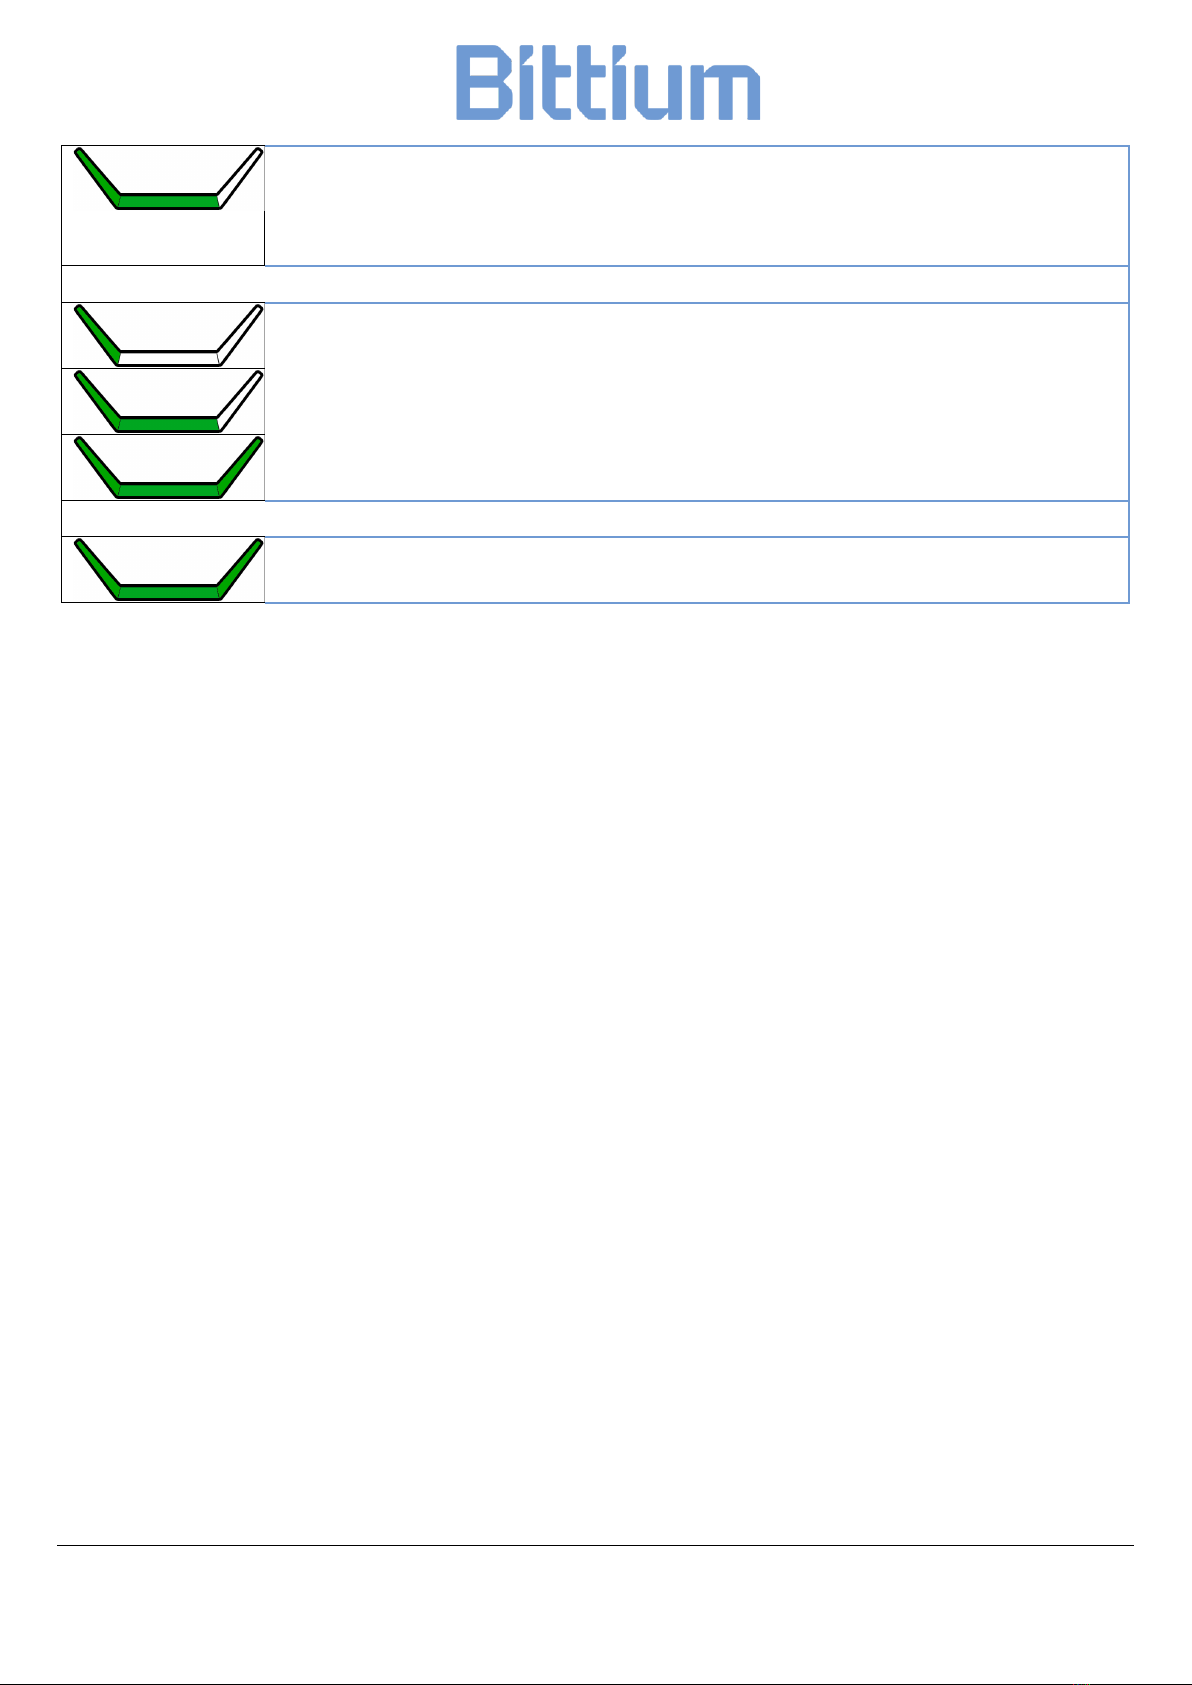
Table 3 LED indicators during charging
Color
Meaning
Leftmost LED blinking yellow: Battery charge 0-29 %.
Leftmost LED blinking green: Battery charge 30-49 %.
Two leftmost LEDs turn successively green, rightmost LED off: Battery
charge 50-89 %.
Respiro
16 (48)
Operating Instructions
© Bittium Biosignals 2022
All three LEDs turn successively green: Battery charge 90-94 %.
All LEDs static green: Battery charge 95-100 %.
2.5.4 Power button functions
Respiro device’s power button has the following functions:
•A press of approx. 3 seconds: Respiro power on.
•After power on a press of approx. 8 seconds after which Respiro vibrates
once: Recording start.
•A press of approx. 3 seconds during recording: Recording end. Respiro vi-
brates 3 times.
•Short press (<3 seconds): Patient event marker set indication during record-
ing.
•A press of approx. 12 seconds: Respiro device power off.
2.6 Before recording
Make sure that the Respiro device’s battery charge status is sufficient (at least two
green LEDs are blinking successively according to Table 2. Note! If scheduled
recording is used all three indicator LEDs must be blinking successively to ensure
sufficient battery charge for the recording) for the planned recording and that the
pulse oximeter’s batteries are good and have a sufficient charge. Change pulse ox-
imeter’s batteries if required, that is when there are two segments left in the bat-
tery symbol on pulse oximeter’s display.

Respiro
17 (48)
Operating Instructions
© Bittium Biosignals 2022
Figure 8 Battery charge symbol
Respiro battery life is approx. 20 hours of HSAT recording with the largest configu-
ration and Bluetooth® use. The pulse oximeter’s battery life is approx. 44 hours. It
is recommended that Respiro is charged after three recordings at the latest.
Note! If the recording type is 2 RIP belts configuration with ECG and it is neces-
sary to perform a recording for two nights, the patient must be instructed not to
remove the ECG electrode after the first night. The electrode can remain at-
tached also while having a shower, but the electrode’s stud connectors must be
carefully dried after the shower.
2.6.1 Charging Respiro
Set Respiro in the charging dock while making sure that the charging dock is con-
nected to the charger.
Note: Connect the charging dock to the charger’s USB port only. Do not connect
it anywhere else for charging.
Respiro device’s battery is at least 95 % full when all 3 indicator LEDs are green.
See chapter 2.5.3.
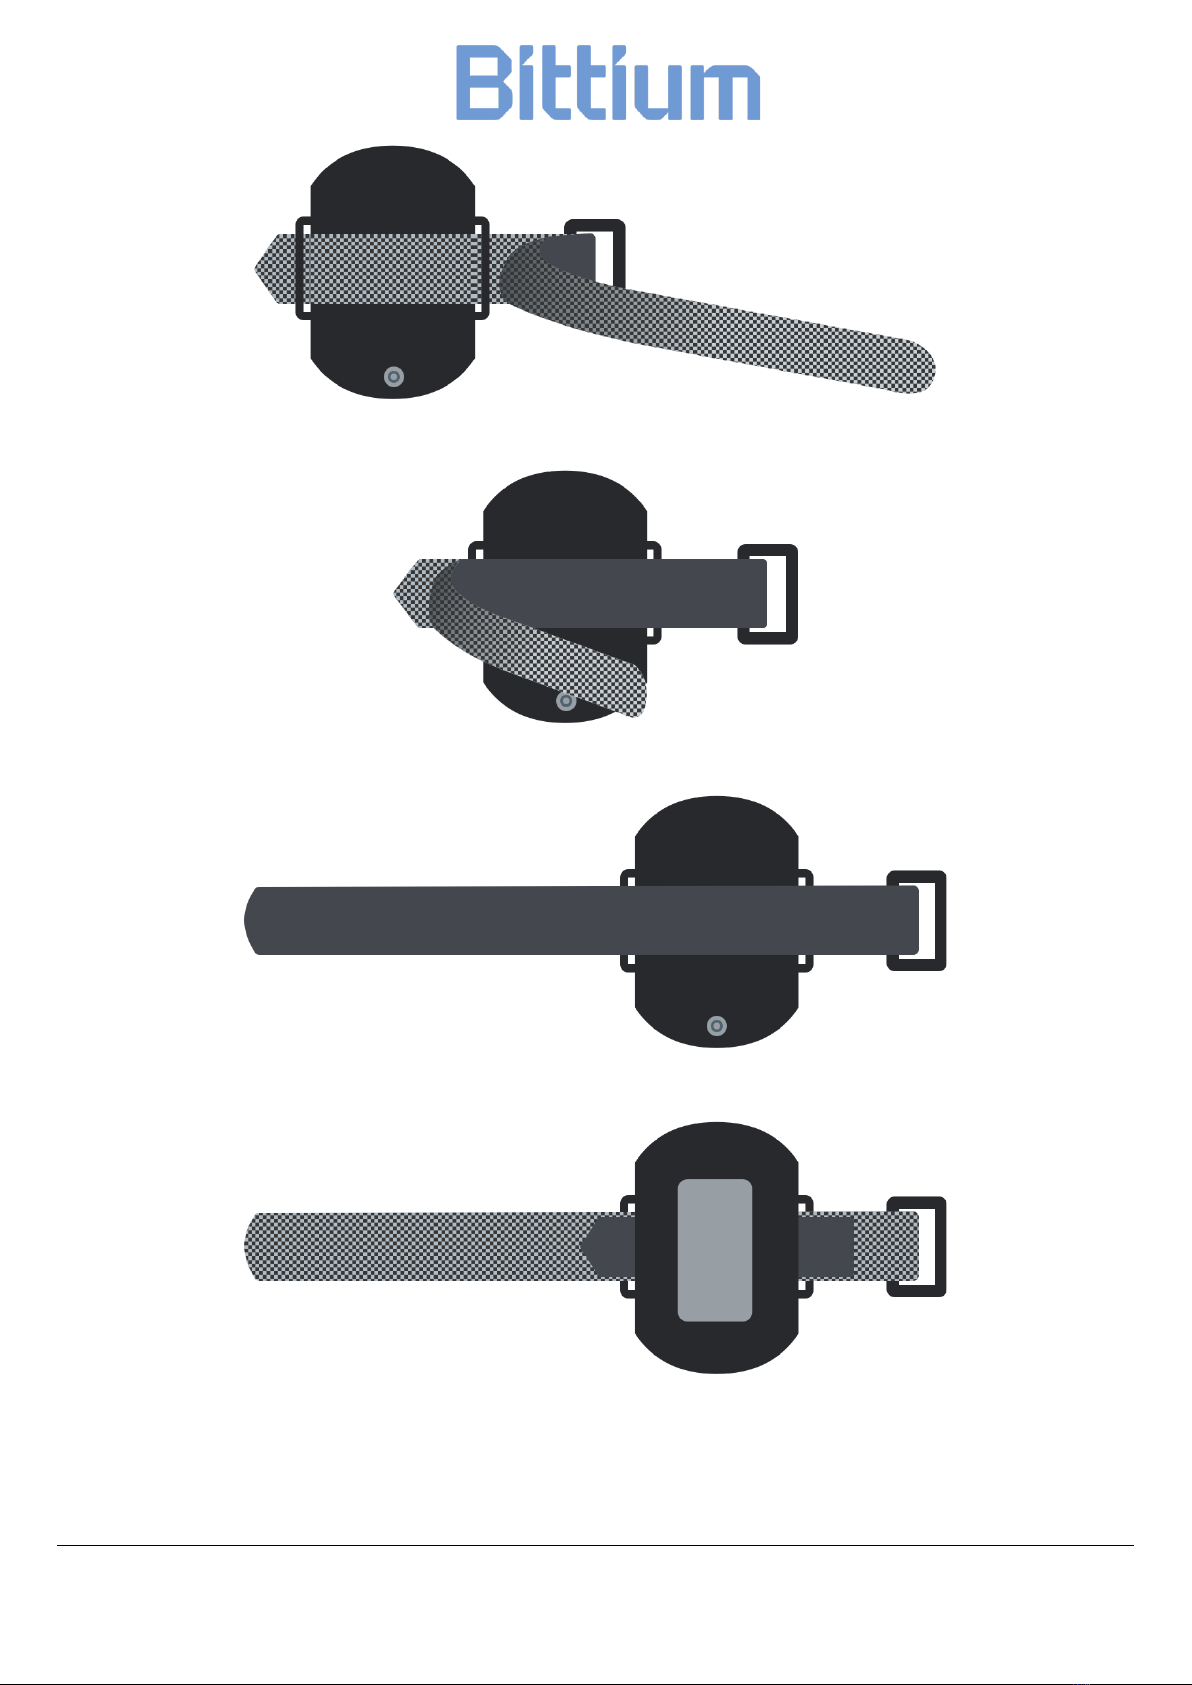
2.6.2 Attaching the pulse oximeter’s wristband
Attach the pulse oximeter’s wristband as shown in the images below.
Respiro
18 (48)
Operating Instructions
© Bittium Biosignals 2022
Figure 9 Threading the short part
Figure 10 Threading the long part
Figure 11 Attached wristband, back view
Figure 12 Attached wristband, front view

Respiro
19 (48)
Operating Instructions
© Bittium Biosignals 2022
2.6.3 Checking the device pairs
Note! Make sure that Respiro is not in the charger dock or connected to a com-
puter.
The carry case equipment (Respiro, pulse oximeter) is already connected together
by the manufacturer. It is possible to find out the device pairs following the in-
structions below.
Respiro and pulse oximeter:
1. Start the Respiro devices by pressing the power button approx. 3 seconds. All
3 indicator LEDs are blue.
2. Press the power button again approx. 8 seconds until Respiro vibrates once
and all 3 indicator LEDs are blinking blue.
3. After Respiro has activated the recording state all 3 indicator LEDs will be
blinking blue for few seconds. Then, after the pulse oximeter is started,
Respiro device’s left LED indicator will be green, if the finger is inserted in the
sensor and yellow if it is not. Respiro is not connected to the pulse oximeter
in question if the left LED indicator is red.
4. Attach the sensor to the pulse oximeter first and then insert your finger in it.
Alternatively, you can press the pulse oximeter’s power button with your
fingernail to start it. Finger does not need to be inserted in this case.

Respiro
20 (48)
Operating Instructions
© Bittium Biosignals 2022
Figure 13 Pulse oximeter power button
5. Switch off the Respiro device by pressing the power button. Press the power
button for approx. 3 seconds to stop the activated recording state.
Note. It is not necessary to switch off the pulse oximeter separately from its
power button. It switches off automatically when the finger is removed from
the sensor.
You can also find out the device pairs via Respiro Device Manager by comparing
the serial number information in Respiro Device Manager with that shown on the
pulse oximeter. See 2.6.4 below.
2.6.4 Connecting Respiro and the pulse oximeter
Follow these instructions if you need to connect Respiro and the pulse oximeter
again due to eg. a device failure:
1. Connect the Respiro device’s charging dock to a computer with the USB ca-
ble.
2. Set Respiro in the charging dock. Respiro indicator LEDs will be blue for a
moment until the charging cycle begins and the LEDs blink green cycling from
left to right.
3. Start Respiro Device Manager application via Windows File Explorer by dou-
ble-clicking first the Respiro device icon (Note that it is also possible to copy
Table of contents
Other Bittium Medical Equipment manuals

Bittium
Bittium MiniSnap Sensitive 1-CH ECG Electrode User manual

Bittium
Bittium HSAT User manual

Bittium
Bittium OmegaSnap User manual

Bittium
Bittium NeurOne User manual

Bittium
Bittium OmegaSnap 3-CH ECG Electrode User manual

Bittium
Bittium OmegaSnap 2-CH ECG User manual

Bittium
Bittium OmegaSnap 1-CH ECG Electrode User manual
Popular Medical Equipment manuals by other brands

Leica
Leica CM1950 Instructions for use

Hamamatsu Photonics
Hamamatsu Photonics C10819 Series instruction manual

Leica
Leica M501 user manual

Tecno-gaz
Tecno-gaz SLIM Instruction manual for use and installation

BRASSELER USA
BRASSELER USA Carbide burs Instructions for use

SmartLine Medical
SmartLine Medical SmartLift UNIVATOR user manual


