Blackline Safety G7 EXO User manual

Field Test Guide
BEFORE UNBOXING
Call the EXO Project Coordinator at +1-825-258-5059


Overview
Thank you for participating in the G7 EXO testing program. Your testing period with EXO
will last eight business days and is mostly self-managed. The Project Coordinator will
contact you at the beginning, halfway through, and at the end of your testing period to
conduct surveys and answer questions.
Can I congure G7 EXO?
During your testing period, EXO will be set up with a default conguration prole. You will
not be able to make changes to the conguration prole.
I’m ready to unbox G7 EXO
Unboxing EXO will occur in your testing facility the day before your testing period begins.
The EXO Project Coordinator needs to be a part of the unboxing process. If you have not
contacted them already, call +1-825-258-5059 before doing anything else with
your device.
What do I do with G7 EXO at the end of my testing period?
Once your testing period is nished, EXO must be shipped to your Regional Sales Manager
using the same packaging it arrived in. Use the prepaid shipping label provided in the EXO
box to cover the cost of shipping. See Test Case 02 for further instructions.
TEST PROGRAM OVERVIEW
SAFETY WARNING
This device is still in development. Do not use EXO in hazardous
environments. EXO is not monitored by the Blackline Safety Operation
Center. Always use G7 wearables to ensure your safety.

Test cases
To help you get the most from this experience, we’ve created a series of cases for you to
work through and test. This Field Test Guide will take an hour to complete and should be
done within the rst four days of your testing period.
Notes
Please take your time to go through the steps of each case and record your feedback —
positive or critical — in the notes sections. The EXO Project Coordinator will contact you to
conduct a mid-point survey and a post survey. Your notes will be helpful reminders of your
experiences with EXO.
Questions?
If you have any questions, need help troubleshooting your device or would like to
pass on feedback prior to a survey, please contact the Project Coordinator at
+1-825-258-5059.
TESTING INSTRUCTIONS

01. UNBOXING AND HARDWARE
............................................................................................................................................................................ 04
02. TRANSPORT EXO
............................................................................................................................................................................ 08
03. POWER ON AND OFF
............................................................................................................................................................................ 10
04. INTERACTING WITH EXO
............................................................................................................................................................................ 12
05. GAS READINGS
............................................................................................................................................................................ 14
06. BUMP TEST
............................................................................................................................................................................ 16
07. CALIBRATION
............................................................................................................................................................................ 18
08. SOS LATCH
............................................................................................................................................................................ 20
09. MESSAGES AND TWOWAY CALLS
............................................................................................................................................................................ 22
10. CHARGE BATTERY PACK
............................................................................................................................................................................ 24
11. REPLACE GAS CARTRIDGE
............................................................................................................................................................................ 26
TEST CASES

04 || G7 EXO TEST PROGRAM
TEST CASE 01
UNBOXING AND HARDWARE
You should have received the following components:
G7 EXO safety monitoring device
Field Test Guide
Pre-installed battery pack
Pre-installed Multi-gas Cartridge (H2S, CO, CH4, O2)
Hex key #5 (to remove battery pack)
Hex key #2.5 (to access gas cartridge)
Bump test and calibration tubing
Battery charger
Return shipping sticker
NOTE: Please keep all of the original packaging.
Use the following images to familiarize yourself with EXO.

G7 EXO TEST PROGRAM || 05
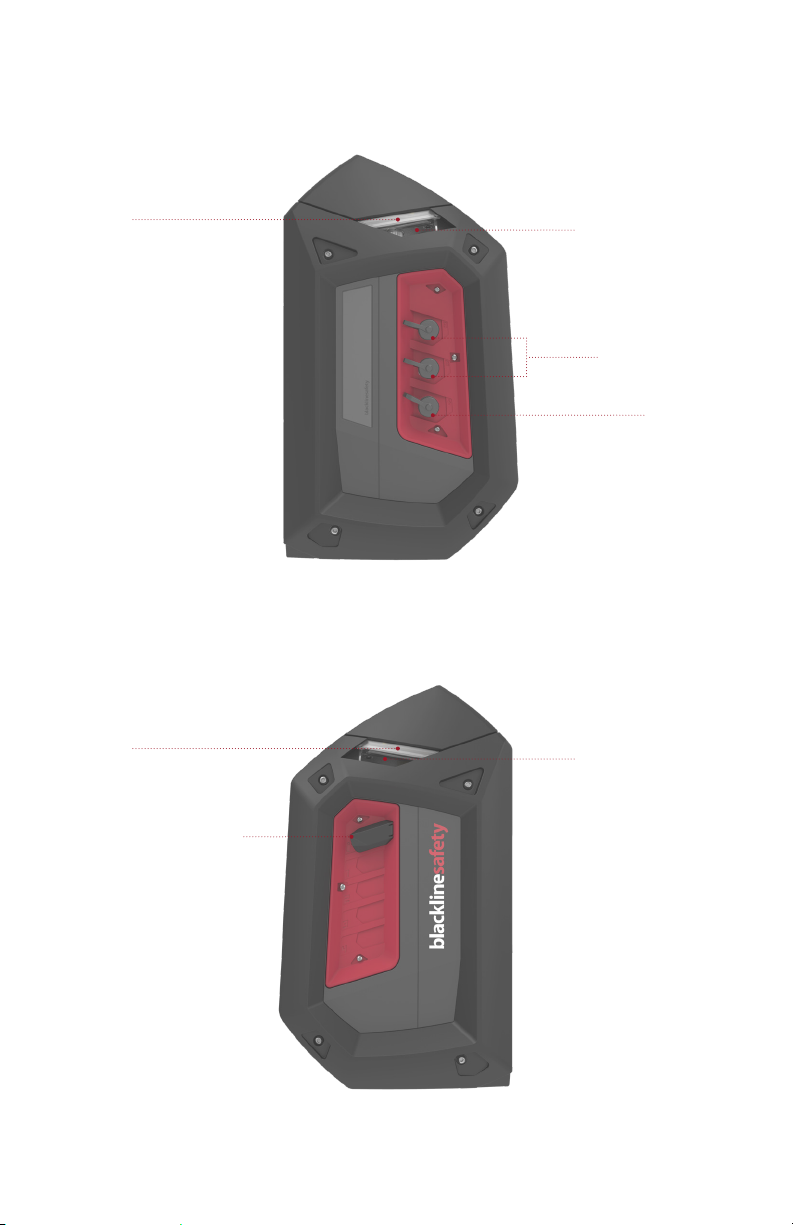
FRONT
BACK
Warning Alarms
Cartridge cover
360° air diusion vents
Alerts
LiveResponse light
Top light
Connectivity light
Top light 360° air diusion vent
Power button
Microphone
OK button
OK
Up button
LCD screen
Battery pack
Speaker
SOS Latch pull
Down button
06 || G7 EXO TEST PROGRAM
RIGHT SIDE ELECTRICAL PORTS
LEFT SIDE GAS INLETS
Top light
Bump test/calibration inlet
A/B interface ports
Power port
360° air diusion vent
360° air diusion vent
Top light
G7 EXO TEST PROGRAM || 07
Notes
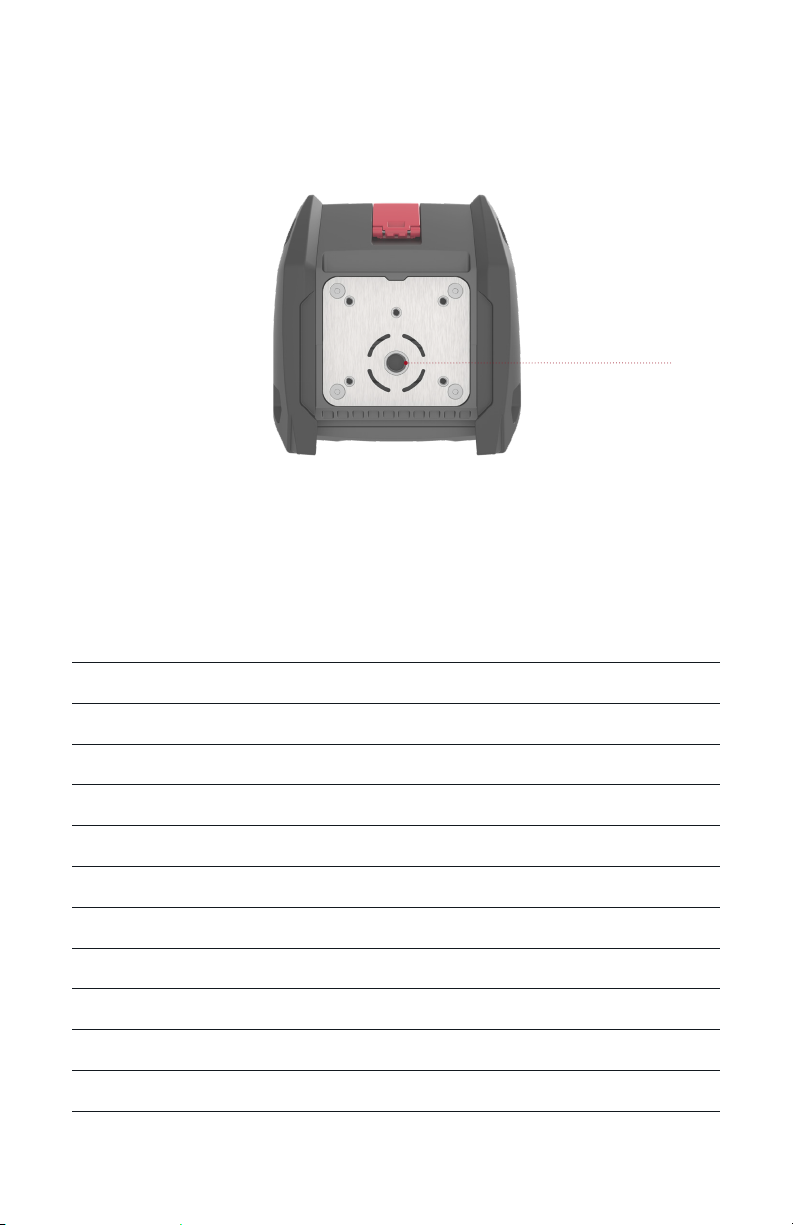
BOTTOM
Mount

08 || G7 EXO TEST PROGRAM
Within the worksite
Use the handle at the top of EXO to lift and move EXO within your worksite.
Between worksites
When shipping EXO to a new site, use the original packaging. This will help to ensure all
the items included in the EXO Field Test stay together.
Shipping
When shipping EXO in the mail, use the original packaging.
To package G7 EXO for shipping,
1. Power EXO o
2. Take EXO to a safe environment with a clean atmosphere
3. Ensure the battery pack and the calibration cover are securely attached to EXO
4. In the original shipping box place:
• G7 EXO in original bag with its front facing up
• Battery charger in original box or packaging
• 2 hex keys in accessories box
• Bump and calibration tubing in accessories box
• Any unused Field Test Guides
5. Fill empty areas in box with bubble wrap
6. Ensure all of the necessary dangerous goods labels are on the shipping box
TEST CASE 02
TRANSPORT EXO

G7 EXO TEST PROGRAM || 09
Notes

10 || G7 EXO TEST PROGRAM
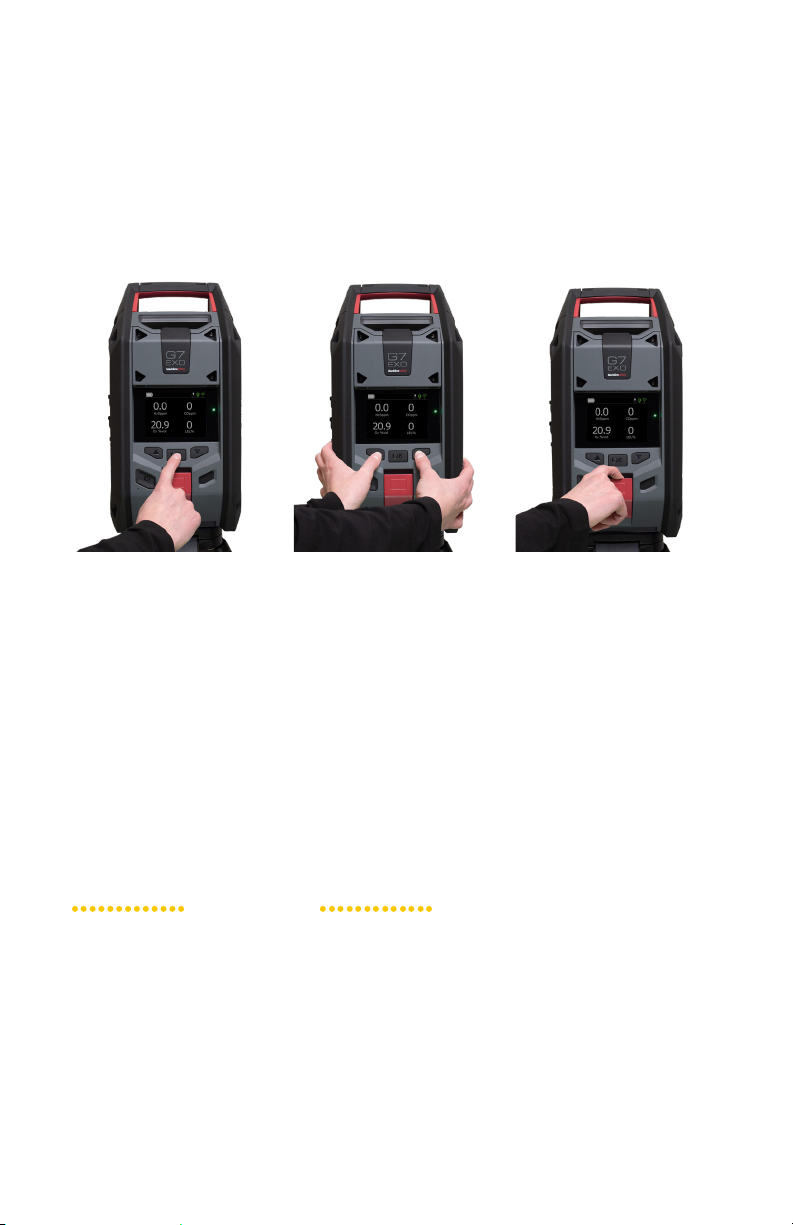
To power on G7 EXO,
1. Press and hold the power button for two seconds
• At the end of two seconds EXO will sound a chime, signaling it is powering on
• Lights will ash
• EXO will go through its startup sequence and the screen will display the active
features on EXO
• When connected to the Blackline Safety Network, the green connectivity light
will remain solid
To power o G7 EXO,
2. Press and hold the power button for three seconds
• EXO will show a three second countdown as you hold the power button. Every
second will have a corresponding beep and ash.
• At the end of the three seconds EXO will sound a chime signaling it is
powering o
• The screen will go into shutdown sequence
• Once all the lights and sounds have stopped, EXO will be powered o and
disconnected from the Blackline Safety Network
If you see a Ostabilizing message on G7 EXO’s screen, wait 20 minutes for the O
sensor to stabilize. EXO will continue to monitor during this process. An SOS latch pull
or dangerous gas levels will override this screen. If the error persists, please contact the
Project Coordinator.
The green light
G7 EXO’s green connectivity light has two states:
A blinking connectivity light indicates that your EXO is trying to connect to the Blackline
Safety Network.
A solid connectivity light indicates that EXO is connected to the Blackline
Safety Network.
Flashing
Solid
TEST CASE 03
POWER ON AND OFF

G7 EXO TEST PROGRAM || 11
Notes
12 || G7 EXO TEST PROGRAM
YELLOW WARNING ALARM
This alarm is triggered by incoming messages, an incoming two-way call, a low
battery warning, an overdue bump test, an overdue calibration, the low gas threshold
being reached or by other active features on EXO.
In the case of a yellow warning alarm, read the information on your EXO screen. Press
and hold the up and down buttons at the same time to acknowledge and mute the
alarm.
BUTTONS
Be sure EXO is stable when pressing buttons. G7 EXO works similarly to a G7 safety
wearable device.
OK button
Press the OK button to
enter the main menu on
the LCD screen.
Press the OK button to
conrm a menu selection.
Up and down buttons
Use the up and down
buttons to navigate the
menu.
Press and hold both
simultaneously to
acknowledge and mute a
yellow warning alarm or a
red alert.
SOS latch pull
Pull the SOS latch to call
for help when emergency
assistance is required.
Rapid Blinking
TEST CASE 04
INTERACT WITH EXO

G7 EXO TEST PROGRAM || 13
Notes
RED ALERT
This alert is triggered by pulling the SOS latch, if TWA, STEL or high gas thresholds
are reached, or if gas levels are higher than the sensors can detect. When a red alert is
triggered, a notication will immediately be sent to the Blackline Safety Network. During
Test Cases 9 and 10 the Project Coordinator will be acting as your monitoring personnel.
Rapid Blinking
EXO is NOT monitored by the Blackline Safety Operation Center during
your testing period. Always use G7 wearables to ensure your safety.
In the case of a red alert, immediately follow your safety protocol and evacuate
the area.
If you intentionally trigger a red alert as part of this testing program, read the
information on your EXO screen. Press and hold the up and down buttons at the same
time to acknowledge and mute the alert.
14 || G7 EXO TEST PROGRAM
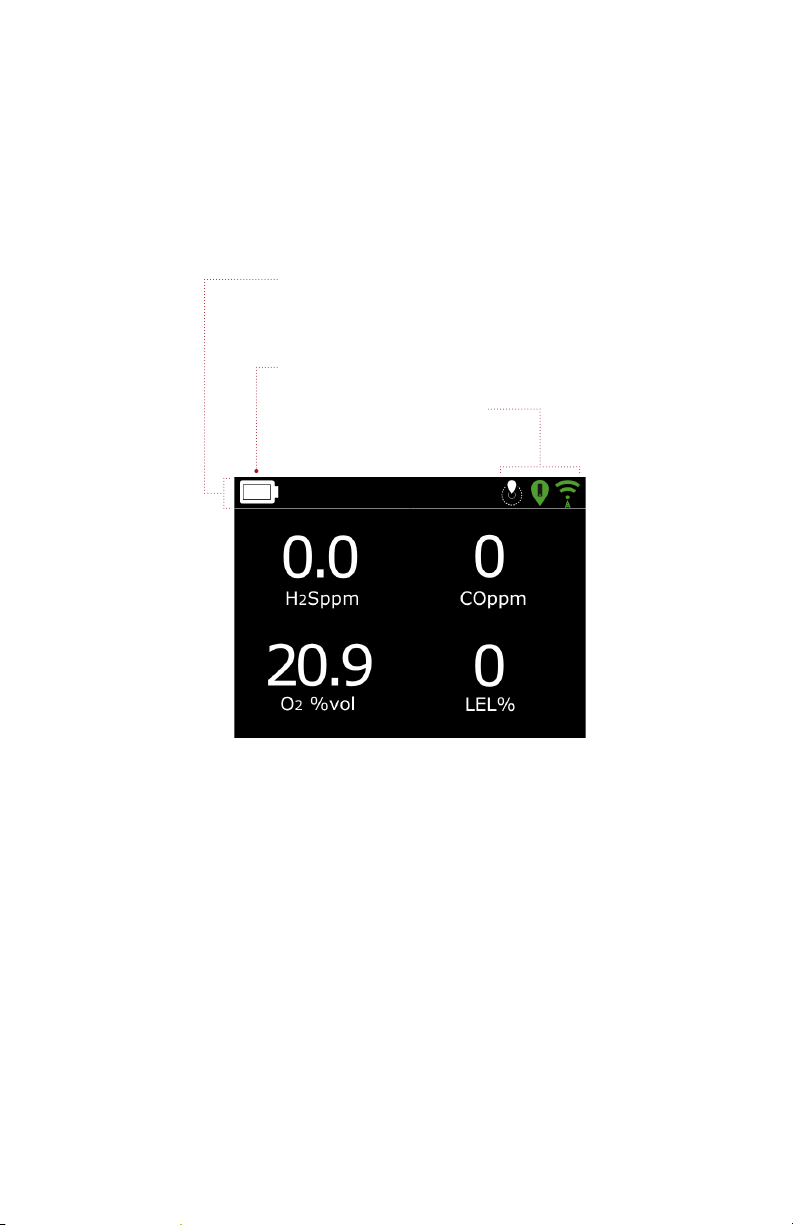
The main screen is the gas status screen. G7 EXO will be preinstalled with a standard
quad gas cartridge (HS, LEL, CO, O). The four gas readings will be displayed.
TEST CASE 05
GAS READINGS
The banner is where you will
nd more information about
yellow alarms and red alerts
Battery life
Feature and status icons

G7 EXO TEST PROGRAM || 15
Notes

16 || G7 EXO TEST PROGRAM
You will need:
Multi-gas Cylinder (H2S, CO, CH4, O2)
0.5 LPM xed ow regulator attached to the cylinder
Tubing tted with a quick connect (shipped with EXO)
To start bump test,
1. Ensure G7 EXO is in clean air
2. Press the OK button to enter the main menu
3. Select Gas options
4. Select Bump test
5. You will see a screen that says,“Continue with bump test?”select Yes
Bump test process
6. EXO will perform an automatic audio/visual assessment
7. A screen will prompt you to start the bump test. Ensure all four gases are checked.
8. Select Start bump
9. EXO will begin to count down from 60 seconds. Within this time window:
• Attach tubing tted with a quick connect to EXO’s calibration inlet
• Ensure the other end of the tubing is attached to the xed ow regulator on the
gas cylinder
• Turn the gas regulator on to apply the gas, keep gas owing
10. Turn the gas regulator o when prompted by EXO
11. Press the OK button to complete the bump test
12. EXO will inform you if the bump test has passed or failed and when your next bump
test is due
13. Remove the tubing from the calibration inlet and let your EXO sit until the gas
readings stabilize (this may take a few minutes)
If you see a bump test fail message on G7 EXO’s screen,
Let EXO sit until its gas readings stabilize
Check the gas and gas connections
Try the bump test again
If the bump test continues to fail, please contact the Project Coordinator
TEST CASE 06
BUMP TEST

G7 EXO TEST PROGRAM || 17
Notes

18 || G7 EXO TEST PROGRAM
You will need:
Multi-gas cylinder (H2S, CO, CH4, O2)
0.5 LPM xed ow regulator attached to the cylinder
Tubing tted with a quick connect (shipped with EXO)
To start calibration,
1. Ensure G7 EXO is in clean air
2. Press the OK button to enter the main menu
3. Select Gas options
4. Select Calibration
5. You will see a screen that says,“Continue with calibration?” select Yes
Calibration process
6. EXO will perform an automatic audio/visual assessment
7. A screen will prompt you to zero the sensors. Ensure all four gases are checked.
8. Select Start zeroing
9. A screen will prompt you to select a gas mix. Ensure all four gases are checked.
10. Select Start span
11. EXO will begin to count down from 60 seconds. Within this time window:
• Attach tubing tted with a quick connect to EXO’s calibration inlet
• Ensure the other end of the tubing is attached to the xed ow regulator on the
gas cylinder
• Turn on the gas regulator and apply the gas (keep gas owing)
12. Turn gas o when prompted on your EXO screen
13. Press the OK button to complete the calibration
14. EXO will let you know if the calibration has passed or failed and when the next
calibration is due
15. Remove the tubing from the calibration inlet and let your EXO sit until the gas
readings stabilize
If you see a calibration fail message on G7 EXO’s screen,
Let EXO sit until its gas readings stabilize
Check the gas and gas connections
Try the calibration again
If the calibration continues to fail, please contact the Project Coordinator
TEST CASE 07
CALIBRATION
Other manuals for G7 EXO
4
Table of contents
Other Blackline Safety Gas Detector manuals

Blackline Safety
Blackline Safety G7 BRIDGE User manual

Blackline Safety
Blackline Safety G6 User manual

Blackline Safety
Blackline Safety G6 User manual

Blackline Safety
Blackline Safety G7 BRIDGE User manual

Blackline Safety
Blackline Safety G7 BRIDGE User manual

Blackline Safety
Blackline Safety G7 BRIDGE User manual
Popular Gas Detector manuals by other brands

Tecnocontrol
Tecnocontrol SE126K user manual

brennenstuhl
brennenstuhl BCN 1221 Directions for use

sewerin
sewerin Snooper Mini operating instructions

heimgard
heimgard Combustible Gas Detector quick start guide

mPower Electronics
mPower Electronics POLI MP400 quick start guide

Eagle Eye
Eagle Eye VS-24 instruction manual


