Blu STUDIO 5.0 HD LTE User manual

1
STUDIO 5.0 HD LTE
USER MANUAL

2
Table of Contents
Safety Information................................................................................... 3
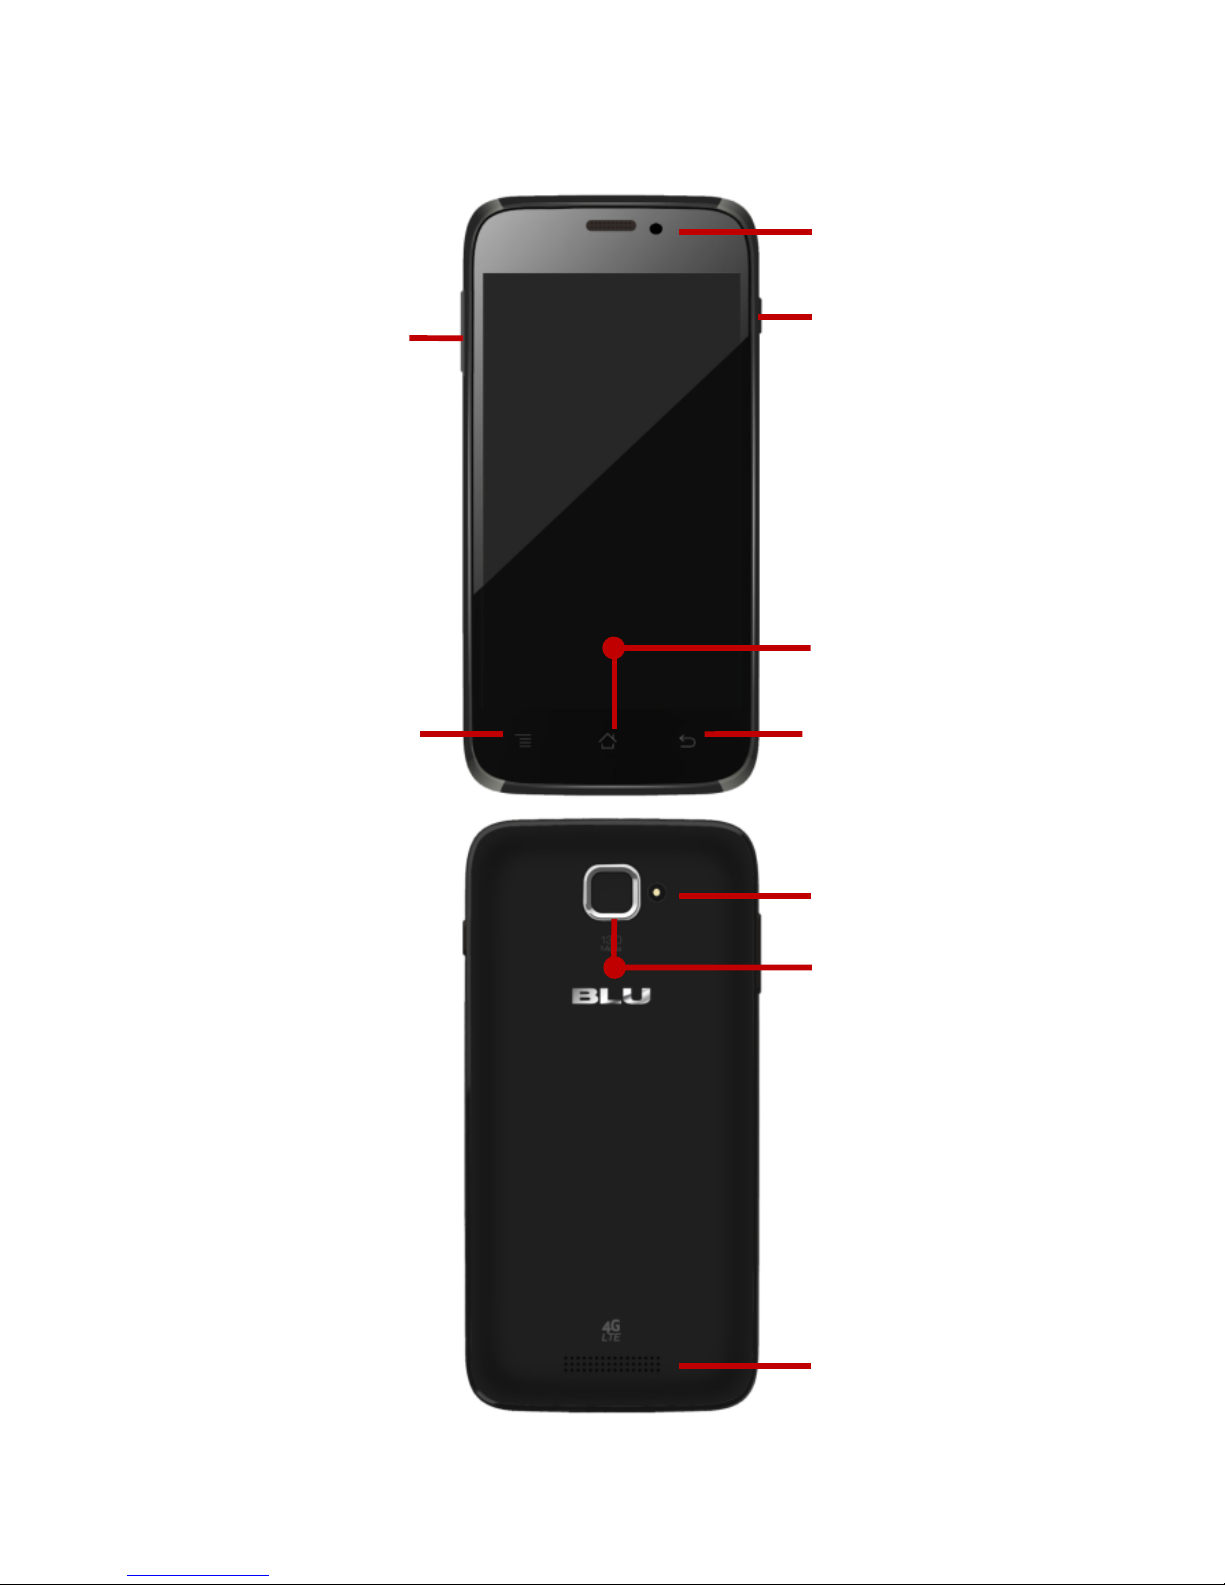
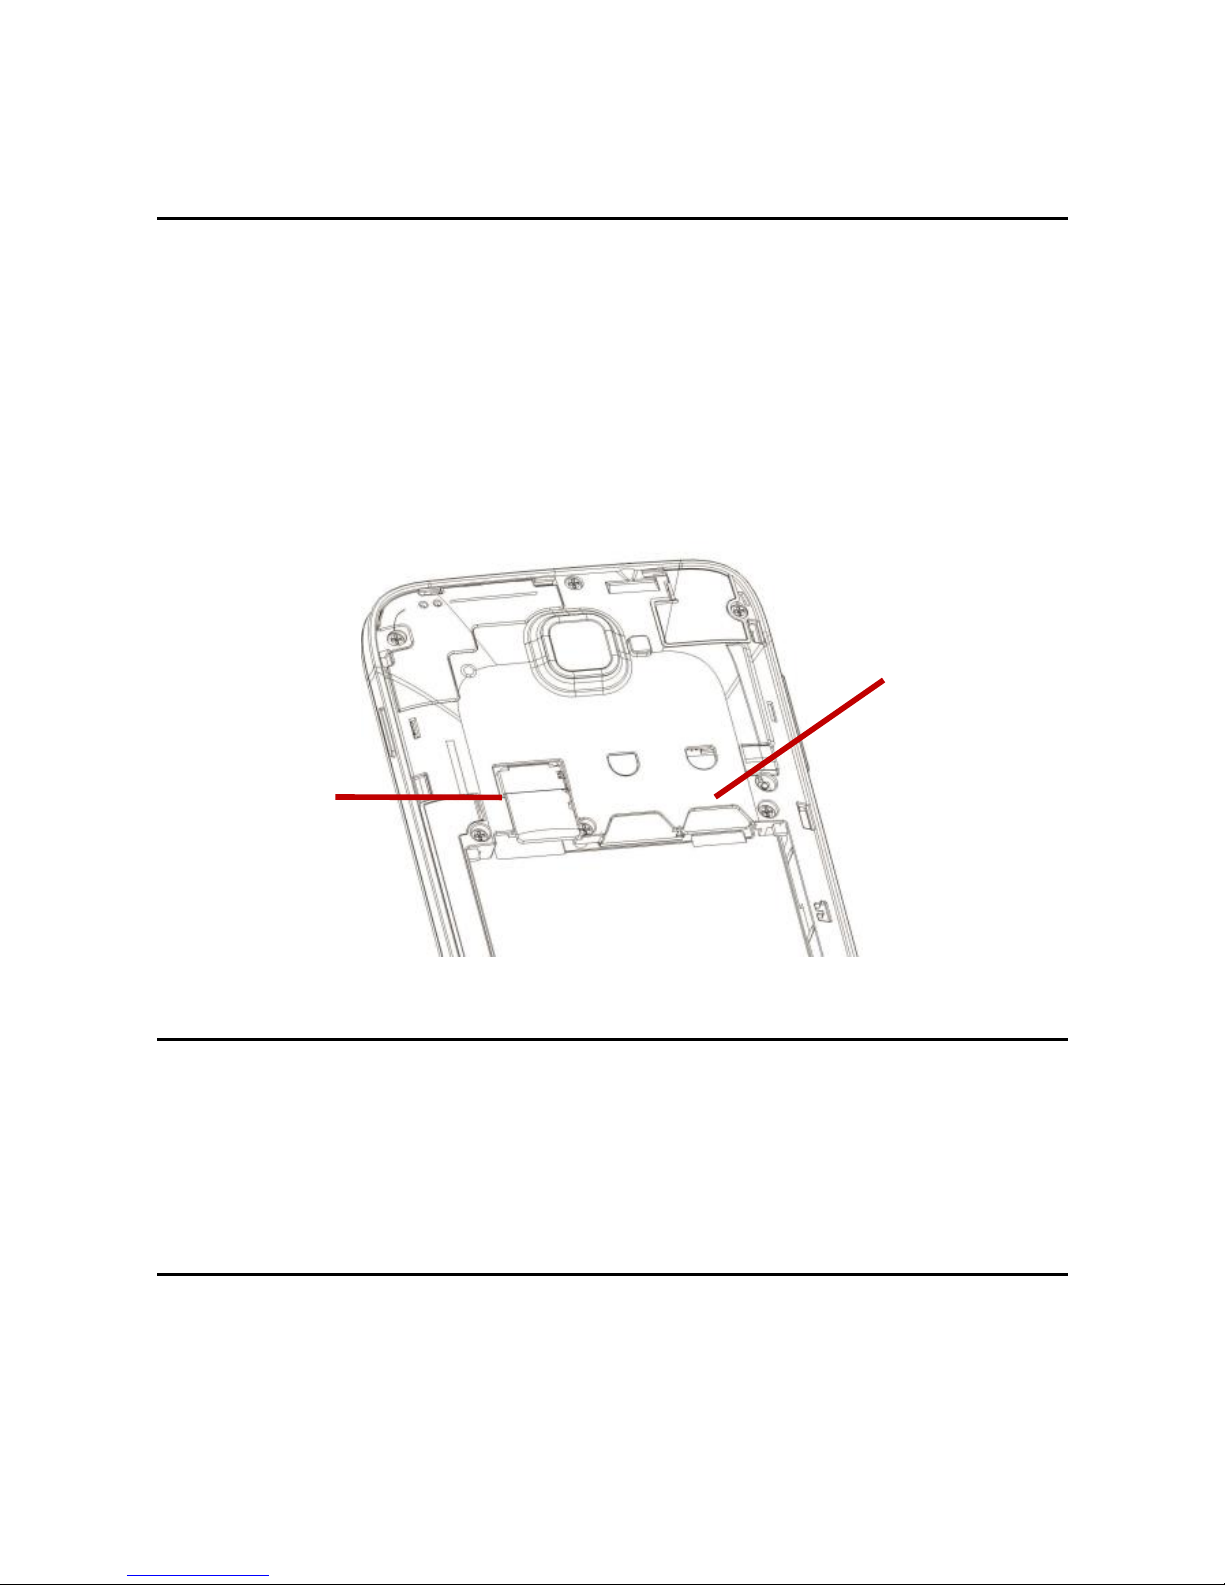
Appearance and Key Function.............................................................. 5
Introduction.............................................................................................. 6
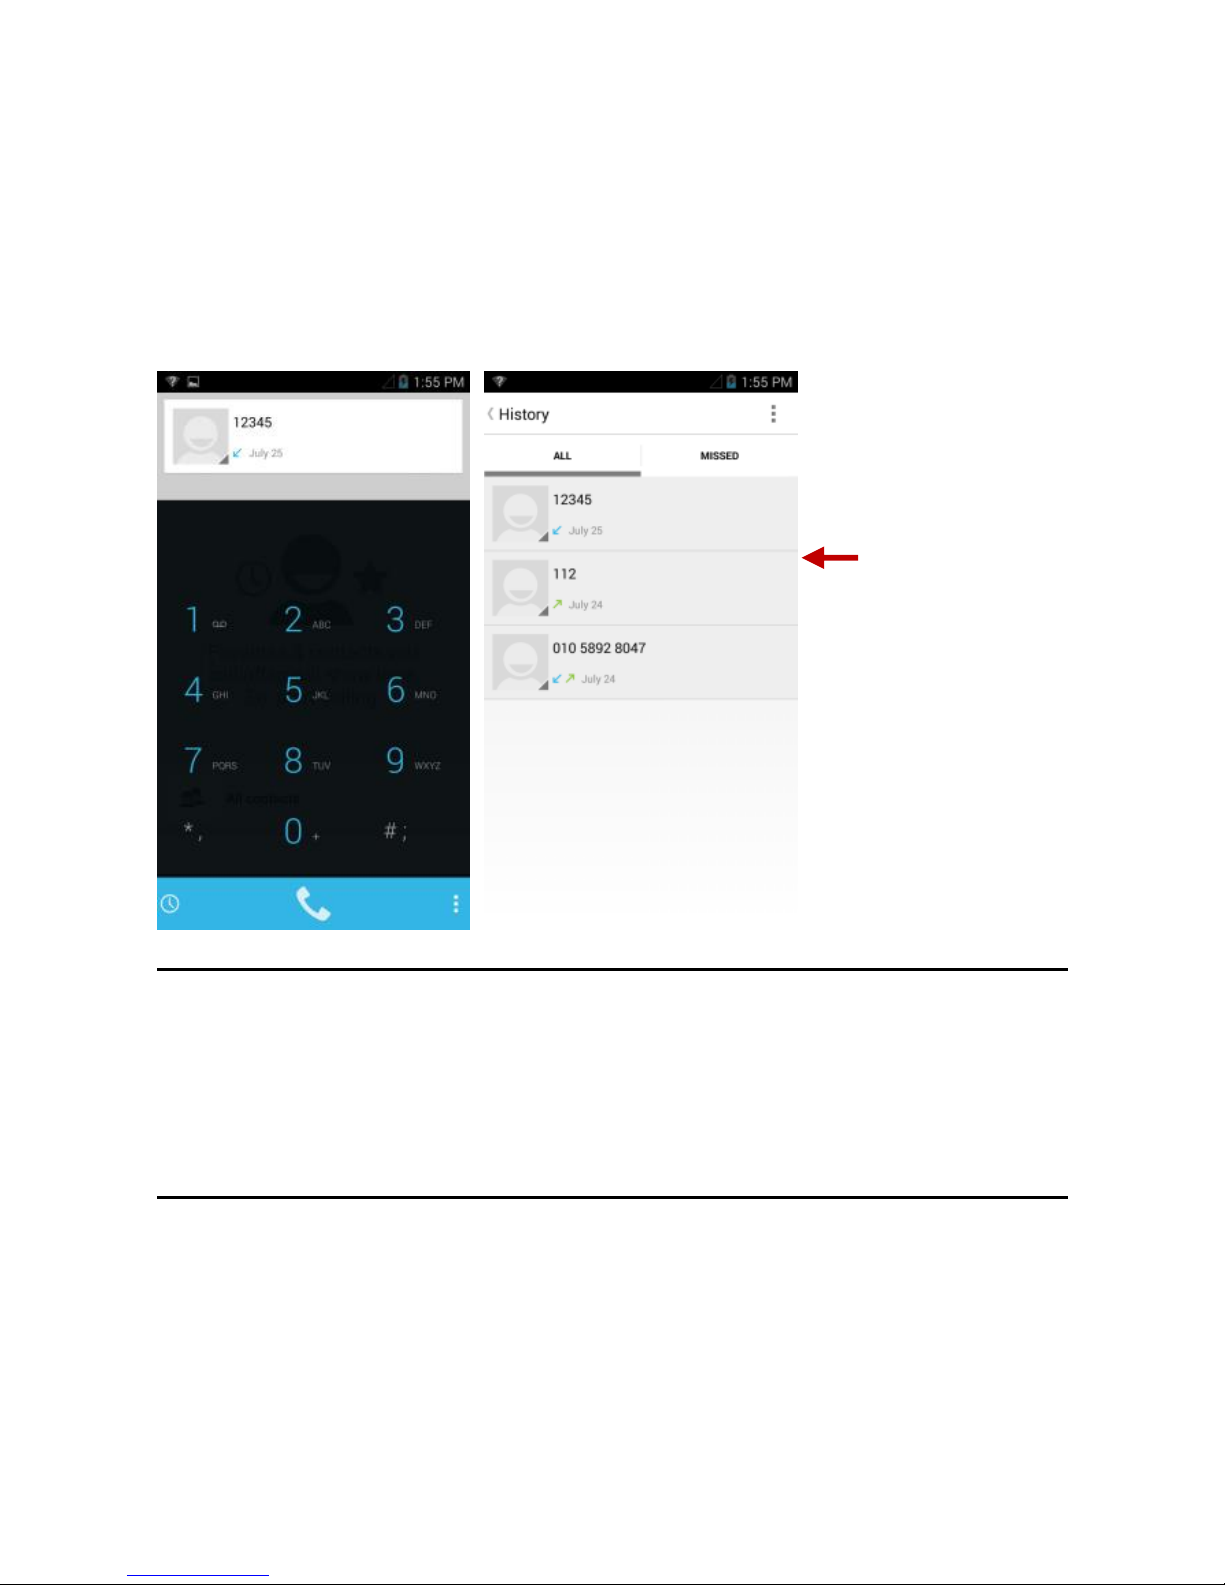
Call Functions.......................................................................................... 7
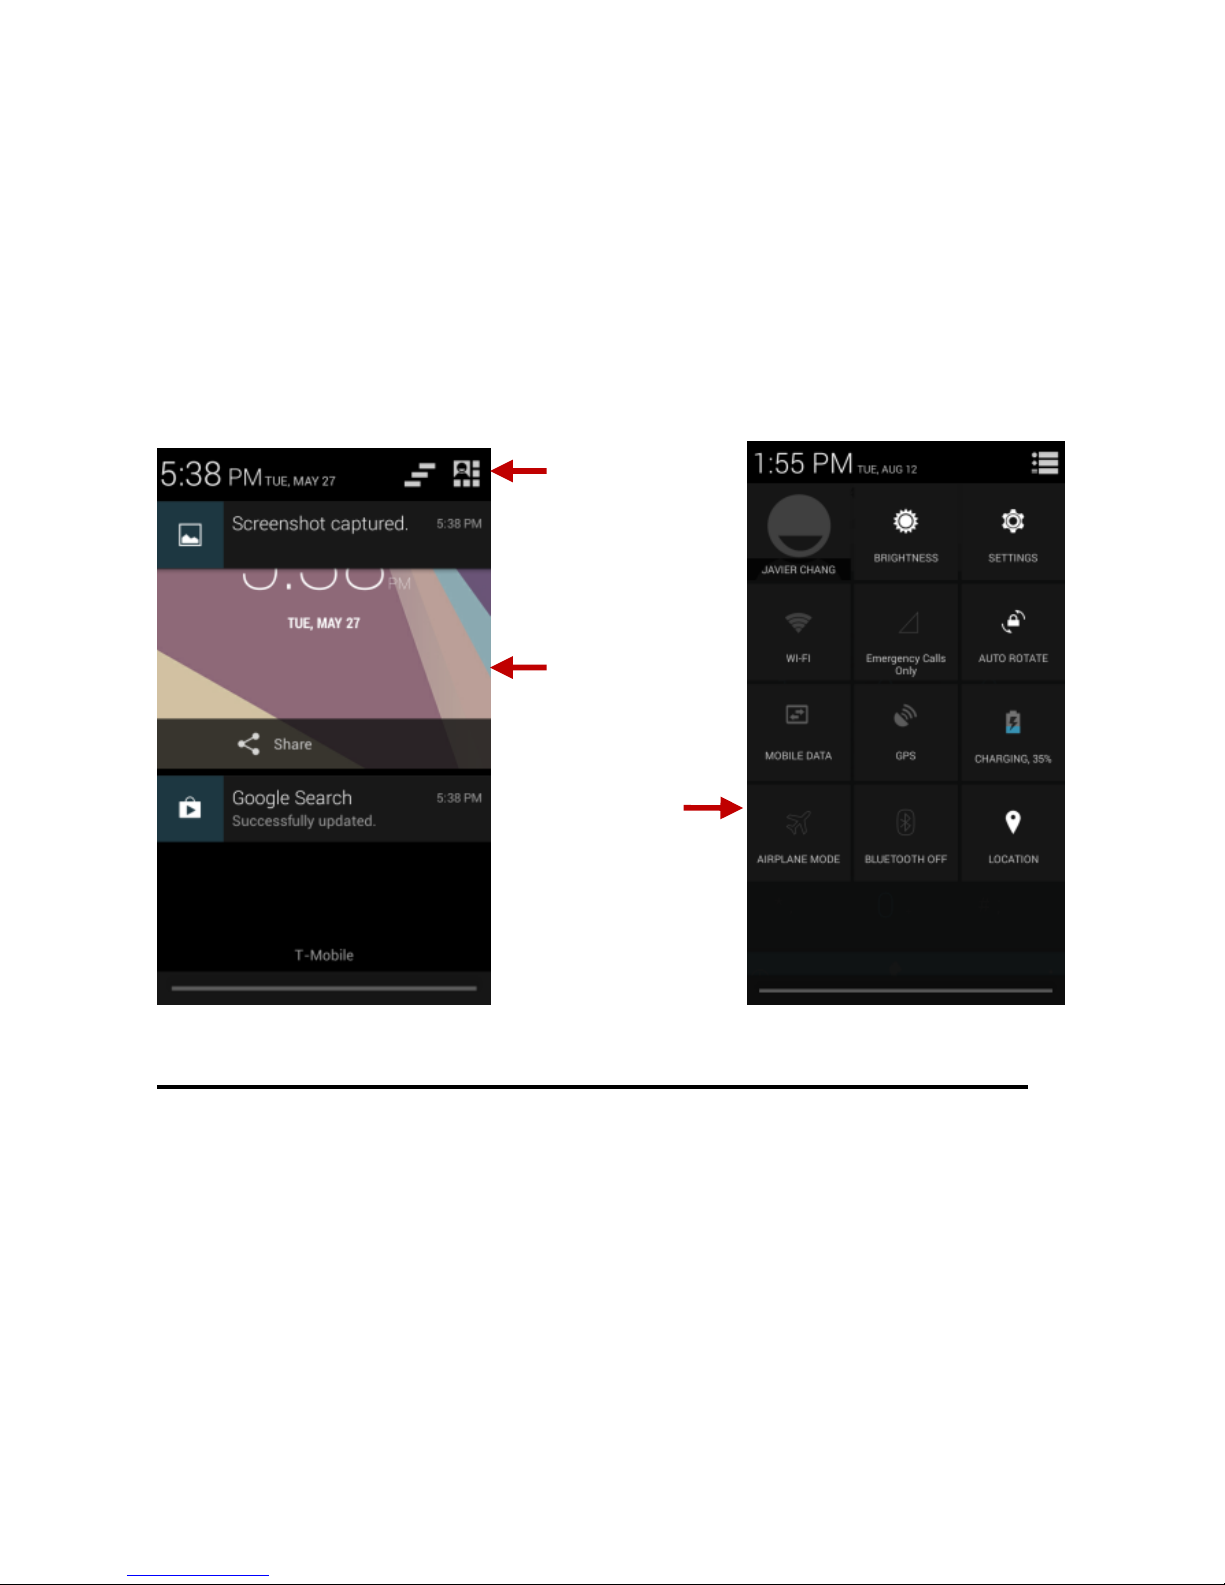
Notifications Bar...................................................................................... 8
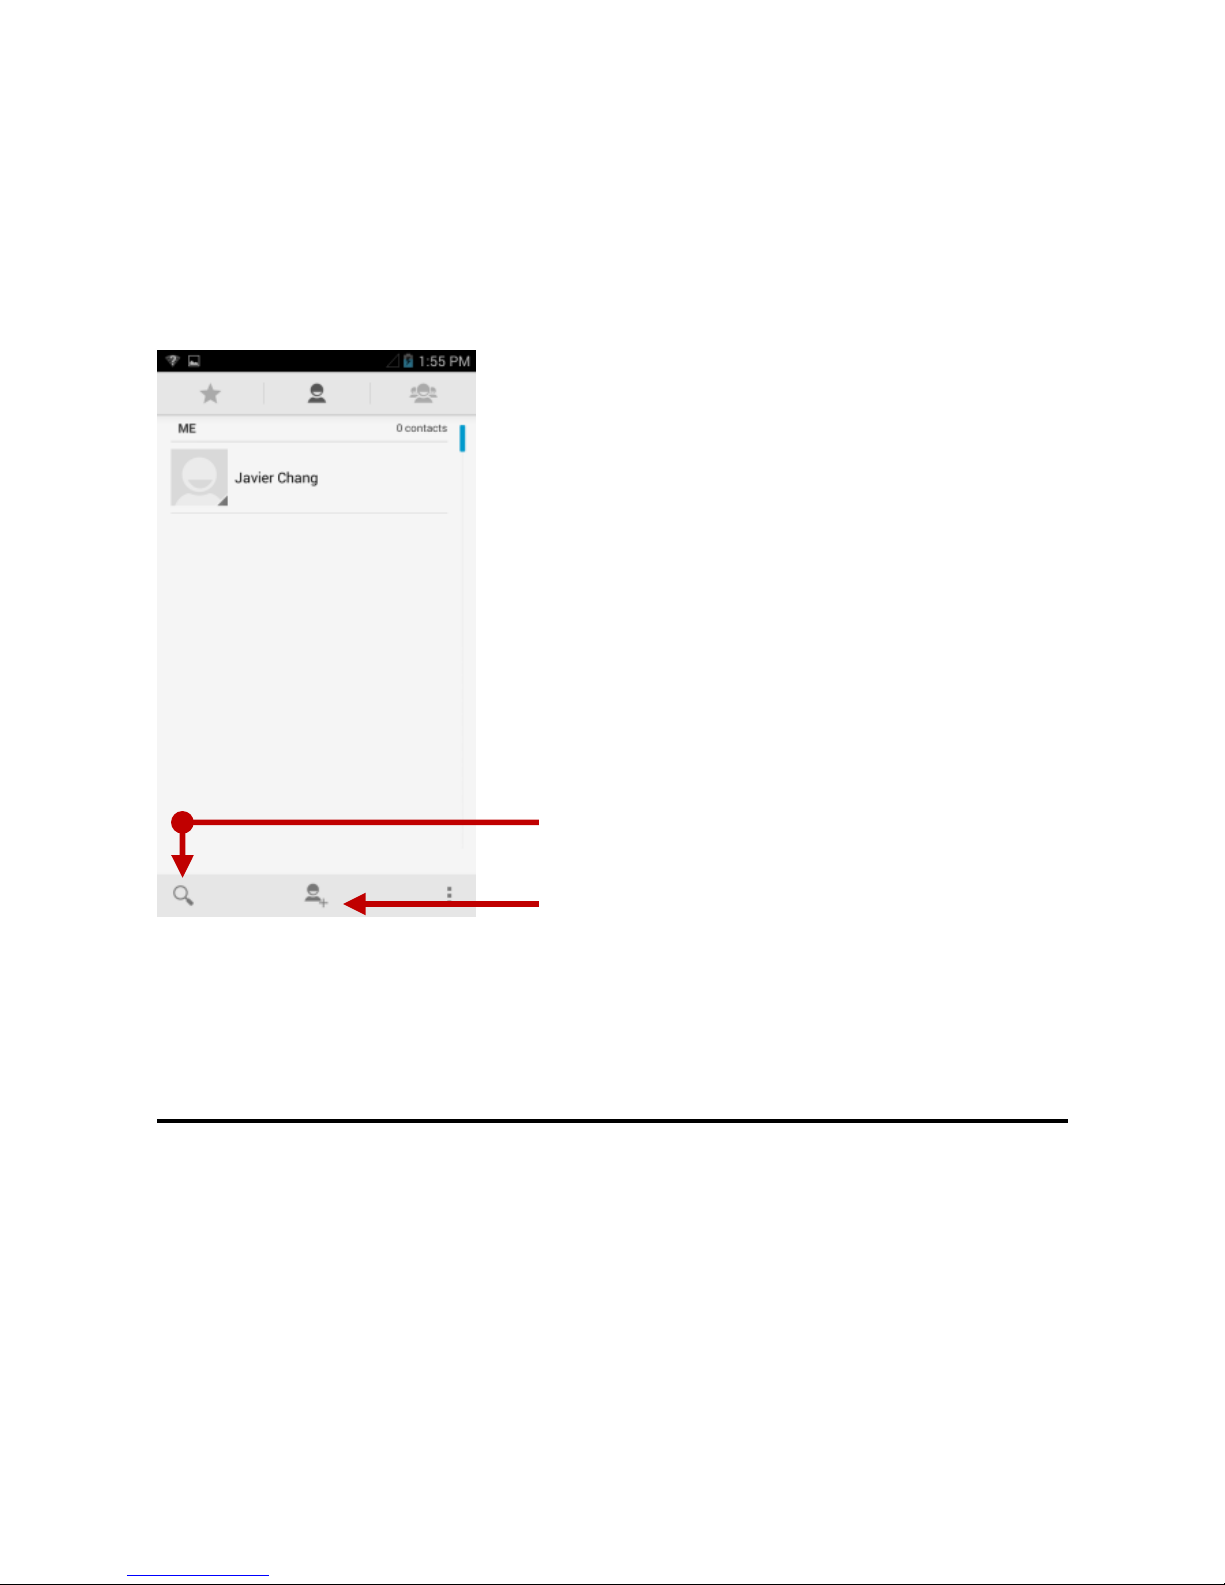
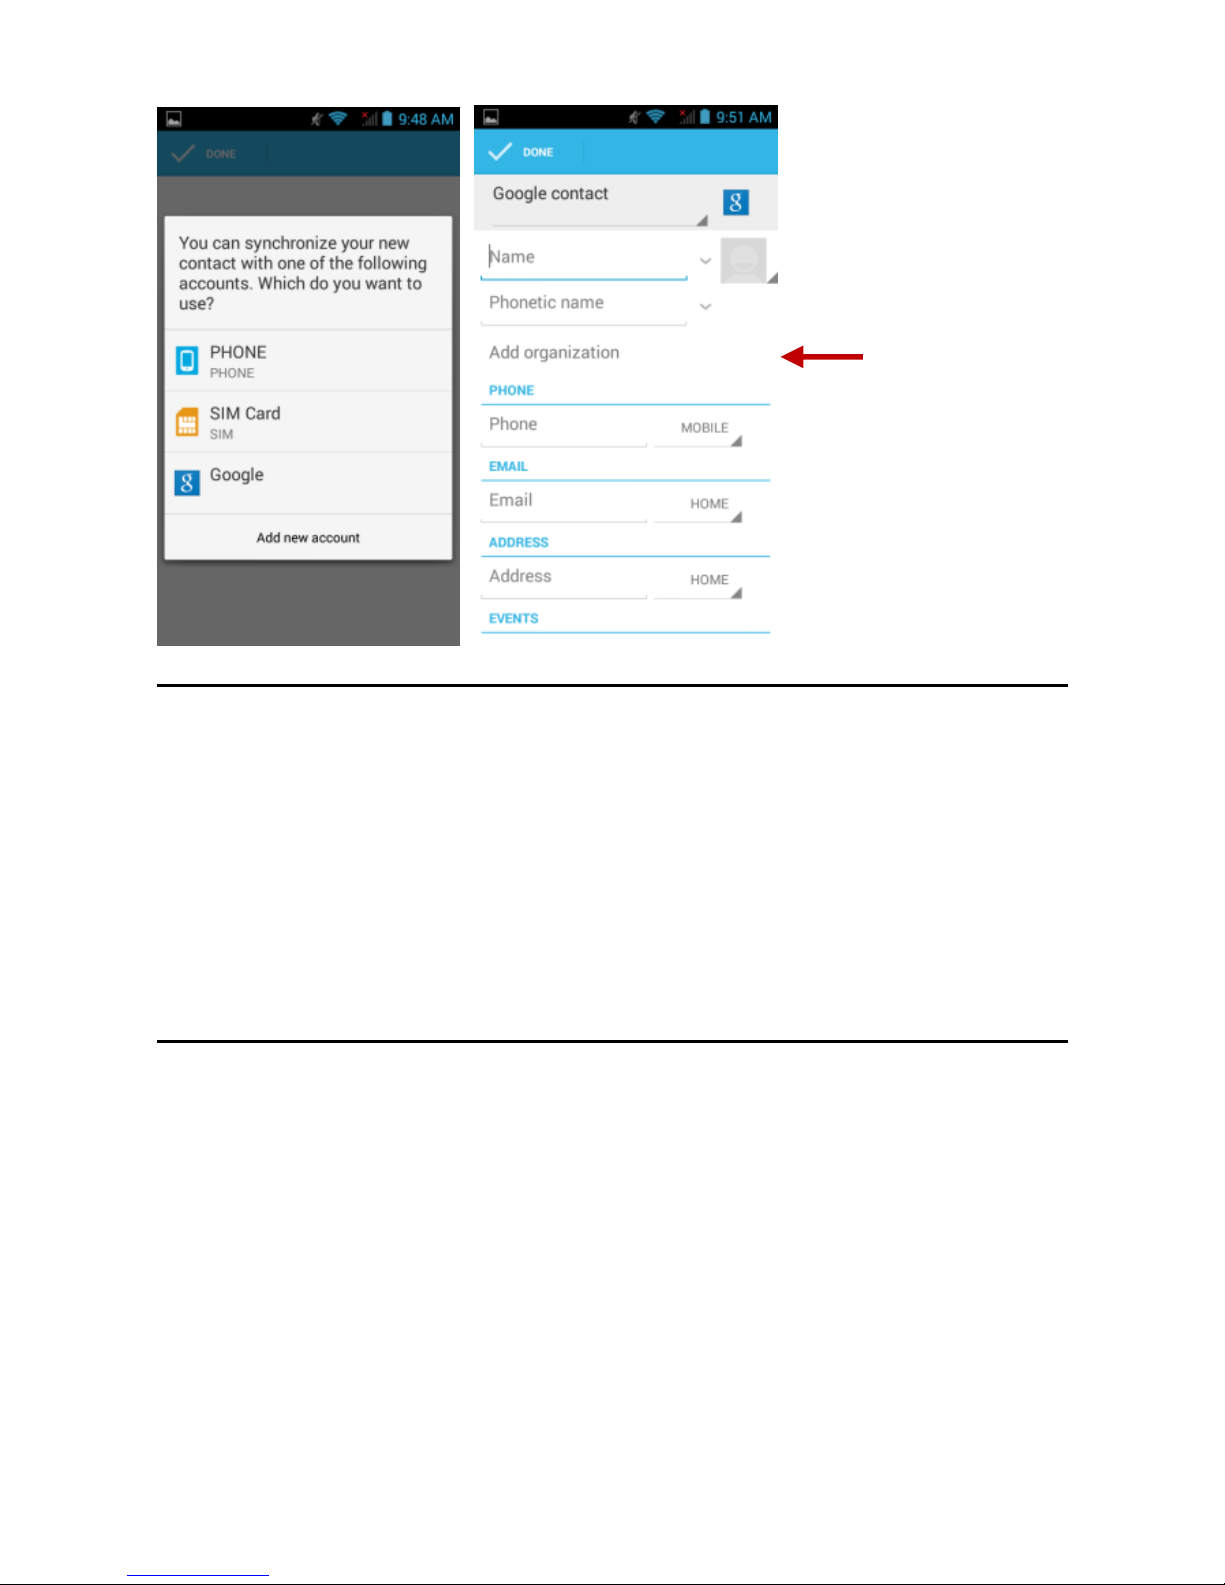
Contacts................................................................................................... 9
Messaging...............................................................................................11
Bluetooth & Wi-Fi.................................................................................. 12
Downloads............................................................................................. 13
Internet Browser.................................................................................... 14
Gmail ...................................................................................................... 15
Play Store............................................................................................... 15
Camera................................................................................................... 16
Gallery.................................................................................................... 17
Play Music.............................................................................................. 18
FM Radio................................................................................................ 19
Sound Recorder.................................................................................... 20
File Explorer........................................................................................... 21
Calendar................................................................................................. 21
Alarm Clock............................................................................................ 22
Settings .................................................................................................. 22
Storage................................................................................................... 26
Troubleshooting..................................................................................... 27

3
Safety Information
Please carefully read the terms below:
Use Safely
Do not use the phone in situations where it might cause danger.
Transportation Safety
Please observe all transportation laws and regulations.
Please drive with both hands on the wheel.
DRIVE RESPONSIBLY - DO NOT TEXT AND DRIVE
Hospital Safety
Please follow hospital rules and limitations.
Please turn off your mobile phone when near medical instruments.
Airport Safety
Remember to follow all airport and flight safety regulations.
Please do not use your phone during flight.
Chemical Warning
Do not use your mobile phone around fuels or chemicals.
Temperature Warning
Do not subject your phone to extreme temperature conditions.
Water Hazard
Your phone is not waterproof. Keep it away from water and liquids.
Emergency Calls
Make sure your mobile phone is switched on and in a service area. In
home screen, tap the phone key and dial the emergency number.
Accessories and Batteries
Use only Blu authorized batteries and accessories.
Information Backup
Remember to keep a written record of all important information.

4
Battery Safety and Precautions
- For better performance and longer battery life, it is recommended
that you charge the battery fully before using the mobile phone for
the first time.
- The optimum performance of a new battery is typically achieved
after two or three complete charge cycles. Note: Keep in mind that
continuous overcharging will affect long term battery life.
- While charging, keep the mobile phone out the reach of children.
- Store the battery in a cool and dry place away from direct sunlight
and water.
- Do not expose batteries to extreme temperatures (below -8°C
(18°F) or above 43°C (110°F).
- Immediately stop using the battery if it produces an odor, cracks
and leaks, overheats, distorts or has any other type of physical
damage.
- Avoid using the charger near or around liquids. If the charger
comes in contact with water or any liquids, immediately unplug it
from the outlet to reduce the risk of overheating, charger
malfunction, electric shock or fire.
Warning: Please be careful with the disposal of used batteries. Do
not throw away batteries with daily waste. Please follow local
environmental laws and guidelines for proper waste disposal.
Cleaning and Maintenance
- Avoid using the handset and accessories in excessively moist areas
to avoid malfunction.
- Use a soft, dry cloth to clean the handset, battery and charger.
- Do not use alcohol, thinner, benzene or any other solvent to clean
the handset.

5
Appearance and Key Function
Volume
Power
Back
Home
Menu
Rear Camera
Flash
Speaker
Front Camera

6
Introduction
Installation of the SIM Card
Advisory: Please keep the SIM card out of the reach of children. The
SIM card and its contact are easily damaged due to scratching or
bending. Please use caution when carrying, installing or taking out
the SIM card. NB: Please contact your cellular phone service
provider directly to obtain your SIM card.
To insert SIM card:
1. Remove the rear cover. Insert the SIM card.
2. Insert the SD card. (For additional storage capacity)
3. Insert the battery, replace the rear cover, and power on phone.
Power On and Off
On - Please ensure the SIM card has been properly inserted into the
phone. Long press the Power key to switch the phone on.
Off - In standby mode, long press on Power key until an options
menu appears. Select Power Off in the menu and confirm in the
pop-up prompt to switch off the phone.
Security
You may set a security lock feature as a security measure for the
phone. For further information regarding password locks, password
revision and other functions please enter into the security option in
system settings.
SIM Slot
Memory
Card

7
Call Functions
At the dial keyboard, enter the phone number and then click the dial
key. If dialing an extension, you may click the dial pad icon in the
bottom of the screen to open the interface and enter the number of
the extension. You may also press and hold the 0 key to add a (+)
sign when adding an international dialing prefix.
Call Logs
Every telephone number called and received will be saved in the
phones call log. All numbers in the call log can be dialed directly by
clicking the dial icon on the screen. When the number appears on
the list, click it to view details. To clear the call logs, press the menu
key and select delete. You may remove one or multiple calls.
Call Options
There are different options that can be used in the call log and
dialing interface. You may press the menu key while in the dial
interface and adjust speed dial and call settings. In the call logs, you
may press the search button to browse through contacts list or set
default contact resources.
Call Log
history

8
Notifications Bar
The notification bar is located on the top of the screen which
contains useful and important information regarding your phone
and the applications that are installed. On the notification bar,
several icons will appear such as signal bar, battery indicator, data
indicator, Bluetooth and Wi-Fi.You may slide the notification bar
down with your finger to display any pending notifications or
actions.
Notification Settings
The notification settings window provides shortcuts to different
phone settings for quick access. Click on any of the shortcut
notification icons to power on or off.
Note: To clear notifications, drag down the notification bar and click
the clear notification icon on the upper right hand part of the screen
(3 horizontal lines). The notification settings menu is located by
dragging down the notification bar and is located on the upper right
hand part of the screen next to the clear notification icon.
Pending
Notifications and
Applications
Quick
Notification
Settings
Clear
Notification
and Quick
Settings menu
buttons

9
Contacts
Enter: Click on the applications menu and select contacts.
The default display is the phone contacts and SIM card
contacts.
The contacts are organized alphabetically by default.
Click the Search icon to enter the contact search interface.
Any numbers or letters associated with any of the contacts
saved in the list will be shown in the search results.
Add New Contact
Click the add contact icon (+) to add contact.
Select to save your contacts to your Google account, the
phone or the SIM card.
You may enter different contact details which include
adding a picture, name, telephone number, group,
address, and email among other options.
Click to finish and save contact.
Add
Contact
Search

10
Delete Contact
Click on the Contacts icon to enter the phonebook.
Click the menu key to access the Contacts menu.
Click on Delete Contact and scroll to select which
contact(s) you wish to delete.
Note: You may also search for an individual contact in the
phonebook. Once the contact is found click the contact name to
enter the contact profile, press the menu key to bring up the contact
menu and select delete to eliminate from the phonebook.
Import / Export Contacts
The phone allows you to import and export contacts to synchronize
information between different storage types that include the SIM
card, Gmail account and your phone.
To import or export contacts:
1. Press the Contacts icon to enter the phonebook.
2. Press the menu key and select Import / Export
3. Select the source you want to copy the contacts from. Once
selected click next and select the destination where you want the
contact to be copied to then select the desired contacts to be
copied.
Contact
information
entry field

11
Messaging
You may use this function to exchange text messages and
multimedia messages with your family and friends. The messages to
and from the same contact or phone number will be saved into a
single conversation so you may see the entire message history
conveniently.
Send an SMS
Application Menu » Messaging » New message (or shortcut icon)
Click the contact icon to enter text message recipient
Compose Text Message and click Send
Send an MMS
When creating message, the default message style is SMS. The
message will automatically convert to MMS when adding an
attachment or when surpassing 10 pages of SMS messages.
Click the attachment icon in the messaging interface.
Click to add attachments and create an MMS message.
Attachment button
Text message
entry field
Add Recipient

12
Bluetooth & Wi-Fi
Bluetooth is a short-range wireless communications technology that
devices can use to exchange information and connect to different
types of devices which include headsets and other devices.
Power on Bluetooth
Settings » Bluetooth and select to power on Bluetooth.
The Bluetooth icon will appear in the notification bar. The
Bluetooth will then start to scan for all devices within its
range and will display all available devices in a list.
In Bluetooth settings, all the devices found will displayed
in a list.
Power on Wi-Fi
Settings » Wi-Fi and select ON to power on Wi-Fi
Click on the desired Wi-Fi network to be connected.
Note: Unsecured networks can be connected to directly - secured
networks require a password or credentials prior to connection.
List of available
Bluetooth devices
Note: The maximum
detecting time of
the phone is 2
minutes.

13
Downloads
The download section of the phone keeps sorted all of the files that
have been downloaded on the phone. The section can display the
download by date or by size. To clear the file from the list, click on
the box to the left of the file and then select the delete icon.
List of available networks
and the network
connection screen
List of available
downloads sorted by
date, name and size

14
Internet Browser
Menu Functions
Backward
• This option will return the user to the previous page.
Forward
• This option will move to a web page after the current page.
Windows
• View all windows open by clicking the windows icon in the
browser.
Bookmarks
• Click the save to Bookmarks option to save to Bookmarks.
More
Find on page: Search current page.
Share page: Select to share the current page.
Bookmarks/History: Show your bookmarks/browsing history.
Settings: Contains a variety of browser settings.
Click menu to
access the
internet
browser
options

15
Gmail
Gmail is Google’s free email service. To access the Gmail program,
click the applications menu and click on the Gmail icon and either
sign in with your existing account or create a new one.
Note: In order to keep accounts streamlined with Google services,
your Gmail account user name and password will be used for some
Google programs which include: Google Play Store, Google Drive,
Google +, Google Photos, and Google Wallet.
Play Store
Google Play allows you to download music, movies, and games
directly to your device. To access the Google Play Store, click on the
applications menu and then the Play Store icon.
The Gmail inbox is separated by
default in three different
categories.
These categories include primary
inbox, social inbox where all your
Facebook, Twitter, and social
media emails are separated to
and your Promotions inbox
where all your commercial emails
are separated.
You may add or delete other
categories in Gmail settings

16
Camera
Prior to use: Insert SD card before using the camera or video
camera. All photos or videos taken by the phone are typically stored
in the memory card for large storage capacity of images and videos.
Open Camera
Click the Applications Menu » Camera
Switch to video mode if you want to record videos.
Note: You may place a camera shortcut icon on any of the screens
Take Pictures
Aim the object that the picture will be taken.
Press the Shutter button on the screen to capture image.
After taking the picture, the file will be saved in the
cameras gallery folder.
You can view the photos by clicking the preview box
button.
You may adjust various settings for the camera while in the camera
interface. When in the standard camera mode, you can switch to
video to record or click the gallery preview box.
Search and select
between different Play
Store categories

17
Gallery
Open Images
Applications Menu » Gallery
Select between
Camera & Video
Pictures and videos
are stored in
separate albums
Camera Options

18
Share Pictures
You may share pictures by sending them through different types of
installed applications. You may also send pictures through the MMS
message function by attaching a picture and also via Bluetooth.
Adjust Image
Press Menu and select edit to adjust images: You may select from
different effects that may include: Vintage, Black and White, Instant,
Latte, Litho, X-Process, Crop, Rotate, Mirror, Straighten, Vignette,
Contrast, Exposure, Auto color, Shadows, and Vibrancy
Crop Pictures
Click menu and crop to adjust the size of the picture. Once the
picture appears, pinch your fingers in or out to adjust the size. To
keep an images proportion, please hold down any of the four
corners of the image and adjust accordingly.
Play Music
Open Music
Application Menu » Play Music
Song Status
Track Controls
Playback
Settings

19
Search Music
You may choose to search for music from media folder through
artist name, song name, album name. The following formats are
available: AMR, MIDI, MP3, WAV, and OGG.
FM Radio
FM Radio
Through this function, you may listen to FM radio on the device. The
FM radio uses the wired headphones as an antenna in order to
receive signal. Before using this function, connect the original
equipment headphones that came with the phone.
Open FM radio
Press the FM Radio icon to open the application.
Click to scan FM channels automatically then click to add any of your
favorite radio stations.
FM Radio as Background
Click on the Home key to move the FM Radio to the background.
Add Favorite
Radio Stations
Scan

20
Sound Recorder
The Sound Recorder can record voice or any audio.
You may send any recorded audio via Bluetooth or MMS and also
have the option to make any recorded audio the phones default ring
tone.
The recorder uses AMR, 3GPP and OGG format.
Record
Keep the phone’s microphone near the sound source.
Click the record button to record the audio.
Click the stop button to stop recording the audio.
Note: All recordings are typically saved in the SD card folder.
Please ensure the SD card is installed prior to recording.
Recording
Controls
Recording
Time
Other manuals for STUDIO 5.0 HD LTE
1
Table of contents
Other Blu Cell Phone manuals