Blu Studio 5.5 User manual

1
Studio 5.5
User Manual

2
Table of Contents
Safety Information ...............................................3
Appearance and Key Function............................ 4
Introduction.......................................................... 5
Call Functions...................................................... 6
Contacts............................................................... 7
Messaging ........................................................... 8
Internet Browser.................................................. 9
Bluetooth............................................................ 10
Camera...............................................................11
Gallery................................................................ 12
Music..................................................................13
Sound Recorder................................................ 14
Alarm Clock....................................................... 15
FMRadio........................................................... 15
Settings.............................................................. 16
Storage .............................................................. 20

3
Safety Information
Please carefully readtheterms below:
Use Safely
Do notuse yourmobile phonewhereitmight causedanger.
TransportationSafety
Please observealltransportationlaws andregulations.
Please drivewithbothhands onthe wheel.
DO NOT TEXT AND DRIVE
Hospitals
Please follow limitations.
Please turnoff yourmobile phonewhennearmedical instruments.
Airports
Please follow allflightsafety regulations anddonot useyourphone
during flight.
ToxicChemicals
Do notuse yourmobile phonearound fuels orchemicals.
Explosion Hazard
Please observe relatedlimitations and do not useyour mobile phone
aroundan areawhereexplosions may occur.
Accessoriesand Batteries
Please useonly Blu authorizedaccessories andbatteries.
Backup
Please remember to keep a writtenrecordof allimportant
information.
Water
Yourphoneis not waterproof.Keepitaway fromwaterandliquids.
SOS EmergencyCalls
Make sureyourmobile phone is switchedonandin aservicearea.
In home screen,tapthephone key and dial 911 and send.

4
Appearance and Key Function
Volume
Power
Back
Home
Menu
Front
Camera
Rear Camera
Flash
Speaker

5
Introduction
InstallationoftheSIM Card
Please install theSIM cardbeforeusingyour phone.
Note: Please keep the SIM cardoutof the reachof children.The
SIM cardandits contactareeasily damaged due to scratchingor
bending. Please becautiouswhencarrying,installingor taking out
the SIM card.
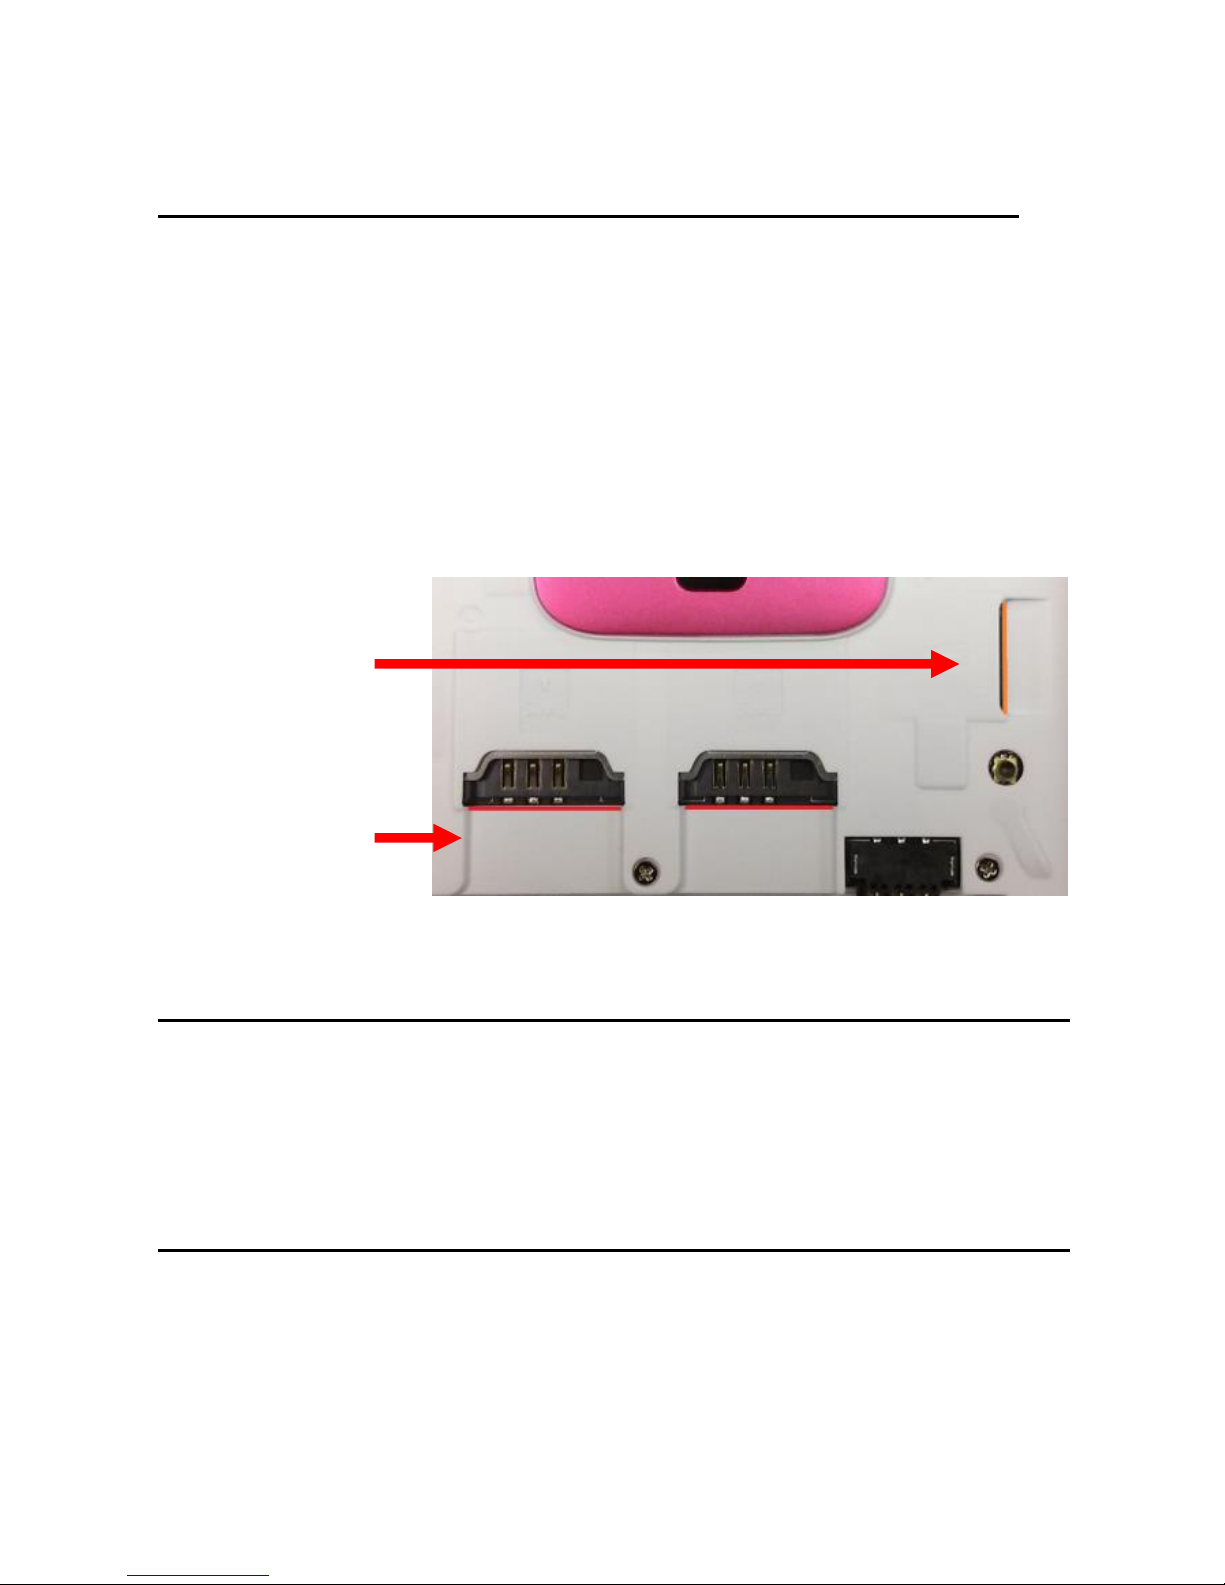
To insertSIM card(s):
1. Switchoffthemobile phone and removethe rear coverand
battery.
2. Insert theSIM card(s).
3. Insert thebattery and replacetherearcoverof themobile phone.
PowerOn and Off
On - Please ensure the SIMcard has beenproperly inserted into the
phone. Longpress thePower key to switchthephoneon.
Off- In standby mode, long press onPower key until an options
menu appears.SelectOFF in the menu and confirmin the pop-up
prompt to switchoffthephone.
PasswordLock
You may setascreen unlock picture ora PINcode lock as asecurity
measure.For furtherinformationregardingpasswordlocks,
passwordrevisionandotherfunctions pleaseenterthesecurity
settings of thephone.
SIM Slot(s)
Memory Card

6
Call Functions
Atthe dial keyboard,enter thephone number and then clickthe dial
key. If dialing an extension,youmay click the dial pad iconin the
bottom of thescreentoopen the interfaceandenterthenumber of
the extension.
Call Logs
Every telephone number called and receivedwillbesavedinthe
phones call log. Allnumbers in the call log canbe dialed directly by
clicking the dial icon on the rightside of thescreen.Whenthe
number appears on thelist, click it to view details.
ProximitySensor
The proximity sensordetermines how far away anobjectis fromthe
device. During thecall orwhenyou placethe phoneclose to the ear,
the backlight willturnoff automatically whichconserves batteryand
prevents inadvertently touching.

7
Contacts
Enter:Click on the applications menu and selectcontacts
• The default display is the phone contacts and SIM card contacts
• The contacts are organizedalphabetically by default.
Click the Searchiconto enterthe contactsearchinterface.
Any numbers or letters associatedwith any of thecontacts
savedin the list willbeshowninthesearchresults.
If therewerenomatches for theinputted contact,the
interfacewilldisplay nocontacts found.
Add New Contact
1. Click “Add Contact” icon
2. Selectto savecontacts tophoneor SIM card
3. Youmay edit contactpicture,name, telephone number, group,
address,andemail among otheroptions
4. Click to finishandsavecontact.
AddContact
Search

8
Messaging
Youmay usethis functiontoexchangetextmessagesand
multimedia messageswithyourfamily andfriends. The messages to
and fromthe same contactor phonenumber willbe savedinto a
single conversationsoyoumay seethe entiremessage history
conveniently.
Send an SMS
ApplicationMenu » Messaging» New message
(oruseshortcuticon)
1. Click to enter recipient (Youmay entercontacts fromcontact book
orenter a new number)
2. Compose Message
3. Send
Send an MMS
When creatingmessage,the defaultmessagestyleis SMS. The
messagewillautomatically converttoMMS whenaddingan
attachment.
1. Click the Paperclip icon in the messaginginterface.
2. Click to add thefollowingattachments.

9
Internet Browser
Menu Functions
Backward
Afterbrowsingthroughmultiple pages,this option will
returnthe usertothe previouspage.
Forward
Afterbrowsingthroughmultiple pages, this option will
move to a webpageafter thecurrentpage.
Windows
Youmay view allwindowsopenby clickingthe windows
icon in the upperright partof thebrowser.
Bookmarks
Click the Bookmarks option to make the currentURL as a
savedBookmark.
Click Bookmarks to opened savedbookmarks.
More
Find on page:Searchcurrentpage.
Sharepage: Select tosharethe currentpage.
Attachment
Type forMMS
Message

10
Savefor offlinereading:Saves pageforofflinereading.
Page info: Display page address and otherinformation of the current
browsing
History:Show yourbrowsinghistory andview themostvisited
pages.
Settings:Contains a variety of browser settings.
Bluetooth
Bluetooth is a short-rangewireless communications technology that
devices canusetoexchangeinformationand connect todifferent
types of devices which include headsets,car kits,and other devices.
Poweron Bluetooth
1)Settings » Wireless & Networks »Bluetoothand selectto power
on Bluetooth.
2)The Bluetooth iconwillappeargrey in the notificationbar.Click
“scan for devices” and the phone w ill start to scan for all devices
withinrange.
3)In Bluetooth settings all the devicesfoundwilldisplayedinthe list
underthe icon.
Note: Themaximum detectingtime of the phoneis 2 minutes.
Browser

11
Camera
Camera
Prior to use:Install memory cardbeforeusingthecameraor video
camera.All photos orvideos taken bythe phone arestoredin the
memory card.
Open Camera
1. Applications Menu » Camera
2. Switchtovideomode if youwanttorecordvideos.
Note: Youmay also placea camera shortcutonany of thescreens
Take Pictures
1. Aimthe object thatthe picturewillbe taken.
2. Press the “Shutter” button on the screen.
3. After taking the picture, the file w ill be saved in the camera’s
gallery folder.
4. Youcanview thephotos by clickingthe preview box button.
List of available
devices

12
Youmay adjust various settings forthecameraby pressingMenu
whilein thecamera interface.
When in the cameraviewfindermode,youcanswitchtovideoor
photos’ gallery. On the camera view finder mode, you w ill find the
display the preview of the previous picture taken. Click the “preview
box” and the photo w ill display in full screen.
Gallery
Open Images
Applications Menu » Gallery
Share Pictures
Youmay sharepictures by sendingthemthrough Gmail or the
E-mail application. Youmay also sendpictures throughtheMMS
messagefunctionby composinga message andattachingthe
picture.Any image canalsobe sentvia the Bluetooth functionby
selectingBluetooth equipment that has been paired.
Adjust Image
Press Menu and Edit to adjustimages
Switchfrom
Camera to Video
Camera Mode

13
Youmay selectdifferenteffectsoptions whichinclude butnotlimited
to: Fill Light, Highlights, Shadows,Auto-Fix,Cross-process,
Posturize,Logo, Documentary, andFish Eye, Warmth, Saturation,
B&W, Sepia, Negative, Tint, Duo-tone, Doodle, Crop, Red Eye,
Straighten, Rotate, Flip, Sharpen.
View Images
In the pictureinterface,clickonan album to view images
In the photoalbum, scrollthe picturetowardslefttoview thenext
pictureor towards righttoview theprevious one.
Crop Pictures
1. If youwanttoadjustthe sizeof thepicture,usethe croptools.
Oncethe arrow appears,pinchyourfingers inoroutto adjustthe
size.
2. If youwanttoadjustthe image andkeep its proportion,please
hold downany of thefour cornersof theimage and adjust
accordingly.
Music
Open Music
ApplicationMenu » Music
Song Status
Song Controls
Player Options

14
Search Music
You may choose tosearchfor music frommedia folder throughartist
name, songname, album name. The following formatsare
available:AMR, M4A, MIDI, MP3, WAV,andOGG.
Sound Recorder
The Sound Recordercanrecordvoiceoranyaudio.
Youmay sendany recordedaudio viaBluetooth or MMS andalso
havethe option to make any recordedaudiothe phones defaultring
tone.
Notice:The recorderonly uses AMR3GPP format.
Record
-Keep the phone’s microphone near the voice source.
-Click the recordbuttonto recordtheaudio.
-Click the stopbutton to stoprecordingtheaudio.
All recordings willbesavedin my recordingfolderin thedefault
music program.
Recording
Controls
Recording
Time

15
Alarm Clock
1. Click on the Clock icon in the application menu
2. Click setalarm buttonand enterthe alarm clocksetinterface
whereyoumay addand edit alarms
FM Radio
FM Radio
Through this function,youmay listen to FM radio on thedevice.The
FM radio uses thewiredheadphones as anantennain orderto
receivesignal.Beforeusingthis function,connecttheoriginal
equipment headphones thatcame withthephone.
Open FM radio
Press the FM Radio icon to openthe application.
1. Click “Search” automatic scans of FMchannels.
2. Click to add favoriteradiostations.
Click to add, edit
ordelete alarms

16
FM Radio as Background
Click on the Home key to move theFM Radio programto the
background.
Settings
Airplane Mode
Turn onAirplaneMode.
Note:When in flight mode, all networkconnectionswillturnoff
automatically.
Dual SIM Settings
Select SIM cardandNetworkOperators.
Mobile Networks
Select Mobile Data Connection.
Wi-Fi / WLAN
Settings » Wi-Fi » Click Wi-Fi to power on. When on, the
Wi-Fi willautomatically searchforavailablenetworks.Any
Radio
Options
AddFavorite
Radio Stations
Scan

17
unsecurednetworkcanbeuseddirectly andany secured
networkrequires apasswordorcredentials prior to
connection.
Bluetooth
Press the switchtopower onBluetooth.Onceon, the
Bluetooth willautomatically scanforany nearby open
equipment.
More Wireless
Data Usage
VPN
Tethering & Portable hotspot
Sound and Vibrate
This option sets thephone tone settings for receivingcalls or
notifications.Some of the settings include
Vibrate,volume, ring tones,ringtones notificationand
haptic feedbacktones
Display
Brightness,Autorotatingscreen,Wallpaper,ScreenTimeout
Security
Set up screenlocks:Usea pattern,PIN orpasswordtolockthe
screen.
Pattern: The firsttime therewillbe simple unlock
instructions and examples. Click “next step” to continue
the security patternstep.
PIN: Enter PIN number to unlock the screen.
Password:Setpasswordtounlockthe screen.
You may stop thesecurityfeatureatany time.
Set up SIM card PINlock
SIM cardPIN (Personal Identification Number) is usedto
preventunauthorizeduseof SIM cards.
To changea blocked PIN code,youwillneedto unlock the SIM lock
then go tothe Change Passwordscreen.Thephonewill

18
automatically prompt you enterthe old PIN codeand askto enter a
new PIN codetwice.Thephonewillthen prompt youthat the
changewas successful.If youenterthe PIN incorrectly threetimes,
the SIM and PIN codes willbeautomatically locked.Youwillneed
the PUK codeto unlockthe phone whichis availablethroughyour
serviceprovider.If youenterthe PUK codeincorrectly 10times, the
SIM cardwillbepermanently locked. Please see yourservice
providerforanew SIMcard.
Passwordvisible–Make the passwordvisible when it’s
typed.
Use security credentials -Allow applications tovisit
security credentials orothercredentials.
Install fromSD card- Install the encryptedcertificatefrom
SD card.
Location Access
Use wireless- Usewirelessservices tofindlocations in
applications.
When usingthe GPS satellite positioning, setaccuracy to
streetlevel (Cancelit tosavebattery).
PowerSaving
Power SavingSettings
Battery
General powerusage
Storage
View theSDcardand phone memory usage.
Allows theremovalor formattingof the SD card.
Allows selectionof thedefaultmemory.
Apps
Manage applications - Manage and delete installed
applications.
Running services - Press any of theservices listedinthe
two-button operation box. Press the ‘Stop’ button to stop

19
any of the services listedandremoves fromthe "running
services"list.
Date & Time
Automation - Use date and time providedby Network.
Date andTime adjustment.
Time Zone -Select Time Zoneaccordingtowhereyour
location.
Select Date Format - There are 3kinds of formats you can
choosefrom:Month-Day-Year,Day-Month-Yearand
Year-Month-Day, andYear-Month-Day which is thedefault
setting
Schedule PowerOn & Off
Schedulepoweronandoff
Schedule airplaneOn/off
Scheduleairplane mode on and off
Language and Input
Language–Change thelanguage of the phone.
Custom Dictionary - Addor delete wordstothecustom
dictionary.
KeyboardSettings –Haptic vibration, Haptic tones,
Capitalizing, Speech Input, Inputtingwords, Predictive text
function,Auto-Text,Inputkeyboardmethod
Reset to FactorySetting
Backup Data –Will backup all application data,WLAN
passwords,andothersettings toGoogle's servers
Restoreto Factory Settings - Clear all datastoredon the
phone.
Accessibility
Power buttonends call
Speak Passwords
Web accessibility

20
DeveloperOptions
If the phonedoes not display Developer options,to access:Press
‘Build number’seven(7) times in theabout phone tabin settings.
The developeroptions gives access toUSBDebugging
and other developeroptions
About Phone
Youcancheckthe information onstatus andremaining
power
Check for softwareor firmwareupdates
Storage
Connect the phonewith the USB cable provided. Onceconnected,a
connectioniconw illappearin the statusbar.Slide downbarand
click on connectionicon.Oncein the connectionmode interface,
selectUSB mass storageand turnon fromthe connectionscreen.
Some system settings and UI may vary depending on final SW version.
Other manuals for Studio 5.5
1
Table of contents
Other Blu Cell Phone manuals