Body Clock Smart TENS User manual
Smart TENS
Instructions for use
TM
Smart TENS Instructions.qx6 30/10/06 16:16 Page

The Smart TENS is a state-of-the
art, efficient method of drug-free
pain relief. This powerful digital
TENS unit is smooth, sophisticated
and simple to use. It has 4 pre-set
modes for ease of use.
TENS is recognised as a safe and highly
effective method of pain relief and is
regularly recommended by medical
professionals.
TENS is drug-free, with no known side
effects. It can also be used in
conjunction with any additional
medication if required.
Explanation of Symbols on Unit
Equipment providing a particular degree
of protection against electric shock
particularly regarding allowable leakage
currents having an F type (floating)
applied part.
Warning - refer to page 4 of these
instructions.
Denotes a product which must be
disposed of safely.
Smart TENS Instructions.qx6 30/10/06 16:17 Page

Contents
What is TENS? ....................................................3
Precautions and Contraindications .................. 4
Controls on the Smart TENS ..............................5
Additional Functions ..........................................5
Setting up your Smart TENS ..............................6
Using your Smart TENS ......................................8
FAQ’s and Troubleshooting ..............................10
Technical Data ..................................................11
What is TENS?
TENS (Transcutaneous Electrical Nerve Stimulation)
works by passing mild electrical impulses through
the skin, into the nerve fibres which lie below, via
electrode pads. TENS impulses help your body
produce its own pain-killing chemicals, such as
‘endorphins’.
What can TENS be used for?
TENS can be used for many chronic and acute pain
conditions such as back pain, shoulder pain,
arthritis, sciatica, sports injuries, migraine, period
pain and post-operative pain.
3
Smart TENS Instructions.qx6 30/10/06 16:17 Page

Precautions and Contraindications
1. Do NOT use the Smart TENS if you have a cardiac
pacemaker.
2. Check with your medical adviser before using if you
suffer from a heart condition, epilepsy, undiagnosed
pain, have any metal implants, or any doubts
whatsoever.
3. TENS must NOT be used before the 37th week of
pregnancy.
4. Never use TENS to mask undiagnosed pain since
this could require urgent treatment.
5. If you are pregnant, do NOT place the electrodes
over your abdomen.
General Precautions
1. Do NOT use this unit without first reading these
instructions.
2. Do NOT immerse the Smart TENS in any liquid.
3. Do NOT place it close to any source of excessive heat
or operate it in the presence of flammable gas.
4. Do NOT drop this unit onto a hard surface.
5. Do NOT attempt to dismantle the Smart TENS.
7. Only use specified batteries and electrodes.
8. If damaged, do not use. Return to supplier.
9. Remove the batteries when not in use.
10. Do NOT use while driving or operating potentially
dangerous machinery or while using a microwave.
11. Keep out of the reach of children.
12. Do NOT place electrodes on or near the eyes, in the
mouth, over the front or sides of the neck, across the
head, heart, or an area of broken, inflamed, infected
or numb skin. Electrodes should generally only be
applied to skin with normal sensation unless under
medical supervision.
13. Do NOT use in the presence of tuberculosis,
malignant tumours, very high or very low blood
pressure, epilepsy, high fever or acute inflammatory
disease unless under medical supervision.
4
Smart TENS Instructions.qx6 30/10/06 16:17 Page

5
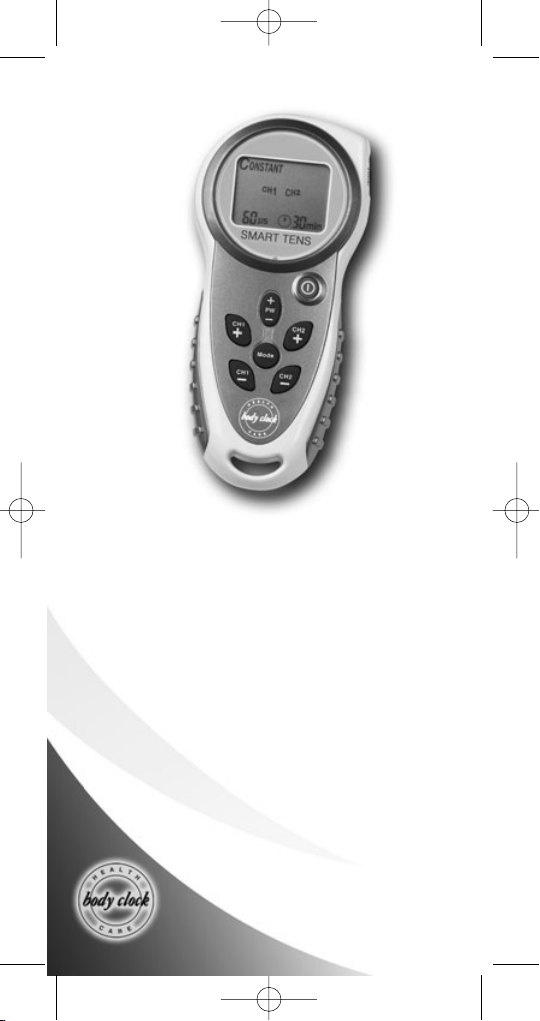
Controls on the Smart TENS
User display
Left Channel
Intensity Keys
Right Channel
Intensity Keys
Mode Key
Load Detector -
appears if an
electrode becomes
detached from
skin. Intensity will
drop to zero.
Pulse Width
Display -
ranging from
20-200µ
Leadwire Jack Plug Socket Connectors
Timer ButtonUser Display
On/Off Button
Pulse Width
Adjustment -
adjusts the
depth of current
upwards or
downwards
Hoop for
attaching neck
cord
Mode indicator -
indicates mode
in use
Power Bar -
indicates intensity
level for each
channel
Timer Display
Low Battery Indicator - flashes
when battery power is low
Smart TENS Instructions.qx6 30/10/06 16:17 Page

Setting up your Smart TENS
Check you have the following contents:
1 x Smart TENS
1 x Pack of 4 self-adhesive electrodes
2 x Leadwires
2 x AA batteries
1 x Neck cord
1 x Carrying pouch
1 x Easy Guide to TENS
The assembly stage
a) Press and rotate the belt clip at the back of the
Smart TENS in either direction to reveal the
battery compartment (see fig 1,page 7).
b) Release the battery compartment cover and
insert 2 x AA batteries (see fig2, page 7),
ensuring the positive (+) and negative (-)
terminals are correctly positioned as marked in
the battery compartment. Replace the cover.
c) Take the two blue leadwires and insert each of
the black jack plugs (at one end of each
leadwire) into the sockets at the top of the
Smart TENS unit (see fig 3, page 7).
d) Now insert the pins (at the other end of the
leadwires) into the sockets attached to the
sticky electrodes. Do not remove the electrodes
from the backing at this stage (see fig 4,
page 7).
e) If you wish, attach the easy-release neck cord
which enables you to hang the Smart TENS
from your neck (see fig 5, page 7).
6
Smart TENS Instructions.qx6 30/10/06 16:17 Page

Before first use of the Smart TENS, please
familiarise yourself with the warnings and
contraindications contained on page 4.
7
Figure 1
Figure 2
Figure 3
Figure 4
Figure 5
Inserting the battery
Press and rotate the belt clip
to reveal the battery
compartment.
Release the battery
compartment and insert
the batteries.
Connecting the leads
Insert both black jack plugs
into the sockets.
Connecting the Electrode
Pads
Insert a red and black pin (at
the end of each lead wire)
into each pair of electrodes.
Using the Neck Cord
Thread the loop of the neck
cord through the space at
the base of the unit. Slip the
other end of the neck cord
through the loop and pull
into position.
Smart TENS Instructions.qx6 30/10/06 16:17 Page

8
Using your Smart TENS
The Smart TENS has 4 TENS modes. Each has been
designed to provide a different sensation.
You can use any of the TENS modes to treat your pain. The
table below sets out a brief description of the sensation
each mode provides:
To commence treatment
1. Carefully peel the electrodes from the plastic backing,
using your forefinger and thumb. Place on you body as
shown on the diagrams found in your Easy Guide to
TENS Pain Relief.
2. Switch the unit on by pressing the On/Off Button.
Your unit will automatically start up in the Constant
mode the first time you use it.
3. Begin by pressing the CH1+ key. Each time you press
this key, a small ‘half-moon’ shape will appear on the
screen increasing in number and size as the intensity is
increased.
4. You will begin to feel a tingling sensation. Repeat step
3 with the CH2+ key. You will now feel a sensation in
both sets of pads.
Description
The pulses are continuous. This will feel
like a tingly sensation and is based on
the Gate Control Theory. Please refer to
page 3 of the accompanying book “ An
Easy Guide to TENS Pain Relief”, for a
full explanation.
The pulses are off and on in a regular
cycle, i.e. the signal from the unit is
emitted in bursts. This will feel like a
heart beat, and is based on the
Acupuncture like TENS or Endorphin
Release Theory. (see page 3 of
“An Easy Guide to TENS Pain Relief”).
The pulse decreases and then increases
in regular cycles creating a massaging
sensation.
This is a mixed setting – 3 seconds of
Constant and 3 seconds of Burst as
described above – this cycle is repeated
Mode
CONSTANT
BURST
MASSAGE
MIXED
(Dense
disperse)
Smart TENS Instructions.qx6 30/10/06 16:17 Page
99
5. The Mode Key. The Smart TENS has 4 modes as
described in the table on page 8. These modes are
selected by pressing the Mode Key allowing you to
choose whichever you find to be the most comfortable.
Varying the modes helps to avoid or delay your body
becoming used to any particular setting.
6. Pulse Width Adjustment: An added facility giving extra
versatility to your TENS unit. Increasing or decreasing
the pulse width heightens or lessens the sensation at
the site of the electrodes. This is fully adjustable
between 20µand 250µin steps of 10µfor all modes on
the Smart TENS and can be altered by pressing the PW
key. (µ= microseconds)
7. Timer Key: Allows you to set your length of treatment.
The are 5 settings: Continuous, 15mins, 30 mins,
45 mins and 60 mins.
8. Continue stimulating for as long as necessary but
preferably for no less than 30 minutes, unless you
experience discomfort.
9. Some people achieve pain relief after short periods of
time. Others may require to use their TENS for a lot
longer.
10. If you continue to stimulate for a number of hours
check you to make sure your self-adhesive electrodes
have not dried out. If this is the case, dampen them
slightly. If electrodes are allowed to dry out this can
cause minor skin irritation.
11 Always ensure the unit is switched off before you
remove the leads. Do not pull the wires. Always remove
the jack plugs from their sockets by holding the plugs
between the forefinger and thumb.
Additional information
Automatic Power Off - When the unit intensity levels are
zero, and it has not been in use for about 5 minutes, the
unit will shut off automatically.
Memory function - The Smart TENS has a memory function
which will remember the last setting for the next time you
use it.
Please refer to your “Easy Guide to TENS Pain
Relief” (UK only) for electrode placement charts,
troubleshooting and general TENS information.
Smart TENS Instructions.qx6 30/10/06 16:17 Page

10
TENS - Frequently Asked Questions
QIs it safe?
A Yes, TENS is used widely for pain relief and is
recommended by medical professionals.
QCan I use it with other medications?
A Yes. TENS is drug-free so you can use it with any
other medication including paracetamol.
QWhat conditions can TENS be used to treat?
A TENS can be used to treat numerous pain
conditions. If you are unsure about using TENS
please consult your medical adviser or contact
Body Clock Health Care on 020 8532 9595.
QCan I use the Smart TENS for labour?
A This is not recommended as it does not include the
boost function required for use during contractions.
For information on TENS for use during labour,
please visit www.babycaretens.com or call
0845 230 9737.
Troubleshooting Questions
QWhy does the pulse sensation not appear to be
as strong after you have used the Smart TENS
for a while?
A Increase the intensity, you may have become
acclimatised to a lower setting.
QWhy does the pulse sensation feel strong but
ineffective?
A You may need to reposition the electrode pads
(don’t forget to switch the Smart TENS off before
doing so).
QWhy does the sensation not feel sufficiently
strong even on a high setting?
A The batteries may need replacing.
Smart TENS Instructions.qx6 30/10/06 16:17 Page
Technical Data
Display 8 seven segment digits and
around 95 segments
Operation Mode Four modes:
• Constant
• Burst - 32Hz-2 bursts per second,
8 pulses per burst
• Massage - 100Hz - fixed frequency
modulating on pulse width
• Mixed - 3 second in mode 1,
3 seconds in mode 2, repeat
Pulse (Hz) Pulse Display
Frequency Width (µs)
Constant 100 20-250 CONSTANT
Burst 32 20-250 BURST
Massage 100 20-250 MASSAGE
Mixed 32 and 100 20-250 MIXED
Timer Contdown timer has 5 settings
• Continuous
• 15 Minutes
• 30 Minutes
• 45 Minutes
• 60 Minutes
Automatic Power Off 5 Minutes
Output Channel Dual Channel
Output Voltage 0-60V adjustable in 15 steps
(500Ω load, peak to 0)
Output Intensity 0 - 120mA adjustable in 15 steps
(500Ω load). Intensity level will drop
back to 0 after mode changes
Output Waveform Asymmetrical bi-phasic rectangular
Output Jacks CE touch-proof jacks
Load Detector Contact detection between the
device and human skin
Battery 2 x 1.5V AA Battery (Type LR6)
Battery Low Detect 2.2V±0.2V
11
Smart TENS Instructions.qx6 30/10/06 16:17 Page

www.elletens.com.au
Ph: (02) 6140 1232
sales@elletens.com.au
Elle TENS Australia
PO Box 7418, Fisher LPO
Fisher ACT 2611
Other manuals for Smart TENS
1
Table of contents
Other Body Clock Medical Equipment manuals

Body Clock
Body Clock SensaTONE User manual

Body Clock
Body Clock Profile EMS User manual

Body Clock
Body Clock Stimplus User manual

Body Clock
Body Clock Flexi TENS User manual

Body Clock
Body Clock Profile TENS User manual

Body Clock
Body Clock Easy TENS User manual

Body Clock
Body Clock Easy TENS User manual

Body Clock
Body Clock Profile TENS User manual


