Bosch Drive System User manual


English–2
0 276 001 USPen | (1.9.14) Bosch eBike Systems
Introduction . . . . . . . . . . . . . . . . . . . . . . . . . . . . . . . . . . . . . . . . . . . . . . . . . . . . . . . . . 3
General Warnings. . . . . . . . . . . . . . . . . . . . . . . . . . . . . . . . . . . . . . . . . . . . . . . . 3
Using Your Operator’s Manual . . . . . . . . . . . . . . . . . . . . . . . . . . . . . . . . . . . . . 3
Bosch Drive System Overview. . . . . . . . . . . . . . . . . . . . . . . . . . . . . . . . . . . . . . . . . . 4
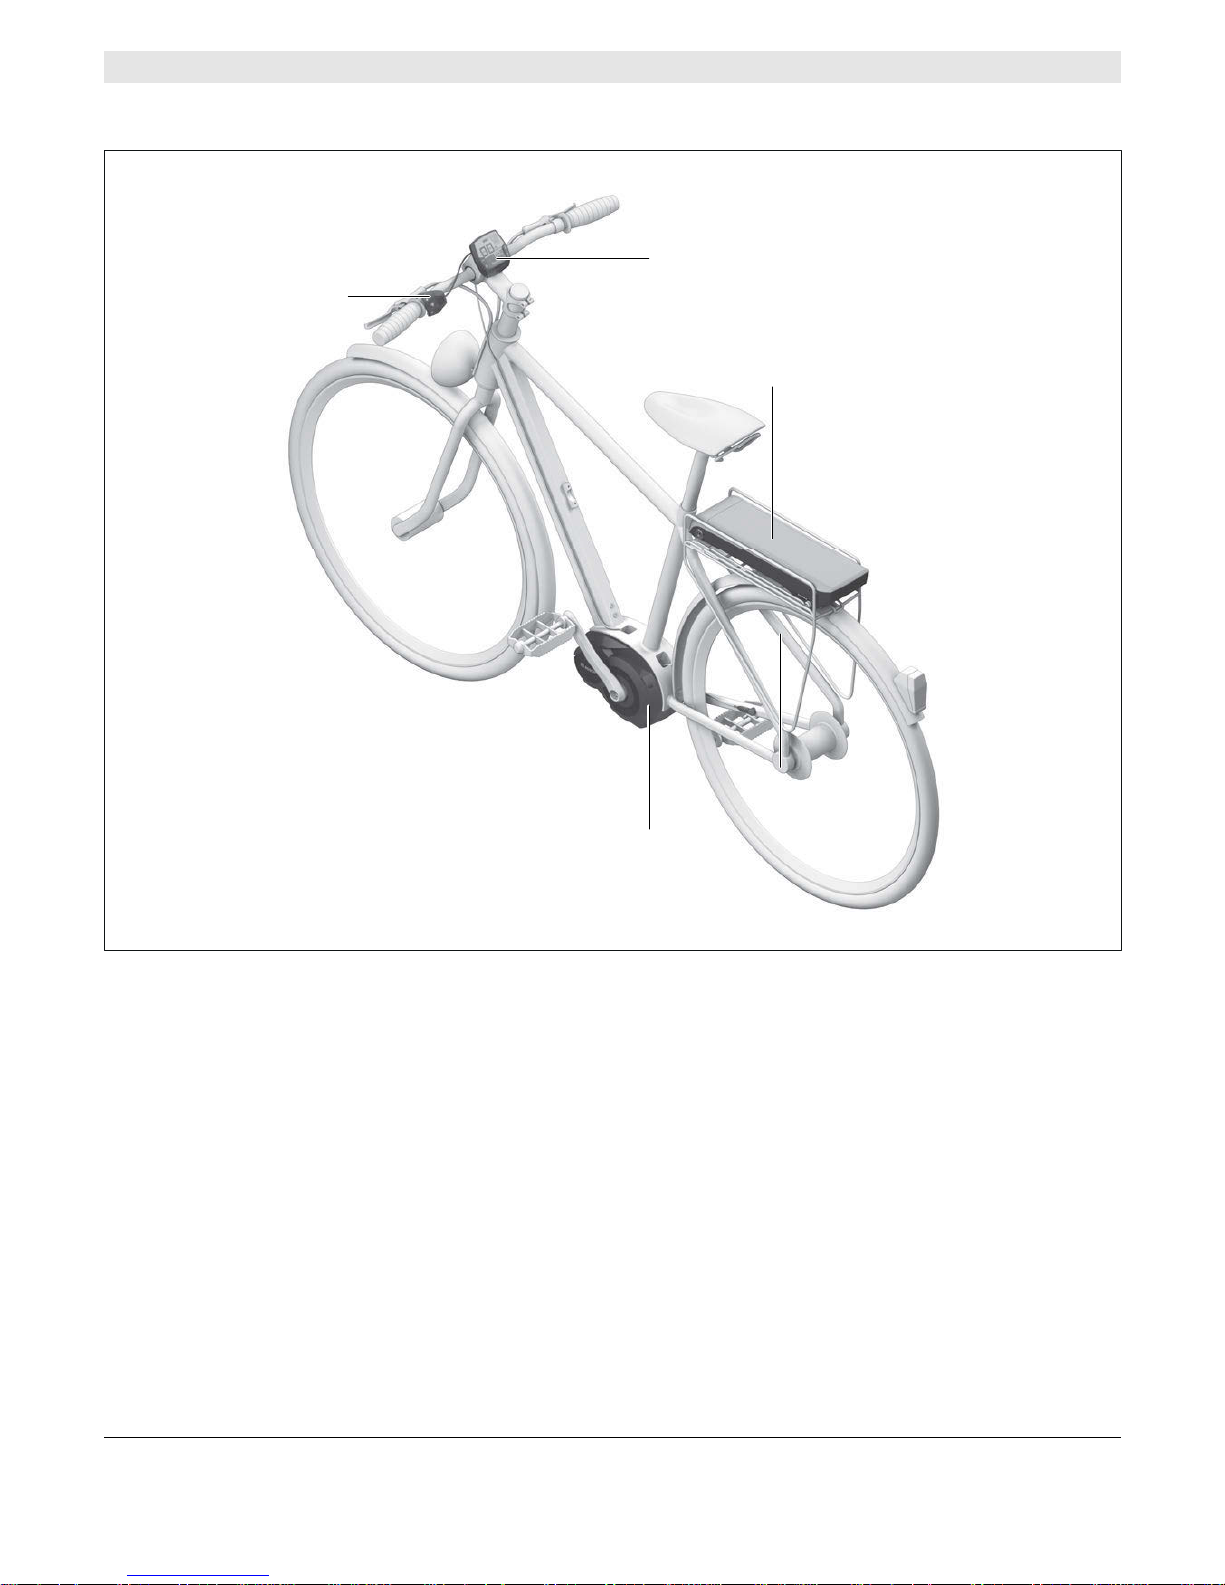
Bicycle View (Standard) . . . . . . . . . . . . . . . . . . . . . . . . . . . . . . . . . . . . . . . . . . 4
Bicycle View (Rack-Type) . . . . . . . . . . . . . . . . . . . . . . . . . . . . . . . . . . . . . . . . . 5
Component View (On-board Computer/Operating Unit/Drive Unit) . . . . . 6
Component View (Battery Pack “PowerPack”). . . . . . . . . . . . . . . . . . . . . . . 7
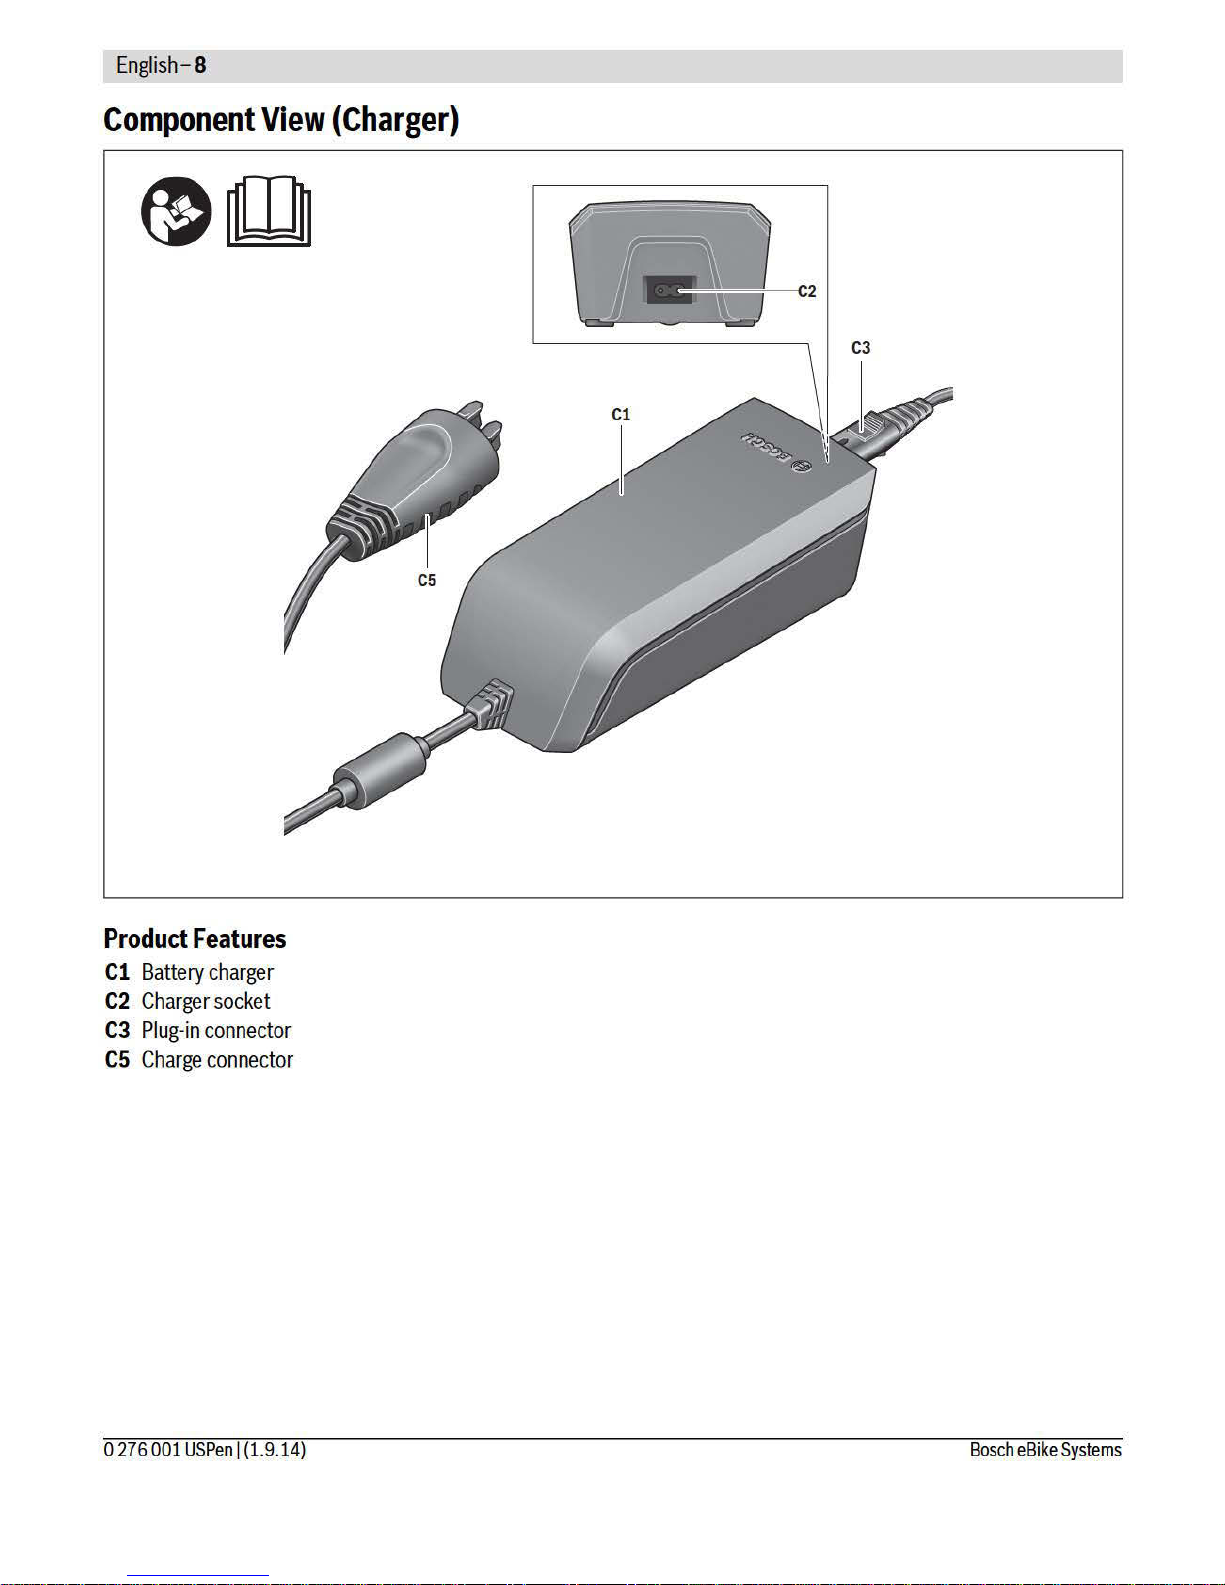
Component View (Charger) . . . . . . . . . . . . . . . . . . . . . . . . . . . . . . . . . . . . . . . 8
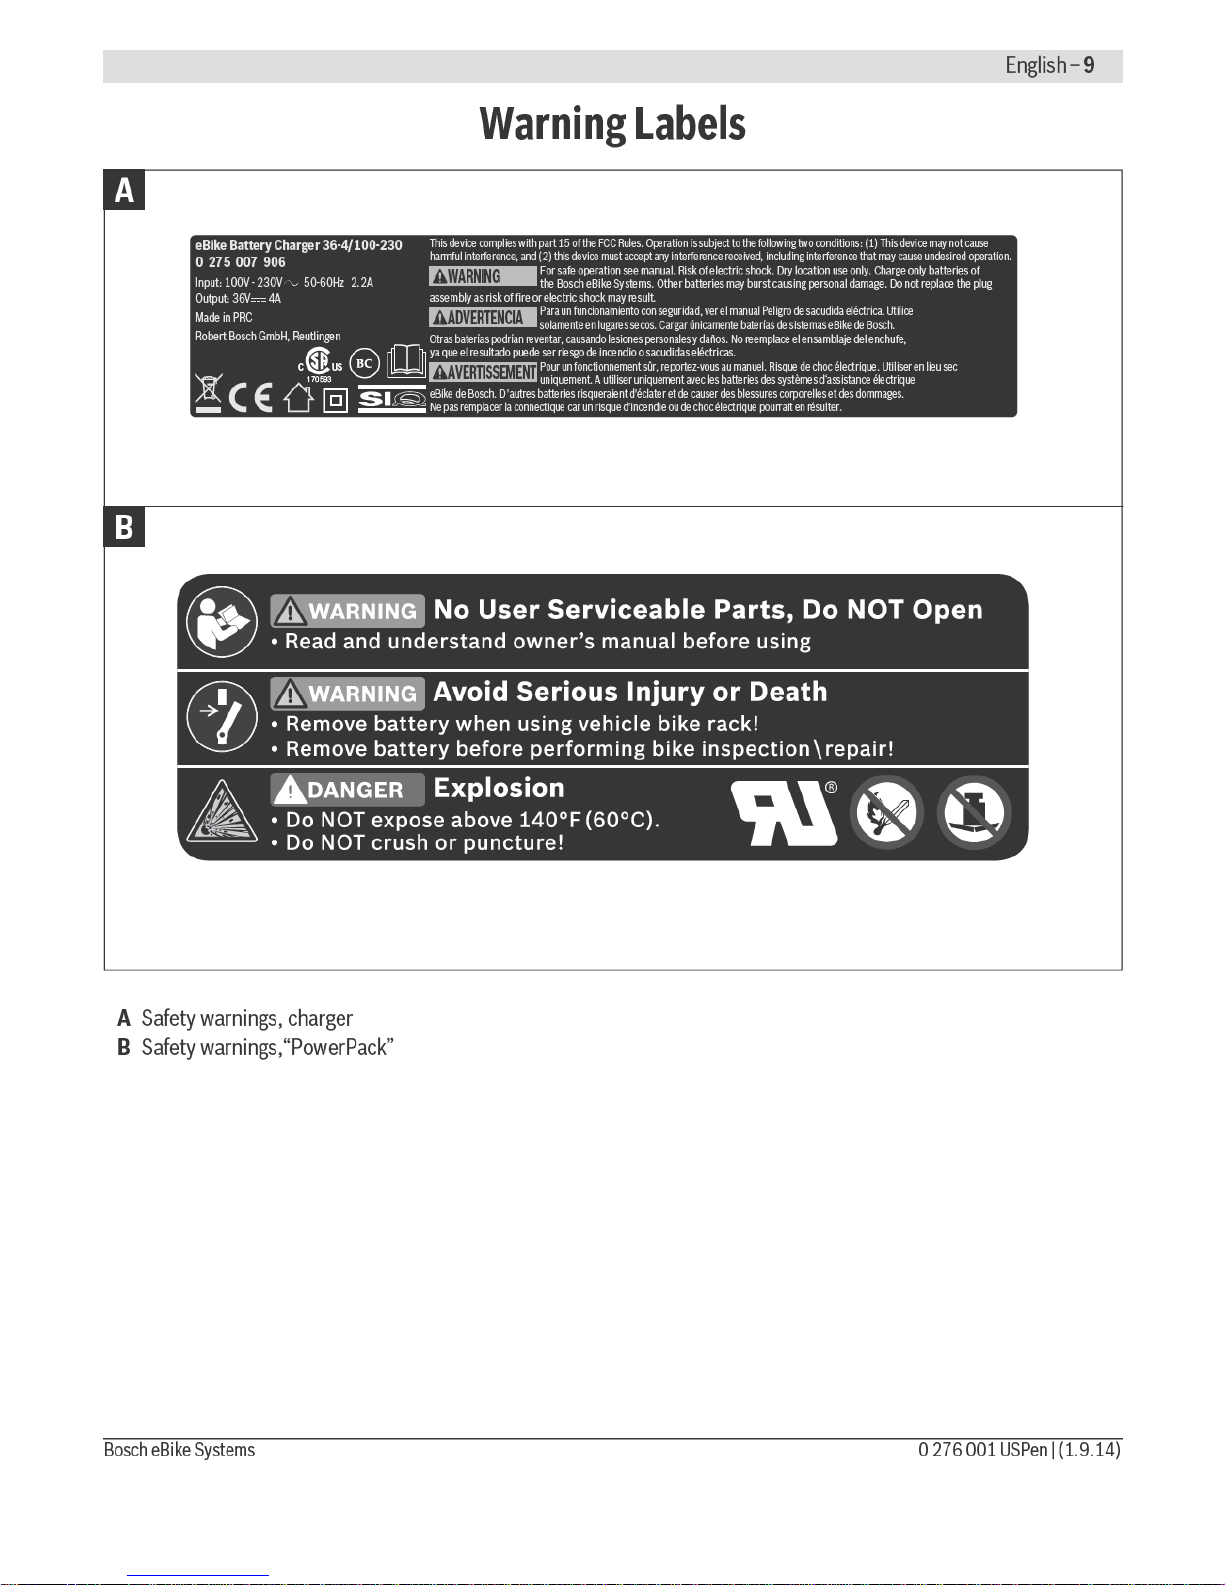
Warning Labels . . . . . . . . . . . . . . . . . . . . . . . . . . . . . . . . . . . . . . . . . . . . . . . . . . . . . . 9
Operating your Bosch Drive System. . . . . . . . . . . . . . . . . . . . . . . . . . . . . . . . . . . . 10
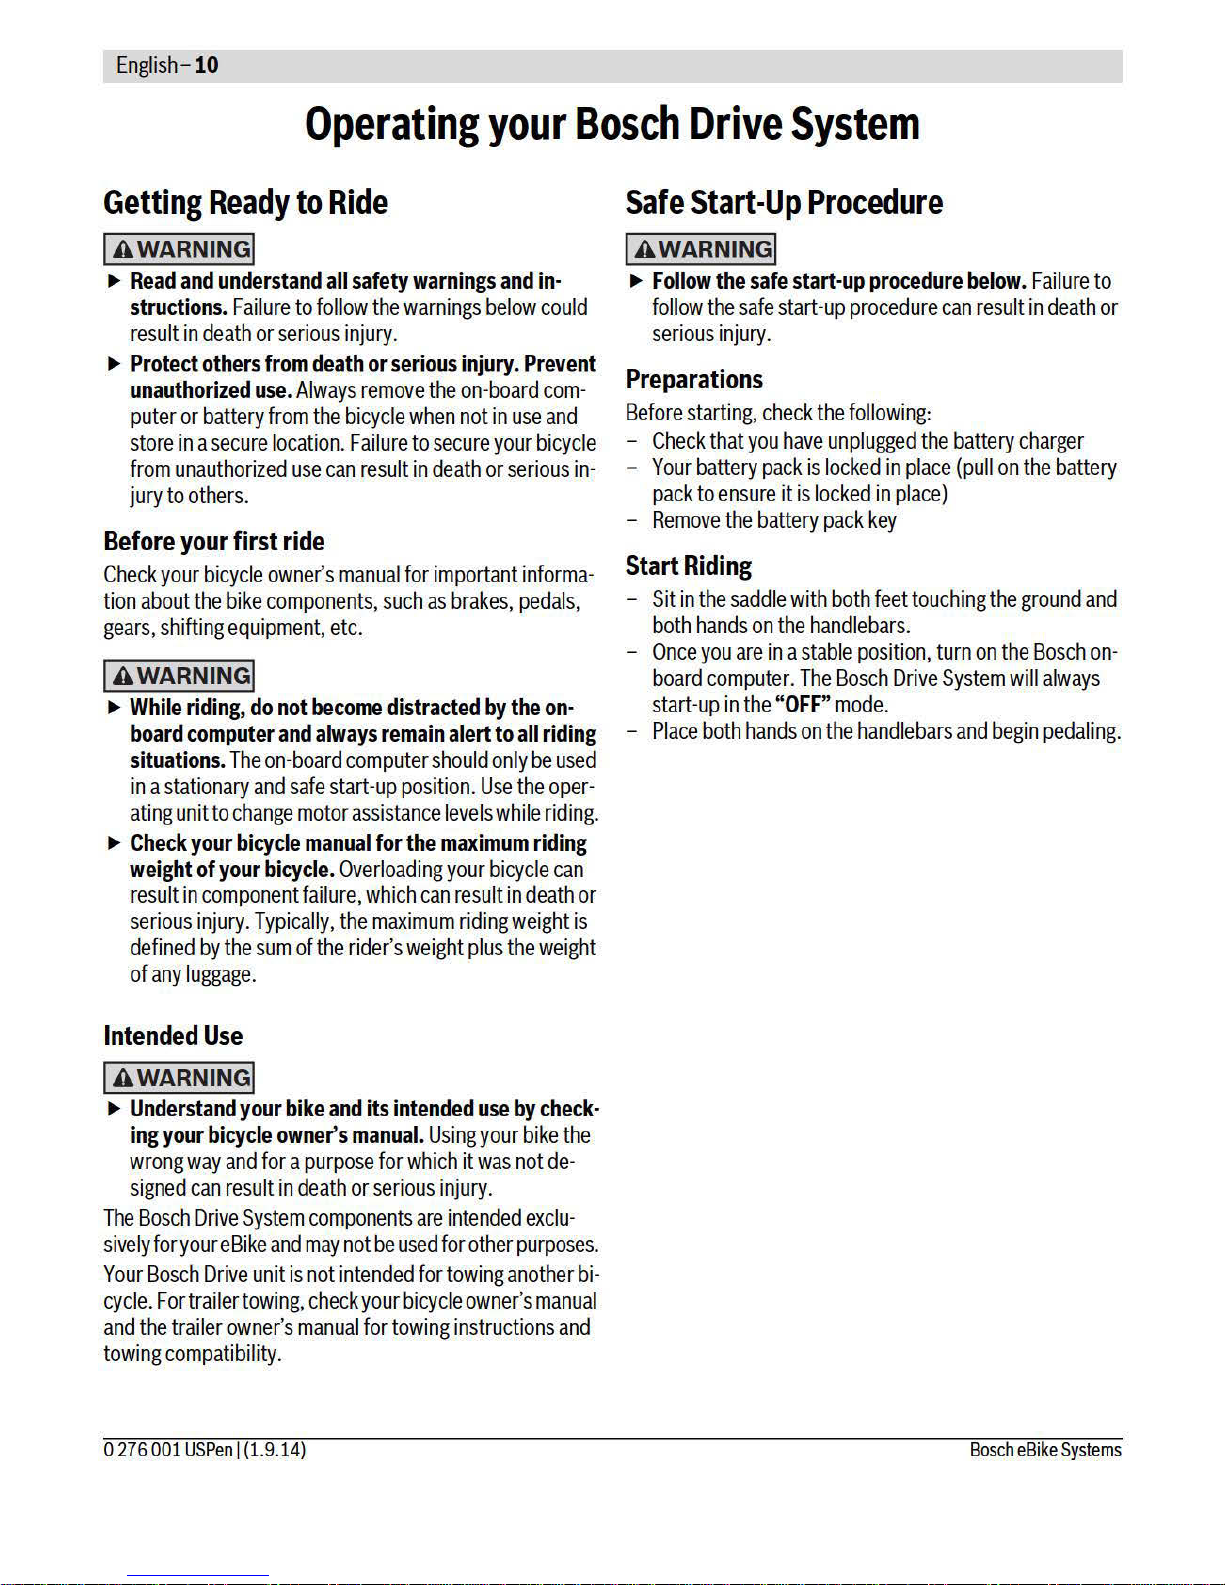
Getting Ready to Ride . . . . . . . . . . . . . . . . . . . . . . . . . . . . . . . . . . . . . . . . . . . 10
Safe Start-Up Procedure . . . . . . . . . . . . . . . . . . . . . . . . . . . . . . . . . . . . . . . . . 10
Operation. . . . . . . . . . . . . . . . . . . . . . . . . . . . . . . . . . . . . . . . . . . . . . . . . . . . . . 11
Maintenance/Cleaning . . . . . . . . . . . . . . . . . . . . . . . . . . . . . . . . . . . . . . . . . . 15
Storing . . . . . . . . . . . . . . . . . . . . . . . . . . . . . . . . . . . . . . . . . . . . . . . . . . . . . . . . 16
Bosch Drive System Components. . . . . . . . . . . . . . . . . . . . . . . . . . . . . . . . . . . . . . 17
DriveUnit/On-board Computer Intuvia . . . . . . . . . . . . . . . . . . . . . . . . . . . . . 17
Lithium-Ion Battery Pack “PowerPack” . . . . . . . . . . . . . . . . . . . . . . . . . . . . 21
Charger . . . . . . . . . . . . . . . . . . . . . . . . . . . . . . . . . . . . . . . . . . . . . . . . . . . . . . . 26
Troubleshooting. . . . . . . . . . . . . . . . . . . . . . . . . . . . . . . . . . . . . . . . . . . . . . . . . . . . . 30
Battery Recycling Program . . . . . . . . . . . . . . . . . . . . . . . . . . . . . . . . . . . . . . . . . . . 33


English–4
0 276 001 USPen | (1.9.14) Bosch eBike Systems
Bosch Drive System Overview
Bicycle View (Standard)
Bosch Drive System Components
All representations of bike components, with the exception
of the eBike components, are schematic and can deviate
from your eBike.
3On-board computerIntuvia
9Drive unit
10 Operating unit
A8 Standard battery pack“PowerPack”
C1 Battery charger
9
A8
3
10
C1

English–5
Bosch eBike Systems 0 276 001 USPen | (1.9.14)
Bicycle View (Rack-Type)
Bosch Drive System Components
All representations of bike components, with the exception
of the eBike components, are schematic and can deviate
from your eBike.
3On-board computerIntuvia
9Drive unit
10 Operating unit
A2 Rack-type battery pack“PowerPack”
3
10
9
A2


English–13
Bosch eBike Systems 0 276 001 USPen | (1.9.14)
Speed and Distance Indicator
The speed indicator falways displays the current speed.
The following functions are available in the function indica-
tor (combination of text indicator dand value indicator e):
–“Range”: Estimated range of the available battery pack
charge (for constant conditions such as assistance level,
route profile, etc.)
–“Distance”: Distance covered since the last reset
–“Trip time”: Trip time since the last reset
–“Avg. Speed”: Average speed achieved since the last
reset
–“Max. Speed”: Maximum speed achieved since the last
reset
–“Clock”: Current time
–“odometer”: Display of the total distance traveled with
the eBike (cannot be reset)
To switch between the indication functions, press the “i”
button 1on the on-board computer or the “i” button 11 on
the operating unit until the desired function is displayed.
To reset “Distance”, “Trip time” and “Avg. Speed”,
switch to any of the three functions and then press and hold
the “RESET” button 6until the indicator is set to zero. This
also resets the values for the other two functions.
To reset the “Max. Speed”, switch to this function and
then press and hold the “RESET” button 6until the indica-
tor is set to zero.
To reset “Range”, switch to this function and then press
the “RESET” 6button until the display is reset to the value
of the factory setting.
When the on-board computer is removed from the holder
4, all function values remain stored and can be viewed.
Displaying/Adapting Basic Settings
The basic settings can be displayed and changed no matter
if the on-board computer is in the holder 4or not.
To access the basic settings menu, press and hold the
“RESET” button 6and the “i” button 1until “Configura-
tion” is displayed in text indicator d.
To switch between the basic settings, press the “i” but-
ton 1on the on-board computer until the desired basic set-
ting is displayed. When the on-board computer is inserted
in holder 4, you can also press the “i” button 11 on the op-
erating unit.
To change the basic settings, press the On/Off button 5
next to the “–”indicator to decrease the value or scroll
down, or the light button 2next to the “+” indicator to in-
crease the value or scroll up.
When the on-board computer is inserted in holder 4, you
can also change the values with the “–”button 12 or the
“+” button 13 on the operating unit.
To exit the function and store a changed setting, press the
“RESET” button 6for 3 s.
The following basic settings are available:
–“clock”: The current time can be set here. Pressing and
holding the setting buttons fast-forwards the setting
speed.
–“wheel circum.”: You can change this value pre-set by
the manufacturer by ±5 %. This value is displayed only
when the on-board computer is in the holder.
–“English”: The language for the text indicator can be
changed. The available languages are German, English,
French, Spanish, Italian, Dutch and Danish.
–“unit km/mi”: The speed and distance can be displayed
either in kilometers or miles.
–“time format”: The time can be displayed either in a
12-hour or 24-hour format.
–“Shift recom. on/off”: You can switch the indication of
a shift recommendation on and off.
–“power-on hours”: Indicates the total travel time with
the eBike (can not be changed).
–“Displ. vx.x.x.x”: This is the software version of the dis-
play.
–“DU vx.x.x.x”: This is the software version of the drive
unit.This value is displayed only when the on-board
computer is in the holder.
–“Bat vx.x.x.x”: This is the software version of the bat-
tery pack.This value is displayed only when the on-
board computer is in the holder.
Error Code Indicator
The components of the eBike system are continuously and
automatically monitored. When an error is detected, the re-
spective error code is indicated in text indicator d.
To return to the standard indicator, press any button on the
on-board computer 3or on the operating unit 10.
Depending on the type of error, the drive unit is automati-
cally shut off, if required. Continued travel without assis-
tance from the drive unit is possible at any time. However,
have the eBike checked before attempting new trips.
WARNING: Have all checks and repairs performed
only by an authorized Bosch eBike dealer.


English–16
0 276 001 USPen | (1.9.14) Bosch eBike Systems
Storing
Notes for Optimum Handling of the
Battery Pack
The battery pack life can be extended if properly main-
tained and especially if operated and stored at the right
temperatures.
With increasing age, however, the battery pack capacity
will diminish, even if properly maintained.
A significantly reduced operating period after charging in-
dicates that the battery pack is worn out and must be re-
placed. You can replace it yourself by purchasing a genuine
Bosch PowerPack from an authorized Bosch eBike dealer.
Recharging the Battery Pack Before and During Storage
When not using the battery pack for a longer period, charge
it to approx. 60 % (3 to 4 LEDs lit on the charge-control in-
dicator A3).
Check the charge condition after 6 months. When only one
LED on the charge-control indicator A3 lights up, recharge
the battery pack again to approx. 60 %.
Note: When the battery pack is stored discharged (empty)
for longer periods, it can become damaged despite the low
self-discharging feature, and the battery pack capacity may
be strongly reduced.
It is not recommended to have the battery pack connected
permanently to the charger.
Storage Conditions
Store the battery pack in a dry, well-ventilated location.
Protect the battery pack against moisture and water. Under
unfavorable weather conditions, it is recommended e. g.,
to remove the battery pack from the eBike and store it in an
enclosed location until it is used again.
The battery pack can be stored at temperatures between
+14 °F and +140 °F. However, storing the battery pack at
the optimal temperature of 68 °F will provide the longer
battery life.
Make sure that the maximum storage temperature is not ex-
ceeded. As an example, store the battery pack out of direct
sunlight and do not leave it in a vehicle during the summer.
It is recommended to not store the battery pack on the bike.


Table of contents
Other Bosch Bicycle manuals

Bosch
Bosch Kiox User manual

Bosch
Bosch FLYER Mountain Quick start guide

Bosch
Bosch Purion BUI210 User manual

Bosch
Bosch BDU336Y User manual

Bosch
Bosch ZEMO SU-E FS 12 Wiring diagram

Bosch
Bosch i:SY User manual

Bosch
Bosch KOGA PACE B05 2020 User manual

Bosch
Bosch WHYTE E-Lyte 140 User manual

Bosch
Bosch BDU280P CX User manual

Bosch
Bosch BULLS Twenty 6 EVO Quick guide