Brandt KG365TE1 Quick start guide

GUIDE FOR INSTALLATION AND USE
All gas cookers
99626797_GB_A.QXD 13/07/2005 15:06 Page 1

2
99626797_GB_A.QXD 13/07/2005 15:06 Page 2

1 / SAFETY GUIDELINES ____________________________________________ 4
2 / INSTALLING YOUR COOKER
••Statuory installation conditions _______ _ 5
••Environmental protection __ _________ 5
••Fitting recommendations _________________________________ 6
••Electrical connections _________________________________ 6
••Gas connections _______________________________________ 7
••Changing the type of gas supply ___________ 9
3 / USING YOUR COOKER
••Using the hob burners ______________ _ 13
••Using the oven __________________________________________ 16
••Accessories ________________________ 18
4 / HOW TO LOOK AFTER YOUR COOKER ___________________ ______ _ 20
5 / MINOR MAINTENANCE BY THE USER
••Adjustable feet ___________________________ _ 22
••Replacing the oven lamp __________________________________ 22
••Replacing the catalytic panels __________________ ____ 23
6 / MINOR TROUBLESHOOTING ____________________________________ 26
7 / AFTER SALES SERVICE _________________________________________ 28
LIST OF CONTENTS
3
99626797_GB_A.QXD 13/07/2005 15:06 Page 3

•
PPLLEEAASSEERREEAADDTTHHEEIINNSSTTRRUUCCTTIIOONNSSBBEEFFOORREE
IINNSSTTAALLLLIINNGGAANNDDUUSSIINNGGTTHHIISSAAPPPPLLIIAANNCCEE..
- We have designed your hob for private do-
mestic use.
- This cooker is designed exclusively for the
cooking of drinks and foodstuffs. This
product do not contain any asbestos-based
component parts.
- Using a gas-powered hob produces both
heat and humidity in the room where it is used.
MMaakkeessuurreeyyoouurrkkiittcchheenniisswweellllvveennttiillaatteedd::
keep all natural air-vents open or have a
mechanical ventilation system installed (a
mechanically ventilated hood) with a
minimum airflow of 2m3/hr.
- You must always keep an eye on your
cooking.
- Prolonged, intensive use of the hob may re-
quire extra ventilation; by opening a
window for example or producing more
efficient ventilation by increasing the power of
the existing mechanical ventilation.
- Disconnect your cooker from both
electrical and gas supplies before carrying out
any maintenance operations.
- If you plug in any electrical appliance near
the hob, make sure that its power cable is not
in contact with any source of heat.
- The EECCmark of conformity can be found on
this cooker.
•
UUSSIINNGGTTHHEEOOVVEENNFFOORRTTHHEEFFIIRRSSTTTTIIMMEE::
Before using your oven for the first time, heat
it up empty with the door closed for
approximately 15 minutes on the MAXIMUM
setting in order to help the appliance to "run
in" properly. The mineral wool which
surrounds the oven cavity may at first
produce a particular smell, which is due to its
composition. Similarly, you may notice that so-
me smoke is being given off.
TThhiissiissqquuiitteennoorrmmaall..
- Do not allow anyone to lean or sit on the
open oven door.
- TThheeaacccceessssiibblleeppaarrttssoorrssuurrffaacceessmmaayyggeetthhoott
dduurriinnggooppeerraattiioonn..KKeeeeppyyoouunnggcchhiillddrreennaawwaayy..
-DDuurriinngguussee,,ddoonnoottppiicckkuupptthhee
ssaauucceeppaannss,,ppaannssoorrootthheerraacccceessssoorriieess((ggrriillll,,
ssppiittss,,ddrriippppiinnggppaann,,ssppiittccrraaddllee,,eettcc))uussiinnggyyoouurr
bbaarreehhaannddss..AAllwwaayyssuusseeaahhaannddppaaddoorrpprrootteecc--
ttiivveeccllootthhttoopprrootteeccttyyoouuffrroommtthheehheeaatt..
- Do not use a high-pressure steam cleaner.
- If a knob is difficult to turn, DDOONNOOTTFFOORRCCEEIITT.
Call up your installer.
- DDuurriinngguussee,,tthheeaapppplliiaanncceeggeettsshhoott..EEnnssuurree
tthhaattnneeiitthheerryyoouunnoorraannyyoonnee
eellsseettoouucchheesstthheehhoottppaarrttss..
1 / SAFETY GUIDELINES
Tip
Do not hesitate to call in an electrical
domestic appliance specialist in order to
ensure that your installation is correct.
4
99626797_GB_A.QXD 13/07/2005 15:06 Page 4

- TThhiissaapppplliiaanncceemmuussttbbeeiinnssttaalllleeddiinnccoonnffoorrmmiittyy
wwiitthhtthheeaapppplliiccaabblleerreegguullaattiioonnssaanndduusseeddoonnllyyiinnaa
wweellllvveennttiillaatteeddaarreeaa..CCoonnssuulltttthheeiinnssttrruuccttiioonnssccaa--
rreeffuullllyybbeeffoorreeiinnssttaalllliinnggaanndduussiinnggtthhiissaapppplliiaannccee..
- BBeeffoorreeiinnssttaallllaattiioonn,,eennssuurreetthhaatttthhee
llooccaallggaassddiissttrriibbuuttiioonnccoonnddiittiioonnss((ttyyppeeooffggaassaanndd
pprreessssuurree))aannddtthheeaaddjjuussttmmeennttoofftthheeaapppplliiaannccee
aarreeaallllccoommppaattiibbllee..
- The adjustment conditions of this
appliance are shown on the label glued
inside the housing.
- The combustion of the gas is made
possible by the oxygen in the air. It is
therefore necessary that the air should be re-
newed constantly and that the combustion pro-
ducts are removed (an air flow of 2m3 per hour for
each KW of power is necessary).
- This appliance is not connected to an eva-
cuation device for combustion
products. It must be installed and
connected in conformity with the
installation rules applicable and particular care
should be taken with regard to
ventilation.
- The heating of products as result of its ope-
ration places this cooker in class 1
(isolated appliance) or in class 2 - sub-class 1 (in-
corporable or non-incorporable, fig. 1) in accor-
dance with gas standard EN 30-1-1.
•
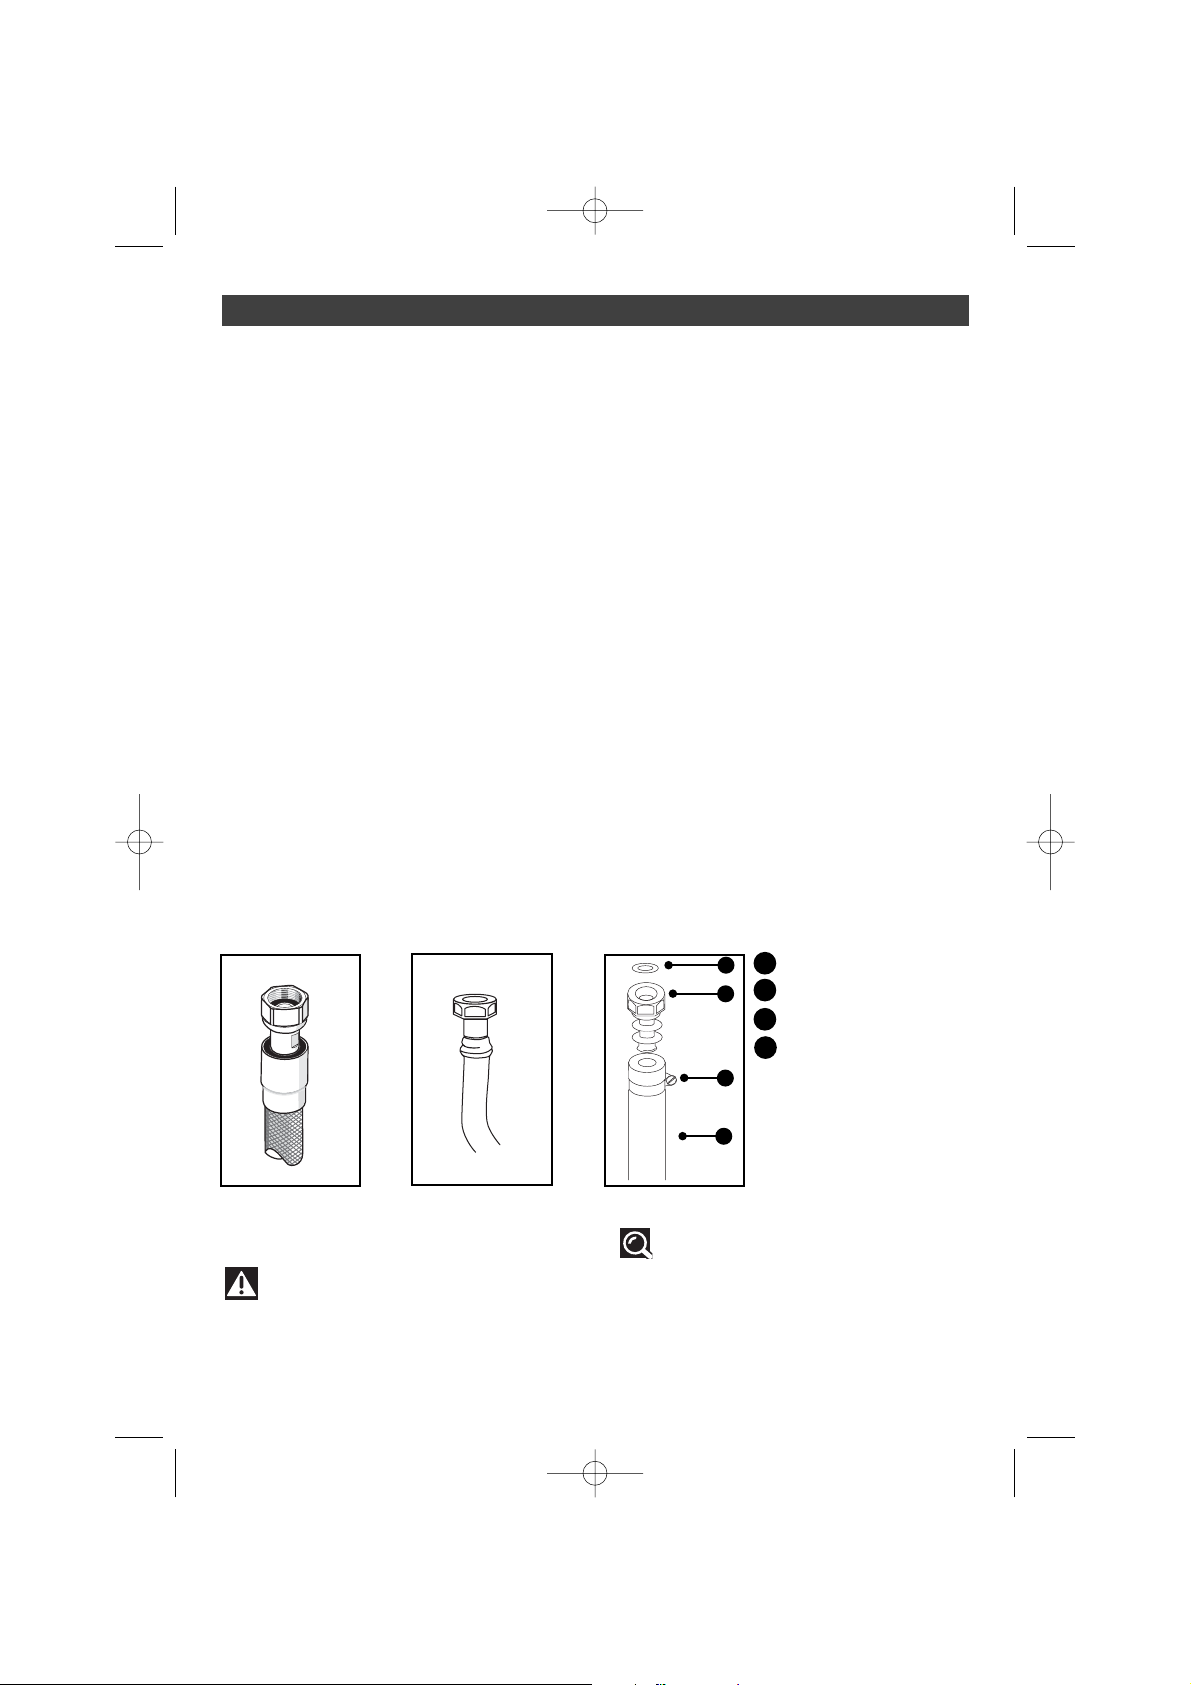
GGAASSCCOONNNNEECCTTIIOONNSS::
The gas connection is made at the rear of the
appliance, ensuring that the pipe is nneevveerriinn
ccoonnttaaccttwwiitthhtthheebbaacckkoofftthheeaapppplliiaannccee, that it
is not located in a spot where it is likely to
become blocked and that it cannot come into
contact with a moving item.
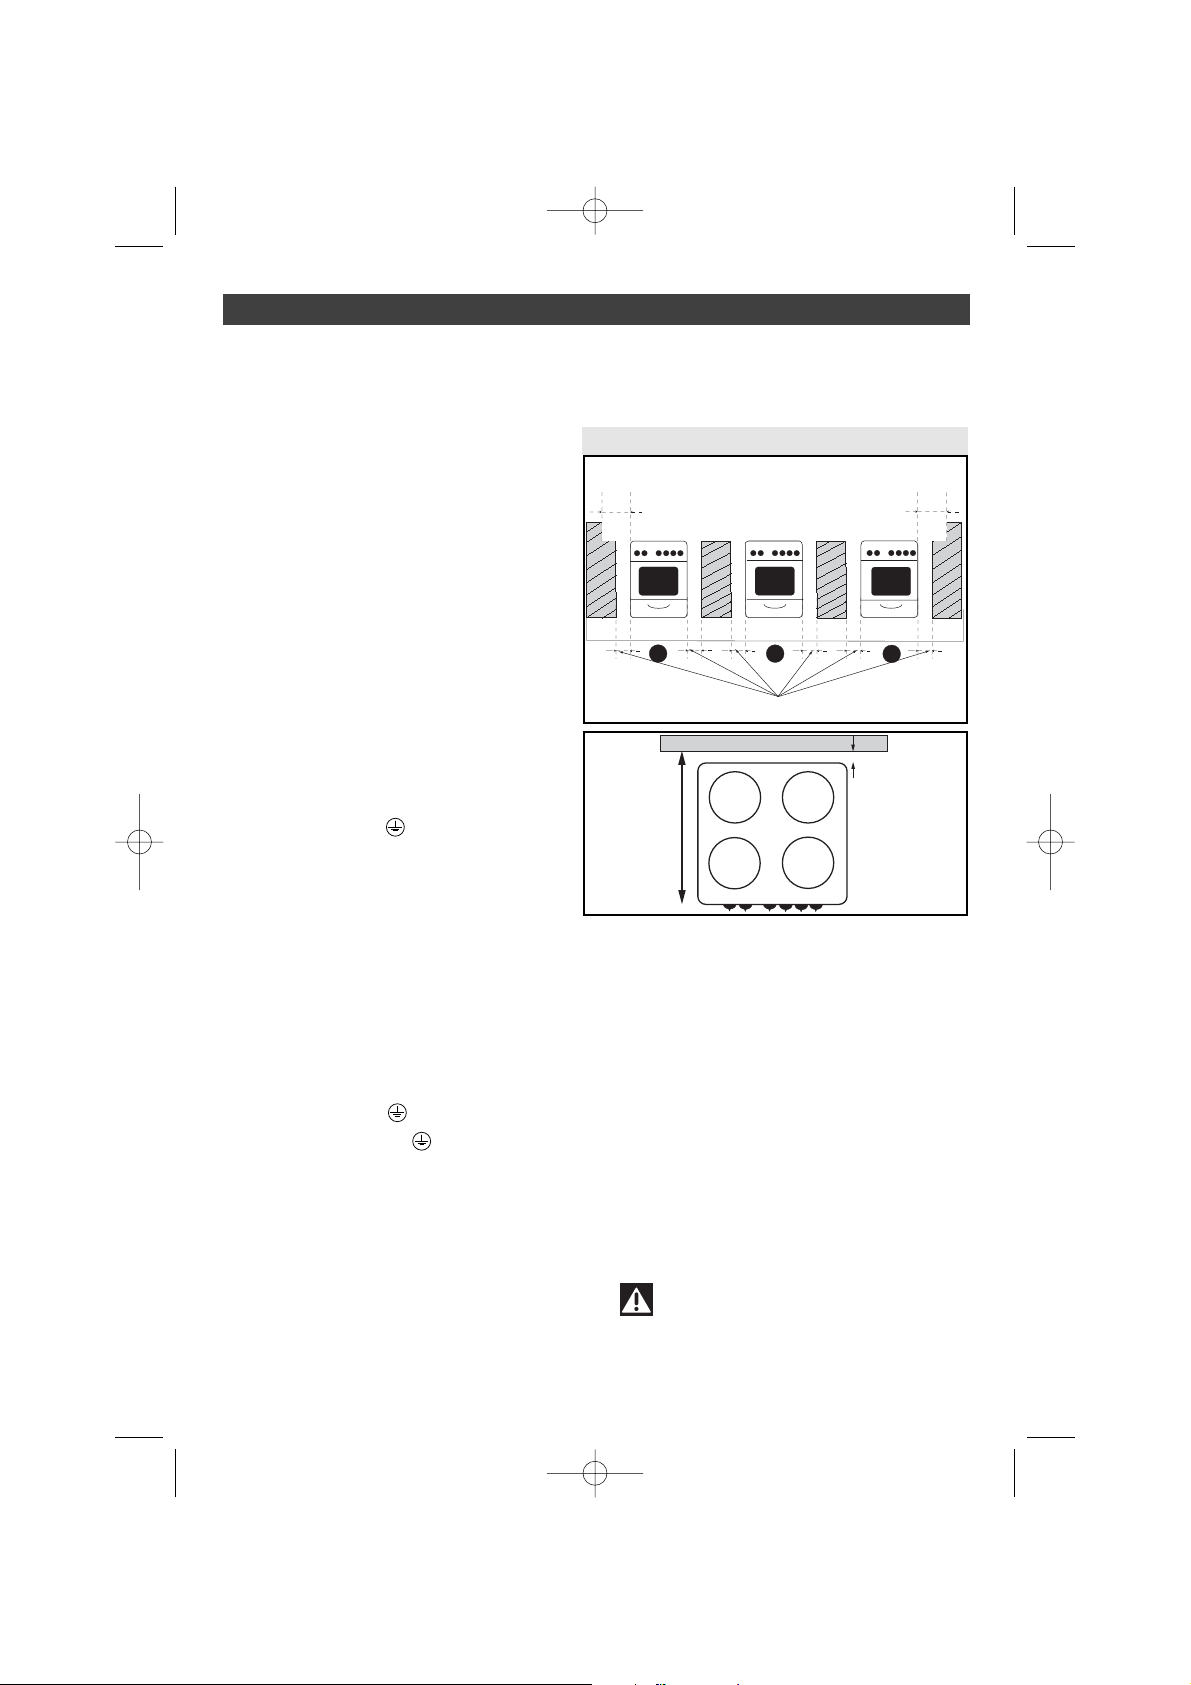
Regardless of the type or class of cooker,
and of whether it is a gas, combination or
electric appliance, the walls (rear and
adjacent) must be made from a heat resistant
material or coated with such a material.
FFlleexxiibblleettuubbeessoorrppiippeessmmuussttbbeeaacccceessssiibbllee
aalloonnggtthheeiirreennttiirreelleennggtthh,,rreeppllaacceeddbbeeffoorreetthheeiirr
eexxppiirryyddaattee((sshhoowwnnoonntthheeppiippee)),,aannddhhaavveeaa
mmaaxxiimmuummlleennggtthhooff22mm..
Connection using a flexible pipe attached to
an end piece is ssttrriiccttllyyffoorrbbiiddddeennif the gas
installation is new or modified (replacement of
the gas supply tap).
2 / INSTALLING YOUR COOKER
STATUTORY INSTALLATION
CONDITIONS
••
ENVIRONMENTAL PROTECTION
••
This appliance's packaging material is
recyclable. Help recycle it and protect the
environment by dropping it off in the
municipal receptacles provided for this
purpose.
Your appliance also contains a
great amount of recyclable
material. It is marked with this label
to indicate the used appliances
that should not be mixed with
other waste. This way, the
appliance recycling organised by
your manufacturer will be done under the
best possible conditions, in compliance with
European Directive 2002/96/EC on Waste
Electrical and Electronic Equipment. Contact
your town hall or your retailer for the used
appliance collection points closest to your
home.
We thank you doing your part to protect the
environment.
5
99626797_GB_A.QXD 13/07/2005 15:06 Page 5

When installing the appliance you should leave the
following minimum gaps between it and its
surroundings (fig. 1 and 2):
- 1100mmmmbetween the sides of the appliance and the
walls or furniture.
- 3300mmmmbetween the wall and the back of the
appliance, with the cover closed.
- The total distance between the front of the
appliance and the wall behind the appliance: 661100
mmmm(please see the view from above in fig.2).
- If the cooker is placed on a base, ensure
that the appliance is fastened firmly in place,
to avoid it sliding off the base.
The cooker must be connected to the single
phase 220-240 V mains network and the pro-
tective wire (yellow/green) must be connected
to the earth terminal of the installation.
The appliances are delivered with a power
cable and a plug (depending on the model). If
it is necessary to change the power cable or if
the power cable gets damaged, it should be
replaced by the manufacturer, by his after
sales service department or by
similarly qualified persons in order to avoid all
risks. The cable must be of the H 05 VVF type
with three 1.5 mm2 conductors.
The power cable for class 1 appliances must
include a green/yellow conductor connected
to the earth terminal of the appliance and
to the earth connection on the plug.
The appliance must be connected to the
mains using a CEI60083-standard 2P+E plug
or an all-pole cut-off device with a contact
opening distance of at least 3 mm.
In the case of connection using a plug
socket, this must remain accessible
following installation.
2 / INSTALLING YOUR COOKER
FITTING RECOMMENDATIONS
••
123
10mm
150mm
150mm
610 mm
30 mm
33ppoossssiibblleeiinnsseerrttiioonnmmeetthhooddss
fig.2
fig.1
ELECTRICAL CONNECTIONS
••
Warning
We shall not be held responsible in
the event of an accident resulting from an
installation that has not been earthed or
incorrectly earthed.
6
99626797_GB_A.QXD 13/07/2005 15:06 Page 6

••Non incorporable appliances
--FFoorrggaasseessddiissttrriibbuutteeddvviiaaaappiippeelliinnee
((nnaattuurraallggaassoorrpprrooppaannee--aaiirr//bbuuttaannee--aaiirr
ddeeppeennddiinnggoonntthheemmooddeell)),,ccoonnnneeccttiioonniiss
ccaarrrriieeddoouuttaassffoolllloowwss::
- Either by a flexible pipe with threaded
mechanical ends ((ffiigg..11)).
- Or by a rigid connection (copper pipes)
((ffiigg..22)).
- Or, in the case of an existing installation,
via a flexible tube with a diameter below 15
mm ((ffiigg..33))attached to an appropriate end
piece fitted with pipe clips at both ends.
For butane - propane distributed in bottles
or tanks, the connection is carried out:
- Either by a flexible pipe with threaded
mechanical ends ((ffiigg..11))..
- Or by a rigid connection (copper pipes)
((ffiigg..22)).
- Or, in the case of an existing installation,
via a flexible tube with a diameter below 6
mm ((ffiigg..33))attached to an appropriate end
piece fitted with pipe clips at both ends.
••Incorporable appliances
(between 2 items of furniture).
--FFoorrggaasseessddiissttrriibbuutteeddvviiaaaappiippeelliinnee((nnaattuurraall
ggaassoorrpprrooppaannee--aaiirr//bbuuttaannee--aaiirrddeeppeennddiinnggoonn
tthheemmooddeell)),,ccoonnnneeccttiioonniissccaarrrriieeddoouuttaass
ffoolllloowwss::
- Either by a flexible pipe with threaded
mechanical ends ((ffiigg..11)).
- Or by a rigid connection (copper pipes) ((ffiigg..
22)).
--FFoorrbbuuttaannee--pprrooppaanneeddiissttrriibbuutteeddiinnbboottttlleess
oorrttaannkkss,,tthheeccoonnnneeccttiioonniissccaarrrriieeddoouuttaass
ffoolllloowwss::
- Either by a flexible pipe with threaded
mechanical ends ((ffiigg..11)).
- Or by a rigid connection (copper pipes) ((ffiigg..
22)).
- Or, iinntthheeccaasseeooffaanneexxiissttiinnggiinnssttaallllaattiioonn, via
a flexible tube with a diameter below 6 mm
(ffiigg..33) attached to an appropriate end piece
ffiitttteeddwwiitthhppiippeecclliippssaattbbootthheennddss.
2 / INSTALLING YOUR COOKER
GAS CONNECTIONS
••
fig.1 fig.2
Tip
In the event of end-pieces being used
in accordance with the recommendations
above, these can be obtained from the
manufacturer’s After Sales Service
department (contact details can be
obtained from the brand’s Customer
Services department).
Warning
Installation should normally be
carried out by qualified installers and
technicians.
The appliance is delivered pre-adjusted to
mains gas (natural gas).
7
fig.3
Seal
Jubilee clip
Clip (not supplied)
Flexible tube
A
B
C
A
B
C
D
D
99626797_GB_A.QXD 13/07/2005 15:06 Page 7

MMEETTEERR
bbuuttaannee
pprrooppaannee
pprrooppaannee
pprrooppaannee
GGDDFF
Regulator
MMEETTEERR
bbuuttaannee
pprrooppaannee
propane
pprrooppaannee
GGDDFF
Regulator
CC
HHAANNGGIINNGGFFRROOMMMMAAIINNSSGGAASS
TTOOBBUUTTAANNEE
//
PPRROOPPAANNEEGGAASS
CC
HHAANNGGIINNGGFFRROOMMBBUUTTAANNEE
//
PPRROOPPAANNEEGGAASS
TTOOMMAAIINNSSGGAASS
AANNDD
MMAAIINNSS
GGAASS
BBUUTTAANNEE//PPRROOPPAANN
EEGGAASS
MMAAIINNSS
GGAASS
BBUUTTAANNEE//PPRROOPPAANNEE
GGAASS
2 / INSTALLING YOUR COOKER
GAS CONNECTIONS
••
--Adapt the gas connection,
--Change the injectors,
--Adjust the retarder on the taps.
-
The injectors needed for the adaptation to
butane/propane can be found in the plastic
sachet containing the instructions.
-
In France, this cooker is also adaptable to
propane-air / butane-air. You can obtain an
adapter sachet from your After-sales Service.
WWhheennoorrddeerriinnggtthheeaaddaapptteerrssaacchheett,,bbeessuurreettoo
ssttiippuullaatteetthheettyyppeeooffccooookkeerr..
-
Whenever you change the type of gas, enter
the new adjustment information on the label in
the sachet.
- Adaptation of the gas connection
Please refer to paragraphs of the previous
page.
Attention
When changing the gas, you must
imperatively carry out the three
following operations:
TThhiissccooookkeerriissddeelliivveerreeddpprree--aaddjjuusstteeddffoorr
mmaaiinnssggaass((nnaattuurraallggaass))..
8
99626797_GB_A.QXD 13/07/2005 15:06 Page 8

••Changing the injectors on the hob
EEaacchhiinnjjeeccttoorriissiiddeennttiiffiieeddbbyyaa
nnuummbbeerreennggrraavveedduuppoonniitt..
Change the injectors using an angled
spanner, proceeding as follows:
- Remove the supports, and all the burner
caps and heads ((ffiigg..11)).
- Using the spanner supplied, unscrew the in-
jectors at the bottom of each dish and remove
them ((ffiigg..22)).
- Replace them with the injectors supplied in
the sachet, in conformity with the gas charac-
teristics table supplied in the installation ins-
tructions. To do this:
- Screw in the injectors by hand until they are
tight.
- Put the spanner well onto the injector.
- Tighten in accordance with the
instructions below.
FFoorrooppttiimmaallttiigghhtteenniinngg::
- With a pencil draw a line on the hearth plate
as indicated ((ffiigg..33)).
- Turn the spanner clockwise until the line ap-
pears on the other side ((ffiigg..44)).
Spanner
Line
Angle spanner
Hearthplate
Injector
Dish
Warning
- You should adjust the taps to adapt
the power of the burners to the gas
(please see the following page)
fig.2
fig.3
fig.4
Burner cover
Burner head
Natural gas injector
Thermocouple (depending on model)
Sparker
A
B
C
D
E
Line
Spanner
fig.1
A
E
B
C
D
2 / INSTALLING YOUR COOKER
CHANGING THE TYPE OF GAS
SUPPLY
••
9
99626797_GB_A.QXD 13/07/2005 15:06 Page 9

fig.2
Tube Metal tie
Injector
Seal
fig.1
Deflector
••Changing the injector for the oven
and grill (according to model)
Change the injectors in the following way:
— Remove the deflector by unscrewing the
two screws holding it in place (ffiigg..11).
—Remove the rear cover by unscrewing the
11 attachment screws (ffiigg..11).
— Undip the metal tie located on the base of
each burner (bottom and grill) (ffiigg..22) using a
small screwdriver.
— Remove the injector which covers the tube.
— CChheecckkccaarreeffuullllyytthhaatttthheesseeaalliissiinnppllaacceeoonn
tthheeaalluummiinniiuummttuubbee,,oorreellsseerreemmoovveeiittffrroomm
tthheeiinnjjeeccttoorrwwiitthhoouuttddaammaaggiinnggiittaannddffiittiittoonn
tthheettuubbee..
— Check carefully that the seal is in place on
the aluminium tube, or else remove it from
the injector without damaging it and fit it on
the tube.
— Replace the tube and clip the metal tie
back on.
— Screw the rear cover and the deflector
back on.
2 / INSTALLING YOUR COOKER
Warning
You must imperatively replace the
seal on the aluminium tube before fitting
the new injector.
CHANGING THE TYPE OF GAS
SUPPLY
••
10
99626797_GB_A.QXD 13/07/2005 15:06 Page 10

MMaaiinnssggaass((nnaattuurraallggaassoorraaiirrpprrooppaannee//aaiirrbbuuttaannee))➡➡BBuuttaannee//pprrooppaanneeggaass
- Remove the knobs.
- Using a small screwdriver, screw in the brass screws of each tap (top and oven).
- Replace the knobs, light each burner in turn and gently set to the minimum position.
- Switch from full flow to reduced flow several times to check that the adjustment is correct.
BBuuttaannee//pprrooppaanneeggaass➡➡MMaaiinnssggaass((nnaattuurraallggaassoorraaiirrpprrooppaannee//aaiirrbbuuttaannee))
- Remove the knobs.
- Using a small screwdriver, unscrew in the brass screws of each tap (top and oven).
- Replace the knobs, light each burner in turn and gently set to the minimum position.
- Check that you obtain a stable flame and switch from full flow to reduced flow several times to
check that the adjustment is correct.
GGaazznnaattuurreell➡➡GGaazzaaiirrpprrooppaannéé//aaiirrbbuuttaannéé
- Remove the knobs.
- Using a small screwdriver, unscrew in the brass screws of each tap (top and oven).
- Replace the knobs, light each burner in turn and gently set to the minimum position.
- Check that you obtain a stable flame and swich from full flow to reduced flow several times to
check that adjustment is correct.
2 / INSTALLING YOUR COOKER
CHANGING THE TYPE OF GAS
SUPPLY
••
••Adjustment of the flow reduction for the taps of the hob burners.
(no flow reduction is to be carried out for the grill).
11
99626797_GB_A.QXD 13/07/2005 15:06 Page 11

AAiirr--pprrooppaannee//aaiirr--bbuuttaanneeggaass➡➡NNaattuurraallggaass
- Remove the knobs.
- Using a small screwdriver, screw in the brass screws of each tap (top and oven).
- Replace the knobs, light each burner in turn and gently set to the minimum position.
- Check that you obtain a stable flame and switch from full flow to reduced flow several times
to check that the adjustment is correct.
NNoottee::aafftteerraaddjjuussttmmeenntt,,dduurriinnggrreedduucceeddfflloowwooppeerraattiioonn,,tthheeffllaammeeoonntthheebbuurrnneerrsssshhoouullddnnoottggoo
oouutt..TThheeoovveennbbuurrnneerrsshhoouullddnnoottggoooouuttwwhheenntthheeoovveennddoooorriisscclloosseedd..NNeevveerrtthheelleessss,,yyoouu
sshhoouullddaavvooiiddcclloossiinnggtthheeddoooorrttoooosshhaarrppllyyaannddcchheecckktthhrroouugghhtthheeiiggnniittiioonnhhoolleetthhaatttthheeffllaammeeiiss
pprreesseenntt..
2 / INSTALLING YOUR COOKER
CHANGING THE TYPE OF GAS
SUPPLY
••
Oven with thermostat
Tap (according to model) Tap (according to model)
Brass
adjustment
screw
Brass
adjustment
screw
12
99626797_GB_A.QXD 13/07/2005 15:06 Page 12

3 / USING YOUR COOKER
USING THE HOB BURNERS
••
Adjustment to a lower flow is carried out by
moving from the "High Flame" symbol and the
"Low flame" symbol. The ●dot equates to the
total closure of the tap.
••Ignition without gas safety
(according to model)
Each burner is controlled by a safety lock tap
which is opened by pushing down on the
knob and then turning it in the direction.
- MMaannuuaalliiggnniittiioonn((mmooddeellwwiitthhoouutteelleeccttrroonniicc
iiggnniittiioonn))::
- Open your tap to the "High Flame" position
and
- Place a lighted match near the burner.
- EElleeccttrroonniicciiggnniittiioonn::
- Turn the burner knob to the "High
Flame" position.
- Press the electronic ignition button (press
and release).
- KKnnoobbsswwiitthhbbuuiilltt--iinniiggnniittiioonn::
- Press on the knob and turn it in the di-
rection until you reach the "High Flame" po-
sition.
- Keep the knob pressed down. This will trig-
ger off a series of sparks that will light up the
burner.
In the event of a break in the electricity sup-
ply, it is always possible to light the flame by
moving a lighted match near the burner whi-
le at the same time keeping the knob for the
corresponding tap opened at maximum
flow.
••Ignition with gas safety
(according to model)
Each burner is controlled by a tap with a safe-
ty lock which, in the event of accidental extinc-
tion of the flame (overflows, draughts etc.)
quickly shuts off the arrival of gas and pre-
vents this from escaping.
The safety feature for the burners takes the
form of a metal stem (thermocouple) located
directly next to the flame.
Warning
To set off the safety system, keep the
knob pressed completely down for a few
seconds after the flame has lit up.
- MMaannuuaalliiggnniittiioonn((mmooddeellwwiitthhoouutteelleeccttrroonniicc
iiggnniittiioonn))::
- Open your tap to the "High Flame" position
and
- Place a lighted match near the burner.
- EElleeccttrroonniicciiggnniittiioonn::
- Turn the burner knob to the "High
Flame" position.
- Press the electronic ignition button (press
and release).
- KKnnoobbsswwiitthhbbuuiilltt--iinniiggnniittiioonn::
- Press on the knob and turn it in the di-
rection until you reach the "High Flame" posi-
tion
- Keep the knob pressed down. This will trig-
ger off a series of sparks that will light up the
burner.
In the event of a break in the electricity sup-
ply, it is always possible to light the flame by
moving a lighted match near the burner while
at the same time keeping the knob for the
corresponding tap opened at maximum flow.
IIffeevveerryyoouurrffllaammeeggooeessoouutt,,rreelliigghhttiittaassppeerr
nnoorrmmaallpprroocceedduurree..
13
99626797_GB_A.QXD 13/07/2005 15:06 Page 13

••Tips for using hob burners
- When your preparation reaches boiling point,
there is no need to allow it to boil with large
bubbles. The food will not cook more quickly.
It will cook better on a lower light which will
maintain gentle
boiling.
- Adjust the ring of flame to ensure that the
flames do not lick around the saucepan or
other recipient. Your recipients must be suffi-
ciently wide to ensure that the flame spreads
out across the base without
encroaching on the sides. Otherwise, you risk
damaging the handle of the recipient.
- Do not use recipients with a domed base or
with a diameter below 12 cm on
reduced flow.
SSMMAALLLLBBUURRNNEERR
((SSEEMMII--FFAASSTT))
Recipients of 18 cm in
diameter and more :
SSAAUUCCEESS,,RREEHHEEAATTIINNGG
MMEEDDIIUUMMBBUURRNNEERR
((FFAASSTT))
Recipients of 24 cm in
diameter and more:
SSEEAARRIINNGG
EEXXTTRRAABBUURRNNEERR
((EEXXTTRRAA--FFAASSTT))
Recipients of 28 cm in
diameter and more:
FFRRYY--UUPPSS,,BBRRIINNGGIINNGGTTOO
TTHHEEBBOOIILL
AAUUXXIILLIIAARRYYBBUURRNNEERR
Recipients of 8 to
16 cm in diameter and
more:
SSAAUUCCEESS,,RREEHHEEAATTIINNGG,,
KKEEEEPPIINNGGWWAARRMM
- Some appliances are equipped with a small
grill support which is removable, for small sau-
cepans. This can be used on all of the ap-
pliance's gas rings.
When simmering on reduced flow, these sizes can be reduced respectively to 12, 14 and 16 cm.
We recommend the use of the following recipients:
3 / USING YOUR COOKER
USING THE HOB BURNERS
••
MAUVAIS
BON
EBULLI
T
MIJOT
A
BBRRIINNGGIINNGG
TTOOTTHHEEBBOOIILL
SSIIMMMMEERRIINNGG
RRIIGGHHTTWWRROONNGG
AApppplliiaanncceesswwiitthhaaggllaassssccoovveerr
((aaccccoorrddiinnggttoommooddeell))::tthheeggllaassss
ccoovveerrccaannbbuurrssttwwhheennhheeaatteedd..EEnn--
ssuurreetthhaattaallllbbuurrnneerrssaarreettuurrnneedd
ooffffbbeeffoorreecclloossiinnggtthheeccoovveerr
Warning
Glass topped cookers:
If the surface is cracked, immediately
disconnect the appliance from the power
source to avoid all risks of electric shocks.
Inform your installer right away.
Do not use the knob until it has been
repaired.
14
99626797_GB_A.QXD 13/07/2005 15:06 Page 14

••Tips for using hob burners
- To ensure the correct ignition of your bur-
ners, we advise the following:
- Regularly ensure that the sparkers are per-
fectly clean and that the various parts compri-
sing the burners operate properly.
- Before ignition, ensure that the burner heads
and covers are in the correct position.
- That you place your saucepans, pans and
other recipients on the grill before ignition with
the pushbutton.
IIttiissrreeccoommmmeennddeeddtthhaatttthheeeelleeccttrroonniicciiggnniittiioonn
sshhoouullddnnoottbbeeuusseeddiifftthheebbuurrnneerrssaarreennoottaalllliinn
ppllaaccee..
- In the case of an accidental extinction of the
flame, turn off the burner control knob and do
not try to reignite the burner for at least a mi-
nute.
-The flames on the burner are smaller near the
grate supports to avoid any damage being do-
ne to the enamel.
- The appearance of yellow specks is due to
the quality of the gas used but in no way af-
fects the performance of the burners.
- The noise generated by the burners is related
to their power, which in no way affects the per-
formance of your hob.
- To transfer your recipients from one burner
to another, do not slide them but instead lift
them in order to avoid moving the grills.
3 / USING YOUR COOKER
USING THE HOB BURNERS
••
Burner cover
Burner head
Natural gas injector
Thermocouple (depending on model)
Sparker
A
B
C
D
E
fig.1
A
E
B
C
D
15
99626797_GB_A.QXD 13/07/2005 15:06 Page 15

Cooker width and
door type
50 cm sheet metal door
60 cm sheet metal door
Sales Ref.
KKKK336600WWEE11
WWHHIITTEEGGRRIIDD
••Tips for using the oven
-UUssiinnggtthheeoovveennffoorrtthheeffiirrssttttiimmee::BBeeffoorree
uussiinnggyyoouurroovveennffoorrtthheeffiirrssttttiimmee,,hheeaattiittuupp
eemmppttyywwiitthhtthheeddoooorrcclloosseeddffoorraapppprrooxxiimmaatteellyy
1155mmiinnuutteessoonntthheemmaaxxiimmuummsseettttiinngg..
TThheepprrootteeccttiioonnwwhhiicchhssuurrrroouunnddsstthheeoovveennccaavvii--
ttyymmaayyaattffiirrssttpprroodduucceeaappaarrttiiccuullaarrssmmeellll,,wwhhii--
cchhiissdduueettooiittssccoommppoossiittiioonn..YYoouummaayyaallssoonnoo--
ttiicceetthhaattssoommeessmmookkeeiittpprroodduucceeddtthheeffiirrssttttiimmee
tthheeoovveenniisshheeaatteedd..
- The cooking guide for your appliances pro-
vides the necessary information to create a
certain number of popular dishes.
- Before beginning cooking, consult the user
instructions to find the most
appropriate heat setting and the oven level to
be used for the cooking accessories.
- By turning off the oven 5 to 10 minutes befo-
re the end of your cooking session, you can
benefit from the accumulated heat and save
energy.
- The adjustment settings for the oven thermo-
stat in the cooking guide are
provided for information purposes only.
Consequently, in order to avoid excess smoke
being produced by a cooking
temperature which is too high, it is
preferable to reduce the oven power
setting.
- Child safety (according to model)
An additional protection device making it pos-
sible to avoid contact with the oven door is
available from your distributor
under the following reference: WHITE GRID.
This device should be fitted if young children
are present.
3 / USING YOUR COOKER
USING THE OVEN
••
Warning
- Ensure that your oven door is
securely closed, to ensure that the door
seal can play its role effectively.
- Cooking in the oven and on the grill should
be carried out with the cooker cover opened
in order to facilitate the removal of hot gases
at the back of the work top.
- Do not cover the inside of your oven with
aluminium sheet. Otherwise, this will result in
a build-up of heat which will have a harmful
effect upon the cooking or roasting and will
damage the enamel.
- During operation, do not leave the oven
door open for more than three minutes in or-
der to avoid excessive temperature at the
knobs.
- During use, the appliance gets hot. Take ca-
re that neither you nor anyone else touches
the heating elements.
- The oven should not give off smoke. The
main cause of smoke is a cooking
temperature which is too high, leading to
spattering. In this case, reduce the oven po-
wer setting.
16
99626797_GB_A.QXD 13/07/2005 15:06 Page 16

3 / USING YOUR COOKER
USING THE OVEN
••
TThheeoovveennon your cooker is equipped
wwiitthhaa
ffllaammeessaaffeettyyddeevviiccee
making it possible to
automatically shut off the arrival of gas in the
event that the flame is accidentally
extinguished. When lighting your oven, this
device requires that you follow the following
instructions:
IIggnniittiinnggtthheeggaassbboottttoomm
((tthheelloowweerrbbuurrnneerriinntthheeoovveenn))..
--Open the gas tap supplying your cooker.
--Push in and turn the oven knob towards the
left until it is in the maximum position.
--KKeeeepptthheeoovveennkknnoobbppuusshheeddiinn..
--
MMaannuuaalliiggnniittiioonn((mmooddeellwwiitthhoouutteelleeccttrroonniicc
iiggnniittiioonn))::
Place a lighted match near the burner.
--
EElleeccttrroonniicciiggnniittiioonn::
Press the electronic ignition button (press and
release).
--KKnnoobbsswwiitthhbbuuiilltt--iinniiggnniittiioonn::
Press on the knob and turn it in the
direction until you reach the maximum "High
Flame" position.
--As soon as the flame appears, ccoonnttiinnuueettoo
kkeeeepptthheeoovveennkknnoobbppuusshheeddiinnffoorr55ttoo1100
sseeccoonnddss,,ttooggiivveetthheessaaffeettyyttiimmeettooaaccttiivvaattee.
Release the knob and check that the burner
remains lit.
Avoid closing the cooker door too sharply as
you risk blowing out the flames when your
oven is operating at a lower setting.
--Adjust the oven knob to the desired
position.
Warning
Your oven is fitted with either an
electronic ignition or manual ignition.
Check your appliance
••Ignition of the gas grill
((aaccccoorrddiiiinnggoottmmooddeell))
((tthheeuuppppeerrbbuurrnneerroofftthheeoovveenn))
--Push in and turn the oven knob to the right
until you reach the grill position.
--KKeeeepptthheekknnoobbppuusshheeddiinn..
--
MMaannuuaalliiggnniittiioonn((mmooddeellwwiitthhoouutteelleeccttrroonniicc
iiggnniittiioonn))::
Place a lighted match near the burner.
--
EElleeccttrroonniicciiggnniittiioonn::
Press the electronic ignition button (press and
release).
--KKnnoobbsswwiitthhbbuuiilltt--iinniiggnniittiioonn::
Press on the knob and turn it in the
direction until you reach the maximum "High
Flame" position.
--When the flame appears, ccoonnttiinnuueettookkeeeepp
tthheeoovveennkknnoobbppuusshheeddiinnffoorr55ttoo1100
sseeccoonnddss,,ttooggiivveetthheessaaffeettyyttiimmeettooaaccttiivvaattee.
Release the knob and check that the burner
remains lit
NNOOTTEE
The ignition device should not be operated for
more than 15 seconds. If after 15 seconds the
burner has not lit up, stop operating the ignition
device, open the door of the oven and/or wait
for at least one minute before trying to ignite the
burner once again.
In the event of the accidental extinction of the
burner's flame, turn off the burner control knob
and do not attempt to relight the burner for at
least one minute.
Prolonged, intensive use of the hob may require
extra ventilation; by opening a window for
example or producing more efficient ventilation
by increasing the power of the existing
mechanical ventilation.
EElleeccttrriiccGGrriillll((aaccccoorrddiinnggttoommooddeell))
--Press in and turn the oven knob (located on
the left of the cooker control panel) to the right
until the grill position is reached.
The "On" indicator shows that the grill is
operating.
17
99626797_GB_A.QXD 13/07/2005 15:06 Page 17

••Flat shelf fig.2
The flat shelf can be used to support all dishes
and tins containing foodstuffs to be cooked or
browned. It can also be used for grilling meat.
••Multi-purpose dripping pan fig.3
This can be used as a baking tray and has slo-
ping sides. It can be used for cooking choux
buns, meringues, small cakes, flaky pastry,
etc.
Inserted into the runners under the shelf, it
collects the juices and fat produced when
grilling. It can also be used, half-filled with wa-
ter, as a bain marie.
Do not roast joints of meat in the dripping pan
as this will inevitably result in fat splashes on
the sides of the oven.
Never place this tray directly on the floor of
the oven, except on the GRILL setting.
BK
FR
••Anti-drop safety shelf fig.1
The shelf can be used to support all dishes
and tins containing foodstuffs to be cooked or
browned.
It can also be used for grilling meat (with the
meat placed directly upon it).
••Removal of dishes using a sliding
oven removal system fig.4
Fitted with a cake plate holder, this makes it
possible to completely remove the dish from
the oven enclosure, enabling you to intervene
easily during cooking.
The system has a anti-drop safety system en-
abling it to bear a weight of 5 kg spread uni-
formly.
3 / USING YOUR COOKER
ACCESSORIES
(depending on model)
fig.3
fig.2
fig.1
fig.4
••Pastry tray fig.5
Placed on the oven shelf, this is used for
cooking pastries such as cream puffs,
meringues, madeleines, puff pastry, etc.,
(maximum weight 25 kg). fig.5
18
99626797_GB_A.QXD 13/07/2005 15:06 Page 18

berceau
tourne-broche
Rotisserie Spit
Berceau
Broche
Fourchette
(suivant modèle)
poignée
Handle
(depending on model)
Cradle
Spit
Fork
••The dripping pan fig.6
This is used to collect juices and fat from cooking on
the high grill and the pulsed grill (according to mo-
del).
It can be used as a cooking dish according to the si-
ze of the item to be cooked (for example poultry sur-
rounded by vegetables, at medium temperature).
Avoid placing small roasts or meat joints in it and co-
oking them at high temperatures as you will automa-
tically have problems of fat and juices spattering up
the walls of the oven.
Never place this dish directly on the bottom.
••Rotisserie (depending on model)
fig.7
Cooking on a rotisserie is very effective and
results in flavourful and evenly cooked joints.
To use:
- engage the spit cradle in the 3rd shelf posi-
tion from the bottom (check the direction)
- slide one of the forks onto the spit, then the
meat for roasting, slide on the second fork,
centre them and twist the forks to tighten
them,
- place the spit on its cradle,
- push gently to engage the point of the spit in
the square bit drive at the back of the oven,
- place the multi-purpose dripping pan on the
lower shelf position to collect the cooking
juices.
Poignée dévissable
Berceau
Broche
Fourchette
(suivant modèle)
poignée
6600ccmmmmooddeellmmuullttiipplleeccooookkiinngg
3 / USING YOUR COOKER
ACCESSORIES
(depending on model)
••
Warning
Cradle direction : you should place
the cradle in such a manner that the hole
for the spit is fully visible.
Warning
If the spit has an insulated handle,
unscrew and remove it before reclosing
the door.
fig.7
fig.7
fig.7
fig.6
5500ccmmmmooddeell
6600ccmmmmooddeell
Removable handle
Cradle
Spit
Fork
Handle
(depending
on model)
19
99626797_GB_A.QXD 13/07/2005 15:06 Page 19

CCaassiinngg
CCoonnttrroollkknnoobbss
- SSppoonnggeethe top wwiitthhssooaappyywwaatteerr. In the event of spills, use a ssttaannddaarrddnnoonn
aabbrraassiivveeppaasstteecclleeaanneerrffoorreennaammeell. Shine with a dry cloth, or even better with aa
sshhaammmmyy--lleeaatthheerr. Do not allow acidic liquids (lemon juice, vinegar…) to lay on
the enamel for long.
Before opening the cover, remove all soiling or spattering from this. Do not
close it again while the cooker is still warm.
For polished metal surfaces, use commercial products designed for the
upkeep of polished metal.
- Use ssooaappyywwaatteerroonnaaddaammppssppoonnggee..
GGrriillllss//ppaann
ssuuppppoorrttss- Only use ssooaappyywwaatteerroonnaaddaammppssppoonnggee. Never use sharp objects.
GGaassbbuurrnneerrss
- The gas injector is at the centre of the burner. Ensure that you do not block
it during cleaning, which would affect the performance of your hob. To clean
the burner covers, use ssooaappyywwaatteerr.
In the case of persistent stains, you can use a small amount of nnoonn--aabbrraassiivvee
ccrreeaammon a sponge, and then rinse with clean water.
Carefully wipe the burner covers before using your hob again. In the event of
the burner vents becoming blocked or the sparkers getting dirty, clean them
using a brush with firm bristles.
OOvveennddoooorr
wwiinnddooww
- After a particularly messy cooking session, we recommend that you clean
the inner window with ssooaappyywwaatteerroonnaaddaammppssppoonnggee.
WWHHAATTTTOODDOO??
4 / HOW TO LOOK AFTER YOUR COOKER?
Warning
Before cleaning, allow the appliance to cool down and check that all the knobs are in
the OFF position.
As a general rule, abrasive powders and metallic sponges should not be used.
Warning
- Do not use high-pressure steam cleaners.
- Never splash or spray the cooker with water.
20
99626797_GB_A.QXD 13/07/2005 15:06 Page 20
Other manuals for KG365TE1
1
Table of contents
Other Brandt Cooker manuals

Brandt
Brandt TI2FSOFT User manual

Brandt
Brandt KG365TE1 User manual

Brandt
Brandt TI2005 User manual

Brandt
Brandt TI1FSOFT User manual

Brandt
Brandt TI2SLIM1 User manual

Brandt
Brandt TI2SLIM User manual

Brandt
Brandt KV567WE1 User manual

Brandt
Brandt KG265 E1 Series User manual

Brandt
Brandt KV374XE1 User manual

Brandt
Brandt KV368WE1 User manual

Brandt
Brandt TI2010R User manual

Brandt
Brandt KV568WE1 Operation manual

Brandt
Brandt KG468WA1 Operation manual

Brandt
Brandt KV568 Series User manual

Brandt
Brandt KV374WE1 User manual

Brandt
Brandt TI1801 User manual

Brandt
Brandt KV373WE1 User manual

Brandt
Brandt KV371WE1 User manual

Brandt
Brandt TI1SLIM User manual

Brandt
Brandt KV372WE1 User manual