Brandt KV372WE1 User manual

Operating instructions
for your new cooker
Cooker
Reference KV372WE1
99628641_GB_A.qxd 12/05/03 16:04 Page 1

displays safety instructions
displays tips and hints
2
Dear Customer,
Thank you for purchasing a Brandt cooker.
Our research teams have designed for you a new generation of appliances for pleasurable
cooking every day.
Featuring a pure styling and modern design, your new cooker blends perfectly into your
kitchen, combining ease of use with cooking performance.
You will also find in the Brandt range a wide selection of ovens, extractor hoods, dishwashers
and refrigerators that you can coordinate with your new Brandt cooker.
Of course, constantly concerned with better satisfying your requirements, our customer
service department can answer all your questions and welcomes all your suggestions (details
at the end of this booklet).
At the cutting edge of innovation, Brandt contributes to the quality of daily life by giving you
constantly improving products that are simple to use, respect the environment and are
well-designed and reliable.
BRANDT.
Editorial
In this Manual,
List of contents
The layout of your cooker 3
Using radiant cooking zone 4
Oven cook settings 6-7
Cooking guide 8-9
Using the oven 10
After Sales Service 12
99628641_GB_A.qxd 12/05/03 16:04 Page 2

The layout of your cooker
3
These cookers have been designed for private use in the home.
Please read these instructions before installing and using your
cooker.
With a view to constantly improving our products, we reserve the right to
make any changes in their technical, functional or aesthetic characteristics as a
result of technical developments.
These cookers are designed exclusively for the cooking of drinks and
foodstuffs.
These products do not contain any asbestos-based component parts.
You must always keep an eye on your cooking.
Please read
Sélecteur
des fonctions
du four
Manette
du foyer radiant
arrière gauche
Manette
du foyer radiant
avant gauche
Manette
du foyer radiant avant droit
Manette
du foyer radiant arrière droit
Manette
de thermostat
du four
Voyant
de thermostat
du four
Voyant de mise
sous tension des
foyers radiants
Chaleur résiduelle
Foyer radiant arrière gauche
1800 W - diam.180 mm
Foyer radiant arrière
droit
1500 W
diam.160 mm
Foyer radiant avant droit
1800 W - diam.180 mm
Foyer radiant avant
gauche
1200 W
diam.145 mm
Témoins de chaleur résiduelle
de chaque zone de cuisson
Rear right radiant cooking zone
1800 W - diameter 180 mm
Residual heat indicators for
each cooking zone
Front right radiant
cooking zone
1200 W - diameter
145 mm
Rear left radiant cooking zone
1500 W - diameter 160 mm
Front left radiant cooking zone
1800 W - diameter 180 mm
Hob hot indicator
for each cooking
zone
Oven
temperature
regulator
Oven controls
Rear right radiant
cooking zone knob
Front right
radiant cooking
zone knob
“Power on” indicator for
cooking zones
Rear left radiant cooking zone
knob
Front left radiant cooking zone
knob
99628641_GB_A.qxd 12/05/03 16:04 Page 3

4
Position 1, 2, 3
Used for continuous cooking, for reheating
or for keeping certain dishes warm.
Position 4, 5, 6
Used for simmering and for cooking larger
quantities.
Position 7, 8, 9
Used for roasting, frying and bringing to the boil.
For rapid heating or roasting
Set the switch for the hotplate or cooking
zone to position 9. When it has heated up,
turn the switch back to the appropriate
position.
Using your cooker in all simplicity
POSITION
0
1
2 - 3
4
5 - 6
7
9
MODE
OFF
WARMING
SIMMERING
SLOW COOKING
MEDIUM COOKING
HIGH
ULTRA-HIGH
DISHES
Keeping dishes
warm, dishes
ready-to-serve,
slow simmering
White sauce,
stews, pulses, rice
pudding, medium
simmering,
reheating.
Pasta, mashed
potatoes, soup,
jam, broth/stock.
Escalopes,
croquettes, fresh
vegetables, soup,
fried frozen foods,
sauté potatoes.
Omelettes, boiling
milk.
Lamb chops, grilled
meat, steaks, fried
dishes.
Using the radiant cooking zones
●Details of cooking positions
A high setting is needed for:
- Large quantities
- Cooking with uncovered recipients
- Using glass or ceramic saucepans.
99628641_GB_A.qxd 12/05/03 16:04 Page 4

5
Personal notes
99628641_GB_A.qxd 12/05/03 16:04 Page 5

6
Oven cook settings
Your oven is equipped with an automatic preheating function. This function enables you to place the dish
to be cooked into the oven at the beginning of the heating cycle, without having to wait for the oven to
reach the set temperature. This automatic preheating function is not available for the GRILL functions.
TRADITIONAL CONVECTION
•
The top and bottom elements perform cooking to which the air
propeller is added to guarantee even cooking;
•
Fast rise in temperature : food preparations can be placed directly in the cold oven.
•
Temperatures recommended are lower than in cooking modes not using the propeller.
•
Less fat burnt. Less spattering, less risks of smoking.
•
Limites the loss in weight of the food. Fragile vegetables (stuffed tomatoes) will not
be squashed, or burst, potatoes au gratin will be soft and browned.
•
Controls adapted to cooking identical or different dishes on two levels at the same
temperature. The flavours of both will be kept apart.
GRILL CONVECTION
•
The top element performs cooking to which the air propeller is added to guarantee
an even distribution of colour.
•
A large cut of meat can be roasted (chicken, duck...) laid on the rack; turn it once
while cooking. Place the enamel drip pan on the 1st runner to collect the cooking juices.
FLOOR CONVECTION
•
Cooking is performed from underneath, the air propeller is added to guarantee even
cooking, colouring and browning of the dish.
•
Cooking mode recommended for pizzas, quiches,juicy fruit tarts, milk bread, cakes...
Wet cake mixes will be perfectly cooked underneath. Doughs (milk loaf...),
risen cake mixes (cakes...), soufflés will not be prevented from rising by the formation
of a crust.
99628641_GB_A.qxd 12/05/03 16:04 Page 6

7
ACCESSORIES : your appliance is fitted with a multipurpose dripping pan, a hollow dish, an
arched shelf, with an optional spit and a flat, tip-proof shelf.
DEFROSTING
•
Food can be defrosted with a limited amount of heat, the propeller accelerates the
exchanges of heat.
•
This mode is particularly adapted to delicate food to be eaten raw (strawberries, rasp-
berries...).
•
The defrosting temperature can be increased to defrost food to be cooked following
the defrosting (meat...). Proceed with care to avoid cooking the surface of the meat.
Place the cuts on the rack on the 2nd runner, and the multi-purpose dripping-pan on
the 1st runner so that they are not in contact with the juices from defrosting.
* TRADITIONAL
•
Top and bottom elements perform cooking without air convection.
•
Baked eg custard, flans, caramel creams can be cooked to perfection in the dripping-
pan used as a bain --marie, without forgetting burnt caramel creams stood a few
minutes under the grill after sprinkling with sugar.
•
After preheating cook roasts, vegetable dishes such as browned potaotes, baked
stuffed tomates, fish poultry and tarts.
GRILL (high-power)
•
Mode adapted to grilling :
• Preheat for 5 min.with the rack in the oven then place the food on it and place on a
suitable runner (depending on size).
• Place the dripping-pan on the 1st runner.
Pour a glass of water into it ; this tip has the advantage of reducing smoke and smells
particularly when grilling meat, sausages…
•
Ideal for making toast.
* Sequence(s) used for the statement featured on the energy label, in conformity with Euro-
pean standard EN 50304 and European directive 2002/40/CE.
Oven cook settings
99628641_GB_A.qxd 12/05/03 16:04 Page 7

8
Cooking guide
DISHES
TRADITIONAL COOKING
COOKING SHOULD ALWAYS BE CARRIED OUT WITH THE DOOR CLOSED AND UNDER YOUR SUPERVISION.
MEAT
Roast pork(1kg)
Roast Veal (1kg)
Roast beef
Lamb (Leg of lamb, Shoulder 2,5 kg)
Poultry (1 kg)
Large poultry pieces
Chicken legs
Pork and veal chops
Beef ribs (1 kg)
Mutton chops
FISH
Grilled fish
Cooked fish (Sea bream)
Fish cooked in tinfoil
VEGETABLES
Gratins (cooked dishes)
Browned potatoes
Lasagnes
Stuffed Tomatoes
VARIOUS
Kebabs
Paté in terrines
Pizza (shortcrust base)
Pizza (bread base)
Quiches
Soufflé
Pies
Bread
Toasted bread
Casseroled dishes (lidded)
Thermostat
*180
*180
*240
210
180
180
*180
*240
*180
*180
*180
*210
*210
*240
*210
*210
*210
180
2
2
2
1
2
1
2
2-3
2
2
2
2
2
3
2
2
1
1
Thermostat
*240
180
*210
1
1
1
Thermostat
210
210
*210
*210-240
210-240
*270
*270
*270
*270
*270
RS
RS
3
3
3-4
4
4
3-4
4
4-5
180
180
180
180
*210
180
180
180
*180
210
*210
180
180
180
*210
150
2
2
2
2
2-3
2
2
2
2
2
3
2
1
2
1
1
*240
180
*210
2
1
1
210
180
210
210
210
210
240
240
210
240
*270
2
2
RS
3
3
3
4
4
2-3
4
4-5
90
60-70
30-40
50-55
50-70
90-120
15-25
15-20
25-30
10-20
15-20
35-45
10-15
30
55-60
40-45
40-45
15-20
80-100
30-40
15-18
30-45
50
40-45
30-50
1-2
90-180
Add a little water
Instructions overleaf
Placed on the grill
Earthenware dish
Double boiler pan
30 cm baking tin
Multipurpose dish
30 cm baking tin
21 cm baking tin
On the grill
Depending on the preparation
Cooking time
in minutes
indications
MULTIFUNCTION COOKING
Runner
Runner
Runner
Runner
Runner
Runner
Thermostat
Thermostat
Thermostat
99628641_GB_A.qxd 12/05/03 16:04 Page 8

9
Cooking guide
Capacity available: 50,4 l
EQUIVALENCE : THERMOSTAT SETTING
➜➜
°C
Number 1 2 3 4 5 6 7 8 9 maxi
C° 55 75 100 125 150 180 210 240 270
*Preheat to the temperature shown in sequence or according to model.
•Do not cook meat in the dripping pan: risk of spatter.
•When using a double boiler pan, you should always begin with boiling water: do not overfill the dish.
•When using the GRILL function, place the item to be grilled on the grill or the rotary spit, with the dripping pan on the level below to catch the juices.
•RS = Rotary spit (depending on the model).
Your cooker is equipped with five levels.
For the grill function, using the rotary spit do not exceed 210°C (temperature recommended in this guide) and grill with the door closed.
!
4
3
2
1
5
PASTRY
Sponge cake
Sponge roll
Brioche
Brownies
Cake - Pound cake
Clafoutis (fruit in batter)
Creams
Cookies - Biscuits
Kugelhopf (Alsatian cake)
Meringues
Madeleines
Choux pastry
Small pastry cakes
Savarin
Shortcrust pastry tarts
Fine puff pastry tarts
Sponge tarts
*210
*180
*180
*180
*180
*180
*180
100
*210
*180
*210
*180
*210
*240
*210
3
1
2
1
2
2
3
2
2
3
3
2
2
2
2
180
180
180
180
180
180
1
1
2
1
1
1
180
150
180
100
*210
*180
*210
210
*210
*180
2
2
3
2
2
3
3
2
2
2
180
180
180
180
180
*210
180
210
1
1
2
1
1
2
1
2
35-45
5-10
25-30
25-30
55-60
35-45
20-45
15-18
45-50
90
5-10
30-40
10-15
30-40
30-40
15-25
35-45
Large glass dish
Double boiler pan
Multipurpose dish
Plates on the grill
depending on size
30 cm baking tin
Multipurpose dish
Multipurpose dish
99628641_GB_A.qxd 12/05/03 16:04 Page 9

10
Roasting joints
•Allow all joints to sit at room
temperature for at least 1 hour before
roasting. Remove any excess fat to
prevent smoke and smells.
•Wherever possible use earthenware
rather than glass dishes (less spitting)
big enough to contain the joint easily.
•Do not sprinkle with salt before
cooking as this dries the meat out.
•Add a few tbsp of warm water to the
roasting dish to prevent the juices
burning.
•Cooking time
- Roast beef 10 to 15 min for 500 g.
- Roast pork 35 to 40 min for 500 g.
- Roast Veal 30 to 40 min for 500 g.
•After removing from the oven, wrap
the joint in kitchen foil and leave to
recover for 10 to 15 mins. The meat
will be more succulent and tender, and
more uniform in colour.
•Grilling meat: Drizzle with a thin
layer of oil. Avoid pricking red meat
and use a spatula or tongs to turn
over.
•Prick poultry skin under the wings so
the juices can run out without spitting.
Baking cakes
•Choosing your cake tin:
Avoid bright shiny tins:
- They require longer cooking times.
- The oven has to be pre-heated.
Use non-stick tins for flans, pies
and quiches. These give crisper
golden pastry on the base.
•Tip:
Even if your tins are non-stick, use
baking parchment to protect them.
It makes it easier to turn flans etc.
out. Use it too to line enamelled tins
to protect the coating from fruit acids.
Always add yeast last and avoid
contact with salt, which will destroy
the yeast's properties.
When you use the fan feature we
recommend that you reduce cooking
temperatures by 30-50ºC compared
with a conventional oven and extend
the cooking time by 5 to 10 minutes.
Cooking vegetables
•When preparing a dish topped with
layered potatoes, pre- cook the sliced
potatoes in water or milk.
•To peel peppers, place them under
a hot grill turning frequently until the
skin bubbles. Pop into a plastic bag
for a few minutes and the skin will
peel away easily.
•When stuffing tomatoes, slice off
one end and scoop out the pulp and
pips. Salt the inside and leave to drain
on a grid before stuffing.
•Drain cooked leeks and chicory
thoroughly before coating with a
sauce (ham or béchamel) otherwise
the cooking liquid will water down the
sauce.
•Mix grated cheese with
breadcrumbs for a topping that is
brown and crispy.
Using the oven
•When cooking times are long, turn the oven off 5 to 10 minutes
before the end and use the residual heat to finish the dish.
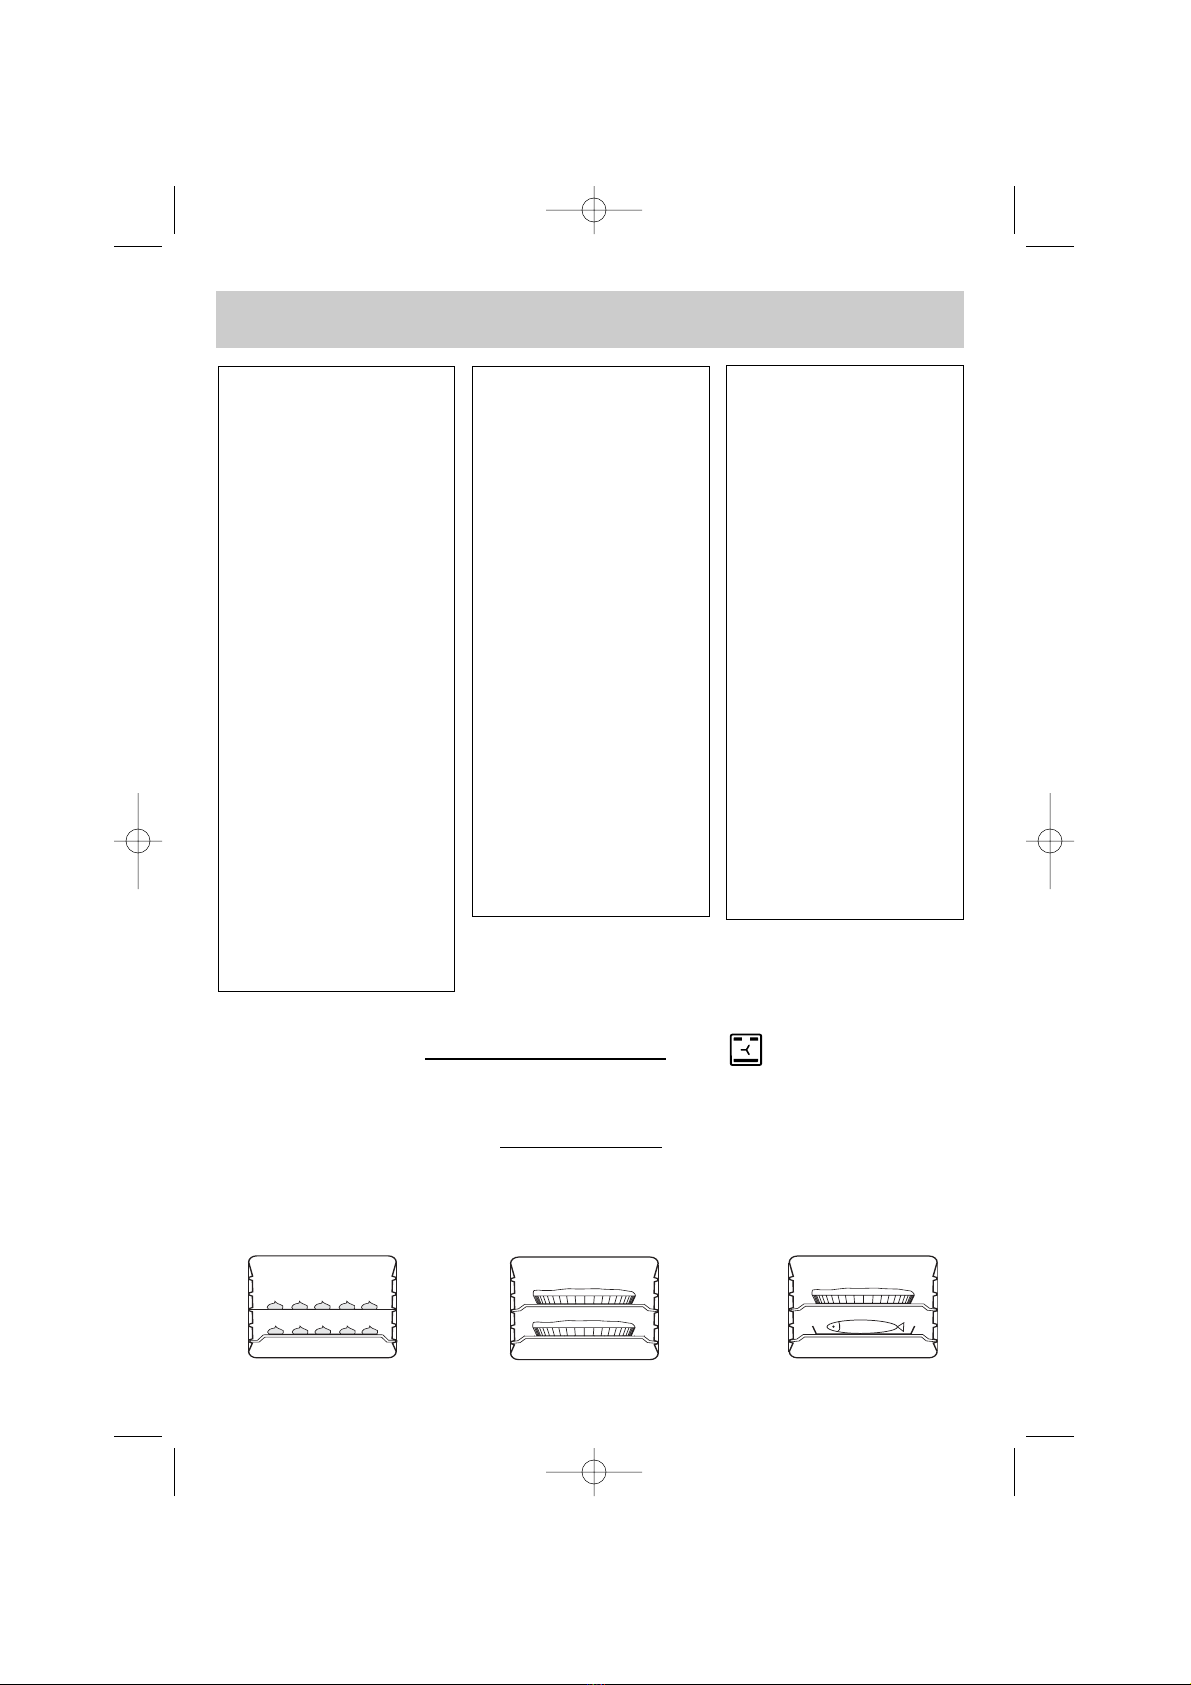
Cooking on 2 levels with
PRE-HEAT THE OVEN BEFORE COOKING THE DISH
•Several dishes (similar or different) can be cooked at the same time without any contamination of
smell or taste, provided they require the same temperature. The dishes cooked can require different
lengths of cooking. The cooking times shown in the table for each dish should be extended by 10 to 20
minutes.
Small cakes
2 shelves
3
1
2 Tarts
3
1
2 shelves
1 fish + 1 tart
3
1
99628641_GB_A.qxd 12/05/03 16:04 Page 10

11
99628641_GB_A.qxd 12/05/03 16:04 Page 11

9962- 8641 - 05/03
After Sales Service
Caution! Be sure to keep these instructions in a safe place after having copied the
information from the identification plate on the cooker housing (open the lower
door or the draw).
Serial number
BRANDT APPLIANCES SAS
7 RUE HENRI BECQUEREL
92500 RUEIL MALMAISON
TYPE
99628641_GB_A.qxd 12/05/03 16:04 Page 12
Table of contents
Other Brandt Cooker manuals

Brandt
Brandt KV600WN1 Quick start guide

Brandt
Brandt KV568WE1 Operation manual

Brandt
Brandt KG265 E1 Series User manual

Brandt
Brandt TI1SLIM User manual

Brandt
Brandt TI342 User manual

Brandt
Brandt TI1FSOFT User manual

Brandt
Brandt KV368WE1 User manual

Brandt
Brandt TI2010R User manual

Brandt
Brandt TI2FSOFT User manual

Brandt
Brandt KV374WE1 Quick start guide

Brandt
Brandt TI1FSOFT User manual

Brandt
Brandt KV374XE1 User manual

Brandt
Brandt KV374WE1 User manual

Brandt
Brandt TI2SLIM1 User manual

Brandt
Brandt KV371WE1 User manual

Brandt
Brandt KV567WE1 User manual

Brandt
Brandt KG468WA1 Operation manual

Brandt
Brandt TI1801 User manual

Brandt
Brandt KG365TE1 Quick start guide

Brandt
Brandt KV373WE1 User manual