8
Recipe Example: Mashed Potatoes
1 kg cooked potatoes
200 ml warm milk
• Place the potatoes in a bowl and mash for 30 seconds (3/4
way on the Smart Speed switch)
• Add the milk. Resume mashing for another 30 seconds.
Chopper Accessory (D)
The chopper (10) is perfectly suited for hard cheese, onions,
herbs, garlic, vegetables, bread, crackers and nuts.
Use the «hc» chopper (10) for fine results.It is not suitable for
meat.
Refer to the Processing Guide D for maximum quantities,
recommended times and speeds.
For «hc» chopper do not exceed the quantity of ingredients
higher than max line. Maximum operation time for the «hc»
chopper: 1 minute for large amounts of wet ingredients,
30 seconds for dry or hard ingredients.
Note: leave an interval of at least 3 minutes before operating
again (To prevent faults). Immediately stop processing when
motor speed decreases and/or strong vibrations occur.
Before Use
• Pre-cut foods into small pieces for easier chopping.
• Remove any bones, tendons and gristle from meat to help
prevent damage to the blades.
• Make sure the anti-slip rubber ring (10d) is attached to the
bottom of the chopper bowl.
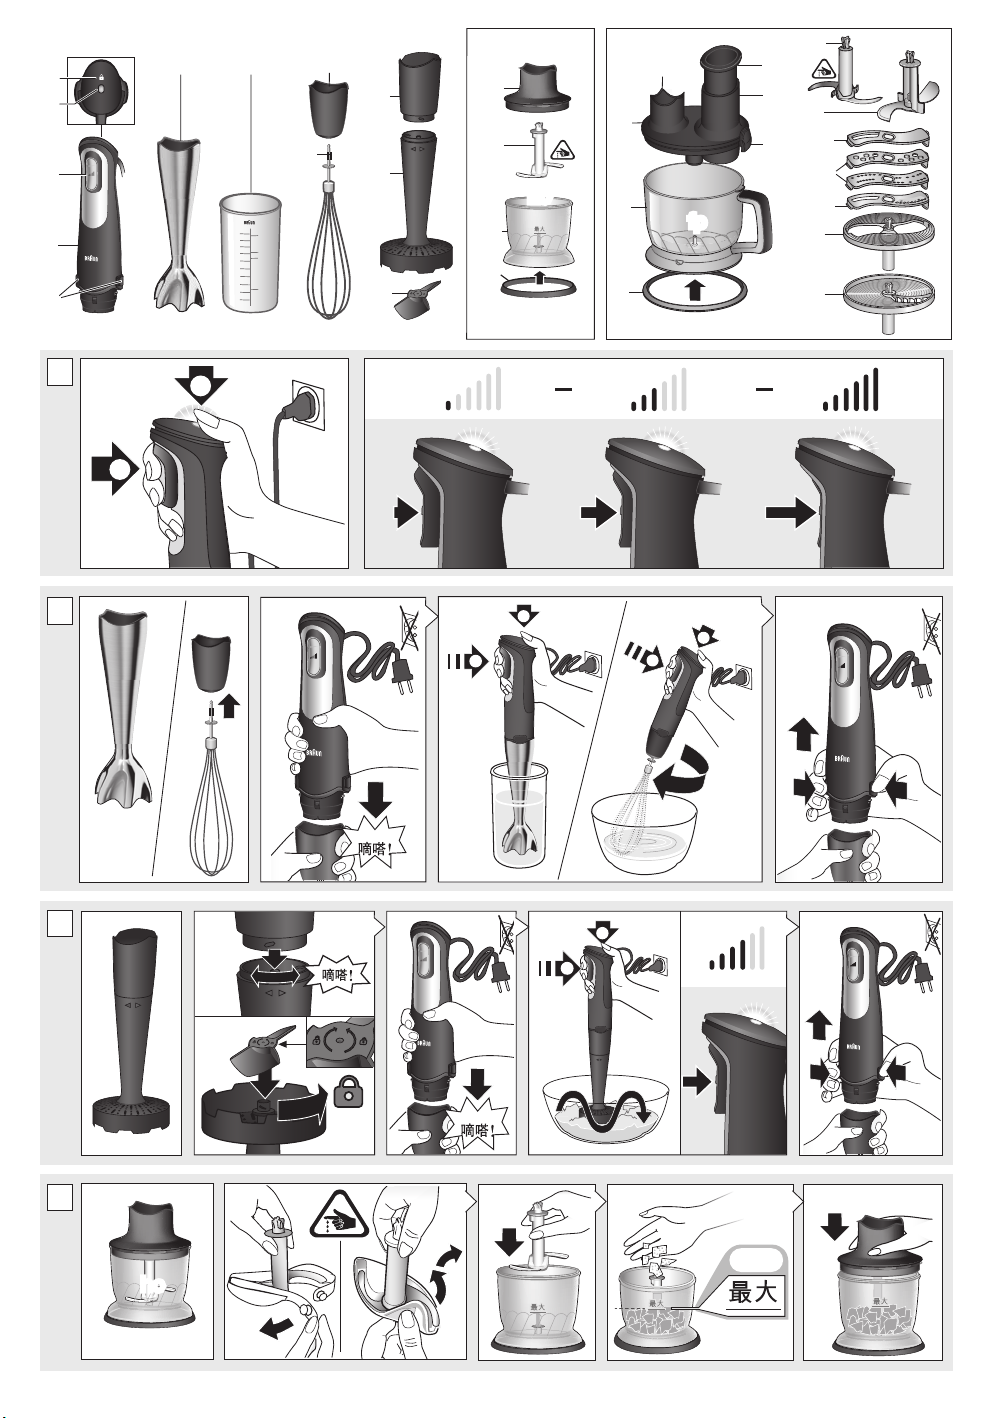
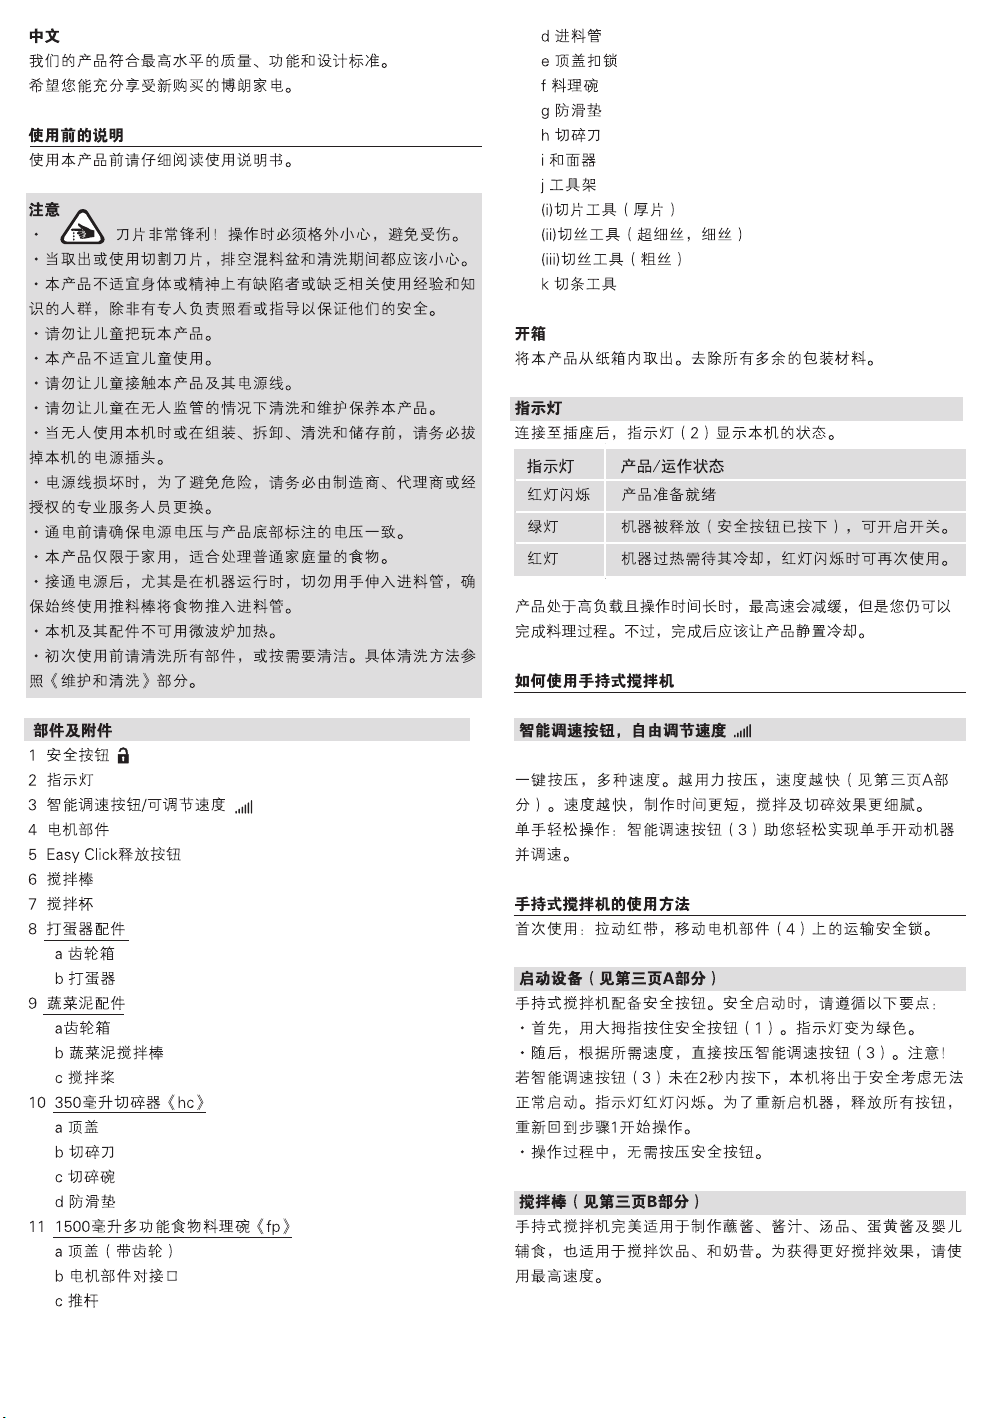
Assembly and Operation
• Carefully remove the plastic cover from the blade.
• The blades (10b) are very sharp! Always hold them by the
upper plastic part and handle them carefully.
• Place the blade on the center pin of the chopper bowl (10c).
Press it down and give it a turn so that it locks into place.
• Fill the chopper with food and put on the lid (10a).
• Align the chopper with the motor part (4) and click together.
• To operate the chopper, switch on the appliance. During
processing, hold the motor part with one hand and the
chopper bowl with the other.
• Always chop harder foods (e.g. parmesan cheese) at full
speed.
• When chopping is complete, unplug and press the
EasyClick release buttons (5) to detach the motor part.
• Lift the lid up. Carefully take out the blade before pouring
out the contents of the bowl. To remove the blade, slightly
turn it then pull it off.
Caution
• Do not use the chopper accessory (10) to process
extremely hard foods, such as unshelled nuts, ice cubes,
coffee beans, grains, or hard spices e.g. nutmeg.
Processing these foods could damage the blades.
• Never place the chopper bowl in the microwave oven.
«hc» Recipe example: Honey-Prunes (as a pancake stuffing or
spread):
50 g prunes
70 g creamy honey
10 ml water (vanilla-flavoured)
• Fill the «hc» chopper bowl with prunes and creamy honey.
• Chop 4 seconds at maximum speed (fully press the Smart
Speed switch)
• Add 10 ml water (vanilla-flavoured).
• Resume chopping for another 1,5 seconds.
Food Processor Accessory
The food processor accessory (11) can be used for:
• Chopping, blending and mixing light batter;
• kneading dough (based on max. 250 g flour);
• slicing, shredding, julienning, and making french fries.
Chopping (E)
Using the blade (11h) you can chop meat, hard cheese,
onions, herbs, garlic, vegetables, bread, crackers, and nuts.
Refer to the Processing Guide E for maximum quantities,
recommended times and speeds.
Before Use
• Pre-cut foods into small pieces for easier chopping.
• Remove any bones, cartilage, tendons and gristle from
meat to help prevent damage to the blades.
• Remove stems from herbs, shell nuts.
• Make sure the anti-slip rubber ring (11g) is attached to the
bottom of the food processor bowl.
Assembly and Operation
• Carefully remove the plastic cover from the blade.
• The blade (11h) is very sharp! Always hold it by the upper
plastic part and handle it carefully.
• Place the blade on the center pin of the bowl (11f). Press it
down and give it a turn so that it locks into place.
• Fill the bowl with food. Attach the lid (11a) to the bowl with
the latch (11e) positioned to the right of the bowl handle
and align with marks.
• To lock the lid, turn it clockwise so that the latch engages
with a click.
• Insert the motor part (4) into the coupling (11b) until it
locks.
• Plug in the appliance and insert the pusher (11c) in the feed
tube (11d).
• To operate the food processor, switch on the appliance.
During processing, hold the motor part with one hand and
the food processor bowl on the handle.
• When chopping is complete, unplug and press the
EasyClick release buttons (5) to detach the motor part.
• Press the lid latch (11e) and hold it. Turn the lid (11a)
counter-clockwise to unlatch it.
• Lift the lid up. Carefully take out the blade before pouring
out the contents of the bowl. To remove and unlock the
blade, slightly turn it then pull it off.
Caution
• Do not use the food processor accessory to chop extremely
hard foods, such as unshelled nuts, ice cubes, coffee
beans, grains or hard spices e.g. nutmeg. Processing these
foods could damage the blades.
• Never place the food processor bowl in the microwave
oven.
Using the blade (11h), you may also mix light batter like a
pancake batter or a cake mixture based on up to 250 g of flour.
Recipe Example: Pancake Batter
375 ml milk
250 g plain flour
2 eggs
• Pour milk into the bowl, then add flour and finally the eggs.
• Using full speed, mix the batter until smooth.
Kneading Dough (E)
Figure E also applies for the use of the kneading hook (11i).
The kneading hook is ideal for kneading different dough types
such as yeast or pastry.
5722113674_MQ787_China_S6-16.indd 8 21.05.19 10:42