BREKER WP-25 User manual

Art.-Nr. | Größevvvvv
12.773 | 30 x 30 cm
12.770 | 40 x 40 cm
12.771 | 40 x 50 cm
12.772 | 40 x 60 cm
Firma Breker GmbH & Co. KG • Kneblinghauser Weg 20 • 59602 Rüthen – Tel.: 02952-444
Fax: 02952-2850 • E-Mail: info@breker.de • Web: www.breker.de
Wärmeplatte
BEDIENUNGSANLEITUNG
* Bild enthält optional erhältliches Zubehör. (Haube)

Anleitung Comfort Wärmeplatte
Gebruiksaanwijzing comfort warmteplaat
Instructions Comfort Panneau chauant
QUICK START GUIDE
QUICK START GUIDE
QUICK START GUIDE
QUICK START GUIDE
QUICK START GUIDE
WP-25 WP-30(T) WP-40(T) WP-50 WP-60
Heating plate
for chicks

Important
Wichtig
Please read this user guide before first use.
• Use this heating plate only in a dry and moisture free environment and only for the purpose it has been
developed for: the warming of chicks and their rearing.
• Connect the product only to a power supply that has been installed by a qualified electrician and only
after the product has been placed correctly: horizontal on 4 legs and with the upper part pointing upwards
(exactly as shown in the picture on the box).
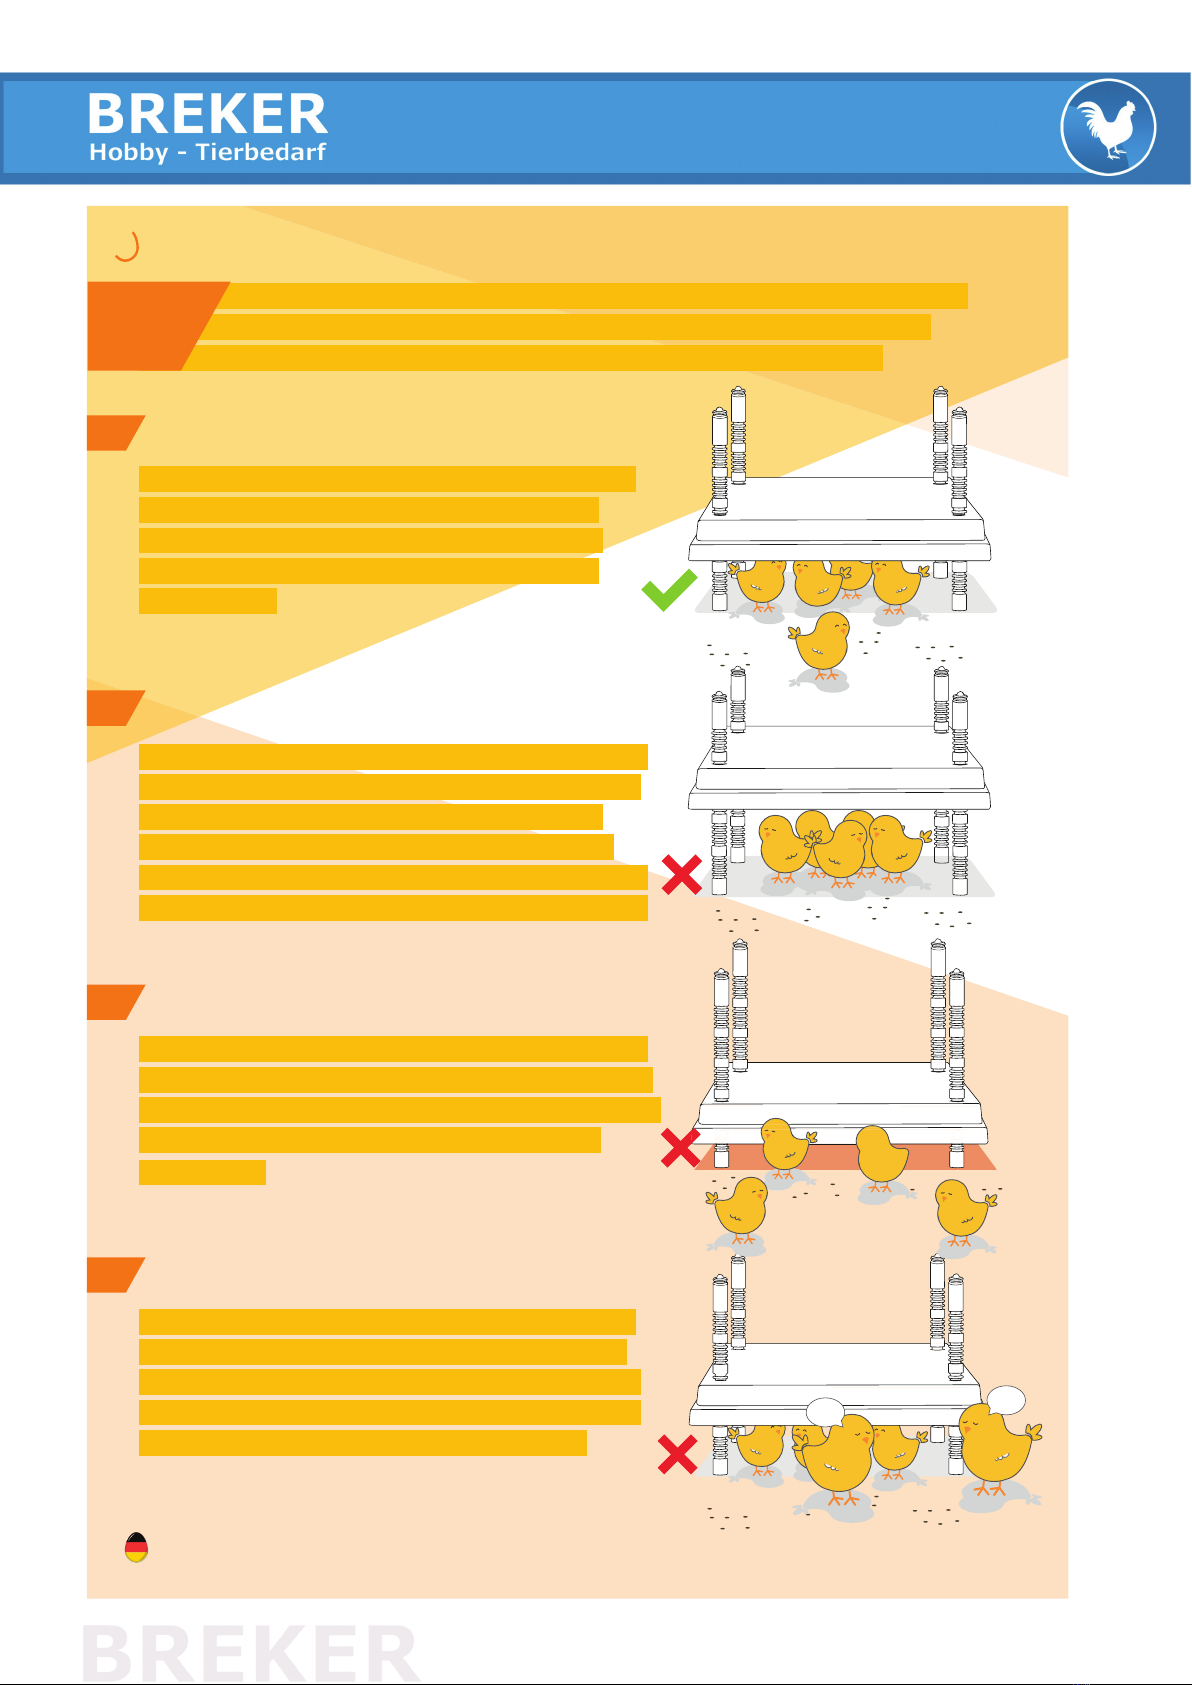
• At any time, the minimum height settings of 30mm from the litter should be observed.
• The device should never be used without legs, being opened, repaired or immersed in liquids.
• Return of the product, in case of malfunction, should be to the original supplier, including the receipt, all
accessories and the description of the malfunction.
• The warranty expires, if the product has been opened, in case of material damage, erroneous use, modifi-
cations, repairs by unauthorised dealers, careless use or if the product has been used for other purposes
than the one it has been made for: the rearing of chicks.
• The warranty is also void in the case of damages caused by accidents and catastrophes, such as fire, flood,
earthquake, war, vandalism or theft.
• Under no circumstances the manufacturer will be liable for wrong use or amendments of the product or
any consequential or incidental damages, loss of profit or other economic damage resulting from the use
of this product.
• This appliance is not intended for use by persons (including children) with reduced physical, sensory or
mental capabilities
• Children should be supervised to ensure that they do not play with the appliance
• If the supply cord is damaged, it must be replaced by the manufacturer, its service agent or similarly
qualified persons in order to avoid a hazard
• This product is intended to be used at a minimum height of 50 cm above the floor.
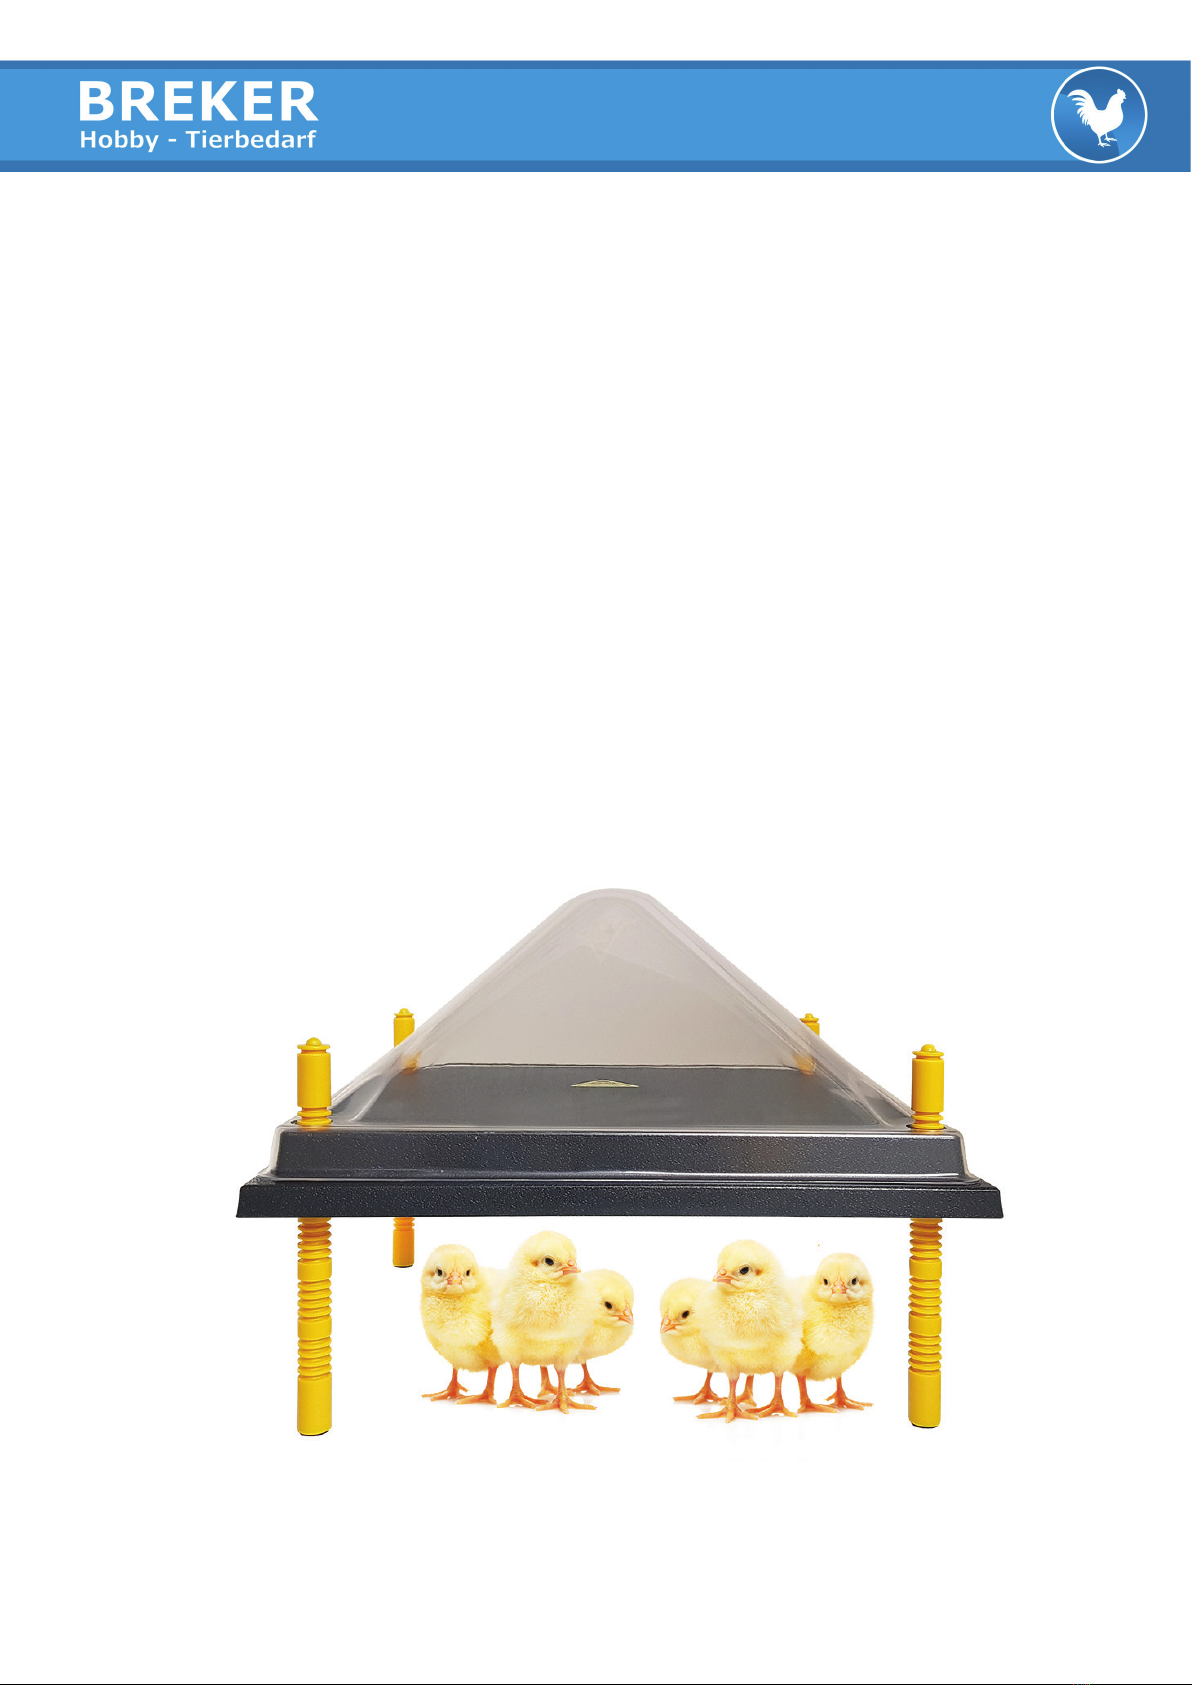
• Never place anything on top of this heating plate. The only exception is our own cover, made of strong
clear PET. This cover is especially developed for the Comfort heating plate series.
• At least 2 sides (including a long side) of the heating plate have to stay fully open to avoid overheating!
Lesen Sie bitte vor der Nutzung diese Anleitung.
• Verwenden Sie diese Wärmeplatte in einem trockenen, feuchtlosen Raum und nur für den Zweck, wofür
sie entworfen wurde: das Warmhalten von Küken und dessen Aufzucht.
• Schließen Sie das Produkt nur an ein durch einen Elektriker angelegtes Stromnetz und nur dann an,
nachdem das Produkt korrekt hingestellt ist: waagerecht auf 4 Füssen und mit der Oberseite nach oben
gerichtet (genau wie auf dem Bild auf dem Karton).
• Die Minimumhöheneinstellung von 3 cm, in Bezug auf der Streu, sollte jederzeit eingehalten werden.
• Das Gerät darf auf keinen Fall ohne Füße verwendet, geönet, repariert oder in Flüssigkeit getaucht werden.
• Rückgabe des Produktes, im Falle eines Defektes, muss beim eigenen Händler stattfinden, inkl. Quittung,
allen Accessoires und Umschreibung des Mangels.
• Die Garantie erlischt, wenn das Produkt geönet wurde, im Falle materieller Beschädigung, falscher Verwen-
dung, Anpassungen, Reparaturen durch einen unautorisierten Händler, unsorgfältige Nutzung oder wenn das
Produkt für andere Zwecke eingesetzt wurde als wofür es bestimmt ist: das Aufzüchten von Küken.
• Anspruch auf Garantie erlischt auch im Falle von Beschädigungen durch Unfälle und Katastrophen, wie
Brand, Überflutung, Erdbeben, Krieg, Vandalismus oder Diebstahl.
• Der Hersteller haftet unter keinen Umständen für mögliche Folgeschäden oder Nebenschäden, entgan-
genen Gewinn oder sonstige wirtschaftliche Schäden wegen falschen Nutzung oder Modifikationen des
Produktes, die durch die Verwendung dieses Produkts entstehen.
• Dieses Gerät ist nicht dazu gedacht, um durch Personen (Kinder inbegrien) mit reduzierten physischen,
sensorischen oder mentalen Fähigkeiten genutzt zu werden
• Kinder sollten beaufsichtigt werden, um sicher zu gehen, dass sie nicht mit dem Gerät spielen
• Sollte das Netzkabel beschädigt sein, muss dieses durch den Hersteller, seinem Kundendienst oder einer
anderen, ähnlich qualifizierten Person ausgetauscht werden, um Unfallrisikos zu vermeiden
• Das Produkt ist vorgesehen, um auf einer minimalen Höhe von 50 cm über dem Boden benutzt zu werden.
• Legen Sie nie etwas auf die Wärmeplatte. Aussonderung hierin ist unsere Kunststohaube. Diese Haube
ist speziell für die Serie der Comfort Wärmeplatten entwickelt.
• Mindestens zwei Seiten der Wärmeplatte (eine lange Seite inbegrien) sollten komplett oen gelassen
werden, um eine Überhitzung zu vermeiden!
2

1 2 3
Dieser Karton enthält:
1 | Füsse (4x)
2 | Wärmeplatte
3 | Anleitung
Kleine Küken wachsen schnell heran! Vor allem, wenn Sie
Ihnen genau geben was sie brauchen. Ihre neue Comfort
Wärmeplatte sorgt dafür. Diese Anleitung hilft Ihnen
dieses revolutionäre Produkt richtig zu verwenden.
Lesen Sie bitte schnell weiter.
Glückwunsch zum Kauf Ihrer neunen Comfort Wärmeplatte!
Lesen Sie bitte vor der Nutzung diese Anleitung.
Glückwunsch zum Kauf Ihrer neunen Comfort Wärmeplatte!
GLÜCKWUNSCH!
8

Anleitung Comfort Wärmeplatte
Der erste Einsatz
Höheneinstellung anpassen
Bevor Sie die Wärmeplatte zum ersten Mal verwenden,
befestigen sie bitte die gelben Füße an die Wärmeplatte.
Legen Sie die Wärmeplatte auf eine Seite und fügen
Sie in jede Ecke einen Fuß ein. Hierfür drücken Sie auf
die gelbe Lasche (PUSH) und schieben den Fuß, mit dem
abgerundeten Ende nach oben, durch die Önung bis die
gewünschte Höhe erreicht ist. Lassen Sie anschließend die
gelbe Lasche los. Wenn Sie danach ein Klickgeräusch hören,
ist der Fuß richtig gesichert.
1
2
3
4
Als alle Füße auf die gleiche Höhe eingestellt
sind, kann die Wärmeplatte aufgestellt werden
und anschließend an das Stromnetz angeschlos-
sen werden. Die Kontrolle-LED wird jetzt aufleuch-
ten. Nach ungefähr 60 Minuten wird die ideale
Temperatur erreicht sein und können die Küken
unter der Wärmeplatte Platz nehmen.
60 min
Die Comfort Wärmeplatte wächst mit Ihren Küken mit-
so bekommen die Küken in jeder Phase ihres Wachstums
die Wärme die sie benötigen. Passen Sie die Höhe der Füße
minimal einmal pro Woche an. Als Maßstab für das Einstellen
der Höhe, kann die Rückenhöhe der Küken eingehalten wer-
den. In den ersten Tagen ist es zu empfehlen die Wärmeplat-
te in Höhe etwas niedriger einzustellen. Die Verwendung von
Messinstrumenten zum Feststellen der idealen Temperatur,
ist nicht notwendig. Das Benehmen der Küken gibt nämlich
an, wann es wieder Zeit ist die Höhe der Wärmeplatte anzu-
passen. Empfehlungen: das eine Küken ist das andere nicht.
Stellen Sie darum die Füße der Wärmeplatte auf der einen
Seite etwas niedriger ein als auf der gegenüberliegenden. Auf
diese Weise steht die Wärmeplatte etwas schräg und ist die
perfekte Höheneinstellung für alle Küken erzielt, egal was für
Unterschiede in Wachstum und Wärmebedarfs sie auch haben.
9

Richtige Höheneinstellung
Die Küken sitzen ruhig und still unter der Wärmeplatte.
Sie kommen nur unter der Wärmeplatte hervor, um
etwas zu fressen und zu trinken. Danach kehren sie
zurück. Sie machen einen zufriedenen Eindruck und
piepen nicht.
?? ??
Zu hohe Höheneinstellung
Die Küken sind unter der Wärmeplatte, aber sind unruhig.
Sie Kommen fast gar nicht unter der Wärmeplatte hervor
und fressen und trinken dementsprechend zu wenig.
Sie machen einen unzufriedenen Eindruck und piepen
wahrscheinlich sehr viel. Stellen Sie die Wärmeplatte nie-
driger ein und überprüfen Sie das Benehmen Ihrer Küken.
Zu niedrige Höheneinstellung
Die Küken können nicht unter die Wärmeplatte gelangen
oder wollen es nicht, weil dieHöheneinstellung dazu führt,
dass es da zu warm für sie ist. Stellen Sie die Wärmeplatte
höher ein und observieren erneut sie das Verhalten
Ihrer Küken.
Überfällige Höheneinstellung
Trotz einer richtigen Höheneinstellung kann es vorkom-
men, dass durch ein außergewöhnliches Wachstum der
Küken, diese nicht mehr unter die Wärmeplatte kommen
können. Stellen Sie darum, anhand ihres Wachstums, die
Wärmeplatte minimal 1 Mal pro Woche erneut ein.
Sorgen Sie, dass die Wärmplatte beim Hinstellen an eine Wand oder in einer Ecke,
eng an deren Seiten anschließt, sodass die Küken aus Versehen nicht zwischen
Wärmeplatte und Wand/Ecke können geraten und da eingeklemmt bleiben.
!
10

Anleitung Comfort Wärmeplatte
Preisgünstig und ökologisch
Reinigung und Lagerung
Die Comfort Wärmeplatte ist mit einem feuchten Tuch einfach zu reinigen. Sollte es notwendig sein,
können Sie zuerst einen Schaber verwenden, um den überschüssigen Kot zu entfernen. Lagern Sie
das Produkt nach der Reinigung vorsichtig in dem Originalkarton für eine optimale Lebensdauer.
Die Comfort Wärmeplatte reduziert Energieverschwendung bis fast
auf den Nullpunkt, weil die Wärme direkt an der Unterseite der
Platte verfügbar ist. Dies im Gegensatz zu Wärmelampen, die ihre
Wärme über einen größeren Raum abgeben. In Vergleich zu einer
gewöhnlichen Wärmelampe, werden Sie ihre Investition bei einer
Wärmeplatte schon in durchschnittlich 6-13* Wochen zurückverdinen.
* Basierend auf Niederländische Energie- und Verkaufspreisen.
Noch einfachere Reinigung
Speziell für die Serie der Comfort Wärmeplatten entwickelt: eine Schutzabdeckung, hergestellt aus
starkem durchsichtigem PET Kunststo, die das bekannte Problem des Schmutzes auf der Wärmeplatte
für immer löst. Küken, die auf die Wärmeplatte springen wollen, gleiten, dank der Abdeckung gleich
wieder herunter. Nach Gebrauch ist die Abdeckung einfach mit warmem Wasser abzuspülen, um even-
tuellen Staub zu entfernen. Außerdem kann die Wärmeplatte mit einem Temperaturregler ausgestattet
werden (WPR), sodass die Temperatur der Wärmeplatte kontrolliert werden kann. Fragen Sie Ihren
Händler nach den Möglichkeiten.
Anzeige Energieeinsparung Wärmeplatten
* Basierend auf Niederländische Energie- und Verkaufspreisen.
Option: Schutzabdeckung Option: Temperaturregler (WPR)
Anleitung Comfort Wärmeplatte
WP-25 WP-30(T) WP-30 WP-40(T) WP-40 WP-50 WP-60
Vermögen Wärmeplatte 13 Watt 13 Watt 20 Watt 24 Watt 38 Watt 46 Watt 56 Watt
Vermögen Infrarotlampe 60 Watt 60 Watt 100 Watt 100 Watt 150 Watt 150 Watt 250 Watt
Zurückverdienen Wärmeplatte
in Zeit (Wochen) 13* 13* 9* 9* 7* 9* 6*
11

1 2 3
This box contains:
1 | Legs (4x)
2 | Heating plate
3 | User guide
Little chicks grow fast! But only if you provide them with every-
thing they need. Your new Comfort heating plate takes care of
this. This user guide helps you to use this revolutionary product
in the correct way.
Congratulations on the purchase of your new Comfort heating plate!
This box contains:
This box contains:
Little chicks grow fast! But only if you provide them with every-
thing the
y need. Your new Comfort heating plate takes care of
this. This user guide helps you to use this revolutionary product
in the correct way.
Congratulations on the purchase of your new Comfort heating plate!
Little chicks grow fast! But only if you provide them with every-
Congratulations on the purchase of your new Comfort heating plate!
y need. Your new Comfort heating plate takes care of
this. This user guide helps you to use this revolutionary product
Little chicks grow fast! But only if you provide them with every-
y need. Your new Comfort heating plate takes care of
this. This user guide helps you to use this revolutionary product
Little chicks grow fast! But only if you provide them with every-
Congratulations on the purchase of your new Comfort heating plate!
CONGRATULATIONS!
Please read this guide before using the product!
4

First use:
Adjusting the height:
Guide Comfort heating plate
Connect the yellow legs to the heating plate before its first
use. Put the heating plate on its side and insert a leg into
each of its corners. To insert the leg, push the yellow slide
(PUSH) and insert the leg with the round end upward, until
you have reached the desired height. Release the slide.
If you hear the slide “clicking” the leg has been secured
correctly. If not, please move the leg a little until you hear
it “click”. Make sure all legs are secured!
1
2
3
4
When all legs have been mounted to the right
height, the heating plate can be placed into the
rearing unit. Connect the plug to the power supply
and you will see the red LED indication lighting
up. After approximately 60 minutes the maximum
temperature will be reached, and the chicks can
be released near the heating plate.
60 min
The Comfort heating plate should increase in height along
with your chick’s growth. This way the chicks get the
warmth they need in each growth phase. As your chicks
grow, adjust the leg height at least once a week.
You may use the height of the chicks as a guideline for
the adjustment of the leg height of your heating plate.
During the first days it is advisable to slightly reduce the
height of the heating plate to make sure they get the heat
they need. The use of measuring instrument to check the
ideal temperature is not necessary. The chick’s behaviour
will tell if the height is right or not.
Suggestion: one chick is not the same as the other one.
Therefore, adjust 2 legs of the heating plate on one side
slightly lower than the other side. This way the heating
plate will be sloping and the goal of the perfect height
setting for every chick is therefore achieved, regardless
their dierences in the chick’s growth and warmth need.
5

Correct height setting
The chicks stay calm and quiet under the heating
plate. They leave from underneath the heating plate
to get food and to drink. After that they go back under.
They look comfortable and remain quiet and don’t
cheep or huddle.
?? ??
If the height setting is to high
The chicks stay under the heating plate all the time but
are restless, standing and huddling. They almost never
leave the heating plate to drink or eat. They’re acting
uncomfortable and cheep a lot more.
To remedy, lower the heating plate and check the behavi-
our of your chicks again until they’re comfortable.
The height setting is too low
The chicks struggle to go underneath the heating plate.
Also, if the temperature is too high the chicks will not
stay under the heating plate and tend to huddle in a
corner away from the plate. Please raise the height
and check again.
Monitor the height setting
Despite of the right height setting, chicks will grow so
the heating plate must be raised with the chick’s
growth. Raise the heating plate about once a week.
Please make sure that when the heating plate is placed in a corner or against a wall
there is no gap left to avoid any chicks getting stuck.
!
6

Budget and economy
Cleaning and storage
The Comfort heating plate is easy to clean with a damp cloth. In case it’s necessary, you may first
remove the excess dried faeces with a scraper. Please store the product, after cleansing, carefully
in its original box for a longer lifespan. Never submerge your heating plate in water.
The Comfort heating plate reduces the energy waste almost to
almost nothing, because its heat is directly available underneath
or not lost through the top of the plate. This, in contrast to a hea-
ting bulb, which radiates heat over a much larger environment.
In comparison to a common heating bulb, you will already earn
back your investment in energy savings from your heating plate in
an average 6-13* weeks.
* Based on Dutch internet sales prices and electric power prices
Even easier cleaning
Specially developed for the Comfort heating plate series: a cover, made of strong clear PET,
which solves once for all the known problem of dirt on the heating plate. Chicks that want to
jump onto the heating plate top will slide straight o and down again due to the covers sloping
design. After use, the cover can be cleaned rinsing simply with hot water to remove the dirt.
The heating plate can also be equipped with a temperature controller (WPR), to control the
temperature. Ask your dealer for the possibilities.
Overview energy saving of heating plates
WP-25 WP-30(T) WP-30 WP-40(T) WP-40 WP-50 WP-60
Heating plate power 13 Watt 13 Watt 20 Watt 24 Watt 38 Watt 46 Watt 56 Watt
Infrared heating bulb 60 Watt 60 Watt 100 Watt 100 Watt 150 Watt 150 Watt 250 Watt
Back earning time
heating plate (weeks) 13* 13* 9* 9* 7* 9* 6*
* Based on an energy price of € 0.25/KWH
Guide Comfort heating plate
Option: cover heating plate Option: temperature controller (WPR)
7
This manual suits for next models
10
Table of contents
Languages:
Popular Farm Equipment manuals by other brands

Chore-Time
Chore-Time Turbo-Cool Installation & operator's instruction manual

Norwest
Norwest Pivot track filler owner's manual

Brower
Brower CQB20 INSTALLATION INSTRUCTIONS AND REPAIR PARTS LIST

Pottinger
Pottinger FARO 3500 L/D Operator's manual

Chapman Machinery
Chapman Machinery TF Series Original instructions

Ziegler
Ziegler PKT 450 Operating instructions and spare parts list