BREN CraftPro 400 Series User manual

V.1June 2017
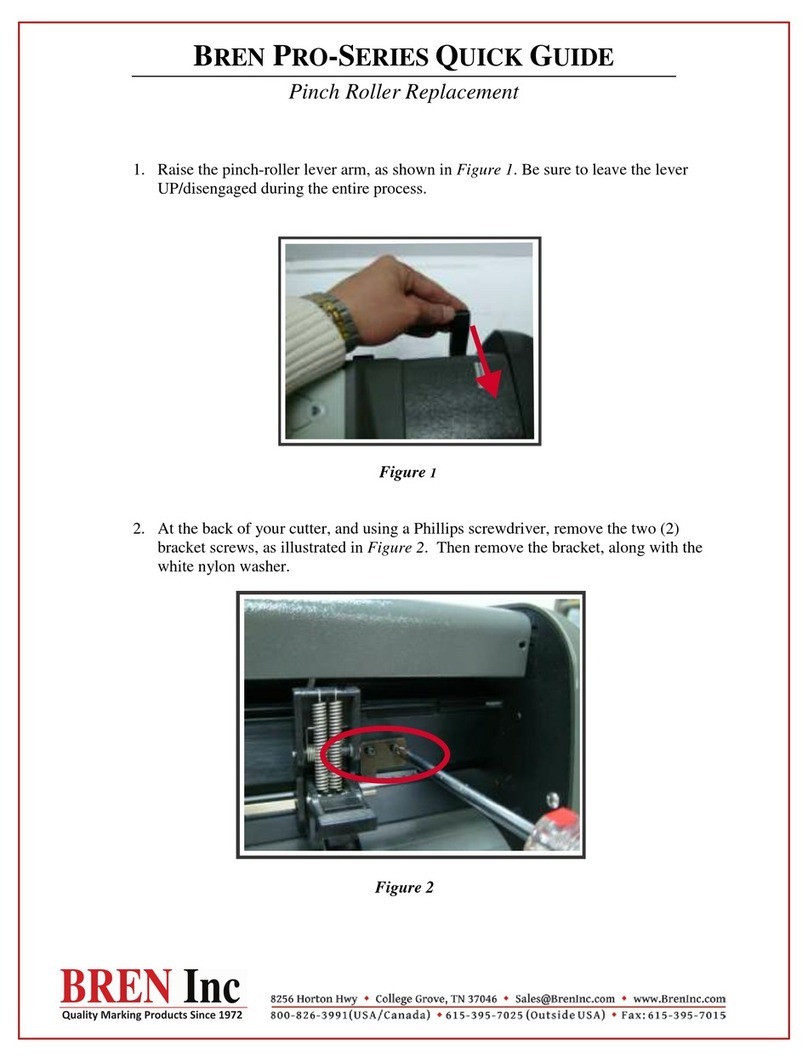
BREN Inc.
1-800-826-3991
8256 Horton Highway
College Grove, TN 37046
www.BrenInc.com All
rights reserved. 2017
BREN 424 CraftPro
User Manual

BREN CraftProUserManual
Important Information
Important Information
Thank you for purchasing the BREN CraftPro Cutting Plotter.
Beforeyou use the cutting plotter, please make sure that you have read the
safety precautions and instructions below.
Caution
!
SAFETY PRECAUTIONS!
For safety concern, please always hold the cutter firmly from the bottom while moving
it. Do not move the cutter by clasping the depression area on both sides.
Do not shake or drop the blade holder, a blade tip can fly out.
During an operation, do not touch any of the moving parts of this machine (such as the
carriage). Also be careful to make sure that clothing and hair do not get caught.
Always connect the power cable to a grounded outlet.
Always use the accessory power cable which is provided. Do not wire the power cable
so that it becomes bent or caught between objects.
Do not connect the power cable to branching outlet to which other machines are also
connected, or use an extension cable. There is danger of overheating and of
mis-operation of the machine.
Keep the tools away from children where they can reach.
Always put the pinch rollers within the white marks.
(Correct) (Incorrect)

BREN CraftPro User Manual
General Information 1-1
Chapter 1 General Information
1.1 Introduction
BREN CraftPro series cutting plotters have been designed to produce computer-generated
images or perform contour cutting on sheets or rolls ofvinyl media. In addition to
performing quality cutting on sheet or rolls of media, BREN CraftPro series cutting plotters
can also be used as a pen plotter.
This manual covers the following models of BREN CraftPro series cutting plotters:
CraftPro 424 for media width: 50mm(1.97”) ~ 719mm(28.3”)
1.2 Package Items
The package of BREN CraftPro contents the items listed below,please check
carefully.If you find any item missing, please contact BREN customer service.
1 BREN 424 CraftPro Cutting plotter.
1 BREN Software Installation CD-ROM
1 CraftPro User Manual
1 AC power Cord
1 USB Cable.
1 set of Blade Holder Assembly (Installed in tool carriage of the cutting plotter)
2 45 degree Blades (One installed in Blade Holder)
1 Safety Blade
1 pair of Tweezers

BREN CraftPro User Manual
General Information 1-2
H
A
G
F
E
D
C
B
1.3 Product Features
The followings are the main features ofthe BREN CraftP
‧Up to 12.34 oz (or 350 grams) of cutting force.
‧Up to 705 per second cutting speed (at 45 degree direction.)
‧Guaranty 10-foot (3 meters) tracking.
‧Enhanced Automatic-Aligning System (AAS II) for auto contour cutting.
1.4 The Appearance (BREN 424 CraftPro)
1.4.1 The Front View
Object Description
A Primary Pinch Roller To help hold the media during cutting.
B Cutting Strip To help slice off media.
C Alignment Ruler To align media with clear guideline marks
D Carriage Performs the cutting or plotting with the installed blade or
pen.
E Blade Holder Holds the blade.
F Platen The surface for holding and supporting media in operation.
G Cutting Pad To protect blade and plate in operation.
H Control Panel To consist of 10 control keys and 6 LED lights.
J Grit Areas To move media back and forth in operation
Figure 1-1

BREN CraftPro User Manual
General Information 1-3
1.4.2 The Side Views
Object
Description
K
AC Power Connector
To insert the AC power cord.
L
Fuse
3Amp.
M
Power Switch
To turn on or off the machine.
N
USB Connector To connect the machine and a computer through a
USB cable.
O Serial Interface Connector To connect the machine and a computer through a
RS-232 cable.
K
L
M
Figure 1-3
Figure 1-4
N
O
J
Figure 1-2

BREN CraftPro User Manual
Installation
2-1
Chapter 2 Installation
2.1 Precaution
Please read below information carefully before you start installation.
Notice 1
Make sure the power switch is off before installing the cutting plotter.
Carefully handle the cutter to prevent any injuries.
Notice 2 Choosing a proper place before setting up the cutting plotter
Before installing your cutting plotter, select a suitable location, which meets the following
conditions.
The machine can be approached easily from any direction.
Keep enough space for the machine, accessories and supplies.
Keep the working area stable, avoiding severe vibration.
Keep the temperature between 60-86oF in the workshop.
Keep the relative humidity between 25%and 75% in the workshop.
Protecting the machine from dust andstrong aircurrent.
Preventing the machine from direct sunlight orextremely bright
lighting.
Notice 3 Connecting the Power Supply
Check the plug of the power cord to see if it mates with the wall outlet. If not, please contact
your dealer.
Insert the plug (male) into a grounded power outlet.
Insert the other end (female) of power cord into the AC connector of cutting plotter.

BREN CraftPro User Manual
Installation 2-2
Figure 2-1
Figure 2-3
Figure 2-2
2.2 Media Loading
2.2.1 Loading the Sheet Media
Toload the media properly,please follow the
procedures below:
Step 1
Lift the 2 levers at the backside of the cutter to lift
the pinch rollers
Step 2
Load your media on the platen and slide it under
the pinch rollers from either the front side or the
backside. The alignment rulers on the platen
extension will help you to adjust the
media precisely (Figure 2-2).
Step 3
Then move the pinch rollers manually to the proper position. Be sure the pinch rollers
must be positioned above the grit areas.The stickers on the main beam show the
position of the grit areas. (Figure 2-3).
Stickers

BREN CraftPro User Manual
Installation 2-3
CAUTION!!!
Make sure the Primary and secondary pinch rollers are set toright positions.
Position thePrimary Pinch Rollersatthe right and left sides ofmedia.
Position the Secondary Pinch Roller atthe center ofmedia.
Note: BREN CraftPro serves as an illustrator here.
Figure 2-4
Secondary Pinch Roller
Figure 2-5
Step 4
Push the lever backward to lower down the pinch rollers.
Step 5
After turn on the power,the tool carriage will measure the size of the media
automatically.And the cutter begins to work.
Primary Pinch Roller
CORRECT
INCORRECT

BREN CraftPro User Manual
Installation 2-4
Figure 2-6 Figure 2-7
Correct Incorrect
2.2.2 Loading the Roll Media
You can use the stand. Please refer to Chapter 2.2 for hardware setup, and Chapter 2.5.1
for media loading.
2.2.3 How to change the poll size without turning off the machine?
Have the machine on-line, press origin set once and the red error light will start blinking,
then pressed again and the machine will start moving to get the new size. Then open the
VLCD and under the poll size you will find the new measurements.
Note:
Always adjust the position with the pinch rollers raised.
Please reposition the pinch roller by holding the center of the pinch roller and
moving itfrom the rear end ofthe machine. (Figure 2-6)
DO NOT move the pinch roller by holding its front rubber roller (Figure 2-7).

BREN CraftPro User Manual
Installation 2-5
2.3 Cable Connection
The cutting plotter communicates with a computer through a USB (Universal Serial Bus, a
Serial port (RS-232C or Ethernet. This chapter shows you how to connect the cutting plotter
to a host computer and how to set up the computer/cutting plotter interconnection.
!! Notice: When USB connection is enabled, serial port will be disabled automatically.
2.3.1 USB Interface
BREN CraftPro built-in USB interface arebased on the Universal Serial Bus
Specifications Revision 2.0 (Full Speed).
2.3.2 Connecting your BREN CraftPro cutter
1. Turn on the machine.
2. Connect the USB connector tothe machine and then start the BREN driver installation
process.
WINDOWS WILL DETECT THE USB AUTOMATICALLY
BUT YOUR CUTTER WILL NOT BE ABLE TO BE
USED UNTIL DRIVER IS INSTALLED CORRECTLY!!!
Figure 2-8
Serial Interface Connector (RS232C) –
used to connect the cutting plotter to a
computer through a serial interface cable.
USB Connector – used to connect the cutting
plotter to a computer through a USB cable.

BREN CraftPro User Manual
Installation 2-6
2.4. Installing the driver for USB connection.
1. Insert the BREN INSTALLATION CDthat is included with your BREN 400-Series
cutter and select ‘BREN CraftPro 400-Series Installation' when the disc starts.
2. On the following screen, you will have the option to install the 32 or 64-bit version
of the Windows driver for your BREN CraftPro. If you do not know which version
you are currently running, see section 3b on the next page. NOTE: Windows will
generally not allow you to install the version that isn't compatible with your
system.
Once you've verified which version you're running, select the appropriate option or you can
select "Download Drivers Online' to get the most up-to-date version of the driver.

BREN CraftPro User Manual
Installation 2-7
3. If you selected the “Download Drivers Online”option your default web
browser should open and take you to bren.winline.com Once you’re at the site,
select the download option.
3b. On the following screen, select either the 32 or 64-bit version of the driver to download
depending on what version of Windows you are running. If you aren’t sure, you can
open your start menu and right click “This PC” or “My Computer”, right click and select
properties. The version of Windows you are running should be displayed.
4. Once the Welcome screen is displayed, select “Next” to continue to the ‘License
Agreement’ screen. You must select “I Agree” to continue the driver installation process.

BREN CraftPro User Manual
Installation 2-8
If you do not agree to the terms displayed you can select “Back” or “Cancel” to stop the
installation process.
5. The Choose Install Location screen will let you chose where you want the software to
be installed on your PC. It will default to C:\Program Files (x86)\WinLINE Bren OEM
Edition\ unless you set a new location for the driver to be installed. Once you’ve decided
where to install the software, select “Next” to continue.
6. Once the driver had been downloaded to your PC, the Installation Wizard will begin.
Select “Next” on the Installation screen to continue the setup process or“Cancel” toexit.
7. Following the instructions on screen, verify your BREN 400-Series CraftPro cutter is
connected to your PCvia USB.

BREN CraftPro User Manual
Installation 2-9
The Windows Auto-Play feature may ask if you want it to install the driver; select
"Not this time." Allowing the Windows Auto-Play to install the driver will result in a
FAILED installation. To successfully install and activate the driver, you MUST use
the WinLINE Installation Wizard.
Once the cutter is connected to your PC via USB, click the box next to “The printer IS
plugged in.” and then select “Next” to continue.
8. On the following screen, enter your BREN 400-Series CraftPro serial number which is
located below the power switch and also on the Technical Support sticker on your
BREN cutter. Enter your serial number and select “Next” to continue.

BREN CraftPro User Manual
Installation 2-10
9. That next screen will ask you to verify the manufacturer which will default to Bren
Instruments. For the model, select BREN 424.
It isimportant to select the correct model number as the driver will set the cut
widths for the corresponding cutter. For example, ifyou set a BREN 424 up as
a 740 on your PC, your computer will think your cutter has a 40-inch cut width
and that can cause layout and cutting issues. If this happens, the driver will
need to be uninstalled and reinstalled verifying the correct model.
10. The next screen will ask you to name your Cutter. It will default to whichever model you
selected in the previous step and will display in “Devices and Printers” under that name.
The printer name can be changed but is not recommended.

BREN CraftPro User Manual
Installation 2-1
11. The next screen will ask If you would like to activate the software now or later. If you
select “Activate the software via the internet now”, select “Finish” to complete driver
installation and restart your computer.
If you do not have internet access or get an error message when attempting to activate
2.4.1RS-232Serial Interface
Connecting to the RS-232 (Serial) Port
1. For IBM PC, PS/2 users or compatibles, connect the RS-232C cable to the serial
connector ofthe assigned serial port(COM1 or COM2) ofyour host computer.
2. Set up the communication parameters (Baud Rate and Data Bits/Parity) to match the
setting ofsoftware.
Caution!! Please turn off the BREN CraftPro cutter before plugging the RS-232C
cable.

BREN CraftPro User Manual
Operation
3-1
Chapter 3 Operation
3.1 The Control Panel
3.1.1 The BREN CraftPro control panel
Key Function
POWER LED
To indicate the power status ( light up: power on; light off: power off )
ERROR LED To indicate the error status ( light up: error; light off: normal )
ON/OFF LINE
To switch modes or stop cutting job( light up: on-line; light off: off-line )
While in on-
line mode: only ON/OFF LINE and PAUSE keys activated
While in off-line mode: the settings in VLCD can be adjusted.
PAUSE To temporarily halt cutting process or to continue
REPEAT
To repeat last job.
DATA CLEAR To clear up buffer memory.
CUT TEST To perform cutting tests on different media.
ORIGIN SET To reset origin at a new position.
4 Arrow Keys
To move carriage position, select function, or change setting.
3.1.2 Reset Origin
Figure 3-1
Note:
Make sure the machine is in off-line mode to enable this function.

BREN CraftPro User Manual
Operation
3-2
Step 1 Move the carriage to a new position.
Step 2 Press the ORIGIN SET button to reset origin.
3.1.3 Cut Test
Step 1After sizing, press the ON/OFF LINE button to set as off-line mode.
Step 2Move the carriage to a preferred position.
Step 3Press CUT TEST button to perform.
3.1.4 Repeat
Step 1Press the ON/OFF LINE button to set as off-line mode.
Step 2 Press the REPEAT button to perform re-plot function starting at the position where
the carriage locates. It is also available to move carriage to a preferred position,
re-set origin, and then perform this function.
Note:
Make sure the machine is in off-line mode to enable this function.
It’s recommended to keep performing this function until the cutting
quality meets your demand before executing the cutting job.
Note:
Make sure the machine is in off-line mode to enable this function.

BREN CraftPro User Manual
Operation
3-3
Figure
3-3
3.2 VLCD
“VLCD” is acomputer program tohelpmodify parameters ofcutting functions.
3.2.1 Installation
Step 1Select 'BREN CraftPro 400-Series Installation' from the main menu of
your installation CD. Once you're in the CraftPro menu screen, select
'CraftPro Control Panel (VLCD3) and complete the installation steps.
Step 2Launch VLCD by double-clicking on the icon.
Step 3Choose the right port connected to your computer (Figure 3-2).
If you are using the USB cable, choose BREN 400-Series from the drop-down
menu.Ifyou are using a Serial cable, choose either COM1 or COM2.Make sure
no other devices are occupying the port that you are going to use.
Step 4 Press the Connect button to connect your computer and the cutter. If the
connection succeeds, the model info, firmware version, and adjustable parameter
columns will be showing (Figure 3-3).
Note:
Make sure the machine is in online mode to enable this program.
There is media in the machine.

BREN CraftPro User Manual
Operation
3-4
Figure 3-4
3.2.2 Functions of VLCD
Below are the functions adjustable in VLCD for BREN CraftPro.
Poll Size
Force
Media Weight
Offset
AAS Offset
Auto Unroll
Update Setting
Poll Size
Click on the Poll Size button will reveal the X/Y values.
In this case, the maximum
plotting length is 984.25
inches and the distance
between the pinch rollers is
10.27 inches. (Figure 3-4).
Force
To adjust the blade force between 0 and 350 (Default = 50).
Note: when plotting with a pen, adjust the Force to the lowest setting to avoid faint lines as
well as to extend the life of a pen.
This manual suits for next models
1
Table of contents
Other BREN Cutter manuals
