manuals.online logo
Brands
  1. Home
  2. •
  3. Brands
  4. •
  5. Breville
  6. •
  7. Juicer
  8. •
  9. Breville Juice Fountain BJE200 User manual

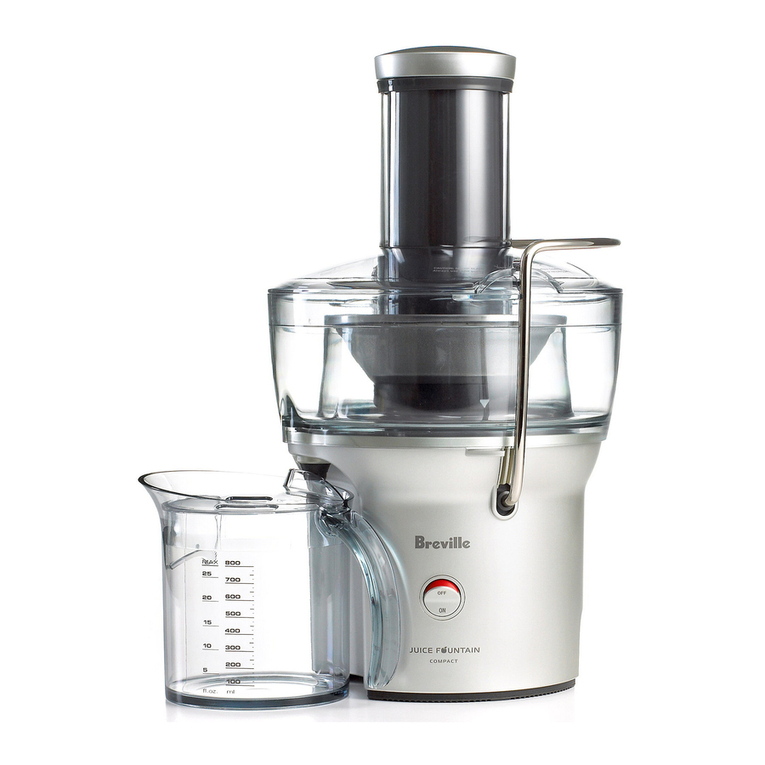
Breville Juice Fountain BJE200 User manual

Juice Fountain®
Compact and easy clean design
Model BJE200 & BJE200C
Instructions for use
Includes recipes
Contents
Page
Introduction 3
Breville recommends safety first 4
Important safeguards for your Breville Juice Fountain 4
Important safeguards for all electrical appliances 5
Know your Breville Juice Fountain 6
Assembling your Breville Juice Fountain 7
Operating your Breville Juice Fountain 10
Disassembling your Breville Juice Fountain 11
Care and cleaning 13
Trouble shooting guide 14
Tips on juicing 15
Fruit and vegetable facts 17
Recipe ideas R2
2
Congratulations
on the purchase of your new Breville Juice Fountain®
Breville recommends safety first
We at Breville are very safety conscious. We design and manufacture consumer products with the safety of you,
our valued customer foremost in mind. In addition, we ask that you exercise a degree of care when using any
electrical appliance and adhere to the following precautions. Carefully read all instructions before operating
and save for future reference.
Important safeguards for your Breville Juice Fountain
•Do not push produce into the feed chute with your
fingers. Always use the food pusher provided.
•Do not touch the small cutting blades in the base
of the stainless steel filter basket.
•Always make sure the Juice Fountain is properly
and completely assembled before connecting to
power outlet and operating. The unit will not turn
‘ON’ unless properly assembled.
•Always use the Juice Fountain on a dry, level surface.
•Always turn the Juice Fountain off then turn off at
the power outlet and then unplug when not in use
or when disassembling or assembling.
•Do not juice stone fruit unless seed stone has
been removed.
•Always turn the Juice Fountain ‘OFF’ at the power
outlet and the remove cord – if appliance is left
unattended, - if not in use, - before cleaning, - before
attempting to move the appliance, disassembling,
assembling and when storing the appliance.
•Do not operate the Juice Fountain continuously on
heavy loads for more than 10 seconds. None of the
recipes in this book are considered a heavy load.
4
EXTRA WIDE FEED CHUTE. DO NOT PLACE HANDS OR FOREIGN OBJECTS DOWN FEED CHUTE.
ALWAYS USE THE FOOD PUSHER PROVIDED.
5
Important safeguards for all electrical appliances
•Fully unwind the cord before use.
•To protect against electric shock, do not immerse
cord, plug or motor base in water or any other liquid.
•Do not let the cord hand over the edge of a table
or counter, touch hot surfaces or become knotted.
•This appliance is not intended for use by young
children or infirm persons without supervision.
•Young children should be supervised to ensure that
they do not play with the appliance.
•It is recommended to regularly inspect the
appliance. Do not use the appliance if the power
supply cord, plug or appliance becomes damaged in
any way. Return the entire appliance to the nearest
authorised Breville Service Centre for examination
and/or repair.
•Any maintenance other than cleaning should be
performed at an authorised Breville Service Centre.
•This appliance is for household use only. Do not use
this appliance for anything other than its intended
use. Do not use in moving vehicles or boats. Do not
use outdoors.
•The installation of a residual current device
(safety switch) is recommended to provide
additional safety protection when using electrical
appliances. It is advisable that a safety switch
with a rated residual operating current not
exceeding 30mA be installed in the electrical circuit
supplying the appliance. See your electrician for
professional advice.
•The use of accessory attachments not
recommended by Breville may cause a risk of injury
to persons, fire or electric shock.
Know your Breville Juice Fountain
6
Spatula
ruler style end of brush is to assist in the
removal of pulp from the integrated pulp
container when juicing large quantities
Easy ‘O ’ and ‘OFF’ button
Stainless steel micro mesh filter basket
(dishwasher safe)
Juice jug lid
allows juicer to operate with the lid
on, therefore eliminating any splatter
during operation. Place lid onto juice
jug to store juice in refrigerator
High performance
900 watt motor
Safety locking arm
Juicer will not operate without juicer
cover in place and safely locking arm in
place in the vertical operating position
Unique patented centrally located feed chute
designed to extract more juice. The extra wide 75mm
feed chute fits whole apples, carrots, tomatoes.
Makes juicing fruit and vegetables fast and easy
800ml dishwasher
safe juice jug
Built in froth
separator in lid
ensures juice froth is
separated from juice
when poured into a
glass (if preferred)
Cord wrap
cord wraps around a raised disc
on the base of the Juice Fountain
(not shown in picture)
ylon bristle brush
included for easy cleaning of the
micro mesh filter basket
Food pusher
for pushing whole fruit and vegetables
down the patented wide feed chute
Juicer cover
(dishwasher safe)
Integrated pulp container
will collect pulp for up to
1.5 litres of apple juice
(dishwasher safe)
To include froth in your juice simply remove the
lid of the juice jug when pouring.
Note
Assembling your Breville Juice Fountain
7
Step 1
Place the motor base on a flat, dry surface such
as a bench top. Ensure that the motor base is
switched ‘OFF’ at the power outlet and the power
cord is unplugged.
Step 2
Place the integrated pulp container on top of the
motor base. Locate the integrated pulp container so
that the spout fits through the hole on the front of
the motor base.
Step 3
Align the arrows on the stainless steel filter basket
with the arrows on the motor drive coupling and push
down until it clicks into place. Ensure the stainless
steel filter basket is fitted securely inside the
integrated pulp container and onto the motor base.
2
3
Step 4
Place the juicer cover over the stainless steel filter and
integrated pulp container. The humps of the rim of the
juicer cover should align with the small plastic wings
on the integrated pulp container. Lower into position.
The juicing cover can be positioned in either of
the plastic wings on the integrated pulp container.
Note
Step 5
Raise the safety locking arm up and lock into the two
grooves on either side of the juicer cover. The safety
locking arm should now be in a vertical position and
locked into place on top of the juicer cover.
Assembling your Breville Juice Fountain continued
8
4
5b
5a
9
Step 6
Slide the food pusher down the feed chute by
aligning one of the grooves in the food pusher with
the small protrusion on the inside of the top of the
feed chute. Continue to slide the food pusher down
the feed chute.
Step 7
Place the juice jug provided sideways under the spout
of the Juice Fountain. A graphic on the lid shows
where the juicer spout is to be placed. Note the jug is
designed to clip in under the spout to give it a
positive location.
A glass could also be used to collect the juice,
but using the jug and lid is recommended to
avoid any splatter.
Note
7
SMALL
PROTRUSION
INSIDE FEED TUBE
FOOD PUSHER
GROOVE
Operating your Breville Juice Fountain
10
Step 1
Wash your selection of fruit and vegetables ready
for juicing.
Most fruit and vegetables such as small apples,
carrots and cucumbers will not need to be cut to
size as these will fit into the feed chute whole.
When juicing carrots place the tip of the carrot
into the feed chute last.
Note
Step 2
Ensure the Juice Fountain is correctly assembled.
Ensure the stainless steel filter is thoroughly
cleaned before each use (refer to care and cleaning)
(See page 13). Ensure you place the juice jug with
lid fitted (or glass) under spout before
commencing juicing.
Step 3
Plug the power cord into a 230/240V power outlet
and turn the power ‘ON’. Push the ‘ON/OFF’ button
to ‘ON’.
Step 4
With the motor running, place food into the feed
chute. Using the food pusher, gently guide food down
the feed chute. To extract the maximum amount of
juice, always push the food pusher down slowly.
Step 5
Juice will flow into the juice jug and the separated
pulp will accumulate in the integrated pulp container.
When the integrated pulp container is full of pulp,
it must be emptied before continuing to juice.
(Refer to disassembling instructions on Page 11).
Reassemble machine to continue juicing.
Note
NEVER USE FINGERS TO PUSH FOOD DOWN THE FEED CHUTE OR TO CLEAR THE FEED CHUTE.
ALWAYS USE THE FOOD PUSHER PROVIDED.
Disassembling your Breville Juice Fountain
11
Step 1
Push the ‘ON/OFF’ button on Juice Fountain to ‘OFF’
and then switch ‘OFF’ at the power outlet and unplug.
Important
Wait for the filter basket to stop spinning before
continuing to step 2.
Step 2
Pull the locking arm back over the grooves on either
side of the juicer cover.
Step 3
Move the locking arm down.
Step 4
Remove the integrated pulp container (preferably
with the juicer cover, stainless steel mesh filter and
food pusher in place) by lifting vertically from the
motor base. Take it to the sink for easy cleaning.
1
2
4
3
Disassembling your Breville Juice Fountain continued
Step 5
Remove the food pusher by lifting it vertically.
Step 6
Remove the juicer cover from the integrated pulp
container by lifting it vertically. Remove any pulp
from the cover by using the flat end of the brush to
gently scrape down the sides.
Step 7
Remove the stainless steel filter basket by lifting it
vertically from the pulp bowl surround.
Step 8
Empty the pulp from the integrated pulp container
into a side bowl for composting or into the bin.
Use the flat end of the brush to gently scrape down
inside the pulp container.
12
THE STAINLESS STEEL FILTER BAS ET CONTAINS SMALL SHARP BLADES TO CUT AND PROCESS
FRUITS AND VEGETABLES. DO NOT TOUCH BLADES WHEN HANDLING THE FILTER BAS ET.
8
7
CAUTION:
SHARP
BLADES
Care and cleaning
13
•Always ensure that the Juice Fountain is switched
off at the power outlet. Then remove the plug from
the power outlet before cleaning, dissembling and
storing the appliance.
•Follow these instructions to clean all surfaces of
parts that come into contact with food during
normal use.
•For easy cleaning – immediately after each use
always switch off at power outlet and then unplug.
Then rinse removable parts under running water
(to remove wet pulp). Allow parts to air dry.
•After disassembling the unit all removable parts
may be washing in hot soapy water or dishwasher
safe parts may be placed in the dishwasher.
•The Juice Fountain cover, integrated pulp container,
stainless steel filter basket and 800ml juice jug are
dishwasher safe, (top shelf only).
•Wipe the motor base with a damp cloth.
•For consistent juicing results always ensure that the
stainless steel filter basket is thoroughly cleaned
using the supplied nylon bristle brush. Using the
nylon washing brush, hold the stainless steel filter
basket under running water and brush from the
inside of the basket, hold it up towards a light to
ensure the fine mesh holes are not blocked. If the
holes are blocked soak the stainless steel filter
basket in hot water with 10% lemon juice to loosen
the blocked holes. Alternatively wash the stainless
steel filter basket in the dishwasher.
•Do not soak the stainless steel filter basket in bleach.
•Always treat the stainless steel filter basket with
care as it can be easily damaged.
•Discolouration of the plastic may occur with
strongly coloured fruit and vegetables. To help
prevent this, wash parts immediately after use.
•If discolouration does occur, the plastic parts can be
soaked in 10% lemon juice and water or they can
be cleaned with a non- abrasive cleaner.
To assist with cleaning soak the stainless steel
filter basket in hot soapy water for approximately
10 minutes immediately after juicing is
completed. If pulp is left to dry on the filter it
may clog the fine pores of the filter mesh
thereby lessening the effectiveness of the Juicer.
For your convenience a nylon cleaning brush has
been included with your Juice Fountain.
Note
DO NOT IMMERSE THE MOTOR BASE IN WATER OR ANY OTHER LIQUID. DO NOT USE WATER
JET TO CLEAN THE MOTOR BASE.
THE CENTRE OF THE FILTER BAS ET AND FEED CHUTE CONTAIN SMALL SHARP BLADES TO
PROCESS FRUIT AND VEGETABLES DURING THE JUICING FUNCTION. DO NOT TOUCH BLADES
WHEN HANDLING THE FILTER BAS ET OR FEED CHUTE.
ossible problem Easy solution
Machine will not work The safety locking arm may not be correctly engaged in
when switched ‘ON’ the vertical operating position with the locking arm located into
the two grooves on either side of the juicer cover (see picture on
page 8, Step 5).
Motor appears to stall Wet pulp can build up under the cover if the juicing action
when juicing is too vigorous. Try slower juicing action by pushing the food
pusher down more slowly. Clean the integrated pulp container,
the stainless steel filter basket and the juicer cover.
Excess pulp building Stop the juicing process. Remove the juicer cover, scrape off
up in the micro mesh pulp. Re-assemble and begin juicing again. Try alternating
filter basket (soft and hard) vegetable and fruit varieties.
ulp too wet and Try a slower juicing action by pushing the food pusher down
reduced extracted juice more slowly. Remove stainless steel filter basket and thoroughly
clean mesh walls with the nylon brush. Rinse the stainless steel
filter basket under hot water. If the fine mesh holes are blocked,
soak the stainless steel filter basket in a solution of hot water
with 10% lemon juice to unblock the holes or wash in the
dishwasher. This will remove excess fibre build up (from fruit or
vegetables) which could be inhibiting the juice flow.
Juice leaks between Try a slower juicing action by pushing the food pusher down
the rim of the juicer more slowly. Fruit and vegetables with a high water content
and the cover of the filter (tomatoes and watermelon) should be juiced on low speed.
Bowl surround juice sprays Try a slower juicing action by pushing the food pusher down
out from spout more slowly.
Juicer makes loud Filer basket is not properly snapped into position.
noise when turned on Turn the On/OFF button to OFF. Turn the power OFF.
Disassemble the Juice Fountain (refer to disassembling page 11).
Re-assemble (refer to assembly page 7).
No Juice coming out Check that the spout is not blocked with pulp.
while juicing Refer to care and cleaning page 13.
Trouble shooting guide
14
Tips on juicing
15
The inside information on juicing
Although juice drinks are usually developed with
flavour, texture and aroma at the forefront, the
health benefits certainly add to the pleasurable
taste experience.
95% of the nutrient content of fruit and vegetables is
found in the juice. Liquids extracted from fresh fruit
and vegetables form an important part of a well-
balanced diet. Fresh fruit and vegetable juices are
an easy to make source of vitamins and minerals.
Juices are rapidly absorbed into the blood stream
therefore being the quickest way in which the body
can digest nutrients.
When you make your own juices, you have complete
control over what you include in them. You select the
ingredients and decide if you need to use sugar, salt
or other flavouring agents.
Freshly extracted juices should be consumed just
after they have been made to avoid a loss of
vitamin content.
urchasing and storage of fruit
and vegetables
•Always wash fruit and vegetables before juicing.
•Always use fresh fruit and vegetables for juicing.
•To save money and obtain fresher produce,
purchase fruit or vegetables that are in season.
•eep your fruit and vegetables ready for juicing by
washing them before storing.
•Most fruits and hardier type vegetables can be
stored at room temperature. The more delicate and
perishable items such as tomatoes, berries, leafy
greens, celery, cucumbers and herbs should be
stored in the refrigerator until required.
reparation of fruit and vegetables
•If using fruits with hard or inedible skins such as
mangoes, guava, melons or pineapple, always peel
before juicing.
•Citrus fruit can be juiced in the Juice Fountain if
peeled first.
•All fruits with pits, hard seeds or stones such as
nectarines, peaches, mangoes, apricots, plums and
cherries must be pitted before juicing.
•A small amount of lemon juice can be added to
apple juice to prohibit browning.
Your Juice Fountain makes invigorating, frothy
orange juice. Simply peel the oranges and juice.
(It is best to refrigerate oranges before juicing).
That’s the idea™
16
The right technique
When juicing a variety of ingredients with varying
textures start with the softer textured ingredients
then change to for harder texture ingredients.
If you are juicing herbs, sprouts or leafy green
vegetables either wrap then together to form a
bundle or juice them in the middle of a combination
of ingredients to obtain the best extraction.
If juicing herbs or leafy green vegetables on
their own, the juice yield will be low due to the
nature of centrifugal juicing, it is advised to
juice them as with a combination of other fruit
and vegetables.
Note
All fruit and vegetables produce different amounts of
liquids. This varies within the same group i.e. one
batch of tomatoes can produce more juice than
another batch. Since juice recipes are not exact, the
precise quantities of any juice are not crucial to the
success of a particular mixture.
To extract the maximum amount of juice always
push the food pusher down slowly.
Note
Getting the right blend
It is easy to create great tasting juice. If you have
been making your own vegetable and fruit juices,
then you know how simple it is to invent new
combinations. Taste, colour, texture and ingredient
preferences are a personal thing. Just think of some
of your favourite flavours and foods – would they
work well together or would they clash. Some strong
flavours could over power the more subtle flavours of
others. It is however, a good rule of thumb to
combine starchy, pulpy ingredients with those high
in moisture.
Using the pulp
The remaining pulp left after juicing fruit or
vegetables is mostly fibre and cellulose which, like
the juice, contains vital nutrients necessary for the
daily diet and can be used in many ways. However,
like the juice, pulp should be used that day to avoid
loss of vitamins.
Some of the uses of pulp are to bulk out rissoles,
thicken casseroles or soups or in the case of fruit,
simply placed in a bowl topped with meringue and
baked for a simple dessert.
Quite apart from the consumption use, pulp is great
used in the garden for compost.
When using the pulp, there may be some pieces
of fruit or vegetables remaining. These should be
removed before using the pulp in any recipes.
Note
Tips on juicing continued
Fruit and vegetable facts
17
Fruit and Best season Storage Nutritional value Kilojoule/
vegetables to buy calorie count
Apples Autumn/ Vented plastic bags High in Dietary Fibre 200g Apple
Winter in refrigerator and Vitamin C =300kj (72 cals)
Apricots Summer Unwrapped in High in Dietary Fibre 30g Apricot
crisper of refrigerator Contains Potassium =85kj
(20 cals)
Beetroot Winter Cut off tops, then Good source Folate 160g Beetroot
refrigerate unwrapped and Dietary Fibre =190kj (45 cals)
Vitamin C and
Potassium
Blueberries Summer Cover in the Vitamin C 125g Blueberries
refrigerator =295kg (70 cals)
Broccoli Autumn/ Plastic bag in Vitamin C, 100g Broccoli
Winter refrigerator Folate, B2, B5, E, B6 =195kj (23 cals)
and Dietary Fibre
Brussels Autumn/ Unwrapped in crisper Vitamin C, 100g Brussels
Sprouts Winter of refrigerator B2, B6, E, Folate and Sprouts
Dietary Fibre =110kj (26 cals)
Cabbage Winter Wrap, trimmed in Vitamin C, 100g Cabbage
the refrigerator Folate, Potassium =110kj (26 cals)
B6 and Dietary Fibre
Carrots Winter Uncovered in Vitamin A, C, B6 120g Carrots
refrigerator and Dietary Fibre =125kj (30 cals)
Cauliflower Autumn/ Remove outer leaves, Vitamin C, B5, B6 100g Cauliflower
Winter store in plastic bag Folate Vitamin = 55kj (13 cals)
in refrigerator and Potassium
Celery Autumn/ Refrigerate in Vitamin C and 80g stick
Winter plastic bag Potassium =55kj (7 cals)
Cucumber Summer Crisper in Vitamin C 280g Cucumber
refrigerator =120kj (29 cals)
Fennel Winter/ Crisper in Vitamin C and 300g Fennel
Spring refrigerator Dietary Fibre = 145kj (35 cals)
Grapes Summer Plastic bag in Vitamin C, B6 and 125g Grapes
(seedless) refrigerator Potassium =355kj (85 cals)
iwi Fruit Winter/ Crisper in Vitamin C and 100g iwi Fruit
Spring refrigerator Potassium =100j (40 cals)
Fruit and vegetable facts continued
18
Fruit and Best season Storage Nutritional value Kilojoule/
vegetables to buy calorie count
Mangoes Summer Covered in Vitamins A, C, B1, 240g Mango
refrigerator B6 and Potassium =200kj (102 cals)
Melons Summer/ Crisper in Vitamin C, Folate, 200g Melon
including Autumn refrigerator Dietary Fibre and =210kj (50 cals)
Watermelon Vitamin A
Nectarines Summer Crisper in Vitamin C, 180g Nectarines
refrigerator B3, Potassium and =355kj (85 cals.)
Dietary fibre
Oranges Winter/ Cool, dry place Vitamin C 150g Orange
Autumn/ for 1 week, 35mg/100g = 160kj
Spring transfer refrigerator
keep longer
Peaches Summer Refrigerate Vitamin C, B3 150g Peach
uncovered Potassium and =205kj (49 cals)
Dietary Fibre
Pears Autumn Refrigerate Dietary Fibre 150g Pear
uncovered =250kj (60 cals)
Pineapples Summer Refrigerate Vitamin C 150g Pineapple
uncovered =245kj (59 cals)
Plums Summer Refrigerate Dietary Fibre 70g Plums
uncovered =110kj (26 cals)
Raspberries Summer Covered in Vitamin C, Iron, 125g Raspberries
refrigerator Potassium and =130kj (31cals)
Magnesium
Tomatoes Summer Uncovered in crisper Vitamin C, 100g Tomatoes
of refrigerator Dietary fibre =90kj (22 cals)
Vitamin E, Folate
and Vitamin A
Your Juice Fountain makes invigorating frothy orange juice. Simply peel the oranges and juice.
(Best to refrigerate oranges before juicing)
That’s the idea™
Breville Customer Service Centre
Australian Customers
✉Breville Customer Service Centre
Locked Bag 2000
Botany SW 2019
AUSTRALIA
☎Customer Service: 1300 139 798
Fax (02) 9384 9601
Email Customer Service: askus@breville.com.au
New Zealand Customers
✉Breville Customer Service Centre
Private Bag 94411
Greenmount
Auckland, ew Zealand
☎Customer Service: 09 271 3980
Fax 0800 288 513
Email Customer Service: askus@breville.com.au
Breville is a registered trademark of Breville Pty. Ltd. AB 98 000 092 928
www.breville.com.au
© Copyright. Breville Pty. Ltd. 2005
Product ame is a trademark of Breville Pty. Ltd.
Due to continual improvements in design or otherwise, the product you
purchase may differ slightly from the one illustrated in this booklet.
Model BJE200 & BJE200C Issue 1/05
Recipes
Delicious recipes
Includes instructions for use

Other manuals for Juice Fountain BJE200

2

This manual suits for next models

1

Other Breville Juicer manuals

Breville BIS300 User manual

Breville

Breville BIS300 User manual

Breville vfj016 User manual

Breville

Breville vfj016 User manual

Breville BJE430 User manual

Breville

Breville BJE430 User manual

Breville Juice Fountain Elite User manual

Breville

Breville Juice Fountain Elite User manual

Breville Juice Fountain BJE200 User manual

Breville

Breville Juice Fountain BJE200 User manual

Breville he Juice Fountain Cold User manual

Breville

Breville he Juice Fountain Cold User manual

Breville BJE410 User manual

Breville

Breville BJE410 User manual

Breville Juice Fountain Multi-Speed BJE510XL User manual

Breville

Breville Juice Fountain Multi-Speed BJE510XL User manual

Breville JUICE FOUNTAIN ELITE 800JEXL /B User manual

Breville

Breville JUICE FOUNTAIN ELITE 800JEXL /B User manual

Breville Juice Fountain BJE200 User manual

Breville

Breville Juice Fountain BJE200 User manual

Breville The Juice Fountain Multi-Speed BJE510XL/A User manual

Breville

Breville The Juice Fountain Multi-Speed BJE510XL/A User manual

Breville BJE410 User manual

Breville

Breville BJE410 User manual

Breville 800CPXL User manual

Breville

Breville 800CPXL User manual

Breville Die Cast User manual

Breville

Breville Die Cast User manual

Breville ELITE JUICE FOUNTAIN ELITE User manual

Breville

Breville ELITE JUICE FOUNTAIN ELITE User manual

Breville 800CP User manual

Breville

Breville 800CP User manual

Breville Juice Fountain Multi-Speed BJE510XL User manual

Breville

Breville Juice Fountain Multi-Speed BJE510XL User manual

Breville Squeezed JC7 User manual

Breville

Breville Squeezed JC7 User manual

Breville Juice Fountain Multi-Speed BJE510XL User manual

Breville

Breville Juice Fountain Multi-Speed BJE510XL User manual

Breville BJE520 User manual

Breville

Breville BJE520 User manual

Breville Juice Fountain Duo User manual

Breville

Breville Juice Fountain Duo User manual

Breville 800CPXL User manual

Breville

Breville 800CPXL User manual

Breville Cold Fountain Pro User manual

Breville

Breville Cold Fountain Pro User manual

Breville the Juice Fountain JE95 User manual

Breville

Breville the Juice Fountain JE95 User manual

Popular Juicer manuals by other brands

Tibret VI 404 instruction manual

Tibret

Tibret VI 404 instruction manual

Gastroback DESIGN JUICER BASIC operating instructions

Gastroback

Gastroback DESIGN JUICER BASIC operating instructions

HUROM H-AA Series instructions

HUROM

HUROM H-AA Series instructions

Aztech JUICEMAX user manual

Aztech

Aztech JUICEMAX user manual

SKG GS-306L user manual

SKG

SKG GS-306L user manual

Kenwood JE260 series instructions

Kenwood

Kenwood JE260 series instructions

Taurus TC-8 manual

Taurus

Taurus TC-8 manual

Andrew James AJ001545 manual

Andrew James

Andrew James AJ001545 manual

Royal Catering RCSJ-200W user manual

Royal Catering

Royal Catering RCSJ-200W user manual

Lacor 69120 Instructions for use and maintenance

Lacor

Lacor 69120 Instructions for use and maintenance

Unold ZITRUSPRESSE 78130/ Instructions for use

Unold

Unold ZITRUSPRESSE 78130/ Instructions for use

Moulinex JU655 instruction manual

Moulinex

Moulinex JU655 instruction manual

NUTRIBULLET NUTRIBULLET user guide

NUTRIBULLET

NUTRIBULLET NUTRIBULLET user guide

KUVING M1 manual

KUVING

KUVING M1 manual

Twinzee SD80A user manual

Twinzee

Twinzee SD80A user manual

Klarstein 10027959 manual

Klarstein

Klarstein 10027959 manual

G21 Perfect Juicer manual

G21

G21 Perfect Juicer manual

Westfalia SW-201 instruction manual

Westfalia

Westfalia SW-201 instruction manual

manuals.online logo
manuals.online logoBrands
  • About & Mission
  • Contact us
  • Privacy Policy
  • Terms and Conditions

Copyright 2025 Manuals.Online. All Rights Reserved.