Britax HUGS User manual

Britax Child Safety, Inc., 13501 South Ridge Drive, Charlotte, NC 28273, U.S.A
Consumer Services: 888.427.4829
www.Britax.com
© 2012 Britax Child Safety, Inc. All rights reserved.
R2:10.12
P529100
Page 1 of 6
CONVERTIBLE CAR SEATS
Instructions / Instructions / Instrucciones
5
43
a
b
1 2
6
Removing the HUGS™ with
SafeCell Technology®
1. Loosen the harness.
a Lift the harness adjuster lever
located under the cover flap
b Grasp the chest clip and pull
outward
* Connect the chest clip for easier
adjustment
2. Open the chest clip.
a Press tabs
b Pull apart
3. From the back of the HUGS
chest pad, angle the strap
retainer and route it through the
slot in the HUGS chest pad and
out through the top to remove
the HUGS strap.
4. Pull the HUGS strap out
through the harness slot to the
back of the seat and unhook
it from the HUGS clip on the
back of the seat.
5. Pull the HUGS strap through
the opposite harness slot to the
front of the seat.
6. From the back of the seat,
unhook the harness straps from
the yoke.
7. Pull the harness straps through
the harness slots to the front of
the seat.
8. Slide the harness straps out of
the HUGS chest pads and the
chest clip to remove.
7

Britax Child Safety, Inc., 13501 South Ridge Drive, Charlotte, NC 28273, U.S.A
Consumer Services: 888.427.4829
www.Britax.com
© 2012 Britax Child Safety, Inc. All rights reserved.
R2:10.12
P529100
Page 2 of 6
CONVERTIBLE CAR SEATS
Instructions / Instructions / Instrucciones
Replacing the HUGS™ with
SafeCell Technology®
1. Connect the HUGS strap to one
HUGS chest pad by routing
the retainer through the slot at
the top of the HUGS chest pad
and then through the slot at
the bottom ensuring that it is
properly seated on the back.
2. Route the HUGS strap through
the harness slot to the back of
the seat on one side.
3. From the back of the seat hook
the HUGS strap onto the clip
and route the rest of the strap
through the opposite harness
slot to the front of the seat.
4. Connect the HUGS strap to the
second HUGS chest pad.
* Ensure the HUGS strap is not
twisted before continuing.
5. Route the harness straps
through the HUGS chest pads
and chest clip.
6. Route the harness straps
through the harness slots to the
back of the seat.
* Ensure that the harness straps and
HUGS strap are not twisted and that
the HUGS strap lays flat below the
harness straps.
7. Nest the end of the right
harness strap into the left.
8. Hook the harness straps
onto the yoke. Ensure that
the harness straps are not
twisted and that the ends of
the harness straps are securely
attached to the yoke.
3
1 2
5
4
6
7 8

Britax Child Safety, Inc., 13501 South Ridge Drive, Charlotte, NC 28273, U.S.A
Consumer Services: 888.427.4829
www.Britax.com
© 2012 Britax Child Safety, Inc. All rights reserved.
R2:10.12
P529100
Page 3 of 6
CONVERTIBLE CAR SEATS
Instructions / Instructions / Instrucciones
5
43
a
b
1 2
6
Enlever les coussinets de poitrine
HUGS™ avec SafeCell Technology®
7
1. Désserez le harnais.
a Levez le levier d’ajustement du
harnais
b Tirez fermement l’attache à la
poitrine et tirez vers l’extérieur
* Fixer l’attache à la poitrine pour
ajustement plus facile
2. Ouvrez l’attache à la poitrine.
a Appuyez sur les onglets
b Détachez
3. De l’arrière du coussinet de
poitrine HUGS, tournez la
retenue de la sangle et passer
à travers la fente dans le
coussinet de poitrine HUGS et
sortir du haut pour enlever la
sangle HUGS.
4. Retirez la sangle HUGS de
l’arrière du siège et détacher
de l’attache HUGS à l’arrière du
siège.
5. Tirez la sangle HUGS à travers
du côté opposé vers l’avant du
siège.
6. De l’arrière du siège, détachez
les sangles du harnais de la
chape.
7. Tirez les courroies du harnais
vers l’avant du siège.
8. Glissez les sangles du harnais
hors des coussinets de poitrine
HUGS et l’attache à la poitrine
pour enlever.

Britax Child Safety, Inc., 13501 South Ridge Drive, Charlotte, NC 28273, U.S.A
Consumer Services: 888.427.4829
www.Britax.com
© 2012 Britax Child Safety, Inc. All rights reserved.
R2:10.12
P529100
Page 4 of 6
CONVERTIBLE CAR SEATS
Instructions / Instructions / Instrucciones
Remplacer des coussinets de poitrine
HUGS™ avec SafeCell Technology®
1. Rattachez la sangle HUGS à un
coussinet de poitrine HUGS en
acheminant le dispositif de retenue
à travers la fente dans le haut du
coussinet de poitrine HUGS et
ensuite à travers la fente au bas
assurer qu’il est correctement assis
sur le dos.
2. Acheminez la sangle HUGS à travers
la fente du harnais à l’arrière du
siège d’un côté.
3. De l’arrière du siège, accrochez la
sangle HUGS sur l’attache HUGS
et acheminer le reste de la sangle à
travers la fente du harnais opposée
à l’avant du siège.
4. Rattachez la sangle HUGS de la
deuxième coussinet de poitrine
HUGS.
* Assurez la sangle HUGS n’est pas
entortillèe avant de continuer.
5. Acheminez les sangles du harnais
à travers les coussinets de poitrine
HUGS et l’attache à la poitrine.
6. Acheminez les sangles du harnais
à travers les fentes du harnais à
l’arrière du siège.
* Assurez les sangles du harnais et la
sangle HUGS ne sont pas entortillée
et que la sangle HUGS est bien à plat
dessous les sangles du harnais.
7. Emboîtez les sangles du harnais en
insérant la boucle de sangle droite
dans la boucle de sangle gauche.
8. Attachez les sangles sur la chape.
Assurez que les sangles ne sont
pas entortillées et que les bouts des
sangles sont bien fixes à la chape.
3
1 2
5
4
6
7 8

Britax Child Safety, Inc., 13501 South Ridge Drive, Charlotte, NC 28273, U.S.A
Consumer Services: 888.427.4829
www.Britax.com
© 2012 Britax Child Safety, Inc. All rights reserved.
R2:10.12
P529100
Page 5 of 6
CONVERTIBLE CAR SEATS
Instructions / Instructions / Instrucciones
5
43
a
b
1 2
6
Extracción del sistema de HUGS™
con SafeCell Technology®
1. Afloje el arnés.
a Levante el ajustador de altura del
arnés.
b Sujete el clip de pecho y jale hacia
adelante.
* Conecta el broche pectoral para
ajustarlo fácilmente
2. Abra el broche pectoral.
a Presione las pestañas.
b Separe y desenlace.
3. Por la parte posterior de la
almohadilla HUGS ponga el
dispositivo de retención en
ángulo, diríjalo a través de
la ranura de la almohadilla
HUGS y hacia afuera por la
parte superior para remover el
cinturón HUGS.
4. Jale el cinturón HUGS hacia
afuera por detrás del asiento
y desabróchelo de la hebilla
HUGS por la parte posterior del
mismo.
5. Jale el cinturón HUGS por el
lado opuesto de la parte frontal
del asiento.
6. Desde la parte posterior del
asiento desabroche las correas
del arnés del gancho.
7. Jale las correas del arnés
de afuera hacia el frente del
asiento.
8. Deslice las correas de
arnés hacia afuera de las
almohadillas HUGS y el broche
pectoral para remover.
7

Britax Child Safety, Inc., 13501 South Ridge Drive, Charlotte, NC 28273, U.S.A
Consumer Services: 888.427.4829
www.Britax.com
© 2012 Britax Child Safety, Inc. All rights reserved.
R2:10.12
P529100
Page 6 of 6
CONVERTIBLE CAR SEATS
Instructions / Instructions / Instrucciones
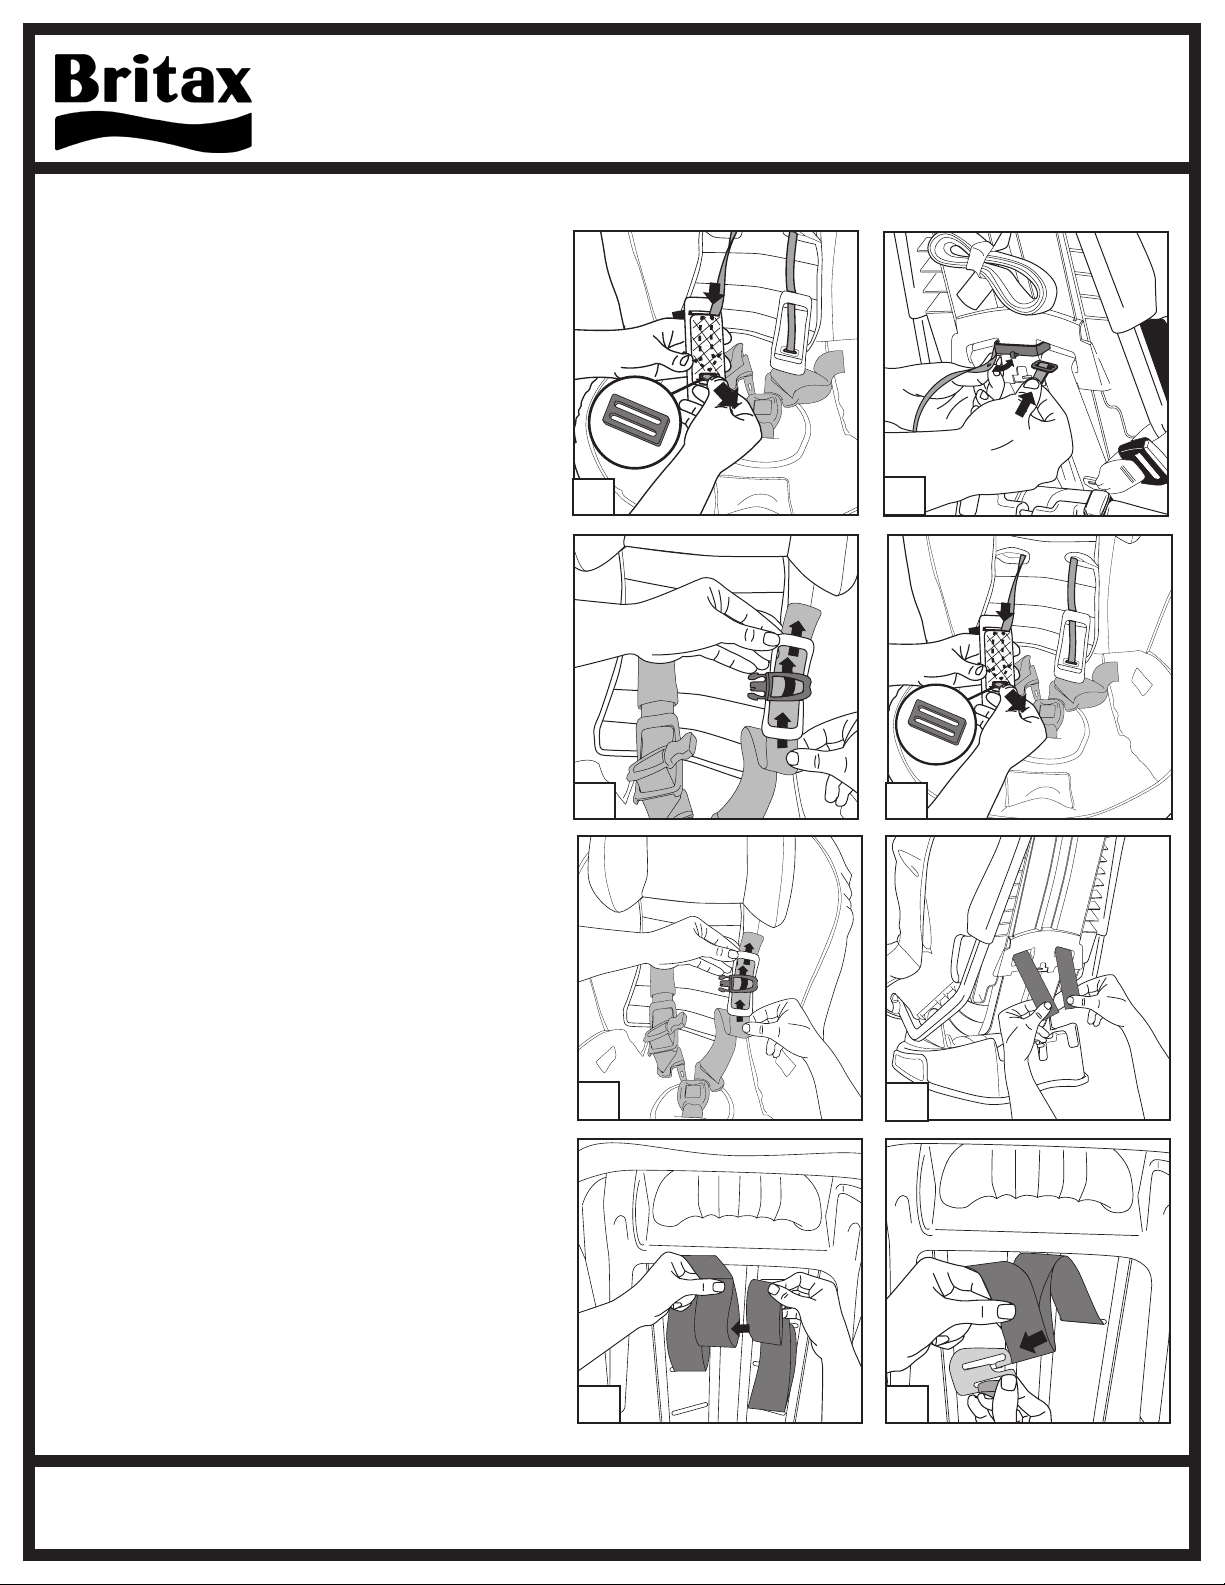
Remplazo del sistema de HUGS™
con SafeCell Technology®
1. Conecte la correa del sistema de
HUGS a la almohadilla de pecho
de HUGS haciendo pasar el retén
a través de la ranura en la parte
superior de la almohadilla de
pecho de HUGS y luego a través
de la ranura en la parte inferior
asegurándose de que esté colocadoa
correctamente en la parte posterior.
2. Pase la correa del sistema de HUGS
través de la ranura del arnés en la
parte posterior del asiento a un lado.
3. Desde la parte posterior del asiento,
enganchar la correa del sistema de
HUGS en el clip y pase el resto de
la correa a través de la ranura arnés
opuesto a la parte delantera del
asiento.
4. Conecte la correa del sistema de
HUGS a la segunda almohadilla de
pecho de HUGS.
* Asegúrese de que la correa del sistema de
HUGS no este torcida antes de continuar.
5. Pase de las correas del arnes a traves
de las almohadillas para el pecho del
sistema de HUGS y del clip de pecho.
6. Pase las correas del arnés por las
ranuras del arnés en la parte posterior
del asiento.
* Asegúrese de que las correas del arnés y
la correa del sistema de HUGS no esten
tuercidas y que la correa del HUGS esté
plana por debajo de las correas del arnés.
7. Ponga el extremo de la correa del
arnés derecha en la izquierda.
8. Enganche las correas del arnés
sobre el yugo. Asegúrese de que las
correas del arnés no estén torcidas y
que los extremos de las correas del
arnés estén bien sujetos al yugo.
3
1 2
5
4
6
7 8
Table of contents
Languages:
Other Britax Safety Equipment manuals
Popular Safety Equipment manuals by other brands

Horizon Signal
Horizon Signal SQ2-T user manual

JSP
JSP FAR0504 INSTRUCTIONS ON USE, CARE AND INSPECTION

Daniamant
Daniamant Dan WL3-2 Installation and maintenance instructions

CLiC-iT
CLiC-iT PROTECTMAN RODEOSTOP B100 user manual

SECUMAR
SECUMAR 17 Instructions for use

Datalogic
Datalogic SG4 FIELDBUS Series instruction manual