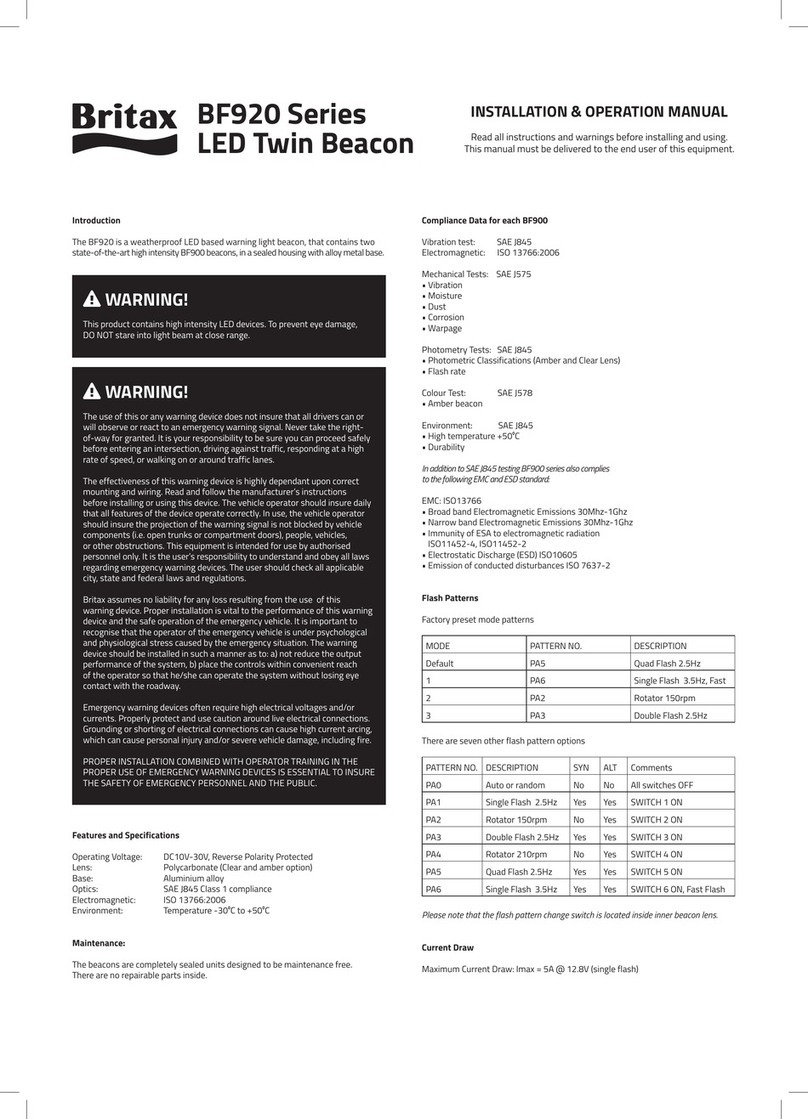
Britax BFR1000 Series User manual

INSTALLATION & OPERATION MANUAL
Read all instructions and warnings before installing and using.
This manual must be delivered to the end user of this equipment.
BFR1000 Series
LED Beacon
Introduction
The BFR1000 is a weatherproof LED based warning light beacon that contains
unique CyclOne LED Technology with a high reflectivity free-form rotating reflector,
a virtually unbreakable polycarbonate lens, and a rugged die-cast alloy metal base.
Features and Specifications
Operating Voltage: DC10V-30V, Reverse Polarity Protected
Lens: Polycarbonate
Base: Aluminium alloy
Optics: SAE J845 Class 1 compliance
Electromagnetic: R10
Environment: Temperature-20⁰Cto+50⁰C
Compliance Data
Vibration test: SAE J845
Electromagnetic: R10
Mechanical Tests: SAE J575
• Vibration
• Moisture
• Dust
• Corrosion
• Warpage
Photometry Tests: SAE J845
• Photometric Classifications (Amber Lens)
• Flash rate
Colour Test: SAE J578
• Amber beacon
Environment: SAE J845
•Hightemperature+50⁰C
• Durability
Operation Options
• Two rotation speeds at 120rpm and 180rpm (user selectable)
• Selectable rotation direction: clockwise and anti-clockwise (user selectable)
Dimensions
Current Draw
Maximum Current Draw: 2.0A @ 12.8V
WARNING!
This product contains high intensity LED devices. To prevent eye damage,
DO NOT stare into light beam at close range.
WARNING!
The use of this or any warning device does not insure that all drivers can or
will observe or react to an emergency warning signal. Never take the right-
of-way for granted. It is your responsibility to be sure you can proceed safely
before entering an intersection, driving against traffic, responding at a high
rate of speed, or walking on or around traffic lanes.
The effectiveness of this warning device is highly dependant upon correct
mounting and wiring. Read and follow the manufacturer’s instructions
before installing or using this device. The vehicle operator should insure daily
that all features of the device operate correctly. In use, the vehicle operator
should insure the projection of the warning signal is not blocked by vehicle
components (i.e. open trunks or compartment doors), people, vehicles,
or other obstructions. This equipment is intended for use by authorised
personnel only. It is the user’s responsibility to understand and obey all laws
regarding emergency warning devices. The user should check all applicable
city, state and federal laws and regulations.
Britax assumes no liability for any loss resulting from the use of this
warning device. Proper installation is vital to the performance of this warning
device and the safe operation of the emergency vehicle. It is important to
recognise that the operator of the emergency vehicle is under psychological
and physiological stress caused by the emergency situation. The warning
device should be installed in such a manner as to: a) not reduce the output
performance of the system, b) place the controls within convenient reach
of the operator so that he/she can operate the system without losing eye
contact with the roadway.
Emergency warning devices often require high electrical voltages and/or
currents. Properly protect and use caution around live electrical connections.
Grounding or shorting of electrical connections can cause high current arcing,
which can cause personal injury and/or severe vehicle damage, including fire.
PROPER INSTALLATION COMBINED WITH OPERATOR TRAINING IN THE
PROPER USE OF EMERGENCY WARNING DEVICES IS ESSENTIAL TO INSURE
THE SAFETY OF EMERGENCY PERSONNEL AND THE PUBLIC.

Installation and Mounting
Magnetic Mounting:
The magnetic based beacon provides a secure, temporary installation. The beacon
should be placed in the centre of the roof where the least amount of curvature
occurs. Check the magnet for debris before installation. Any foreign matter can
reduce holding power and scratch the vehicle. The roof surface should be dry
and have a dull, not glossy finish. A glossy, highly waxed surface will reduce the
magnet’s holding power. When placed, the beacon should adhere firmly. The user
should not attempt to drive with the beacon in place should the unit slide or move
easily.
Permanent Mounting:
The permanent mount beacon provides a secure, permanent installation. Wire
routing should be taken into consideration when choosing a mounting location.
Wiring Instructions
Consideration has to be taken to make sure the wire gauge is sufficient to drive the
product. AWG18 or above is recommended.
Magnetic base version BFR1004 only has Red and Black wire.
COLOR .....FUNCTION .........CONNECT TO
Red ........Power..............+VDC
Black .......Ground.............Chassis Ground
Violet.......Dimming . . . . . . . . . . . Ground to dim or open for full output
Operation:
Flash speed selection
1. 180rpm: Bank A selection jumper is on the left location
2. 120rpm: Bank A selection jumper is on the right location
Rotation direction selection
1. Anti-clockwise: Bank B selection jumper is on the left location
2. Clockwise: Bank B selection jumper is on the right location
Dimming (not available for BFR1004 magnetic version)
1. Default 100% light output.
2. Connect violet wire to ground: diming to 30% light intensity.
Maintenance:
The beacons are completely sealed units designed to be maintenance free.
There are no repairable parts inside.
Issue date
10 February 2016
Bank B
selection jumper
Bank A
selection jumper
WARNING!
As with any magnetically-mounted warning device, its use on the exterior
of a moving vehicle is at the sole discretion and responsibility of the user.
This magnetic mount product provides a secure, temporary installation in
most circumstances and is recommended for stationary use only.
Warranty
Britax Automotive Equipment (BAE) guarantees this product against defects
of materials and workmanship for a period of 3 years from the date of
purchase provided the product is used for its proper purpose, and is installed
in accordance to this instruction sheet. BAE will at its own option and cost
make good, or replace this product with the same or similar product and return
it to you, or provide a credit, if the product proves to be defective within the
limits set out above provided that no repairs, alterations, or modifications to
the product have been undertaken or attempted by anyone, other than BAE or
their authorised agents. Should you wish to make a claim under this guarantee,
the product and proof of purchase must be returned pre-paid by you to the
place of purchase. This guarantee is in addition to and does not take away
from any other rights and remedies you may have under any relevant law.
Our goods come with guarantees that cannot be excluded under the Australian
Consumer Law. You are entitled to a replacement or refund for a major failure
and compensation for any other reasonably foreseeable loss or damage. You
are also entitled to have the goods repaired or replaced if the goods fail to be
of acceptable quality and the failure does not amount to a major failure. Please
retain your proof of purchase for all warranty claims.
For all warranty enquiries:
Britax Automotive Equipment Pty Ltd
4 Garret Street Brendale 4500 Australia
PO Box 5940 Brendale DC Qld 4500 Australia
T+61732937900|F+61732937999
Other Britax Security System manuals
Popular Security System manuals by other brands

Swann
Swann Safety Camera Kit Wireless Camera & Receiver installation guide

SVAT
SVAT Do-It-Yourself Compact DVR Security System... Specifications

Digicom
Digicom Voice Box Button quick guide

FBII
FBII XL-4 Programming guide

Interlogix
Interlogix Simon XTi-5 Version 2 installation manual

Assa Abloy
Assa Abloy MSL mFlipLock drive Assembly and operating instructions