Brouwer Kesmac 4000 R Series User manual


BROUWER4000-16/24R
Sod Harvester
Operator’s Manual
Contents.
Foreword. i
Serial Number Plate. i
Patent Label. ii
Service Access; Keyed Safety Guards.ii
Specifications. iii
Caterpillar Service Center Locations. iv
Section 1. Safety.
Section 2. Cab Controls.
Section 3. Operation.
Section 4. Hydraulic System.
Section 5. Electrical System.
Section 6. Maintenance Schedule.
Lubrication.
Section 7. Electronic Auto–Steer.
Section 8. Cab Maintenance.
Radio - Owners Manual.
Section 9. Engine Operation and Maintenance
Manual.


BROUWER-16/24R
Self Propelled Sod Harvester
Foreword
IMPORTANT
The Owner and Operator, must assume responsibility for the safe operation of the machine, their own
safety, and the safety of others, by reading, understanding, and following all of the safety instructions
and operating procedures as outlined in the machines Operator’s Manual.
Failure of the Owner or Operator to adhere to the recommended safety instructions and operating
procedures, indemnifies Brouwer Turf Inc. against any claims that may arise, due to accidents resulting
in personal injury or property damage.
It is not possible to list all situations that may affect the safety of the machine or the operator, and therefore
Brouwer Turf Inc. cannot list all precautions, and identify all potential hazards, that may prevent accidents.
IF YOU DO NOT UNDERSTAND….ASK
BE A QUALIFIED OPERATOR BY ;
•Reading and obeying the instructions in this manual, and the safety decals on the machine.
•Receiving operational training on the sod harvester.
•Asking your supervisor or equipment dealer to explain anything you do not understand.
•Explaining the written instructions in the operator’s manual and safety decals to user/operators who
cannot read or understand them.
WARNING
Brouwer Sod Harvesters are designed for safe efficient operation and must not be used for any purpose other than
that for which they are designed.
Prior to being shipped from the manufacturer the machines are inspected to insure that all safety guards, shields
and warning/safety/operating decals are correctly positioned and secure
Before operating the machine the operator must check that all of the above items are correctly located.
The machine must not be used if any guards, shields or warning/operating decals are damaged or missing.
Brouwer Sod Harvesters are designed and built to give many years of outstanding performance.
The service and reliability you receive from this product will be affected by the proper maintenance and operation
of the machine.
Use only genuine factory placement parts. Parts not supplied by Brouwer may not meet the factory engineering
specifications or standards of manufacture and may void warranty. The use of non-approved parts may result in
component failure causing damage to the machine and possibly result in an accident to the operator or others.
IMPORTANT
MODEL NUMBER
The Model Number appears on sales literature
technical manuals and price lists.
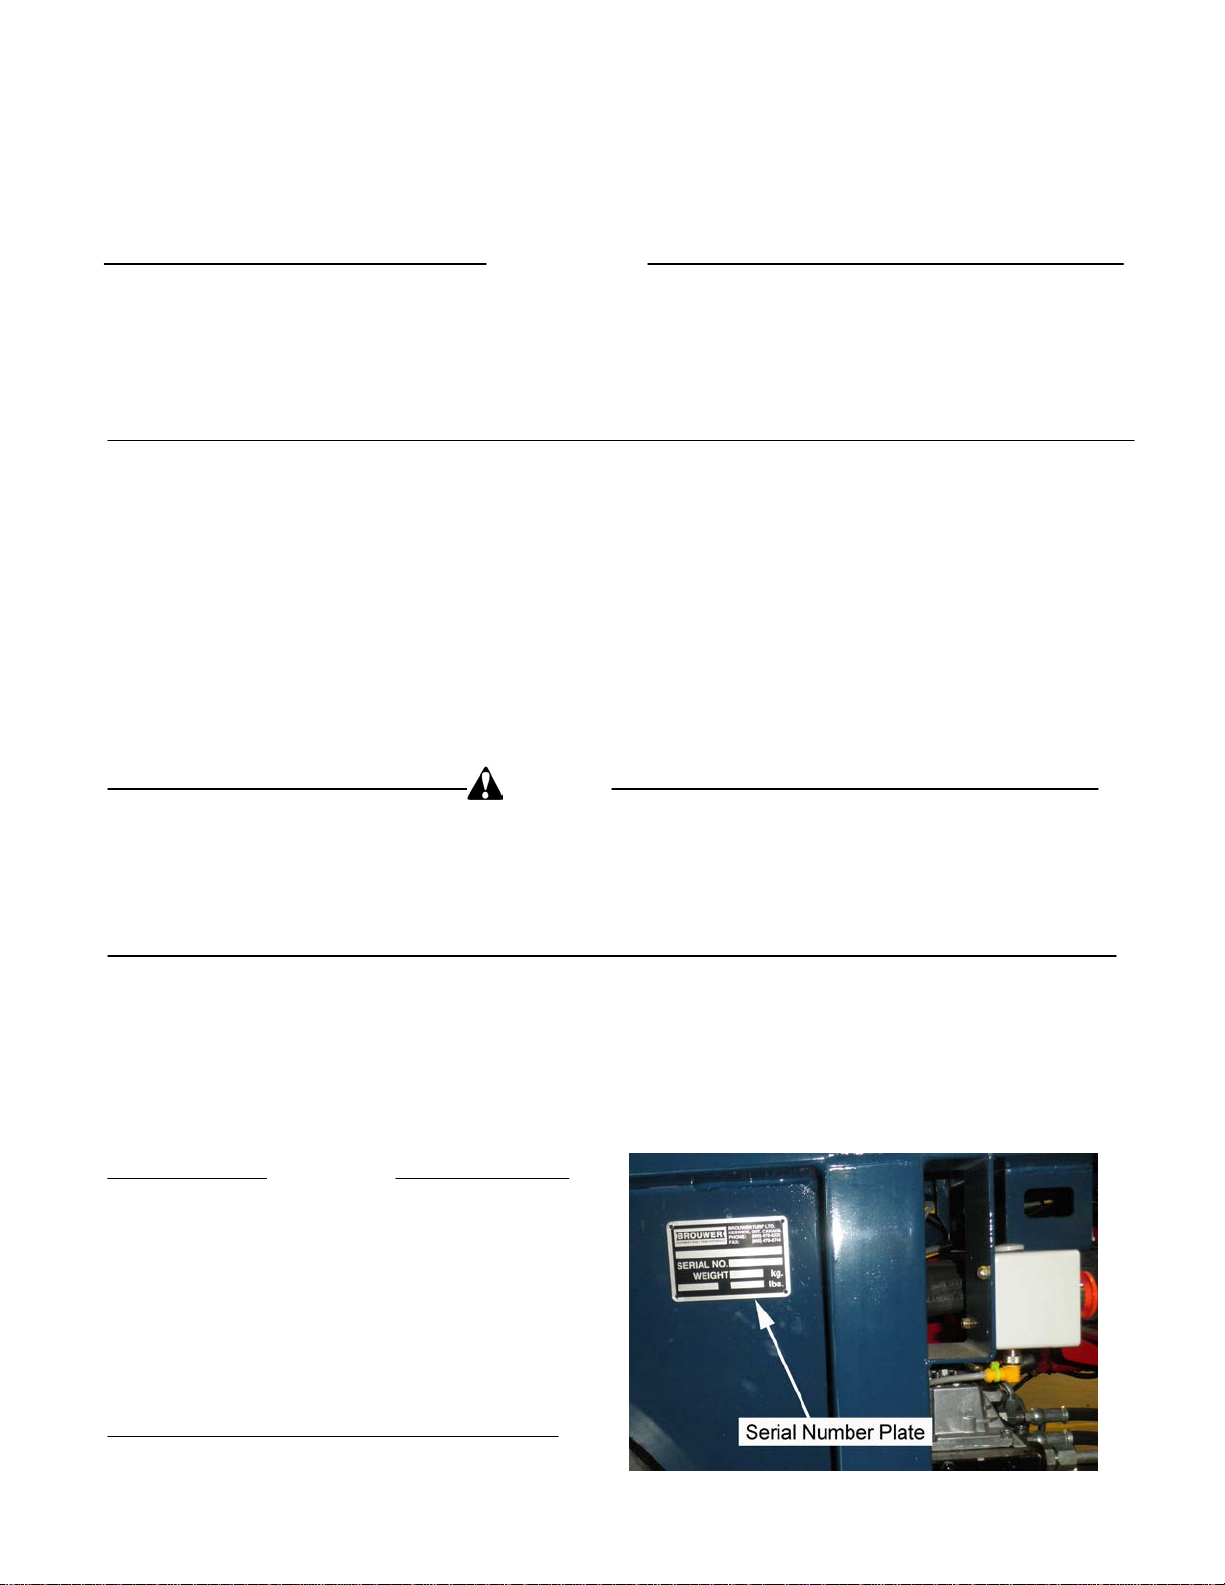
SERIAL NUMBER
The serial number applies only to the machine
to which it is allocated.
The serial number MUST be quoted when ordering
parts or calling for service or warranty
i

BROUWER 4000-16/24R
IMPORTANT
Maintenance and Service Access.
Keyed Locks are fitted to the Safety Guards : Gripper Head ‘A’; Roll-Up Area ‘B’; and Index Conveyor ‘C’.
These keys must be kept with the ignition key at all times.
Under no circumstance should the keys be left in the locks.
WARNING
Do not operate the machine if any of the safety guards are damaged or missing.
In this manual for illustration purposes only, some guards may not be shown.
ii


SAFETY
SECTION 1
Warning Symbols. 1-01
Safe Operation. 1-02
General Operating Safety. 1-03/1-04
Maintenance Safety. 1-04/1-06
Transport and Storage. 1-07
Safe Service Procedure. 1-07
Tire Service. 1-07
Handling Chemicals. 1-07
Safe Welding. 1-08
Battery Isolator Switch 1-08
Fuel Filler Access & Fuel Gauge. 1-08
To move machine with no engine power.
Towing /Transporting. 1-09
Release Torque Hub Brake. 1-09
Remove Conveyor. 1-09
Cab – Rear View Screen. 1-10
Rear View Camera. 1-10
Optional Camera-Piling/Cavity Area. 1-10
Back-Up Alarm. 1-10
Service & Maintenance Access Panels. 1-11
Battery Location. 1-11
Transport Tie-Down Locations. 1-11
Decals. 1-12/13/14/15/16
Optional Camera – Installation. 1-17


WARNING
Unauthorized modifications may result in extreme
safety hazards to operators and bystanders, and
could result in damage to the machine.
Brouwer Turf Inc. warns against and strongly rejects
and disclaims against any modifications, add-on
accessories or product modifications that are not
designed, developed, tested and approved by
Brouwer Engineering Department.
Any Brouwer product that is altered or modified in
anyway that is not authorized, after original
manufacture, including after market accessories or
component parts that are not approved by Brouwer
Turf Ltd. will result in the machines warranty being
voided.
All liability for personal injury and/or property damage
caused by any unauthorized modifications, add-on
accessories or products not approved by Brouwer
Ltd. will be considered the responsibility of the
individual(s) or Company designing and/or making
such changes.
Brouwer Turf Inc. will vigorously pursue full
indemnification and costs, from any party responsible
for unauthorized post manufacture modifications
and/or accessories, should personal injury and/or
property damage result from any of the above.
DANGER
TO PREVENT POSSIBLE SERIOUS INJURY OR
DEATH :
Under no circumstances is any service or maint-
enance work to be performed on the machine
until :
•THE ENGINE IS SWITCHED OFF.
•THE IGNITION KEY IS REMOVED.
•THE CAB DOOR IS LOCKED.
Brouwer Turf Inc. cannot stress too strongly the
importance of Owners/Operators adhering strictly to
the safety recommendations as stated in this manual.
SAFETY
WARNING
For illustration purposes only some safety guards
and shields may not be shown.
The machine must not be operated if any guards
or shields are damaged or missing.
Failure to observe this warning could result in
serious injury or death.
This Symbol means :
•ATTENTION !
•BECOME ALERT !
Your safety and that of others is involved.
Signal word definitions.
The signal words below are used to identify levels of
‘hazard’ seriousness. These words appear in this
manual and on the safety decals that are placed on
the machine.
For your safety and that of others, read and follow the
information and instructions given with these signal
words and/or the symbol shown above.
DANGER:
Indicates an imminently hazardous situation which if
not avoided WILL result in death or serious injury.
WARNING:
Indicates a potentially hazardous situation which if not
avoided COULD result in death or serious injury.
CAUTION:
Indicates a potentially hazardous situation which if not
avoided MAY result in minor or moderate injury.
It may also be used to alert against unsafe practices
or property damage.
CAUTION:
Used without the safety alert symbol indicates a
potentially hazardous situation which if not avoided
MAY result in property damage.
1-01

Safe Operation
Operator preparation and training.
Read the Brouwer400024-R/400016-R Operator’s Manual.
It must be kept on the machine at all times.
•If an operator or mechanic cannot read and
understand English, it is the owners responsibility
to explain the material contents to them.
•If any of the information or instructions in this
manual are not clear, contact your dealer or the
factory representative for clarification.
•Become familiar with the safe operation of the
machine, the operating controls and the safety
decals. If there are any questions concerning
safety, do not operate the machine until they are
clarified.
All safety guards and shields must be kept in
place and in good condition. All interlock switches
must be correctly adjusted.
•It is the owners responsibility to ensure that all
operators and service personnel are trained in the
proper operation and service procedures of the
machine.
•Do not allow children or untrained persons to
operate this equipment. Local regulations may
restrict the age of the operator.
•Wear appropriate work clothing, safety equipment
and work boots. Do not operate the machine with
loose clothing, long hair, or any jewelry, that may
get tangled in moving parts.
CAUTION
Wear suitable hearing protection such as
earmuffs or earplugs, to protect against hearing
impairment or hearing loss.
Operating equipment safely requires the full
attention of the operator. Do not wear radio or
music headphones while operating the machine.
•Only the operator must be on the machine, never
allow riders on the machine. Riders can be injured
by foreign objects or can be thrown off the
machine. Also they may obstruct the ability of the
operator or the operators view resulting in unsafe
operation of the machine.
•warning/safety decals must be kept clean, legible,
and undamaged. Do not operate the machine if
any decals are missing or damaged. Obtain new
decals from the factory.
1-02
SAFETY
•Do not operate the machine if drugs, alcohol or
medication are being used that can affect the
alertness or co-ordination of the operator.
Seek professional advice before operating the
machine if there is any doubt about the side
affects of any medication being taken that may put
your safety and that of others at risk.
•Keep animals and bystanders clear of the
machine, at a safe distance, when operating the
machine.
•The owner/operator is responsible for accidents
and/or injuries that may occur to themselves,
bystanders, or property that may occur as a result
of the operation of this machine.
Machine preparation
•Check that the ‘operator presence’ interlock switch
is operating.
WARNING
If the operator leaves the operator’s seat while the
machine is moving, the system will automatically
move the controls to neutral and the machine will
stop.
•Do not tamper with, or defeat, safety devices.
Keep guards, shields and interlock safety devices
in place and in proper working condition. They are
for your protection.
•Check regularly that all fasteners, nuts/ bolts, and
retainer pins are secure.
•Check daily that the machine is in good working
condition. Check all tires for damage or excessive
wear.
•Use only accessories, attachments and
replacement parts that are approved by the
manufacturer.
WARNING
To prevent unauthorized persons having access to
the cab:
The cab door must be kept locked when in
service, and the key in possession of the
service person.
IF YOU DO NOT UNDERSTAND….ASK

General Operating Safety
•Ensure all persons are clear of the machine before
starting the engine. Keep hands and feet clear of
the cutting unit and all moving parts.
•Do not make sharp turns. Exercise care when
reversing and maneuvering. Look behind the
machine and downward when reversing.
•Keep all persons clear of the Robotic Arm
operating areas and pallet cavity, the Arm may
move suddenly and result in serious injury.
•Exercise caution when approaching or crossing
roadways.
WARNING
Never attempt to get on or off the machine
when it is moving.
Before leaving the operating position, place
the Control Handle in ‘neutral’, set the brake,
lower the cutting head and pallet forks to
the ground, stop the engine and remove the
ignition key.
Starting the Engine.
WARNING
Start only in accordance with the instructions
in this manual
•Start only from the operator’s seat, with System
Power ‘OFF’, the Control Handle in ‘NEUTRAL’
and brake ‘ON’.
•DO NOT use starting-aid fluid.
Transporting
•Exercise caution when loading or unloading the
machine on or off a truck or trailer.
IMPORTANT
If the Conveyor is to be removed when trans-
porting the machine refer to page 1-09 for the
correct procedure.
•Ensure that the machine is properly ‘blocked’ and
secured during transport.
SAFETY
Operating
•Do not change the engine governor setting,
or over-speed the engine.
WARNING
Work in a ventilated area. Never operate the
machine without adequate engine exhaust
ventilation.
Never run the engine in an enclosed area.
Exhaust fumes contain carbon monoxide and
can be fatal if inhaled.
•Inspect the area to harvested and remove any
objects that may be hazardous or may cause an
injury.
•Operate with adequate light and avoid any holes
and other hazards.
Highway Operation
•Ensure that the ‘Slow moving vehicle’ sign is in
place.
•To prevent collisions with other vehicles, slow
moving tractors with attachments, towed equip-
ment or self-propelled machines, frequently check
for traffic from the rear, particularly when making
turns. Always use the turn signal lights.
•Slow down and exercise caution when making
turns and when crossing roads and railway tracks.
•Use headlights, flashing warning lights and turn
signals day and night. Follow local regulations
for equipment lighting and marking.
Ensure that all lighting, signals and markings are
visible, clean and in good working order.
Repair or replace any lights, signals or marking
that is damaged or is missing.
To prevent Tipping
•Avoid holes, ditches, slopes, and obstacles that
may cause instability and the machine to tip.
WARNING
Never drive close to the edge of a gully or steep
embankment that may collapse and cave-in,
causing the machine to tip.
1-03

SAFETY
Speed Control. ‘HI’ –‘LOW’.
To change speed from ‘HARVEST‘ (LOW) to ‘ROAD’
(HI). Stop the machine and operate the 2-Speed switch
on the cab Switch Panel. See page 2-01. Reverse the
procedure for ‘HI’ to ‘LOW’.
•Reduce travel speed before descending a steep
incline, to assist in braking and improving your
control of the machine.
•Slow down and exercise caution when making
turns and changing direction on a slope.
Stopping Operation
•Before stopping the engine: Reduce the engine
speed to ‘SLOW’ and let it operate at ‘no load’
for five to ten minutes, to allow the engine to
cool down.
To safely park the machine:
•Stop on level ground. Place all controls in the
‘OFF’ position. Lower the Cutter Head and the
Forks to the ground. Put the Control Handle in
the NEUTRAL position. Apply the brake and
switch off the engine. Before leaving the
operator’s seat, wait for the engine and all
moving/rotating parts to stop. Remove the
ignition key.
To free a ‘mired’ machine.
•Check that all towing devices are of adequate
size/strength to handle the load.
•Always attach to the Draw Bar of the towing
unit. Do not use the front attachment point.
Apply power smoothly to take up slack, a
sudden pull could ‘snap’ the towing device
causing it to ‘whip’ or ‘recoil’ dangerously.
CAUTION
The machine must not be towed any further than
necessary to extricate it.
Caution should be exercised when attempting to free a
machine that is stuck in mud.
Hazards that can occur when towing, and are to be
avoided are:
•The towing tractor overturning.
•The tow chain failing and recoiling. (Use of a
cable is not recommended).
•Tow-bar failing.
•The harvester becoming unstable and tipping.
The following procedures are recommended;
•If possible reverse the machine out, if it is
‘mired’ in mud.
Dig mud out from behind the wheels. Place
boards behind/under the wheels and reverse
out ‘slowly’. Keep bystanders clear of the
rear of the machine.
1-04
•Dig mud out from in front of the wheels and
drive ahead ‘slowly’.
Maintenance Safety
WARNING
Do not service or repair this machine with
the attachments in the raised position, unless
they are securely blocked, or the safety
devices are engaged.
Do not enter the Forks/Piling Cavity area when
the engine is running
Failure to follow these warnings could
result in serious injury or death
•To attain maximum safety and the optimum
harvesting results, maintain your Harvester
according to the recommended schedules and
instructions in this manual.
•When servicing or operating the machine do not
wear loose clothing or jewelry that can entangle
in machinery and cause personal injury.
•Never allow untrained persons to operate or
service the machine.
•Allow the engine and rotating/moving parts to
come to a complete stop before attempting any
service or repair work.
•Turn the battery Isolator Switch ‘OFF’ before
making any repairs, and before doing any
welding on the machine.
•Carefully release pressure from components
with ‘stored’ energy.
•Park the machine on smooth, firm, level ground.
•Replace worn, damaged, or faulty parts only
with ones supplied by the manufacturer.
•Before working on the machine, lower the Cutter
Head and the Forks to the ground and lower the
Gripper Head onto sod rolls on the Index
Conveyor.
If the machine is to be raised, use jack stands.
If left in a raised position hydraulic supports
can settle or ‘leak’ down.

Maintenance Safety
WARNING
Do not support the machine on cinder blocks,
hollow tiles, or props that may crumble under
continuous load.
Do not work under a machine that is supported
solely by a hydraulic jack.
•To reduce fire hazards: Keep the engine,
muffler, battery area and fuel storage area
free of grass, leaves, debris or grease build-up.
•Clean-up any fuel or oil spillage.
Handling Fuel.
WARNING
•Exercise caution when refueling do not
over-fill. Fuels are flammable and vapors are
explosive. If using fuel cans use only approved
containers and a funnel. Avoid spillage. Clean-
up spills immediately.
•Do not smoke, allow naked flame, or cause
sparks near the fuel.
Never drain or fill the fuel tank indoors.
•Never remove the Fuel Tank Cap or add
fuel when the engine is running or if it is hot.
•Never handle or store fuel containers near an
open flame or any device that may create sparks
and ignite the fuel or vapors.
•Ensure that the Closure Caps on the Fuel Tank,
and any containers, are replaced securely.
WARNING
To prevent sparks from static discharge:
•Do not fill containers in a vehicle, on a
truck, or a trailer bed that has a plastic liner.
Fill the containers on the ground, away from
the vehicle.
•Always keep the fuel dispenser nozzle in contact
with the rim of the fuel tank, or container
opening, until fueling is completed.
•Do not use a nozzle lock-open device.
•Always be prepared in case of fire. Keep a first-
aid kit and fire extinguisher close to hand.
•Keep emergency numbers for fire, hospital,
ambulance services, and doctors close to your
telephone.
Refer to page 1-08 for fuel filler and fuel gauge
locations.
SAFETY
Hydraulic System
WARNING
The Hydraulic System operates under high pressure.
To prevent serious injury from hot, high pressure oil:
•Never check for leaks with bare hands.
Use cardboard, paper or wood.
•High pressure oil can penetrate the skin. If it is
injected into the skin it must be surgically
removed within a few hours, by a doctor familiar
with this type of injury. Failure to do so may
result in gangrene.
•Relieve high pressure before disconnecting
hydraulic lines or fittings.
•Fully tighten fittings and connections before
pressurizing the system.
•Before inspecting or disconnecting hydraulic
lines or fittings. Lower Cutter Head and the
Forks to the ground. Disengage all drives, apply
the brake/inch/clutch pedal. Stop the engine
and remove the ignition key,
•Visually check daily all hydraulic hoses, tubes
and fittings for leaks. Replace any worn or
damaged hoses, tubes or fittings before
operating the machine.
•Replacement hoses or tubes must be routed in
the same location and path. Do not move
clamps, brackets or ties to new locations.
•Thoroughly inspect all hoses, tubes and fittings
every 300 hours.
IMPORTANT
To prevent serious damage to the hydraulic system
components, do not allow any contaminants to enter the
hydraulic system. Clean thoroughly around all fittings
and areas to be worked on. Cap and plug any conn-
ections that are disconnected.
•Before disconnecting, tag or mark the location of
the connection.
•Check that ‘O-Rings’ are clean and hose fittings
are properly seated before tightening.
•Align the hoses without twisting. Twisted hoses
can cause couplings to loosen as the hose
flexes during operation resulting in oil leaks.
•Kinked or twisted hoses can restrict the oil flow
causing the oil to overheat, the system to
malfunction, possible hose failure,
1-05

SAFETY
Cooling System
WARNING
To prevent serious injury from hot coolant
and steam, DO NOT remove the radiator
cap when the engine is running and/or hot.
Allow the engine and system to cool.
Use caution when removing the radiator cap.
•Do not operate the engine without the recom-
mended coolant mixture.
•Add top-up coolant into the recovery tank NOT
directly to the radiator
•Ensure that the radiator cap is tight and secure.
•If the radiator cap must be removed, stop the
engine and allow the cooling system to cool,
until the cap is cool to the touch. Loosen it
slowly to relieve pressure, before removing
completely.
Battery Service
WARNING
The sulfuric acid in the battery electrolyte is
poisonous. It can cause serious skin burns
and blindness if splashed in the eyes.
CAUTION
Always wear protective glasses/goggles,
and protective clothing and use insulated
tools when working with batteries.
Read, understand, and obey the battery manuf-
acturers instructions and warnings.
Battery posts, terminals and related accessories
contain lead, lead compounds and chemicals.
Wash your hands after handling them.
Avoid Hazards By:
•Fill/top-up batteries in a well ventilated area.
•Wearing eye protection and rubber gloves.
•Avoid breathing fumes.
•Avoid spilling, splashing or dripping electrolyte.
•Follow proper ‘jump-start’ procedure.
If acid is splashed on your person:
•Flush the affected skin with water.
•Apply baking soda, or lime, to help neutralize the
acid.
•Flush your eyes with water for 15 to 30 minutes.
Get medical help immediately.
1-06
If acid is swallowed:
•Do not induce vomiting
•Drink large quantities of water or milk, but do not
exceed 2 liters (2 Quarts).
•Get medical help immediately.
Battery Charging
•Charge batteries in an open well ventilated area,
away from sparks or open flame.
•Unplug the charger before connecting or
disconnecting the battery.
Jump Starting
•Check that the Jumper cables are in good
condition.
•Turn the ignition and all electrical accessories
‘OFF’, on both machines.
•Position the machine with the ‘charged’ battery
close to, but not touching, the machine with the
dead battery, to ensure that the cables will easily
reach.
Connecting the Cables
•Do not allow the cable clamps to touch any
metal parts except those intended.
•Never connect the positive ‘+’ (red) terminal to
the negative ‘-‘ (black) terminal.
•Ensure that the cables cannot get caught in
moving engine parts when starting.
•Connect one end of the positive ‘+’ (red) cable
to the positive ‘+‘ terminal on one battery.
Connect the other end to the positive ‘+’
terminal on the other battery
•Connect one end of the negative ‘-‘ (black)
cable to the negative ‘-‘ terminal on the
‘charged’ battery. Connect the other end of the
cable to the engine block on the machine with
the ‘dead’ battery.
•Start the machine that has the ‘charged’ battery,
then start the machine that has the ‘dead’
battery.
•Remove the jumper cables in the exact reverse
order of connecting. Do not allow the cable
clamps to touch any metal parts while the other
end is connected to a battery terminal.
IMPORTANT
Keep the battery terminals clean. Smear them
with white grease to prevent corrosion.
The positive terminal (red) protective cover must
be kept in place.

Transporting and Storage
IMPORTANT
If the machine should become disabled, and
cannot be moved under its own power, refer to
page 1-09 for the recommended procedure for
towing and transporting.
Storage
IMPORTANT
If the Harvester is to be stored ‘inside’ keep the
doors open to ensure good ventilation until the
procedure below is complete.
•Stop the engine and allow it to fully cool down.
•Evacuate the fuel from the tank into an
approved container and shut off the fuel.
•Store the fuel in a cool dry location.
•Turn the Battery Isolator Switch to ‘OFF’.
•Keep the Harvester and fuel containers in a
locked, secure storage place, to prevent
tampering, and children from playing in the area.
•Do not store the Harvester or fuel containers
close to heating appliances with an open flame,
such as a water heater with a pilot light.
Safe Service Procedures
•Do not service the harvester when it is moving
or the engine is running.
•If servicing a four wheel drive machine, when
necessary raise front and rear wheels off the
ground. This is to prevent the machine being
pulled of the jack stands if power is applied to
the wheels.
•Tighten the wheel lug nuts to the correct torque
as specified in specifications section, page 6-13.
•Refit all safety guards and shields that may
have been removed during service.
Tire Service
WARNING
Do not operate the harvester if any of the tires are
badly worn or damaged. See Page 6-13 for tire
pressures
The front tires are loaded with liquid ballast, and are
extremely heavy. Exercise caution when
removing or replacing them. Use suitable tools,
equipment and hoists with adequate lift capacity.
Only qualified and experienced personnel must
service the wheel assemblies.
SAFETY
CAUTION
Operating the machine with loose wheel lug nuts will
result in damage to, and require the replacement of,
wheel assembly components.
•Always maintain the correct tire pressures.
•Do not inflate tires above the recommended
operating pressure shown on the side wall.
DANGER
Never weld or heat a wheel/tire assembly. The heat
can cause increased air pressure and result in the
tire exploding. Explosive separation of tire and rim
components will result in serious injury or death
•When inflating tires use a clip-on chuck, and a
air hose that is long enough to allow you to
stand to one side of the wheel, not in front or
over it. Use a safety cage if one is available.
Handling Chemical Products
CAUTION
To prevent serious personal injury avoid direct exp-
osure to hazardous chemicals. Potential hazardous
chemicals include : fuels, lubricants, coolants, paints
and adhesives.
Material Safety Data Sheets (MSDS)
Material Safety Data Sheets provide specific details on
chemical products that affect:
•Physical and personal health hazards.
•Safety procedures.
•Emergency response techniques
It is recommended that the MSDS data is checked
before a job is started that involves a hazardous
chemical. This informs of the possible risks and the
safest way to proceed. Follow carefully the recomm-
endations.
Proper Waste Disposal
•Improper disposal of waste material is harmful
to the environment. Some potentially harmful
products used on machines are: oil, fuel, filters
coolant, brake fluid, and batteries.
•Use leak proof containers when draining fluids.
Do not use food or beverage containers that
someone may mistakenly drink from.
•Do not pour waste fluids onto the ground, down
a drain or into any natural water source.
•Air conditioning refrigerants are harmful to the
atmosphere. Government regulations may
require a certified technician to service and
properly recover and recycle refrigerants.
1-07

SAFETY
•Before disposing of waste material, enquire at your local environmental or recycling facility
for instructions on proper waste disposal.
Welding on Painted Areas
CAUTION
Hazardous fumes are generated when paint is heated when welding, soldering, or using a torch.
The use of an approved respirator is recommended when welding, sanding or grinding on painted
areas to avoid the inhalation of fumes or dust.
•It is recommended that paint be removed a minimum of 4 inches (100mm) from around
the area to be affected by heating.
•If solvent or stripper is used, wash them off with soapy water before doing any welding.
Remove any stripper or solvent containers and other flammable material from the area.
Allow a minimum of 15 minutes for fumes to disperse before welding.
•Do not use chlorinated solvent in areas where welding will be done. Do all work in an area
that is well ventilated to allow fumes and/or dust to disperse.
CAUTION
Do not weld, solder or use a torch close to pressurized fluid lines, that may cause them to burst.
Flammable spray can be generated by burst fluid lines resulting in severe burn injury to
yourself and bystanders.
Fuel Tank and Fuel Gauge.
Fuel Tank. Fuel Gauge.
1-08

To move the machine with no engine power:
If the engine cannot be started, and it is necessary that the machine has to be moved, follow the procedure
below.
•Jack-up the conveyor frame at ‘A’, sufficient to allow the
cutter blades ’B’ to be removed.
•To prevent the conveyor frame from dropping while
removing the cutter blades, place a suitable support
under the front ground roller ‘C’.
•Remove the cutter blades ‘B’.
•Remove the roller support and lower the conveyor to
place the Front Roller ‘C’ on the ground.
Release the Torque Hub Brakes on all wheels:
•Remove the Bolts ‘A’ securing the ‘Top Hat’ Plate.
•Reverse the ‘Top Hat’ Plate and replace the bolts.
WARNING
The machine can now be towed to another location.
Extreme caution must be exercised. It will not be possible to
steer or apply brakes during this operation.
Do not move the machine onto an incline as it may
‘run-away’.
If the problem with the engine is investigated and not
resolved then a call to your Caterpillar Engine service
representative is necessary.
If the problem cannot be resolved ‘on site’ and is such that
the engine has to be repaired at a Caterpillar Service Center,
it is recommended that the main conveyor is removed from
the machine to enable easier transportation.
To remove the Main Conveyor:
Position a fork lift under the rear end of the conveyor frame, or
use slings, to support it when it is disconnected from the
main frame.
IMPORTANT
To prevent loss of function calibration when disconnecting
the sensor cables: Turn the ignition ‘ON’; Switch the system
power ‘ON’; Go to System Screen ‘select’; Select ‘Set-Up’;
Activate ‘Shipping Mode’. (See Section 5).
•Switch off system power and ignition.
•Turn battery isolator switch ‘OFF’.(See P1-11).
•Disconnect the hydraulic fittings at the bulkhead ‘A’,
and ‘B’ at the Roll Eject motor.
Plug and cap all hydraulic fittings.
•Remove the Conveyor Drive Chain ‘C’.
•Remove the Bearing Bolts ‘D’, both sides of the frame.
•Unplug the cables ‘E’ from the: Cut-off, Slab End,
Tooth Count , Auto-Steer and Down Pressure Sensors.
•Remove the three Soc.Hd cap screws ‘G’, and remove
Outer Tracking Rod ‘F’.
•Carefully lift the conveyor clear of the main frame.
The machine can then be ‘winched’ onto a flatbed.
Using the four tie-down rings, (see page 1-11), chain down
the machine and block the wheels.
1-09

SAFETY
Standard Rear View Camera.
The Rear View Camera is ‘ON’ at all times when the
engine is running.
Keep the camera lens clean to ensure a clear picture on
the rear view screen.
Optional Camera. Piling/Cavity Area.
The Optional Camera is located on the rear beam.
The camera can be adjusted to show the area that the
operator prefers.
Keep the lens clean to ensure a clear picture on the
rear view screen.
NOTE
If the camera is retro-fitted in the field, installation
instructions, included in the Kit, are also shown on
page 1-17.
Interior Rear View Screen.
The operator must pay particular attention to the screen
when reversing.
CAUTION
To prevent possible personal injuries or damage:
The operator must be alert at all times to any persons
or obstructions that may be in the vicinity of the
machine.
Back-Up Alarm
The Back-Up Alarm ‘ Warning Beeper’ sounds when
reverse is selected.
CAUTION
The operator must be aware of the warning.
If it fails to sound, the problem must be resolved before
operating the machine.
1-10
This manual suits for next models
2
Table of contents
Popular Farm Equipment manuals by other brands

Agria
Agria 9600-112 Translation of the original operating instructions

Gaspardo
Gaspardo PA1 Use and maintenance

Toro
Toro GROUNDSMASTER 345 Operator's manual

Velp Scientifica
Velp Scientifica FTC 120 instruction manual

Monosem
Monosem NG Plus 4 Assembly, Adujstment and Maintenance Instructions

Modern
Modern 003-7445 Operator's manual

Enoitalia
Enoitalia DELTA 1 User Instructions, Installation and Technical Manual

Amazone
Amazone CatrosXL 4003-2TS Original operating manual

Degelman
Degelman Rock King 9600 Operator's & parts manual

Frontier
Frontier DH5410C Operator's manual

GREAT PLAINS
GREAT PLAINS Nutri-Pro NP30A installation instructions

Kongskilde
Kongskilde GXS 9005 Operator's manual