Bush-whacker T-104 User manual

2010

2
2010 T-104
Welcome
Thank you for selecting the T-104 Rotary Mower. Your machine has been care-
fully inspected by both the factory and the dealership prior to being received by
you to ensure that it is ready for operation.
This manual explains the proper operation of your machine. It is very important
that you read and understand these instructions before operating or maintaining
the machine. Failure to do so could result in personal injury or even death to you
or passersby. Consult your Bush-Whacker dealership if you do not understand the
instructions in this manual or need additional information.
Hall Manufacturing, Inc. reserves the right to make changes at any time without
notice or obligation. Additional copies of the manuals are available from your lo-
cal Bush-Whacker dealer.
Hall Manufacturing, Inc.
3706 E. Washington Ave., P.O. Box Drawer 5638
North Little Rock, AR 72119
(501)945-7550

3
2010 T-104
Table of Contents
Introductory Page ………………………………………………………...…………..2
Safety Section ….…………………………………………………………………….4-13
General Safety Instructions and Warnings…………………………………...5
Decals Placement…………………..…………………………………………6
Operations…………………………………………………………………….7-8
Attaching/Detaching Cutter…………………………………………………..9
Rollover……………………………………………………………………….9-10
Rotating Blades……………………………………………………………….10
Hydraulics…………………………………………………………………….11
Maintenance...………………………………………………………………………...12-15
General Maintenance………………………………………………………….13
At Least Twice Daily………………………………………………………….13-14
Daily…………………………………………………………………………...14-15
Every 1,000 Hours or Annually. .……………………………………………..15
Gearbox Disassembly and Assembly………………………………………………….16-17
Parts book………………………………………………………………………………19-54
Lift Type……………………………………………………………………….20-35
Pull Type……………………………………………………………………….39-51
Miscellaneous…………………………………………………………………..52-54
Warranty Information................................................................................... ................55-56
Warranty Registration Card…………………………………………………………...57-58
Notes………………..................................................................................... ............... 59

4
2010 T-104
Safety
Section

5
2010 T-104
Attention
Important Safety Information
Read and Study this safety information BEFORE operating this
equipment.
The use of common sense and reasonable safety precautions are a must in the operation
of this equipment. Think Safety – Accident prevention is dependant upon the personnel
involved in the operation, transport, and maintenance of the equipment. To minimize the
chance of accidents, serious injury, or even death; Safety Precautions Must Be Fol-
lowed! FAILURE TO FOLLOW SAFETY INSTRUCTIONS AND FAILURE TO
USE COMMON SENSE COULD RESULT IN SERIOUS INJURY AND/OR
DEATH TO THE OPERATOR, BYSTANDERS, PASSERSBY, OR ANIMALS IN
THE AREA.
General Safety Instructions and Warnings
Safety Decals Information
• Always keep the area around safety decals clean and free of debris so that they can be easily
seen and read.
• When installing new components to the equipment, it is necessary to obtain new safety de-
cals from your Bush-Whacker dealer and adhere them promptly and properly.
• Always keep safety decals clean, using soap and water. Do not use abrasive cleaners be-
cause they could cause damage to the decals.
• If the safety decals get damaged, or are missing, contact your local Bush-Whacker dealer to
order replacements for them.
• In order to replace the safety decals, the equipment must be clean and dry. Then remove the
adhesive backing and place it on the equipment.

6
2010 T-104
Decals Part Numbers and Placement
2569 2572 4416 CW - 4167
CCW - 4168
540 Rpm - 4169
1000 Rpm - 4170
4415

7
2010 T-104
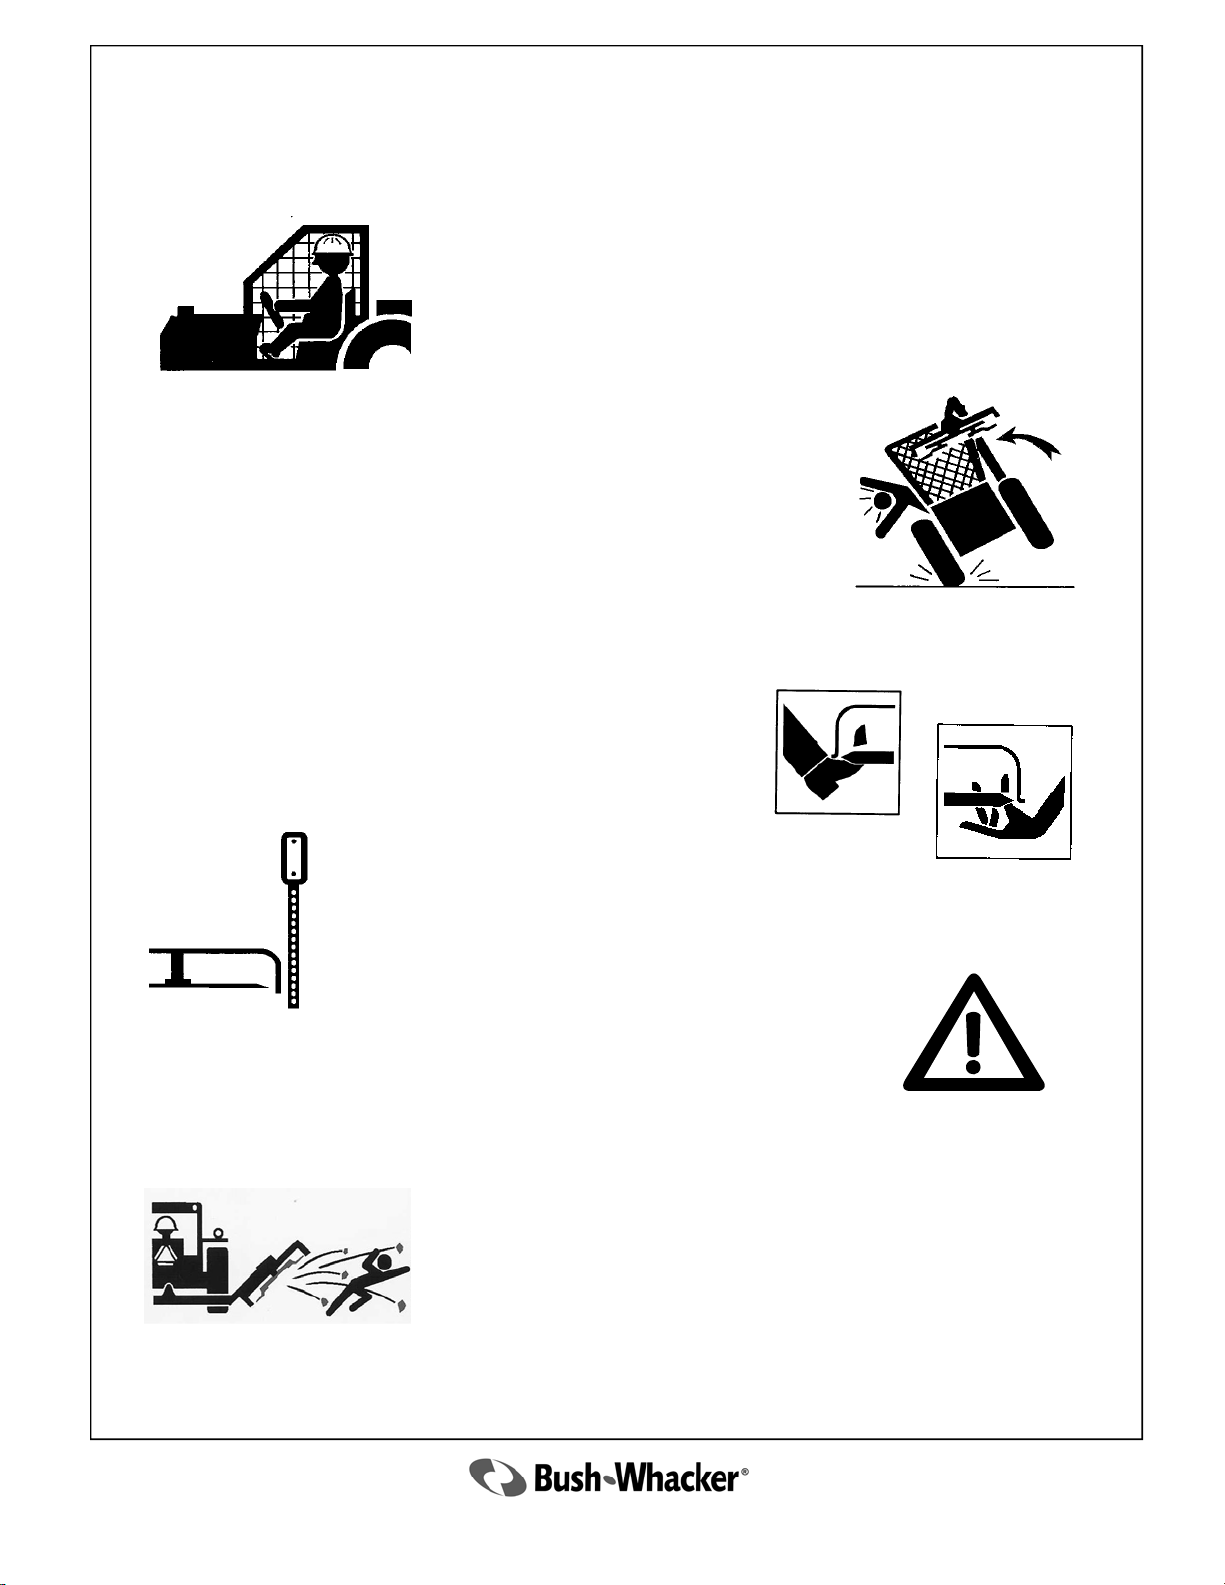
NEVER operate a rotary mower with a person or animal in the
area. The blades may throw objects for great distances and can
strike a person, passersby, or animal causing serious injury or
death.
Safety Warnings
Stop operation of the machine for a passerby or if someone appears to be approaching the area.
Objects can be thrown for hundreds of yards at great speed.
ALWAYS inspect the deflector shields and/or chain guards daily to ensure
that they are in proper working order and that no chains are missing. If the
deflector shields or chain guards are not operating correctly, chain links are
missing, or the complete deflector shields or chain guards assembly is
missing, do not operate the mower. NEVER OPERATE THE MOWER
WITHOUT CHAIN GUARDS OR DEFLECTORS IN PROPER
WORKING ORDER.
Operations
Rocks, gravel, wire, rope, bricks, or similar objects are potential hazards for
rotary mowers operation. These items can cause damage to the machine; but
more importantly, they can be ejected from underneath the mower at very high
speeds, resulting in property damage, injury or even death. Always inspect the
mowing area prior to the operation of any rotary mower. If any of these objects
or similar objects are found, remove them immediately before operation.
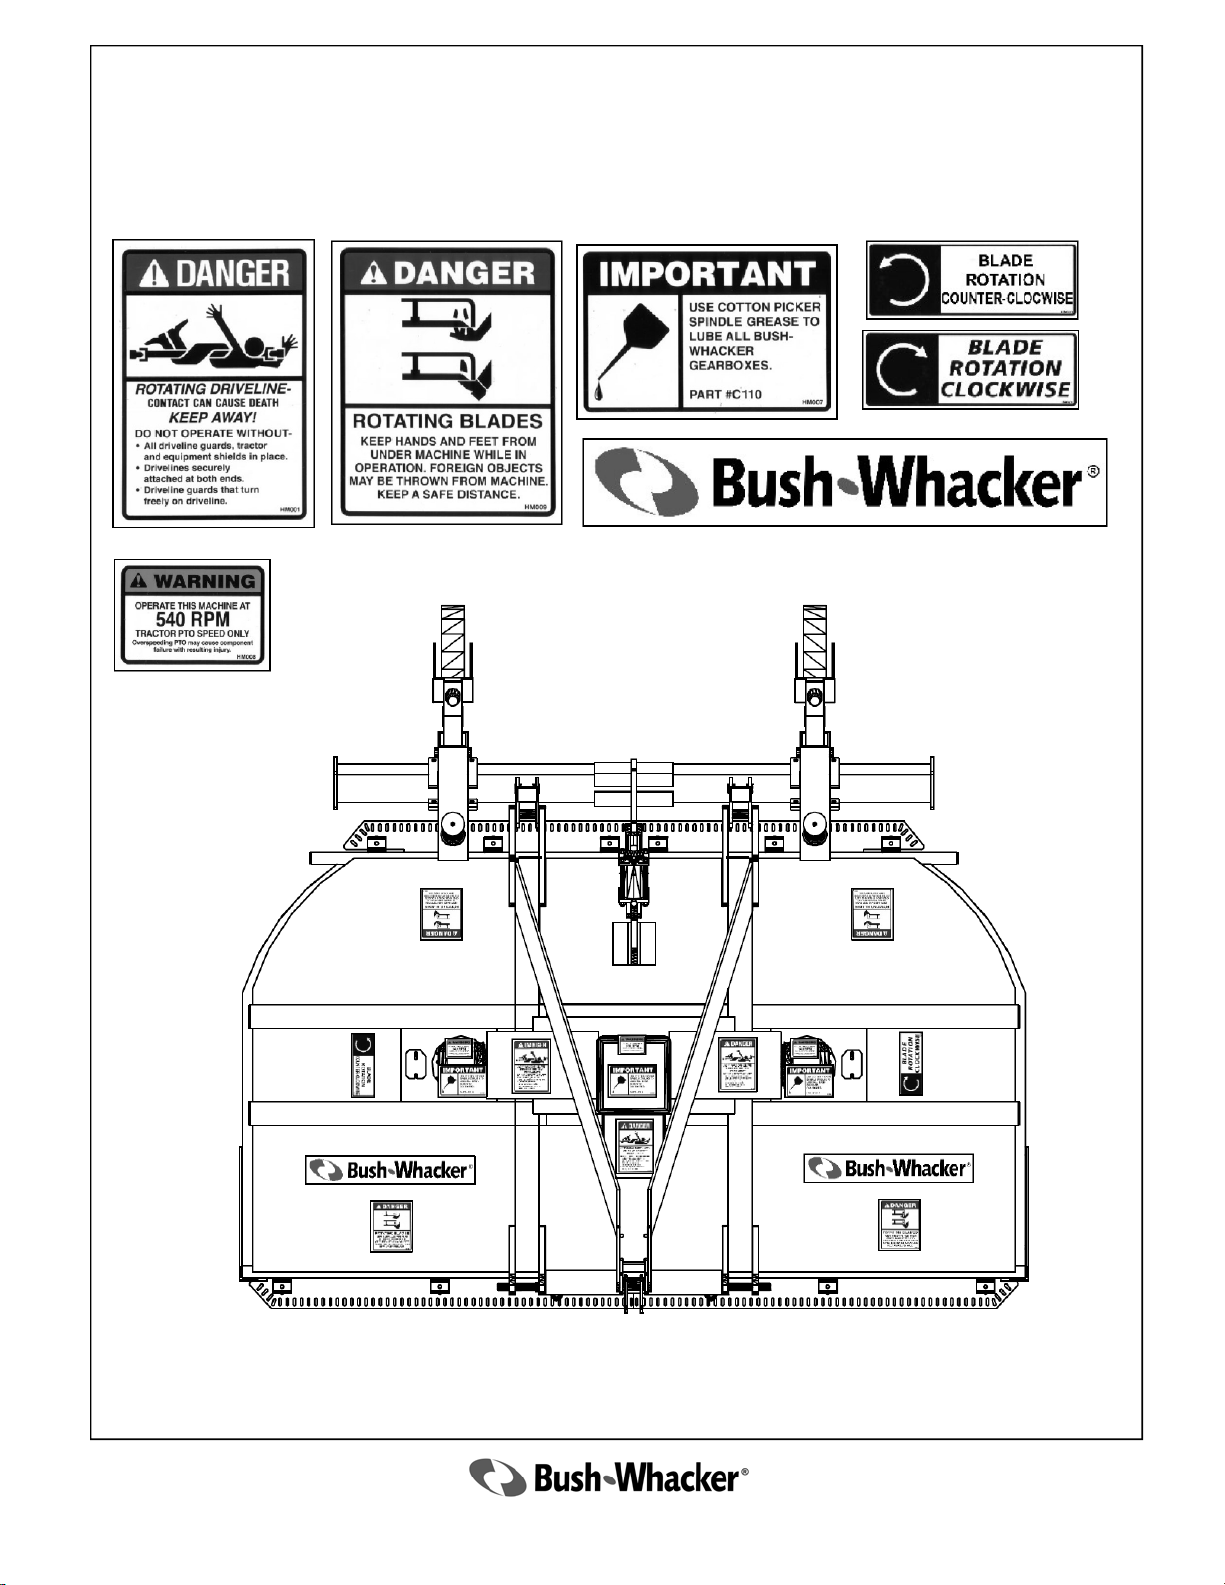
NEVER operate the mower without the driveline safety shields in place and in
proper working order. Operation without safety shields can lead to injury or
death.
EXTREMELY IMPORTANT—Make sure all gearbox shields are in place and tightened be-
fore operating the mower. If one works loose, stop mowing and tighten immediately. NEVER
OPERATE THE MOWER WITHOUT ALL GEARBOX SHIELDS PROPERLY IN-
STALLED. OPERATION WITHOUT SAFETY SHIELDS MAY CAUSE SERIOUS IN-
JURY OR DEATH.
This mower operates at a PTO speed of 540 RPM only. Check the tractor manufacture’s
instruction manual for the proper engine RPM to achieve the proper PTO speed. DO NOT
operate the mower at any higher RPM, doing so will cause damage to the mower as well
as create an extreme hazard to the operator, passersby, or animals. Also note that doing so
will void the warranty of the machine.

8
2010 T-104
Safety Warnings
Operations
Always inspect the area before mowing for potential mower hazards.
Remove or avoid all foreign objects such as wire, cable, metal objects, and
all other foreign material. Failure to do so could result in serious injury
to the operator or passerby from foreign material being thrown from
the mower.
Thoroughly examine the rotary mower each day before operating. Tighten
loose bolts, nuts, and hydraulic fittings. Replace all damaged or broken parts,
including hydraulic hoses. If rotary mowers are not kept in proper working
order, they could be damaged and this could result in serious injury.
NEVER engage in repair work under the mower deck or any other
part of the mower that is raised off the ground until the mower is
safely and securely supported in the raised position. Inadequate
support can result in the mower falling, which could result in seri-
ous injury or death.
Use proper signage around working area. This will help the operator
have a safe place to work, and help passers by to take appropriate
precautions.
Use the proper reflective devices on the equipment to help prevent
accidents.
Make sure that all rules of the road are followed, and Slow Moving
Vehicle (SMV) rules are also observed
NEVER ALLOW ANYONE TO RIDE ON THE MOWER OR
THE TRACTOR. This equipment, if not operated properly, could be
potentially dangerous; therefore, NEVER ALLOW A CHILD TO
OPERATE A ROTARY MOWER.
Avoid hitting hard solid objects such as large rocks, concrete culverts, guard
rails, etc. This could cause serious damage to the machine. Broken machine
parts or pieces of the object can be thrown at very high speeds. This could re-
sult in serious injury or death to persons at a considerable distance from the
rotary mower.

9
2010 T-104
Safety Warnings
Attaching/Detaching Cutter
NEVER WORK ON THE ROTARY MOWER WITH
THE POWER ON.
Care must be taken when operating on uneven terrain, ditches, or embank-
ments. The chances of the tractor and/or mower rolling over are increased.
Also, the chance of objects being thrown by the blade are increased when
operating under these adverse conditions.
Rollover
Before approaching any rotary mower or before dismounting the tractor,
always make sure of the following:
The tractor transmission is in the parking gear, and the parking brake is set
to keep the tractor from moving while unattended.
The tractor PTO is disengaged.
The engine has stopped, the key is out of the ignition, and all moving parts
(both tractor and mower) have completely stopped. The rotating parts of
the tractor and rotary may mower continue to rotate after the PTO has been
disengaged. THE OPERATOR SHOULD REMAIN SEATED UNTIL
ALL MOVEMENT HAS CEASED!
Never use equipment around railroad tracks without direct railway supervision.
Inexperience in railway operations may cause loss of communications, loss of
signals, rail and tie damage or derailment.
NEVER railway tracks anywhere other than at normal traffic crossings.
Unauthorized machinery on railways are in extreme danger of being struck by
locomotives and railway machinery resulting in damaged equipment, serious
injury or death.
If operating along roadway, keep equipment within the lane closest to the
work area. Never operate equipment against the flow of traffic, which
could possibly result in a head-on collision causing serious injury or death.

10
2010 T-104
OPERATE CAREFULLY! It is important to slow down when
turning and when going down slopes. Doing so could result in a roll
over and injury, or possibly death, to the operator.
Safety Warnings
Never operate the equipment without the Roll-Over Protective
Structure (ROPS) and without a seat belt. These items prevent
injury in a roll-over accident. It is also highly recommended to
wear protective equipment such as a hard hat, safety glasses,
safety shoes, and ear plugs.
Rollover
Stay away from rotating blades. Keep hands and feet clear
of rotating blades and discharge areas at all times. Never
get close to the blades until all motion has stopped and ma-
chine is turned off.
• Never operate with Cutting Head raised if bystanders or
traffic are in the area to prevent injury or death from objects
thrown by Blades.
• Stop cutting if someone comes within 300 feet. DO NOT
operate equipment with bystanders in the area! Rotary
mowers have the ability to throw debris considerable
distances when blades are allowed to strike foreign objects.
Operator must exercise caution or serious injury or even
death could result.
Never operate equipment with loose blades. Retighten after the first 8
hours of use and after blade replacement.
Never allow rotating blades to contact solid objects like rocks, posts, curbs
or guard rails. Only operate if all guards and deflectors are in place and
in good working condition.
Rotating Blades

11
2010 T-104
Safety Warnings
Hydraulics
Relieve all pressure in the hydraulic lines by setting the mower deck on the
ground, shutting the tractor off, and actuating lift valve handles before dis-
connecting hoses. This relief of pressure will reduce possibility of serious
injury from spewing hydraulic fluid.
Frayed, torn, or crimped hoses may rupture and spray boiling oil onto
Operator and cause serious bodily injury from scalding.
Failure to inspect and repair or replace hoses may cause worn hoses
to rupture suddenly and violently resulting in serious bodily injury
from scalding or fire with resulting burn injury or death.
Inspect hoses daily and repair or replace when needed. Stop all leaks.
Repair or replace hoses as indicated to prevent unexpected failure and
possible serious injury to operator or bystander.
Boiling oil may spray onto hot tractor parts and catch fire causing severe burn injury or death.
Safety Conclusion
Now that the operator has read the information provided in this manual; he or she should now
be aware of how dangerous a rotary mower can be if operated improperly. It is important that
the operator of this equipment should be cautious, conscientious, and use common sense when
operating this equipment in order to avoid serious injury and or death to the operator, support
personnel, passersby, or animals.
Safety
Depends on You!
Use paper or cardboard to check for leaks. Never use your hand.
If oil penetrates skin, gangrene or other serious injury could occur.
If skin is penetrated by hydraulic fluid, get immediate medical
attention.

12
2010 T-104
General
Maintenance
Tips

13
2010 T-104
General Maintenance
Refer to tractor’s service manual for proper tractor maintenance.
NEVER service the mower with the power on, except where otherwise stated.
Before working on a mower always check to see that:
• The tractor’s transmission is in the parking gear and the parking brake is set to keep the
tractor from moving while unattended.
• The tractor PTO has been disengaged.
• The engine is off and all moving parts (both tractor and mower) have completely stopped.
The rotating parts of the tractor and mower continue to rotate after the PTO has been
disengaged. The operator should remain seated until all movement has ceased.
Never engage in repair or service work under the mower deck or any other part of the mower
that is raised off of the ground until the mower is safely and securely supported in the raised
position.
Use extreme caution when working on a mower. Many of the parts are heavy and sharp and
can cause serious injury if they are dropped or fall on the operator or bystander.
The blades are very sharp and can pivot. Use extreme caution when performing maintenance
on them. Failure to do so could result in serious injury or possibly even death.
Use marfac double ought grease or 0 weight cotton picker spindle grease to lubricate all Bush-
Whacker gearboxes. Replacement gearbox grease is available from your Bush-Whacker
dealership.
Always use genuine Bush-Whacker replacement parts, available through the network of
authorized dealers. The use of non-OEM parts will void the warranty of this machine.
Non-OEM parts may not meet Hall Manufacturing Inc. specifications and could lead to
serious injury or death.
At Least Twice Daily
Rotor Bar Assembly, Blades, Blade Bolts, and Nuts
• Check blades for any signs of cracking or damaged cutting surfaces. If a blade is cracked,
replace the set at once. DO NOT operate the mower at any time with a cracked or severely
damaged blade! If a blade breaks, it could cause severe injury or possibly death.
• Check if blade cutting surfaces are dull. If they are, re-sharpen or replace blades.
• Check if blade bolts and nuts are loose, cracked or damaged. DO NOT operate the mower
with any of those characteristics. Any of these conditions could allow the blade to come
loose and could cause injury or possibly death. Always keep the blade bolts and nuts
tightened to 350 ft. lbs. of torque.
• DO NOT operate the mower with just one blade.

14
2010 T-104
At Least Twice Daily
Rotor Bar Assembly, Blades, Blade Bolts, and Nuts
• Make sure rotor bar assembly is securely attached with castle nut and cotter pin to the
output shaft.
• Always make sure to replace the blades in sets.
NOTE: When mowing at low cutting heights or on uneven terrain, the blades can come in
contact with the ground frequently. When this happens, the blade tips can be pushed upwards
causing the blade to bend. By pushing upwards on the blade tip, the rear of the blade (at the
bolt hole) is forced downward away from the rotor bar assembly. This causes the bolt to be
pulled through the bar and can cause it to shear. When the bolt shears, it will throw a blade.
When operating in these conditions, the operator must check the blade bolts more frequently
than normal, at least four times a day.
Always use genuine Bush-Whacker replacement blades, bolts, and nuts. Other blades may not
meet Hall Manufacturing specifications and could lead to serious injury or death.
Hydraulics
• If at any time the hoses become frayed, worn, or pinched, replace them.
Daily
Shields
• Make sure ALL shields are in place and tightened before operating the mower. If one
works loose, stop mowing and tighten immediately.
• Replace shields if there’s any damage or excessive wear.
Drive Shafts
• Inspect the Drive Shaft Shields, make sure that they are installed and working properly. If
shields become damaged or loose during operation, stop immediately and fix or replace
them.
• Make sure the drive shaft shield mounting chains are securely fastened.
• Inspect cross kits
• Grease each zerk fitting with natural or synthetic lubricants. Never mix the two types of
lubricants.
• Check Drive Shaft tubes to ensure that they telescope properly. If they do not, replace
them.

15
2010 T-104
Daily
Gearboxes
• Check gear lube. If the grease is lower than the inspection plug on the rear side of the
gearbox, then fill to the level of the plug. NOTE: Do not overfill the gearbox. If the grease
level of the gearbox is low, additional grease can be purchased from your Bush-Whacker
dealer.
• Inspect output shaft for vines, wire, rope, etc. that may collect around the shaft and tear up
the output seal. If a seal is leaking, replace it, or risk overheating and severe damage to the
equipment.
• Check the mounting bolts and nuts to be sure that they are correctly secured. If left
unchecked, it could cause excessive vibrating which could damage the equipment.
Pins, Bolts, and Nuts
• Inspect all pins, bolts, and nuts, making sure that they are all in place and secure. Look for
loose fasteners and tighten to the proper torque as required.
• Make sure the three point hitch mount and stabilizer pins are secure, and top links are not
loose or slack.
Skid Shoes
• Check for any wear or damage, replace if required.
Frame
• Look for any structural cracks, damage and wear.
• Keep the equipment clean. Inspect for debris caught in the machine, especially at all pinch
points.
Wheel Hubs
• Grease wheel hubs at zerk fitting once a day before operating the mower. Check seals for
leakage. Replace seals if a leak is detected. Also, check bearings for damage. If they have
seized, they are damaged; replace them immediately before use.
Chain Guards
• Rear and front chain guards and front metal deflectors are standard equipment for all Bush-
Whacker rotary mowers.
• Always inspect the chain guards and deflectors to be sure no chain links are missing and the
guards are operating correctly. If the guards are not operating correctly, links are missing, or
the complete chain guard assembly is missing, do not operate the mower. Never operate
the mower without chain guards in proper working order.
Every 1,000 Hours orAnnually
It is recommended to do annual, pre-season maintenance at the end of each operating season,
rather than at the beginning.
The mower should be stored in the off-season cleaned, inspected and repaired. This will
prevent any rust forming on the mower’s surfaces and contaminants damaging the hydraulic
components.

16
2010 T-104
Gearbox Disassembly Procedure
1. Remove 3/8” bolts from input cap. Remove the input cap taking care not to damage the seal
in the cap.
2. The input shaft assembly can now be removed. To disassemble the input shaft assembly it is
not necessary to remove the retaining ring. The bearing will press off of the ends of the
shaft and the gear will slide off.
3. The output gear will slide off of the output shaft.
4. Remove the 1/2” bolts from the output cap and remove the output cap; once again take care
not to damage the seal.
5. The output shaft assembly will have to be pressed out from the inside or it can be pulled out.
The bearings will need to be pressed off.
6. If any of the bearing races either in the housing or in the input cap need to be removed, a
blind hole bearing puller should be used.

17
2010 T-104
Gearbox Assembly Procedure
1. The output assembly goes into the housing first. If the upper bearing race has been pulled
out it must be pressed in. After the bearings are pressed onto the output shaft, the shaft can
be inserted into the housing.
2. The lower bearing race will have to be pressed into the housing until it is flush with the bot-
tom surface of the housing. Using the same number and thickness of gaskets replace the
output cap. The 1/2” bolts are torqued to 60 foot pounds.
3. The bearing preload is measured by rolling torque. The rolling torque should be between 6-
15 inch pounds. If the rolling torque is too high the output cap will need to be removed and
an additional gasket added. When a gasket is added the lower race will need to be pulled out
slightly. If the rolling torque is too low or there is any movement of the output shaft, a gas-
ket will need to be removed.
4. Once the preload is set, remove the output cap. Install the seal into the cap and apply sealant
to the gaskets. Replace the output cap, making sure the torque is correct.
5. Slide the output gear onto the output shaft in the housing.
6. The bearing race for the rear bearing on the input shaft must be pressed in.
7. Slide the input gear onto the shaft to the retaining ring. Then place the spacer above the
gear. Press the bearing on the front of the input shaft. Lastly, press the bearing onto the rear
of the shaft.
8. Place the input shaft assembly in the housing and check the gear mesh and black lash. The
gear mesh is correct when the back surface of the gear teeth are level. The back lash should
be between 0.006” and 0.014” when measured at the pitch diameter of the gear set. If the
gear mesh or back lash are incorrect use shims to correct.
9. Press the bearing race into the input cap. Using the same number and thickness of gaskets,
place the input cap on the housing. Torque the 3/8” bolts to 25 foot pounds.
10. The bearing preload is measured in the same manner as for the output shaft. The rolling
torque should be between 11-25 inch pounds. Refer to step 3 for correction of the preload.
11. Once the preload is set, remove the input cap. Install the seal into the input cap and apply a
sealant to the gaskets. Replace the input cap taking care not to damage the seal. Check the
position of the oil plugs on the input cap. The oil level check plug should be just below and
to the right of the input shaft, with the fill plug directly under the input shaft. Torque the
bolts back to 25 foot pounds.
12. Fill the gearbox with the recommended lubricant in an upright position similar to the
mounting position. Fill the gearbox to the level plug (1/8” pipe plug). Check the lubricant
with a dipstick (a small piece of wood works well as a dipstick).

18
2010 T-104
Using The Optional OffsetAdapter
I. Mowing in the Center Position
1. Attach the tractor lift arms to the mower and adapter at points “A” using the hitch pins,
Part# 2765, provided.
2. Attach the tractor top link to the clevis and adapter at point “B”.
3. Hook to the offset adapter is now complete.
II. Mowing in the Offset Position
Note: Always adjust the offset adapter with the mower disengaged from the tractor and
firmly on the ground. This will prevent the machine from becoming unstable and falling
onto the operator. Failure to do so might cause serious injury or death to the operator.
1. Attach Part D leaving the fasteners slightly loose. (Note: Part D also includes the top link
clevis)
2. Loosen Part A and slide Part A&D to the desired offset Position (up to 12”) and tighten
them securely into place.
3. Attach the mower to the tractor as stated in Part I except now the operator must attach the
top link to Part D.

19
2010 T-104
Parts book

20
2010 T-104
Ref. No. Description Page Number
1 Front Chain Guard 34
2 Hitch Frame Assembly 21
3 Tail Wheel Axle Assembly 30
4 Tail Wheel Fork & Wheel Assembly 31
5 Gear Box Shields 32
6 Gearbox 22-25
7 Access Cover 54
8 Rear Chain Guard 35
T-104 Lift Type
Assembly Breakdown
Table of contents
Other Bush-whacker Farm Equipment manuals