Bush IDLCD2204HD User manual

INS TR UCTION MANUAL
IDLCD2204HD
The Gold T echnical Support Line: 1902 215 259
Personal Product Support
(Charges will apply at $2.95 per minute)
22

-1-
INTRODUCTION
Thank youforbuying this Bushproduct, whichisdesigned to giveyoumany yearsof
trouble-free service.
Youmay alreadybefamiliar with usingasimilar unit, b ut please taketime to read
these instructions. T hey are designed to familiarise youwith the unit s many features
and to ensureyouget the very best fromyour purchase.
Safety is important
Your safety and thesafety of others is important. T herefore, please ensureyouread
the Safety Instructions before youoperatethis unit.
Warranty
In the unlikelyevent that your productfails to work normally, please callthe below
Bush warranty numberto discuss the problem with oneof our qualified service
engineers.
Australia
Bush Warranty:1800 509 394
New Zealand
Bush Warranty:0800 450 259

1. INTRODUCTION........................................................................1
2. SAFETY INSTRUCTIONS...........................................................3
3. INSTALLATION......................................................................... 4
WALL MOUNTING INSTALLATION GUIDLINES.............................4
ACCESSORIES..........................................................................5
FRONT PANEL............................................................................5
KEY BOARD...............................................................................6
REAR PANEL.............................................................................6
ANTENNA CONNECTION............................................................7
CONNECTING TO PC.................................................................8
PCPRESET................................................................................9
CONNECTING TO AV EQUIPMENTS...........................................10
4. REMOTE CONTROL................................................................ 11
BATTERY INSTALLAT ION..........................................................11
KEYS FUNCTION......................................................................12
5. OPERATION........................................................................... 13
BASIC OPERATION.................................................................13
TELETEXT...............................................................................14
EPG........................................................................................15
MENU OPERATION..................................................................16
6. TROUBLESHOOTINGS............................................................21
7. TECHNICAL SPECIFICATION...................................................22
8. WARRANTY............................................................................23
CONTENTS
-2-

SAFETY INSTRUCTIONS
-3-
1.Do notuse this apparatusnear water.
2. Clean onlywith dry cloth.
3.Do notblock any ventilationopenings. Install inaccordancewith the manufacturers
instructions.
4. Do notinstall near anyheat sources suchas radiators, heat registers, stoves, or
other apparatus (includingamplifiers) that produceheat.
5. Protectthepower cord frombeing walked onorpinched particularlyat plugs
conveniencereceptacles, and the point wherethey exit fromthe apparatus.
6.Only useattachments/accessories specified bythe manufacturer.
7.Unplug thisapparatus during lightningstorms orwhenunused forlongperiodsof
time.
8.Refer allservicing to aqualified servicepersonnel.Servicing is required when the
apparatus has beendamaged in anyway, suchas power-supplycord orplug is
damaged, liquid hasbeen spilled orobjects havefalleninto apparatus, the
apparatus has beenexposed to rainormoisture, doesnotoperate normally, orhas
been dropped.
9. The apparatus should notbeexposed to d ripping orsplashingand no objectsfilled
with liquids, suchas vases, should b eplaced onthe apparatus.
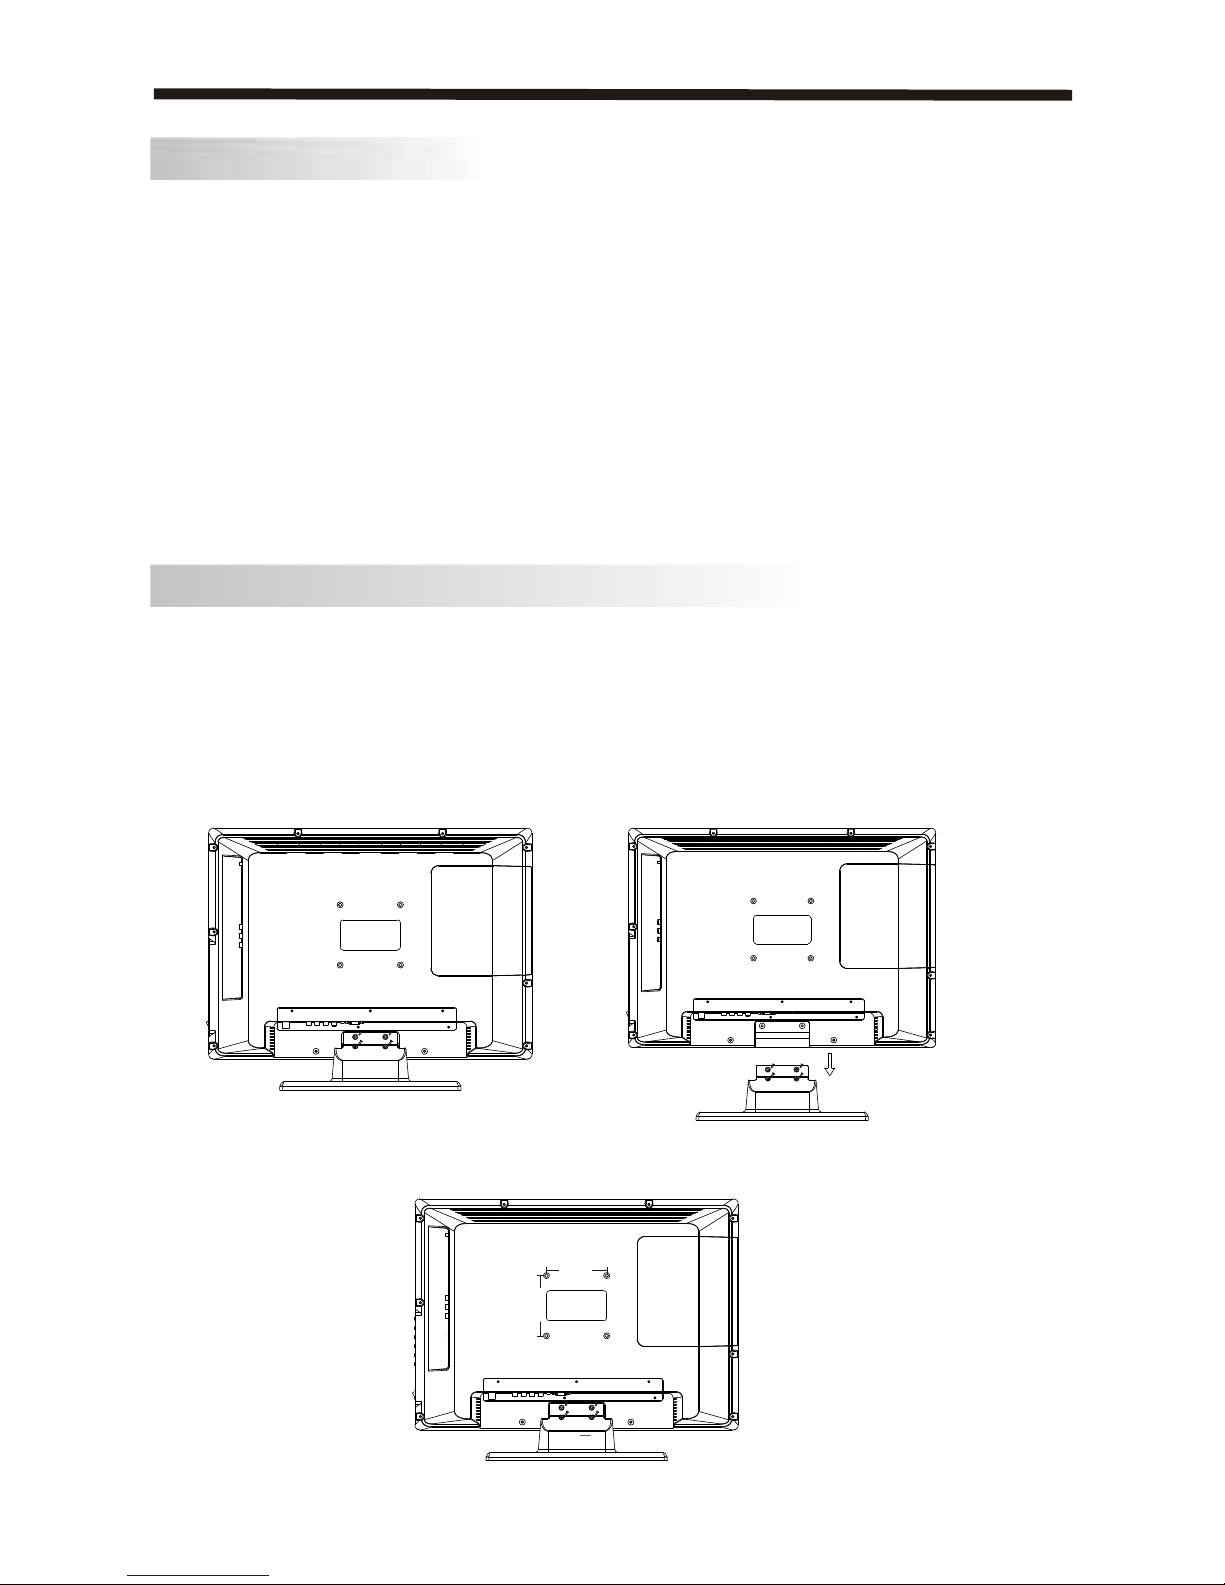
10. If thetelevisionis to b ebuilt into acompartment orsimilar enclosed, theminimum
distances must bemaintained.Heat build-upcan reducetheservicelifeof your
television, and canalso bedangerous.
ADDITIONAL SAFETY NOTES
Never tamper withany components insidethe TV, oranyother adjustment controlsnot
mentioned in thismanual.
All LCD-TVsarehigh voltage instruments. When youcleanup dust orwater drops on
the LCD PANELorCABINET,the power cord should bepulled o ut fromthereceptacle,
then wipe theTV with adry softcloth.
During thunder and lighting, unplug thepower cord and antenna cord to prevent
damage to yourTV.
All repairs to this TV should only beperformed byqualifiedTV servicepersonnel.

INTSTALLATION
INSTALLATION NOTES
This TV can beconnected to AC100-240 Volts.50/60Hz.Neverconnectto aDC
supply oranyother power supply.
Locate the TV in theroomwhere light does notstrikethe screen .Total darkness ora
reflectiononthepicture screen cancause eyestrain. Softand indirectlightingis
recommended forcomfortableviewing.
Allowenough spacebetween the TV and thewall to permitventilation.
Avoid excessively warm locations to prevent possible damageto the cabinetor
premature component failure.
Do notcoverthe ventilationopeningswhen using theTV.
WALL MOUNTING INSTALLATION GUIDELINES
This televisioncanbewall mounted as follows:
1.Placethe LCDTelevisiononto asolid surface. Pleaseplacesome softmaterial to
over the frontof the screento avoid any damage.
2.Removethe screwsfromthe lowerpart of the television, where thebase joins to the
TV, and takeawaythe stand (put the stand somewheresafeforfutureuse).
3.Use the fourscrews provided to f ix the TV onto awall mounting bracket via the 4
VESA standard holes ontheback of thetelevision.
-4-
100 mm
100 mm

FRONT PANEL
ACPower Cord.........................1
Infrared Remote Control............1
User s Manual ........................ 1
Battery(AAA)........................... 2
ACCESSORIES
INTSTALLATION
1
ENTER
2 3
4 5 6
7 8 9 0
+
CH
_
+
_
VOL
POWER MUTE
NICAM
RECALL
TVMENU INPUT
DVBMENU SOUND EXIT
PIC
SLEEP ASPECT
TEXTDISPLAYSOURCE
INFO FAV EPG
REVEAL HOLD LIST INDEX
SUBPAGE SIZE AUDIO SUBTITLE
1: Remote controlsensor.
2: IndicatorLED: GREEN POWER ON.
REDSTANDBY.
3: Key board(see nextpage).
4: Power: Press this buttonto the status
of , the unit will turn ON.Press
this buttonto the status of , the
unit will turn OFF.
30 30
2
1
3
4
-5-

INSTALLATION
KEY BOARD
1 SOURCE
To display theinput sourcemenu.
2MENU
To display mainMENU.
3CH+/CH-
In TV modeto change the channel up and d o wn.
In MENU mode, to selectthemenu items .
In standbymode, it can turnonthe TV.
4VOL+/VOL-
To adjust sound level.
In MENU mode,to selectthe menuitems.
REAR PANEL
-6-
SOURCE
MENU
CH+
CH-
VOL+
VOL-
SOURCE
MENU
CH+
CH-
VOL+
VOL-
All the terminals are(fromleftto right):
ACPOWER SOCKET, HDMIinput,VGA ,PCAUDIO input,AV ,S-VIDEO,Rear Audio input,
YPbPrinput, ANTENNA SOCKET,
Note: 1.AV,S-VIDEO and YPbPrshare the Rear Audio input channel.
2. When HDMIport get DVIsignal,the PCAudio channel will change to receivethe audio
fromHDMIport.
Coaxial SPDIF OUTPUT,
100-240V~ 50/60Hz
AC-INPUT AUDIO
VGA INPUT
VGA INPUT
L
R
AV
S-VIDEO
HDMIANT
AUDIO
INPUT
Pr
Y
Pb
YPbPr
INPUT
SPDIF OUTPUT

ANTENNA CONNECTION
INSTALLATION
Note:
Aerial connections:IEC(female).
Input impendance:75unbalanced.
-7-

STEPS:
CONNECTING TO PC
Besure boththe TV and computer are set to Poweroff.
1.ConnectVGA and audio cable.
2.Connectthe powercord.
3.Power ontheTV,switchthe input sourceto VGAmode.
4.Power onthePC.
This sequenceisvery important.
INSTALLATION
-8-
PC Audio
Power cord
VGA cable
100-240V~ 50/60Hz
AC-INPUT AUDIO
VGA INPUT
VGA INPUT
L
R
AV
S-VIDEO
HDMIANT
AUDIO
INPUT
Pr
Y
Pb SPDIF OUTPUT
YPbPr
INPUT

PRESETMODE(recommended resolution is 1024*768@60Hz)
INSTALLATION
PC PRESET
-9-
1
2
3
4
5
6
7
8
9
720*400
640*480
800*600
800*600
800*600
800*600
1024*768
1024*768
1024*768
70
60
56
60
75
72
60
70
75
31.47
31.47
35.156
37.88
46.88
48.08
48.36
56.48
60.02
RESOLUTION V.Freq.(Hz) H.Freq.(KHz)

INSTALLATION
CONNECTING TO AV EQUIPMENTS
-10-
It can beconnected to the following appliances: VCR, multi disc player, DVD, camcorder,
video game orstereo system as well as anumber of other electronic items.
YPbPrcan support these video fomats:480i,576i,480p,576p,720p,1080i,1080p.
This TV provides one group of AV, one S-Video,one group of YPbPrforconvenient
connectionto VCR, DVDorother video equipment. Please refer to the owner smanual
of the equipment to beconnected as well.
Youcan use the input terminals onTV set rear as follows.
To audio
outputswith
terminal
VIDEO EQUIPMENT
To audio outputs
with S-video
term inal
VIDEO EQUIPMENT
To S-VIDEO
output
Yellow (video)
White(audio L)
Red(audio R or Pr)
Y
W
R
RWY
WR
output
To video
Blue(Pb)
Green(Y)
B
G
VIDEO EQUIPMENT with YPbPr
Y W R
WR
GBR
GBR
Y
From Coaxial SPDIF
output
VIDEO RECORDER
Y
with SPDIF Input
term inal
100-240V~ 50/60Hz
AC-INPUT AUDIO
VGA INPUT
VGA INPUT
L
R
AV
S-VIDEO
HDMIANT
AUDIO
INPUT
Pr
Y
Pb SPDIF OUTPUT
YPbPr
INPUT

REMOTE CONTROL
-11-
Remark:
BATTERY INSTALLATION
1.Removethe battery cover.
2. Inserting the 2AAA 1.5V batteries making sure the polarity (+ or-)of the batteries
matches the polarity marksinsidethe unit.
3.Mount the battery cover. Replacewith new batteries when the TV set begins to show
the following symptoms: Operationis unsteadyorerratic.Sometimes the TV set does
notfunctionwith Remote ControlUnit.
1)Alkaline Battery Recommended.
2) Removebatteries when they are exhausted orif the remote controlis notto beused for
an extended period of time.

REMOTE CONTROL
KEYSFUNCTION
1
OK
2 3
4 5 6
7 8 9 0
+
CH
_
+
_
VOL
POWER MUTE
AUDIO
RECALL
TV MENU SOURCE
CH.LIST SOUNDEXIT
PIC
SLEEP ASPECT
TEXTTV/RADIOFREEZE
EPG FAV INFO
REVEALHOLD LIST INDEX
SUBPAGE SIZE MIX SUBTITLE
25
14
15
20
18
16
13
17
19
21
23
24
22
8
2
3
4
5
7
12
1
6
9
10
11
-12-
1:POWER:Toset the TV to standbyorpower on.
2:NUMERIC KEY:
3:TV MENU:Todisplay TV menu.
4:CURSOR:Tomovewithin the menu.
5:CH.LIST:Todisplay the channelslist.
6:VOL+/- :Toadjust sound level.
7:PIC:Toswitchpicture mode.
8:SLEEP:S
9:FREEZE : To freezethepicture.
10:EPG:T
11: FAV:T
12:TELETEXTKEYS: See page14.
13:MUTE:Todisable orenable the sound output.
14: AUDIO:Toselectthe available audio
language of TV programs
15: RECALL: To access thepreviously viewed
channel.
16: SOURCE: To selectinputsource.
17: OK:Toconfirm selection.
18: EXIT:
19: SOUND:Toswitchsound mode.
20: CH+/CH-:Toaccess the nextorprevious
channels.
21: ASPECT: To change pictureaspectratio.
22:TV/RADIO:In DTV mode, it is u
23: TEXT:Toenter orexitTELETEXT.
24:INFO:T
25: SUBTITLE:T
Fordirectaccessto channels.
et timer to turn off the TV.
o display informationabout the
program being viewed and what'sonnextin
DTV mode.
o access yourfavourite channels list
in TV orDTV mode.
exit the menu.
sed to switch
between digital TV channels and radio
stations.
o display informationabout the
channel being viewed o rfurther information
about the programwhen in small EPG
screen in DTVmode.
o switchbetweendifferent
subtitles in DTVmode.
orselectsound
channel.
To

OPERATION
-13-
BASIC OPERATION
TURN ON THEUINT
Press the POWERbuttononthe remote controlto switchonthe power. The power
indicatorwill lightup in green colour, pressthe POWER buttonagain to switchoff
the power, and the indicatorwill change to red.
CHANNELSEARCH
Press the SOURCE b uttonontheremote controlto selectthe TV orDTV input mode,
and press theOK buttonto c o nfirm.If youareusing the unit forthe firsttime, an
InstallationGuidemenuwill bedisplayed to guideyouthrough
WATCH TV PROGRAM
Press the CH- o rCH+ buttonto selectthe previous ornextchannels orpressthe 0-9
buttons to enterachannel number directly.Press CH.LIST buttonto view the channels
list and press the buttons to selectthe desired TV programmes.
CHANGE VOLUME
Press the VOL- orVOL+ buttonto adjust the volumelevel. Press the VOL- b utton
repeatedly to decreasethe volume; press the VOL+ buttonrepeatedlyto increase
the volume from0to 100.
Press the PIC buttonrepeatedly to c ycle through theavailable video picture modes.
CHANGE SOUND MODE
Press the SOUNDbuttonrepeatedly to c ycle through theavailable sound modes.
VIEW CHANNELINFORAMTION
Press the INFObuttonto display the preset channelinformation.
MUTE
Press the MUTEbuttonto cutoff the sound output, press this buttonagainto resume
sound output.
CHANGE INPUT SOURCE
Press the SOURCEbuttonthen pressthe buttons to selectthe inputsourceand
press the OKbuttonto confirm.
the channel scan,
Use the remotecontrolto finish channel scan (youcan also referto CHANNELMENU
(page 16)inthis manual forthe channel scan operation).
CHANGE PICTURE MODE
EXITMENU
OK
NEW INSTALLAT ION
Menu Language English
Auto Tuning

OPERATION
-14-
E
TEXT
SELECTING A PAGE
DIRECTACCESS
TO THE ITEMS
INDEX
SUB PAGE
HOLD
REVEAL
Press:Youwill obtain:
TELETEXT
Enter the numberof the page required using the0to 9
up/down. Example: page120, enter 120.The number is
displayed topleft, the counter turnsand then the page is
displayed.Repeat thisoperationto viewanother page. If
the counter continuesto search, this means that thepage is
nottransmitted.Selectanother number.
Coloured icons aredisplayed at the bottomof thescreen. The 4
coloured buttons onthe remote controlare used to access the
items orcorrespondingpages. The coloured icons flashwhen
the item orthe page isnotyet available.
This returns to the contents page(usually page 100).
Certain pages containsubpages whichare automatically
displayed successively. This key is used to stoporresume sub-
page acquisition. The indicationappears topleft.
To freezethe page.
To display orhidethe concealed information(games solutions).
This is used to enterorexit teletextmode. The summary
appears with alist of itemsthat can beaccessed.Eachitem
has acorresponding 3 digit pagenumber. If the channel
selected does notbroadcast teletext, theindication100 will
bedisplayed and the screen willremain blank (inthis case,
exit teletextand selectanother channel).
Teletextis an informationsystem broadcastbycertain channelswhichcan be
consulted likeanewspaper. Italso offers access to subtitles forviewers with
hearing problems orwho are notfamiliar with thetransmissionlanguage (cable
networks, satellite channels, etc.)
SIZE To zoomthe page.
LIST Tosaveand display your favourite pages.
MIXTomix teletextwith video pictures.

OPERATION
-15-
EPG (Electronic ProgrammeGuide)
DTV
800 France2
802 France5
803 ARTE
804 LCP
805 France3
801 France4
PROGRAMME GUIDEDTV 801France4
1555.1625 Last Exit
20 Feb 2006 16:07
20 Feb
16:00 17:00
Information
Last Exit
Programme 2
Programme 3
Programme 4
Programme 5
EXITReminder
OK
INFO
Movie 1
DATE
Schedule
The EPG (Electronic P rogramme Guide) menuis used to look at what is
being broadcast onaDTV orRadio channel atalater point in time.
he detailed programme
informationof thechannel currently beingviewed will bedisplayed.
Press the EPGbuttonto access the EPG menu, t
Tosee what is going to bebroadcast after thecurrent programme, pressthe
buttonto viewfuture programmes and press the buttonto return towards
the programmes televised at the currenttime.
Toview adiff erent channel, pressthe orbutton.To book awanted
programme forlaterwatching, press the blue buttonto enter Reminder menu.
Press the greenbuttonto enterthe schedule list.
Toexit the EPG menu and watchthe selected channel, press the EPG
orEXIT button.

OPERATION
-16-
EXITMENU
OK
CHANNEL
Auto Tuning
DTV Manual Tuning
ATV ManualT uning
Programme Edit
1.CHANNELMENU
The first itemof the menuis CHANNELmenu( forTV sourceonly).
Youcan searchchannelsand edit programshere.
1).Auto Tuning:Searchall the channels automatically(ATV, DTV & Radio)
Press the buttonsto selectcountrythen press the buttons to selectstart or
cancel.
Press the OKbuttonto start orexit auto tuning .
NOTE: Allthe channels includingATV, DTV and Radio c an betuned at the onetime .
2).DTV Manual Tuning:Youcan selectaDTV channel then find the programin this
channel.
Pls press the buttons to selectthe channel , then press theOK buttonto search
the programs .
NOTE: Bad NormalGood refers to the signal intensity.
Please selectcountry first
then selectStart to update info
Country selection
Start Cancel
Australia
DTV Manual Tuning
UHF CH 30
Please selectchannel then
press OK to search
Bad Nomal Good
EXITMENU
MENU OPERATION
OK

OPERATION
-17-
iconwill disappear.
3). AT V Manual Tuning :Youcan change thesound system to searchthe analog
TV channels and f ine tune the channels, then store the channels youselected.
Press the red b uttonto storethe channel aftermanual tuning .
4). ProgrammeEdit:Youcan edit programsin the followingitems.
Delete
Press the red b utton, it will shows ared d elete cursor.
Press the buttons to choose the program.
Press the red b uttonagain, the program will bedeleted.
Rename
Youcan only renameATV programs.
Movethe cursorto the program, press the greenbuttonto renamethe program,
Press the TV MENU buttonto exit edit, Press the EXIT buttonto exit themenu.
Move
Movethe cursorto the program, press the yellowbutton, it willshowayellow
cursor, Pressthe buttons to movethe program.
Skip
Press the buttons to choose theprogram, then pressthe blue buttonto skip
this program, the iconwill showonthe rightsideof theprogram.
Choose the skipped program and pressthe blue buttonagain to cancelskip, the
FAV
Press the buttons to choose theprogram, press theFAV button, it will show
onthe rightsideof the program.Choose the FA V program and press the FAV button
again to cancelFAV, the iconwill disappear .
SKIP
SKIP
ATV ManualTuning
Storage To
EXITSAVE
System BG
Current CH 1
Search
Fine-Tune
Skip Yes
Frequency255.25MHz
Onceyour favouritegroup is created,youcan press theFAV buttonto q uickly access
your favourite channellist.
StorageTo : Toselectthe channel number youwant to saveto.
System:Toselectthe TV sound system.
Current CH:Toselectthe current channel.
Search: To searchbackward/forward.
Fine-Tune: Tofine tuning when the signal level of current channel is weak.
Skip: When it set to Yes, the current channel will beskipped while youare
changing channels bypressing the CH+ orCH- buttons.

-18-
The second item of themenu is PICTUREmenu.
Youcan adjust pictureeffecthere, including contrast, brightness and colour as
well as otherpicture functions.
Press the buttonsto selectitemsand press the buttons to adjust.
EXITMENU
OK
PICTURE
Picture ModeDynamic
Contrast
Brightness
Colour
Sharpness
Tint
70
70
70
70
0
OPERATION
NOTE:
1).Tint is available in NTSCsystem only.
2).PCSetup isavailable in VGAmodeonly.
EXITMENU
OK
SOUND
Sound ModeStandard
Treble
Bass
Balance
Surround Sound Off
3.SOUND MENU
The third itemof the menu is the SOUNDmenu.
Youcan adjust thesound effecthere, including treble, b ass and balanceas well
as other sound f unctions.
Press the buttonsto selectand press the buttonsto adjust.
50
50
0
2.PICTUREMENU
EXITMENU
OK
PICTURE
Colour Temp Normal
Red
Green
Blue
AspectRatio 16:9
Noise ReductionON
70
70
70
EXITMENU
OK
PICTURE
PCSetup
EXITMENU
OK
PICTURE
Auto Adjust
H-Position
V-Position
Clock
Phase
70
70
70
70
(1) (2)
(3) (4)

OPERATION
-19-
EXITMENU
OK
TIME
Clock
Off Time Off
OnTime Off
Sleep Timer Off
Auto Sleep Off
Time Zone
New South Wales GMT+10
4.TIME MENU
The forth itemof the menu is the T IME menu.
Youcan adjust theclock, power on/off time, sleeptimer and time zone as wellas
other time clockfunctions.
Press the buttonsto selectand press the buttonsto adjust.
NOTE:
When theA uto Sleep is set to ON,the unit willturn to standbymodeautomatically
if there isno signal input foraperiodof about 15minutes.
EXITMENU
OK
DEFAULT
Menu Language English
Audio Language English
Subtitle Language English
Hearing impaired Off
Country Australia
5.DEFAULT MENU
The fifth itemof the MENUis the DEFAULT menu.
In this menu, youcan adjustthe Hearing impaired f unctiononly.
Table of contents
Other Bush LCD TV manuals