BYK multi-angle User manual

Operating
Instructions
Betriebsanleitung
Mode d’emploi
Modo d’uso
Instrucciones
de uso
multi-angle
spectrophotometer
For Equipment and
Service please visit:
www.multiangle.net

1
English
multi-angle
spectrophotometer
Operating instructions
Betriebsanleitung
Mode d’emploi
Manualed’uso
Instrucciónesdeuso
Patent pending
Patent angemeldet
Demande de brevet en cours
Domanda di brevetto inoltata
Patente solicitada
Deutsch
Français
Español Italiano

2
BYK - Gardner GmbH
Lausitzer Straße 8
Germany
Tel. 0-800-gardner
(0-800-4273637)
+49- 8171-3493-0
Fax +49- 8171-3493-140
BYK - Gardner USA
9104 Guilford Road
Columbia, MD 21046
USA
Phone 800-343-7721
301-483-6500
Fax 800-394-8215
301-483-6555
www.bykgardner.com
82538 Geretsried

3
Table of Contents
Page
1 Description of the System 4
2 Safety Instructions 5
3 General Information 7
4 Installing the Batteries 8
5 Controls 10
6 Getting Started 11
7 Measurement Techniques 12
8 Measure 13
9 Calibrate 14
10 Delete 18
11 Joblist 19
12 Change Names 20
13 Browse 21
14 Interface 22
15 Base Station 23
16 Technical and Standard Data 24
17 Delivery Notes 26
18 Errors and Warning Messages 27
19 Cleaning and Maintenance 29
20 EC Declaration of Conformity 143
Specifications subject to change without notice
Contents/Inhaltsverzeichnis/Sommaire/Contenido/Indice
English 3
German 31
Français 59
Italiano 87
Español 115

4
English
1 Description of the System
The multi-angle spectrophoto-
meter is a custom instrument for
the use with the DuPont Perfor-
mance Coatings computer
system. The instrument is an easy
to use tool for measuring the color
of automotive paint finishes and
storing the information for the
uploading data to the respective
software provided by DuPont Per-
formance Coatings.
The instrument is operated by the
Operate button and the menu -
scroll wheel. Both, the Operate
button and the scroll - wheel are
used to switch on the instrument.
The display can be configured in
English, German, French, Italian or
Spanish.
The instrument complies with the
following standards: DIN 5033,
5036, 6174; ISO 7724; ASTM
D2244, E308, E2194.

5
English
• No claims of product liability or warrantee can be honored if
the device is not operated in accordance with the operating
instructions or the instructions on the instrument.
• If you use the unit and accessories properly, there are no
hazards to fear – none of a mechanical nature and none caused
by electrical shock.
The following paragraphs contain information about the safe use
of the device.
• Please use only accessories that are available for the unit. See
“Delivery Notes” and the “Technical and Standard Data” for furt-
her information.
• Avoid exposure to continuous humidity and condensation (see
Technical and Standard Data). Avoid splashing with water,
chemicals or other liquids.
• Do not perform any repairs on the unit, neither mechanical nor
electrical yourself. The unit must be opened by trained
professionals only. Please contact our customer service
department in such cases. They will be happy to assist you as
quickly as possible.
• Only devices that meet the requirements for low-voltage safety
may be connected to the RS 232 interface.
• You can disconnect the measurement device and accessories
from the power supply by removing the battery box from the
battery compartment.
Safety Instructions 2

6
English
• When working with the batteries and the battery compart-
ment, make certain there is no short circuit on the contacts. Me-
tallic objects must not come in contact with the bare contacts.
• Safety advices for batteries: Do not crush or dismantle, do not
heat or incinerate, do not immerse in any liquid. This may cause
explosion or release harmful substances.
• In case you intend not to use the instrument for a longer
period of time, take out the batteries in order to avoid that the
batteries leaks inside the instrument and thus causes damage.
• Caution: Batteries and rechargeable batteries are special
waste and must therefore not be disposed of with household
trash. Make certain to observe the disposal instructions of the
battery or rechargeable battery manufacturer.
• You will find the technical data for all system components such
as the measurement unit and battery compartment on the
respective manufacturer’s plates and in the section Technical and
Standard Data
• Defects and extraordinary loads
If safe operation can no longer be presumed, shut down the
device and secure it against unintended operation.
The device must be presumed unsafe to operate:
• if visible damage is evident
• if the instrument is no longer working
• if it has been stored for long periods under adverse conditions
• after harsh treatment during shipping.
• Please read the instruction manual before placing the
instrument in service and observe the safety instructions.
2 Safety Instructions

7
English
General Information 3
The measurement unit consists of sensitive optical and electronic
precision parts. Treat the unit as an expensive camera. Prevent it from
being dropped, bumped or shaken!
Do not hold the unit by the measurement aperture. You should not allow
any foreign objects to get into this opening.
Do not expose the unit to direct sunlight for extended periods of time. Do
not store it in a hot or dusty environment. The case that comes with the
unit offers the best protection when the unit is being stored.
Avoid prolonged high relative humidity and do not allow water to form
from condensation (see Technical and Standard data).
Protect the measuring unit from moisture, chemicals and corrosive
vapors.
The unit housing is resistant to many solvents. However, we cannot
guarantee resistance to all chemicals. You should therefore use a soft,
moist cloth for cleaning. For clean excessive dirt and dust, use ethanol
or cleaning alcohol. Do not use any acetone!
If the device is exposed to excessive static electricity, it may happen
that the display goes blank. If this happens, wait until the instrument
turns itself off automatically and then turn it on again.
Please note that batteries are special refuse and shall not be disposed
of together with household refuse. Pay attention to the producers
instruction or how to dispose of the battery.

8
English
4 Installing the Batteries
Before putting the unit in
operation, read the operating
instructions and pay attention to
the safety instructions and
general instructions in Section 2.
Unpack the device and check
the delivery for completeness (for
scope of delivery, see Section
Delivery notes).
Power supply
battery - operated
The batteries must be placed in
the measuring unit for operation.
The device runs on four AA 1.5-V
alkaline batteries.
Use only alkaline batteries
(AA /LR6)!
Depending on the exact brand,
the capacity of each battery-set is
sufficient for about 3.000
measurements. When the battery
voltage falls below the required
minimum voltage in the course of
operation, the following message
appears on the display
Battery empty!
To ensure that the unit is always
ready for operation, it is
recommended to have spare
batteries handy, especially when
performing measurements in the
field.
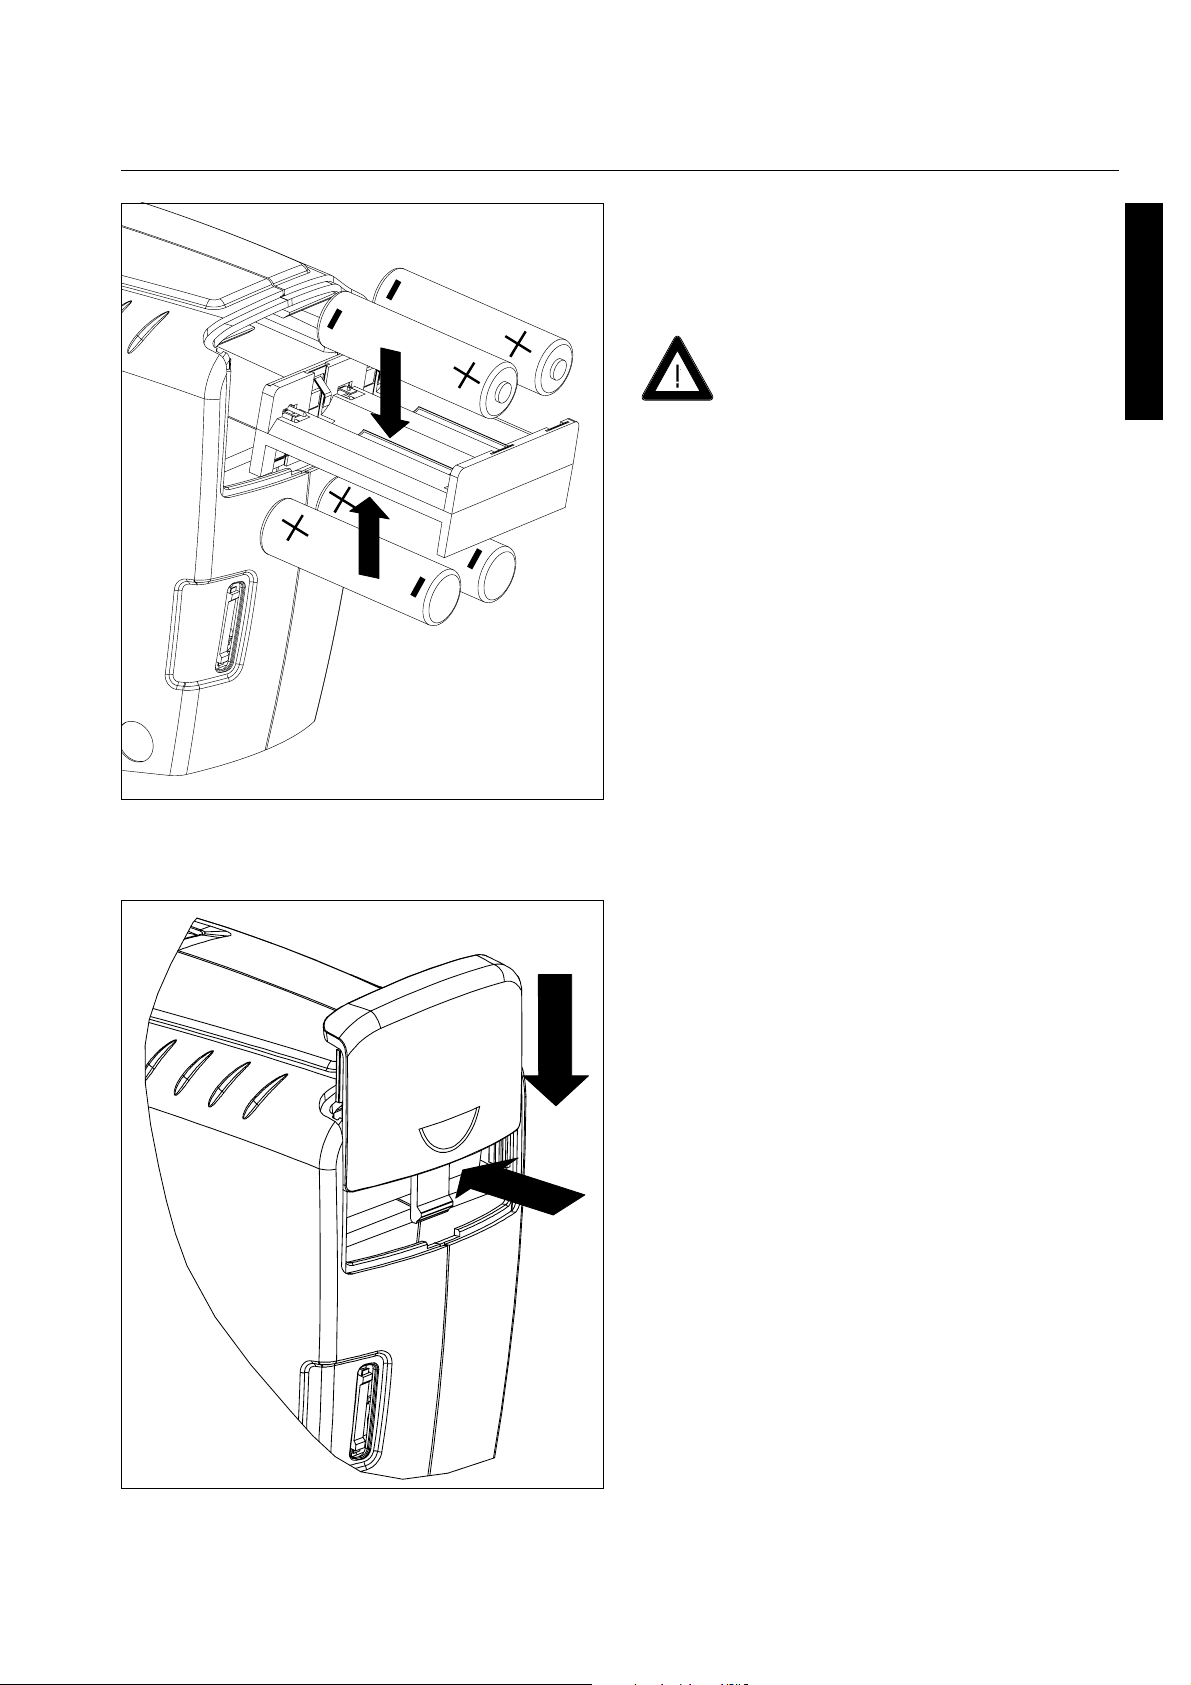
Changing the battery
To insert or change the batteries,
open the lid of the battery
compartment (1) and take out the
battery box as shown below (2).
1
2

9
English
Insert the new batteries.
Make sure that the
batteries are correctly
oriented in the battery box
according to the (+) and (-)
marks.
Insert the battery box into the
battery compartment and press it
inside with one finger. Set the
battery compartment cover in the
guidance again. Lock the cover
by sliding it downwards until it
snaps.
Installing the Batteries 4

10
English
Measurement unit
1 Menu scroll wheel: turn on and menu selection
2 Display for user guidance and displaying measurement values
3 Operate button (measurement button): turn on and measure
4 Alignment mark
5 Interface for connecting to a PC
6 Micro switches for detection of correct placement during
measurement
7 Protective cap
5 Controls
1
2
3
4
5
6
7

11
English
Getting Started 6
Turning on the unit
To turn on the unit, press the menu
scroll wheel or the operate button.
The selection menu appears:
Navigation
The operate button and scroll
wheel are used to control the
system. Pressing the wheel or the
operate button turns the unit on.
All settings within the menu are
made by turning the wheel and
pressing the operate button.
Pressing the operate button starts
measurements or performs
functions that are displayed.
System operation is supported by
comments and error messages,
which appear in the display.
menu
menu

12
English
7 Measurement Techniques
Measurement techniques
In order to obtain accurate and
repeatable measurements, the
bottom of the instrument must be
aligned flat on the surface to be
measured. Do not move the
instrument while measuring. This
can cause the measurement
angles to vary, greatly affecting
measurement values on metallic
paint finishes.
Use the alignment marks on both
sides of the instrument to center
the measurement aperture over
the desired area.
To perform a measurement, both
switches on the bottom must be
activated and the operate key is
pressed.
A measurement requires three
readings to be taken around the
repair area to complete one
stored measurement.
After a reading is completed, the
instrument must be lifted and
placed on a different spot to re-
activate the switches again.
The display will guide you through
the readings.

13
English
Measure 8
Measure
Select the menu item Measure by
pressing the operate button.
The display indicates the number
of the current reading and the
step within the reading itself.
If you haven’t positioned your
instrument until now, place it on the
spot you intend to measure and
press the operate button.
The measurement is indicated in
the display.
Do not move the instrument while
taking a reading.
The instrument is now ready for
the next reading. Lift the
instrument, place it on the next
spot and press the operate button
again to perform the next reading.
Repeat this step to perform the
last reading.
When the last reading is finished,
data will be stored.

14
English
Calibration Information
The device must be calibrated every 7 calender days. When calibration
is required, the device will display a message to calibrate before
allowing the user to read a vehicle.
You should recalibrate the device if ambient conditions have changed.
This applies especially when changing location and if major changes in
temperature and relative humidity may be expected as a result (for
example inside/outside).
When moving from cold areas to warm areas, there is a danger of
condensation. For this reason, after there has been a change in
ambient conditions, you should wait for an appropriate amount of time
to allow the optical components to adjust before calibrating and using
the unit.
Calibration Notes
• Dirt or dust in the optics area will cause an inaccurate calibration
reading. Therefore, always use the protective cap if no readings are
taken.
• The white standard is dramatically affected by dirt, dust and finger
prints. For cleaning procedure see section "Cleaning and
Maintenance“.
• The black trap should be cleaned periodically. It can be taken
apart for easy cleaning. For cleaning procedure see section "Cleaning
and Maintenance“.
• Before you position the instrument on the black trap, make sure that
you have removed the hole plug. After having calibrated the instrument,
close the black trap with the hole plug again. Always store black trap
with hole plug in place when not in use.
• Use the alignment marks on the instrument, the white standard and
the black trap when you position the instrument into the indentation of
the white standard or the black trap.
• Do not move the instrument while taking a calibration measurement.
If motion is detected, an error message will be displayed and
calibration aborted.
9 Calibrate

15
English
Calibrate 9
Black Trap
White Calibration Standard
Hole Plug
Measurement
Opening
Black Trap
The black trap is used to perform
the zero reflectance measurement.
Remove the hole plug and position
the instrument over the opening.
The instrument snaps into the
indentation of the black trap and
can only be positioned in one
direction. Use the alignment marks
on the instrument and the black
trap as guides.
The black trap can be taken apart
for cleaning. Refer to chapter
Cleaning and Maintenance.
Always store black trap with hole
plug in place when not in use.
White Calibration Standard
The white calibration plaque is
concealed in a case that has a
hinged cover. Open the cover and
position the instrument on the
white standard. The instrument
snaps into the indentation of the
standard and can only be
positioned in one direction. Use
the alignment marks on the
instrument and the standard as
guides.
Note: Make sure that the white
calibration standard and the black
trap are clean. Refer to section
"Cleaning and Maintenance“.

16
English
9 Calibrate
Calibrate
Turn the unit on by pressing either
the menu scroll wheel or the
operate button.
Choose the menu item Calibrate
from the main menu with the menu
scroll wheel and activate it by
pressing the operate button.
Read Black is displayed.
Place the instrument on the black
trap. Make sure that the red
marks on the instrument and the
black trap are neatly aligned and
that the instrument fits into the
indentation of the black trap.
Press the operate button to per-
form the black reading.
You get an indication of the
reading process in the display.
"Reading Black"
Note: Choosing Cancel will abort
the calibration procedure and
calibration will not be updated.

17
English
Calibrate 9
When Reading Black is
completed, the instrument must be
placed on the white standard.
Read White is indicated in the
display.
Position the instrument as
thoroughly on the white standard
as it is described for the black
trap and press the operate button.
You get an indication of the
reading process in the display.
"Reading White"
When calibration is complete, an
affirmation is shown in the display.
Note:If an error occurs during
calibration, try to read the plaque
again. If the error message still
occurs, refer to section "Errors
and warning messages“.

18
English
10 Delete
Delete
In case of a measurement error
you can delete measurements.
Select the menu item Delete by
turning the menu scroll wheel and
pressing the operate button. The
number of the last measurement is
displayed together with the delete
function. To proceed press the
operate button.
You can now delete the indicated
measurement or abort the delete
operation by highlighting Cancel
and pressing the operate button.
Choosing cancel aborts the
process. The instrument returns to
the main menu.
To delete the measurement press
the operate button.
You get an indication of the delete
process in the display.
"Deleting #006"
After deleting, the instrument
returns to the main menu.
The measure and the delete
counter are diminished by one.

19
English
Joblist 11
Joblist
In case you must enforce test
series with recurrent courses, you
can select names from a pre-
defined joblist. This list must be
created on a PC and be sent to
the instrument in advance.
Select the menu item Joblist by
turning the menu scroll wheel and
pressing the operate button.
The jobnames available appear in
the display. Select a name by
turning the wheel and then
pressing operate.
The instrument starts with the
measuring procedure. The
jobname is indicated in the
display.
Pressing operate starts the
measurement. After three
readings, measurement is done
and the data is stored as
described above.
You can use a jobname only once.
When you select Joblist again, the
previous name is removed from
the list.
Measure # 00
4
Delete # 003
Calibrate
Browse
Joblist
Table of contents
Other BYK Measuring Instrument manuals

BYK
BYK LC 3 User manual

BYK
BYK micro-gloss Installation manual

BYK
BYK haze-gard plus User manual

BYK
BYK LCM III User manual

BYK
BYK spectro2profiler Manual

BYK
BYK haze-gard plus Instruction Manual

BYK
BYK CAP 1000+ User manual

BYK
BYK micro-TRI-gloss ? User manual

BYK
BYK spectro2guide User manual

BYK
BYK micro-TRI-color 345 000 015 Series User manual