manuals.online logo
Brands
  1. Home
  2. •
  3. Brands
  4. •
  5. Caberg
  6. •
  7. Motorcycle Accessories
  8. •
  9. Caberg just speak User manual

Caberg just speak User manual

SISTEMA CABERG JUST SPEAK PER CASCO KONDA
CABERG JUST SPEAK SYSTEM FOR KONDA
CABERG JUST SPEAK SYSTEM POUR KONDA
SISTEMA CABERG JUST SPEAK PARA EL CASCO KONDA
DAS CABERG JUST SPEAK SYSTEM FUR KONDA
1) Per il montaggio del microfono sul casco Konda rimuovere il
supporto n.1 e n.2
2) Estrarre guanciali ed interno lavabile.
3) Estrarre tappo calotta che si trova sulla guancia sinistra.
Per farlo, spingere dall’interno verso l’esterno. (FOTO 1)
(FOTO 1)
4) Agganciare il microfono facendo attenzione a far coincidere la cufa con
la sede preposta. Accertarsi che i punti stampati sulla testa del microfono
siano rivolti verso l’interno del casco (FOTO 2).
(FOTO 2)
(FOTO 3)
(FOTO 4)
(FOTO 5)
1) For mount the microphone on Konda Helmet take out both
supports n.1 and n.2
1) Pour le montage du micro sur le casque Konda enlever le
support n.1 et n. 2
1) Para montar el micrófono en el casco Konda, extraer ambos
soportes: 1 y 2.
1) Um das kit am helm zu montieren Konda den Träger n.1 oder
n.2 entfernen.
2) Remove the cheek-pads and washable lining
2) Extraiga los protectores faciales y el interior lavable
2) Die Wangenpolster und das washbare Innenpolster
herasnehmen
2) Ôter les coussins de joue et l’ intérieur lavable
3) Remove the cap plug on left side.Push outwards to do this
(PIC 1)
3) Enlever le bouchon qui se trouve sur le côté gauche de la
calotte. Pour ce faire pousser de l’ intérieur vers l’extérieur
(PHOTO 1)
3) Extraiga el tapón del casquete que se encuentra sobra la
mejilla izquierda. Para hacerlo empuje desde adentro hacia
afuera (FOTO 1)
3) Den Kappendeckel, der sich auf der linken Wangenseite
bendet, herausziehen. Von Innen nach au, en drücken
(FOTOS 1)
5) Togliere la pellicola protettiva dal biadesivo posizionato sulla tastiera
di comando (FOTO 3).
5) Pell off the protective pellicle from the control keyboard (PIC 3)
5) Enlever le lm de protection placé sur le clavier de commandes
(PHOTO 3)
5) Sacar la pelicula proteciva del adhesivo situado en la pieza del
mecanismo (FOTO 3).
5)Die Folie vom Doppelklebeband an der Steuerungstastatur abnehmen
(FOTOS 3).
6) Inserire i cavi nell’apposita sede ed incastrare il supporto della tastiera
nel foro della calotta (FOTO 4)
6) Fit the wires in their holder and place the control keyboard in the
seating of the shell (PIC 4)
6) Insérer les câbles dans l’emplacement prévu à cet effet et placer le
support dans le trou de la calotte (PHOTO 4)
6) Insertar los cables en su lugar y incrustar los botones en el agujero de
la calota (FOTO 4)
6) Die Kabel in die vorgesehene Stelle einführen und den Träger in das
Loch an der Schale einsetzen (FOTOS 4)
7) Inserire il cavo della tastiera nella sede A della scheda in modo che la
scritta “DOWN ” sia rivolto verso l’interno della scheda; chiudere i piedini di
ssaggio spingendo nella zona indicata nella FOTO 5 (per sconnettere la
tastiera dovrà essere eseguita l’operazione inversa).
4) Fix the micro, taking care when remounting the inner lining to place it on
ist own area. Make sure that the two dots printed on the microphone head
are oriented towards your mouth. (PIC 2)
7) Insert the keyboard cable to the seat A of the electronic card so that the
word “DOWN ” face downwards; close the pins fastening pushing the area
described in PICTURE 5 (to disconnect the keyboard has to be performed
the reverse).
4) Boucler le micro faisant attention a fair coincider l’interieur a la place
predisposé. Vérier que les points imprimés sur la tête du micro soient
tournés vers l’intérieur du casque. (PHOTO 2)
7) Insérer le câble dans l’emplacement A de la che de façon que l’inscrip-
tion DOWN soit tournée vers l’intérieur de la che même; à proximité des
broches de xation poussant la zone décrite à la PHOTO 5 (pour débran-
cher le clavier doit se faire l’inverse).
4) Fijar el micrófono, prestando especial atención en colocar el interior en
su lugar correspondiente. Cercionarse que el punto estampado son posi-
cionado hacia el interior del casco. (FOTO 2)
4) Das Mikrofon festschrauben und darauf achten, dass der Popschutz
am vorgesehen Platz anliegt. Vergewissern Sie sich, dass die geprägten
Punkte am Kopf des Mikrofons zum Inneren des Helmes gedreht sind.
(FOTOS 2)
7) Legen Sie die Tastatur-Kabel an den Sitz einer der elektronischen Karte,
so die Schrift “DOWN” zum Inneren der Anlage drehen; Schließen Sie die
Stifte Befestigung Drücken der Bereich in FOTOS 5 (zum Trennen Sie die
Tastatur hat, die aufgrund der Rückseite).
7) Inserte el cable del teclado a la sede A de la tarjeta electrónica para
que la escrita “DOWN” se encuentre hacia el interior de la tarjeta; cerrar
las clavijas de jación empujando la zona descrita en la FOTO 5 (para
desconectar el teclado tiene que ser realizado a la inversa).
(FOTO 6)
8) Connettere i cavi delle auricolari nel connettore B come illustrato nella
FOTO 6 e piegare il cavo USB verso l’esterno della scheda.
(FOTO 7)
(FOTO 8)
(FOTO 9)
10)Per non rischiare di rovinare i cavi, sistemarli il più aderente possibile
al polistirolo prima di montare gli interni (FOTO 9)
11) Montare l’interno lavabile ed i guanciali; inserire le auricolari
nelle relative sedi ricavate nei guanciali. Durante questa opera-
zione assicuratevi di non “pizzicare” i cavi elettrici. (FOTO 10)
12) Applicare la copertura auricolari. (FOTO 12)
(FOTO 10)
(FOTO 12)
Nota: con il sistema Caberg Just Speak montato, il cinturino deve passare nell’asola dei guanciali.
Vericate sempre la corretta lunghezza del nastro sottogola ed eventualmente regolatela nuovamente
facendo riferimento alle speciche istruzioni del casco.
9) Inserire il sistema Caberg Just Speak nella sede predisposta nel polisti-
rolo nel lato opposto alla tastierina e in modo tale che l’etichetta “DOWN”
sia rivolta verso l’interno del casco. Connettere il cavo del microfono C
come indicato nella FOTO 8.
12) Fit the earpieces covers (PIC 12)
12) Mettre en place la protection des écouteurs (PHOTO 12)
12) Aplique la cobertura de los auriculares (FOTO 12)
12) Bringen Sie die Deck el des Kopfhörers an (FOTOS 12
11) Replace the washable lining and the cheek-pads; place the
earpieces on the space provided in the cheek-pads. Make sure
you do not “pinch” the wires when doing this (PIC 10)
11) Remonter l’intérieur lavable et les coussins de joue; placer
les écouteurs dans leurs emplacements situés dans les cous-
sins de joue. Pendant cette opération, veiller à ne pas “coincer”
les ls électriques (PHOTO 10)
11) Coloque el interior lavable y los protectores faciales; coloque
los auriculares en los alojamientos correspondientes, presentes
en los protectores faciales. Durante esta operación verique que
los cables eléctricos no queden atrapados (FOTO 10)
11) Fügen Sie das washbare Innenpolster und die Wagenpol-
ster wiedere ein; shieben Sie die Kopfhörer in die vorgesehe-
ne Position am Wagenpolster ein. Achten Sie darauf, während
dieser Operation nicht die elektronischen Kabel einzuklemmen
(FOTOS 10)
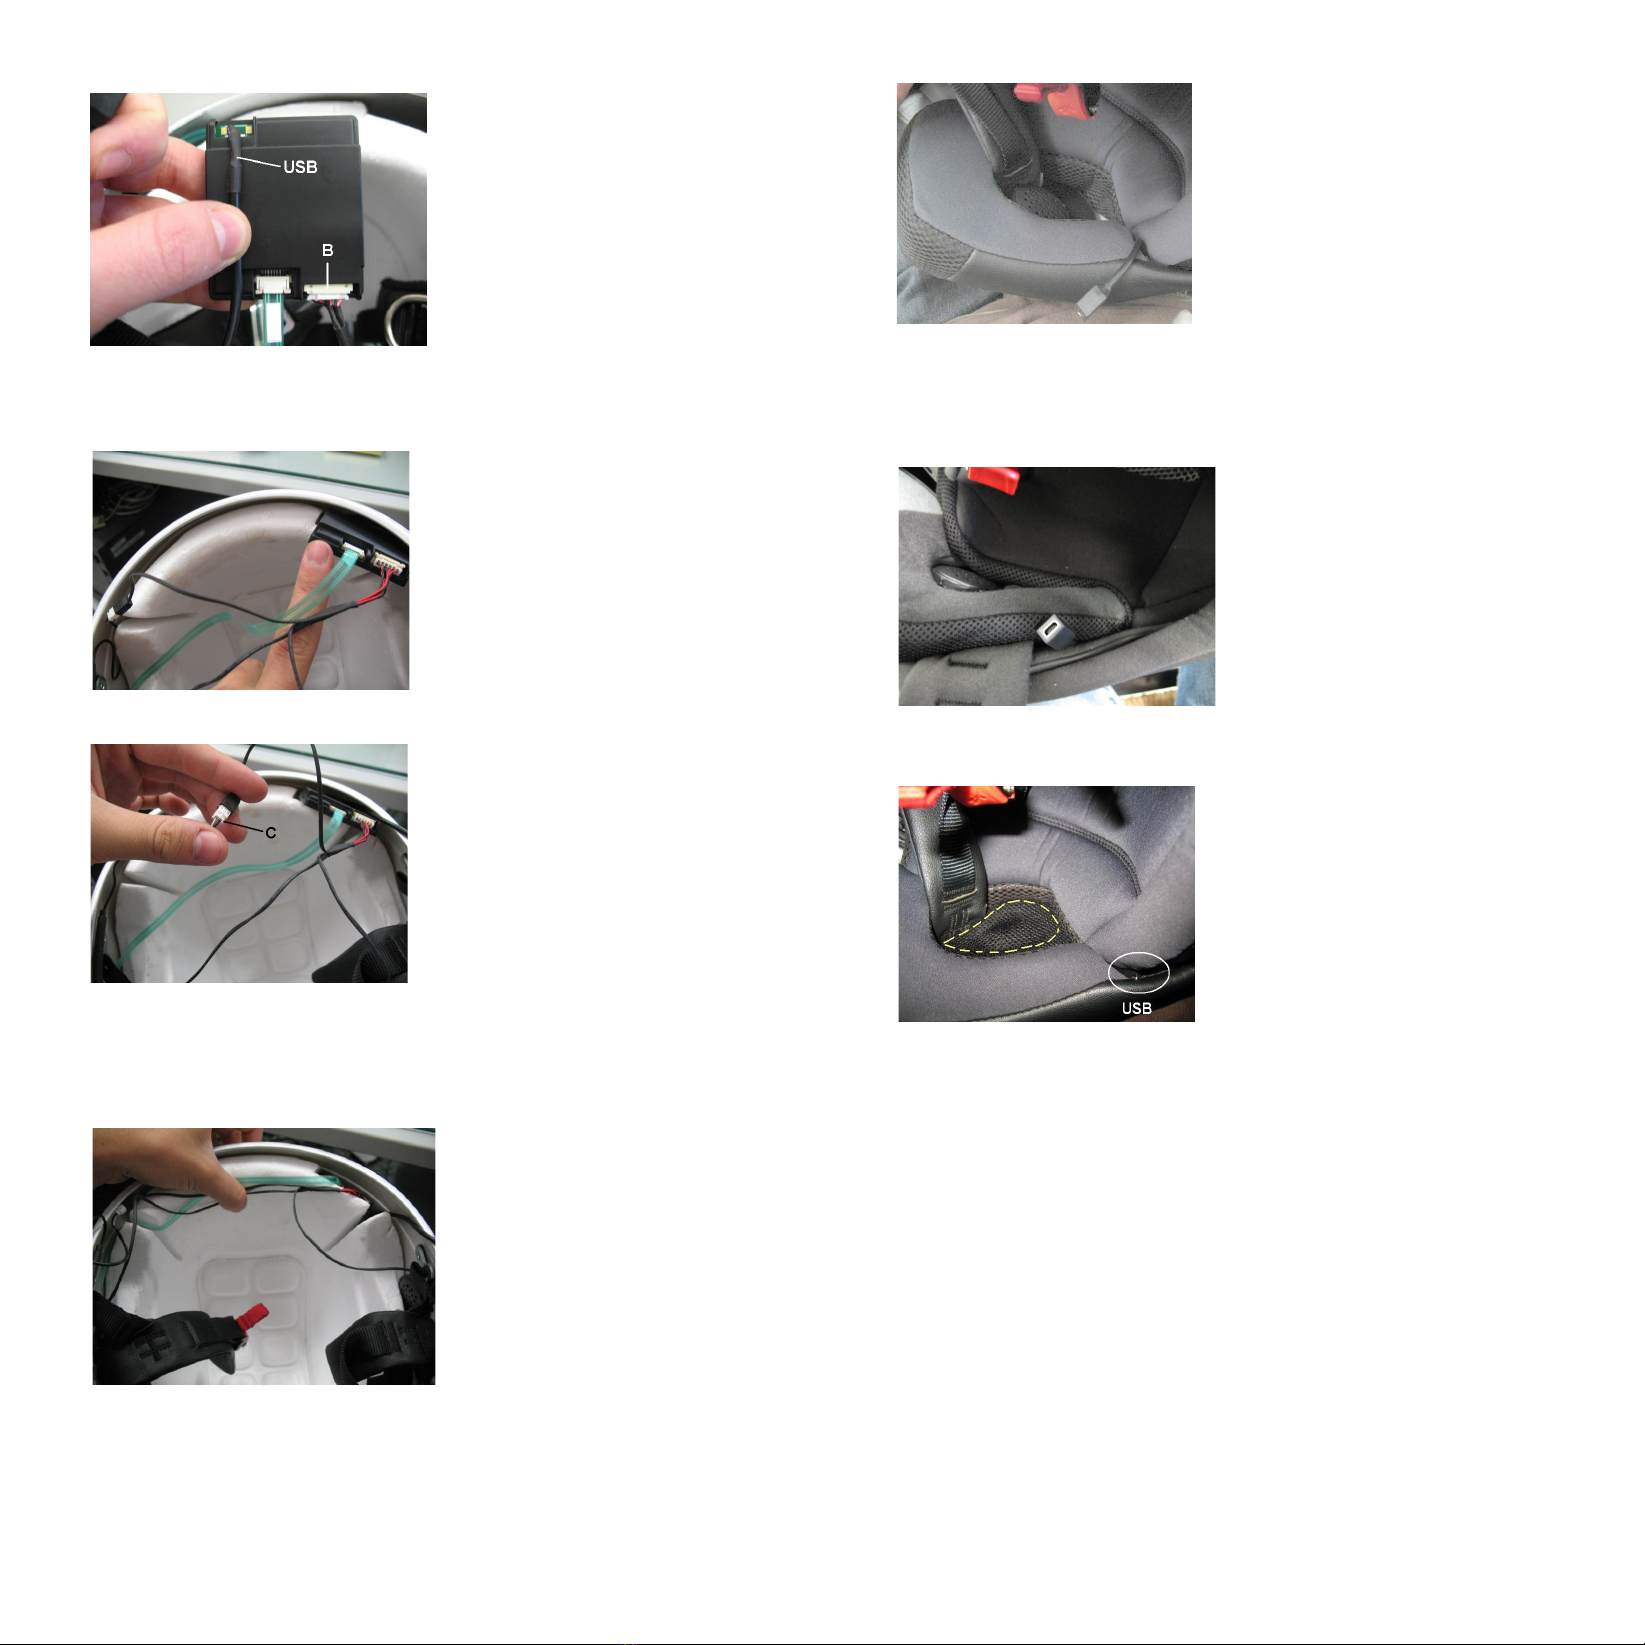
12) Place the USB wire between the washable lining and the
cheek-pads.(PIC 11)
(FOTO 11)
12) Posizionare la presa USB fra l’interno lavabile ed i guan-
ciali.(FOTO 11)
8) Connect the earpiece wires to the connector plug B as shown in PIC-
TURE 6; then bend the USB wire on the outer side of the electronic card
9) Insert the Caberg Just Speak system into the predisposed seating on
the EPS ( on the opposite side of the keypad). Make sure that the word
“DOWN” is oriented towards the inside of the helmet. Connect the micro-
phone cable C as shown in PICTURE 8.
10) Place the cables adherent to the polystyrene before mount the
inner lining , to avoid to spoil them. (PIC 9)
8) Connecter les câbles des écouteurs dans le connecteur B comme indi-
qué sur la PHOTO 6 et plier le câble USB envers l’intérieur de la che
9) Placer le système Caberg Just Speak dans le siège prédisposé dans
le polystyrène dans le côté opposé au clavier et de façon que l’étiquette
DOWN soit tournée vers l’intérieur du casque. Branchez le câble du
micro C comme indiqué sur la PHOTO 8.
10) Adhérer les cables au polystyrène avant d’installer la coiffe pour
eviter qu’ils abîment. (PHOTO 9)
12) Poser le câble USB entre l’intérieur lavable et les coussins
de joue. (PHOTO 11)
8) Conectar el cable del auricular en el conector b como se indica en la
FOTO 6 y plegar el cable USB hacia el exterior de la tarjeta
9) Insertar el sistema caberg just speak en el lugar predispuesto del
polespan en el lado opuesto de modo que la etiqueta down este pòsicio-
nada hacia el exterior del casco. Conecte el cable del micrófono C como
se muestra en la FOTO 8.
10) Colocar los cables adherentes al poliestirolo antes de montar el
interior para evitar dañarlos. (FOTO 9)
12) Alojar el cable usb en el interior lavable de la mentonera.
(FOTO 11)
8) Verbinden Sie, wie in der Abbildung 6 gezeigt, die Kabel der Kopfhörer
mit dem Stecker B und biegen Sie das USB Kabel außen um die Anlage.
9) Bauen Sie das Caberg Just Speak System in die vorgesehene Stelle
an der Styroporschale an der gegenüberliegender Seite der Tastatur ein,
die Etikette “DOWN“ muss zur Helminnenseite zeigen. Schließen Sie
das Mikrofon-Kabel C wie in FOTOS 8.
10) Um die Kabel nicht zu beschädigen, bringen Sie diese fest an die
Styroporschale an, bevor Sie die Innenausstattung einsetzten.(FOTOS 9)
12) Das USB Kabel zwischen das Innenfutter und den Wangen-
polster einführen. (FOTOS 11)
Note: if the Caberg Just Speak system is installed, the strap should go inside the cheek holes. Always
you check the correct length of the strap and possibly you adjust it again referring to the specic instruc-
tions of the helmet.
Note: si le Caberg Just Speak système est installé, la sangle doit passer dans le trou des coussins
de joue. Toujours vérier la bonne longueur de la sangle et éventuellement d'ajuster de nouveau se
référant aux instructions spéciques du casque.
Hinweis: Wenn das Caberg Just Speak System installiert ist, sollten Sie den Riemen durch den
Knopfschlitz des Backenpolster. Sie immer die richtige Länge des Gurtbandes und möglicherweise stel-
len Sie sie wieder auf die speziellen Anweisungen der Helm.
Nota: si el sistema Caberg Just Speak es instalado, la correa debe ir por las ranuras situadas en las
mentoneras. Siempre comprobar la correcta longitud de la correa y, posiblemente, ajustar de nuevo
referencia a las instrucciones especícas del casco.

Other manuals for just speak

4

Other Caberg Motorcycle Accessories manuals

Caberg Levante User manual

Caberg

Caberg Levante User manual

Caberg DUKE II User manual

Caberg

Caberg DUKE II User manual

Caberg AVALON User manual

Caberg

Caberg AVALON User manual

Caberg PRO SPEAK EVO User manual

Caberg

Caberg PRO SPEAK EVO User manual

Caberg A9235 PRO SPEAK EVO User manual

Caberg

Caberg A9235 PRO SPEAK EVO User manual

Caberg JET FLYON II User manual

Caberg

Caberg JET FLYON II User manual

Caberg REERIDE CASCO JET User manual

Caberg

Caberg REERIDE CASCO JET User manual

Caberg EGO User manual

Caberg

Caberg EGO User manual

Caberg GHOST User manual

Caberg

Caberg GHOST User manual

Caberg XTRACE User manual

Caberg

Caberg XTRACE User manual

Caberg V2R User manual

Caberg

Caberg V2R User manual

Caberg PRO SPEAK EVO User manual

Caberg

Caberg PRO SPEAK EVO User manual

Caberg DUKE EVO User manual

Caberg

Caberg DUKE EVO User manual

Caberg FLIP-UP DUKE X Instruction manual

Caberg

Caberg FLIP-UP DUKE X Instruction manual

Caberg 49/50 User manual

Caberg

Caberg 49/50 User manual

Caberg Jackal User manual

Caberg

Caberg Jackal User manual

Caberg PRO SPEAK EVO User manual

Caberg

Caberg PRO SPEAK EVO User manual

Caberg DRIFT EVO II User manual

Caberg

Caberg DRIFT EVO II User manual

Caberg Just SpeakS User manual

Caberg

Caberg Just SpeakS User manual

Caberg Droid User manual

Caberg

Caberg Droid User manual

Caberg HORUS User manual

Caberg

Caberg HORUS User manual

Caberg A9235 PRO SPEAK EVO User manual

Caberg

Caberg A9235 PRO SPEAK EVO User manual

Popular Motorcycle Accessories manuals by other brands

hepco & becker 504983 00 01 quick start guide

hepco & becker

hepco & becker 504983 00 01 quick start guide

Rekluse Motor Sports Radius CX Clutch Installation and user guide

Rekluse Motor Sports

Rekluse Motor Sports Radius CX Clutch Installation and user guide

130R AWA user manual

130R

130R AWA user manual

Memphis Shades 2320-0039 Mounting instructions

Memphis Shades

Memphis Shades 2320-0039 Mounting instructions

hepco & becker 5032536 00 01 quick start guide

hepco & becker

hepco & becker 5032536 00 01 quick start guide

Sentidrive SENTINELLE quick start guide

Sentidrive

Sentidrive SENTINELLE quick start guide

Roof RO31 DESMO How to use and maintain

Roof

Roof RO31 DESMO How to use and maintain

Lincoln Electric K4767-1 Operator's manual

Lincoln Electric

Lincoln Electric K4767-1 Operator's manual

Corbin KV-900-6-BAG quick guide

Corbin

Corbin KV-900-6-BAG quick guide

Bisado Technologies LOOKING N1 Night Plus user manual

Bisado Technologies

Bisado Technologies LOOKING N1 Night Plus user manual

Rothewald 10011331 Instructions for use

Rothewald

Rothewald 10011331 Instructions for use

3M G22 manual

3M

3M G22 manual

rizoma RM004 user manual

rizoma

rizoma RM004 user manual

SCORPION EHA-95 Fitting instructions

SCORPION

SCORPION EHA-95 Fitting instructions

Suzuki 57100-0682 Series installation instructions

Suzuki

Suzuki 57100-0682 Series installation instructions

hepco & becker 630548 00 01 Mounting instructions

hepco & becker

hepco & becker 630548 00 01 Mounting instructions

DYNATEK DC1-3 manual

DYNATEK

DYNATEK DC1-3 manual

hepco & becker 502606 00 01 Mounting instructions

hepco & becker

hepco & becker 502606 00 01 Mounting instructions

manuals.online logo
manuals.online logoBrands
  • About & Mission
  • Contact us
  • Privacy Policy
  • Terms and Conditions

Copyright 2025 Manuals.Online. All Rights Reserved.