Cablematic WX082 Instruction Manual

1/ 17
Guideline of PIR Alarm WIFI KIT
V1.01

2/ 17
Catalogue
Ⅰ.Brief introduction
Ⅱ.product description
Ⅲ.WIFI Kit connection diagram
Ⅳ.HDD installation
Ⅴ.Connection setting
Ⅵ.Setting of other function
Ⅶ.How to use mobile software
Ⅷ.FAQ Help
Ⅰ.Brief introduction:
Smart PIR Alarm cctv kit is the new product,which integrates burglar alarm and video surveillance. It is designed
to prevent and intimidate intruders and protect users' property and life.
Advantages:
1.Frighten intruders: PIR+Motion detector,once detect intruder at night,it will switch on the bright white led
lights to scare them to escape.
2.Color video: get clearly color video once detect intruder at night.
3. Two-way Audio:you can hear the voice around the camera,also,you can speak to the cameras.
4. Real-time Alarm push:when it detects and scare intruder,at the same time,you will get the alarming message
on your mobile phone.
3/ 17
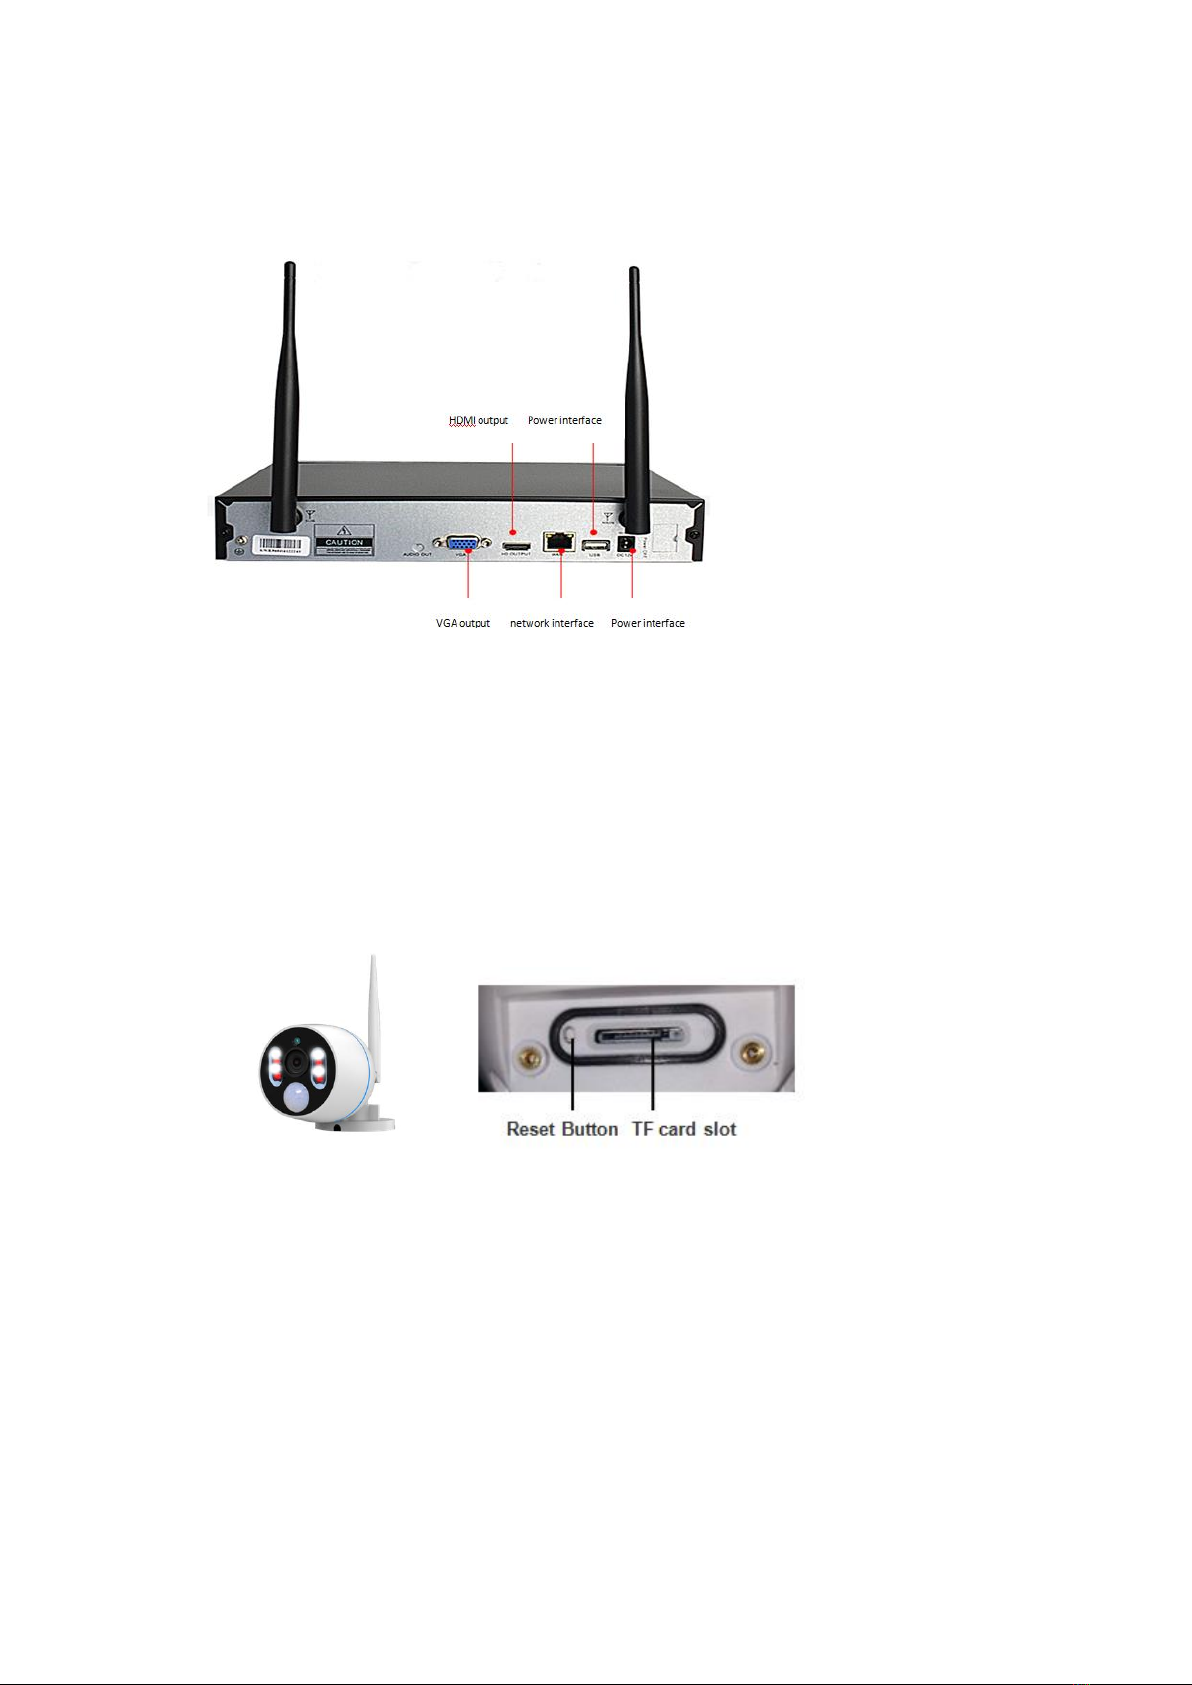
Ⅱ.Product Introduction
A,Smart Alarm NVR
power:DC12V/2A,
USB:to connect mouse or usb drive,
Net port:to connect net line,
VGA/HDMI port:used to connect display,
WIFI aerial:in order to connect wifi camera.
B,Smart PIR Alarm camera
IR LED:In Dark,fill light automatically.
White LED:Once both detected heat and motion,it will light up.
PIR Detector:Search human heat.
Microphone/horn:Two way audio.
Power:DC12V/1A.
WIFI aerial:Connect camera.
Reset button:Press it 5 seconds to reset it.

4/ 17
TF card:Max support 128G.
Attention:
Installation height and direction of PIR infrared detection camera: the installation height should not exceed 3-4
meters (best within 3 meters); the installation direction is preferably horizontal installation (the installation
position will directly affect the sensitivity of the PIR detector. When the camera is oriented The detection
sensitivity is highest when the person's walking direction is 90 degrees.)
C,PIR Alarm camera picture
IR LED: In Dark,fill light automatically。
Power: DC12V/1A.
WIFI aerial:used to connect NVR
Ⅲ.WIFI PIRAlarm kit intallation diagram

5/ 17
Connection step:
1,all cameras connect to power,DC12V/1A.
2,Display connect to NVR HDMI or VGAport.
3,Mouse connect to the USB port.
4,NVR connect Power,DC12V/2A.
5,If you want to see the video by Mob/PC remotely,the net pot need to connect the router.
Ⅳ.HDD Installation(If already finished,ignore)
Preparation Remember to click the power off firstly
Installation Step
1).Unscrew the screw,remove the cover,connect the data and power cable.
2)Stand the DVR chassis sideways, align the holes on the hard disk with the reserved holes at the bottom of the
chassis, and fix the hard disk with screws. Cover the chassis cover and secure the cover with screws.
Attention:
A.Choosing the matched HDD,which can meet the working request of NVR.
B.After booting,the system will ask to format the hard disk, the original
data in the hard disk may be completely lost.
C.Different hard disk capacities and parameter configuration of the DVR will affect the total length of video data
storage.
6/ 17
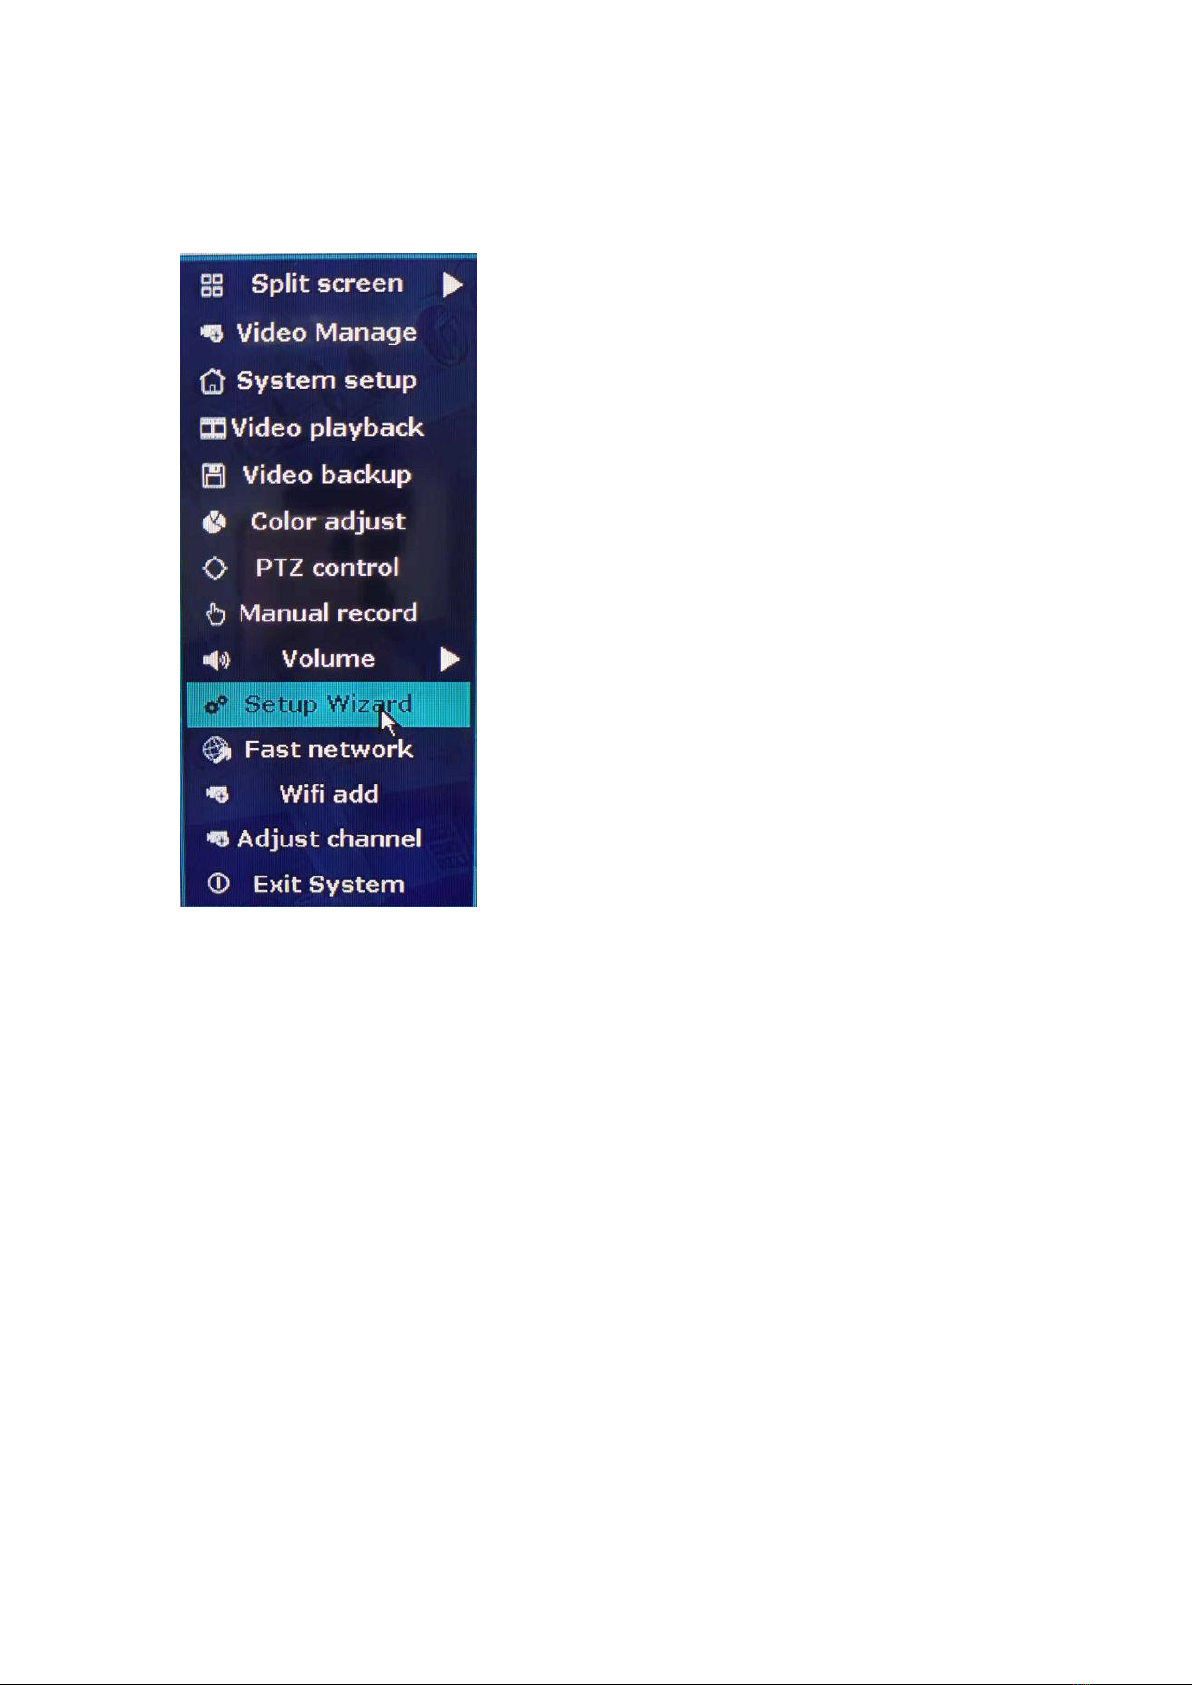
Ⅴ.Setting guideline
Click the right mouse button to enter the menu list. (Default login username: admin, no password).
1).Split screen selection: single screen / multi screen selection
2).Video Management: Used to add a code/delete camera channel.
3)System settings: Recording Settings / Network Settings / User Management / Hard Disk Management / Factory
Reset and more.
4).Video playback: video playback. You can play back video, video backup, etc. according to date, time, and
channel.
5).Video backup: You can select the corresponding time period for backup.
6).Color adjustment: Adjust the color, brightness and so on of the monitor screen.
7).Setup Wizard: Recorder Operation Wizard.
8).One-click Internet access: for diagnosing network status.
9).Wireless add: for adding new camera functions.
10).Adjust the channel: for channel interchange, use the mouse to drag the channel to swap.
7/ 17
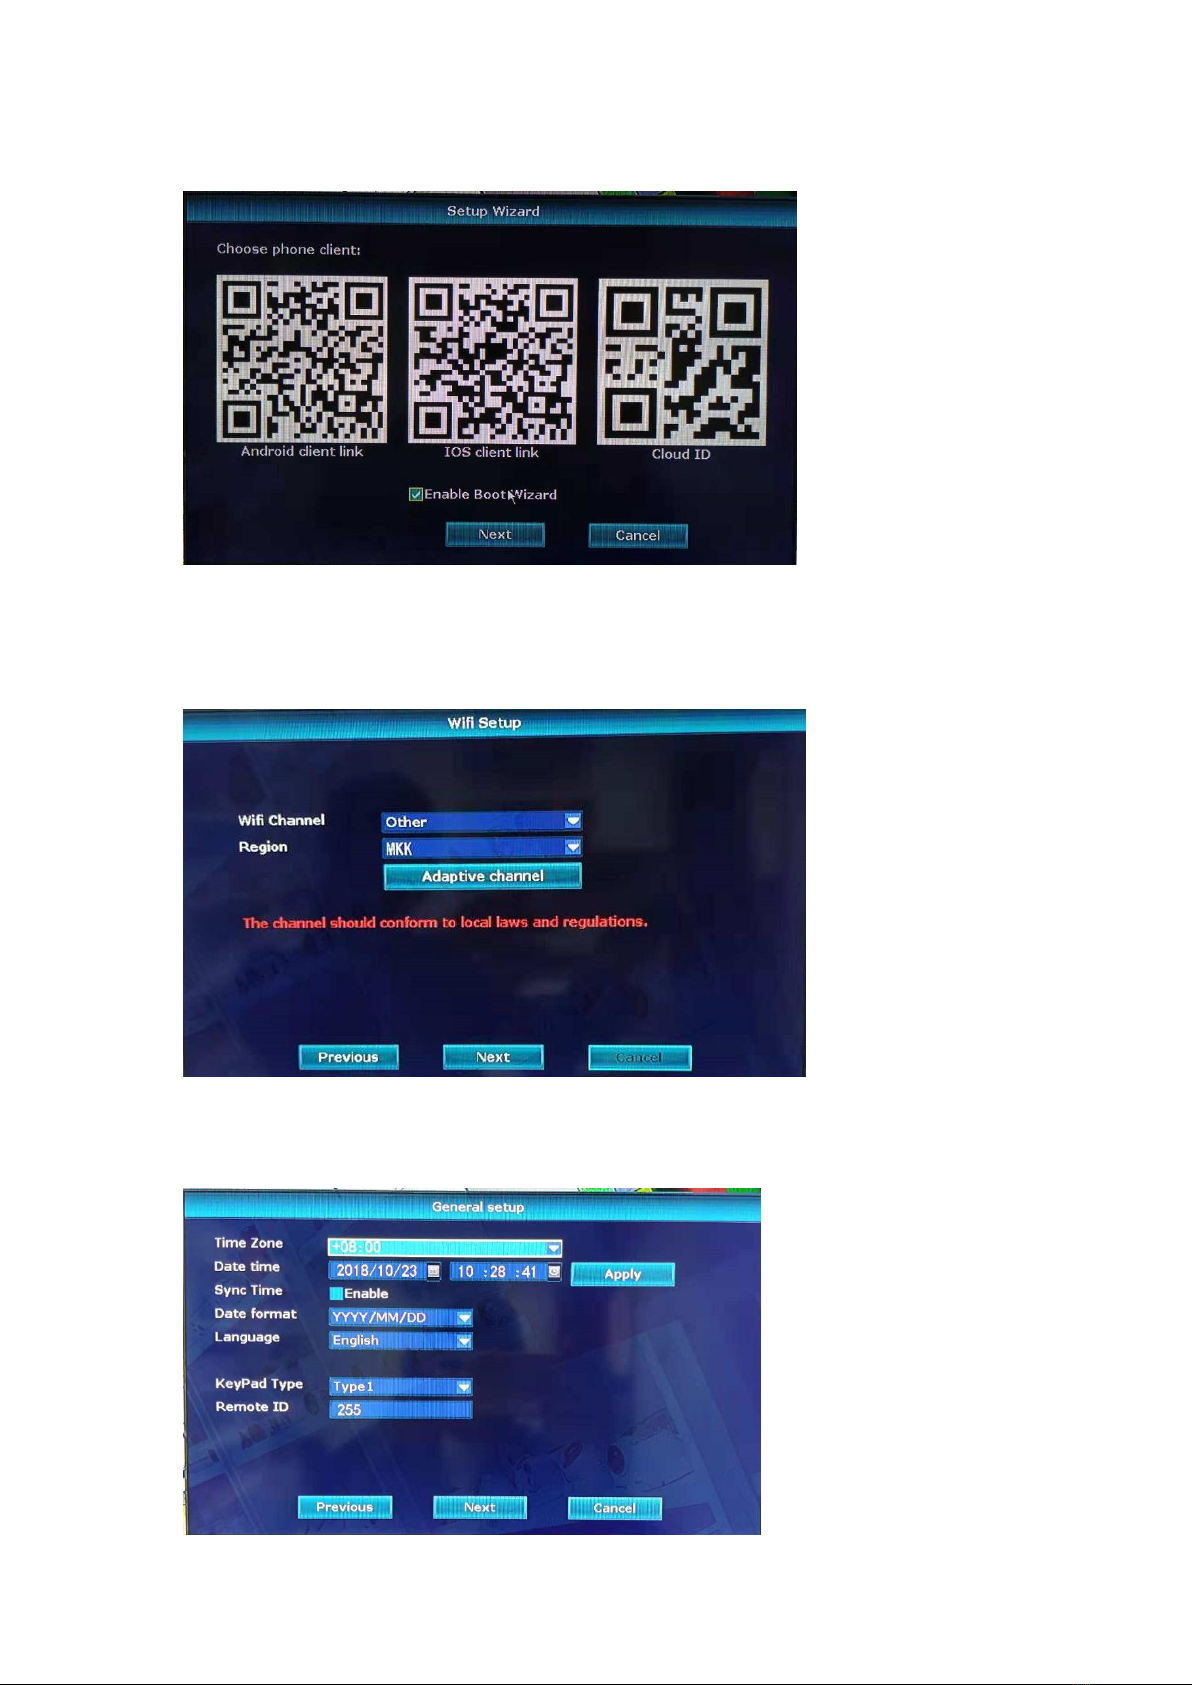
Clicking setup wizard
1, mobile APP: use the mobile phone to scan the corresponding Android or Apple QR code, you can download the
APP to the phone. (The cloud ID QR code on the right is added to the mobile app, which will be used later in the
APP operation). Click Next again.
2, wireless settings: the use of wireless channels must comply with local laws and regulations. (If there is no
special requirement for monitoring the installation, the default setting can be.) Click Next step.
8/ 17
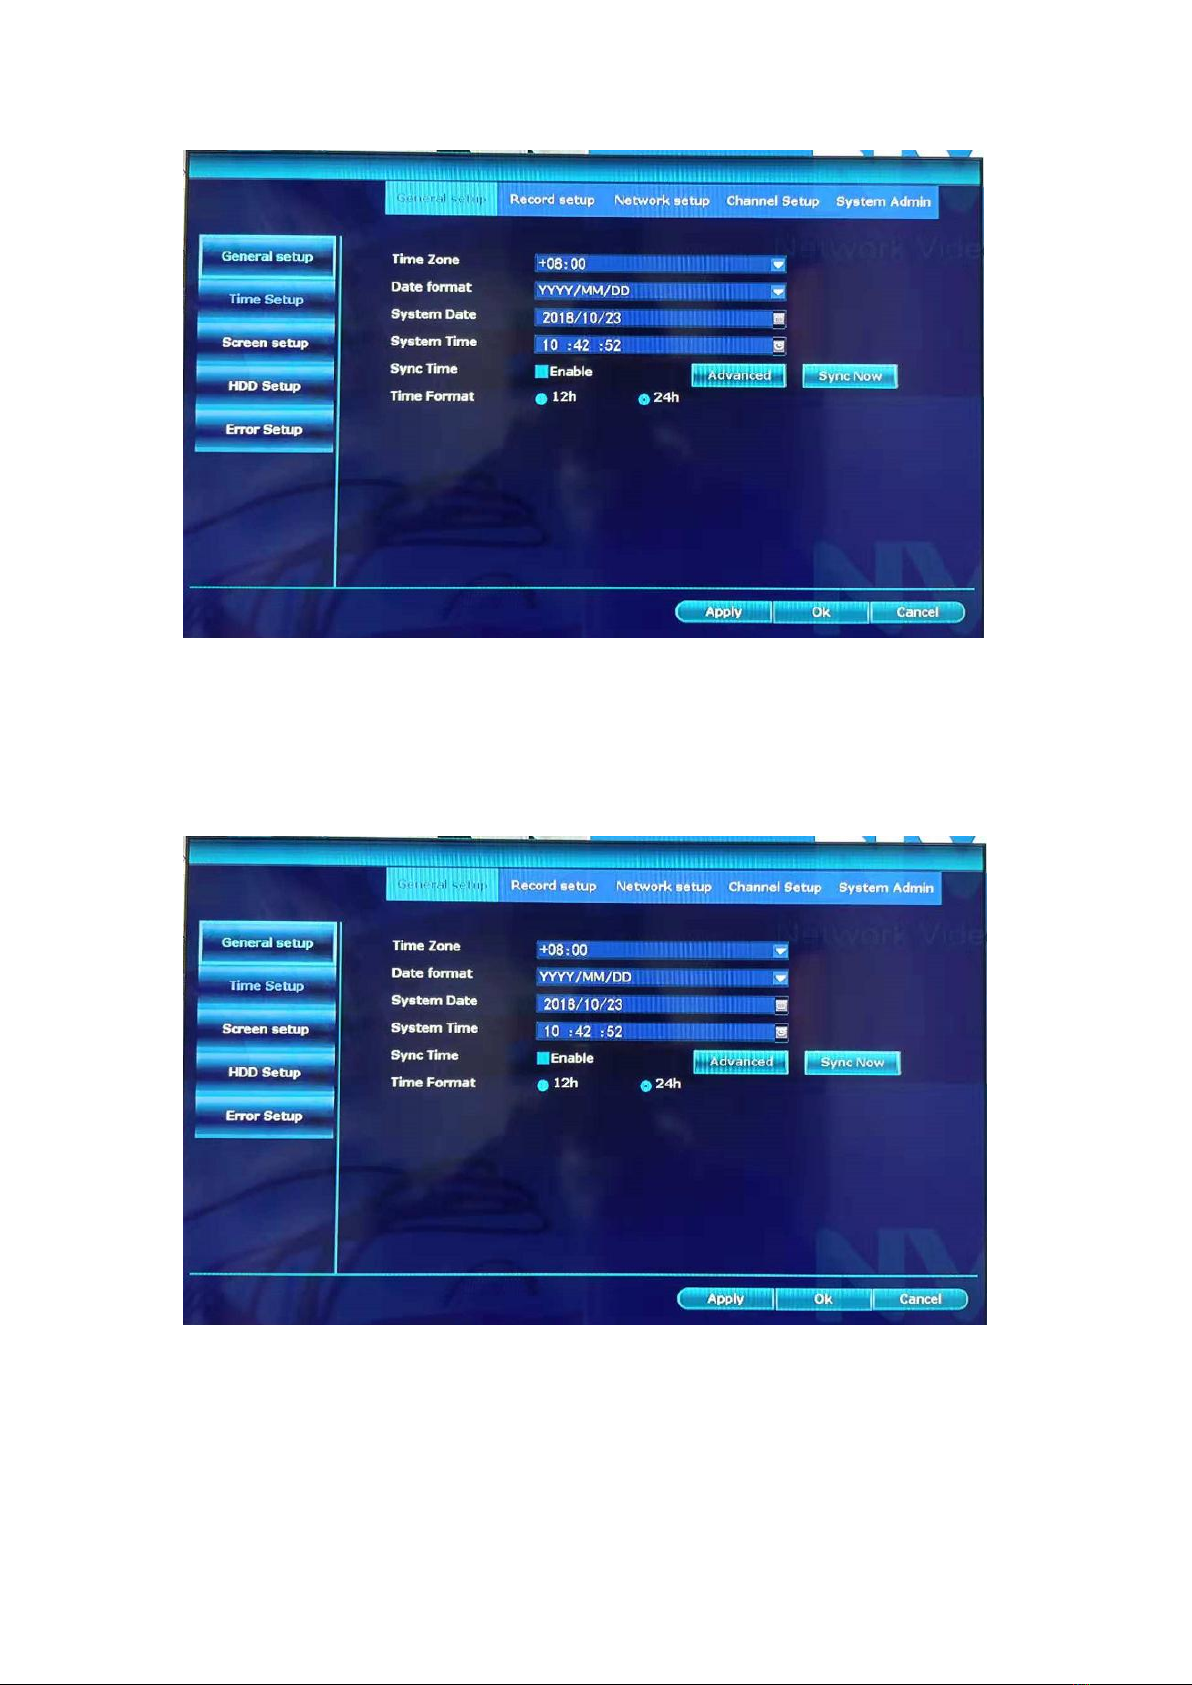
3, general settings: adjust the time and local time is correct. Click Next step.
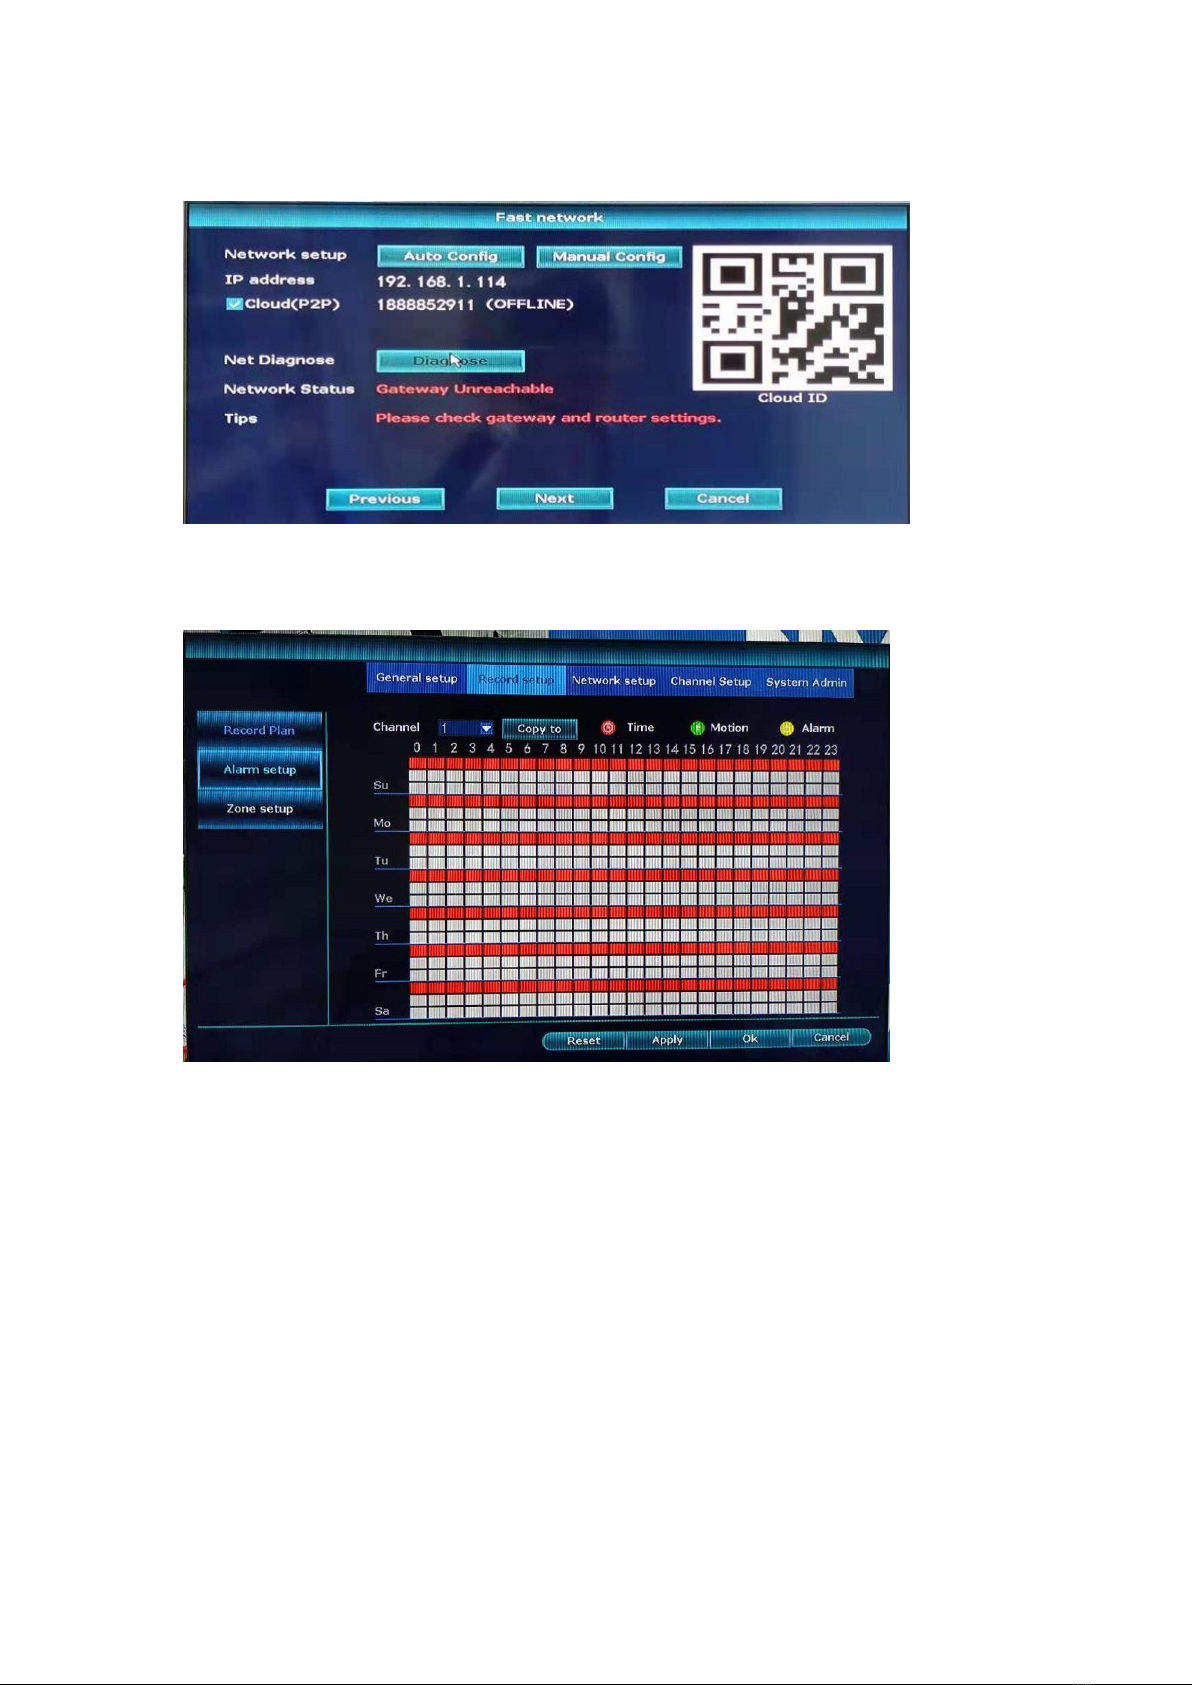
4, one-click Internet access: used to diagnose whether the Internet status is normal. (You can skip this step if you
are not connected to the network). Click next step.
5,HDD settings: After installing the hard disk, it will display the hard disk capacity, usage, status information. (If
the status display is not formatted, you need to click format). Then click Finish.
Ⅵ: other function settings
A.Encoding format setting
Click the right mouse button to enter the menu list and select System Settings. Select Channel Settings - Encoding
Settings. (The default access to the recorder is the H.264 encoding format. If you connect the H.265 camera to the
H.265 encoding format, each channel can be changed to save hard disk storage space.)
9/ 17
B,Screen resolution setting:
System Settings—General Settings—Screen Settings. (The default resolution is 1280*1024. If you are connected
to a 1080P HD display, you can modify the resolution to 1080P, and the monitor screen will be clearer; if you are
not sure if your monitor resolution is 1080P, please do not modify it.)
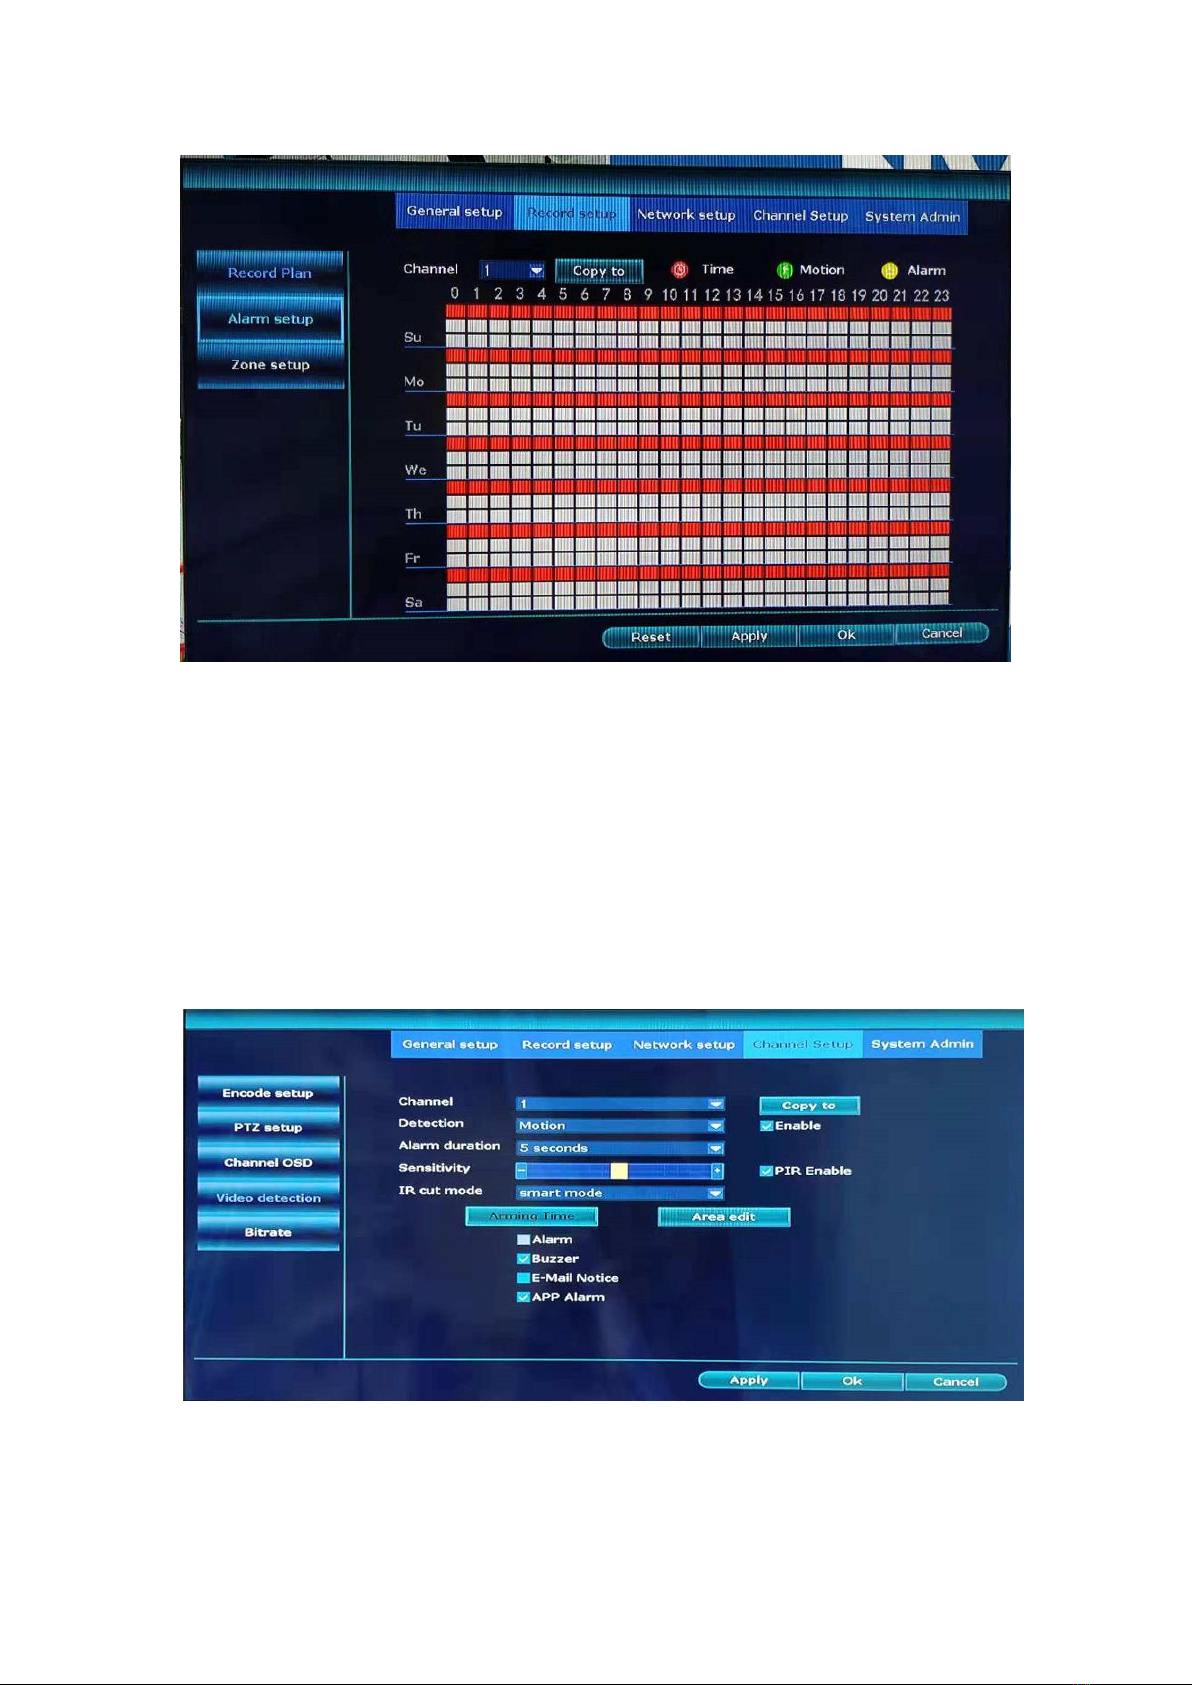
C,Video settings:
System Settings - Recording Settings - Recording Plan. Red stands for timer recording; green stands for motion
detection recording; (only timer recording is enabled by default. You can choose to enable motion detection
recording. This makes it easier to find key video clips during playback.)
10 / 17
D,PIR function settings:
System Settings - Channel Settings - Video Detection.
Remark:A camera with a PIR function needs to be ticked after the PIR is turned on, and a normal camera needs to
be turned off. (Firstly, look at which channel the camera is equipped with PIR, and which channel camera does not
have PIR. Then select the corresponding channel to see if it needs to be checked.)
Table of contents
Other Cablematic Security System manuals


Popular Security System manuals by other brands


EDM
EDM Solution 6+6 Wireless-AE installation manual

Highway Safety Group
Highway Safety Group EA401 user manual

Siren
Siren LED GSM operating manual

Detection Systems
Detection Systems 7090i Installation and programming manual

Se-Kure Controls
Se-Kure Controls MicroMini SK-4841 instructions

Siemens
Siemens FDM273 manual