Cairox SOLANO EASY PRO User manual

1/52 User Instructions CAIROX 15/12/2021
www.cairox.com
USER INTRUCTIONS
MANUEL D'UTILISATION
SOLANO EASY PRO
Before performing any installation, maintenance or removal work, please read
these instructions carefully. The manufacturer cannot be held responsible for
any damage to persons and/or property if the instructions in this manual are
not followed.
Veuillez lire ce manuel d'utilisation attentivement, avant tout travail
d'installation, de dépose ou d'entretien. Le fabricant ne peut être tenu
responsable d'aucun dommage aux personnes et/ou aux biens si les
instructions de ce manuel n'ont pas été suivies.

2/52 User Instructions CAIROX 15/12/2021
INTRODUCTION.................................................................................................................................4
1IMPORTANT SAFETY INFORMATION......................................................................................4
2MODELS....................................................................................................................................5
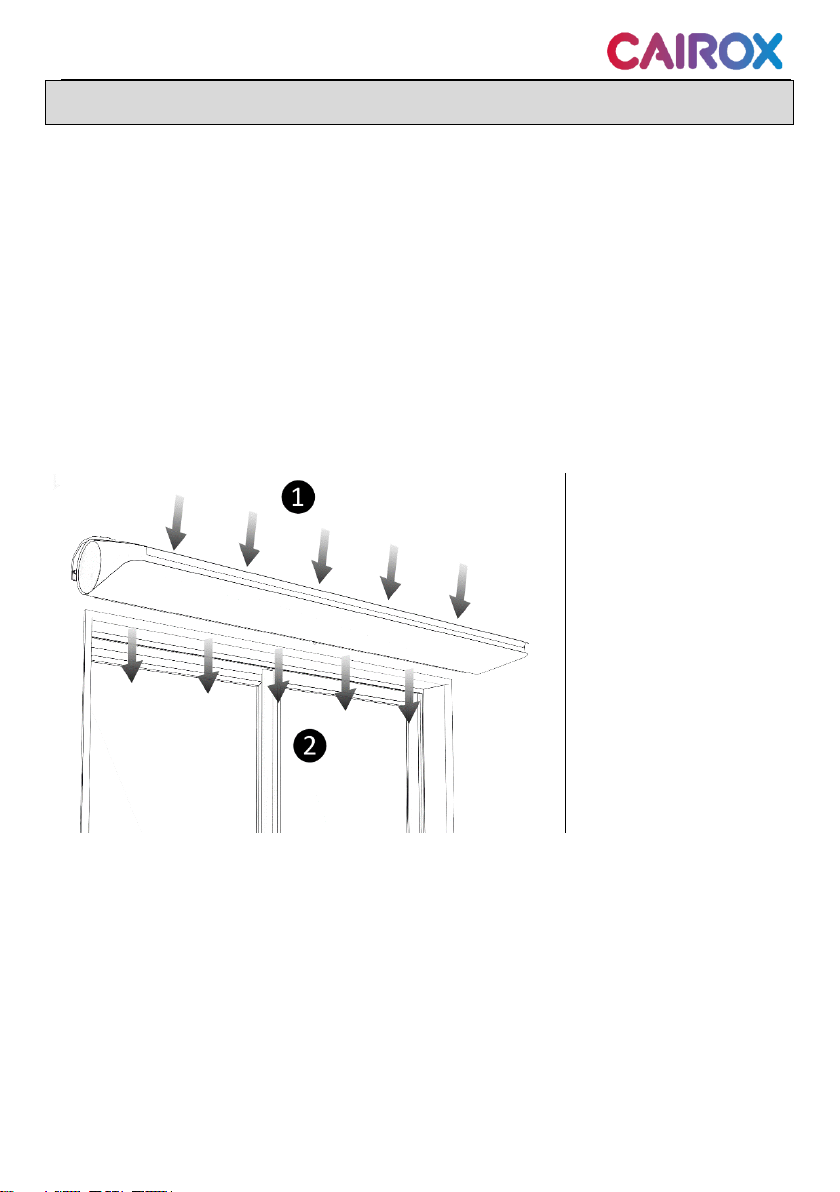
3GENERAL INFORMATION........................................................................................................6
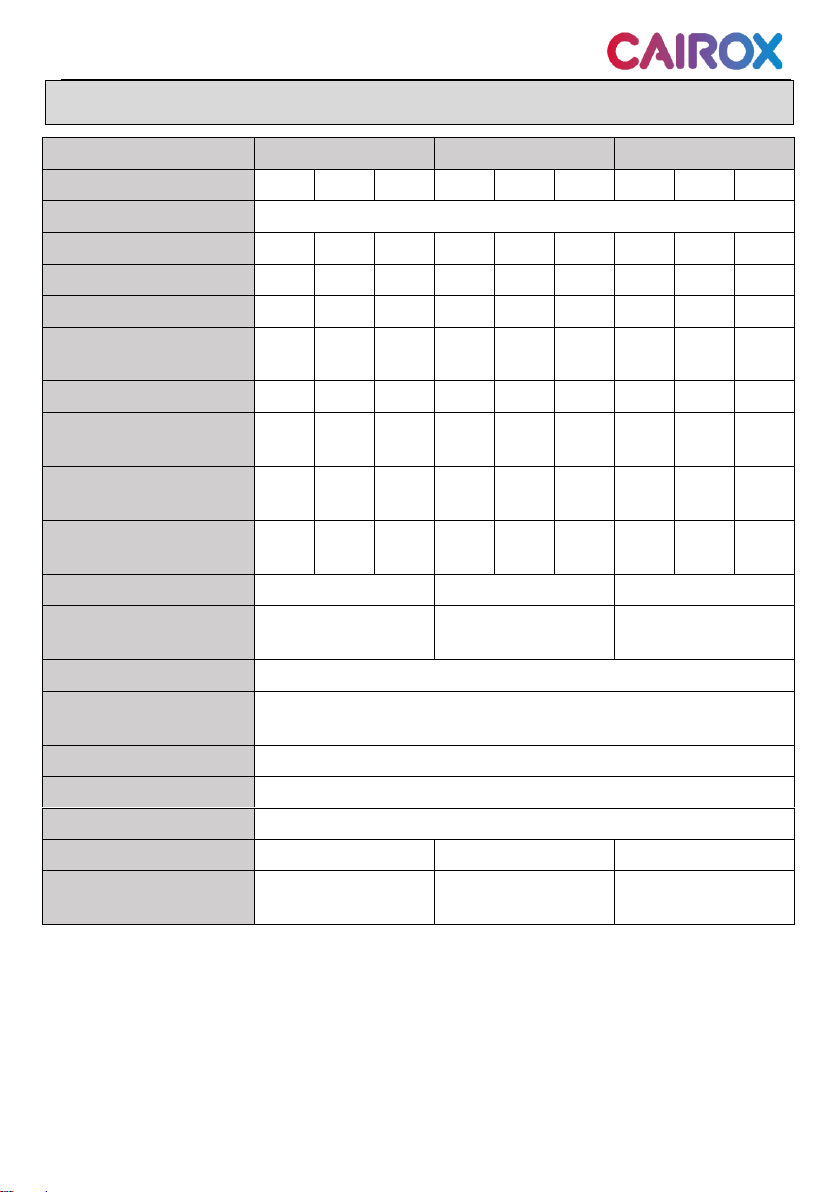
4TECHNICAL DATA SOLANO EASY PRO W .............................................................................7
5TECHNICAL DATA SOLANO EASY PRO E ..............................................................................8
6TECHNICAL DATA SOLANO EASY PRO N..............................................................................9
7DIMENSIONS............................................................................................................................9
8INSTALLATION........................................................................................................................10
9MOUNTING .............................................................................................................................10
10 ELECTRICAL CONNECTION..................................................................................................14
11 CONNECTION DIAGRAM SOLANO EASY PRO N/W.............................................................15
12 CONNECTION OF HYDRAULIC INSTALLATION....................................................................16
13 PARAMETERS OF THE HEATING MEDIUM...........................................................................18
14 CONNECTION DIAGRAM SOLANO EASY PRO E..................................................................18
15 CONTROLS –OPTIONAL ELEMENTS ...................................................................................19
16 CONNECTION DIAGRAM SOLANO EASY PRO N/W S-TOUCH + S-ECM.............................21
17 CONNECTION DIAGRAM SOLANO EASY PRO E S-TOUCH + S-ECM .................................22
18 ADJUSTMENT OF OUTLET GRILLE.......................................................................................23
19 FILTER INSTALLATION ..........................................................................................................23
20 OPERATION............................................................................................................................24
21 CLEANINING AND MAINTENANCE........................................................................................24
22 COMPLIANCE WITH 2009/125/EC..........................................................................................25
23 CONFORMITY WITH WEEE DIRECTIVE 2012/19/UE ............................................................25
24 CONCLUSION.........................................................................................................................26

3/52 User Instructions CAIROX 15/12/2021
INTRODUCTION...............................................................................................................................27
1INFORMATIONS IMPORTANTES RELATIVES A LA SÉCURITÉ............................................27
2MODÈLES ...............................................................................................................................29
3GÉNÉRALITÉS........................................................................................................................30
4SOLANO EASY PRO W DONNÉES TECHNIQUES ................................................................31
5SOLANO EASY PRO E DONNÉES TECHNIQUES .................................................................32
6SOLANO EASY PRO N DONNÉES TECHNIQUES .................................................................33
7DIMENSIONS..........................................................................................................................33
8INSTALLATION........................................................................................................................34
9FIXATION................................................................................................................................34
10 RACCORDEMENT ÉLECTRIQUE...........................................................................................38
11 SCHÉMA DE CONNEXION SOLANO EASY PRO N/W ...........................................................39
12 RACCORDEMENT DE L'INSTALLATION HYDRAULIQUE......................................................40
13 PARAMÈTRES DE L’AGENT CHAUFFANT ............................................................................42
14 SCHÉMA DE CONNEXION SOLANO EASY PRO E................................................................42
15 COMMANDES - ÉLÉMENTS OPTIONNELS............................................................................43
16 SCHÉMA DE CONNEXION SOLANO EASY PRO N/W S-TOUCH + S-ECM...........................45
17 SCHÉMA DE CONNEXION SOLANO EASY PRO E S-TOUCH + S-ECM ...............................46
18 RÉGLAGE DE LA GRILLE DE SORTIE ...................................................................................47
19 INSTALLATION DU FILTRE ....................................................................................................47
20 FONCTIONNEMENT ...............................................................................................................48
21 NETTOYAGE ET ENTRETIEN.................................................................................................48
22 CONFORMITÉ AVEC LA DIRECTIVE 2009/125/EC................................................................49
23 CONFORMITÉ AVEC LA DIRECTIVE WEEE 2012/19/UE.......................................................50
24 CONCLUSION.........................................................................................................................50

4/52 User Instructions CAIROX 15/12/2021
INTRODUCTION
Please read this notice carefully before installation or usage.
Thank you for purchasing the SOLANO EASY PRO air curtain. The manufacturer
reserves the right to make revisions and changes in the operation manual at any
time and without notice, and also to make changes in the device that do not
influence its operation. This manual is an integral part of the device and it must
be delivered to the user together with the device. In order to ensure correct
operation of the equipment, get thoroughly acquainted with this manual and
keep it for the future.
1IMPORTANT SAFETY INFORMATION
The device is powered by dangerous voltage. Always disconnect the device from
the power supply before servicing or accessing its internal components.
Do not insert your fingers or any objects inside the device.
Do not cover the device.
Before installing, connecting, starting up, using and maintaining the device,
please read this manual completely.
After receiving the product, check that it has not been damaged during transport.
If the product appears to be damaged, DO NOT START TO MOUNT THE DEVICE;
instead, you must immediately report the damage to the carrier.
The device must be mounted in a stable way and in accordance with the
instructions, in a place that can be easily accessed, thus ensuring the possibility
of carrying out repairs and routine maintenance, as well as allowing easy and
safe disassembly of the device.
The stability and durability of installation of the device depends on the structure
of the building (in particular walls and ceilings). The person performing the
assembly should take these conditions into account when mounting the device.
The technical documentation should be kept in a safe place, easily accessible to
the user and service technician.
The nameplate is located next the cable glands on the top of the device.
Always test the operation of the device after installation.

5/52 User Instructions CAIROX 15/12/2021
The power connection shall be performed only by an authorized person.
The device is not equipped with a thermostat that controls the room
temperature. Do not use the device in small rooms where there are people who
are not able to leave the premises alone. Above mentioned does not apply to
rooms with constant supervision.
The device requires periodic inspections in accordance with the instructions in
this manual.
Do not hang/put pressure on the device.
Do not place any objects on the device or hang anything on the connection stubs.
The product should be stored and assembled out of the reach of small children.
The device is dedicated to work indoors with a maximum air dustiness of 0.3 g /
m3. The device has elements made of aluminum, copper and galvanized steel and
cannot be used in an corrosive environment. Equipment cannot be used in an
environment where oil mist is present.
This equipment may be used by children that are at least 8 years old, by persons
with reduced physical and mental abilities and persons with no experience and
knowledge of the equipment, on condition that the supervision or instruction
regarding correct use of the equipment in a safe manner is provided and the
possible threats are understood. The device cannot be used by children to play.
Unattended children should not clean or maintain the equipment.
The device in electric version (EASY PRO E) may emit a smell of burning dust at
first start up or if it is starting after a long standstill.
2MODELS
The SOLANO EASY PRO device group includes the following models:
EASY PRO-W-100 –curtain with water heat exchanger,
EASY PRO-W-150 –curtain with water heat exchanger,
EASY PRO-W-200 –curtain with water heat exchanger,
EASY PRO-E-100 –curtain with electric heaters,
EASY PRO-E-150 –curtain with electric heaters,
EASY PRO-E-200 –curtain with electric heaters,
EASY PRO-N-100 –curtain without heat exchanger,
EASY PRO-N-150 –curtain without heat exchanger.
EASY PRO-N-200 –curtain without heat exchanger.
EASY PRO-W/N/E (100/150/200) –air curtains in standard version with 3-step fan.

6/52 User Instructions CAIROX 15/12/2021
3GENERAL INFORMATION
EASY PRO air curtain is a high-quality device that, by creating an air barrier,
reduces heat exchange losses. The device is dedicated ONLY for indoor use. The
EASY PRO air curtain is intended for horizontal installation above a door opening
or vertical installation with a door opening with a maximum height of 3.2 m*.
The use of a heated air curtain (W or E) is recommended for public buildings .
Under pressure in the building significantly reduces the efficiency of the air
barrier, the ventilation system should be balanced.
At a wind speed of more than 3 m/s, the heated version of air curtain should be
used to increase user’s comfort.
* according to ISO 27327-1
➊inlet
➋outlet
PIC. 3.1 Direction of airflow

7/52 User Instructions CAIROX 15/12/2021
4TECHNICAL DATA SOLANO EASY PRO W
EASY PRO W-100
EASY PRO W-150
EASY PRO W-200
STEP
III
II
I
III
II
I
III
II
I
Power supply [V/Hz]
1N 230/50
Power consumption [W]
115
90
75
165
110
90
230
150
115
Current consumption [A]
0,5
0,4
0,3
0,7
0,5
0,4
1,0
0,6
0,5
Air volume [m3/h]*
1100
900
750
1950
1450
1200
2850
1800
1400
Air volume with filter (Coarse
30%) [m3/h]*
750
650
600
1300
1100
1000
1900
1600
1350
Range [m]*
3,2
2,8
2,1
3,2
2,8
2,1
3,2
2,8
2,1
Acoustic pressure level
[dB(A)]** - 3 m
55,5
50,5
46
57
48,5
45
59
46
38
Acoustic pressure level
[dB(A)]** - 5 m
54,5
49,5
45
56
47,5
44
58
45
37
Acoustic power level
[dB(A)]***
70,5
65,5
61
72
63,5
59
74
61
53
Weight [kg]
16,2
21,5
26,9
Weight of unit filled with
water [kg]
16,8
22,4
28,1
IP
20
Max. operating temperature
[°C]
30
Connection stub [‘’]
½ internal thread connection
Max. Water pressure [MPa]
1,6
Max. Water temperature [°C]
110
Heating power [kW]****
1,2 –12,1
2,6 –21,0
3,7 –29,3
Temperature increase
(ΔT)[°C]****
3,0 –32,5
4,0 –32,0
4,0 –30,5
* according to ISO 27327-1;
** Acoustic pressure level has been measured in a 1500m3space with a medium sound absorption coefficient, directional
factor: Q=2;
*** Acoustic power level according to ISO 27327-2;
**** Range of heating powers and temperatures specified for the parameters: III fan speed, heating medium temperature
40/30 ° C inlet temperature 20 ° C - III fan speed, heating medium temperature 110/90 ° C at the device inlet 0 ° C.

8/52 User Instructions CAIROX 15/12/2021
5TECHNICAL DATA SOLANO EASY PRO E
EASY PRO E-100
EASY PRO E-150
EASY PRO E-200
STEP
III
II
I
III
II
I
III
II
I
Power supply [V/Hz]
3N 400/50
1N 230/50
Fan power consumption [W]
130
95
80
195
115
95
250
165
165
Fan current consumption [A]
0,5
0,4
0,3
0,8
0,5
0,4
1,0
0,7
0,7
Air volume [m3/h]*
1300
950
800
2200
1500
1250
3000
1850
1850
Range [m]*
3,2
2,8
2,1
3,2
2,8
2,1
3,2
2,8
2,8
Acoustic pressure level
[dB(A)]** - 3 m
56,5
49
44
55
46
41
58
42
42
Acoustic pressure level
[dB(A)]** - 5 m
55,5
48
43
54
45
40
57
41
41
Acoustic power level
[dB(A)]***
71,5
64
59
70
61
56
73
57
57
Weight [kg]
15,1
19,6
24,6
IP
20
Max. operating temperature
[°C]
30
3N 400/50
STEP
III
II
I
III
II
I
III
II
I
Heating elements power
[kW]
5
9
12
Heating elements current
consumption [A]
8,5
13
17,3
Temperature increase (ΔT)
[°C]
20
22
24
20
26
32
19
29
29
1N 230/50
Heating elements power
[kW]
2
3
4
Heating elements current
consumption [A]
8,5
13
17,3
Temperature increase (ΔT)
[°C]
4
5
7
6
8
10
6
10
10
* according to ISO 27327-1;
** Acoustic pressure level has been measured in a 1500 m3space with a medium sound absorption coefficient, directional
factor: Q=2;
*** Acoustic power level according to ISO 27327-2;

9/52 User Instructions CAIROX 15/12/2021
6TECHNICAL DATA SOLANO EASY PRO N
EASY PRO N-100
EASY PRO N-150
EASY PRO N-200
STEP
III
II
I
III
II
I
III
II
I
Power supply [V/Hz]
1N 230/50
Power consumption [W]
140
100
80
200
120
95
230
150
110
Current consumption [A]
0,6
0,4
0,3
0,8
0,5
0,4
1,0
0,6
0,5
Air volume [m3/h]*
1400
1000
800
2300
1550
1300
3000
1900
1400
Air volume with filter (Coarse
30%) [m3/h]*
1000
900
750
1600
1350
1200
2200
1800
1800
Range [m]*
3,2
2,8
2,1
3,2
2,8
2,1
3,2
2,8
2,1
Acoustic pressure level
[dB(A)]** - 3 m
58
49,5
43,5
57
45,5
42
57
42
34,5
Acoustic pressure level
[dB(A)]** - 5 m
57
48,5
42,5
56
44,5
41
56
41
33,5
Acoustic power level [dB(A)]***
73
64,5
58,5
72
60,5
56
72
57
49,5
Weight [kg]
14,7
19,0
23,8
IP
20
Max. operating temperature
[°C]
30
7DIMENSIONS
All values are given in millimeters
PIC. 7.1 EASY PRO Dimensions

10/52 User Instructions CAIROX 15/12/2021
A [mm]
B [mm]
EASY PRO N/W/E-100
946
1000
EASY PRO N/W/E-150
1446
1500
EASY PRO N/W/E-200
1946
2000
8INSTALLATION
Air curtains must be installed as close as possible to the door opening and cover:
-the entire width (applies to horizontal installation),
-full height (applies to vertical mounting).
CORRECT
WRONG
CORRECT
WRONG
9MOUNTING
EASY PRO curtains are designed for horizontal mounting using 2 dedicated
brackets or 4 M8 threaded rods (max. threaded rods length 1 m). It is also
possible to install the curtains vertically using 2 brackets. During assembly, keep
the minimum distances from the partitions as shown in the figure below. In
addition, when installing the curtain, free access to the side of the device should
be taken into account (required minimum 100 mm). The electric curtain
(EASY PRO E) cannot be installed directly under the power socket. The device
must be leveled before starting work.
PIC. 8.1 Proper horizontal installation
PIC. 8.2 Proper vertical installation

11/52 User Instructions CAIROX 15/12/2021
PIC. 9.3 Horizontal installation on 4 threaded rods
M8 with 2 pcs. dedicated brackets
PIC. 9.4 Vertical mounting with 2 pcs. dedicated
brackets
PIC. 9.1 Horizontal installation on dedicated
brackets
PIC. 9.2 Horizontal installation on threaded
rods M8

12/52 User Instructions CAIROX 15/12/2021
EASY PRO
Installation pins spacing AxB [mm]
N/W/E-100;
946x40
N/W/E-150;
1446x40
N/W/E-200;
1946x40
The brackets should be mounted to the
wall with:
Expansion fixings x 4 pcs * - properly
selected for the type of partition
Washers x 4 pcs *
Anchor bolts x 4 pcs * - maximum size
M10
* Not included
PIC. 9.6 Threaded rods spacing
PIC. 9.7 Mounting brackets spacing
PIC. 9.5 Device leveling and countering with nuts

13/52 User Instructions CAIROX 15/12/2021
PIC. 9.8 Unscrew the bolts
PIC. 9.9 Mounting the unit with brackets using bolts

14/52 User Instructions CAIROX 15/12/2021
10 ELECTRICAL CONNECTION
- The maximum outer diameter of the cable sleeve is 14.0 mm;
- The minimum outer diameter of cable sleeve is 4.0 mm;
- Maximum wire diameter 4,0 mm2.
1. The power connection should be made in accordance with the technical
documentation. The device installation should always be carried out in
accordance with applicable local safety standards.
2. The cross-section and type of cable should be selected by the designer.
(Always make sure that the disconnectors and protective switches are properly
sized).
3. Make sure that the connection of power supply and controllers to the Easy Pro
curtain is made in accordance with the electrical specifications and the
instructions included in the connection diagrams in the technical documentation.
4. Before connecting the power supply, check that the mains voltage corresponds
to the voltage on the device's type plate.
PIC. 10.2 Remove the screws from the front
PIC. 10.3 Open the service hatch
PIC. 10.4 Put the cable through the gland
PIC. 10.1 Remove the screw next to the grill

15/52 User Instructions CAIROX 15/12/2021
5. Check the power connection before connecting the air curtain.
6. Starting the device without connecting the grounding wire is not allowed.
7. Protect the power cord against pulling out by clamping the PG16 or PG11 cable
gland
8. Tighten all connection cables in the block properly
9. In the event of a hazard due to unintentional reset of the thermal switch, this
curtain (EASY PRO E) should not be powered by an external connecting device
such as a time switch, or connected to a circuit that is regularly switched off and
switched on during use.
10. Do not start the device with the service hatch open.
11 CONNECTION DIAGRAM SOLANO EASY PRO N/W
❶Power supply: 1N 230V/50Hz (min. 3x1,5mm2; Protection B4)
❷Valve with actuator S-V-3-½; S-V-2-½(min. 3x0,75mm2)
❸Door switch S-DS-RMAG/S-DS-MEC (door opened –closed switch)(min.
2x0,5mm2)
❹Air curtain step switch witch thermostat S-C (min. 5x0,5mm2)
PIC. 11.1 Power supply 1N~230V / 50 Hz + S-C

16/52 User Instructions CAIROX 15/12/2021
In the event of a hazard arising from the unintentional reset of the thermal
switch, this equipment should not be powered by an external connecting device,
such as a time switch, or a disconnector connected to the circuit, which is
regularly switched OFF and ON during use.
VALVE PARAMETERS:
-S-V-3-½” - Three-way valve ½” with
actuator
-S-V-2-½” - Two-way valve ½” with
actuator
Class of protection: IP20
Supply voltage:1N ~230V/50 Hz
Max. Medium temperature: + 93°C
Max. Operating pressure: 2.1Mpa
S-V-2 1⁄2 ”Kvs: 3.0 m3/h
S-V-3 1⁄2 ”Kvs: 3.4 m3/h
Motor running time: 18 s
A –Return pipe water supply
AB –Valve water supply
B –Exchanger water supply
12 CONNECTION OF HYDRAULIC INSTALLATION
PIC. 12.1 Delivery of the heating medium
PIC. 12.2 Bleeding / air release valve

17/52 User Instructions CAIROX 15/12/2021
Disconnect the curtain power supply before connecting the water system.
The connection should be made without stress. It is recommended to use flexible
ducts supplying the heating medium.
Water supply should be connected to the connector marked with the
symbol ↓IN.
The installation with the heating medium must be protected against the increase
of the heating medium pressure above the permissible value (1.6 MPa).
Before starting the device, check the correct connection of the heating medium
and the system for leaks.
During assembly of the installation it is absolutely necessary to immobilize the
exchanger's connector pipes (counter).
After filling the system with heating medium, check the tightness of the hydraulic
connections, including the built-in vent.
1. It is recommended to use bleeding/air release valves at the highest point of
the installation. When installing the device vertically, bleeding should be done
using the built-in valve (PIC. 12.2) while protecting the remaining elements of the
device against water damage/flooding.
2. In the event that the water from the device is drained for a longer period of
time, the exchanger tubes should be blown and dried with compressed air.
3. Installation should be carried out in such a way that in the event of a failure it
is possible to dismantle the device (use of flexible hoses is recommended). For
this purpose, use shut-off valves next to the device (PIC. 12.3).
ZK - ball valve
ZO - bleeding valve
ZR - balancing valve
ZD - drainage valve
FS –mesh filter
S-FLEX-1/2 - flexible
hoses
PIC. 12.3 Connection example of hydraulic components

18/52 User Instructions CAIROX 15/12/2021
13 PARAMETERS OF THE HEATING MEDIUM
The water heat exchanger can be supplied with water or glycol solutions up to
60% . The heat exchanger tubes are made of copper. The heating medium should
not cause corrosion of this material. In particular, the parameters as below
should be provided.
Parameter
Value
pH
7,5-9,0
Pollution
Free of sediments/particles
Total hardness
[Ca2+,Mg2+]/ [HCO3-] > 0.5
Oil and grease
<1 mg/l
Oxygen
<0.1mg/l
HCOᵌ
60-300 mg/l
Ammonia
< 1.0 mg/l
Sulphides
< 0.05 mg/l
Chlorides, Cl
<100 mg/l
14 CONNECTION DIAGRAM SOLANO EASY PRO E
PIC. 14.1 Power supply 1N (~230V / 50 Hz) and 3N (~400V / 50 Hz) + S-C.

19/52 User Instructions CAIROX 15/12/2021
❶Power supply:
3N 400V/50Hz:
EASY PRO E-100 (min. 5x2,5mm2;
Protection B10)
EASY PRO E-150 (min. 5x2,5mm2;
Protection B16)
EASY PRO E-200 (min. 5x4,0mm2;
Protection B20)
❷Power supply:
1N 230V/50Hz:
EASY PRO E-100 (min. 3x1,5mm2;
Protection B10)
EASY PRO E-150 (min. 3x1,5mm2;
Protection B16)
EASY PRO E-200 (min. 3x2,5mm2;
Protection B20)
In the event of a hazard arising from the unintentional reset of the thermal
switch, this equipment should not be powered by an external connecting device,
such as a time switch, or a disconnector connected to the circuit, which is
regularly switched OFF and ON during use.
15 CONTROLS –OPTIONAL ELEMENTS
S-C
FAN AUTO - fan operation depends on
the temperature.
FAN CONT - continuous fan operation
HEAT - heating function
FAN - deactivate the thermostat for FAN
CONT
COOL - reversal of the operation logic of
the thermostat
S-TOUCH + S-ECM
S-Touch:
Temperature setting range: +5 ... + 35oC
Operating temperature range: -10 ... +
60oC Protection degree: IP30
Supply voltage: 24 VDC
S-ECM:
Operating temperature range: -10 ... +
60oC Protection degree: IP54
Supply voltage: 230 V / 50 Hz
PIC. 15.1 3-step regulator with built in
thermostat.
PIC. 15.2 Touch screen controller + control
system.

20/52 User Instructions CAIROX 15/12/2021
DOOR SWITCH
Door switch
S-DS-RMAG
S-DS-MEC
S-DS-MAG
Operation temperature
range
-5…+60°C
-10…+80°C
-5…+60°C
Cooperates with
S-C
S-C
S-TOUCH + S-ECM
Protection degree
IP65
IP66
IP64
Contacts current capacity
5A
3A
0,5A
Power supply
230V
230VAC
Max. 175VDC
Weight
800g
200g
100g
Installation type
Surface (wall)
Surface (wall)
Surface (wall)
PIC. 15.3 S-DS-RMAG
PIC. 15.4 S-DS-MEC
PIC. 15.5 S-DS-MAG
Table of contents
Languages:
Other Cairox Heater manuals
Popular Heater manuals by other brands

Clarke
Clarke Devil 370P Operating & maintenance instructions

Stadler Form
Stadler Form Anna operating instructions

HearthRite
HearthRite HB20ML-1 OWNER'S OPERATION AND INSTALLATION MANUAL

Nu-Flame
Nu-Flame Fenton Balanced Flue Use, installation & servicing instructions

Dyson
Dyson AM05 operating manual

Jaga
Jaga Eyecatchers Iguana Circo Corner Mounting instructions