TAM
432SA
CANCELLI AUTOMATICI
-> Met TAM zenders die reeds actief zijn
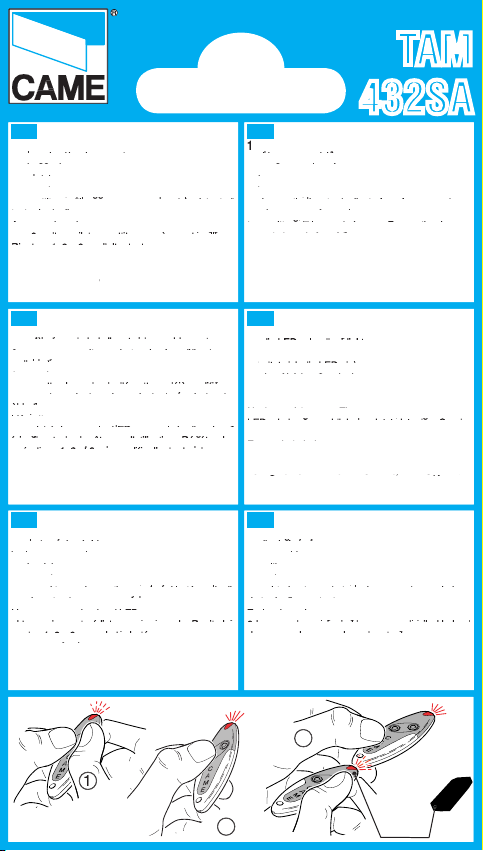
- Druk gelijktijdig op de twee toetsen totdat de Led
- Druk gelijktijdig op de twee toetsen totdat de Led
sneller knippert;
- Druk gelijktijdig op de twee toetsen totdat de Led
sneller knippert;
2
sneller knippert;
- Druk dan op de te activeren toets ( de Led
sneller knippert;
- Druk dan op de te activeren toets ( de Led
sneller knippert;
- Druk dan op de te activeren toets ( de Led
brandt);
- Druk dan op de te activeren toets ( de Led
- Binnen 10 seconden, plaats de actief zender aan
brandt);
- Binnen 10 seconden, plaats de actief zender aan
brandt);
de achterkant van de te coderen zender en druk op
- Binnen 10 seconden, plaats de actief zender aan
de achterkant van de te coderen zender en druk op
- Binnen 10 seconden, plaats de actief zender aan
de achterkant van de te coderen zender en druk op
de te dupliceren toets.
de achterkant van de te coderen zender en druk op
Zodra de code opgeslagen wordt, knippert de LED
de te dupliceren toets.
Zodra de code opgeslagen wordt, knippert de LED
de te dupliceren toets.
3 keer en de zender is klaar voor gebruik. Herhaal
Zodra de code opgeslagen wordt, knippert de LED
3 keer en de zender is klaar voor gebruik. Herhaal
Zodra de code opgeslagen wordt, knippert de LED
deze procedure voor de andere toetsen.
3 keer en de zender is klaar voor gebruik. Herhaal
deze procedure voor de andere toetsen.
3 keer en de zender is klaar voor gebruik. Herhaal
-> Voor een NIEUWE INSTALLATIE
RAADPLEEG DE DOCUMENTATIE VAN DE STUURKAST OM DE
EERSTE ZENDER TE PROGRAMMEREN, DAARNA VOLG DEZELFDE
- pulse juntos los 2 botones hasta que el Led
- pulse juntos los 2 botones hasta que el Led
parpadee más rápido;
- pulse juntos los 2 botones hasta que el Led
parpadee más rápido;
2
parpadee más rápido;
- ahora pulse el botón a activar (el Led se
parpadee más rápido;
- ahora pulse el botón a activar (el Led se
parpadee más rápido;
- ahora pulse el botón a activar (el Led se
enciende);
- ahora pulse el botón a activar (el Led se
- antes de transcurridos 10”, apoye sobre la parte
enciende);
- antes de transcurridos 10”, apoye sobre la parte
enciende);
trasera el transmisor activo y pulse el botón a dupli-
- antes de transcurridos 10”, apoye sobre la parte
trasera el transmisor activo y pulse el botón a dupli-
- antes de transcurridos 10”, apoye sobre la parte
car durante algunos segundos.
trasera el transmisor activo y pulse el botón a dupli-
car durante algunos segundos.
trasera el transmisor activo y pulse el botón a dupli-
Una vez memorizado, el LED parpadeará 3 veces y
car durante algunos segundos.
Una vez memorizado, el LED parpadeará 3 veces y
car durante algunos segundos.
el transmisor estará listo para ser usado. Repita los
Una vez memorizado, el LED parpadeará 3 veces y
el transmisor estará listo para ser usado. Repita los
Una vez memorizado, el LED parpadeará 3 veces y
puntos 1, 2 y 3 para el otro botón.
el transmisor estará listo para ser usado. Repita los
puntos 1, 2 y 3 para el otro botón.
el transmisor estará listo para ser usado. Repita los
-> Para una NUEVA INSTALACIÓN
puntos 1, 2 y 3 para el otro botón.
-> Para una NUEVA INSTALACIÓN
puntos 1, 2 y 3 para el otro botón.
CONSULTE LA DOCUMENTACIÓN DEL CUADRO ELÉCTRICO PARA
MEMORIZAR EL 1ER TRANSMISOR Y SIGA EL PROCEDIMIENTO
ANTEDICHO PARA DUPLICARLO.
-> Mit bereits aktivierten TAM
- die beiden Tasten gemeinsam so lange drücken,
bis die LED schneller blinkt;
- die beiden Tasten gemeinsam so lange drücken,
bis die LED schneller blinkt;
- die beiden Tasten gemeinsam so lange drücken,
- nun die zu aktivieriende Taste drücken (es
schaltet sich die LED ein);
- nun die zu aktivieriende Taste drücken (es
schaltet sich die LED ein);
- nun die zu aktivieriende Taste drücken (es
- den Aktiviert-Sender innerhalb von 10 Sekunden
schaltet sich die LED ein);
- den Aktiviert-Sender innerhalb von 10 Sekunden
schaltet sich die LED ein);
an seine Rückseite halten und kurz die zu
kopierende Taste drücken.
Nach erfolgtem Einspeichern, beginnt die
kopierende Taste drücken.
Nach erfolgtem Einspeichern, beginnt die
kopierende Taste drücken.
LED dreimal zu blinken. Jetzt ist der Sender
Nach erfolgtem Einspeichern, beginnt die
LED dreimal zu blinken. Jetzt ist der Sender
Nach erfolgtem Einspeichern, beginnt die
betriebsbereit. Die Punkte 1,2 und 3 für die andere
betriebsbereit. Die Punkte 1,2 und 3 für die andere
Taste wiederholen.
betriebsbereit. Die Punkte 1,2 und 3 für die andere
ZUM EINSPEICHERN DES 1 SENDERS, DIE UNTERLAGEN
DER STEUERKARTE EINSEHEN; DANACH ZUM KOPIEREN
ZUM EINSPEICHERN DES 1 SENDERS, DIE UNTERLAGEN
DER STEUERKARTE EINSEHEN; DANACH ZUM KOPIEREN
ZUM EINSPEICHERN DES 1 SENDERS, DIE UNTERLAGEN
DESSELBEN WIE OBEN BESCHRIEBEN VORGEHEN.
-> Avec des TAM déjà codi és
- appuyez en même temps sur les 2 touches
jusqu’à ce que le led clignote plus rapidement;
- appuyez en même temps sur les 2 touches
jusqu’à ce que le led clignote plus rapidement;
- appuyez en même temps sur les 2 touches
jusqu’à ce que le led clignote plus rapidement;
2
jusqu’à ce que le led clignote plus rapidement;
- appuyez ensuite sur la touche à codi er (le led
jusqu’à ce que le led clignote plus rapidement;
- appuyez ensuite sur la touche à codi er (le led
jusqu’à ce que le led clignote plus rapidement;
- appuyez ensuite sur la touche à codi er (le led
s’allume);
- appuyez ensuite sur la touche à codi er (le led
- une fois le led allumé, vous avez 10” pour
s’allume);
- une fois le led allumé, vous avez 10” pour
s’allume);
transmettre le code de l’émetteur déjà codi é en
- une fois le led allumé, vous avez 10” pour
transmettre le code de l’émetteur déjà codi é en
- une fois le led allumé, vous avez 10” pour
appuyant pendant quelques instants sur la touche
transmettre le code de l’émetteur déjà codi é en
appuyant pendant quelques instants sur la touche
transmettre le code de l’émetteur déjà codi é en
appuyant pendant quelques instants sur la touche
à copier.
appuyant pendant quelques instants sur la touche
L’émetteur con rme que le code a bien été
à copier.
L’émetteur con rme que le code a bien été
à copier.
enregistré lorsque le LED se met à clignoter 3
L’émetteur con rme que le code a bien été
enregistré lorsque le LED se met à clignoter 3
L’émetteur con rme que le code a bien été
fois. Il est alors prêt pour l’utilisation. Répétez les
enregistré lorsque le LED se met à clignoter 3
fois. Il est alors prêt pour l’utilisation. Répétez les
enregistré lorsque le LED se met à clignoter 3
opérations 1, 2 et 3 pour codi er l’autre touche.
fois. Il est alors prêt pour l’utilisation. Répétez les
opérations 1, 2 et 3 pour codi er l’autre touche.
fois. Il est alors prêt pour l’utilisation. Répétez les
-> Pour une NOUVELLE INSTALLATION
CONSULTEZ LA DOCUMENTATION DU TABLEAU ÉLECTRIQUE
POUR MÉMORISER LE 1ER ÉMETTEUR ET SUIVEZ LA
PROCÉDURE DÉCRITE PLUS HAUT POUR LE COPIER.
-> With TAMs already active
- press the 2 keys together until the LED starts
- press the 2 keys together until the LED starts
ashing more quickly;
- press the 2 keys together until the LED starts
ashing more quickly;
2
ashing more quickly;
- then press the key to activate (the LED comes
ashing more quickly;
- then press the key to activate (the LED comes
ashing more quickly;
- then press the key to activate (the LED comes
on);
- then press the key to activate (the LED comes
- within 10”, place the active transmitter on its back
on);
- within 10”, place the active transmitter on its back
on);
and press the key to duplicate for a few seconds.
- within 10”, place the active transmitter on its back
and press the key to duplicate for a few seconds.
- within 10”, place the active transmitter on its back
After saving, the LED will ash 3 times and the
and press the key to duplicate for a few seconds.
After saving, the LED will ash 3 times and the
and press the key to duplicate for a few seconds.
transmitter will be ready for use. For another key,
After saving, the LED will ash 3 times and the
transmitter will be ready for use. For another key,
After saving, the LED will ash 3 times and the
transmitter will be ready for use. For another key,
repeat steps 1, 2 and 3.
transmitter will be ready for use. For another key,
READ THE MANUAL OF THE ELECTRIC PANEL TO SAVE THE
1ST TRANSMITTER, THEN FOLLOW THE ABOVE PROCEDURE
- premere assieme i 2 tasti no a quando il Led
lampeggia più velocemente;
- premere assieme i 2 tasti no a quando il Led
lampeggia più velocemente;
- premere assieme i 2 tasti no a quando il Led
lampeggia più velocemente;
2
lampeggia più velocemente;
- premere ora il tasto da attivare (il Led si
lampeggia più velocemente;
- premere ora il tasto da attivare (il Led si
lampeggia più velocemente;
- premere ora il tasto da attivare (il Led si
accende);
- premere ora il tasto da attivare (il Led si
- entro 10”, appoggiare alla sua parte posteriore il
accende);
- entro 10”, appoggiare alla sua parte posteriore il
accende);
trasmettitore attivo e premere per qualche istante il
- entro 10”, appoggiare alla sua parte posteriore il
trasmettitore attivo e premere per qualche istante il
- entro 10”, appoggiare alla sua parte posteriore il
trasmettitore attivo e premere per qualche istante il
tasto da duplicare.
trasmettitore attivo e premere per qualche istante il
A memorizzazione avvenuta, il LED lampeggierà
tasto da duplicare.
A memorizzazione avvenuta, il LED lampeggierà
tasto da duplicare.
per 3 volte e il trasmettitore sarà pronto all’uso.
A memorizzazione avvenuta, il LED lampeggierà
per 3 volte e il trasmettitore sarà pronto all’uso.
A memorizzazione avvenuta, il LED lampeggierà
Ripetere 1, 2 e 3 per l’altro tasto.
per 3 volte e il trasmettitore sarà pronto all’uso.
Ripetere 1, 2 e 3 per l’altro tasto.
per 3 volte e il trasmettitore sarà pronto all’uso.
CONSULTARE LA DOCUMENTAZIONE DEL QUADRO ELETTRICO
TRASMETTITORE, QUINDI SEGUIRE LA
O
TRASMETTITORE, QUINDI SEGUIRE LA
O
PROCEDURA SOPRADESCRITTA PER DUPLICARLO.