Camsat ICAM-Mobile HD User manual

www.camsat-cctv.com
TECHNICAL
SUPPORT
tel.+48 52 387 36 58
Mon–Fr 8.00 AM–4.00 PM
Full instructions available on the www.camsat-cctv.com 14
External, wireless system for mobile monitoring
for IP cameras HD and Full HD
QUICK START
ver. 1.0
Feature
Full instructions available on the www.camsat-cctv.com
The mobile camera in transport should be turned off. During start-up of iCam-Mobile system,
follow these steps:
1. Connecng the antennas
2. Mounng the camera
3. Power supply connecon
4. Starng the camera
5.Connecng with system
6. Diagnosing device status
Make sure that both antennas are screwed to the connectors.
The camera must be hung on the mounng bracket.
The camera should be plugged in if used for a long period of me. In other case the camera turns off
when the baery is empty.
The camera will be acvated aer turning the key in the ignion. Remove the key from the ignion.
Panel lights up green LED.
You can get remote access to the system via the iCAM-receiver or other device over WiFi 5GHz.
Make sure the device is properly configured. Aer logging into the Recorder module, check the connecon
to the camera, the disk status and recording status reviewing the last minute of recordings.
Make sure the camera is properly addressed and observes area according to your requirements.
Factory settings of radio links
Actions taken during each system start-up
WARNING
The DHCP server must be turned off so the wireless connection of mobile devices automatically
configures LINKS SETTINGS → Network Settings.
Support recorder
Preview video stream
In the Preview tab (Preview) on the left panel is a list of connected IP cameras.
To start the preview, click one of the following icons:
Running one of the main stream
Running one stream of additional (extra)
Playback and archiving
Playing downloaded video
The configuraon of mobile applicaons to operate recorder
Goolink (P2P connecon)
SSID (network name) CAMSAT
Network password camsat.com
Encrypon WPA2-PSK
Operang mode Video Bridge
Operang channel Auto (36 kanałów pracy, 5 GHz DFS)
IP address 192.168.1.21
Subnet mask 255.255.255.0 (CIDR /24)
DHCP Server Off
User name camsat
User password camsat
Feature Factory default settings
The module allows the recorder to operate up to 4 IP cameras (greater number of cameras results in faster
fulfillment of memory storage, which shortens the length of the recorded material). Additional cameras can be
connected by radio.
To play the recorded materials with a memory module connected to the DVR, go to the Playback (Playback).
Contained therein recordings from connected IP cameras are recorded according to the recording schedule.
Select the desired IP camera from the list on the left side by selecting the hook in their name, and then indicate
the date of the day, which will be loaded video. On the bottom panel are buttons to control playback.
Taking pictures of the material is useful in the process of doing the documentation of the events. You can also
download a piece of video material to move it to another device (only in Internet Explorer).
Materials can be downloaded when you click the icon . Then select the channel you will be saved recordin-
gs, specify a time range, and indicate where to store video files. Download starts by clicking the start button.
You can access the recorder via mobile devices. Applications are available for download from the platform
Google Play or Apple App Store. To connect to a mobile camera system, connect to the Wi-Fi (not all devices
support 5GHz band). The connection can be established by scanning the QR code or by specifying the applica-
tion IP address of the registrar, port and user data.
After running the application, click the "+" button to add a new device. Indicate
the serial number of the device in three ways: by scanning the QR code, prescri-
bing serial number UID manually or automatically search for the device on the
LAN. Then enter your username and password to access the recorder (fabrycz-
niy username: admin password: none) QR code is on the menu QR code recorder
(Config> Device Parameters> QR code).
Materials can be played using any application or software for watching movies AVI. The recommended applica-
tion to play videos in AVI format is VLC.
EUEU
POLISH
MARK
POLISH
MARK

www.camsat-cctv.com
Full instructions available on the www.camsat-cctv.com Full instructions available on the www.camsat-cctv.com
First start-up
WARNING
Before any start-up, connect both antennas! Trying to run the machine without screwed antennas may
cause damage to the radio link.
Connecting the power supply of 230V
When using the 230V, connect iCAM-Mobile power plug into the socket adapted to the conditions of
use, ie. external hermetic socket or connector plug enclosed in another hermetic enclosure / box.
Mounting at the installation site / monitored area
Starting at the destination point / monitored
Remote access to the system ICAM-MobileHD
Wireless access to the system
Access to iCAM-MobileHD system with Android or iOS
Recorder
Log in to recorder
WARNING
Kit (iCAM-Mobile with IP camera) should be mounted only to solid, stable construction of walls and poles.
The installer is responsible for proper installation of the camera!
In the selected location you should mount wall bracket adapter with anchors to the wall or pole handle
adapter with steel bands.
Additionally, you should install steel safety cable to a separate anchors or any other part of the pole. Safety
cable must be mounted to a solid, robust construction, which will guarantee the iCAM with the camera will
be hold in case of an emergency.
Slide the camera (antenna up) into the holder, and then attach the safety cable and padlock to secure the
camera or twist two caps on the bolts to prevent unauthorized assembly.
Plug iCAM-Mobile power plugs into the socket adapted to the conditions of use, ie. the outer hermetic
connector or connector plug enclosed in another hermetic enclosure / box.
After turning the ignition key to the "I" it should light up two LEDs on the external panel (STATUS NVR, Power
MAIN). iCAM-MobileHD starts to record the image, and full remote access to the device will be possible.
WARNING
After starting the machine, remove the key from the ignition, leaving it in position "1" to prevent the the
shutdown of the system by third parties.
WARNING
After starting the machine, remove the key from the ignition, leaving it in position "1" to prevent the the
shutdown of the system by third parties.
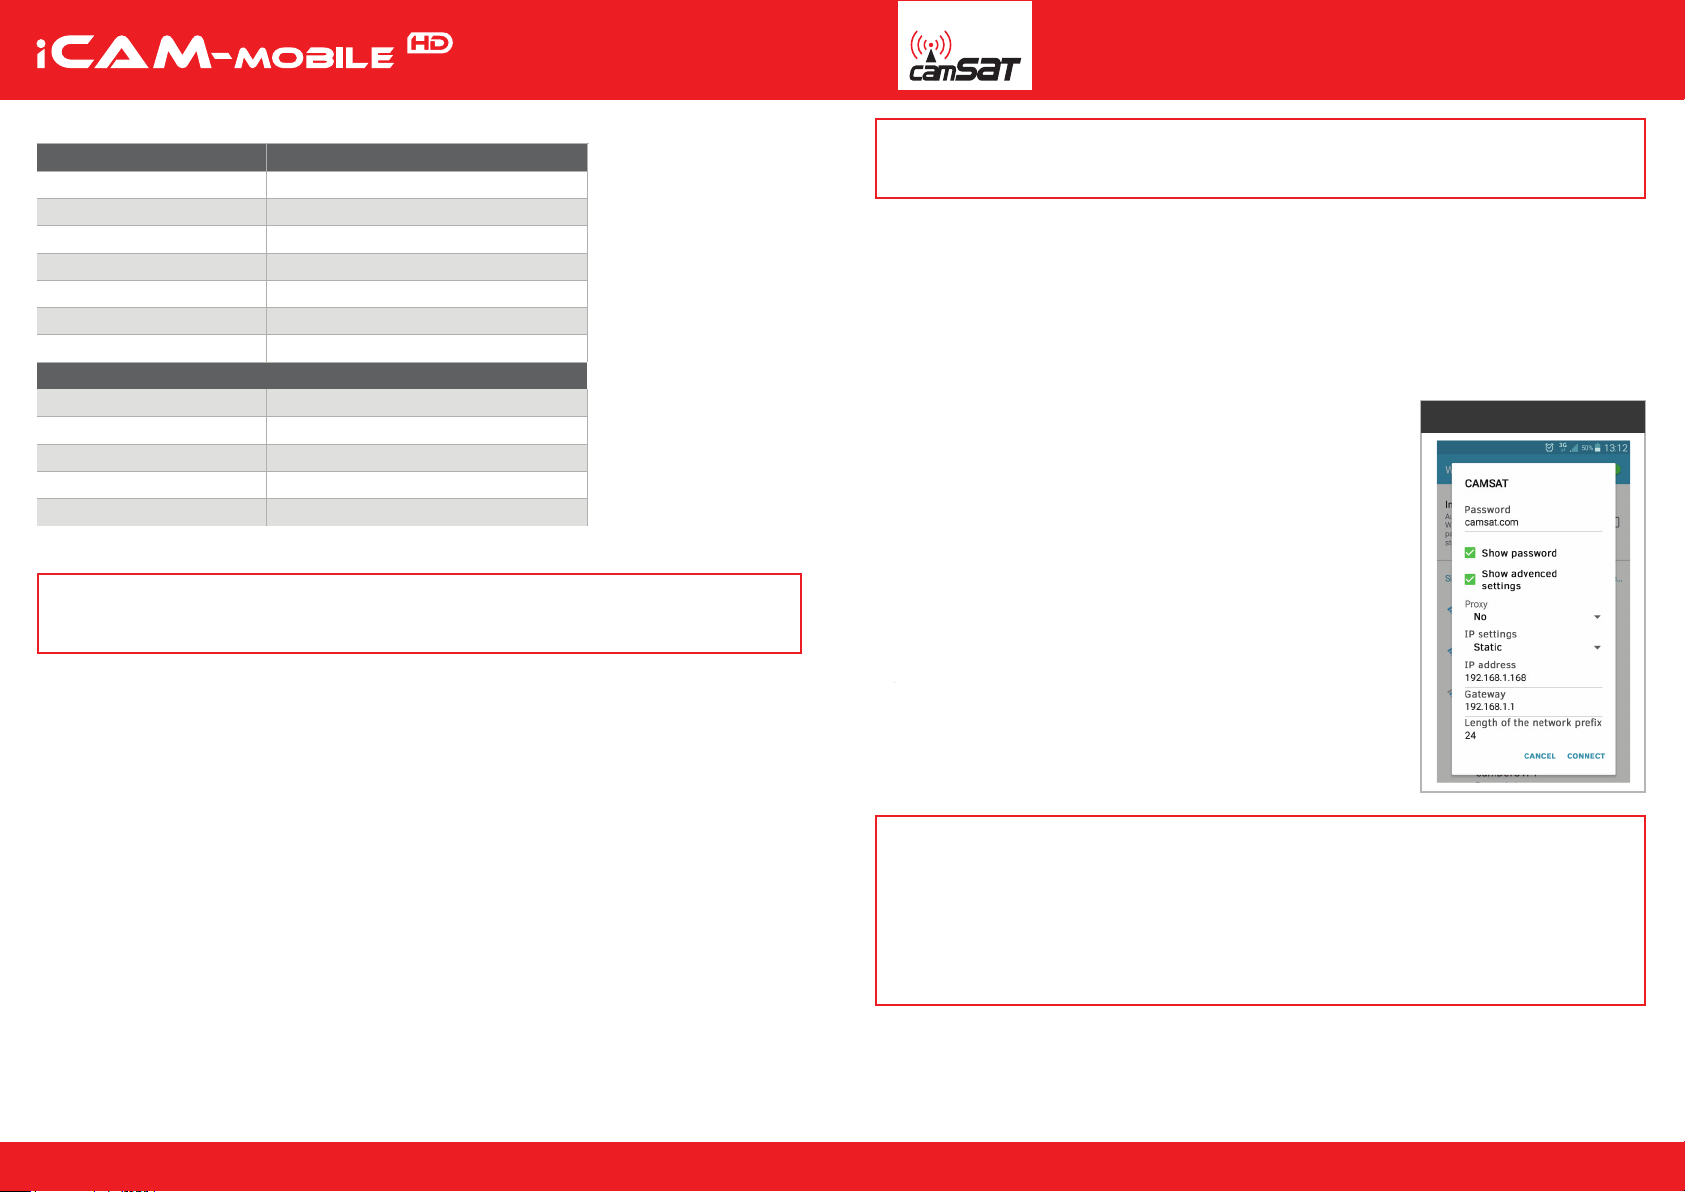
To complete the setup, connect your PC wirelessly via a WiFi network in the 5 GHz band (802.11a or
802.11n). The default network name (SSID) is "CAMSAT."
Configuration example for iCAM-Receiver is shown below.
Devices operating only in the band 2.4 GHz (802.11b and 802.11g) are incompatible with iCAM-Mobile!
As a receiving device you can use the device iCAM-Receiver (not included in the kit).
You need to connect to a Wi-Fi network using the pre-configured network
name, password (the default SSID: CAMSAT) and configure the IP settings.
If the device did not receive an IP address automatically, during connecting
manually enter a unique static IP address, default gateway, and subnet
mask in the advanced options. The HDCP server must be ON so configura-
tion was performed automatically, you can turn it on in the settings of the
radio Link settings → Network Settings (CAMERA CONNECTION SETTINGS
→ Network Settings).
To log in to the recorder module, launch the web browser Internet
Explorer and enter the IP address of the module (the default address,
assuming 192.168.1.188). Appears on the screen menu login. On the
screen, enter your login information (default: Username: admin,
password: none).
When you use a browser other than Internet Explorer, select "NoN ActiveX."
Install ActiveX plugin (Internet Explorer only!)
Run the installer ActiveX plugin (rtspvideoplugin.exe), and close the IE browser before installing. Once
successfully installed, open your browser again. Enter the IP address of the recorder, and then log on.
When prompted, allow the browser to run plug-ins.
Example configuraon
The default settings of the recorder
IP address 192.168.1.188
Subnet mask 255.255.255.0 (CIDR /24)
CMS applicaon port 5050
Mobile devices port 5053
Rtsp stream 554
User name admin
2 3
Standard Onvif
IP address 192.168.1.190
Port Onvif 80
User admin
Password admin
Password
Feature
Pre-configured IP camera
Factory settings