CanDock G2 JETSLIDE Quick start guide

INSTALLATION AND USE OF THE
J
ETSLIDE G2 from
C
ANDOCK

Here are some very important details concerning the installation of
JetSlide systems for PWC and boats:
INSTRUCTIONS FOLLOWING ARE GUIDELINES TO BE FOLLOWED AND
RESPECTED. CANDOCK ASSUMES NO RESPONSIBILITY FOR DAMAGES
INCURRED BY THE NON-COMPLIANCE WITH THESE GUIDELINES.
All distrib tors are held responsible for giving training to the
c stomers on the complete se of the system, theoretical and practical with
the watercraft of the c stomer. Candock Inc. will not be held responsible
for all damages res lting from the fact that the operator did not receive the
adeq ate training.
With the numerous varieties of boats on the market, it is possible that
certain types will not be compatible with our system Candock Inc cannot be
held responsible for this fact It is impossible for us to be able to test all the
existing types of boats in the world We can on the other hand confirm that all
the boats having stabilizing fins and/or a driveshaft passing through the hull
are not compatible, such as the majority of ski and wake board boats
Never use the JetSlide without Candock cubes around
Orientation :
FRONT OF JETSLIDE
SYSTEM.
REAR OF JETSLIDE
SYSTEM.

I) INSTALLATION & USE OF THE
J
ETSLIDE
1) ASSEMBLY
Advices :
-Assemble on a flat surface rather than water It will be easier that
way
-Assemble the cubes around the JetSlide If you
attach it to a dock, make sure the plugs are facing
the shore If your JetSlide is an independent unit,
black plugs must be oriented toward the front of
your unit
Steps : See ANNEXE A
1) Insert spacers before screwing the connecting pins When the cubes
are put together, the tabs (See B) will nest on top of each other (See
C) The tabs are numbered (See D), one (1) being the lowest and four
(4) the highest The JetSlide’s tabs are placed just below the #1 tab
of the cubes You must insert spacers at the right positions to
generate the equivalent of four (4) tabs on top of the Jetslide’s tabs
(See E, F)
2) Insert spacers as you position cubes around JetSlide
3) Insert connecting pins around the JetSlide and make a slight hand
tightening, then tighten them with the T key until they are snug (See
H)
4) In position 1 (See I) connecting pin require a sliding nut because the
JetSlide has no tab for this position Place a sliding nut on the lower
tab (1)
5) Install the exterior lug connectors and screw them around the
JetSlide using the proper tool for this purpose (See G) You will
never have more than two (2) tabs or more than two (2) spacers to
install
Normally, in the case of a personal water craft, the cubes are positioned
rearmost of JetSlide are not necessary, but if a higher flotation is required, you
can add cubes or corner cubes (therefore using JetSlide bolts to fix the
modules on the last JetSlide tab You will also need spacers)

2) ANCHOR
Steps : See ANNEXE B
1)
The JetSlide can simply be attached to an existing dock using rope or
a custom made bracket (ask your dealer) If you tie the JetSlide to an
existing dock, make sure that the dock is sturdy enough to resist the
forward and backward movement generated by the watercraft when
it enters or goes down the JetSlide
2)
The JetSlide can be added to an existing Candock dock Make sure
that the dock is anchored well enough to resist the forward and
backward movement generated by the watercraft when it enters or
goes down the JetSlide
3)
The JetSlide can also be installed by using (two) 2 or (four) 4 pilings
(See K) Please note that an installation with 4 piles is not
recommended for PWC’s If the system is for a boat, the piles at the
back should not be placed in the perimeter covered by the JetSlide
at the back, this could limit its capacity to lower (sink) and will make
going on and off the system more difficult Ask your dealer for
appropriate parts and instructions This type of installation should
not be used when water depth is more than 2m / 6’
4)
The JetSlide can be anchored by using weights and chains (See L) It
is very important that the chains stay as tight as possible Ask your
dealer for recommended weight of anchors and special attachments
You will have to use galvanized or stainless steel 5/16”chain or good
quality marine rope, the length will depend on water depth and
variations of the water level When using this type of installation, it
is normal that the JetSlide moves slightly forward when entering the
unit and backwards when exiting the unit This is why you need to
check regularly the tightness of the chains to limit this movement

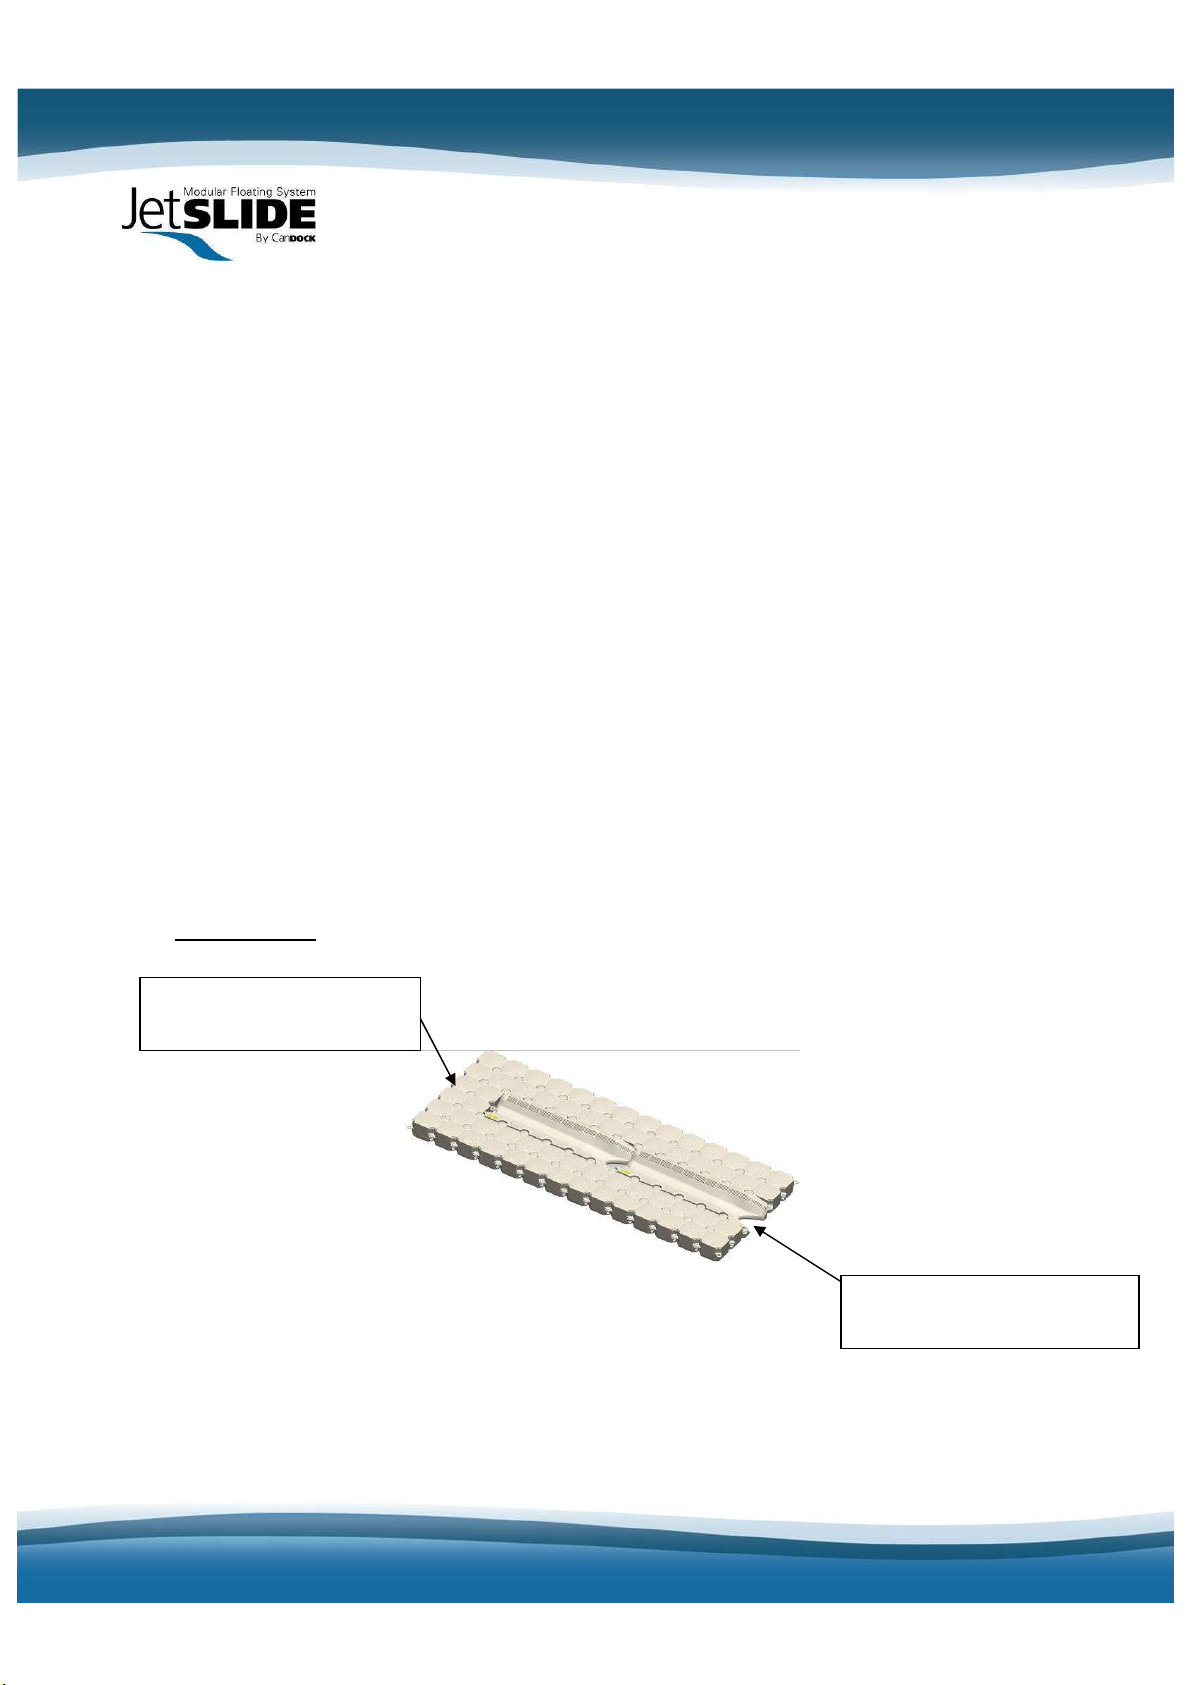
3) USING THE JETSLIDE
1)
Approach the JetSlide at idle, keeping the craft straight and centred
with the JetSlide When the bow of the craft will be in contact with
the JetSlide, give small throttle strokes that will make the craft align
with the JetSlide When the craft is in line with the JetSlide, throttle
in slowly After a few tries, you will rapidly develop a feel of how
much you have to use the throttle the reach final position on the
JetSlide
2)
For a boat, engine must be trimmed down fully during the entering
procedures and the depth of water at the back of the system must be
3' /1m minimum at all time to avoid damage to the boat Increase
throttle power until the boat is fully up on the system When the
engine gets in contact with the JetSlide, you will feel the craft
stopping You must immediately throttle down This indicates that
the craft is at final resting position Entering the unit at high speed
may damage the unit We recommend, at first, that you try at slow
speeds until you reach the correct speed If the boat gets on the
system but is not all the way in, you can continue throttling
progressively until the boat reaches final resting position Be caref l,
boarding at high speed can be dangero s.
3)
It is recommended to sec re the craft to a cleat in order to
prevent the craft from sliding back into the water accidentally
The craft can be locked to the JetSlide with a chain when you are not
using it Ask your dealer for details
4)
To go back into the water, take a standing position on your PWC and
generate a backward movement by using your lower back and arms,
pumping backwards rapidly until the PWC starts sliding back into the
water The procedure is easier when the PWC is wet You can also
stand up at the back of your PWC, grab the handle of the seat and
transfer your weight back The easiest way to return to water is to
keep the front of the PWC in one hand and the handle of the other
and then push gently Be vigilant, because at some point, your PWC
will start to go down by itself At this point, you will have to get on it
if you do not want your watercraft in the water without you
5)
For a boat, put the engine in reverse and increase throttle until craft
starts to go down by itself It helps if you wet the system, especially
if the boat was not used for a couple of days It might be necessary
to give a good throttle stroke to start the movement and then

throttle down For a Jet boat, the pneumatic assisted system will be
required, no matter the weight of the boat
II) WARNINGS & SPECIAL INSTRUCTIONS
1) Like all JetSlide installations, the system should not be installed in
areas subject to waves of more than 0 75m / 2ft regularly We
recommend an installation in a protected area
2) The installation of multiple
JetSlides side to side is possible,
but a minimum of 2 rows of cubes
must be found between each
JetSlide An installation with only
one row is possible, b t the risk
of damage is possible and the
res lting damage will not be
covered by the warranty.
Contact Candock for more
information.
3) The handling of several JetSlides assembled in series by lifting (for
winterizing by using a crane for example) is strictly forbidden The
excessive inflections will break the tabs of the JetSlide and the
res lting damage will not be covered by the warranty. Contact
Candock for more information.
4) The depth of water at the back of the system must be 1m / 3'
minimum at all time to avoid damage to the boats
5) Riveted hulls can damage the JetSlide
6) Surface can be slippery when the system is wet
7) The capacity of the JetSlide may change depending on the type of
assembly, accessories and according to the weight distribution of the
engines
8) Please note that some boats have cooling intakes for the engine
which is on the hull and this intake needs to be in the water when
the engine is running Please make sure that if you are doing a
JetSlide system that this intake will be in the water when the engine

is running CANDOCK INC. WILL NOT TAKE ANY RESPONSABILITY
FOR ANY TYPE OF DAMAGE TO A BOAT RESULTING FROM THIS. IT IS
THE RESPONSABILITY OF THE DISTRIBUTOR TO MAKE SURE THAT
THIS IS VERIFIED BEFORE SELLING THE INSTALLATION TO THE
CLIENT. We recommend that you inform your clients of that even if
you are sure that the intake will be in the water
9) The fact of removing cubes at the back of the system to lower the back of the
system closer to the water could exert excessive pressure on the back tabs of
the Jetslide and may cause damage which will not be covered by the
warranty.
10) All distributors are held responsible for giving training to the customers
on the complete use of the system, theoretical and practical with the
watercraft of the customer. Candock Inc. will not be held responsible for
all damage resulting from the fact that the operator did not receive the
adequate training.
11) The boats and personnal water crafts must be completely mounted on the
Jetslide at all time. A craft left on the Jetslide in a position where the major
part of the weight is left on the back, could exert excessive pressure on the
back tabs of the Jetslide and may cause damage which will not be covered
by the warranty.
12) The installation of multiple Jetslides side to side is possible, but no rows of
cubes should be removed with the aim of saving space moreover the totality
of the back Jetslide must be left free to be able to go up and down. Therefore,
it must not be connected to the adjacent systems.
13) It is normal that a certain wear of the JetSlide appears at the points
of contact where the boat exerts more pressure
III) ACCESSORIES
1) V PLATE
You'll notice that the
installation of in line JetSlides leaves
a gap (in red on the attached image)
at the V of JetSlide To fill the gap
you must install a V-plate which can
be simply screwed under the JetSlide
It is very important for the safety of

users Candock Inc. disclaims all liability for accidents if the V plate is not
installed.
Tighten the 6 screws
included with the plate in the
inserts for that purpose on the
JetSlide
BEWARE, THIS PLATE
MUST NOT BE INSTALLED ON
THE FIRST JETSLIDE BUT FROM
THE SECOND.
2) STABILIZER BAR
To stabilize your JetSlide system and
minimize the lifting of cubes around the
system, a stabilizer bar system was designed
The positioning of the
stabilizer bars is not
optional. These should
always be used when recommended and the use of bars other
than those provided by Candock is prohibited unless written
permission from Candock The first bar is always installed
between the 1st and 2nd row of cubes in the back The 2nd
bar is installed between the 3rd and 4th row of cubes In order
to prevent the lifting of the cubes on the sides, more bars
could be required, install them where needed
The fixing is
done with the
hardware kit supplied
with the bars Pass the
threaded rode through
Candock white bolt
and then place the
washer, lock washer
and nut
The tightening
of the stabilizer bars
may exert undue

pressure on the tabs and ca se damages to the JetSlide that are not covered
by warranties.
3) SAFETY PLATE
The half-JetSlide, previously used to supplement the JetSlide for
intermediate sizes has been discontinued and was replaced in the G2 line in
favor of a Safety Plate available in 3 different sizes The sizing is based on the
extra length that the boat requires
Here are the components necessary for installation* :
P
A
R
T
N
U
M
B
E
R
P
A
R
T
N
U
M
B
E
R
P
A
R
T
N
U
M
B
E
R
P
A
R
T
N
U
M
B
E
R
D
E
S
C
R
I
P
T
I
O
N
D
E
S
C
R
I
P
T
I
O
N
D
E
S
C
R
I
P
T
I
O
N
D
E
S
C
R
I
P
T
I
O
N
S
A
F
E
T
Y
P
L
A
T
E
S
A
F
E
T
Y
P
L
A
T
E
S
A
F
E
T
Y
P
L
A
T
E
S
A
F
E
T
Y
P
L
A
T
E
1
1
1
1
C
U
B
E
C
U
B
E
C
U
B
E
C
U
B
E
S
A
F
E
T
Y
P
L
A
T
E
S
A
F
E
T
Y
P
L
A
T
E
S
A
F
E
T
Y
P
L
A
T
E
S
A
F
E
T
Y
P
L
A
T
E
2
2
2
2
C
U
B
E
S
C
U
B
E
S
C
U
B
E
S
C
U
B
E
S
S
A
F
E
T
Y
P
L
A
T
E
3
S
A
F
E
T
Y
P
L
A
T
E
3
S
A
F
E
T
Y
P
L
A
T
E
3
S
A
F
E
T
Y
P
L
A
T
E
3
C
U
B
E
S
C
U
B
E
S
C
U
B
E
S
C
U
B
E
S
CD075 SAFETY PLATE 1 CUBE 1 N/A N/A
CD076 SAFETY PLATE 2 CUBES N/A 1 N/A
CD077 SAFETY PLATE 3 CUBES N/A N/A 1
LK 703016 SPACER CANDOCK 4 6 8
LK 703013 BLACK SLIDING NUT 5 7 9
LK 703015JETSLIDE
JETSLIDE BOLT 5 7 9
*According to an independent installation with plugs forward
Installation Steps :
1 – Place sliding nut on cube tabs
2 – Place spacers on cube tabs to equalize the height with the highest cube tab
3 – Put the security plate without moving the spacers
4 – Screw JetSlide Bolt on the fixation tab of the safety plate

In use, the plate can deform slightly and keep this deformation This
deformation is expected and normal
Please note that the s rface of the safety plate can be slippery.
4) PNEUMATIC AIR ASSISTED SYSTEM : AIR ASSIST.
For all boats over 1360kg /
3000lbs, a pneumatic assistance
system is requested to ensure proper
dry docking of your boat
5) WINCH SYSTEM
Sometimes, for a boat less than 1360kg / 3000lbs, a winch may be
required to return the boat afloat

This winch is composed of a pulley and a fixing ring attaching to the side
of the dock system as shown in the photo:
Turn the handle of the winch until the boat is enough in the water that it
can back off on its own power Do not back the boat too m ch; it co ld slide
in the water by itself.

IV) WARRANTY
Your Jetslide unit carries a 5 years limited warranty as stated below:
This warranty only applies for Jetslides purchased after april 1
st
2011
This warranty will only apply if your Jetslide configuration has been approved by the
LIABILITY LIMITATION AND WARRANTY DOCUMENT
GENERAL
Module docking systems supplied under this warranty are manufactured from the best
quality materials and are warranted by CANDOCK Inc., the manufacturer, to the original
purchaser against defects in materials and workmanship, as specified under this limited
warranty, occurring as a result of the manufacturing process during the stated time
period, under normal use and service, subject to the terms and conditions contained in
this 5 years limited warranty.
The CANDOCK warranty is strictly subject to the conditions set forth below which form
an integral part hereof.
1. The CANDOCK warranty applies to the product being used exclusively for its
intended purpose, being a modular drive-on system for boats and watercrafts.
2. The CANDOCK warranty does not apply when a defect or breakage (damage) to
the product results from the use of improperly or recklessly operated equipment.
3. The CANDOCK warranty does not extend or apply to:
a) normal wear;
b) any product damaged as a result of accident, fire, flood or unforeseeable
act;
c) damage caused by frost, ice or glass, sharp objects such as stone;
d) any products repaired or modified or attempted to have been repaired or
modified by any person other than a duly authorized representative;
e) The installation of CANDOCK products.
4. THE CANDOCK WARRANTIES SET FORTH HEREIN ARE IN LIEU OF ALL
OTHER WARRANTIES, EXPRESS OR IMPLIED, INCLUDING, WITHOUT
LIMITATION, ANY WARRANTIES OF MERCHANTABILITY OR FITNESS FOR A

PARTICULAR PURPOSE, AND SHALL BE THE SOLE AND EXCLUSIVE
REMEDY AVAILABLE TO ORIGINAL PURCHASERS OF CANDOCK
MANUFACTURED PRODUCTS. CANDOCK neither assumes nor incurs any other
obligation or liability for the condition of CANDOCK manufactured products, nor
authorizes any other party to assume any such obligation or liability on its behalf or
to make representations as to the CANDOCK warranty.
5. IN NO EVENT SHALL CANDOCK BE LIABLE FOR ANY SPECIAL, INCIDENTAL,
OR CONSEQUENTIAL DAMAGES (INCLUDING, WITHOUT LIMITATION, LOST
REVENUES AND PROFITS, EVEN IF IT HAS BEEN ADVISED OF THE
POSSIBILITY OF SUCH DAMAGES), SUFFERED OR INCURRED BY THE
PURCHASER AS A RESULT OF OR IN CONNECTION WITH THE USE OF
CANDOCK PRODUCTS.
5 YEARS LIMITED WARRANTY
COVERAGE
Any defect in material and workmanship from normal Jetslide use under calm water
conditions. Any damages due to misuse of the product is not covered under this warranty.
The warranty applies only to the basic product (Jetslide itself).
DURATION
5 years and it applies only to the original owner.
This warranty is regressive and it will apply at the following percentages through time:
0-1 year : 100%
1-2 years : 100%
2-3 years : 70%
3-4 years : 40%
4-5 years : 20%
More than 5 years : 0%

HOW THE WARRANTY IS APPLIED
If your Jetslide product is defective we will repair it, or at our choice, replace it at no
charge to you. If we decide to repair your product, we may use new or reconditioned
replacement parts. If we choose to replace your Jetslide product, we may replace it with a
new or reconditioned product of the same or similar design.
LIMITATIONS
CANDOCK INC. WILL NOT PAY OR BE HELD RESPONSIBLE FOR: INJURIES, LOSS
OF TIME; INCONVENIENCE; LOSS OF USE OF YOUR CANDOCK PRODUCT OR
PROPERTY DAMAGE CAUSED BY YOUR CANDOCK PRODUCT OR ITS FAILURE
TO WORK; ANY SPECIAL, INCIDENTAL OR CONSEQUENTIAL DAMAGES; OR ANY
DAMAGES RESULTING FROM MISUSE OR MODIFICATION OF YOUR CANDOCK
PRODUCT.
Warranty will be void if Candock inc. does not receive this warranty certificate
signed by client within 30 days after date of purchase, as well as a picture
confirming the proper installation of the product.
RECLAMATIONS
For warranty service for your Jetslide product, you must provide proof of the date and
place of purchase of the product our head office.
The defective Jetslide must not be
uninstalled before you contact us. We need to get clear pictures of the defective Jetslide in the
dock assembly and others showing the problem with precise information on what has occurred.
We will also need the serial number if present.
Be sure to include your name, address, telephone number and a description of the
operating problem. After repairing, or at our option, replacing your Jetslide product, we
will ship it to your home at no cost to you for parts and labour. (exceptions might apply)
This warranty is the only one we will give you on your Jetslide product, and it sets forth
all our responsibilities regarding your Jetslide product. There are no other express
warranties.
Candock Inc.
9441, Bourque
Deauville, Quebec
Canada
J1N 3G1

ANNEXE A :


ANNEXE B :
Other manuals for G2 JETSLIDE
1
Table of contents
Other CanDock Marine Equipment manuals