manuals.online logo
Brands
  1. Home
  2. •
  3. Brands
  4. •
  5. CANTERBURY
  6. •
  7. Bathroom Fixture
  8. •
  9. CANTERBURY AGORA Z2328-45IN User manual

CANTERBURY AGORA Z2328-45IN User manual

Basin Mixer with Automatic Pop-up Waste
Art: Z2328--45IN AGORA
• Handmade in Italy since 1960
• ¼ Turn valves handmade at
Nicolazzi Factory
• Lead Free Brass Compliant to
AZ/NZS 3718
• Suitable even and uneven
pressure
• Handles are interchangeable
Specifications
WM22315
AS/NZS3662
Canterbury Sink & Tap Co.
Max/Min Operating
Pressure: 100/500kPa
Further information Phone (03) 9761 4603 sales@sinkandtap.com.au
CAREFULLY READ THROUGH THESE INSTRUCTIONS BEFORE INSTALLATION AND USE OF ALL TAP WARE AND WALL
VALVES
INSTALLATION and WARRANTY INSTRUCTIONS
TECHNICAL INFORMATION
All flexible hoses are designed and manufactured for use with water in exposed locations only. Do not expose to
household cleaners, chlorine, chloride, hydrochloric acid or other corrosive chemicals.
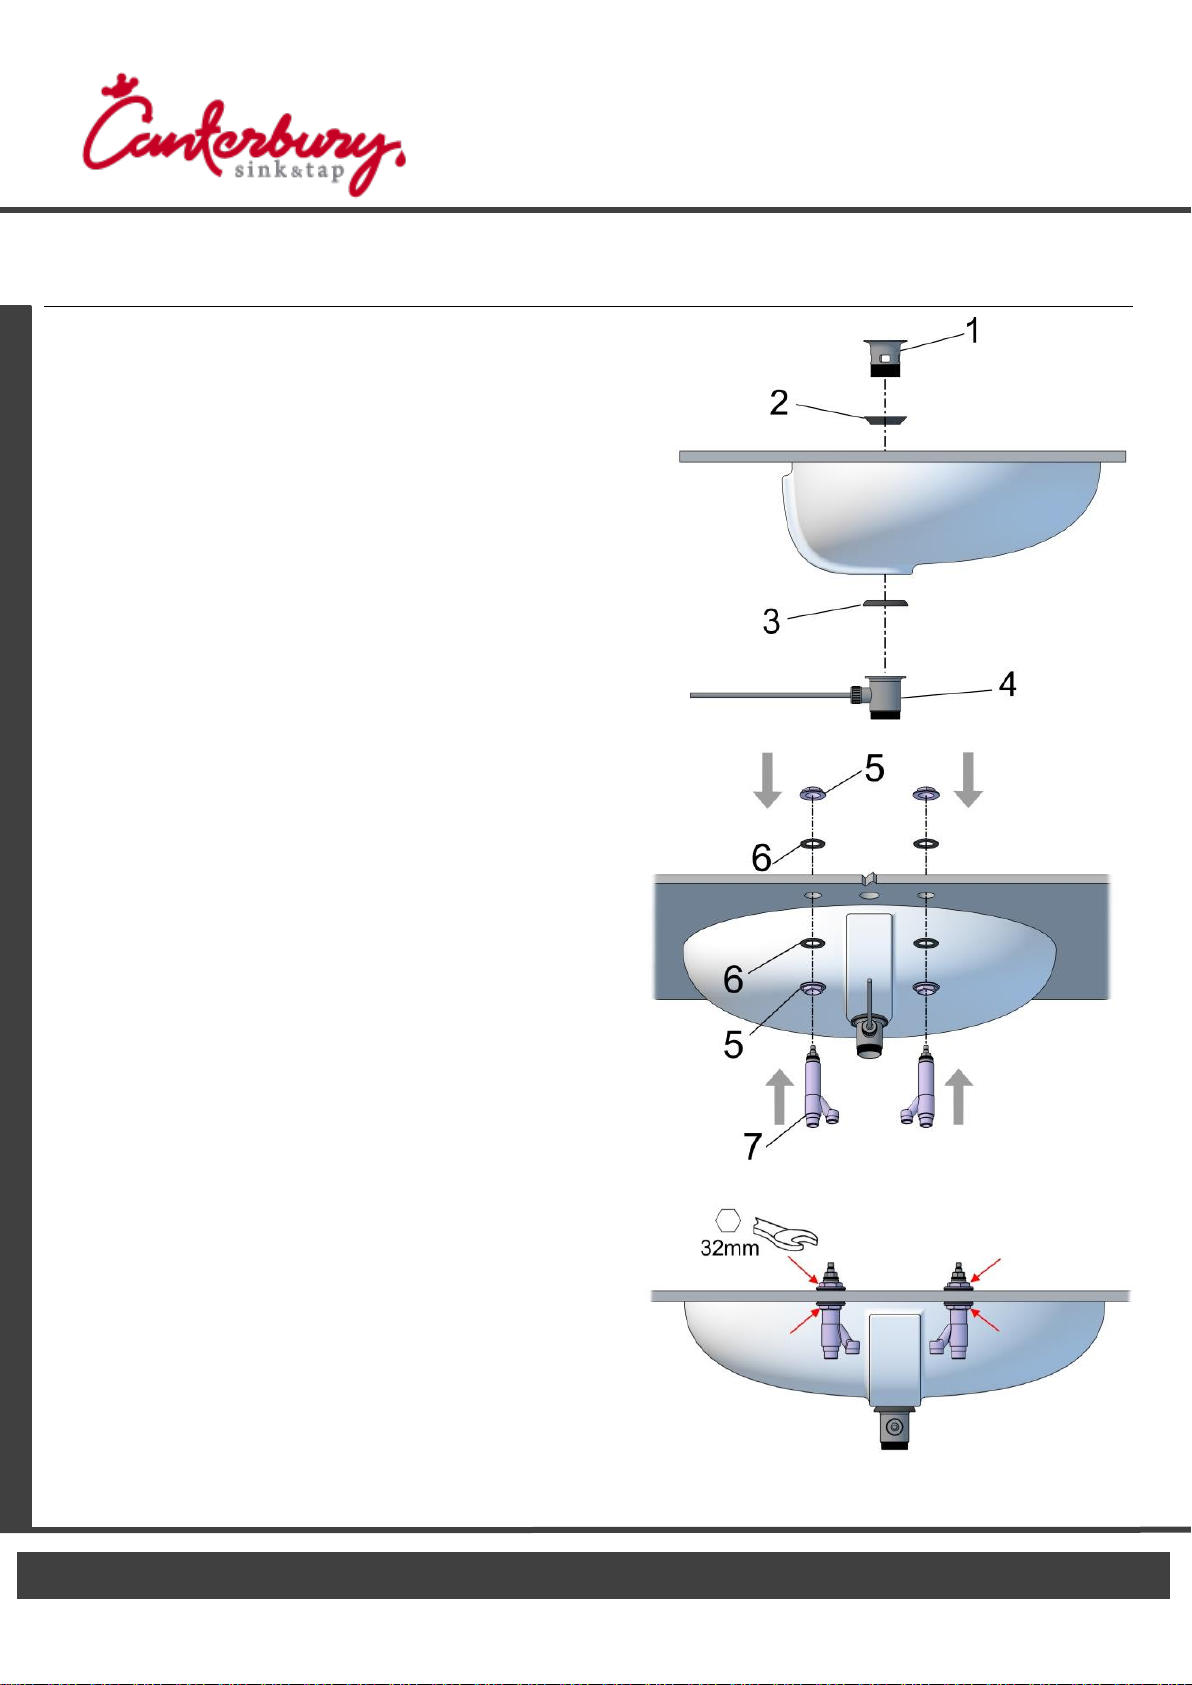
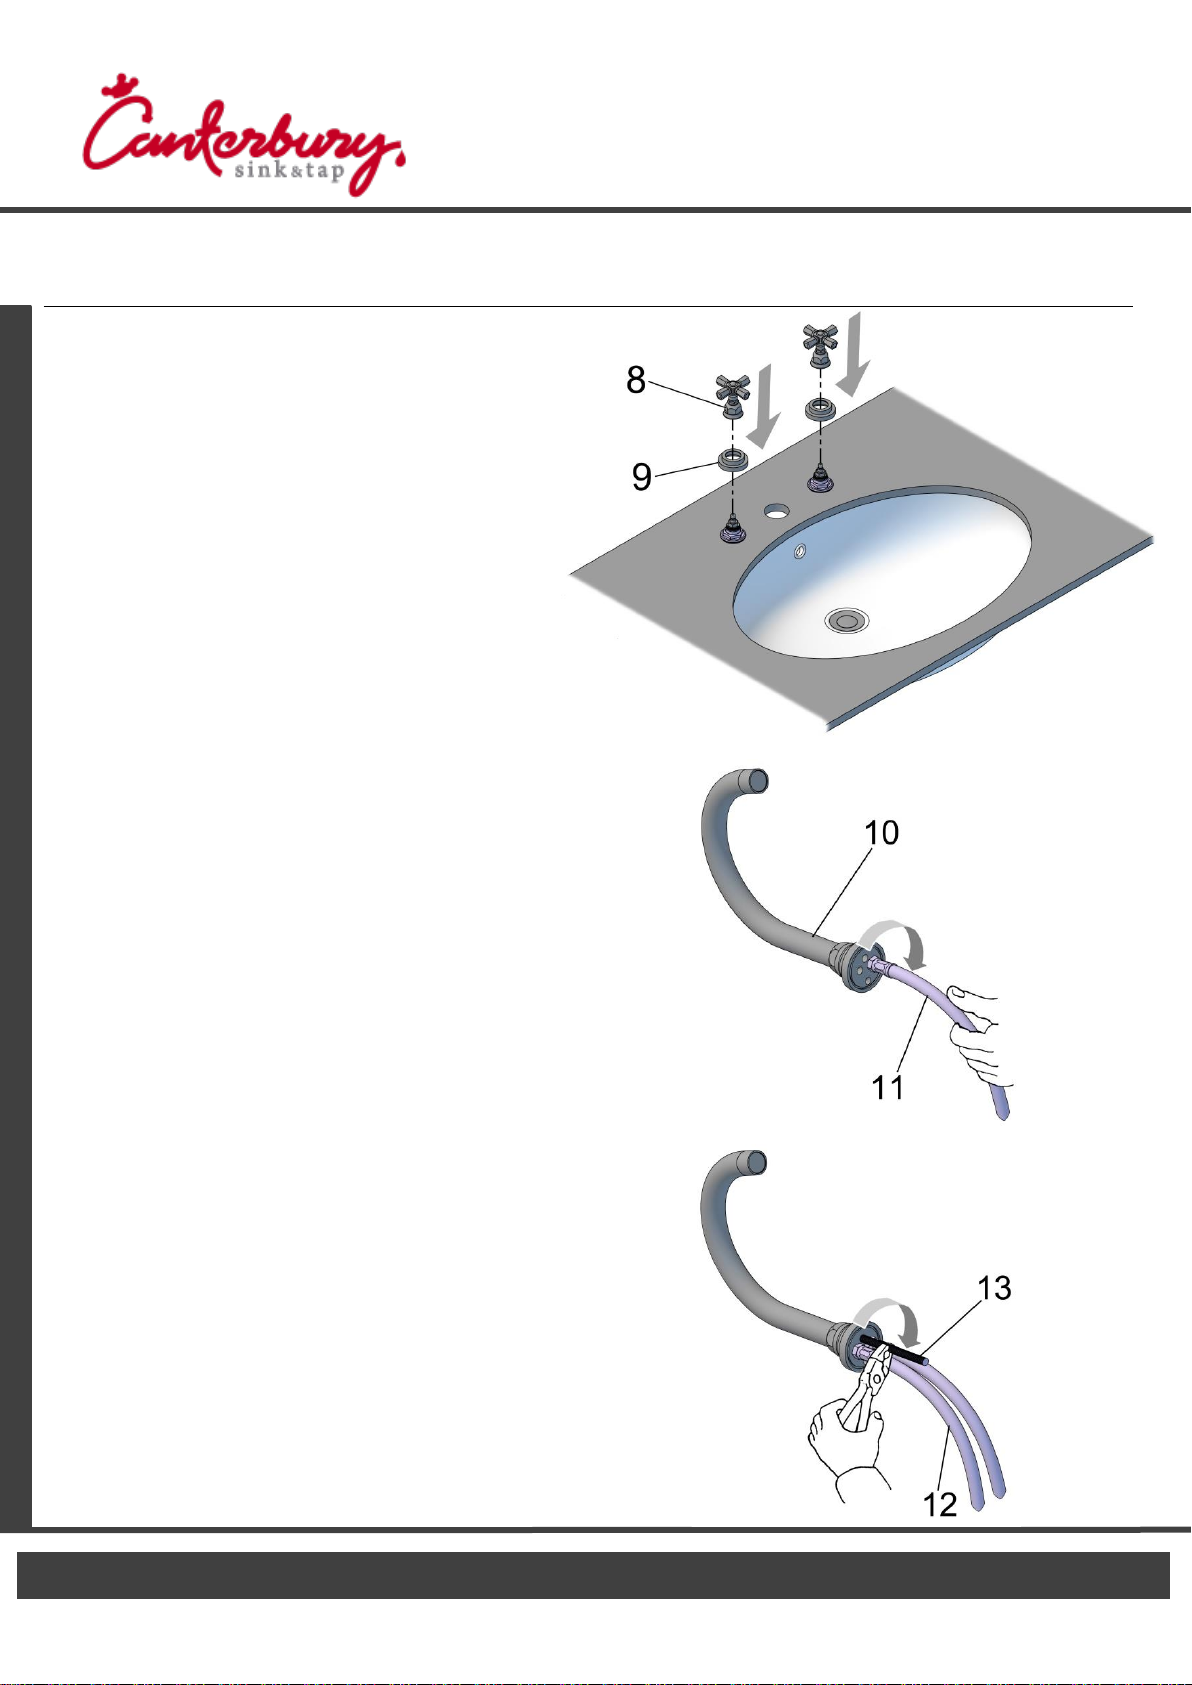
All connections with threads M10x1 male must be hand tighten. Do not over tighten. Over tightening may cause
damage to the hose.
All tap ware washers and o-rings are designed and manufactured for use with water. Do not expose to household
cleaners, chlorine, chloride, hydrochloric acid or other corrosive chemicals.
Our tap ware is designed for use with the temperatures and pressures listed below:
minimum cold water supply 10 °C
maximum hot water supply 62 °C
minimum pressure 100 kPa
maximum pressure 500 kPa
maximum fixing torque value = 13.6 Nm
Please note: The recommended pressure for best performance is between 270 kPa and 420 kPa. More pressure than
420 kPa or less pressure than 270 kPa may affect the diverting action in side spray tap ware.
Do not use any Nicolazzi tap ware with sulphurous water.
The minimum temperature for all tap ware is 10 degrees Celsius . Below 10 degrees Celsius will void the warranty.
When available, filter systems must be placed between hot and cold supply lines and the tap ware. Improper use or
non-use of filters may make diverting tap ware with hand sprays perform poorly.
Don't modify the tap ware and their components.
Use only original spare parts if there are replacements to be ordered. Installation must be made by authorized
plumbers or installers. Improper installation or diagnosis of problems is not covered by the warranty. Yearly
maintenance of cleaning and flushing is recommended.
Operation and use of any tap ware or wall valve that do not conform to these technical instructions will void the
warranty.
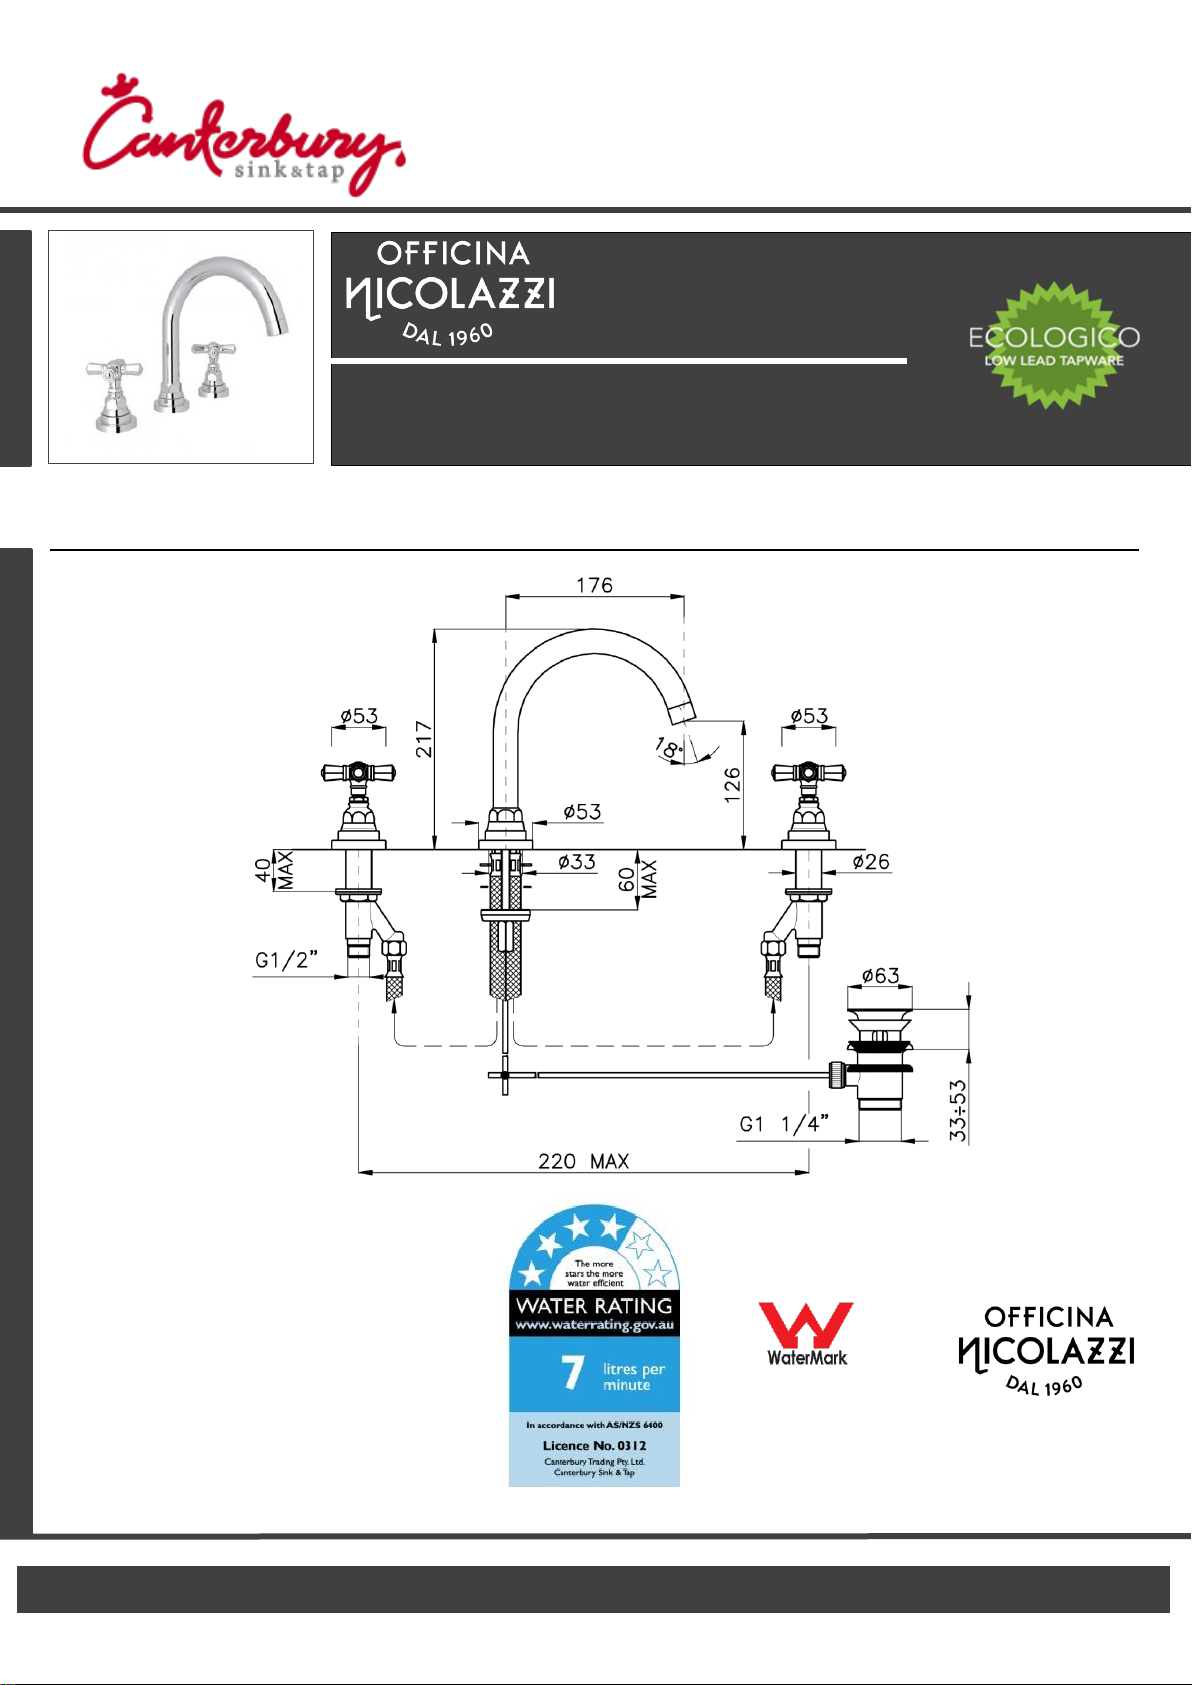
Important Notice Model : Z2328--45IN
Further information Phone (03) 9761 4603 sales@sinkandtap.com.au
2
Installation Instructions Model : Z2328--45IN
Further information Phone (03) 9761 4603 sales@sinkandtap.com.au
❷
Measure and cut tap holes, with a maximum
hole spacing of 110mm from tap body centre
line. Overall max hole cut out distance: 220mm
3
❶
Preparation
Tap body
Flush out the pipework to remove any foreign matter.
Tap body cut out hole sizes : Maximum 33mm diameter.
Under side clearance : Maximum 60mm
Continue…….
Tap section
Tap section cut out hole sizes : Maximum 33mm diameter.
Under side clearance : Maximum 40mm
Installation Instructions Model : Z2328—45IN
Further information Phone (03) 9761 4603 sales@sinkandtap.com.au
❷
❸
Thread the bottom brass lock nut 5, followed by
the bottom rubber washer 6, onto the Side
body 7, thread section.
Repeat for the opposite side.
Insert the Side body 7, through the tap hole cut
outs in the counter top.
Feed the top rubber washer 6, over the thread
section followed by the top brass lock nut 5.
Note: Make sure that the locking nuts are
fully tightened, otherwise the side body may
turn while turning the On-Off lever.
4
❶
Install the pop-up waste body top section 1, and waste
body bottom section 4, to the basin as shown.
Ensure that the top seal 2, and bottom seal 3, are
installed correctly, to ensure proper functioning of the
pop-up waste system and prevent any water leakage.
Continue…….
Installation Instructions Model : Z2328--45IN
Further information Phone (03) 9761 4603 sales@sinkandtap.com.au
❺
❻
Install the water supply hose 12, into tap
the body 11.
- Note: Hand tighten only, DO NOT over
tighten- 12!
Install the second water supply hose 12,
and supplied mounting stud 13, and
verify that they are securely installed.
- Note: Hand tighten the supply hose only, DO
NOT over tighten- 12!
5
❹
Install the O-ring 10, into the recess of the
on the bottom face of the cover plate 9.
Feed the cover plate 9, onto the tap side
body, until it is flush with the counter top
surface.
Thread the retaining flange and handle 8,
onto the cartridge, securing it firmly by
hand only. See the “Removing and replacing
a handle”, on page “11” for additional
details.
Continue…….

Other CANTERBURY Bathroom Fixture manuals

CANTERBURY OFFICINA NICOLAZZI Z2214 User manual

CANTERBURY

CANTERBURY OFFICINA NICOLAZZI Z2214 User manual

CANTERBURY ARENA Z3312-44 User manual

CANTERBURY

CANTERBURY ARENA Z3312-44 User manual

CANTERBURY Z2225-29 User manual

CANTERBURY

CANTERBURY Z2225-29 User manual

CANTERBURY Z3460 User manual

CANTERBURY

CANTERBURY Z3460 User manual

CANTERBURY Z2214-29 User manual

CANTERBURY

CANTERBURY Z2214-29 User manual

CANTERBURY Z2606 User manual

CANTERBURY

CANTERBURY Z2606 User manual

CANTERBURY Z3450 User manual

CANTERBURY

CANTERBURY Z3450 User manual

Popular Bathroom Fixture manuals by other brands

Kohler Mira Sport Max J03G Installation and user guide

Kohler

Kohler Mira Sport Max J03G Installation and user guide

Moen 186117 Series installation guide

Moen

Moen 186117 Series installation guide

Hans Grohe Raindance Showerpipe 27235000 Instructions for use/assembly instructions

Hans Grohe

Hans Grohe Raindance Showerpipe 27235000 Instructions for use/assembly instructions

Signature Hardware ROUND SWIVEL BODY SPRAY 948942 Install

Signature Hardware

Signature Hardware ROUND SWIVEL BODY SPRAY 948942 Install

fine fixtures AC3TH installation manual

fine fixtures

fine fixtures AC3TH installation manual

LIXIL HP50 Series quick start guide

LIXIL

LIXIL HP50 Series quick start guide

KOLO ATOL PLUS installation manual

KOLO

KOLO ATOL PLUS installation manual

Hans Grohe PuraVida 15073000 Instructions for use/assembly instructions

Hans Grohe

Hans Grohe PuraVida 15073000 Instructions for use/assembly instructions

Toto TS111B8 Installation and owner's manual

Toto

Toto TS111B8 Installation and owner's manual

Kohler K-1158-H2 Homeowner's guide

Kohler

Kohler K-1158-H2 Homeowner's guide

Coram Showers OFFSET QUADRANT manual

Coram Showers

Coram Showers OFFSET QUADRANT manual

baliv DU-2010 manual

baliv

baliv DU-2010 manual

odass OD-1710 instruction manual

odass

odass OD-1710 instruction manual

Oxygenics Evolution Easy installation instructions

Oxygenics

Oxygenics Evolution Easy installation instructions

Bradley Express SS Series installation instructions

Bradley

Bradley Express SS Series installation instructions

Helvex TH-974 installation guide

Helvex

Helvex TH-974 installation guide

DURAVIT C.1 C15240 0090 Instructions for mounting and use

DURAVIT

DURAVIT C.1 C15240 0090 Instructions for mounting and use

Sunshower PURE SOLO manual

Sunshower

Sunshower PURE SOLO manual

manuals.online logo
manuals.online logoBrands
  • About & Mission
  • Contact us
  • Privacy Policy
  • Terms and Conditions

Copyright 2025 Manuals.Online. All Rights Reserved.