manuals.online logo
Brands
  1. Home
  2. •
  3. Brands
  4. •
  5. Carrier
  6. •
  7. Air Conditioner
  8. •
  9. Carrier CRTWOPOS012A00 User manual

Carrier CRTWOPOS012A00 User manual

Manufacturer reserves the right to discontinue, or change at any time, specifications or designs without notice and without incurring obligations.
Catalog No. 04-53480316-01 Printed in U.S.A. Form IIK-CRTWOPOS12-02 Pg 1 6-21 Replaces: IIK-CRTWOPOS12-01
Installation Instructions
Part No. CRTWOPOS012A00 and CRTWOPOS013A00
PACKAGE CONTENTS
SAFETY CONSIDERATIONS
Installation and servicing of air-conditioning equipment can be
hazardous due to system pressure and electrical components. Only
trained and qualified service personnel should install, repair, or
service air-conditioning equipment.
Untrained personnel can perform basic maintenance functions of
cleaning coils and filters and replacing filters. All other operations
should be performed by trained service personnel. When working
on air-conditioning equipment, observe precautions in the
literature, tags and labels attached to the unit, and other safety
precautions that may apply.
Follow all safety codes. Wear safety glasses and work gloves. Use
quenching cloth for unbrazing operations. Have fire extinguisher
available for all brazing operations.
It is important to recognize safety information. This is the safety-
alert symbol . When you see this symbol on the unit and in
instructions or manuals, be alert to the potential for personal
injury.
Understand the signal words DANGER, WARNING, CAUTION,
and NOTE. These words are used with the safety-alert symbol.
DANGER identifies the most serious hazards which will result in
severe personal injury or death. WARNING signifies hazards
which could result in personal injury or death. CAUTION is used
to identify unsafe practices, which may result in minor personal
injury or product and property damage. NOTE is used to highlight
suggestions which will result in enhanced installation, reliability,
or operation.
GENERAL
Use the accessory two-position damper on units without econo-
mizers. The two-position damper accessory will replace the manu-
al damper system or can be installed on units with no outdoor-air
intake. It can be used on vertical or horizontal applications.
The two-position damper accessory allows the unit to control the
outside-air dampers. The damper opens when the indoor fan is op-
erating and closes when the indoor fan is off. The two-position
damper does not modulate; it is either open or closed.
INSTALLATION
These 2 position dampers are designed to work in both a vertical
and horizontal application. The instructions are the same for both.
1. Turn off power and install lockout tag on unit.
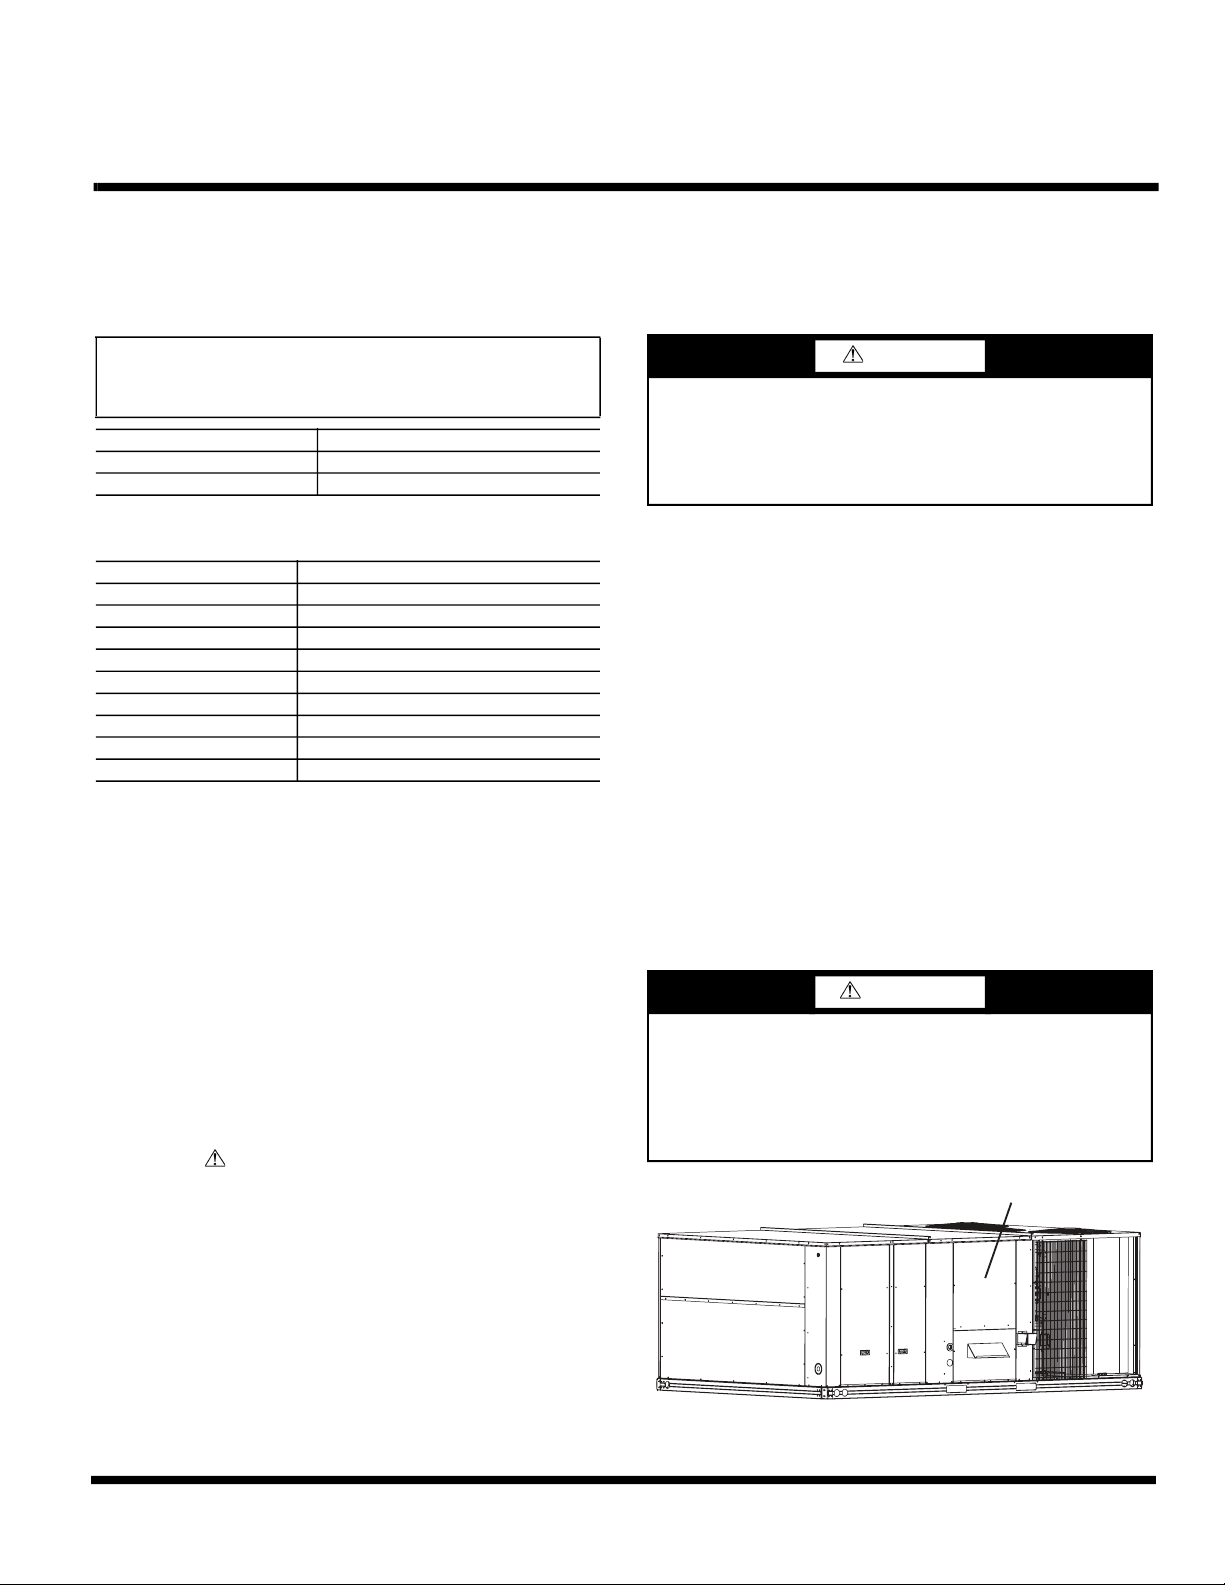
2. Remove the upper-end panel shipped on the HVAC unit. (See
Fig. 1.) The return air chamber of the unit will be exposed.
Save the screws for later use. The upper-end panel can be dis-
carded. The bottom panel remains in its shipping position.
Fig. 1 — Upper and Bottom Panel on End of Unit
IMPORTANT: Read these instructions completely before at-
tempting to install the accessory two-position damper. The two-
position damper is used on the following units:
UNIT SIZE PART NUMBER
15 TO 20 TONS CRTWOPOS012A00
25 TON CRTWOPOS013A00
QTY ITEM
1Upper end panel with damper
4Hood angles
2Hood side plates
1Hood top
4Outdoor air screens
2Hood side filter supports
2Hood side drip angles
2Hood top diverters
60 Screws
DANGER
ELECTRICAL SHOCK HAZARD
Failure to follow this warning could result in personal injury
and/or death.
Disconnect power supply and install lockout tag before
attempting to install the accessory.
CAUTION
EQUIPMENT DAMAGE HAZARD
Failure to follow this caution may result in personal injury and
damage to unit.
Cover the duct opening as a precaution so objects cannot fall
into the return duct opening. Be sure to remove the cover
when installation is complete.
Indoor-fan Panel
Upper End Panel
Shipped on Base Unit
Bottom Panel
Shipped on Base Unit
Two-Position Damper Accessory
Single Package Rooftop Units
15 to 25 Tons
2
Fig. 2 — Upper End Panel with Damper Attached
3. Lift the provided upper-end panel with damper attached in
place over the top of the bottom panel. (See Fig. 2.) Do not
secure in place yet.
4. Remove and save the 12-pin jumper plug from the unit wir-
ing harness. Insert the harness from the 2-position damper
plug into the unit wiring harness plug. (See Fig. 3.)
NOTE: The 12-pin jumper plug should be saved for future use in
the event that the 2-position damper is removed from the unit. The
jumper plug is not needed as long as the 2-position damper is
installed.
5. Screw the upper-end panel with the damper attached, in place
on the HVAC unit. (See Fig. 4.)
Fig. 3 — Unit Wiring Harness Plug
Fig. 4 — Upper End Panel with Damper attached
6. Assemble the outside air hood per Fig. 5-7.
7. To assemble the outside air hood (see Fig. 5 for hood compo-
nent locations and item numbers):
a. Remove hood top panel from shipping position on unit
end.
b. Install filters supports (Item #1) to the upper end panel
using the screws provided.
c. Install each deflector (Item #8) on to each filter support
(Item #1) using the screws provided.
d. Apply seal strip to mating flanges on side plates of hood
(Items #4 and #5).
e. Secure side panels (Items #4 and #5) to upper panel
using the screws provided.
f. Apply seal strip to mating flange of the hood (see Fig. 5).
g. Secure hood top (Item #3) to upper panel using the
screws provided. (On 44-in. chassis, remove the screws
from across top cover of unit. The rear flange of hood
top will slide behind unit top over flange.)
h. Secure side retainers (Item #6) to side panels (Items #4
and #5) using the screws provided, screwing from out-
side of the hood.
i. Secure each central retainer (Item #2) to the hood top
(Item #3). Then align central retainers to holes located
on filter support (Item #1), so central retainer is perpen-
dicular to hood and each filter support. Secure using
screws provided.
j. Apply seal strip to top diverters (Item #7).
k. Secure top diverters (Item #7) to hood top (Item #3).
l. Install outdoor air screens by sliding them into each of
the four spaces created by the hood, filter support and
central retainers. To do so, first insert the air screens into
pocket created at the end of hood (Item #3), then fully
put the air screen into place, and then slide them back
into pocket created in the filter support (Item #1). Repeat
this for each air screen (see Fig. 6). See Fig. 7 for com-
pleted hood assembly.
Fig. 5 — Hood Part Identification and Seal Strip
Application Areas
2-Position Damper
Attached to Upper-End
Panel
Bottom
Panel
2-Position Outside
Air Damper
Provided
Upper Panel
APPLY SEAL STRIP
TO THE FRONT OF
THIS FLANGE
APPLY SEAL STRIP
TO THE BACK
OF THIS FLANGE
APPLY SEAL STRIP
TO THE BACK
OF THIS FLANGE APPLY SEAL STRIP
TO THE BACK
OF THIS FLANGE
7
7
3
5688
2
8
6
4
2
1
2
ITEM # DESCRIPTION QTY
1Filter Supports 3
2Central Retainer 3
3Hood Top 1
4Left Hood Side 1
5Right Hood Side 1
6Side Retainer 2
7Top Diverters 2
8Deflector 3
3
Fig. 6 — Outdoor Air Screen Installation
Fig. 7 — Completed Hood Assembly
8. Install the hood assembly on the unit. (See Fig. 8.)
9. Install the hood screens and other approved accessories.
Fig. 8 — Hood Assembly Installed
1. INSERT
AIR SCREEN
2. SLIDE
INTO
POSITION
Manufacturer reserves the right to discontinue, or change at any time, specifications or designs without notice and without incurring obligations.
Catalog No. 04-53480316-01 Printed in U.S.A. Form IIK-CRTWOPOS12-02 Pg 4 6-21 Replaces: IIK-CRTWOPOS12-01
© 2021 Carrier

This manual suits for next models

1

Other Carrier Air Conditioner manuals

Carrier 48VL Instruction Manual

Carrier

Carrier 48VL Instruction Manual

Carrier 52F Series User manual

Carrier

Carrier 52F Series User manual

Carrier 40MPHA User manual

Carrier

Carrier 40MPHA User manual

Carrier Fan Coil 42B User manual

Carrier

Carrier Fan Coil 42B User manual

Carrier 42HNR010-713 User manual

Carrier

Carrier 42HNR010-713 User manual

Carrier 48LC 07 User manual

Carrier

Carrier 48LC 07 User manual

Carrier 48SS018-060 Dimensions and installation guide

Carrier

Carrier 48SS018-060 Dimensions and installation guide

Carrier ClassiCool 53KDMT12N-718 User manual

Carrier

Carrier ClassiCool 53KDMT12N-718 User manual

Carrier XCT7 40VU0051-7E-QEE Installation instructions

Carrier

Carrier XCT7 40VU0051-7E-QEE Installation instructions

Carrier 024-048 User manual

Carrier

Carrier 024-048 User manual

Carrier 38BK-009 User manual

Carrier

Carrier 38BK-009 User manual

Carrier DURAFRESH 3i User manual

Carrier

Carrier DURAFRESH 3i User manual

Carrier 42QN series User manual

Carrier

Carrier 42QN series User manual

Carrier CRPWREXH068A00 User manual

Carrier

Carrier CRPWREXH068A00 User manual

Carrier 48TJD005 Guide

Carrier

Carrier 48TJD005 Guide

Carrier ZC Series User manual

Carrier

Carrier ZC Series User manual

Carrier 42/38SHDV095 User manual

Carrier

Carrier 42/38SHDV095 User manual

Carrier Infinity 24ANB7 Quick start guide

Carrier

Carrier Infinity 24ANB7 Quick start guide

Carrier 38GL018G User manual

Carrier

Carrier 38GL018G User manual

Carrier Infinity 50XL Instruction Manual

Carrier

Carrier Infinity 50XL Instruction Manual

Carrier 48DU Series Instruction Manual

Carrier

Carrier 48DU Series Instruction Manual

Carrier 50BA Dimensions and installation guide

Carrier

Carrier 50BA Dimensions and installation guide

Carrier 51 Series User manual

Carrier

Carrier 51 Series User manual

Carrier CRECOMZR101A00 User manual

Carrier

Carrier CRECOMZR101A00 User manual

Popular Air Conditioner manuals by other brands

LG I27TTC owner's manual

LG

LG I27TTC owner's manual

York F2FP040H06 User's information manual

York

York F2FP040H06 User's information manual

Soleus Air GB-PAC-08E4 operating instructions

Soleus Air

Soleus Air GB-PAC-08E4 operating instructions

Bryant Evolution Extreme 186CNV installation instructions

Bryant

Bryant Evolution Extreme 186CNV installation instructions

Hitachi RAS-E10HB instruction manual

Hitachi

Hitachi RAS-E10HB instruction manual

ARDES AR5R003 Instructions for use

ARDES

ARDES AR5R003 Instructions for use

Fujitsu ART45L operating manual

Fujitsu

Fujitsu ART45L operating manual

Mitsubishi PQHY-P200YGM-A installation manual

Mitsubishi

Mitsubishi PQHY-P200YGM-A installation manual

Sanyo THX2452 user manual

Sanyo

Sanyo THX2452 user manual

Fuji Electric RD-60FA Service manual

Fuji Electric

Fuji Electric RD-60FA Service manual

Frigidaire FAA074S7A12 Use & care manual

Frigidaire

Frigidaire FAA074S7A12 Use & care manual

Infiniton SPLIT-3725DM Owner's manual & installation manual

Infiniton

Infiniton SPLIT-3725DM Owner's manual & installation manual

Movair MOV10-07-SF Installation and owner's manual

Movair

Movair MOV10-07-SF Installation and owner's manual

Mitsubishi Electric Mr.Slim PLA-RP-BA Series Operation manual

Mitsubishi Electric

Mitsubishi Electric Mr.Slim PLA-RP-BA Series Operation manual

Danby dac10007ee use and care manual

Danby

Danby dac10007ee use and care manual

LG LW5023 owner's manual

LG

LG LW5023 owner's manual

Haier HSU09VHJ installation manual

Haier

Haier HSU09VHJ installation manual

Suntec Wellness Klimatronic AIR BOOSTER 2000 OSC instruction manual

Suntec Wellness

Suntec Wellness Klimatronic AIR BOOSTER 2000 OSC instruction manual

manuals.online logo
manuals.online logoBrands
  • About & Mission
  • Contact us
  • Privacy Policy
  • Terms and Conditions

Copyright 2025 Manuals.Online. All Rights Reserved.