Casals CTR305 User manual

Català
CTR305
Mitre Saw
Ingletadora
Scie à onglet
Troncatrice
Gehrungssäge
Serra de esquadria
22
Fig.1
.
4
5
20
6
7
Fig.2
Fig.3 Fig.4
Fig.5 Fig.6
87
13
29
1
2
15
16
3
4
5
6
9
18
10
11
12
14
17
19
25
21
20
24 26
28
11
21
9
13
Fig.7 Fig.8
16
P1
Fig.9 Fig.10
Fig.11 Fig.12
0
°
-
5
0
°
6
0
°
-
0
°
4
5
°
-
0
°
400 mm
D≤ 120mm
24
C1
2
B1
A1
A2
A3
Fig.13 Fig.14
Fig.15 Fig.16
Fig.17 Fig.18
5
12
4
22

Fig.20
Fig.21
E1
E2
18
E3
E4
Q1
Fig.19
M2
M1
11
L1
Fig.27
Fig.28
N1
N2
N3
N4
92.giF
Fig.29 Fig.30
Fig.31

English
Mitre Saw
CTR305
Dear Customer,
Many thanks for trusting to Casals.
Thanks to its continuous effort, our innovation
and the strictest quality controls, Casals develops
electric Power Tools for the toughest jobs.
SAFETY PRECAUTIONS
- WARNING! When using electric tools
basic safety precautions should always be
followed to reduce the risk of re, electric
shock and personal injury including the
following.
- Read all these instructions before attempt-
ing to operate this product and save these
instructions.
WORK AREA SAFETY
- Keep work area clean and well lit. Cluttered or
dark areas invite accidents
- Do not expose power tools to rain or wet condi-
tions. Water entering a power tool will increase
the risk of electric shock
- Do not operate the power tool near ammable
materials. Sparks could ignite these materials.
-Is required remove cut-off or other parts of
workpieces from the cutting area when the
appliance is running and the cutting head is in
the operating position.
-Remove all cutting from the work surface ensur-
ing it is completely clean.
CLOTHING AND PROTECTIVE EQUIPMENT
- Dress properly. Do not wear loose clothing or
jewellery. Keep your hair, clothing and gloves
away from moving parts. Loose clothes, jewel-
lery or long hair can be caught in moving parts
- Non-skid footwear is recommended when work-
ing outdoors.
- Wear personal protective equipment. Depend-
ing on application, use face shield, safety
goggles or safety glasses. As appropriate, wear
dust mask, hearing protectors, gloves and work-
shop apron capable of stopping small abrasive
or workpiece fragments
ELECTRICAL SAFETY
- Avoid body contact with earthed or grounded
surfaces, such as pipes, radiators, ranges or re-
frigerators. There is an increased risk of electric
shock if your body is earthed or grounded
- Do not force the power tool. Use the correct
power tool for your application. The correct
power tool will do the job better and safer at the
rate for which it was designed
- Do not abuse the cord. Never use the cord for
carrying, pulling or unplugging the power tool.
Keep cord away from heat, oil, sharp edges
or moving parts. Damaged or entangled cords
increase the risk of electric shock.
- When operating the power tool outdoors, use an
extension cord suitable for outdoor use. Use a
cord suitable for outdoor use reduces the risk of
electric shock
MAINTENANCE AND REPAIR
- Check the state of the power cord. Damaged
or tangled cables increase the risk of electric
shock.
- If the connection to the mains has been dam-
aged, it must be replaced, take the appliance to
an authorised technical support service. Do not
attempt to disassemble or repair the appliance
by yourself in order to avoid a hazard.
- Inspect extensions cords periodically and
replace if damaged.
- Maintain power tools. Check for misalignment or
binding of moving parts, breakage of parts and
any other condition that may affect the power
tool’s operation. If damaged, have the power
tool repaired before use. Many accidents are
caused by poorly maintained power tools
- Have your power tool serviced by a qualied
repair person using only identical replacement
parts. This will ensure that the safety of the
power tool is maintained
- Any misuse or failure to follow the instructions
for use renders the guarantee and the manufac-
turer's liability null and void.
- Take the appliance to an authorised technical
support service if product is damaged or other
problems arise. Do not attempt to disassemble
or repair the appliance yourself as this may be
dangerous.
- Check damaged parts. Before further use of
tool, it should be carefully checked to determine
that it will operate properly and perform its
intended function
- A guard or other part that is damaged should be
properly repaired or replaced by an authorized
service centre unless otherwise indicated in this
instructions manual.
- Do not use the power tool if the switch does not

turn it on and off. Any power tool that cannot
be controlled with the switch is dangerous and
must be repaired
- Do not use accessories which are not speci-
cally designed and recommended by the tool
manufacturer. Just because the accessory
can be attached to your power tool, it does not
assure safe operation.
- Have your power tool serviced by a qualied
repair person using only identical replacement
parts. This will ensure that the safety of the
power tool is maintained
PERSONAL SAFETY
- Stay alert, watch you are doing and use com-
mon sense when operating a power tool. Do not
use a power tool while you are tired or under
the inuence of drugs, alcohol or medication.
A moment of inattention while operating power
tools may result in serious personal injury
-Use clamps or another practical way to se-
cure and support the workpiece to a stable
platform. Holding the work by your hand or
against the body leaves it unstable and may
lead to loss of control
USE AND CARE
-This machine may only be started and operated
by persons familiar with crosscut saws and
are aware of the dangers associated with the
operation of crosscut saws. Persons under 18
years of age may use this machine only in the
course of their vocationally training, under the
supervision of an instruction.
-These operating instructions are intended
for people with basic technical knowledge
regarding the operation of a machine like this.
Inexperienced persons are strongly advised
to seek competent advice and guidance from
an experienced person before operating this
machine.
-Keep bystanders, particularly children, out of
the danger zone. Do not permit other persons
to touch the machine or power cable while it is
running
- Do not let persons, especially children, not
involved in the work touch the appliance or the
extension cord and keep them away from the
work area.
- When not in use, the appliance should be
stored in a dry locked-up place, put of reach of
children.
- Use the right the appliance. Do not force small
appliances to do the job of a heavy-duty tool.
- Do not use the appliance for purposes not
intended, for example do not use circular saws
to cut tree limbs or logs.
- If devices are provided for the connection of
dust extraction and collection facilities, ensure
these are connected and properly used. Use of
dust collection can reduce dust-related hazards.
- Do not overreach. Keep proper footing and
balance at all times. This enables better control
of the power tool in unexpected situations.
- Keep cutting tools sharp and clean. Properly
maintained cutting tools with sharp cutting
edges are less likely to bind and are easier to
control
-Follow instructions for lubricating, chain
tensioning and changing accessories.
Improperly tensioned or lubricated chain may ei-
ther break or increase the chance for kickback.
-Keep handles dry, clean, and free from oil
and grease. Greasy, oily handles are slippery
causing loss of control.
- Disconnect the appliance from the mains when
not in use and before undertaking any cleaning
task.
- Unplug the appliance from the mains before
replacing any accessory.
- Remove any adjusting key or wrench before
turning the power tool on. A wrench or a key left
attached to a rotating part of the power tool may
result in personal injury
- Prevent unintentional starting. Ensure the
switch is in the off-position before connecting
the power source and/or battery pack, picking
up or carrying the tool. Carrying power tools
with your nger on the switch or energizing pow-
er tools that have the switch on invites accidents
- Never use the machine without guard. Keep
guards in place.
-Always keep sufcient distance to the saw
blade. Use suitable feeding aids, if necessary.
Keep sufcient distance to driven components
when operating the machine.
-Wait for the saw blade to come to a complete
stop before removing cutoffs, scrap, etc, from
the work area.
-Do not attempt to stop the saw blade by pushing
the work piece against its side.
-Ensure that when turning ON no tools or loose
parts are left on or in the machine.
-Wear gloves when changing the cutting blade
-Store the saw blade(s) in such manner that
nobody can get hurt.
-Ensure that riving knife is correctly set when

working in table saw mode.
-Do not jam work pieces.
-Make sure the saw blade is suitable for the work
piece material.
-Cut thin or thin-walled work pieces only with
netoothed saw blades.
-Always use sharp saw blades.
-If in doubt, check work piece for inclusion of
foreign matter (e.g. nails or screws)
-Cut only stock of dimensions that allow for safe
and secure holding while cutting.
-Never cut bundes or more than one work pieces
at a same time the individual pieces cannot be
properly secured and controlled. Risk of person-
al injury if individual pieces are caught by the
saw blade uncontrolled.
-Never attempt to cut any work pieces which
contain: ropes, strings, cords, cables or wires,
or to which any of the above are attached.
-Minimize the amount of wood dust escaping
from the machine and the job site to the envi-
ronment. (Remove wood dust deposit, x any
leakages on the dust collector, ensure good
ventilation…)
-Make sure the riving knife is not bend. A bent
riving knife will push the work piece against the
side of the saw blade, causing noise.
SERVICE
- This electric tool complies with the relevant
safety rules. Repairs should only be carried out
by qualied persons using original spare parts,
otherwise this may result in considerable danger
to the user.
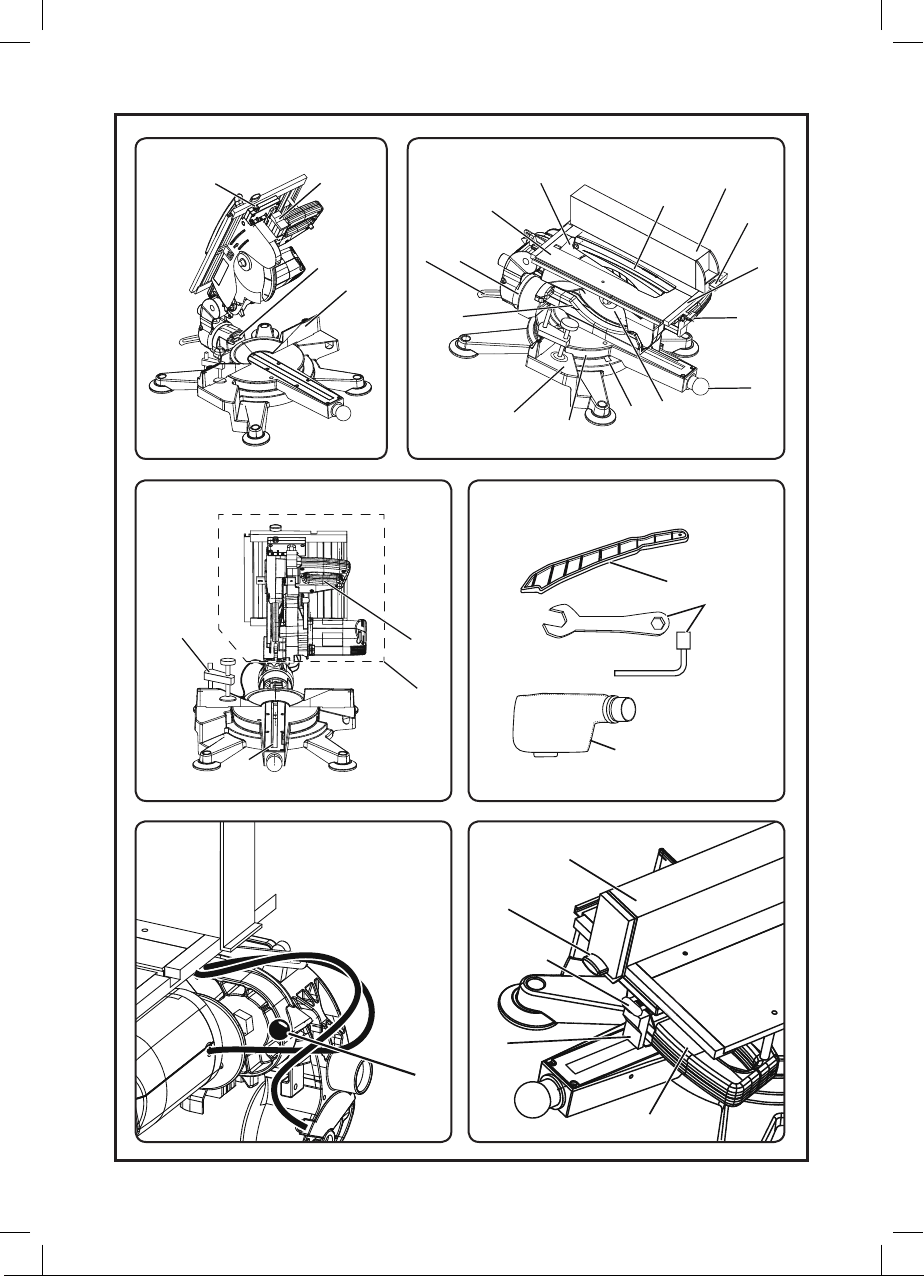
DESCRIPTION
1- Upper saw table
2- Riving Knife
3- Blade guard
4- Rip Fence
5- Tip Fence Knob
6- Safety lock
7- ON/OFF Switch
8-Switch A
9- lock knob
10- Miter angle scale display
11- Miter table
12- Baseplate
13- Fende
14- Lower blade guard
15- Scale
16- Bevel locking lever
17- Scale
18- Blade
19- Sawhead
20- Trigger
21- Kerf plate
22- Lock down pin
24- Push Stick
25- Work clamp
26- Hexagon spanner
28- Dust bag
29- Switch B
If the model of your appliance does not have the
accessories described above, they can also be
bought separately.

INSTALLATION AND TRANSPORT
- Remove the box used to protect the machine
during transport and keep it intact for future
transport or storage.
-CAUTION Do not carry the machine by the han-
dle; the handle is not designed to bear the entire
weight of the machine. To carry the machine,
hold it on both sides of the base (12).
INSTALLATION (FIG.14)
- Lift the machine out of the box with the help of
another person.
- Turn rotating table into 0º position and tighten
the mitre lock.
- Note: If the machine is to be mounted on a
workstand, do not install the rubber feet.
- To install the rubber feet, carefully turn the
machine over to the right, so it is supported by
the motor.
- Fit the nut (A3) into the hole on the bottom of
the rubber foot.
- Insert the Allen head screw (A1) into the ma-
chine’s foot from the top. Attach the rubber foot
(A2) with the previously inserted nut (A3) to the
screw.
- Tighten the rubber foot hand-tight only.
- Tighten screw with the Allen key hand-tight only.
- DANGER! Risk of injury by incorrect handling
when lifting the machine or turning the machine
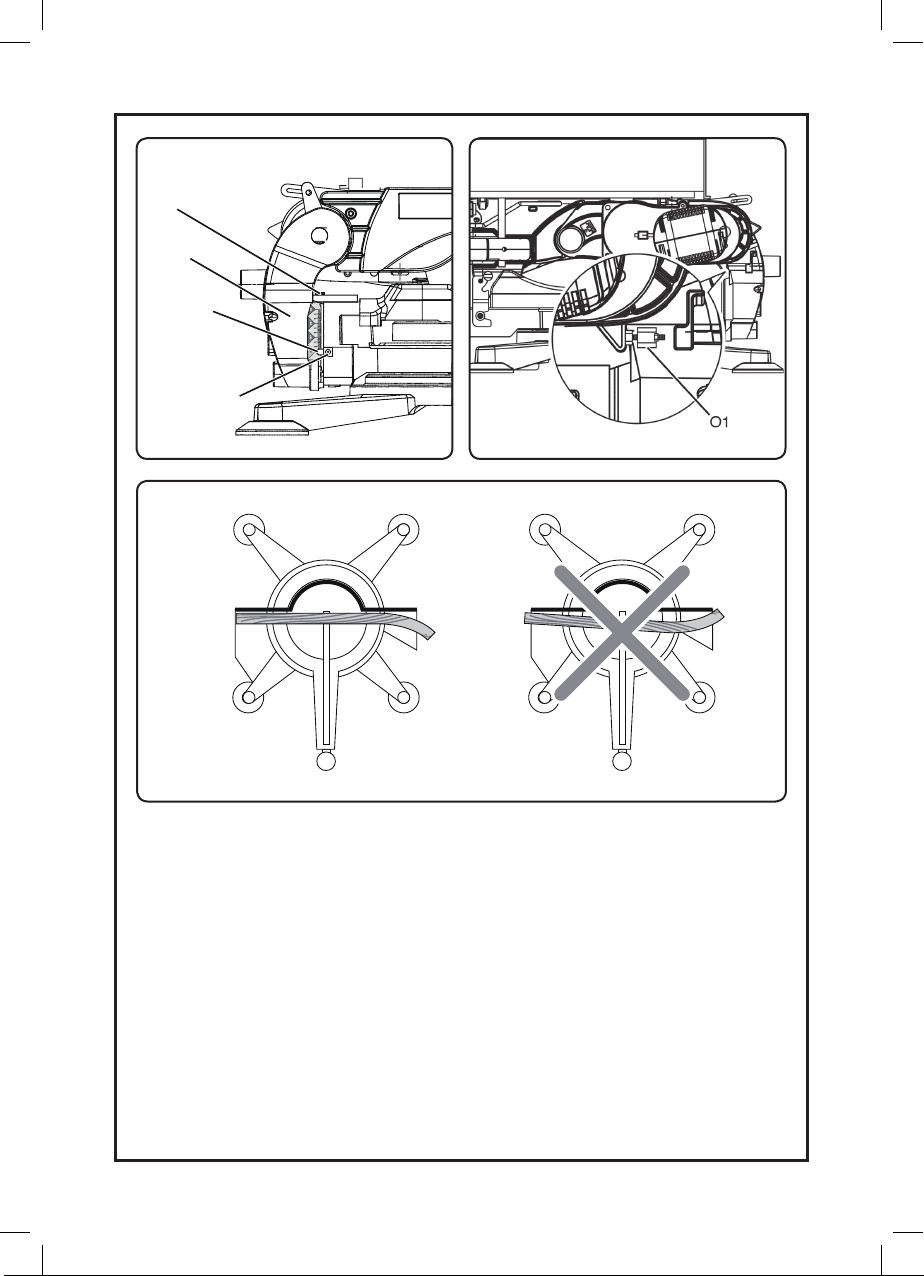
over. Always hold machine at the base (12).
- Place machine on a suitable surface:
- All four feet must rmly rest on the surface.
- The ideal height for the surface is approx
.800mm.
- The saw must stand securely, even when cut-
ting larger work pieces.
- Keep the packaging for future use, or separate
by material and dispose of in an environmentally
friendly manner.
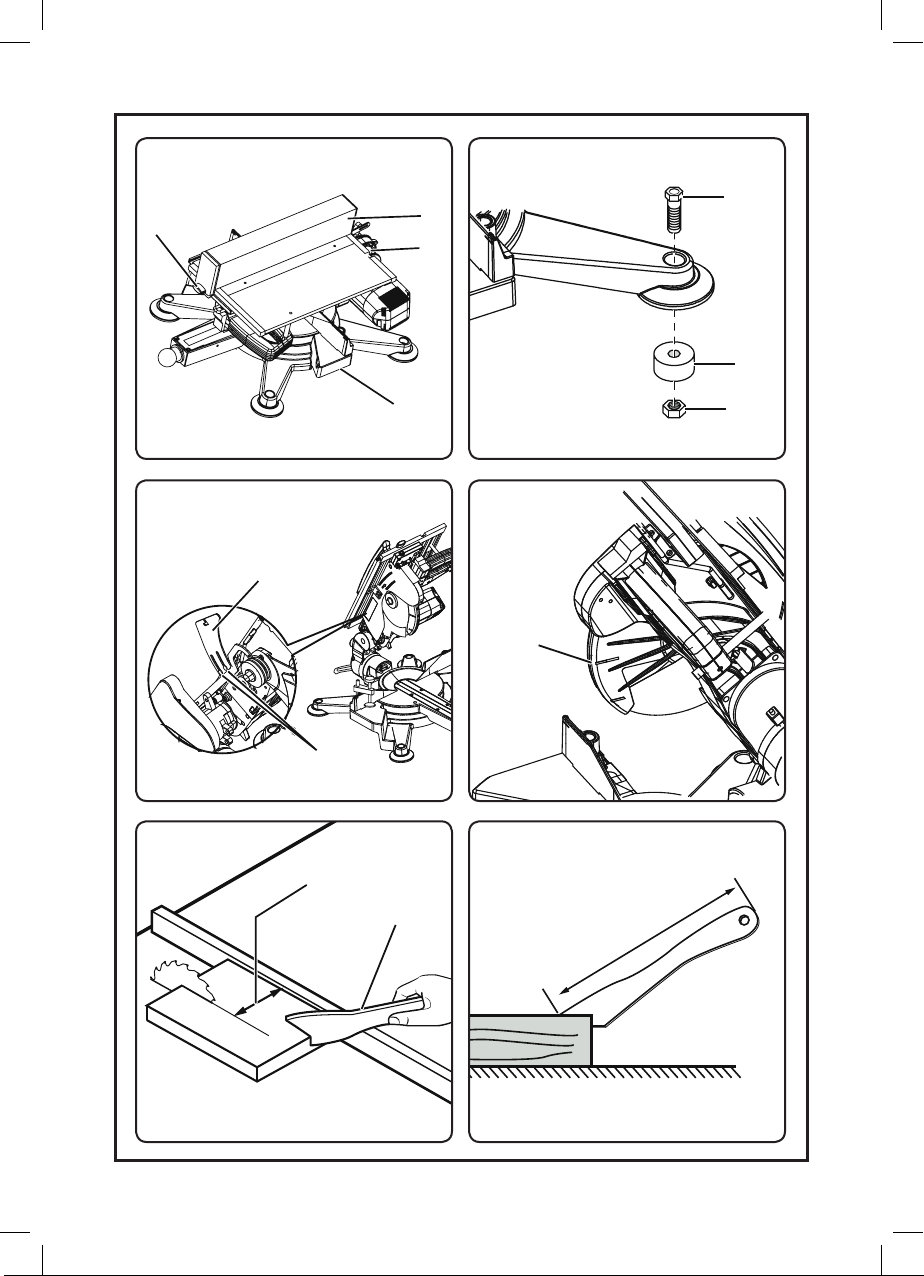
TRANSPORT (FIG.5, 12, 13)
- Place the lower blade guard (14) from the left
hand side in front of the kerf plate’s rear end
and push towards the rear.
- Swing sawhead down and engage the lock
down pin (22).
- Place the rip fence over the blade guard and
secure in position
- Lift the machine by holding it on both sides of
the base (12).
SPECIFICATIONS
Voltage 220-240 V~
Power S1 1600 W S6 25% 1800W
Protection Class II
Degree of protection IP20
Saw blade speed 4000 min-1
Saw blade diameter 305 mm
Dimensions (machine in packaging) 710 x 585 x 470 mm
Maximum work piece cross section
0º x 90º
45º x 90º
0º x 45º
45º x 45º
Cutting capacities in the table saw
100x170 mm
100x118 mm
67x170 mm
62x62 mm
52 mm
Gross Weight 26.5 Kg
Net Weight: (it must include all accessories) 22 Kg
Sound power Level LWA
(according ISO 3744)
105,5 dB(A)
Sound pressure level at operator LPA
(according ISO 3744)
92.5 dB(A)
Effective value of weighted acceleration (vibration at handle) 1.74 m/s2
Table of contents
Languages:
Other Casals Saw manuals


