Casio 3047 User manual

Operation Guide 3047
1
MO0602-EA
Getting Acquainted
Congratulations upon your selection of this CASIO watch. To get the most out
of your purchase, be sure to read this manual carefully.
Applications
The built-in sensors of this watch measure direction, barometric pressure,
temperature and underwater depth. Measured values are then shown on the
display. Such features make this watch useful when hiking, mountain
climbing, skin diving, or snorkeling, or when engaging in other such outdoor
activities.
Keep the watch exposed to bright light
The electricity generated by the solar cell of the
watch is stored by a built-in battery. Leaving or
using the watch where it is not exposed to light
causes the battery to run down. Make sure the
watch is exposed to light as much as possible.
••
••
•When you are not wearing the watch on your
wrist, position the face so it is pointed at a
source of bright light.
••
••
•You should try to keep the watch outside of
your sleeve as much as possible. Charging is
reduced significantly if the face is only partially
covered.
l
l
l
l
l
l
l
l
l
l
l
Bright Light
Solar cell
••
••
•The watch continues to operate, even when it is not exposed to light.
Leaving the watch in the dark can cause the battery to run down, which will
cause some watch functions to be disabled. If the battery goes dead, you
will have to re-configure watch settings after recharging. To ensure normal
watch operation, be sure to keep it exposed to light as much as possible.
Bright Light
Electrical
energy
All
functions
enabled
LEVEL 1
LEVEL 2
LEVEL 3
LEVEL 4
Charge
Solar cell
(Converts light to
electrical power.)
Rechargeable battery
LEVEL 1
LEVEL 2
LEVEL 3
LEVEL 4
Some
functions
disabled
Dis-
charge
Battery charges in the light. Battery discharges in the dark.
If the display of the watch is blank...
If the display of the watch is blank, it means that the watch’s Power Saving
function has turned off the display to conserve power.
•See “Power Saving Function” for more information.
Warning!
•The measurement functions built into this watch are not intended for
taking measurements that require professional or industrial precision.
Values produced by this watch should be considered as reasonable
representations only.
•When engaging in mountain climbing or other activities in which losing
your way can create a dangerous or life-threatening situation, always be
sure to use a second compass to confirm direction readings.
•This watch is intended for use up to skin diving and snorkeling. Never
use this watch while scuba diving.
•Never operate the buttons of the watch while underwater.
•CASIO COMPUTER CO., LTD. assumes no responsibility for any loss,
or any claims by third parties that may arise through the use of this
watch.
(Light)
About This Manual
•Button operations are indicated using the
letters shown in the illustration.
•Each section of this manual provides you with
the information you need in order to perform
operations in each mode. Further details and
technical information can be found in the
“Reference” section.
•The actual level at which some functions are disabled depends on the
watch model.
•Frequent display illumination can run down the battery quickly and require
charging. The following guidelines give an idea of the charging time
required to recover from a single illumination operation.
Approximately five minutes exposure to bright sunlight coming in through
a window
Approximately 50 minutes exposure to indoor fluorescent lighting
•Be sure to read “Power Supply” for important information you need to
know when exposing the watch to bright light.
•
Pressing A, B, or Cwhile in the Timekeeping Mode directly enters the
applicable sensor mode. If you want to go to a sensor mode from the Depth Data
Recall, Countdown Timer, Stopwatch, World Time, Alarm, or Receive Mode, go
to the Timekeeping Mode first, and then press one of the above buttons to enter
a sensor mode.
Timekeeping Mode
General Guide
•The illustration below shows which buttons you need to press to navigate
between modes.
•In any mode, press Lto illuminate the display.
Stopwatch
Mode
World Time
Mode Alarm Mode
Press D.
▲
▲
▲
▲
▲
Countdown
Timer Mode
▲
▲
▲
▲
Barometer/
Thermometer Mode Depth Gauge Mode
Press B.
Digital
Compass Mode
Press D.
▲
▲
Press C.
Press A.
▲
▲
▲
▲
Press B.Press C.
Press A.
▲
Press C.
Sensor Modes
Depth Data
Recall Mode
Receive Mode

Operation Guide 3047
2
Radio-controlled Atomic Timekeeping
This watch receives a time calibration signal and updates its time setting
accordingly.
•This watch is designed to pick up the time calibration signal transmitted in
Germany (Mainflingen), England (Rugby), and the United States (Fort
Collins) and the time calibration signals transmitted in Japan.
Current Time Setting
This watch adjusts its time setting automatically in accordance with a time
calibration signal.You also can perform a manual procedure to set the time
and date, when necessary.
•The first thing you should do after purchasing this watch is to specify your
Home City (the city where you normally will use the watch). For more
information, see “To specify your Home City”below.
•When using the watch outside the areas covered by the time signal
transmitters, you will have to adjust the current time setting manually as
required. See
“Timekeeping”for more information about manual time
settings.
•
The U.S. time calibration signal can be picked up by the watch while in North America.
* The term “North America”in this manual refers to the area that consists of
Canada, the continental United States, and Mexico.
To specify your Home City
1. In the Timekeeping Mode, hold down Euntil
the city code starts to flash, which indicates
the setting screen.
2. Press C(east) and D(west) to select the
city code you want to use as your Home City.
LON : London
PAR, BER : Paris, Berlin, Milan, Rome,
Amsterdam, Hamburg, Frankfurt,
Vienna, Barcelona, Madrid
ATH : Athens
TYO, SEL :Tokyo, Seoul
NYC : New York, Detroit, Miami, Boston, Montreal
CHI :
Chicago, Houston, Dallas/Fort Worth, New Orleans, Winnipeg, Mexico
City
DEN : Denver, El Paso, Edmonton, Culiacan
l
l
l
l
l
l
l
l
l
l
l
l
l
l
l
l
l
l
l
l
l
City code
LAX : Los Angeles, San Francisco, Las Vegas, Seattle/Tacoma,
Vancouver, Tijuana
3. Press Eto exit the setting screen.
•Normally, your watch should show the correct time as soon as you select
your Home City code. If it does not, it should adjust automatically after the
next auto receive operation (in the middle of the night).You also can
perform manual receive or you can set the time manually.
•The watch will receive the time calibration signal automatically from the
applicable transmitter (in the middle of the night) and update its settings
accordingly. For information about the relationship between city codes and
transmitters, see “Transmitters”.
•See the maps under “Reception Ranges”for information about the
reception ranges of the watch.
•You can disable time signal reception, if you want. See “To turn auto receive
on and off”for more information.
Time Calibration Signal Reception
There are two different methods you can use to receive the time calibration
signal: auto receive and manual receive.
•Auto Receive
With auto receive, the watch receives the time calibration signal automatically
up to six times a day. When any auto receive is successful, the remaining
auto receive operations are not performed. For more information, see “About
Auto Receive”.
•Manual Receive
Manual receive lets you start a time calibration receive operation with the press
of a button. For more information, see “To perform manual receive”.
Important!
•When getting ready to receive the time calibration signal, position the watch
as shown in the nearby illustration, with its 12 o’clock side facing towards a
window. Make sure there are no metal objects nearby.
12 o’clock
or
•The watch should not be facing the wrong way.
•Proper signal reception can be difficult or even impossible under the
conditions listed below.
Inside or
among
buildings
Inside a
vehicle
Near a
construction
site, airport,
or other
sources of
electrical
noise
Near high-
tension
power lines
Among or
behind
mountains
Near
household
appliances,
office
equipment,
or a mobile
phone
•The time calibration signal the watch will attempt to pick up depends on its
current Home City code setting as shown below.
Home City Code
LON,
PA R ,BER,ATH
TYO,SEL
NYC,CHI,DEN,LAX
Frequency
60.0 kHz
77.5 kHz
40.0 kHz
60.0 kHz
60.0 kHz
Transmitter
Rugby (England)
Mainflingen (Germany)
Fukushima (Japan)
Fukuoka/Saga (Japan)
Fort Collins, Colorado
(the United States)
•Signal reception normally is better at night than during the day.
•Time calibration signal reception takes from two to seven minutes, but in
some cases it can take as long as 14 minutes. Take care that you do not
perform any button operations or move the watch during this time.
Reception Ranges
Rugby
Mainflingen
1,500 kilometers
500 kilometers
Fort
Collins
2,000 miles
(3,000 kilometers)
600 miles
(1,000 kilometers)
1,000
kilometers
1,000
kilometers
Fukuoka/Saga
500 kilometers
Fukushima
500
kilometers
•Signal reception may not be possible at the distances noted below during
certain times of the year or day. Radio interference may also cause
problems with reception.
Mainflingen (Germany) or Rugby (England) transmitters: 500 kilometers
(310 miles)
Fort Collins (United States) transmitter: 600 miles (1,000 kilometers)
Fukushima or Fukuoka/Saga (Japan) transmitters: 500 kilometers (310
miles)
•Even when the watch is within the reception range of the transmitter, signal
reception will be impossible if the signal is blocked by mountains or other
geological formations between the watch and signal source.
•Signal reception is affected by weather, atmospheric conditions, and
seasonal changes.
•See the information under “Signal Reception Troubleshooting”if you
experience problems with time calibration signal reception.
About Auto Receive
The watch receives the time calibration signal automatically up to six times a
day. When any auto receive is successful, the remaining auto receive
operations are not performed. The reception schedule (calibration times)
depends on your currently selected Home City, and whether standard time or
Daylight Saving Time is selected for your Home City.
Your Home City Auto Receive Start Times
123456
LON Standard Time
1:00 am 2:00 am 3:00 am 4:00 am 5:00 am Midnight
Daylight Saving Time
2:00 am 3:00 am 4:00 am 5:00 am Midnight 1:00 am
next day
PAR,Standard Time
2:00 am 3:00 am 4:00 am 5:00 am Midnight 1:00 am
BER
next day
Daylight Saving Time
3:00 am 4:00 am 5:00 am Midnight 1:00 am 2:00 am
next day next day
ATH Standard Time
3:00 am 4:00 am 5:00 am Midnight 1:00 am 2:00 am
next day next day
Daylight Saving Time
4:00 am 5:00 am Midnight 1:00 am 2:00 am 3:00 am
next day next day next day
TYO,Standard Time
Midnight 1:00 am 2:00 am 3:00 am 4:00 am 5:00 am
SEL
NYC,Standard Time and
Midnight 1:00 am 2:00 am 3:00 am 4:00 am 5:00 am
CHI,
Daylight Saving Time
DEN,
LAX
Note
•When a calibration time is reached, the watch will receive the calibration
signal only if it is in either the Timekeeping Mode or World Time Mode.
Reception is not performed if a calibration time is reached while you are
configuring settings.
•Auto receive of the calibration signal is designed to be performed early in
the morning, while you sleep (provided that the Timekeeping Mode time is
set correctly). Before going to bed for the night, remove the watch from your
wrist, and put it in a location where it can receive the signal easily.

Operation Guide 3047
3
•The watch receives the calibration signal for two to seven minutes everyday
when the time in the Timekeeping Mode reaches each of the calibration
times. Do not perform any button operation within seven minutes before or
after any one of the calibration times. Doing so can interfere with correct
calibration.
•Remember that reception of the calibration signal depends on the current
time in the Timekeeping Mode. The receive operation will be performed
whenever the display shows any one of the calibration times, regardless of
whether or not the displayed time actually is the correct time.
About the Receiving Indicator
The receiving indicator shows the strength of the calibration signal being
received. For best reception, be sure to keep the watch in a location where
signal strength is strongest.
The receiving indicator is displayed while an auto or manual receive operation
is in progress.
•Even in an area where signal strength is strong, it takes about 10 seconds
for signal reception to stabilize enough for the receiving indicator to indicate
signal strength.
Receiving
indicator
Weak
(Level 1)
Strong
(Level 5)
l
l
l
l
l
l
l
l
l
l
l
l
•Use the receiving indicator as a guide for checking signal strength and for
finding the best location for the watch during signal receive operations.
•Following reception of the time calibration signal and calibration of the
watch’s time setting, the Level 5 receiving indicator will remain on the
display in all modes. The Level 5 receiving indicator will not be displayed if
signal reception was unsuccessful or after you adjust the current time
setting manually.
•The Level 5 receiving indicator is displayed only when the watch is able to
receive both time and date data successfully. It does not appear when only
time data is received.
•The Level 5 receiving indicator indicates that at least one of the auto
calibration signal receive operations was successful. Note, however, that
the Level 5 receiving indicator disappears from the display each day when
the first auto receive operation of the day is performed.
To perform manual receive
1. Enter the Receive Mode.
2. Place the watch on a stable surface so its 12
o’clock side is facing towards a window.
3. Hold down Cfor about two seconds until
RC starts to flash on the display.
•Time calibration signal reception takes from
two to seven minutes. Take care that you do not
perform any button operations or move the
watch during this time.
•If the receive operation is successful, the
reception date and time appear on the display,
along with the GET indicator.
The watch will enter the Receive Mode if you
press Cor if you do not perform any button
operation for about one or two minutes.
l
l
l
l
l
l
l
l
l
l
l
l
l
l
l
l
l
l
l
l
l
l
l
l
l
l
l
l
Receiving
Receive
successful
•If the current reception fails but a previous
reception was successful, the display shows
the previous reception’s date and time, and the
ERR indicator. x:xx indicates that none of
the reception operations were successful.
The watch will enter the Receive Mode without
changing the time setting if you press Cor if
you do not perform any button operation for
about three minutes.
Note
•To interrupt a receive operation and return to
the Receive Mode, press C.
Receive failed
If there was a previously
successful reception
If no reception was
successful
To turn auto receive on and off
1. Enter the Receive Mode.
2. In the Receive Mode, hold down Euntil the
current auto receive setting (ON or OFF)
starts to flash. This is the setting screen.
•Note that the setting screen will not appear if
the currently selected Home City is one that
does not support time calibration reception.
3. Press Cto toggle auto receive on (ON) and
off (OFF).
4. Press Eto exit the setting screen.
•For information about city codes that support signal receive, see “To specify
your Home City”.
To check the latest signal reception results
Enter the Receive Mode.
•When receive is successful, the display shows
the time and date that receive was successful.
x:xx indicates that none of the reception
operations were successful.
•To return to the Timekeeping Mode, press D.
l
l
l
l
l
l
l
l
l
l
l
l
l
l
l
l
l
l
l
l
l
l
l
l
l
l
l
On/Off
status
•The watch is not in the
Timekeeping, World Time, or
Receive Mode.
•Your current Home City is not
one of the following: LON,PAR,
BER,ATH,TYO,SEL,NYC,
CHI,DEN, or LAX
•You changed the time setting
manually.
•The DST setting was changed
manually in the World Time
Mode.
•
You pressed a button while signal
receive was in progress.
•
Even if receive is successful, the
Level 5 receiving indicator
disappears from the display
each day when the first auto
receive operation of the day is
performed.
•
Time data (hour, minutes,
seconds) only was received
during the last receive operation.
The Level 5 receiving indicator
appears only when time data
and date data (year, month, day)
are both received.
Cannot perform
manual receive.
Auto receive is
turned on, but
the Level 5
receiving
indicator does
not appear on
the display.
•Enter the Timekeeping,
World Time, or Receive
Mode and try again.
•Select LON,PAR,BER,
ATH,TYO,SEL,NYC,
CHI,DEN, or LAX as
your Home City.
•Perform manual signal
receive or wait until the
next auto signal receive
operation is performed.
•Check to make sure the
watch is in a location
where it can receive the
signal.
What you should doProblem Probable Cause
Signal Reception Troubleshooting
Check the following points whenever you experience problems with signal
reception.
•If the time is one hour off, the
DST setting may be incorrect.
•The Home City code setting is
not correct for the area where
you are using the watch.
•Change the DST setting
to Auto DST.
•Select the correct Home
City code.
Time setting is
incorrect
following signal
reception.
•For further information, see “Important!”under “Time Calibration Signal
Reception”and “Radio-controlled Atomic Timekeeping Precautions”.
Digital Compass
A built-in bearing sensor detects magnetic north and indicates one of 16
directions on the display. Direction readings are performed in the Digital
Compass Mode.
•You can calibrate the bearing sensor if you suspect the direction reading is
incorrect.
To enter and exit the Digital Compass Mode
1. While in the Timekeeping or Barometer/Thermometer Mode, press Ato
enter the Digital Compass Mode.
•At this time, the watch starts a Digital Compass operation immediately.
After about two seconds, letters appear on the display to indicate the
direction that the 12 o’clock position of the watch is pointing.
2. Press Dto return to the Timekeeping Mode.

Operation Guide 3047
4
To take a direction reading
1. Enter the Digital Compass Mode.
2. Place the watch on a flat surface or, if you are
wearing the watch, make sure that your wrist
is horizontal (in relation to the horizon).
3. Point the 12 o’clock position of the watch in
the direction you want to measure.
4. Press Ato start a Digital Compass
measurement operation.
•After about two seconds, the direction that the
12 o’clock position of the watch is pointing
appears on the display.
•Also, four pointers appear to indicate magnetic
north, south, east, and west.
•After the first reading is obtained, the watch
continues to take direction readings
automatically each second, for up to 20
seconds.
Direction
indicator
Angle value (in degrees)
Magnetic north pointer
12 o’clock position
NW
0°
WNW
W
WSW
SW
SSW
S
SSE
SE
ESE
E
ENE
NE
NNE
N
NNW
•During measurement, the watch displays an angle value, a direction
indicator, and four direction pointers, which change dynamically when the
watch is moved. After measurement is complete, the angle value,
direction indicator, and four direction pointers are frozen in accordance
with the last measurement.
Note
•Note that taking a measurement
while the watch is not horizontal
(in relation to the horizon) can
result in large measurement error.
•The margin of error for the angle value is ±11 degrees. If the indicated
direction is northwest (NW) and 315 degrees, for example, the actual
direction can be anywhere from 304 to 326 degrees.
•See “Digital Compass Precautions”for other important information about
taking direction readings.
•Any ongoing direction measurement operation is paused temporarily while
the watch is performing an alert operation (daily alarm, Hourly Time Signal,
countdown timer alarm) or while the watch illuminates the display (by
pressing L). The measurement operation resumes for its remaining
duration after the operation that caused it to pause is finished.
•The following table shows the meanings of each of the direction
abbreviations that appear on the display.
Direction
Meaning
Direction
Meaning
Direction
Meaning
Direction
Meaning
NNE
ESE
SSW
WNW
NE
SE
SW
NW
North-
northeast
East-
southeast
South-
southwest
West-
northwest
Northeast
Southeast
Southwest
Northwest
East-
northeast
South-
southeast
West-
southwest
North-
northwest
ENE
SSE
WSW
NNW
North
East
South
West
N
E
S
W
Barometer/Thermometer
This watch uses a pressure sensor to measure air pressure (barometric
pressure) and a temperature sensor to measure temperature.
•You can calibrate the temperature sensor and the pressure sensor if you
suspect that readings are incorrect.
To take barometric pressure and temperature readings
Pressing Bin the Timekeeping or Digital Compass Mode enters the
Barometer/Thermometer Mode and starts taking barometric pressure and
temperature measurements automatically.
Press Eto
toggle between
screens.
History Graph and
Barometric Pressure
History graph
Temperature
Barometric
pressure
Temperature and
Barometric Pressure
▲
▲
•It can take up to four or five seconds for the barometric pressure reading to
appear after you enter the Barometer/Thermometer Mode.
•Barometric pressure is displayed in units of 1hPa (or 0.05 inHg).
•The displayed barometric pressure value changes to xxxx hPa (or inHg) if
a measured barometric pressure falls outside the range of 600 hPa to 1100
hPa (17.70 inHg to 32.45 inHg). The barometric pressure value will be
displayed again as soon as the measured barometric pressure is within the
allowable range.
•Temperature is displayed in units of 0.1°C (or 0.2°F).
•The displayed temperature value changes to ---. -°C (or °F) if a
measured temperature falls outside the range of –10.0°C to 60.0°C (14.0°F
to 140.0°F). The temperature value will be displayed again as soon as the
measured temperature is within the allowable range.
•In some areas, barometric pressure is expressed in millibars (mb) instead
of hecto-pascals (hPa). It really makes no difference, because 1hPa = 1mb.
•You can select either hectopascals (hPa) or inchesHg (inHg) as the display
unit for the measured barometric pressure, and Celsius (°C) or Fahrenheit
(°F) as the display unit for the measured temperature value. See “To specify
barometric pressure and temperature units”.
•See “Barometer and Thermometer Precautions”for important precautions.
Barometric Pressure Graph
Barometric pressure indicates changes in the atmosphere. By monitoring
these changes you can predict the weather with reasonable accuracy.
In every mode except for the Depth Gauge Mode, your watch takes barometric
pressure readings every two hours (at the top of each even-numbered hour).
Measurement results are used to produce barometric pressure graph and
barometric pressure differential pointer readings.
The barometric pressure graph shows readings of previous measurements for
up to 30 hours. The horizontal axis of the graph represents time, with each
dot standing for two hours. The rightmost dot (flashing) represents the most
recent reading. The vertical axis of the graph represents barometric pressure,
with each dot standing for the relative difference between its reading and that
of the dots next to it. Each dot represents 1hPa.
The following shows how to interpret the data that appears on the barometric
pressure graph.
A rising graph generally means improving weather.
A falling graph generally means deteriorating weather.
Note that if there are sudden changes in weather or
temperature, the graph line of past measurements may run
off the top or bottom of the display. The entire graph will
become visible once barometric conditions stabilize.
The following conditions cause the barometric pressure
measurement to be skipped, with the corresponding point on
the barometric pressure graph being left blank.
•Barometric reading that is out of range (600 hPa/mb to 1,100 hPa/mb or
17.70 inHg to 32.45 inHg)
•Sensor malfunction
Not visible on
the display.
Barometric Pressure Differential Pointer
This pointer indicates the relative difference between the most recent
barometric pressure reading indicated on the barometric pressure graph, and
the current barometric pressure value displayed in the Barometer/
Thermometer Mode.
•Pressure differential is indicated in the range of ±15 hPa, in 1-hPa units.
•The barometric pressure differential pointer is not displayed when the
displayed current barometric value is outside of the allowable measurement
range (600 to 1,100 hPa).
•Barometric pressure is calculated and displayed using hPa as the standard.
The barometric pressure differential also can be read in inHg units as
shown in the illustration.
Pressure differential
examples in the
illustration are indicated
in 10 hPa/0.3 inHg
steps.
Current pressure
less than most
recent measured
pressure
Points to 3 o’clock for
differentials outside
the range of ±15 hPa/
±0.44 inHg.
Current pressure
greater than most
recent measured
pressure
Barometric pressure
differential pointer
inHg values
hPa values

Operation Guide 3047
5
To turn display of the barometric pressure differential pointer on
and off
1. In the Barometer/Thermometer Mode, hold
down Euntil SET appears in the upper
display area.
2. Release E, and wait for four or five more
seconds until either OFF or the current
reference temperature value (if set) starts to
flash. This is the setting screen.
3. Press Dtwice to display the pointer on/off
setting screen.
4. Press Cto toggle display of the barometric
pressure differential pointer on (ON displayed)
and off (OFF displayed).
5. When the setting is the way you want, press
Eto exit the setting screen.
l
l
l
l
l
l
l
l
l
l
l
l
l
l
l
l
l
l
l
l
l
l
l
l
l
About Barometric and Temperature Measurements
•Barometric pressure and temperature measurement operations are
performed as soon as you enter the Barometer/Thermometer Mode. After
that, barometric pressure and temperature measurements are taken every
five seconds.
•You also can perform a barometric pressure and temperature measurement
at any time by pressing Bin the Barometer/Thermometer Mode.
Depth Gauge
The pressure sensor of the watch also can be used to perform underwater
depth measurement while skin diving or snorkeling. Depth readings are taken
every three seconds, and displayed as a value up to 30 meters (98 feet).You
can store the data of your last dive in log memory, including total time
submerged, maximum depth, and water temperature at the maximum depth
attained during your dive. You can view the log data of your last dive before
beginning a new dive, and even take direction readings while in the Depth
Gauge Mode.
Important!
•This watch is intended for use up to skin diving and snorkeling. Never use
this watch while scuba diving.
•This watch is designed to start depth measurement and record data in
memory after a depth of 1 meter (4 feet) is reached. Because of this, the
explanations in this manual uses the term “submerged”to refer to any
depth deeper than 1 meter, and the “on the surface”to refer to any depth
shallower than 1 meter.
•
Leaving the watch in the Depth Gauge Mode while not in the water consumes
battery power. Exit the Depth Gauge Mode whenever you are not using it.
What is “a dive”?
A dive starts when you pass a depth of one meter (about four feet) while the
watch is in the Depth Gauge Mode. The dive ends when you are on the
surface and exit the Depth Gauge Mode. A dive does not end if you surface
but do not exit the Depth Gauge Mode.
Enter the Depth Gauge Mode. Exit the Depth Gauge Mode.
Start of dive
Total time submerged: 1 minute 50 seconds
Maximum depth 20 sec.
30 sec.
1 min.
Depth = 1.0 m
(4 ft.)
End of dive
•Remember that the term “dive”as used in this manual refers to skin diving
or snorkeling only.
•The watch will start depth measurement automatically when the sensor
detects that your depth exceeds one meter (about four feet).
•Depth measurement stops automatically whenever your depth becomes
less than one meter (four feet).
•Depth measurement restarts whenever you re-submerge past one meter
(four feet). All data that is measured between the start of the dive and the
end of the dive is treated as part of the same dive, no matter how many
times you surface during the dive.
l
l
l
l
l
l
l
l
Current
depth
Elapsed measurement time
3. When you want to end the dive, return to the surface and then press Dto
exit the Depth Gauge Mode.
•Exiting the Depth Gauge Mode causes the data accumulated during the
dive (time submerged, maximum depth attained, water temperature at
maximum depth) to be stored in log memory.
•The elapsed time is displayed in minutes and seconds for the first hour.
After the first hour, it switches to hours and minutes.
•Pressing Ewhile your current depth is less than one meter will toggle the
display between the graph and the temperature screens.
•If the watch stays at a depth of less than one meter and you do not perform
any operation for about one hour, the watch will revert to the Timekeeping
Mode automatically.
•The watch will not exit the Depth Gauge Mode if any value other than
(or 0) is displayed for the depth when you press D. If (or 0) does not
appear on the display even though you are on the surface (depth of less
than 1 meter/4 feet), perform the procedure under “To reset the reference
depth to 0 meters (feet) manually”.
•You can select either meters (m) or feet (ft) as the display unit for depth. For
details, see "To specify the depth unit".
•See “Depth Data Recall Mode”for information about viewing dive data.
Important!
Note the following important precautions whenever using the Depth Gauge
Mode.
Before Skin Diving/Snorkeling
•Before beginning a dive, check to make sure that none of the
following marks are shown on the display.
❑CHG (indicating a weak battery)
❑RECOV (indicating a weak battery)
❑ERR (indicating sensor malfunction)
•Make sure that (or 0) is displayed at your current depth.
•Make sure that the watch is set to the correct time of day.
•Check the glass, case and band for cracks or chips.
•Make sure that the band is fastened securely around your wrist.
While Skin Diving/Snorkeling
•Check to make sure that timer operation and depth measurement are
being performed properly.
•Take care when skin diving/snorkeling near rocks or coral to avoid
scratching the watch.
After Skin Diving/Snorkeling
•To avoid corrosion, rinse your watch thoroughly with fresh water to
remove salt water, dirt, etc. When possible, soak the watch in fresh
water overnight to make sure that all salt is removed.
•When using a metal band, clean inside the gaps in the band
occasionally using a soft toothbrush and soapy water. Failure to do so
can result in corrosion of the timepiece, soiling of clothing or irritation
to sensitive skin.
Depth Graph
Changes in depth are displayed in a graph in the Depth Gauge Mode. The
contents of the graph are updated every three seconds whenever you enter
the Depth Gauge Mode.
•The horizontal axis of the graph represents 3-second time increments, and
the bar on the far right is the latest measurement result.
•The vertical axis represents depth values, in 5-meter steps.
•The graph always indicates depths in meters (m), even if you have feet (ft)
selected as the depth unit.
0 to 5 meters
5.0 to 10 meters
10.0 to 15 meters
15.0 to 20 meters
20.0 to 25 meters
25.0 to 30 meters
More than 30 meters
•If you press a button while a measurement operation is in progress, the
measurement operation is stopped, and the graph is not updated.
•Manually resetting the reference depth to 0 meters will change the pressure
reference value. Because of this, all of the graph’s data will be cleared.
•If an error occurs while a measurement operation is in progress, the graph
bar for that measurement is left blank.
•Pressing Ewhile at a depth of less than one meter will toggle between the
depth graph and the temperature screen.
To perform depth measurement
1. Before beginning a dive, in the Timekeeping,
Digital Compass, or Barometer/Thermometer
Mode, press Cto enter the Depth Gauge
Mode.
•It can take up to four or five seconds until
(or 0) appears on the display.
2. Enter the water and submerge past one meter
(four feet) to start the dive.

Operation Guide 3047
6
•Depth values are displayed in units of 0.1 meter (or 1 foot).
•(or 0) appears on the display whenever your depth is less than one
meter (four feet).
•dEEP is displayed in place of the depth value whenever your depth is
greater than 30 meters (98 feet). If you continue to dive deeper after dEEP
appears, xx.xwill appear in place of the depth value. If xx.xremains on
the display after you surface, hold down Dfor three seconds to exit the
Depth Gauge Mode. If xx.xkeeps appearing in place of the depth value, it
could mean that the sensor is malfunctioning. Take the watch to the place
where you purchased it or to some other CASIO retailer to have it checked.
•If the elapsed measurement time exceeds three hours, the watch will switch
to the Timekeeping Mode automatically and store the data for the current
dive into log memory.
•The progress beeper and auto-repeat timer alarm do not sound while the
watch is in the Depth Gauge Mode.
•The watch can take about five minutes to display the correct water
temperature when there is a great difference between air temperature and
water temperature, when there is a sudden change in water temperature,
etc.
To take a direction reading in the Depth Gauge Mode
••
••
•Never operate the buttons of the watch while underwater.
1. In the Depth Gauge Mode, place the watch on
a flat surface, or if you are wearing the watch,
make sure that your wrist is horizontal (in
relation to the horizon).
2. Point the 12 o’clock position of the watch in
the direction you want to read.
3. While the elapsed measurement time/current
depth screen is displayed, press Ato start
direction reading operation.
•After about two seconds, the direction that the
12 o’clock position of the watch is pointing
appears on the display.
•About five or six seconds after you display the
Digital Compass screen, the watch will return
to the Depth Gauge screen automatically.
•The watch will also return to the Depth Gauge
screen if you press Aagain.
Angle value
(in degrees)
Timekeeping
Mode Time
12 o’clock position
Direction
indicator
Depth Data Recall Mode
You can use the Depth Data Recall Mode to view log data that was recorded
in the Depth Gauge Mode. There is enough memory to store up to 40 log
entries, plus one maximum depth record. Each log entry includes the
following data.
Total Time Submerged: This value shows the cumulative amount of time
(hours, minutes, seconds) that you spend submerged at a depth of
one meter (four feet) or greater.
Maximum depth: This value shows the maximum depth you attained during
the dive.
Dive Date (Month
–
Day)
Water temperature at maximum depth: This value shows the water
temperature at the maximum depth attained during the dive.
The following information is stored in the maximum depth record when a new
maximum is attained.
Total Time Submerged
Maximum depth value: Maximum depth value in memory
Dive Date (Month
–
Day)
Water temperature at maximum depth
•If the depth that is attained is the same as the current maximum depth
value, the older data takes priority and the maximum depth record is not
updated.
•The maximum depth record is not cleared even if you delete the 40 log data
entries.
•Perform the following steps to view the log data that is currently stored in
memory.
Depth Gauge Mode Precautions
•After you enter the Depth Gauge Mode, the watch takes a reference
pressure reading automatically and sets the result a 0 meters (feet). This
means that before starting a dive, you should enter the Depth Gauge Mode
while at the water’s surface, never while the watch is submerged.
•A major change in air temperature or other phenomena while you are using
the Depth Gauge Mode can cause the display to show a value other than 0
meters (feet) when you are at the surface of the water. If this happens, reset
the reference depth to 0 meters (feet). See “To reset the reference depth to
0 meters (feet) manually”for more information.
To view log data
1. Enter the Depth Data Recall Mode.
•This will display the maximum depth record screen.
•Pressing Ewill toggle between the date screen and the temperature
screen.
2. Press Ato display data from the newest to the oldest, or Cto display
from oldest to newest.
Water
temperature
at maximum
depth
Maximum Depth
Data Screen
Total time
submerged
▲
▲
▲
Press
C
.
Press
A
.
Maximum
depth
value
Maximum
depth data
indicator
Date
Old data New data
Total time
submerged
Maximum
depth value
▲
▲
▲
▲
▲
Press
E
.
▲
Press
C
.
▲
Press
A
.
Date
Water temperature
at maximum depth
Press
C
.
Press
A
.
Press
E
.
•The maximum total dive time that can be measured by the watch for a
single dive is three hours. If the total elapsed time for a single dive
exceeds three hours, the upper part of the display will remain at 3:00, and
the maximum depth value in the center of the display will show x:xx.
•
The maximum depth that can be measured by the watch is 30 meters (98
feet). If the maximum depth reached during a dive exceeds 30 meters,
the maximum depth value in the center of the display will show
dEEP
.
To delete log memory data
•The following steps delete all the entries in log
memory.
•You cannot delete individual log entries.
1. Enter the Depth Data Recall Mode.
2. Hold down Bfor about three seconds. CLR
will appear on the display and then start
flashing if you keep Bdepressed.
•If you release Bbefore three seconds pass,
the watch will not enter the data delete mode.
3. Release Bafter CLR starts to flash.
•CLR will continue to flash for about two
seconds, as the log entries are deleted. After
that, xxx will appear on the display.
All log entries deleted
Countdown Timer
You can set a countdown timer start time in the
range of one minute to 60 minutes. An alarm
sounds when the countdown reaches zero. An
auto-repeat feature causes the countdown to
restart automatically when the end of a
countdown is reached, and a progress beeper
signals the progress of the countdown. All of this
makes the countdown timer a valuable tool for
timing the start of a yacht race.
•All of the operations in this section are
performed in the Countdown Timer Mode,
which you enter by pressing D.
Configuring the Countdown Timer
The following are the settings you should configure before actually using the
countdown timer.
•Countdown start time and reset time
•Auto-repeat on/off
•Progress beeper on/off
Timekeeping Mode Time
Seconds
Minutes
Countdown start time
You can set a countdown start time from one minute to 60 minutes.
Auto-repeat
Whenever zero is reached, the watch beeps (auto-repeat timer alarm) and
auto-repeat restarts the countdown automatically from the countdown start
time you set. Turning off auto-repeat causes the countdown to stop and the
countdown start time to appear on the display when the end of the countdown
is reached. Auto-repeat will repeat up to 10 times.
Progress Beeper
The progress beeper actually includes two beepers: a reset time beeper and
a reset period progress beeper.
•The reset time beeper and reset period progress beeper sound only while
the progress beeper is turned on.
Reset Time Beeper
The reset time beeper is similar to the countdown end beeper. When the
progress beeper is turned on, the watch beeps each second of the final 10
seconds before the countdown reaches the reset time.

Operation Guide 3047
7
Reset Period Progress Beeper
The reset period is the portion of the countdown between the reset time and
zero. When the progress beeper is turned on, the watch emits four short
beeps at the top of each minute during the reset period, and 10 seconds
before the end of the countdown.
Countdown Timer Examples
Countdown start time: 10 minutes; Reset time: 5 minutes; Timer mode: Auto-
repeat; Progress beeper: On
10'00"
Start Time Reset Time
0'00"1'00" 0'10"2'00"3'00"4'00"5'00"
Reset Period
Reset Period Progress Beeper
Countdown
End Beeper
Reset Time Beeper
0'01"0'02"0'03"0'04"0'05"0'06"0'07"0'08"0'09"0'10" 0'00"
To configure the countdown timer
1. While the countdown start time is on the
display in the Countdown Timer Mode, hold
down Euntil the countdown start time setting
starts to flash, which indicates the setting
screen.
•If the countdown start time is not displayed,
use the procedure under “To use the
countdown timer”to display it.
2. Press Dto move the flashing in the sequence
shown below to select other settings.
Start
Time
Reset
Time
Timer
Mode
3. When the setting you want to change is flashing, use Cand Ato change
it as described below.
l
l
l
l
l
l
l
l
l
l
l
l
l
l
l
l
l
l
4. Press Ato exit the setting screen.
•The reset time setting must be less than the countdown start time setting.
Setting
Start Time
Reset Time
Timer
Mode
Screen Button Operations
Use C(+) and A(–) to change the setting.
•You can set a start time in the range of 1 to 60
minutes in 1-minute increments.
Use C(+) and A(–) to change the setting.
•You can set a reset time in the range of 1 to 5
minutes in 1-minute increments.
Press Cto toggle between the auto-repeat mode
() and the elapsed time mode ( ).
•An auto-repeat indicator ( ) appears when
the auto-repeat mode is selected.
To turn the progress beeper on and off
Pressing Ewhile the countdown start time is on
the display or while a countdown timer operation
is in progress in the Countdown Timer Mode
toggles progress beeper operation on
( displayed) and off ( not displayed).
Progress beeper
on indicator
To use the countdown timer
Press Cwhile in the Countdown Timer Mode to start the countdown timer.
•Press Cwhile a countdown operation is in progress to pause it. Press C
again to resume the countdown.
•The countdown timer operation continues even if you exit the Countdown
Timer Mode.
•To stop a countdown operation completely, first pause it (by pressing C),
and then press A. This returns the countdown time to its starting value.
•You also can stop the timer and return it to the starting value by pressing
Awhile a timer operation is in progress.
•The following describes what happens if you enter the Depth Gauge Mode
for diving while a countdown operation is in progress.
Auto-repeat off: The alarm sounds when the end of the countdown is
reached. The progress beeper does not sound.
Auto-repeat on: Auto-repeat timer alarm does not sound when the end of
a countdown is reached. The progress beeper does not sound.
•Frequent use of auto-repeat and the alarm runs down the battery.
Stopwatch
The stopwatch lets you measure elapsed time,
split times, and two finishes.
•The display range of the stopwatch is 99 hours,
59 minutes, 59.99 seconds.
•The stopwatch continues to run, restarting from
zero after it reaches its limit, until you stop it.
•The stopwatch measurement operation
continues even if you exit the Stopwatch Mode.
•Exiting the Stopwatch Mode while a split time is
frozen on the display clears the split time and
returns to elapsed time measurement.
•All of the operations in this section are
performed in the Stopwatch Mode, which you
enter by pressing D.
Hours
1/100 second
SecondsMinutes
Timekeeping Mode time
To measure times with the stopwatch
Elapsed Time
CC C C A
Start Stop Re-start Stop Clear
Split Time
CA A C A
Start Split Split release Stop Clear
(SPL displayed)
Two Finishes
CA C A A
Start Split Stop Split release Clear
First runner
finishes.
Display time
of first runner.
Display time of
second runner.
Second runner
finishes.
World Time
The World Time Mode shows you the current
time in 30 cities (29 time zones) around the
world.
•If the current time shown for a city is wrong,
check your Home City time settings and make
the necessary changes.
•All of the operations in this section are
performed in the World Time Mode, which you
enter by pressing D.
To view the time in another city
While in the World Time Mode, press Cto scroll eastward through the city
codes (time zones) or Ato scroll westward.
•For full information on city codes, see “City Code Table”.
City code
Current time in
selected city Timekeeping
Mode time
To toggle a city code time between Standard Time and Daylight
Saving Time
1. In the World Time Mode, use Aand Cto
display the city code (time zone) whose
Standard Time/Daylight Saving Time setting
you want to change.
2. Hold down Eto toggle Daylight Saving Time
(DST indicator displayed) and Standard Time
(DST indicator not displayed).
•Note that you cannot switch between Standard
Time and Daylight Saving Time while GMTis
selected as the city code.
•The DST indicator will appear whenever you
display a city code for which Daylight Saving
Time is turned on.
•Note that the DST/Standard Time setting
affects only the currently displayed city code.
Other city codes are not affected.
DST
indicator
▲
▲
▲
▲
▲
▲
▲
▲
▲
▲
▲
▲

Operation Guide 3047
8
Alarms
You can set five independent daily alarms. When
an alarm is turned on, the alarm tone sounds
when the alarm time is reached.
You also can turn on an Hourly Time Signal,
which will cause the watch to beep twice every
hour on the hour.
•The alarm number (AL1 through AL5)
indicates an alarm screen. SIG is shown for
the alarm number when the Hourly Time Signal
screen is on the display.
•When you enter the Alarm Mode, the data you
were viewing when you last exited the mode
appears first.
•All of the operations in this section are
performed in the Alarm Mode, which you enter
by pressing D.
Alarm time
(Hour : Minutes)
Alarm number
Alarm on indicator
Hourly time signal
on indicator
Timekeeping
Mode time
To set an alarm time
1. In the Alarm Mode, use Cor Ato scroll
through the alarm screens until the one whose
time you want to set is displayed.
2. Hold down Euntil the hour digits of the alarm time start to flash, which
indicates the setting screen.
•This automatically turns on the alarm.
3. Press Dto move the flashing between the hour and minute settings.
4. While a setting is flashing, use C(+) and A(–) to change it.
•When setting the alarm time using the 12-hour format, take care to set
the time correctly as a.m. (no indicator) or p.m. (Pindicator).
5. Press Eto exit the setting screen.
C
A
AL1
SIG
AL2 AL3
AL4
AL5
Alarm Operation
The alarm sounds at the preset time for about 10 seconds (in all modes), or
until you stop it by pressing any button.
To test the alarm
In the Alarm Mode, hold down Cto sound the alarm.
To turn an alarm and the Hourly Time Signal on and off
1. In the Alarm Mode, use C or Ato select an alarm or the Hourly Time
Signal.
2. When the alarm or the Hourly Time Signal you want is selected, press B
to turn it on and off.
Indicates alarm is ON.
Indicates Hourly Time Signal is ON.
•The alarm on indicator ( ) and the Hourly Time Signal on indicator ( )
are shown on the display in all modes while these functions are turned on.
•If any alarm is on, the alarm on indicator is shown on the display in all
modes.
Illumination
The watch has an EL (electro-luminescent) panel
that causes the entire display to glow for easy
reading in the dark. The watch’s auto light switch
illuminates the display automatically when you
angle the watch towards your face.
•The auto light switch must be turned on
(indicated by the auto light switch on indicator)
for it to operate.
•See “Illumination Precautions”for other
important information.
Auto light switch on
indicator
To turn on illumination manually
Press Lin any mode to illuminate the display for about one second.
•The above operation turns on illumination regardless of the current auto
light switch setting.
About the Auto Light Switch
Turning on the auto light switch causes illumination to turn on, whenever you
position your wrist as described below in any mode.
Note that this watch features a “Full Auto EL Light”, so the auto light switch
operates only when available light is below a certain level. It does not
illuminate the display under bright light.
•The auto light switch is always disabled, regardless of its on/off setting,
when any one of the following conditions exists.
While an alarm is sounding
During sensor measurement
While a bearing sensor calibration operation is being performed in the
Digital Compass Mode
While a receive operation is in progress in the Receive Mode
Moving the watch to a position that is parallel to the ground and then tilting
it towards you more than 40 degrees causes illumination to turn on.
•Wear the watch on the outside of your wrist.
Warning!
•Always make sure you are in a safe place whenever you are reading
the display of the watch using the auto light switch. Be especially
careful when running or engaged in any other activity that can result
in accident or injury. Also take care that sudden illumination by the
auto light switch does not startle or distract others around you.
•When you are wearing the watch, make sure that its auto light switch
is turned off before riding on a bicycle or operating a motorcycle or
any other motor vehicle. Sudden and unintended operation of the auto
light switch can create a distraction, which can result in a traffic
accident and serious personal injury.
Parallel to
ground More than
40
°
To turn the auto light switch on and off
In the Timekeeping Mode, hold down Lfor about three seconds to toggle the
auto light switch on (A. EL displayed) or off (A. EL not displayed).
•The auto light switch on indicator (A. EL) is on the display in all modes
while the auto light switch is turned on.
•The auto light switch turns off automatically whenever battery power drops
to Level 4.
•Watch illumination may not turn on right away if you raise the watch to your
face while a barometric pressure operation is in progress.
Power Supply
This watch is equipped with a solar cell and a rechargeable battery
(secondary battery) that is charged by the electrical power produced by the
solar cell. The illustration shown below shows how you should position the
watch for charging.
Example: Orient the watch so its face is
pointing at a light source.
•The illustration shows how to position a
watch with a resin band.
•Note that charging efficiency drops when
any part of the solar cell is blocked by
clothing, etc.
•You should try to keep the watch outside
of your sleeve as much as possible.
Charging is reduced significantly if the
face is only partially covered.
Solar cell
Important!
•Storing the watch for long periods in an area where there is no light or
wearing it in such a way that it is blocked from exposure to light can cause
rechargeable battery power to run down. Be sure that the watch is exposed
to bright light whenever possible.
•This watch uses a special rechargeable battery to store power produced by
the solar cell, so regular battery replacement is not required. However, after
very long use, the rechargeable battery may lose its ability to achieve a full
charge. If you experience problems getting the special rechargeable battery
to charge fully, contact your dealer or CASIO distributor about having it
replaced.
•Never try to remove or replace the watch’s special battery yourself. Use of
the wrong type of battery can damage the watch.
•All data stored in memory is deleted, and the current time and all other
settings return to their initial factory defaults whenever battery power drops
to Level 5 and when you have the battery replaced.
•Turn on the watch’s Power Saving function and keep it in an area normally
exposed to bright light when storing it for long periods. This helps to keep
the rechargeable battery from going dead.

Operation Guide 3047
9
Battery Power Indicator and Recover Indicator
The battery power indicator on the display shows you the current status of the
rechargeable battery’s power.
Battery power
indicator
Level
1
2
3
4
5
Battery Power Indicator
Function Status
All functions enabled.
Illumination, beeper tone,
receive operation, and sensors
disabled.
All functions disabled.
All settings revert to factory defaults.
(Charge Soon Alert)
l
l
l
l
l
l
l
l
l
l
l
l
l
l
l
l
l
l
l
l
l
l
l
l
l
l
l
l
l
l
l
l
l
l
l
l
l
l
l
l
l
(Charge Soon Alert)
l
l
l
l
l
l
l
l
l
l
l
l
l
l
l
l
l
l
l
l
l
l
l
•The flashing LOWLOW
LOWLOW
LOW indicator at Level 3 and the CHG indicator flashing at
Level 4 tell you that battery power is very low, and that exposure to bright
light for charging is required as soon as possible.
•At Level 5, all functions are disabled and settings return to their initial
factory defaults. Once the battery reaches Level 2 (M) after falling to Level
4, reconfigure the current time, date, and other settings.
•Display indicators reappear as soon as the battery is charged from Level 5
to Level 2.
•Leaving the watch in direct sunlight or some other very strong light source
can cause the battery power indicator to show a reading temporarily that is
higher than the actual battery level. The correct battery power indicator
should appear after a few minutes.
•If you use illumination or the alarm a number of
times during a short period, RECOV appears
on the display and the illumination, alarm,
hourly time signal, and sensor operations
become disabled until battery power recovers.
After some time, battery power will recover and
RECOV will disappear, indicating that the
above functions are enabled again.
Recover indicator
•Even if battery power is at Level 1 or Level 2, the Digital Compass Mode,
Barometer/Thermometer Mode, or Depth Gauge Mode sensor may be
disabled if there is not enough voltage available to power it sufficiently. This
is indicated by RECOV on the display.
If battery power goes low while a measurement operation is in progress,
the value produced by the last successful measurement operation remains
on the display. Attempting a measurement operation while battery power is
too low will cause the display to go blank.
Sensor operation should resume when battery voltage returns to normal levels.
•
If RECOV starts to flash on the display when you enter the Depth Gauge Mode
(before starting measurement), the log data date will not be recorded if you
start measurement after RECOV disappears from the display. In this case, exit
and re-enter the Depth Gauge Mode, and then start the measurement again.
•If RECOV starts to flash while a Depth Gauge Mode depth measurement
operation is in progress, the measurement operation will continue. Though
the elapsed measurement time will be recorded in log memory, maximum
depth and water temperature values are not. In this case, xx.xis displayed
in place of the maximum depth and water temperature. After you surface
from your dive, hold down Dfor about three seconds to exit the Depth
Gauge Mode to clear RECOV.
•If RECOV appears frequently, it probably means that remaining battery
power is low. Leave the watch in bright light to allow it to charge.
Charging Precautions
Certain charging conditions can cause the watch to become very hot. Avoid
leaving the watch in the areas described below whenever charging its
rechargeable battery.
Also note that allowing the watch to become very hot can cause its liquid
crystal display to black out. The appearance of the LCD should become
normal again when the watch returns to a lower temperature.
Warning!
Leaving the watch in bright light to charge its rechargeable battery can
cause it to become quite hot. Take care when handling the watch to
avoid burn injury. The watch can become particularly hot when exposed
to the following conditions for long periods.
•On the dashboard of a car parked in direct sunlight
•Too close to an incandescent lamp
•Under direct sunlight
Charging Guide
After a full charge, timekeeping remains enabled for up to about five months.
•The following table shows the amount of time the watch needs to be
exposed to light each day in order to generate enough power for normal
daily operations.
•Since these are the specs, we can include all the technical details.
•6 minutes of time calibration reception per day
•Display on 18 hours per day, sleep state 6 hours per day
•1 illumination operation (1.5 seconds) per day
•10 seconds of alarm operation per day
•1 direction reading (20 seconds continuous measurement) per day
•30 seconds of Barometric/Thermometer Mode measurements per day
•Stable operation is promoted by frequent exposure to light.
Approximate
Exposure Time
5 minutes
24 minutes
48 minutes
8 hours
Exposure Level (Brightness)
Outdoor Sunlight (50,000 lux)
Sunlight Through a Window (10,000 lux)
Daylight Through a Window on a Cloudy Day (5,000 lux)
Indoor Fluorescent Lighting (500 lux)
Recovery Times
The table below shows the amount exposure that is required to take the
battery from one level to the next.
•The above exposure time values are all for reference only. Actual required
exposure times depend on lighting conditions.
Approximate Exposure Time
Level 5 Level 4 Level 3 Level 2 Level 1
2 hours 13 hours 6 hours
4 hours 66 hours 30 hours
8 hours 134 hours 60 hours
83 hours - - - - - - - - - - - -
Exposure Level
(Brightness)
Outdoor Sunlight
(50,000 lux)
Sunlight Through a
Window (10,000 lux)
Daylight Through a
Window on a Cloudy
Day (5,000 lux)
Indoor Fluorescent
Lighting (500 lux)
▲
▲
▲
Timekeeping
Use the Timekeeping Mode to view the current
time and date. You also need to enter the
Timekeeping Mode to configure timekeeping
settings, as well as the following settings.
•Power saving on/off (“To turn Power Saving on
and off”)
•Temperature unit (“To specify barometric
pressure and temperature units”)
•Depth unit (“To specify the depth unit”)
•Barometric pressure unit (“To specify
barometric pressure and temperature units”)
Hour : Minutes
PM indicator
Seconds
Day
Day of week
Setting the Time and Date Manually
Make sure you select your Home City code before you change the current
time and date settings. World Time Mode times are all displayed in
accordance with the Timekeeping Mode settings. Because of this, World Time
Mode times will not be correct if you do not select the proper Home City code
before setting the time and date in the Timekeeping Mode.
To set the time and date manually
1. In the Timekeeping Mode, hold down Euntil
the city code starts to flash, which indicates
the setting screen.
2. Press Dto change the flashing contents in
the sequence shown below to select other
settings.
l
l
l
l
l
l
l
l
l
l
l
l
l
l
l
l
l
l
l
l
l
City
code
Seconds Hour
12/24-Hour
Format Minutes Year
DST
Month
Day
Power
Saving
Temperature
Unit
Barometric
Pressure Unit
Depth
Unit
City
Code

Operation Guide 3047
10
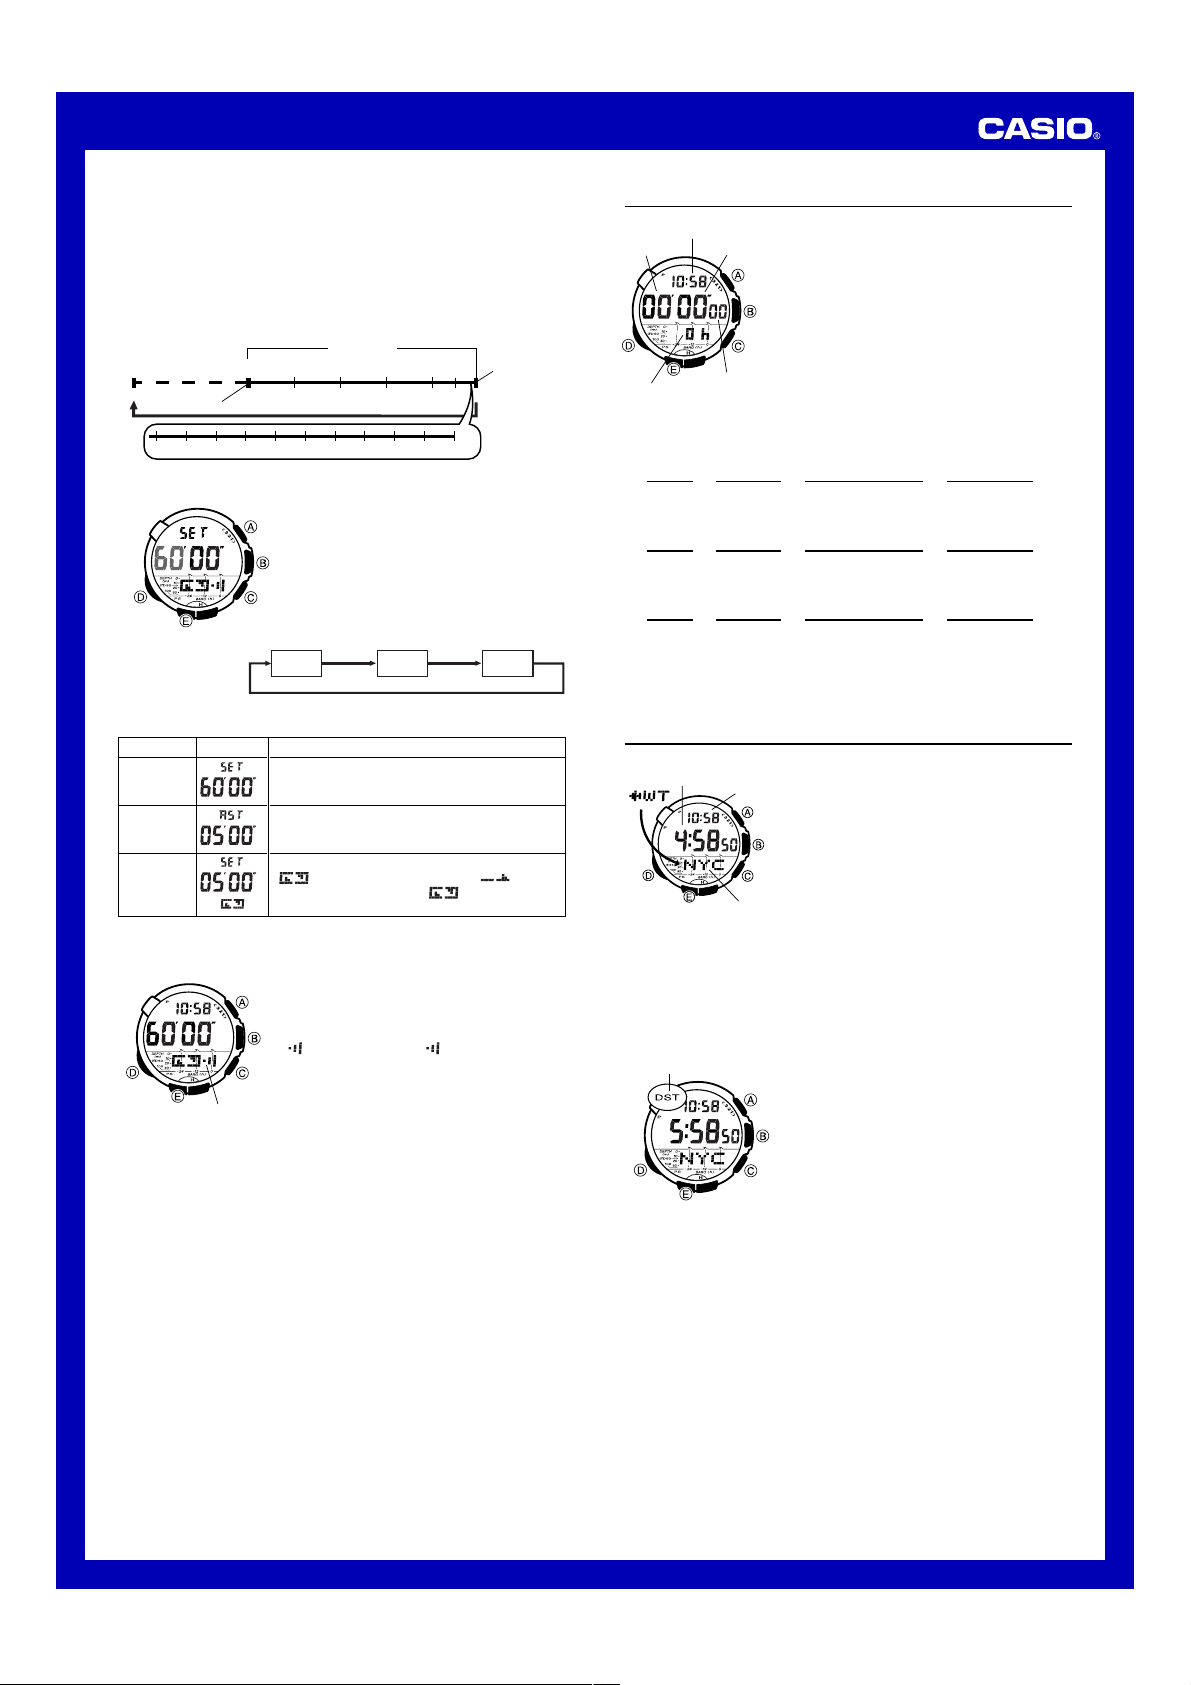
3. When the setting you want to change is flashing, use Aand/or Cto
change it as described below.
Screen: To do this:
Change the city code
Cycle between auto DST (AT),
Standard Time (OFF), and Daylight
Saving Time (ON)
Toggle between 12-hour (12H) and
24-hour (24H) timekeeping
Do this:
Use C(east) and A
(west).
Press C.
Press C.
•See “City Code Table”for a complete list of available city codes.
•Auto DST (AT) can be selected only while LON, PAR, BER,
ATH, NYC,CHI, DEN, LAX, ANC, HNL, TYO, SEL, or
HKG is selected as the Home City code. For more information, see
“Daylight Saving Time (DST)”below.
Reset the seconds to 00
Change the hour or minutes
Change the year, month or day
Toggle Power Saving on (ON) and off
(OFF)
Press C.
Use C(+) and A(–).
Use C(+) and A(–).
Press C.
•See the other sections of this manual for information about configuring
Temperature Unit, Depth Unit, and Barometric Pressure Unit settings.
4. Press Eto exit the setting screen.
Note
•Resetting the seconds to 00 while the current count is in the range of 30 to
59 causes the minutes to be increased by 1. In the range of 00 to 29, the
seconds are reset to 00 without changing the minutes.
•With the 12-hour format, the P(PM) indicator appears on the display for
times in the range of noon to 11:59 p.m. and no indicator appears for times
in the range of midnight to 11:59 a.m.
•With the 24-hour format, times are displayed in the range of 0:00 to 23:59,
without any indicator.
•The 12-hour/24-hour timekeeping format you select in the Timekeeping
Mode is applied in all modes.
•The year can be set in the range of 2000 to 2099. The day of the week is
calculated automatically in accordance with the date you set.
•The watch’s built-in full automatic calendar makes allowances for different
month lengths and leap years automatically. Once you set the date, there
should be no reason to change it except when battery power drops to Level
5.
Daylight Saving Time (DST)
Daylight Saving Time (summer time) advances the time setting by one hour
from Standard Time. Remember that not all countries or even local areas use
Daylight Saving Time.
The time calibration signals transmitted from Mainflingen (Germany), Rugby
(England), or Fort Collins (the United States) include both Standard Time and
DST data. When the Auto DST setting is turned on, the watch switches
between Standard Time and DST (summer time) automatically in accordance
with the signals.
Auto DST (
AT
) DST off (
OFF
) DST on (
ON
)
•The time calibration signals transmitted from Fukushima and Fukuoka/Saga
(Japan) do not include summer time data.
•The default DST setting is Auto DST (AT) whenever you select LON,
PAR, BER, ATH, NYC, CHI, DEN, LAX, ANC, HNL, or
TYO as your Home City code.
•If you experience problems receiving the time calibration signal in your
area, it probably is best to switch between Standard Time and Daylight
Saving Time (summer time) manually.
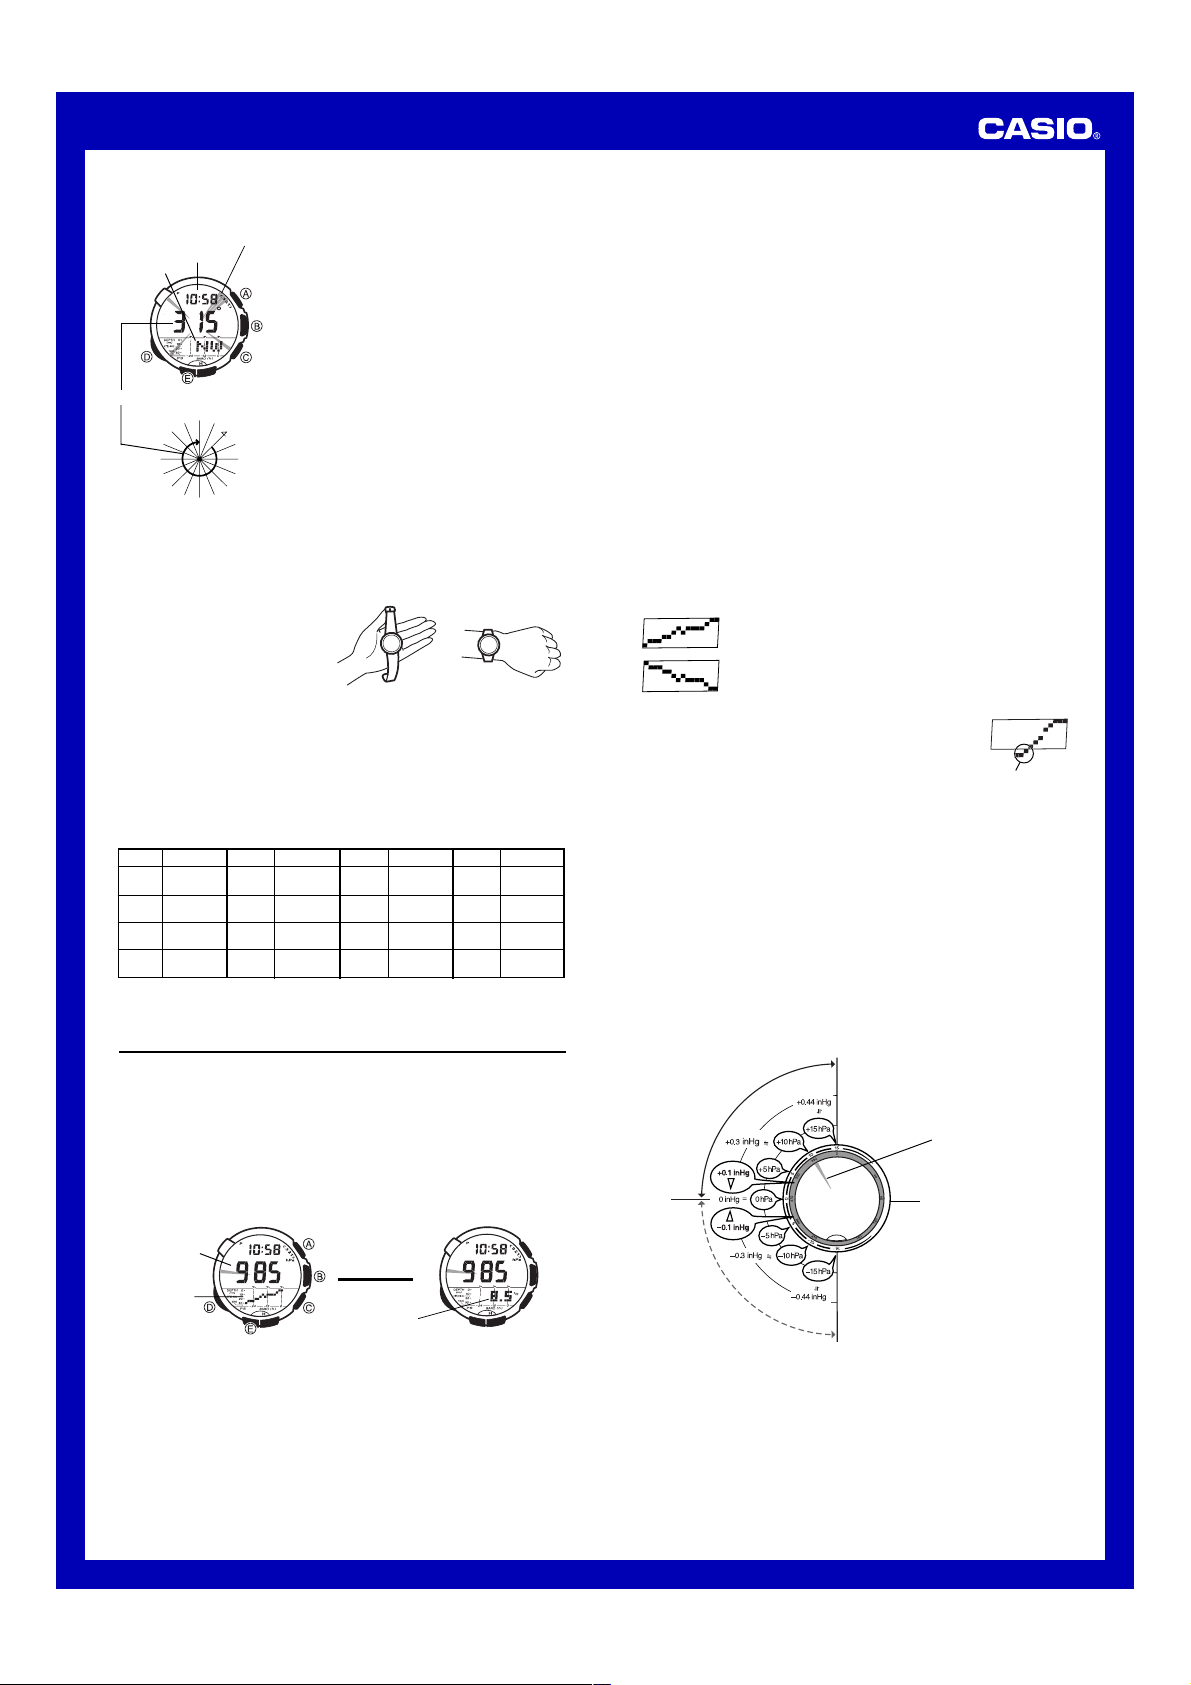
To change the Daylight Saving Time (summer time) setting
1. In the Timekeeping Mode, hold down Euntil the city code starts to flash,
which indicates the setting screen.
2. Press Dand the DST setting screen appears.
3. Use Cto cycle through the DST settings in the sequence shown below.
4. When the setting you want is selected, press Eto exit the setting screen.
•The DST indicator appears to indicate that Daylight Saving Time is turned
on.
•If you change your Home City to one that is within the same transmitter
area, the current DST setting will be retained. If you change to a city that is
outside your current transmitter area, DST will be turned off automatically.
Transmitter area city codes
•HKG, SEL, and TYO
•LAX, DEN, CHI, NYC, ANC, and HNL
•LON, PAR, BER, and ATH
•All other city codes
Reference
This section contains more detailed and technical information about watch
operation. It also contains important precautions and notes about the various
features and functions of this watch.
Auto Return Features
•The watch will return to the Timekeeping Mode automatically if you leave it
in the Depth Data Recall, Alarm, Receive, Digital Compass, or Barometer/
Thermometer Mode for about two or three minutes without performing any
button operation.
•The watch returns to the Timekeeping Mode automatically if a depth
measurement operation (indicated by ongoing elapsed time measurement
in the upper part of the display) in the Depth Gauge Mode continues for
more than three hours. If there is no depth measurement operation being
performed (indicated by or 0in the center part of the display and no
ongoing elapsed time measurement in the upper part of the display), the
watch returns to the Timekeeping Mode automatically if you do not perform
any button operation for about one hour in the Depth Gauge Mode.
•If you leave a screen with flashing digits on the display for two or three
minutes without performing any operation, the watch exits the setting
screen automatically.
Button Operation Tone
The button operation tone sounds any time you
press one of the watch’s buttons.You can turn the
button operation tone on or off as desired.
•Even if you turn off the button operation tone,
the alarm, Hourly Time Signal, and Countdown
Timer Mode alarm all operate normally.
To turn the button operation tone on and off
In any mode (except when a setting screen is on
the display), hold down Dto toggle the button
operation tone on ( not displayed) and off (
displayed).
Mute indicator
•Since the Dbutton is also the mode change button, holding it down to turn
the button operation on or off also causes the watch’s current mode to
change.
•You cannot turn button operation tones on or off while a depth
measurement operation is in progress (at depths greater than one meter).
•The indicator is displayed in all modes when the button operation tone is
turned off.
Scrolling
The Cand Abuttons are used on the setting screen to scroll through data
on the display. In most cases, holding down these buttons during a scroll
operation scrolls through the data at high speed.
Sensor Malfunction Indicator
Subjecting the watch to strong impact can cause its sensor to malfunction or
improper contact of internal circuitry. When this happens, the message ERR
will appear on the display and sensor operations will be disabled.
•If ERR appears during digital compass or barometric pressure
measurement, it will disappear from the display as soon as measurement is
successful again.
•During depth measurement, elapsed dive time measurement continues
even if ERR is on the display. After you surface from your dive, hold down
Dfor about three seconds to exit the Depth Gauge Mode. The ERR
message should no longer be on the display when you re-enter the Depth
Gauge Mode.
Barometric
Pressure
Measurement
Digital
Compass
Measurement
Depth
Measurement
Depth Gauge
Digital Compass
Measurement
•If ERR appears during Depth Gauge digital compass measurement, wait
five or six seconds (or press A) to return to the depth measurement
screen. This should clear the ERR message from the display.
•If the ERR message keeps appearing during measurement, it could mean
there is a problem with the applicable sensor.
Whenever you have a sensor malfunction, be sure to take the watch to
your original dealer or nearest authorized CASIO distributor as soon as
possible.

Operation Guide 3047
11
Power Saving Function
When turned on, the Power Saving function puts the watch into a sleep state
automatically whenever it is left for a certain period in an area where it is dark.
The table below shows how watch functions are affected by the Power Saving
function.
•Wearing the watch inside the sleeve of clothing can cause it to enter the
sleep state.
•The watch will not enter the sleep state while the digital time is between
6:00 AM and 9:59 PM. If the watch is already in the sleep state when the
digital time reaches 6:00 AM, however, it will remain in the sleep state.
•The watch will not enter the sleep state while it is in the Digital Compass,
Barometer/Thermometer, Depth Gauge, Receive, Countdown Timer, or
Stopwatch Mode. When the watch is left in any mode besides the
Countdown Timer and Stopwatch Mode, the watch will return to the
Timekeeping Mode automatically after a specific amount of time. Then if left
in the dark for the elapsed time indicated in the table above, the watch will
enter the sleep state.
Elapsed Time in
Dark
60 to 70 minutes
6 or 7 days
Display
Blank, with
PS flashing
Blank, with
PS not flashing
Operation
Display is off, but all functions are
enabled.
All functions are disabled, but
timekeeping is maintained.
To recover from the sleep state
Perform any one of the following operations.
•Move the watch to a well-lit area. It can take up to two seconds for the
display to turn on.
•Press any button.
•Angle the watch towards your face for reading.
To turn Power Saving on and off
1. In the Timekeeping Mode, hold down Euntil
the city code starts to flash, which indicates
the setting screen.
2. Press Dnine times until the Power Saving
on/off screen appears.
3. Press Cto toggle Power Saving on (ON) and
off (OFF).
4. Press E to exit the setting screen.
•The Power Saving on indicator (PS) is on the
display in all modes while the Power Saving is
turned on.
l
l
l
l
l
l
l
l
l
l
l
l
l
l
l
l
l
l
l
l
l
l
l
l
l
Radio-controlled Atomic Timekeeping Precautions
•Strong electrostatic charge can result in the wrong time being set.
•The time calibration signal bounces off the ionosphere. Because of this,
such factors as changes in the reflectivity of the ionosphere, as well as
movement of the ionosphere to higher altitudes due to seasonal
atmospheric changes or the time of day may change the reception range of
the signal and make reception temporarily impossible.
•Even if the time calibration signal is received properly, certain conditions
can cause the time setting to be off by up to one second.
•The current time setting in accordance with the time calibration signal takes
priority over any time settings you make manually.
•The watch is designed to update the date and day of the week
automatically for the period January 1, 2001 to December 31, 2099. Setting
of the date by the time calibration signal cannot be performed starting from
January 1, 2100.
•This watch can receive signals that differentiate between leap years and
non-leap years.
•Though this watch is designed to receive both time data (hour, minutes,
seconds) and date data (year, month, day), certain signal conditions can
limit reception to time data only.
•
If you are in an area where proper time calibration signal reception is
impossible, the watch keeps time within ±15 seconds a month at normal
temperature.
•If you have problems with proper time calibration signal reception or if the
time setting is wrong after signal reception, check your current city code,
and DST (summer time), and auto receive settings.
•The Home City setting reverts to the initial default of BER (Berlin)
whenever the battery power level drops to Level 5 or when you have the
rechargeable battery replaced. If this happens, change the Home City to the
setting you want.
Transmitters
The time calibration signal received by this watch depends on the currently
selected Home City code.
•When a U.S. time zone is selected, the watch receives the time calibration
signal transmitted from the United States (Fort Collins).
•
When a Japanese time zone is selected, the watch receives the time
calibration signal transmitted from the Japan (Fukushima and Fukuoka/Saga)
.
•When a European time zone is selected, the watch receives the time
calibration signals transmitted from Germany (Mainflingen) and England
(Rugby). The following tables show the reception priority for the European
signals.
When PAR, BER, or ATH is selected as the Home City code:
When LON is selected as the Home City code:
In this case:
The first signal search
operation after the Home
City code has been changed
The second and
subsequent signal searches
The watch does this:
1. Checks the Mainflingen signal first.
2. If the Mainflingen signal cannot be
received, checks the Rugby signal.
1.
Checks the signal of the transmitter of the first
receive operation (Rugby or Mainflingen).
2. If the checked signal cannot be received,
checks the other signal.
The watch does this:
1. Checks the Rugby signal first.
2. If the Rugby signal cannot be received,
checks the Mainflingen signal.
1.
Checks the signal of the transmitter of the first
receive operation (Rugby or Mainflingen).
2.If the checked signal cannot be received,
checks the other signal.
In this case:
The first signal search
operation after the Home
City code has been changed
The second and
subsequent signal searches
Timekeeping
•The year can be set in the range of 2000 to 2099.
•The watch’s built-in full automatic calendar makes allowances for different
month lengths and leap years. Once you set the date, there should be no
reason to change it except after you have the watch’s battery replaced or
when battery power drops to Level 5.
•The current time for all city codes in the Timekeeping Mode is calculated in
accordance with the Greenwich Mean Time (GMT) differential of each zone,
based on your Home City time setting.
•GMT differential is calculated by this watch based on Universal Time
Coordinated (UTC*) data.
*UTC is the world-wide scientific standard of timekeeping. It is based upon
carefully maintained atomic (cesium) clocks that keep time accurately to
within microseconds. Leap seconds are added or subtracted as necessary
to keep UTC in sync with the Earth’s rotation. The reference point for UTC
is Greenwich, England.
Illumination Precautions
•The electro-luminescent panel that provides illumination loses power after
very long use.
•Illumination may be hard to see when viewed under direct sunlight.
•Illumination turns off automatically whenever an alarm sounds.
•The watch may emit an audible sound whenever the display is illuminated.
This is due to vibration of the EL panel used for illumination, and does not
indicate malfunction.
•Frequent use of illumination runs down the battery.
•Illumination is disabled while the watch is taking a depth reading (every
three seconds).
Auto light switch precautions
•The auto light switch is turned off automatically whenever battery power is
at Level 4.
•Wearing the watch on the inside of your wrist, movement of your arm, or
vibration of your arm can cause frequent activation of the auto light switch
and illumination of the display. To avoid running down the battery, turn off
the auto light switch whenever engaging in activities that might cause
frequent illumination of the display.
•Note that wearing the watch under your sleeve while the auto light switch is
turned on can cause frequent illumination of the display and can run down
the battery.
•Illumination may not turn on if the face of the
watch is more than 15 degrees above or below
parallel. Make sure that the back of your hand
is parallel to the ground.
•Illumination turns off in about one second, even
if you keep the watch pointed towards your
face.
More than 15 degrees
too high
•Static electricity or magnetic force can interfere with proper operation of the
auto light switch. If illumination does not turn on, try moving the watch back
to the starting position (parallel with the ground) and then tilt it back toward
you again. If this does not work, drop your arm all the way down so it hangs
at your side, and then bring it back up again.
•Under certain conditions, illumination may not turn on until about one
second after you turn the face of the watch towards you. This does not
necessarily indicate malfunction of the auto light switch.
•You may notice a very faint clicking sound coming from the watch when it is
shaken back and forth. This sound is caused by mechanical operation of
the auto light switch, and does not indicate a problem with the watch.

Operation Guide 3047
12
Digital Compass Precautions
This watch features a built-in magnetic bearing sensor that detects terrestrial
magnetism. This means that north indicated by this watch is magnetic north,
which is somewhat different from true polar north. The magnetic north pole is
located in northern Canada, while the magnetic south pole is in southern
Australia. Note that the difference between magnetic north and true north as
measured with all magnetic compasses tends to be greater as one gets
closer to either of the magnetic poles.You should also remember that some
maps indicate true north (instead of magnetic north), and so you should make
allowances when using such maps with this watch.
Location
•Taking a direction reading when you are near a source of strong magnetism
can cause large errors in readings. Because of this, you should avoid taking
direction readings while in the vicinity of the following types of objects:
permanent magnets (magnetic necklaces, etc.), concentrations of metal
(metal doors, lockers, etc.), high tension wires, aerial wires, household
appliances (TVs, personal computers, washing machines, freezers, etc.)
•Accurate direction readings are impossible while in a train, boat, air plane,
etc.
•Accurate readings are also impossible indoors, especially inside ferro-
concrete structures. This is because the metal framework of such structures
picks up magnetism from appliances, etc.
Storage
•The precision of the bearing sensor may deteriorate if the watch becomes
magnetized. Because of this, you should be sure to store the watch away
from magnets or any other sources of strong magnetism, including:
permanent magnets (magnetic necklaces, etc.) and household appliances
(TVs, personal computers, washing machines, freezers, etc.)
•Whenever you suspect that the watch may have become magnetized,
perform one of the calibration procedures under “Calibrating the Bearing
Sensor”.
Calibrating the Bearing Sensor
Whenever you suspect that direction readings produced by the watch are
wrong, you should calibrate it.You can use either one of two calibration
procedures:
bidirectional calibration
or
northerly calibration
.
Use bidirectional calibration when you want to take readings within an area
exposed to magnetic force. This type of calibration should be used if the
watch becomes magnetized for any reason.
With northerly calibration, you “teach”the watch which way is north (which
you have to determine with another compass or some other means). You
could use this calibration procedure, for example, to set the watch to indicate
true north instead of magnetic north.
Important!
•If you want to perform both bidirectional and northerly calibration, be sure
to perform bidirectional calibration first, and then perform northerly
calibration. This is necessary because bidirectional calibration cancels any
previously set northerly calibration setting.
•The more correctly you perform bidirectional calibration, the better the
accuracy of the bearing sensor readouts.You should perform bidirectional
calibration whenever you change environments where you use the bearing
sensor, and whenever you feel that the bearing sensor is producing
incorrect readings.
Precautions about bidirectional calibration
•You can use any two opposing directions for bidirectional calibration.You
must, however, make sure that they are 180 degrees opposite each other.
Remember that if you perform the procedure incorrectly, you will get wrong
bearing sensor readings.
•Make sure that you do not move the watch while calibration of either
direction is in progress.
•You should perform bidirectional calibration in an environment that is the
same as that where you plan to be taking direction readings. If you plan to
take direction readings in an open field, for example, calibrate in an open
field.
To perform bidirectional calibration
1. Enter the Digital Compass Mode.
2. Hold down Euntil x1x appears on the
display, which indicates the setting screen.
•At this time, the magnetic north pointer
flashes at the 12 o’clock position to indicate
that the watch is ready to calibrate the first
direction.
3. Place the watch on a level surface facing any direction you want, and
press Ato calibrate the first direction.
•xxx is shown on the display while calibration is being performed. OK
appears, x2x appears in the center part of the display, and the
magnetic north pointer flashes at the 6 o’clock position when calibration
of the first direction is complete. This means that the watch is ready for
calibration of the second direction.
4. Rotate the watch 180 degrees.
l
l
l
l
l
l
l
l
l
l
l
l
l
l
l
l
l
l
5. Press Aagain to calibrate the second direction.
•xxx is shown on the display while calibration is being performed. When
calibration is complete, OKappears and then the Digital Compass Mode
screen (showing the angle value) appears.
•If xxx appears and then changes to ERR (error) on the calibration
screen, it means that there is something wrong with the sensor. The ERR
message will disappear after about one second. Try performing the
calibration operation again. If ERR keeps appearing, contact your original
dealer or nearest authorized CASIO distributor to have the watch checked.
To perform northerly calibration
1. While in the Digital Compass Mode, hold
down Euntil x1x appears on the display,
which indicates the setting screen.
2. Press Dto start the northerly calibration
procedure.
•At this time, -N- (north) appears on the
display.
l
l
l
l
l
l
l
l
l
l
l
l
l
l
l
l
l
l
3. Place the watch on a level surface, and position it so that its 12 o’clock
position points north (as measured with another compass).
4. Press Ato start the calibration operation.
•--- is shown on the display while calibration is being performed. When
calibration is complete, OKappears and then the Digital Compass Mode
screen (with 0°indicated as the angle value) appears.
•If --- appears and then changes to ERR (error) on the calibration
screen, it means that there is something wrong with the sensor. About one
second after the ERR message appears, -N- will reappear. Try
performing the calibration operation again. If ERR keeps appearing,
contact your original dealer or nearest authorized CASIO distributor to have
the watch checked.
Barometer and Thermometer Precautions
•The pressure sensor built into this watch measures changes in air
pressure, which you can then apply to your own weather predictions. It is
not intended for use as a precision instrument in official weather prediction
or reporting applications.
•Sudden temperature changes can affect pressure sensor readings.
•Temperature measurements are affected by your body temperature (while
you are wearing the watch), direct sunlight, and moisture. To achieve a
more accurate temperature measurement, remove the watch from your
wrist, place it in a well ventilated location out of direct sunlight, and wipe all
moisture from the case. It takes approximately 20 to 30 minutes for the
case of the watch to reach the actual surrounding temperature.
Calibrating the Temperature Sensor
The temperature sensor of this watch is calibrated at the factory before
shipment, and further adjustment normally is not required. If you notice
serious errors in the temperature readings produced by the watch, you can
calibrate the sensor to correct the errors.
Important!
Incorrectly calibrating the temperature sensor can result in incorrect readings.
Carefully read the following before doing anything.
•Compare the readings produced by the watch with those of another reliable
and accurate thermometer.
•If adjustment is required, remove the watch from your wrist and wait for 20
or 30 minutes to give the temperature of the watch time to stabilize.
To calibrate the temperature sensor
1. Enter the Barometer/Thermometer Mode.
2. Hold down Euntil SET appears in the upper
display area.
3. Release E. After about three or four seconds,
either OFF or a temperature calibration value
(if one is set) will appear in the lower part of
the display. This is the setting screen.
4. Wait four or five seconds until either OFF or a barometric pressure
calibration value (if there is one set) appears in the center part of the display.
5. After waiting four or five seconds, press C(+) or A(–) to change the
displayed temperature by 0.1°C (or 0.2°F).
•Pressing Cand Aat the same time returns to the factory calibration
(OFF).
6. Press Eto exit the setting screen.
l
l
l
l
l
l
l
l
l
l
l
l
l
l
l
l
l
l
l
l
l
l
l
Calibrating the Barometric Pressure Sensor
The pressure sensor of this watch is calibrated at the factory before shipment
and further adjustment normally is not required. If you notice serious errors in
the barometric pressure readings produced by the watch, you can calibrate
the sensor to correct the errors.
Important!
Incorrectly calibrating the barometric pressure sensor can result in incorrect
readings. Before performing the calibration procedure, compare the readings
produced by the watch with those of another reliable and accurate barometer.

Operation Guide 3047
13
To calibrate the pressure sensor
1. Enter the Barometer/Thermometer Mode.
2. Hold down Euntil SET appears in the upper
display area.
3. Release E. After about three or four seconds,
either OFF or a temperature calibration value
(if one is set) will appear in the lower part of
the display. This is the setting screen.
4. Wait four or five seconds until either OFF or a
barometric pressure calibration value (if there
is one set) appears in the center part of the
display.
5. After waiting four or five seconds, press Dto
move the flashing to the pressure sensor
calibration setting.
•At this time, OFF or the barometric pressure
value should be flashing on the display.
l
l
l
l
l
l
l
l
l
l
l
l
l
l
l
l
l
l
l
l
l
l
l
l
l
l
l
l
l
l
l
l
l
l
l
l
l
l
l
l
l
l
l
l
l
l
l
l
l
l
l
l
l
l
l
l
l
l
l
l
6. Press C(+) or A(–) to change the displayed barometric pressure by 1
hPa (0.05 inHg).
•Pressing Cand Aat the same time returns to the factory calibration
(OFF).
7. Press Eto exit the setting screen.
To specify barometric pressure and temperature units
1. Enter the Timekeeping Mode.
2. Hold down Euntil the city code starts to
flash, which indicates the setting screen.
3. Use Dto select either the temperature unit or
barometric pressure unit setting.
•See step 2 under “To set the time and date
manually” for information about how to scroll
through setting screens.
l
l
l
l
l
l
l
l
l
l
l
l
l
l
l
l
l
l
l
l
l
l
l
l
l
l
4. When the setting you want to change is flashing, press Cto toggle
between the available settings.
•Temperature Units: Fahrenheit (°F) or Celsius (°C)
•Barometric Pressure Units: inchesHg (inHg) or Hectopascals (hPa)
5. After the settings are the way you want, press Eto exit the setting screen.
To reset the reference depth to 0 meters (feet) manually
In the Depth Gauge Mode, press Cand Dat
the same time.
Important!
•This resets the reference depth and causes the
displayed depth to change to 0 meters (feet).
•Never perform the above operation while
submerged.
To specify the depth unit
1. Enter the Timekeeping Mode.
2. Hold down Euntil the city code starts to
flash, which indicates the setting screen.
3. Press D11 times to select the depth unit
setting.
•See step 2 under “To set the time and date
manually”for information about how to scroll
through setting screens.
4. Press Cto toggle between meters (m) and
feet (ft).
5. After the setting is the way you want, press E
to exit the setting screen.
l
l
l
l
l
l
l
l
l
l
l
l
l
City Code Table
Honolulu
Anchorage
Los Angeles
Denver
Chicago
New York
Caracas
Rio De Janeiro
London
Paris
Berlin
City City GMT Other major cities in same time zone
Code Differential
–11.0
–10.0
–09.0
–08.0
–07.0
–06.0
–05.0
–04.0
–03.0
–02.0
–01.0
+00.0
+01.0
Pago Pago
Papeete
Nome
San Francisco, Las Vegas, Vancouver,
Seattle/Tacoma, Dawson City, Tijuana
El Paso, Edmonton, Culiacan
Houston, Dallas/Fort Worth,
New Orleans, Mexico City, Winnipeg
Montreal, Detroit, Miami, Boston,
Panama City, Havana, Lima, Bogota
La Paz, Santiago, Port Of Spain
Sao Paulo, Buenos Aires, Brasilia, Montevideo
Praia
Dublin, Lisbon, Casablanca, Dakar, Abidjan
Milan, Rome, Madrid, Amsterdam, Algiers, Hamburg,
Frankfurt, Vienna, Stockholm
–11
HNL
ANC
LAX
DEN
CHI
NYC
CCS
RIO
–02
–01
GMT
LON
PAR
BER
Athens
Cairo
Jerusalem
Jeddah
Tehran
Dubai
Kabul
Karachi
Delhi
Dhaka
Yangon
Bangkok
Hong Kong
Seoul
Tokyo
Adelaide
Sydney
Noumea
Wellington
+02.0
+03.0
+03.5
+04.0
+04.5
+05.0
+05.5
+06.0
+06.5
+07.0
+08.0
+09.0
+09.5
+10.0
+11.0
+12.0
Helsinki, Istanbul, Beirut, Damascus,
Cape Town
Kuwait, Riyadh, Aden, Addis Ababa, Nairobi, Moscow
Shiraz
Abu Dhabi, Muscat
Male
Mumbai, Kolkata
Colombo
Jakarta, Phnom Penh, Hanoi, Vientiane
Singapore, Kuala Lumpur, Beijing, Taipei, Manila,
Perth, Ulaanbaatar
Pyongyang
Darwin
Melbourne, Guam, Rabaul
Port Vila
Christchurch, Nadi, Nauru Island
ATH
CAI
JRS
JED
THR
DXB
KBL
KHI
DEL
DAC
RGN
BKK
HKG
SEL
TYO
ADL
SYD
NOU
WLG
•Based on data as of December 2005.
Table of contents
Other Casio Watch manuals

Casio
Casio 3352 User manual

Casio
Casio 2782 User manual

Casio
Casio 5196 User manual

Casio
Casio 4359 User manual

Casio
Casio QW-2387 Troubleshooting guide

Casio
Casio G-SHOCK G-5600UE-1 User manual

Casio
Casio 5454 (OC) User manual

Casio
Casio 3409 User manual

Casio
Casio 5374 User manual

Casio
Casio 5078 User manual