Casio QW-1444 Configuration guide

— 3 —
2. OPERATION CHART
2-1. QW-1444
•If the contents of the upper part of the display seem to be continually
changing, see “AUTO DISPLAY FUNCTION” for information on how to
stop it.
•Press Mto change from mode to mode.
•Press Lto illuminate the display for about two seconds. While Morse code
data is on the display in the Morse Code Mode, pressing Ldoes not
illuminate the display.
Timekeeping Mode
AB
C
ML
Stopwatch Mode
•When the text in the text area of the display contains more than five
characters, it automatically scrolls. Text scrolling in the text area stops
moving whenever an alarm is sounding.
•In any mode other than Stopwatch Mode, the watch automatically returns to
the Timekeeping Mode if you do not perform any button operation for two or
three minutes.
▼
Alarm Mode
▼
▼
Mission Code Mode Morse Code Mode
Vital Statistics/ID Mode
Contact Code Mode
▼
▼
▼
▼
Light
Mode
Text area
A
C
M
TIMEKEEPING MODE
Inadditiontonormaltimekeeping,theTimekeeping
Mode is also used to set the current time and
date. You can also adjust the seconds count to
“00” at any time by pressing two buttons.
To adjust the seconds count to “00”
In the Timekeeping Mode, press Band C
simultaneously to adjust the seconds count to
00.
•If you press Band Cat the same time while
the seconds count is in the range of 30 to 59, the
seconds are reset to 00 and 1 is added to the
minutes. If the seconds count is in the range of
00 to 29, the minutes count is unchanged.
To set the time and date
1. Hold down Awhile in the Timekeeping Mode until the seconds digits start
to flash on the display. The seconds flash because they are
selected
.
•While the seconds digits are selected (flashing), press Cto reset the
seconds to 00.
2. Press Mto change the selection in the following sequence.
3. While any other digits (besides seconds) are selected (flashing), press C
to increase the number or Bto decrease it. Holding down either button
changes the current selection at high speed.
•While any digits are selected, press Lto switch between the 12-hour and
24-hour formats.
•When the 12-hour format is selected, the 12H indicator appears in place
of the day of the week in the text area of the display. With the 12-hour
format, the Pindicator appears on the display to indicate “p.m.” times.
There is no indicator for “a.m.” times.
Selecting the 24-hour format causes the 24H indicator to appear in place
of the day of the week in the text area, and the 24 indicator to appear on the
display.
4. After you set the time and date, press Ato return to the Timekeeping
Mode.
•The day of the week is automatically set in accordance with the date.
•The date can be set within the range of January 1, 1995 to December 31,
2039.
•If you do not operate any button for a few minutes while a selection is
flashing, the flashing stops and the watch goes back to the Timekeeping
Mode automatically.
About the backlight
Press Lto illuminate the display for about two seconds. While Morse code
data is on the display in the Morse Code Mode, pressing Ldoes not
illuminate the display.
Notes
•The backlight of the watch employs an electro-luminescent (EL) light, which
loses illuminating power after very long use.
•The backlight remains lit for about two seconds from the point you press
L, even if it already lit when you press L. If you keep Ldepressed for
one or two minutes, the backlight will automatically turn off.
•The illumination provided by the backlight may be hard to see when viewed
under direct sunlight.
Seconds Hour Minutes Year Month Date
Text area
Month – Date
PM indicator
Hour : Minutes
Seconds
Year Day of week
•The backlight automatically stops illuminating whenever an alarm sounds.
•The watch will emit an audible sound whenever the display is illuminated.
This is caused by a transistor that vibrates when the EL panel lights up. It
does not indicate malfunction of the watch.
CONTACT CODE MODE
The Contact Code Mode lets you store up to
100*sets of contact data (such as telephone
numbers). Stored data is sorted automatically
into alphabetic sequence based on the text
area text.
*
The Contact Code Mode shares memory with
the Mission Code Mode. This means that the
maximum number of Contact Code Mode
entries you can store is reduced by one each
time you store a Mission Code Mode data
item.
•Whenever you enter the Contact Code Mode,
the text CONTACT CODE scrolls across
thetext area of the displayonce.Next,contact
code data appears on the display. You can
interrupt scrolling of the initial text and
immediately display contact code data at any
time by pressing A, B, or C.
•See the “CHARACTER LIST” at the back of this manual for details on how
the watch sorts data.
•The data item that appears on the display when you enter the Contact Code
Mode is the same one that was displayed the last time you exited the
Contact Code Mode.
AB
C
M
Text area
Mode indicator
Remaining
memory
To input new contact code data
1. In the Contact Code Mode, press Band Cat
the same time to display the new data display.
•Ifthere is no contactcode data stored inmemory
yet, the new data display appears as soon as
you enter the Contact Code Mode.
•If the message FULL appears in the text area
of the display, it means that memory is full. To
store more data, you will first have to delete
some of the data stored in memory.
2. Hold down Auntil the flashing cursor appears in the text area of the
display.
3. Input a name in the text area and a contact number in the number area.
•You can input up to eight characters in the text area, and 12 digits in the
number area.
•You can input only hyphens, numbers and spaces in the number area (you
cannot input text).
Use Band Cto input characters, andMto move the cursor around the
display. For details, see “INPUTTING TEXT”.
4. After inputting your data, press Ato store it and return to the Contact
Code Mode.
•When you press Ato store data, the message SORT appears on the
display for a few seconds. After the sort operation is complete, the normal
Contact Code Mode display (without the cursor) appears.
AB
C
M
Cursor
Text area
Number area
[New Data Display]
GENERAL GUIDE
B
L

— 4 —
To recall contact code data
In the Contact Code Mode, press Cto scroll forward through stored data
items or Bto scroll in reverse.
•Holding down either button scrolls through the data at high speed.
•The new data display appears whenever scrolling reaches the beginning or
the end of data currently stored in memory.
To edit contact code data items
1. In the Contact Code Mode, scroll through the data items and display the
one you want to edit.
2. Hold down Auntil the flashing cursor appears in the text area of the
display.
3. Use Mto move the cursor to the character you want to change.
4. Change the character.
•See “INPUTTING TEXT” for details.
5. After making the changes that you want, press Ato store them and return
to the Contact Code Mode.
To delete contact code data
1. In the Contact Code Mode, scroll through the data items and display the
one you want to delete.
2. Hold down Auntil the flashing cursor appears in the text area of the
display.
3. Press Band Cat the same time to delete the contact code data item.
•At this time the cursor appears in the text area, ready for input.
4. Press Aand then Lto return to the Contact Code Mode.
L
AB
C
M
Remaining
memory
MISSION CODE MODE
Mission Code Mode lets you store up to 100*
mission code data items (mission time, date,
and text). Whenever a mission time is reached,
an alarm sounds and the text you input for the
mission scrolls across the text area of the
display.
*
The Mission Code Mode shares memory with
the Contact Code Mode. This means that the
maximum number of Mission Code Mode
entries you can store is reduced by one each
time you store a Contact Code Mode data
item.
•Whenever you enter the Mission Code Mode,
the text MISSION CODE scrolls across
thetextarea of the display once. Next, mission
code data appears on the display. You can
interrupt scrolling of the initial text and
immediately display mission code data at any
time by pressing A, B, or C.
Notes
•A Mission Code Alarm sounds whenever a mission time you set is reached.
It continues for about 20 seconds or until you interrupt it by pressing any
button.
•The mission code text scrolls across the text area of the display only if the
watch is in the Timekeeping Mode when the mission code time is reached.
The text continues to scroll for about 25 seconds, or until you stop it by
pressing any button after you press a button to interrupt the alarm.
•Mission Code Mode data items are automatically sorted into chronological
order.
•Entering the Mission Code Mode causes data for the next scheduled
mission to appear on the display.
To input new mission code data
1. In the Mission Code Mode, press Bor Cuntil
the new data display appears.
•Ifthereis no mission code datastored in memory
yet, the new data display appears as soon as
you enter the Mission Code Mode.
•If the message FULL appears in the text area
of the display, it means that memory is full. To
store more data, you will first have to delete
some of the data stored in memory.
2. Hold down Auntil the month setting starts to flash in the number area of
the display. The month setting flashes because it is
selected
.
•The initial mission time setting is always midnight, which is indicated as
12:00 with the 12-hour timekeeping format and 0:00 in the 24-hour format.
You can select the timekeeping format in the Timekeeping Mode.
3. Press Mto change the flashing selection in the following sequence.
*
11 spaces are provided for the text. This means that if you input only five
characters for the text, so you have to press
M
6 times to reach the month
setting.
AB
C
M
Text area
Mode indicator
Text
Month – Date
Text area
Number area
[New Data Display]
Month Date Minutes
Hour Text *
Hour : Minutes
4. While the month, date, hour or minutes is flashing, press Cto increase
the selected setting or Bto decrease it. Holding down either button
changes the current selection at high speed.
Important!
•Correct storage of mission code data is impossible if you do not input a
month and date.
•The date you can specify must be within one year from the current date.
This means that if the current date (in the Timekeeping Mode) is June 30,
1996, you will be able to specify any date up to June 29, 1997 for a mission
date.
•When setting the time using the 12-hour format, take care to set the time
correctly as morning (no indicator) or afternoon (P).
5. Input text in the text area of the display.
•You can input up to 11 characters for the text.
Use Band Cto input characters, andMto move the cursor around the
display. For details, see “INPUTTING TEXT”.
6. After inputting your data, press Ato store it and return to the Mission
Code Mode.
•Mission code data remains in memory until you delete it. Be sure to delete
old mission code data whenever you no longer need it. See “To delete
mission code data”.
To recall mission code data
In the Mission Code Mode, press Cto scroll forward through stored data
items or Bto scroll in reverse.
•Holding down either button scrolls through the data at high speed.
•The new data display appears whenever scrolling reaches the beginning or
the end of data currently stored in memory.
To edit mission code data items
1. In the Mission Code Mode, scroll through the data items and display the
one you want to edit.
2. Hold down Auntil the month setting starts to flash in the number area.
3. Use Mto move the flashing to the part of the mission code data item you
want to change.
4. Use Band Cto change the data.
•See “To input new mission code data” for details on inputting data.
5. After making the changes that you want, press Ato store them and return
to the Mission Code Mode.
To delete mission code data
1. In the Mission Code Mode, scroll through the data items and display the
one you want to delete.
2. Hold down Auntil the month setting starts to flash in the number area.
3. Press Band Cat the same time to delete the mission code data item.
•The message CLEAR appears for a short while. Next, the month setting
starts to flash on the display, ready for input of new data.
4. Press Aand then Lto return to the Mission Code Mode.
AB
C
M
Text area
Mode indicator
Morse code data
MORSE CODE MODE
The Morse Code Mode lets you store up to 16
characters as text or Morse code data. Stored
data can be converted between plain text and
its Morse code equivalent with the touch of a
button.
•Whenever you enter the Morse Code Mode,
the text MORSE CODE scrolls across the
text area of the display once. Next, Morse
code data appears on the display. You can
interrupt scrolling of the initial text and
immediately display Morse code data at any
time by pressing A, B, or C.
•When displaying Morse code data in the text
area of the display, the watch first displays
the indicatorforabouttwoorthreeseconds,
followed by the Morse code data.
Using Morse Code
Morse code is a system of representing letters of the alphabet and numbers
using short and long elements called “dots” ( ) and “dashes” ( ). This
watch shows Morse code in the text area of the display using “ ” and “ ”
symbols, with the codes for each letter separated by spaces.

— 5 —
Notes
•This watch displays up to five code elements (dots, dashes) per character.
This means the six-element Morse codes (representing punctuation marks)
are not included.
•You can set up the watch to emit beeps or to silently blink its backlight in
accordance with the dots and dashes of Morse code data as it scrolls
across the text area of the display.
Morse Code Data Example:
In the following example, imagine you want to sound a Morse code message
that tells your friend to meet you at the park at 3 o’clock. One way you could
do this would be to sound a message like the following.
Park, 3 =
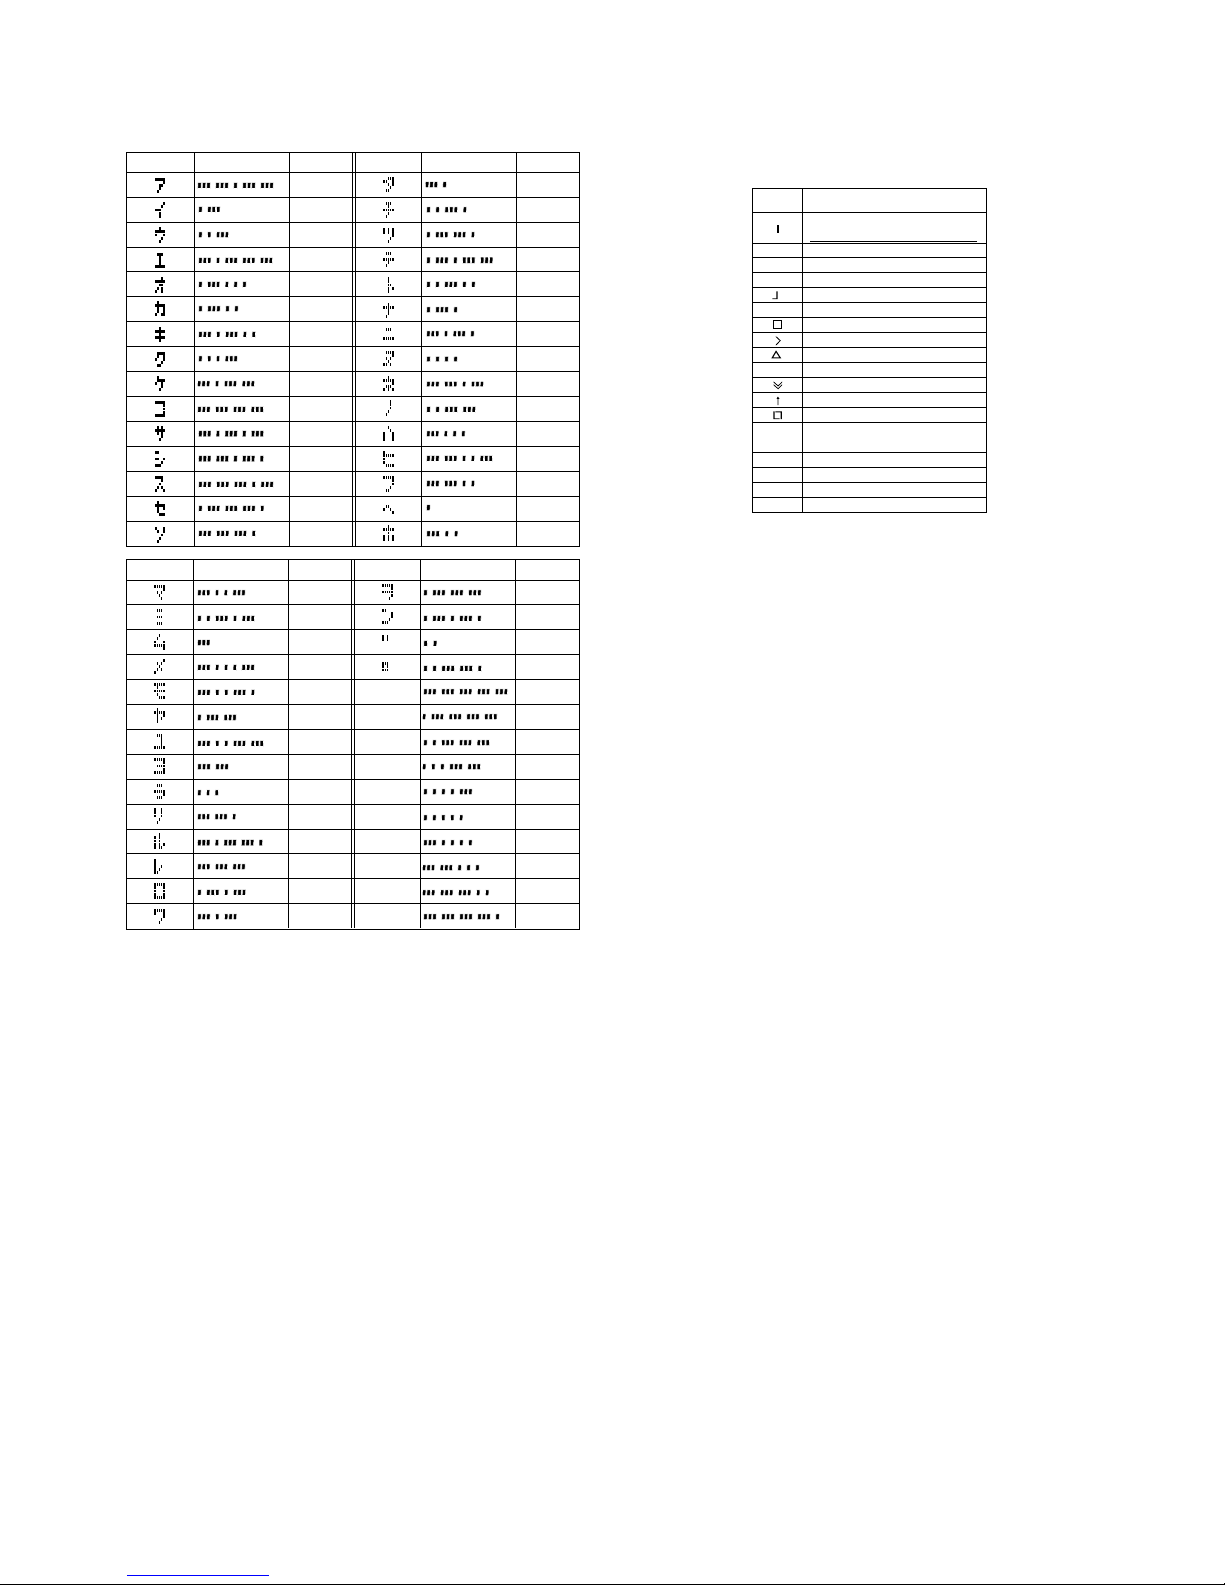
•See the “MORSE CODE TABLE” at the back of this manual for a complete
listof Morse code equivalents forJapanese phonetic characters (
katakana
),
alphabetical characters, and numbers.
PARK 3
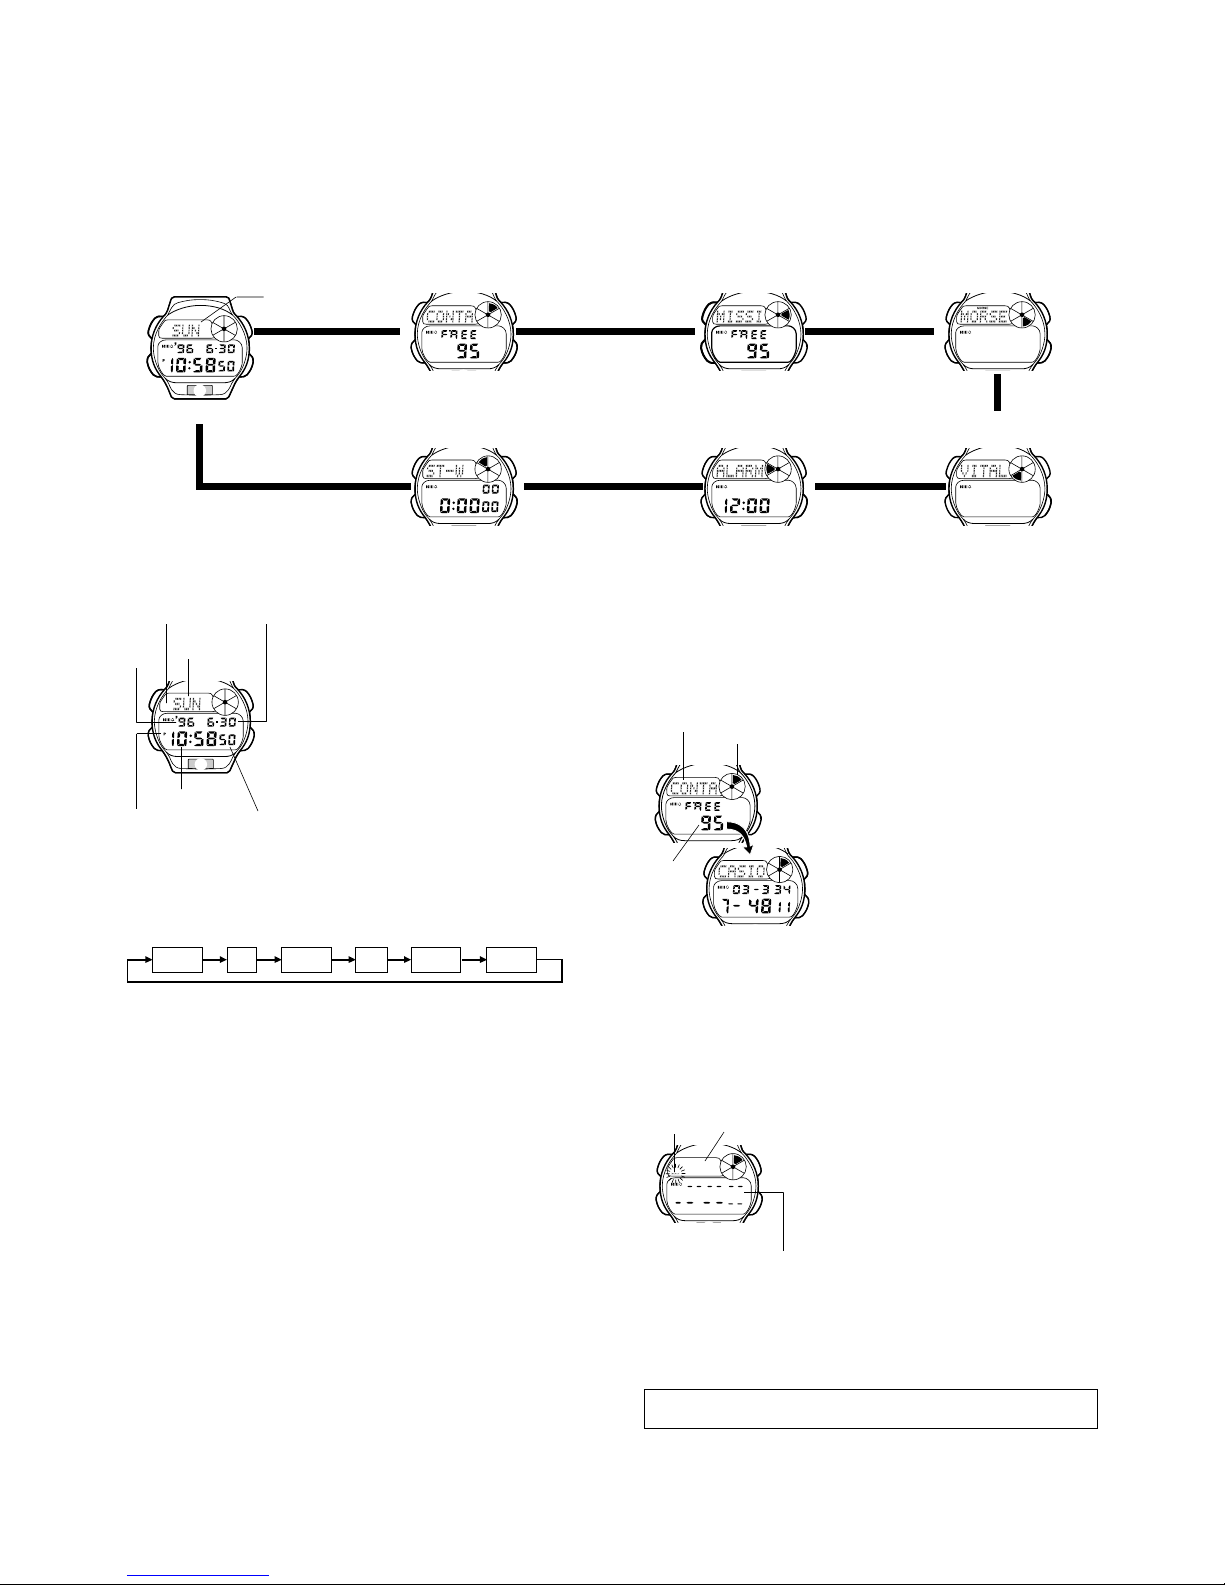
To input text 1. In the Morse Code Mode, use Cto select text
input.
•Each press of Cchanges the input mode and
indicator in the following sequence.
2. Hold down Auntil the flashing cursor appears in the text area of the
display.
3. Input the text you want in the text area.
•You can input up to 16 characters in the text area.
•You can input Japanese phonetic characters (
katakana
), alphabetical
characters, and numbers in the text area. You cannot input punctuation
marks.
Use Band Cto input characters, andMto move the cursor around the
display. For details, see “INPUTTING TEXT”.
4. After inputting the text, press Ato store it and return to the Morse Code
Mode.
Conversion between Text and Morse Code
In the Morse Code Mode, press Cto convert the data in the text area of the
display between text and its Morse code equivalent. See step 1 under “To
input text” for details on converting data.
•If the text data consists of more than five characters, the text scrolls on the
display from right to left. Morse code data always scrolls across the text
area of the display, regardless of how long it is.
•When displaying Morse code data in the text area of the display, the watch
first displays the indicator for about two or three seconds, followed by
the Morse code data. See “Selecting Audible or Visible Morse Code” for
details about the indicator.
•Pressing Bwhile Morse code data is scrolling in the text area stops the
scrolling. Press Bagain to resume scrolling.
•Characters for which there is no Japanese phonetic characters (
katakana
),
alphabetical characters, and numbers equivalent for Morse code you input
are replaced by “ ” in the text area of the display when you press Cto
convert from Morse code to text. Characters replaced by “ ” are converted
to “ ” when you change to the Morse code input display.
•Pressing Aor Lwhile Morse code data is scrolling in the text area
restarts the scrolling operation from the beginning of the Morse code data.
Selecting Audible or Visible Morse Code
You can set up the watch to emit beeps or to silently blink its backlight in
accordance with the dots and dashes of Morse code data as it scrolls across
the text area of the display.
AB
C
M
Cursor
Text area
A-Z indicator
MORSE JPN MORSE A–Z
Morse code
input Japanese
input Alphabet
input
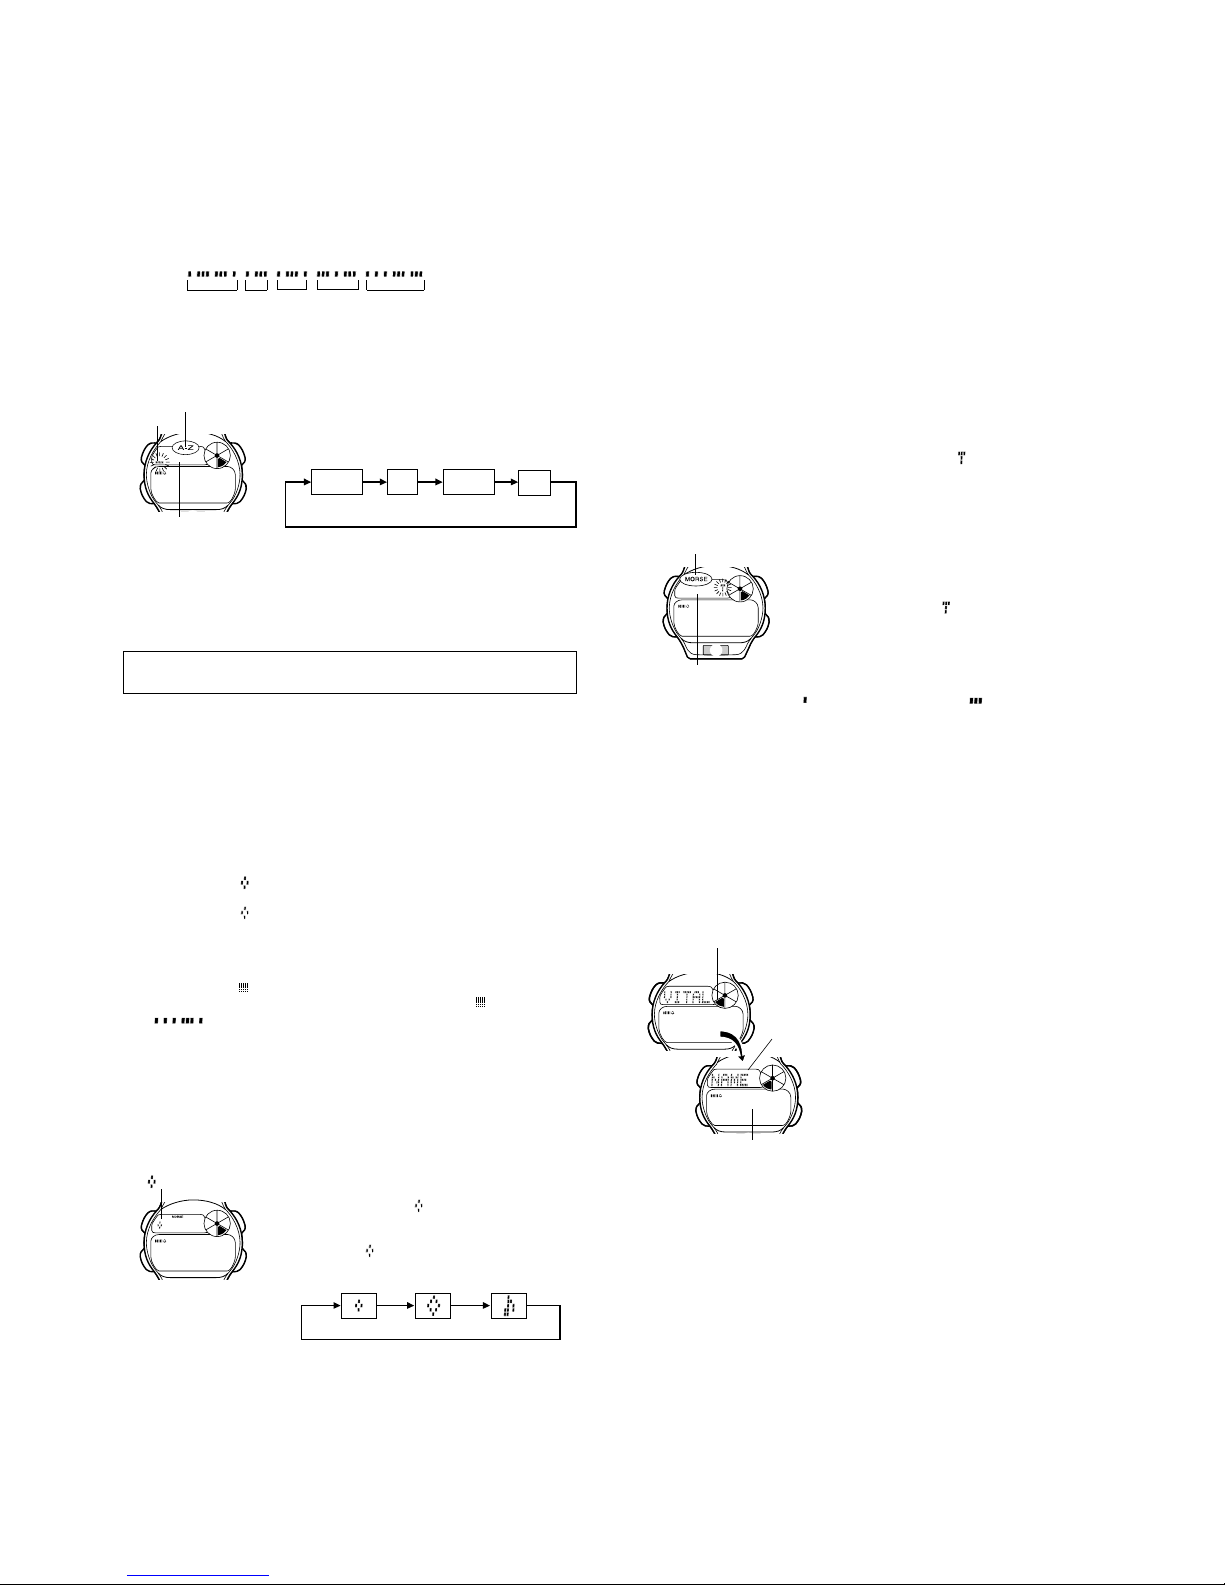
To check the current Morse code output setting
1. In the Morse Code Mode, press Cto display
Morse code.
•Remember that the indicator initially appears
in the text area for about two or three seconds
after you press Cto display Morse code data.
2. Beforethe indicatoris replaced by the Morse
code data, press Bto change the Morse code
output setting in the following sequence.
3. After you make the setting you want, wait about two or three seconds and
the watch will automatically switch to the Morse code data display.
•As the Morse code data scrolls across the text area of the display, it will
perform the output operation in accordance with the setting you make
above.
•The Morse code output operation is performed for one scroll operation only.
•If an Alarm Mode alarm time or Mission Code Mode alarm time is reached
while a tone or backlight Morse code output operation is being performed,
the Morse code output operation is terminated and the applicable alarm
operation is performed.
AB
C
M
indicator
Off Backlight Tone
To edit text
Note that you can edit text you input in the Morse Code Mode only. You
cannot edit Morse code data. After editing the text data you can convert the
new data to Morse code.
1. In the Morse Code Mode, press Cto display the existing text data in the
text area of the display.
2. Hold down Auntil the flashing cursor appears in the text area.
3. Use Mto move the cursor to the character you want to change.
4. Change the character.
•See “INPUTTING TEXT” for details on text input.
5. After making the changes that you want, press Ato store them and return
to the Morse Code Mode.
To delete Morse Code Mode data
You can use the following procedure to delete either Morse code data or text
data. When you do, the corresponding Morse code or text data is also
deleted.
1. While in the Morse Code Mode, hold down A.
•If text is in the text area, hold down Auntil the cursor appears. In the case
of Morse code data, hold down Auntil the data starts to flash.
2. Press Band Cat the same time to delete the data in the text area.
•When deleting Morse code data, pressing any button except Adeletes the
code data.
•At this time, either _(if you deleted text data) or (if you deleted Morse
code data) appears in the text area of the display, ready for new input.
3. Input new data or press Ato return to the Morse Code Mode.
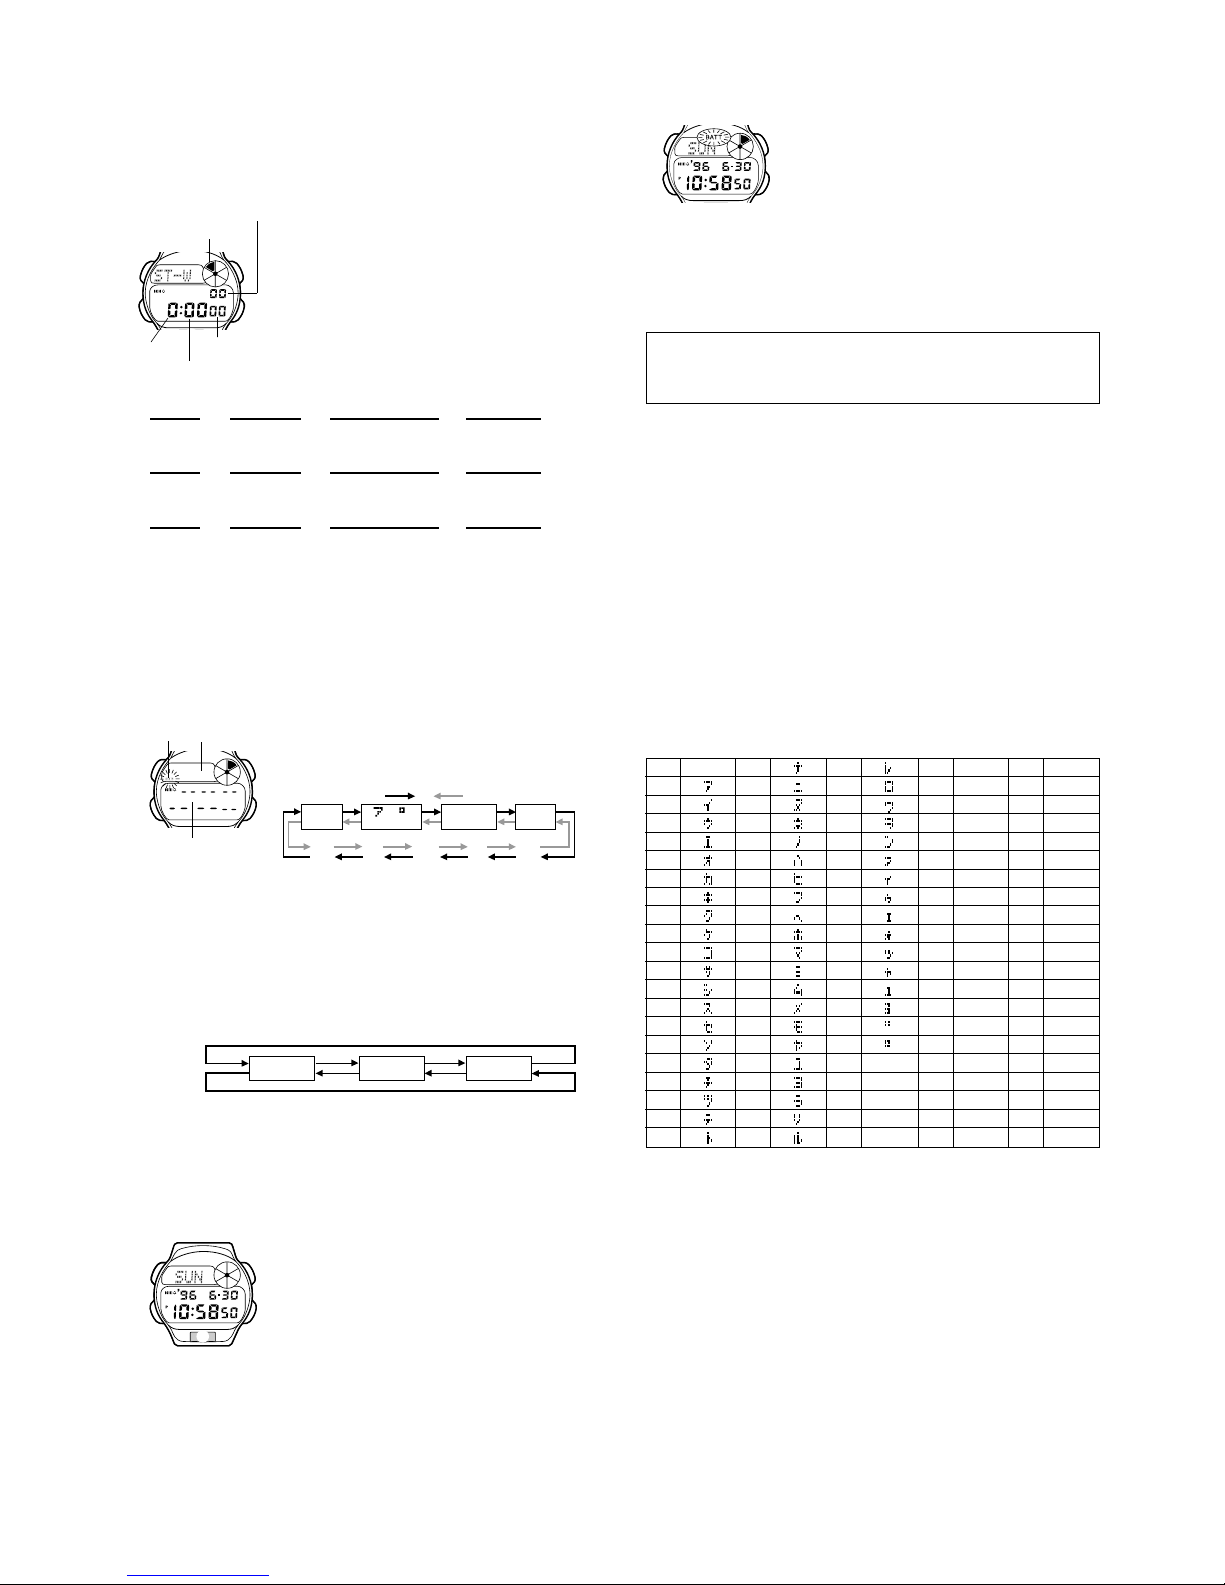
To input new Morse code data
1. In the Morse Code Mode, use Cto select
Morse code input.
•The MORSE indicator appears on the display
during Morse code input.
2. Hold down Auntil appears in the text area
of the display.
3. Input the Morse code that you want in the text
area.
•Press Bto input dots ( ) and Cto input dashes ( ). Press Mto input
spaces between each character, and Lto backspace and delete the dot or
dash to the left.
•Be sure to input a space between each set of dots and dashes, and make
up a character. This watch is designed to allow up to five dots and dashes
per character, so further input becomes impossible after you input the fifth
dot or dash in a series that does not include a space.
4. After inputting your Morse code data, press Ato store it and return to the
Morse Code Mode.
•Morsecodedataalwaysscrollsacrossthetextareaofthedisplay,regardless
of how long it is.
AB
C
ML
Text area
MORSE indicator
VITAL STATISTICS/ID MODE
The Vital Statistics/ID Mode provides a handy
place to store data about your vital statistics
(name, blood type, date of birth) and personal
identification (ID) data (credit card number,
license number, passport number, and two
undefined items).
•Whenever you enter the Vital Statistics/ID
Mode, the text VITAL STATS./ID
scrolls across the text area of the display
once. Next, the name screen appears on the
display.Youcan interrupt scrolling of theinitial
text and immediately display the name screen
at any time by pressing A, B, or C.
•The name screen always appears first
whenever you enter the Vital Statistics/ID
Mode.
Important!
•Once you input your vital statistics, take care that the watch is not borrowed
by another person. Otherwise, emergency medical personnel may assume
that the data in the Vital Statistics/ID Mode applies to the person who is
currently wearing the watch.
•Note that storing important personal identification data in the watch’s
memory runs the risk of it being misused should you lend the watch to
someone or should the watch become lost or stolen. Because of this, the
manufacturerstronglyrecommendsthatyouinputsuchimportantinformation
in coded form that cannot be deciphered by others.
•Note that CASIO COMPUTER CO., LTD. shall not be held liable to you or
any third party for any losses or damages suffered through the misuse of
data stored in the memory of this watch.
AB
C
M
Mode indicator
Text area
Number area

— 6 —
To input the date of your birth
1. In the Vital Statistics/ID Mode, display the
BIRTH screen.
2. Hold down Auntil the year digits start to flash
on the display. The year digits flash because
they are
selected
.
3. Press Mtochangetheselectionin the following
sequence.
4. PressCto increase the selected digits and Bto decrease them. Holding
down either button changes the selected digits at high speed.
•The year can be set in the range of 1900 to 2039.
5. After inputting your data, press Ato store it and return to the normal
BIRTH screen (no flashing digits).
Personal identification data
•Thiswatchhasthree built-in titles for personal identification data: CREDIT
(for a credit card number), LICENCE (for a license number), and
PASSPORT (for a passport number). You can use these built-in title as
they are, or append eight more characters to a built-in title to indicate a
credit card company name, for example.
•In addition to the three built-in titles, you can also input your own titles up to
eight characters long for the two undefined items.
•You can input number up to 12 digits long for each personal identification
data item.
AB
C
M
Month – Date
Year
Year Month Date
To input your blood type
1. In the Vital Statistics/ID Mode, display the
BLOOD screen.
2. Hold down Auntil the Rh factor setting flash in
the text area of the display.
3. Use Band Cto scroll through the available
Rh factor settings in the following sequence.
4. Press Mto advance to the blood type.
5. Use Band Cto scroll through the available blood type settings in the
following sequence.
6. After inputting your data, press Ato store it and return to the normal
BLOOD screen (no flashing characters).
•Select --- if you do not want to specify an Rh factor and -- if you do not
want to select a blood type in the above sequence. When neither an Rh
factor nor blood type is specified, the blood data screen shows ----- on
the watch’s display.
--- R
+R
-
AB
C
M
Blood type ABO
Rh factor
Press C
Press B
-- AB ABO
Press C
Press B
To input personal identification data
1. In the Vital Statistics/ID Mode, display the
personal identification data screen where you
want to input data.
•See “To recall Vital Statistics/ID data” for details
on how to switch between data screens.
2. Hold down Auntil the flashing cursor appears
in the text area of the display.
3. Input a text in the text area if you want.
•In the case of a built-in title, you can append up to eight characters to the
preset title. For the undefined data items, you can input titles up to 8
characters long.
•To use a built-in title as it is without appending text, pressMeight times to
move the cursor to the number area.
Use Band Cto input characters, andMto move the cursor around the
display. For details, see “INPUTTING TEXT”.
4. After you input your text, use Mmove the cursor to the number area and
input number data.
•You can input up to 12 digits in the number area.
•You can input only hyphens, numbers and spaces in the number area (you
cannot input text).
5. After inputting your data, press Ato store it and return to the screen you
started out from in step 1 of this procedure.
To edit Vital Statistics/ID Mode data
1. In the Vital Statistics/ID Mode, scroll through the data items and display
the one you want to edit.
2. Hold down Auntil the data on the display starts to flash.
3. Use Mto move the flashing to the part of the data item you want to
change.
4. Use Band Cto change the displayed data.
•For details on inputting data, see the sections of this manual that describes
input for each screen.
5. After making the changes that you want, press Ato store them and return
to the screen you started out from in step 1 of this procedure.
To delete Vital Statistics/ID Mode data items
1. In the Vital Statistics/ID Mode, scroll through the data items and display
the one you want to delete.
2. Hold down Auntil the data on the display starts to flash.
3. Press Band Cat the same time to delete the data item.
4. Press Ato return to the screen you started out from in step 1 of this
procedure.
AB
C
M
Number area
Cursor
Text area
AB
C
M
ALARM MODE
When the Daily Alarm is switched on, the alarm
sounds for 20 seconds at the preset time each
day. Press any button to stop the alarm after it
starts to sound.
When the Hourly Time Signal is switched on, the
watch beeps every hour on the hour.
To set the alarm time
1. Hold down Awhile in the Alarm Mode until the
hour digits start to flash on the display. The
hour digits flash because they are
selected
.
•This operation will switch the Daily Alarm on
automatically.
2. PressMtochangetheselectioninthefollowing
sequence.
3. Press Cto increase the selected digits or Bto decrease them. Holding
down either button changes the selection at high speed.
•The format (12-hour and 24-hour) of the alarm time matches the format you
select for normal timekeeping.
•When setting the alarm time using the 12-hour format, take care to set the
time correctly as morning (no indicator) or afternoon (P).
4. After you set the alarm time, press Ato return to the Alarm Mode.
To switch the Daily Alarm and Hourly Time Signal on
and off
Press Cwhile in the Alarm Mode to change the status of the Daily Alarm and
Hourly Time Signal in the following sequence.
Alarm on indicator
Hour Minutes
[Alarm ON indicator/Hourly Time Signal ON indicator]
Both ON
Mode indicator
Hour Minutes
Hourly time signal
on indicator
Both OFF Daily Alarm
Only Hourly Time
Signal only
To recall Vital Statistics/ID data
In the Vital Statistics/ID Mode, press Bor Cto change the data on the
display in the following sequence.
•The titles of the each data item appear in the text area of the display. In the
case of the undefined items, you can specify titles that appear in the text
area whenever you later display that item.
NAME
(Name) BLOOD
(Blood type)
CREDI
(Credit card
number)
BIRTH
(Date of birth)
(Undefined) (Undefined)
LICEN
(License
number)
PASSP
(Passport
number)
Press CPress B
To input your name
1. In the Vital Statistics/ID Mode, display the
NAME screen.
2. Hold down Auntil the flashing cursor appears
in the text area of the display.
3. Input your name into the text area.
•Youcan input up to16 characters for yourname.
Use Band Cto input characters, and Mto
move the cursor around the display. For de-
tails, see “INPUTTING TEXT”.
•You can clear the characters currently input for the name by pressing B
and Cat the same time.
4. After inputting your data, press Ato store it and return to the normal
NAME screen (without cursor).
AB
C
M
Text area
Cursor

— 7 —
INPUTTING TEXT
The following describes how to input text in the Contact Code Mode, Mission
Code Mode, Morse Code Mode, and Vital Statistics/ID Mode.
How to input characters
1. When the cursor is blinking in the text area of
the display, use Band Cto scroll through the
available letters, numbers and symbols, in the
following sequence.
•Holding down either button scrolls through at high speed.
•You can input Japanese phonetic characters (
katakana
), alphabetical
characters, numbers, and symbols in the text area. For a complete list of
characters you can input, see the “CHARACTER LIST” at the back of this
manual.
2. When the character you want at the cursor position is shown, press Mto
move the cursor to the right.
3. Repeat steps 1 and 2 until your text is complete.
•Youcan input only hyphens, numbers and spaces in the numberarea. Each
press of Bor Cchanges the input at the current cursor location in the
following sequence.
•If you do not perform any button operation for about two or three minutes
while the cursor is on the display, the watch automatically returns to the
normal data display (the cursor disappears).
(space) Ato Z
(Alphabet) 0to 9
. -/
)(
Press CPress B
to
(Japanese)
AB
C
M
Number area
Cursor
Text area
Press C
Press B
x(space)
0to 9
AUTO DISPLAY FUNCTION
TheAuto Display function continually changes the
contents of the text area of the display. Note that
you cannot use any of the watch’s other functions
(except for turning on the backlight and adjusting
the seconds count to zero) while the Auto Display
function is operating.
To turn the Auto Display off
Hold down Mfor about three seconds until the
watch beeps.
To turn Auto Display on
Hold down Mfor about three seconds until the watch beeps.
Note
TheAuto Display function cannot be performed while you are makingsettings
(i.e. while digits or other settings are flashing on the display).
AB
C
ML
AB
C
M
STOPWATCH MODE
The Stopwatch Mode lets you measure elapsed
time, split times, and two finishes. The range of
the stopwatch is 23 hours, 59 minutes, 59.99
seconds.
(a) Elapsed time measurement
(b) Split time measurement
(c) Split time and 1st-2nd place times
Start
Start
Stop
Stop
Split release
Split release
Re-start
Stop Record time of
second runner.
Second runner finishes.
Record time of first runner.
Split
Split
First runner
finishes.
Clear
Clear
Clear
▼
▼
▼
▼▼
▼
▼▼
▼
▼▼
Start Stop
▼
1/100 second
Mode indicator
Seconds
Minutes
CCCCB
BC
BBC
C
C
B
B
B
Hours
ABOUT THE LOW BATTERY WARNING
The message BATT flashes on the display
whenever the battery power is low. Have the
battery of the watch replaced as soon as possible
afterthis message appears. Usingthe watch while
thebattery is low canresult in abnormal operation.
Important!
•In order to protect data stored in memory, you will not be able to recall
existing data or input new data while the BATT message is flashing on the
display. Also, the alarm, hourly time signal, backlight, and other functions
do not operate.
•Low battery power can cause time keeping to fall behind, and it can cause
the display to become difficult to read, or to clear completely.
ALWAYS LEAVE BATTERY REPLACEMENT UP TO THE DEALER
WHERE YOU BOUGHT THE WATCH OR TO AN AUTHORIZED CASIO
DISTRIBUTOR. BE SURE TO SHOW THE FOLLOWING INFORMATION
TO THE PERSON REPLACING THE BATTERY.
Attention dealer or CASIO distributor
Be sure to use the following procedure when replacing the battery.
1. Open and remove the back cover.
•If CLOSE appears on the display when you open the back cover, replace
the back cover. Wait for a few minutes and try again.
2. Remove the battery holder.
3. Remove the old battery and load a new one.
4. Replace the battery holder.
5. Touch the AC contact and the battery (+) side with metallic tweezers.
6. Close the back cover.
•The message WAIT appears on the display about 15 seconds after you
perform the AC (all clear) operation in step 5 of the above procedure,
indicating that the watch is performing an internal self-check for data errors.
•The WAIT indicator remains on the display for a few minutes while the
watch performs an internal check of data in memory. Though you can
change the time setting of the watch while the WAIT indicator is on the
display, other operations are disabled.
To test the alarm
Hold down Bwhile in the Alarm Mode to sound the alarm.
43
44
45
46
47
48
49
50
51
52
53
54
55
56
57
58
59 A
60 B
61 C
62 D
63 E
22
23
24
25
26
27
28
29
30
31
32
33
34
35
36
37
38
39
40
41
42
64 F
65 G
66 H
67 I
68 J
69 K
70 L
71 M
72 N
73 O
74 P
75 Q
76 R
77 S
78 T
79 U
80 V
81 W
82 X
83 Y
84 Z
85 0
86 1
87 2
88 3
89 4
90 5
91 6
92 7
93 8
94 9
95 -
96 .
97 /
98 (
99 )
CHARACTER LIST
1 (space)
2
3
4
5
6
7
8
9
10
11
12
13
14
15
16
17
18
19
20
21

— 8 —
MORSE CODE TABLE
Japanese Morse Code Alphabet Japanese Morse Code Alphabet
N
F
P
R
C
H
Q
B
Z
E
D
A
U
L
V
Y
0
1
2
3
4
5
6
7
8
9
Source: Radio Laws and Regulations of Japan Radio Station Operating
Regulations
X
T
W
M
S
G
O
K
Japanese Morse Code Alphabet Japanese Morse Code Alphabet
J
I
0
1
2
3
4
5
6
7
8
9
EMERGENCY CODES AND MESSAGES
Some watch models include emergency codes and messages marked on
their cases and bands. The following shows the meanings of these codes.
Source: THECONVENTIONONINTERNATIONAL CIVIL AVIATION ANNEX
12 SIXTH EDITION AMENDMENTS II [SEARCH AND RESCUE]
“Ground-air visual signal code”
Notes
•The emergency codes and messages used by this watch are only part of
the full list of codes contained in the above named source document. Also,
the codes and messages produced by the watch may differ somewhat from
the signal codes contained in the source document.
•Ground-air visual signal codes are letters (such as LL, I, etc.) that are
written on the ground in order to communicate emergency information to
aircraft flying overhead.
They are part of a comprehensive system of distress codes. Ground-air
visual signal codes used alone do not communicate distress messages.
Codes Messages
REQUIRE DOCTOR
–SERIOUS INJURIES (not marked)
X UNABLE TO PROCEED
F REQUIRE FOOD AND WATER
K
INDICATE DIRECTION TO PROCEED
L NOT UNDERSTOOD
LL ALL WELL
REQUIRE MAP AND COMPASS
I WILL ATTEMPT TAKE-OFF
PROBABLY SAFE TO LAND HERE
I I REQUIRE MEDICAL SUPPLIES
REQUIRE FIREARMS AND AMMUNITION
AM PROCEEDING IN THIS DIRECTION
AIRCRAFT SERIOUSLY DAMAGED
IREQUIRE SIGNAL LAMP WITH
IBATTERY AND RADIO
L REQUIRE FUEL AND OIL
NNO
Y YES
W REQUIRE ENGINEER
Table of contents
Other Casio Watch manuals

Casio
Casio 3459 Service manual

Casio
Casio 5063 User manual

Casio
Casio 3543 User manual

Casio
Casio Baby-G BG2000-1 User manual

Casio
Casio 3305 User manual

Casio
Casio 3238 User manual

Casio
Casio 3446 User manual

Casio
Casio 2519 User manual

Casio
Casio 5229 User manual

Casio
Casio Edifice EQB-1200D-2AER User manual