Catler KM 8013 User manual

STAND MIXER
KM 8013
Instructions for use
STAND MIXER
Návod kobsluze
KUCHYŇSKÝ ROBOT
Návod na obsluhu
KUCHYNSKÝ ROBOT
Használati útmutató
KONYHAI ROBOTGÉP
Instrukcja obsługi
ROBOT KUCHENNY
KUCHENNY

STAND MIXER

3
TABLE OF CONTENTS
TABLE OF CONTENTS
5 Catler Recommends Safety First
9 Know Your Stand Mixer KM 8013
9 Stand Mixer Description
10 Description of Accessories
12 Operating Your Stand Mixer KM 8013
12 Before First Use
12 Tilt-Back Head
12 Turning On and O
12 Speed Control
14 Using with the Blending Beaker
15 Using the Meat Grinder
16 Using the Sausage Attachment
17 Using the Meat Roll Attachment
17 Using the Cutting and Grating Attachment
18 Using the Scale
19 Tips and Advice on Preparing the Dough
20 Care and Cleaning
20 Cleaning the Base
20 Disassembling and Cleaning the Meat Grinder
21 Storage
22 Troubleshooting

4CONGRATULATIONS
Congratulations
on the purchase of your new KM 8013 stand mixer.

5
CATLER RECOMMENDS SAFETY FIRST
We understand the importance of safety and that’swhy we put your safety first from the initial
design concept to the production itself. Nevertheless, we ask you to be careful when using
electrical equipment and to observe the following guidelines:
• This appliance is not to be used by children.
Keep this appliance and its power cord out of
children.
• This appliance may be used by persons with
physical, sensory, mental impairments or by
inexperienced persons, if they are properly
supervised or have been informed about how
to use of the product in asafe manner and
understand the potential dangers
• Children must not play with the appliance.
• Cleaning and maintenance performed by the
user must not be performed by children.
• If the power cord is damaged, ask the
authorised service for areplacement in order
to prevent hazards. It is forbidden to use the
appliance with the power cord damaged.
WARNING: Incorrect use may lead to injuries.
• Pay attention when handling the chopping
blade of the meat grinder, especially when
inserting, removing or cleaning. The blades are
very sharp, posing adanger of aserious injury.

6CATLER RECOMMENDS SAFETY FIRST
• Please clean the accessories that comes into
contact with food after each use according to
the instructions in chapter “Care and cleaning”
of these user’sinstructions. Keep the appliance
and its accessories clean at all times.
• Always turn off the appliance, disconnect it
from the power socket when not be using it,
when leaving it without supervision, and before
assembling, disassembling, cleaning or moving it.
• Before disassembling the appliance and
replacing accessories or accessible parts that
move during use, switch off the appliance,
disconnect it from the power supply and wait
for the moving parts to stop.
• Please use only supplied accessories or
the accessories recommended by the
manufacturer. It is forbidden to used other than
supplied accessories with this appliance.
• This appliance is designed for home use only. This appliance is not designed for
commercial use. Do not use this appliance in moving vehicles or on boats, outdoors, or for
any purpose other than it’sintended. Otherwise, there is arisk of personal injury.
• Before connecting this appliance to apower socket, make sure the voltage stated on the
product'srating label corresponds to the voltage in your power socket.
• Place the appliance on astable, heat-resistant, at and dry surface away from the edge of
the worktop.
• Do not place the appliance on or near heat sources such as hotplates, ovens or gas
burners. Vibrations during operation may cause the appliance to move.
• Never use multiple attachments simultaneously.
• Do not use this appliance with aprogrammable switch, timer switch or any other device
that automatically switches the appliance on.

7
CATLER RECOMMENDS SAFETY FIRST
• For safety reasons, this appliance is equipped with asafety mechanism that prevents the
motor from being started if the appliance is incorrectly assembled or the tilt-back head is
lifted.
• Before turning the appliance on, check that it is correctly assembled and that the tilt-back
head is in the horizontal position.
• Allow hot liquids or food to cool down before processing.
• Do not attempt to grind bones, nutshells or other hard ingredients.
• Be careful not to get injured on the edge when handling the blade and the graters.
• Do not leave the appliance running continuously under heavy load for more than 15
minutes. Before turning it on again, allow it to cool down for at least 10 minutes.
• Do not lift the tilt-back head or put your hands or items, such as akitchen knife, fork or
wooden spoon, into the blending beaker while the appliance is in operation. Do not
touch rotating parts of the appliance or attachments and ensure that foreign items such
as clothing, hair, etc. are kept away. An injury could occur or the appliance could be
damaged.
• If any item such as aspoon or awooden spoon falls into the blending beaker while
the appliance is in operation, press the power On/O button immediately to turn the
appliance o, unplug the power cord from the socket, wait for the rotating parts to stop
and then remove the item.
• If you need to wipe the inside of the bowl or the attachments, turn the appliance o and
disconnect it from the mains. Wait until the rotating parts come to acomplete stop. Use
aspatula to clean the attachments and the inside of the bowl. Then you can continue
processing.
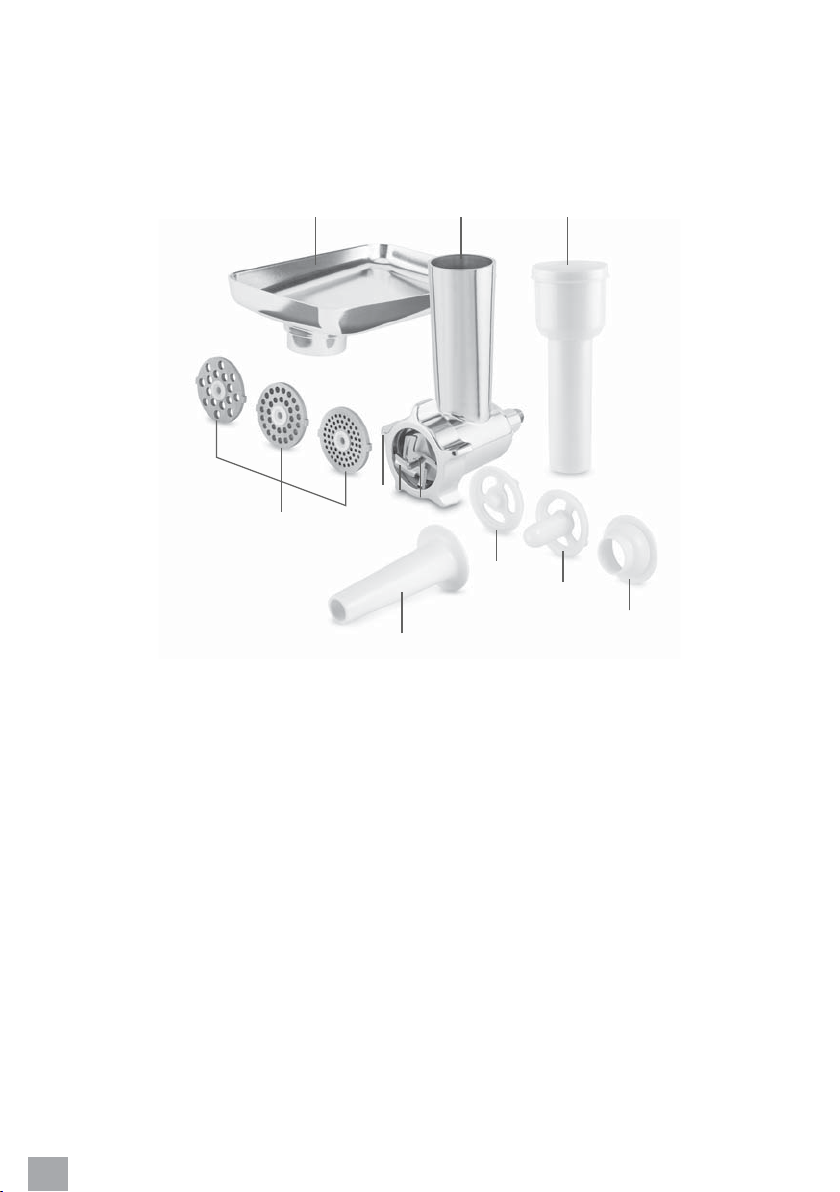
• To push the ingredients through the lling funnel of meat grinder or cutting and grating
attachment, never use your ngers or other items. Always use the provided plungers.
• This appliance is designed to process 300 g to 1 kg of our in one processing. Do not use
the appliance to process large quantities of our. We recommend dividing the quantity
into smaller portions to ensure even processing.
• Never run the appliance without liquid. This may damage the lid.
• Before storing the appliance, make sure that both the appliance and the accessories are
cleaned and the tilt-back head is in the folded position.
• Do not disconnect the appliance from the power socket by pulling on the power cord. This
could damage the power cord or the power socket. Disconnect the cord from the power
socket by gently pulling the plug of the power cord.
IMPORTANT SAFETY INSTRUCTIONS FOR USING ELECTRICAL EQUIPMENT
• Fully unwind the power cord before use.
• Do not leave the power cord hanging over the edge of atable or counter top or allow it
to touch ahot surface or to become tangled up. Do not put heavy objects on the power
cord.
• For safety reasons, we recommend to connect the appliance in an independent electrical
circuit separated from other appliances. Do not use adapter plugs or extension cords to
connect the appliance to apower socket.
• To prevent electric shock, do not immerse the appliance, its base or the power cord in
water or other liquids.

8CATLER RECOMMENDS SAFETY FIRST
• We recommend that you check your appliance regularly. Do not use the appliance if it is
damaged in any way or if the power cord or plug is defective. All repairs or adjustments
must be performed at the nearest Catler authorised service centre.
• Any maintenance other than routine cleaning must be entrusted to an authorised Catler
service centre.
• We recommend to install aresidual current device (standard safety switches in your power
outlet) to provide ahigher level of protection when using the appliance. We recommend
to install aresidual current device (with anominal residual operating current of no more
than 30mA) in the electric circuit in which your appliance is to be connected. For further
expert advise, please contact your electrician.
Instructions are also available at www.catler.eu.

9
KNOW YOUR STAND MIXER KM 8013
STAND MIXER DESCRIPTION
1413 15
1
2
3
4
6
7
5
8
9
10
11
12
1. Front cover
2. Locking screw
3. Drive shaft
4. Protective cover
5. Blending beaker
6. Stand mixer base
7. Anti-slip feet with suction cups
8. Tilt-Back Head
9. Lock button to lift and lower the tilt-back
head
10. Speed Control
11. Display
12. Scale control button
13. Beater blade
14. Kneading hook
15. Whisk

10 KNOW YOUR STAND MIXER KM 8013
DESCRIPTION OF ACCESSORIES
MEAT GRINDER
8
4
9
10
11
1 2 3
567
1. Hopper
2. Meat grinder
3. Plunger
4. Grinding discs
5. Screw cap
6. Grinding blade
7. Screw shaft
8. Sausage attachment
9. Separator
10. Meat roll attachment
11. Cap

11
KNOW YOUR STAND MIXER KM 8013
CUTTING AND GRATING ATTACHMENT
1 2 3 4 5
1. Plunger
2. Grating attachment
3. Coarse grater
4. Fine grater
5. Slicer

12 OPERATING YOUR STAND MIXER KM 8013
OPERATING YOUR STAND MIXER KM 8013
BEFORE FIRST USE
Before rst use, remove all packaging
and advertising labels/stickers from the
appliance. Make sure you have removed all
accessories from the package.
Wipe the stand mixer base with asoft sponge
slightly moistened in warm water. Wipe dry
using aclean wiping cloth.
Wash the blending beaker, protective cover,
beaters, hooks and all accessories in warm
water with asmall amount of washing-up
liquid. Rinse in clean water and wipe dry.
Before storing the stand mixer, make sure
that all parts are clean and dry.
TILTBACK HEAD
In order to operate (lower and lift) the tilt-
back head, you must always press the lock
button located in the rear of the tilt-back
head. Hold the tilt-back head with the other
hand. Aclick signals that the tilt-back head is
securely locked.
If you are about to lower of lift the tilt-back
head, always make sure that the power cord
is unplugged from the mains socket.
WARNING!
Never try to lift or lower
the tilt-back head by
force. There is arisk of damage to the
appliance.
TURNING ON AND OFF
Place the stand mixer on arm, level and
clean work surface at asucient distance
from the power outlet. Make sure you have
enough clear space around it. Apply slight
pressure to the stand mixer to press the
suction cups against the work surface.
Make sure the stand mixer is correctly
assembled and the tilt-back head is lowered.
Insert the power plug into apower socket,
ashort audible warning sounds and the
speed control ashes. Stand mixer is in stand-
by mode.
To turn the stand mixer completely o,
unplug the power cord from the socket.
SPEED CONTROL
Set the speed control dial to arequired speed
between 1–6 where“1” ´is the lowest and “6”
is the highest speed.

13
OPERATING YOUR STAND MIXER KM 8013
SPEED OVERVIEW TABLE
Speed Attachment Use Instructions
1 to 3
Kneading
hook, beater
blade
Kneading, mixing of
ingredients
Select speed 1 for 30 seconds, speed
2 for 30 seconds and speed 3 for 4 to
5 minutes when preparing dough or
mixing ingredients.
Cutting
and grating
attachment
Slicing and grating of
ingredients
Select the speed according to the type
of food. Soft foods (e.g. cucumber)
require alower speed, while hard foods
(e.g. carrots) require ahigher speed.
Sausage
attachment
Preparation of
sausages
Assemble the attachment according
to the instructions below and process
the mixture. Always use the provided
plunger.
Meat roll
attachment
Preparation of meat
rolls.
4Beater blade,
whisk
Whisking butter,
mixing jam, preparing
mashed potatoes
Put all the ingredients in the blending
beaker.
Keep in mind that fragile ingredients
require alower speed at the beginning
of processing. You can gradually increase
this.
5Beater blade,
whisk
Mixing of ingredients
at higher speed.
Put all the ingredients in the blending
beaker and set the speed to 5.
6
Beater blade,
whisk
Whisking eggs,
preparing whipped
cream, whipping egg
whites, etc.
Whisking egg whites until sti: you can
put 3 to 12 egg whites (about 100 g),
choose speed 6 for 1 to 5 minutes.
Meat grinder Meat grinding,
sausage preparation
Cut the meat into the same-sized pieces.
Assemble the meat grinder according
to the instructions below and use
asuitable grinding disc.
Cutting
and grating
attachment
Cutting and grating
food
Assemble the attachment according
to the instructions below. Choose
asuitable grater.
PWhisk Fast whisking at
maximum speed
Turn the rotary knob to position P and
hold the rotary knob in this position.
When you release the rotary knob to
position 0, the stand mixer stops.

14 OPERATING YOUR STAND MIXER KM 8013
WARNING!
Use the kneading hook
only at speeds 1 to 3. Do
not use ahigher speed.
WARNING!
Before assembling or
disassembling, always
make sure that the power plug is
disconnected from the mains socket.
WARNING!
Never run the stand mixer
with any accessories
continuously for longer than
15 minutes. After 15 minutes of
continuous running, turn the appliance
off, unplug the power cord and let it
cool down for about 10 minutes.
USING WITH THE BLENDING
BEAKER
1. Put the stand mixer on clean, rm and
stable surface within easy reach of
amains socket.
2. Press the lock button to release the tilt-
back head and lift the tilt-back head.
3. Insert the blending beaker into the
hole in the stand mixer base so that the
projections on the outer edge of the
blending beaker are aligned with the
projections in the base. Turn the blending
beaker clockwise until you feel resistance.
The handle of the blending beaker
should point outwards away from the
stand mixer. The stand mixer will not start
unless the blending beaker is correctly
inserted in the base.
4. Place the protective cover on the tilt-back
head from below, with the lling funnel
in the protective cover facing away from
the head. Push gently until you hear
aclick.
5. We recommend using aprotective cover
every time you use it. This prevents
unwanted staining of the tilt-back head
and the area around the stand mixer
when processing ingredients.
6. To attach the kneading hook, beater
blade or whisk, t the attachment onto
the shaft so that the projections on
the shaft t into the cut-outs in the
attachment. Then turn the attachment
counterclockwise. This will x the
attachment on the shaft.
7. Place the ingredients that you wish to
process into the jar. Always observe the
maximum amount of ingredients that
can be processed (1 kg of our).
8. Lower the tilt-back head by pressing the
lock button and slowly lower the head.
9. Now insert the power plug into apower
socket. Ashort audible warning sounds
and the speed control ashes.
10. Turn the speed control dial to set
the required speed. Select the speed
according to the type of ingredients to be
processed – see speed table above.
11. If you need to wipe the inside of the
bowl, set the speed dial control to“0”,
unplug the power cord from the mains
socket and wait until the rotating parts
come to acomplete stop. Press the lock
button and lift the tilt-back head. Wipe
the inside of the bowl using aspatula or
awooden spoon.
12. When the mixture in the bowl has
been processed into the appropriate
consistence, set the speed to“0”,
wait until the rotating parts come to
acomplete stop, and unplug the power
cord from the power outlet. Press the
lock button and lift the tilt-back head.
Take the bowl by the handle and rotate it
anticlockwise to remove it from the base.
13. Remove blend from the bowl.

15
OPERATING YOUR STAND MIXER KM 8013
14. Clean the bowl and the stand mixer
according to the instructions in the “Care
and Cleaning”chapter.
REMARK:
If you are going to process solid
mixtures such as bread doughs, do
not run the stand mixer for more than
10 minutes. Then, turn the stand mixer
o and let it cool down for about 10
minutes.
USING THE MEAT GRINDER
1. Put the stand mixer on clean, rm and
stable surface within easy reach of
amains socket.
2. Insert the screw shaft in the grinding
chamber, then attach the grinding blade.
It is important that the edge is oriented
out of the grinding chamber.
3. Attach one of the grinding discs on
thegrinding blade. Select agrinding disc
depending on thepreferred grinding
roughness and intended meat use. Make
sure that the protrusion in the grinding
chamber is engaged with the notch in
the grinding disc.
WARNING!
When attaching the
grinding blade, be very
careful not to get injured with its edge.
4. Now attach the screw cap and screw it
properly by turning clockwise.
5. Release the locking screw and remove
the front cover.
6. Insert the assembled meat grinder in the
hole on the tilt-back head (with the screw
shaft end pointing forward).
7. Tighten the locking screw. Make sure that
the meat grinder is not loose and does
not move.
8. Insert the hopper on the lling funnel.
9. Now insert the power plug into apower
socket. Ashort audible warning sounds
and the speed control ashes.
10. Put the ingredients to be processed
in the hopper and put acontainer
for the processed food under the
grinder’soutlet.
11. Turn the speed control dial to set the
required speed. We recommend that you
select speed 5–6 and adjust as needed.
12. Insert the ingredients one by one in the
lling funnel using the plunger. Avoid
choking the lling funnel with excessive
amount of ingredients. To remove meat
residues from the grinding chamber, we
recommend to insert aslice of bread or
acroissant in the lling funnel and grind
them.
WARNING!
To push meat through the
filling funnel, always use
the supplied plunger. Never use your
fingers or other items.
13. When all the ingredients have been
processed, set the speed to“0”, wait until
the rotating parts come to acomplete
stop and unplug the power cord from the
power outlet.
14. Remove the hopper from the lling
funnel and put the bowl with the
processed ingredients aside.

16 OPERATING YOUR STAND MIXER KM 8013
15. Hold the grinder with one hand and
release the locking screw with the
other. Carefully remove the grinder
from the tilt-back head and put it on the
countertop or in the sink. Insert the front
cover in the hole on the tilt-back head
and tighten the locking screw.
16. Clean the meat grinder and the stand
mixer according to the instructions in the
“Care and Cleaning”chapter.
REMARK:
To achieve optimal results, we
recommend to cut the ingredients
into equally sized pieces. We do not
recommend to process frozen meat.
Never process bones, sinews etc.
USING THE SAUSAGE
ATTACHMENT
1. Put the stand mixer on clean, rm and
stable surface within easy reach of
amains socket.
2. Insert the screw shaft in the grinding
chamber.
3. Place the separator on the screw shaft
rst and then the sausage attachment.
4. Attach the screw cap and screw it
properly by turning clockwise.
5. Release the locking screw and remove
the front cover.
6. Insert the assembled sausage attachment
in the hole on the tilt-back head (with
the screw shaft end pointing forward).
Tighten the locking screw. Make sure that
the attachment is not loose and does not
move.
7. Insert the hopper on the lling funnel.
8. Now insert the power plug into apower
socket. Ashort audible warning sounds
and the speed control ashes.
9. Put the sausage making mixture in the
hopper.
10. Insert the casing (natural or articial) on
the attachment spike. We recommend
that loose end be tied or xed with
askewer. It’simportant to insert the
whole casing.
11. Turn the speed control dial to set the
required speed. We recommend that you
set the initial speed to 1–3 and adjust as
needed.
12. Hold the casing on the attachment with
one hand while pushing the mixture
through the lling funnel with the other
hand using the plunger.
WARNING!
To push mixture through
the filling funnel, always
use the supplied plunger. Never use
your fingers or other items.
13. When the sausage has reached the
required length, pause the stand
mixer run. Press the casing right at the
attachment outlet with your ngers and
rotate the sausage several times around
its axis. The turn the stand mixer back on
and proceed in the same manner until
the entire mixture has been processed.
REMARK:
The natural casing must be soaked in
lukewarm water for about 10 minutes
before use. If the casing gets stuck on
the attachment while being lled, wet
it slightly with lukewarm water. While
lling, make sure that the mixture is
loosely, yet evenly distributed in the
casing. If there were excessive amount
of mixture in the casing, it could break
during cooking or frying.

17
OPERATING YOUR STAND MIXER KM 8013
14.
Once you have used up all the mixture,
set the speed to“0”, wait until the rotating
parts come to acomplete stop and press
the button briey to turn the appliance o.
15. Remove the hopper from the lling
funnel.
16. Hold the sausage attachment with one
hand and release the locking screw
with the other. Carefully remove the
attachment from the tilt-back head and
put it on the countertop or in the sink.
Insert the front cover in the hole on the
tilt-back head and tighten the locking
screw.
17. Clean the sausage attachment and the
stand mixer according to the instructions
in the“Care and Cleaning”chapter.
USING THE MEAT ROLL
ATTACHMENT
1. Put the stand mixer on clean, rm and
stable surface within easy reach of
amains socket.
2. Insert the screw shaft in the grinding
chamber.
3. Put on the meat roll attachment and then
the cap.
4. Attach the screw cap and screw it
properly by turning clockwise.
5. Release the locking screw and remove
the front cover.
6. Insert the assembled attachment in the
hole on the tilt-back head (with the screw
shaft end pointing forward). Tighten
the locking screw. Make sure that the
attachment is not loose and does not
move.
7. Insert the hopper on the lling funnel.
8. Now insert the power plug into apower
socket. Ashort audible warning sounds
and the speed control ashes.
9. Place the meat mixture on the hopper.
10. Turn the speed control dial to set the
required speed. We recommend that you
set the initial speed to 1–3 and adjust as
needed.
11. Keep one hand under the attachment
and use the other hand to slowly push
the mixture through the lling funnel
using plunger.
WARNING!
To push mixture through
the filling funnel, always
use the supplied plunger. Never use
your fingers or other items.
12. When the meat roll has reached the
required length, pause the stand mixer
run. Cut it o with aknife. The turn the
stand mixer back on and proceed in the
same manner until the entire mixture has
been processed.
13. Once you have used up all the mixture,
set the speed to“0”, wait until the
rotating parts come to acomplete stop
and press the button briey to turn the
appliance o.
14. Remove the hopper from the lling
funnel.
15.
Hold the meat roll attachment with one
hand and release the locking screw with
the other. Carefully remove the attachment
from the tilt-back head and put it on the
countertop or in the sink. Insert the front
cover in the hole on the tilt-back head
and tighten the locking screw.
16. Clean the sausage attachment and the
stand mixer according to the instructions
in the“Care and Cleaning”chapter.
USING THE CUTTING AND
GRATING ATTACHMENT
1. Put the stand mixer on clean, rm and
stable surface within easy reach of
amains socket.
2. Insert one of the graters in the
attachment’sinternal chamber. Select
agrater according to the ingredients
processing method.

18 OPERATING YOUR STAND MIXER KM 8013
WARNING!
When handling the graters,
be very careful not to get
injured with their edge.
3. Release the locking screw and remove
the front cover.
4. Insert the assembled cutting and grating
attachment in the hole on the tilt-back
head.
5. Tighten the locking screw. Make sure that
the attachment is not loose and does not
move.
6. Now insert the power plug into apower
socket. Ashort audible warning sounds
and the speed control ashes.
7. Put abowl under the attachment outlet.
8. Turn the speed control dial to set the
required speed. We recommend that you
set the initial speed to 6 and adjust as
needed.
9. Place the ingredients that you wish
to process into in lling funnel. Using
the supplied plunger, slowly push the
ingredients through the lling funnel.
WARNING!
To push ingredients
through the filling funnel,
always use the supplied plunger. Never
use your fingers or other items.
10. Once you have used up all the
ingredients, set the speed to“0”, wait until
the rotating parts come to acomplete
stop and press the button briey to turn
the appliance o.
11. Put the bowl with the processed food
aside.
12. Hold the cutting and grating attachment
with one hand and release the locking
screw with the other. Carefully remove
the attachment from the tilt-back head
and put it on the countertop or in the
sink. Insert the front cover in the hole on
the tilt-back head and tighten the locking
screw.
13. Clean the attachment and the stand
mixer according to the instructions in the
“Care and Cleaning”chapter.
USING THE SCALE
1. Put the stand mixer on clean, rm and
stable surface within easy reach of
amains socket.
2. Insert the blending beaker into the stand
mixer base.
3. Insert the mains cord plug into apower
socket. Ashort audible warning sounds
and the speed control ashes.
4. Press the scale control button. Ashort
audible warning sounds and the display
lights up. It will display“0000”and “g”.
5. Place the ingredients in the blending
beaker and the display will show their
weight.
6. Ashort press of the scale control button
resets the display so you can add and
weigh more ingredients.
7. If you are not using the scale, press the
scale control button for along time,
an audible warning will sound and the
display will go o.
The default unit of weight is grams (g). If you
need to change the unit of weight to pounds
(lb), press the scale control button twice
briey and“Lb”will appear on the display. To
change the weight unit back to grams, press
the scale control button twice briey and the
display will show“g”.
The maximum weight of the scale is 5 300 g
(12 Lb) with an accuracy of 1 g (0.01 lb). If the
maximum weight is exceeded, the display
will show“----”.
While the stand mixer is in scale mode, it is
not possible to adjust the speed.

19
OPERATING YOUR STAND MIXER KM 8013
TIPS AND ADVICE ON PREPARING
THE DOUGH
In this chapter you will nd basic tips and
advice and recommendations for preparing
the dough. However, it is necessary to follow
the instructions in the recipe and the actual
amount of ingredients being processed.
Kneading bread/pizza dough
Use akneading hook to knead the dough.
The basic dough is prepared from our and
water and then other ingredients are added.
The minimum quantity is 500 g our and
250g water, the maximum quantity is 1000 g
our and 600 g water.
We recommend selecting speed 1 for
30seconds, then speed 2 for 30 seconds
and nally speed 3 for 3 to 4 minutes until
the dough is well worked-out, smooth and
elastic.
Dough for the Preparation of Cakes
Batters are usually quick to process and
suitable for cakes, muns, marble cakes, etc.
Use awhisk to prepare such doughs.
Place the ingredients in the blending beaker
and select speed 4 for 1 to 3 minutes. Follow
the instructions in the recipe and gradually
add the ingredients. Finally, you can select
speed 5 for about 30 seconds to properly
process the dough.
Whisking Eggs/Cream
Use awhisk to whisk the eggs/cream. It is
also suitable for the preparation of spreads,
dips, creams, etc. The minimum quantity is
3egg whites (about 100 g) or 500 g of cream.
The recommended speed is 5 to 6 and whisk
for 1 to 5 minutes depending on the nal
consistency and amount of ingredients.

20 CARE AND CLEANING
CARE AND CLEANING
Before cleaning the appliance, always
disconnect the plug of the power cord from
the mains socket and let it to cool down.
WARNING!
Do not wash the appliance,
mains cord and plug under
running water and do not immerse it in
water or any other liquid.
WARNING!
Do not use sharp objects,
chemicals, thinners, petrol
or other similar substances. Never
clean the stand mixer with asteam
appliance.
REMARK:
No part of your stand mixer and its
accessories is suitable for dishwasher
use.
CLEANING THE BASE
Wipe the base with asoft sponge lightly
dipped in warm water withasmall amount
of neutral washing-up liquid. Wipe dry using
aclean wiping cloth.
CLEANING THE BLENDING BEAKER,
PROTECTIVE COVER, KNEADING HOOK,
BEATER BLADE AND WHISK
Wash the blending beaker, protective cover,
kneading hook, beater blade and whisk
immediately after use in warm water with
asmall amount of neutral washing-up liquid.
Rinse in clean water properly and wipe dry.
Should any ingredients residues stick dry in
the bowl or on the accessories, you can soak
them in warm water with asmall amount of
washing-up liquid for about 10 minutes.
DISASSEMBLING AND CLEANING
THE MEAT GRINDER
When the meat grinder has been removed
from the stand mixer, unscrew the screw
cap and carefully remove the grinding disc,
grinding blade and screw shaft. Wash all the
meat grinder parts including the hopper
and the plunger in warm water with asmall
amount of neutral washing-up liquid. Rinse
in clean water properly and wipe dry.
To clean the grinding chamber and the
lling funnel, you can also use ane bottle
brush. To clean the ingredients residues in
thegrinding disc holes, please use asoft
brush or atoothpick.
WARNING!
When handling the
grinding blade, be very
careful not to get injured with its edge.
DISASSEMBLING AND CLEANING THE
SAUSAGE ATTACHMENT
When the sausage attachment has been
removed from the stand mixer, unscrew the
screw cap and carefully remove attachment,
separator and the screw shaft. Wash all the
parts including the hopper and the plunger
in warm water with asmall amount of neutral
washing-up liquid. Rinse in clean water
properly and wipe dry.
To clean the grinding chamber and the lling
funnel, you can also use ane bottle brush.
DISASSEMBLING AND CLEANING THE
SAUSAGE ATTACHMENT
When the meat roll attachment has been
removed from the stand mixer, unscrew the
screw cap and carefully remove attachment,
cap and the screw shaft. Wash all the parts
including the hopper and the plunger in
Table of contents
Other Catler Kitchen Appliance manuals

Catler
Catler SM 2011 User manual

Catler
Catler JE 4010 User manual

Catler
Catler SP 8010 User manual

Catler
Catler MF 610 User manual

Catler
Catler MC 8010 User manual

Catler
Catler 800 SERIES User manual

Catler
Catler JE 8011 User manual

Catler
Catler VS 812 User manual

Catler
Catler 800 SERIES User manual

Catler
Catler FD 4010 User manual
Popular Kitchen Appliance manuals by other brands

Baumatic
Baumatic BT2355SS user manual

Nostalgia Electrics
Nostalgia Electrics MyMini MCPCK5PK Instructions and recipes

Husky
Husky HUS-ZY SERIES instruction manual

Klarstein
Klarstein VINETAGE 12 UNO manual

Nostalgia Electrics
Nostalgia Electrics CDP200RED Instructions and recipes

Korona
Korona 18050 instruction manual