CDP Blow & Go 4500 User manual

1
Blow & Go
CDP 4500
Coin-operated Alcohol Breath Tester
C.D.Products S.A

2
1. Description
The Blow & Go coin-operated Alcohol Breath Tester is designed to measure your
alcohol concentration level. With an advanced fuel-cell sensor, this device offer
high sensitivity and is extremely accurate. Its easy testing process and complete
functions make it versatile. When your alcohol blood content exceeds the preset
alarm level, it will send an alarm warning and show the result directly and clearly on
the LCD digital display.
2. Main Technical Data
Model
Blow & Go
Sensor type
Fuel cell sensor
Working Voltage
AC110V~AC220V, 50/60HZ
Working Current
≤15mA
Environment
Temperature:-10ºC~50ºC;Relative humidity:≤95%
No Dews
Response Time
< 8s
Test Range
0.000~2.000mg/L(0~440mg/100mL, 0.000~4.000g/L,
0.000~0.400%BAC, 0.000~2.000‰BAC)
Warning level
Warning level:0.090mg/L;Danger level:0.250mg/L
Accuracy
±0.005% at 0.05%BAC
Warning method
Audio and light
Display
Four digits LCD display. Test process and result are
shown with red, green, and yellow indicator lights
Dimension
lxwxh,mm:250×105×400
Indication manner
mg/l, mg/100ml, g/l, %BAC, ‰BAC optional
Coin for single time
0 —— 15 (For 0, the unit can be tested without a coin)
Coin diameter
20mm –28mm
Coin Thickness
1.2mm –2.5mm
Coin capacity
200 units
Straw capacity
200 units(¢≤7mm)
C.D.Products S.A

3
3. Installation Guide
Photo 1
First find a suitable place to install the unit. Then use bolts to fasten the device on
the wall according to Photo 1. Note the distance and measurements.
4. Test Unit Setup
●Note: Please cut off the power supply before this step.
You may set the unit format in which to show the alcohol concentration levels using
dial switch 2 inside the machine. The format options are: mg/l, mg/100ml, g/l, %BAC
and ‰BAC. Make sure the unit chosen appears on the front panel. The test unit is
set by the first, second and third switches. This means that the switch on the top is 1
and the switch on the bottom is 0. (Note: switch number 4 is not used and an X will
appear on the machine). For example, in Picture 2, both the first and third switch
are at the bottom (they both mean 0); the second switch is on the top (it means 1).
So, according to Table 1 shown further below, the current unit would be g/l. The
factory-set default unit format is Mg/L.
Photo 2
Table 1
A
B
C
D
Unit
0
0
0
X
mg/L
0
0
1
X
mg/100mL
0
1
0
X
g/L
0
1
1
X
%BAC
1
0
0
X
‰BAC
On/Off switch
Power
cable
Screw installation
orifice
Straw exit
C.D.Products S.A

4
5. Setting the coin quantity to carry out a test.
● Note: Please cut off the power supply before operation.
The number of similar coins required is set by dial switch S1 located inside the unit.
This means that the switch on the top is 1 and the switch on the bottom is 0. Setting
range from 0-15 units.
For example, in Photo 3, both the first and third switches are at the bottom (they
both mean 0); the second and fourth switches are at the top (they both mean 1).
So, according to Table 2, in this example you would need 5 coins to perform the
test. One (1) coin is the default setting1).
Photo 3
Table 2
A
B
C
D
Coin quantity
0
0
0
0
0
0
0
0
1
1 (default is 1 coin)
0
0
1
0
2
0
0
1
1
3
0
1
0
0
4
0
1
0
1
5
0
1
1
0
6
0
1
1
1
7
1
0
0
0
8
1
0
0
1
9
1
0
1
0
10
1
0
1
1
11
1
1
0
0
12
1
1
0
1
13
1
1
1
0
14
1
1
1
1
15
C.D.Products S.A

5
6. Adjusting the electronic coin selector:
See video at this link: http://youtu.be/Sn1ieVK0UL4
How to configure the coin model
Turn on the unit, open the front part of the case, you will see LED (7) flashing. Press
the setup button (5) during two seconds and then release it. The LED (7) indicator
on the top left will change from red to green. Press the setup button again during
two seconds and then release it. The LED (7) indicator will change from green to
red and it will then flash.
You are now in the Coin Setup Mode. Please insert 20 coin models in the insert coin
slot (we recommend inserting coins of different years and versions, do this both
quickly and slowly to imitate the normal way users would do it). When you have
finished, the Light indicator will remain on constantly.
BUTTONS AND FUNCTIONS
NAME
FUNCTION
(1) Segment 1 switch
Differentiates accuracy: exact,
normal, loose.
(2) Connector 4 pins
(3) Segment 2 switch
Differentiates between NO and NC.
(4) Segment 3 switch
Coin entry speed: fast, average
speed, slow.
(5) Setup button
Button to make adjustments.
(6) Connector 2 pins
Electromagnetic strobe.
(7) LED Indicator
To configure/adjust coin.
(8) Coin entry
Coin entry.
(9) Coin return button
Press the button to retriever the coins
blocked in the insert slot.
(10) Coin output
Coin output.
C.D.Products S.A

6
7. Test procedure
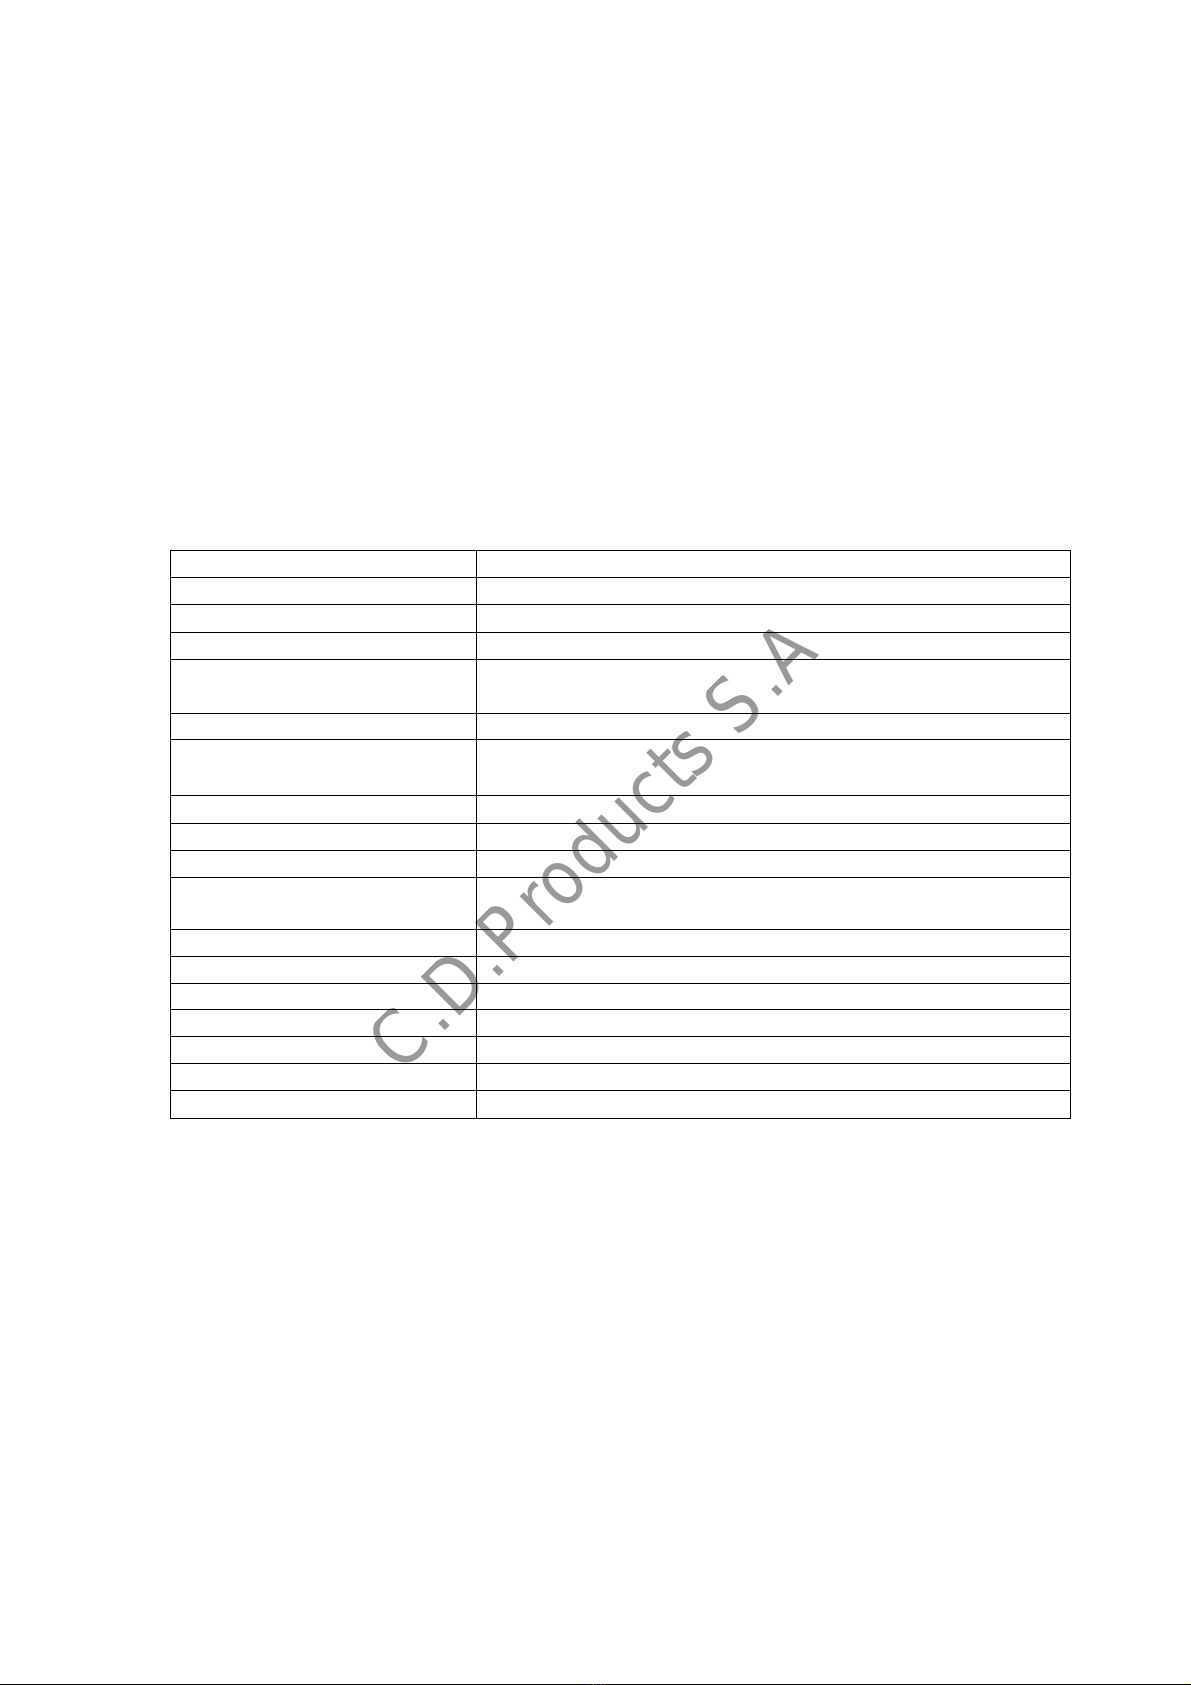
7.1. Mount the device on the wall securely; connect the power cord, then press the
switch button on the side.
7.2. Press the On/Off switch on the side of tester. When the tester is on, it will begin
to initialize. The warm-up begins when the “Wait” indicator light flashes. The test
cannot be performed yet. About 6 seconds later, the initialization process
concludes and testing can begin. In the meantime, the <INSERT STRAW> indicator
light will turn on, and the <INSERT COIN> light will flash and prompt you to insert a
coin and start testing.
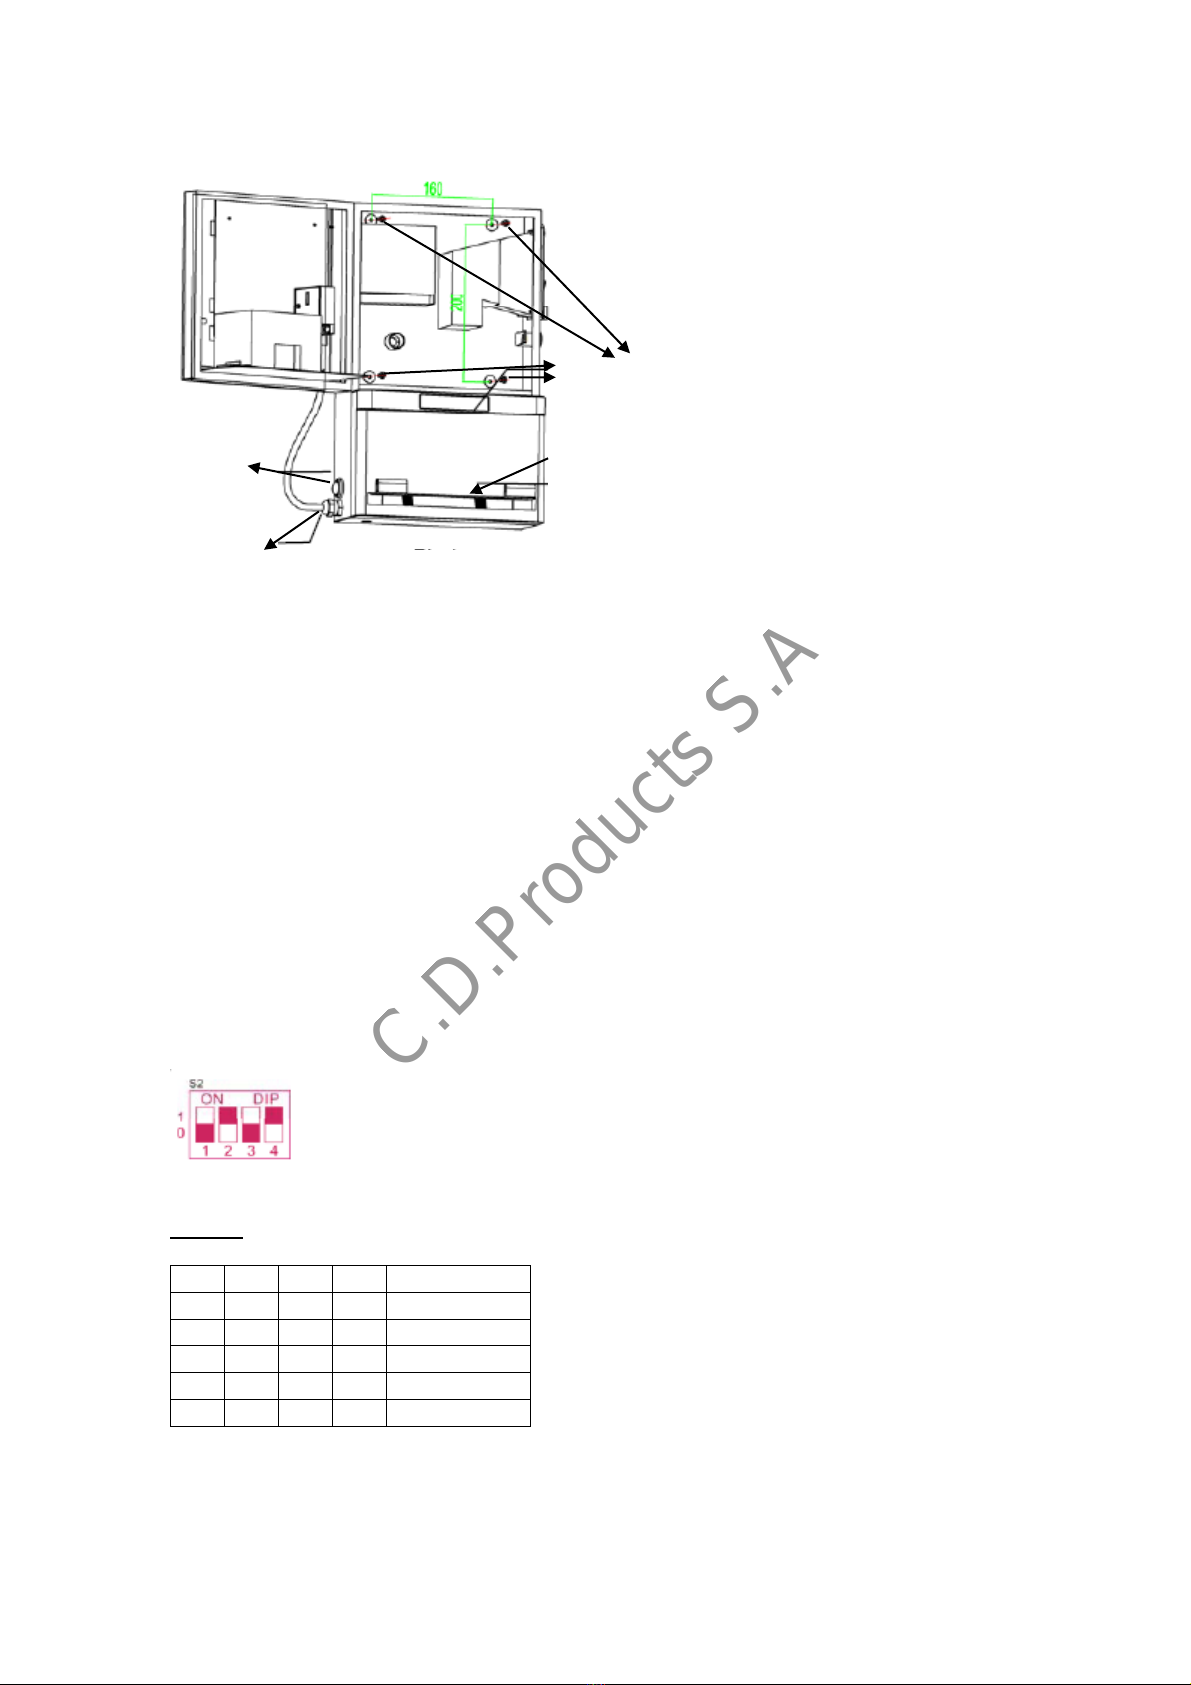
7.3. Insert coin: The coin may be inserted when the <INSERT COIN>led flashes. The
quantity of coins needed and the coin value will have been already set up
according to the instructions above. If several coins are required, the tester will emit
a tone for each additional coin and show the necessary quantity remaining. When
the number of coins needed is reached, the <INSERT COIN> light will turn off, and
the <BLOW> signal will flash. At this point you may begin testing.
7.4. Take a straw from the straw deposit box. Insert the straw. Take a deep breath,
then blow into the tester continuously, and don’t stop until you hear the prompt
tone. If you stop blowing during the test, the device will emit a “di----di di” sound
and will inform that the blowing is incomplete. You should blow again until the
blowing concludes when the “di---di di” sound stops (approximately lasts 6
seconds).
7.5. After a few seconds, the result on the LCD screen shows the alcohol
concentration in your body when the test finishes.
If the result is lower than the warning level, a soft “di-di di” sound will be heard and
the “OK” indicator light flashes in green colour.
If the result is equal or above than warning level, the “di-di di” sound will be heard
and the “Warning” indicator light flashes in yellow colour.
If the result reaches a danger level, you will hear a stronger “di-di di” sound and the
“Danger” indicator light flashes in red.
7.6. The result will be displayed on the screen for several seconds, and then the LCD
returns to its normal wait state. Another test can be performed at this time.
8. Usage counter
When the tester is switched on and also after every test, the usage counter shows -
for 1 to 2 seconds - the accumulated number of tests for the sensor module. Every
sensor module will require replacement after 1000 tests. Please contact your
distributor to acquire the new sensor parts.
C.D.Products S.A

7
9. Calibration
This high-tech sensor-module design does not require complex calibrations. You
only need to change the module when the tester flashes the number 0000.
Remember that each sensor module can be used 1000 times.
Turn off the tester. Open its front panel. (See Picture 8). You will see a yellow
shell with a small tube and white connector. This is the sensor module.
First, disconnect the small tube and White connector by pulling gently. Then
unscrew the aluminum knob located at the back of the module shell by
rotating it in a counter-clockwise direction to remove the sensor module.
You may now insert the new sensor module. First screw the knob in a
clockwise direction, and then connect the small tube and the white
connector. It’s now ready for use.
Photo 8
10. Recommendations
Avoid dropping or hitting the unit.
Very Important: To avoid damaging the sensor and obtain accurate results,
please wait at 15 minutes after drinking before taking the test, or rinse your
mouth with water or a non-alcoholic beverage.
If the unit is stored for a long period of time, the first result obtained may be
inaccurate. In this case perform several preliminary tests.
Do not store the tester in an environment near corrosive gas (chlorine, etc)
or in an area with excessive humidity or smoke.
The life of the sensor is over 2 years under standard usage and normal
operating conditions; remember the module must be changed after 1000
tests.
White
connector
Knob
Small tube
C.D.Products S.A

8
11. Troubleshooting
Fault
Possible reason
Solution
No display
Unstable power cord
connection
Plug in again
on LCD
Circuit fault
Contact distributor
No response to
Warm-up has not concluded
Wait until the warm-up
gas detection
concludes
Circuit fault
Contact distributor
12. Contact data
C.D.Products S.A.
Polígono P-29
Collado Villalba –Madrid. Spain
Customer Service: 902 10 40 60
Fax: 91 851 71 60
www.cdpsa.es
C.D.Products S.A
Table of contents
Other CDP Test Equipment manuals