CGM 111 User manual
-ITA-
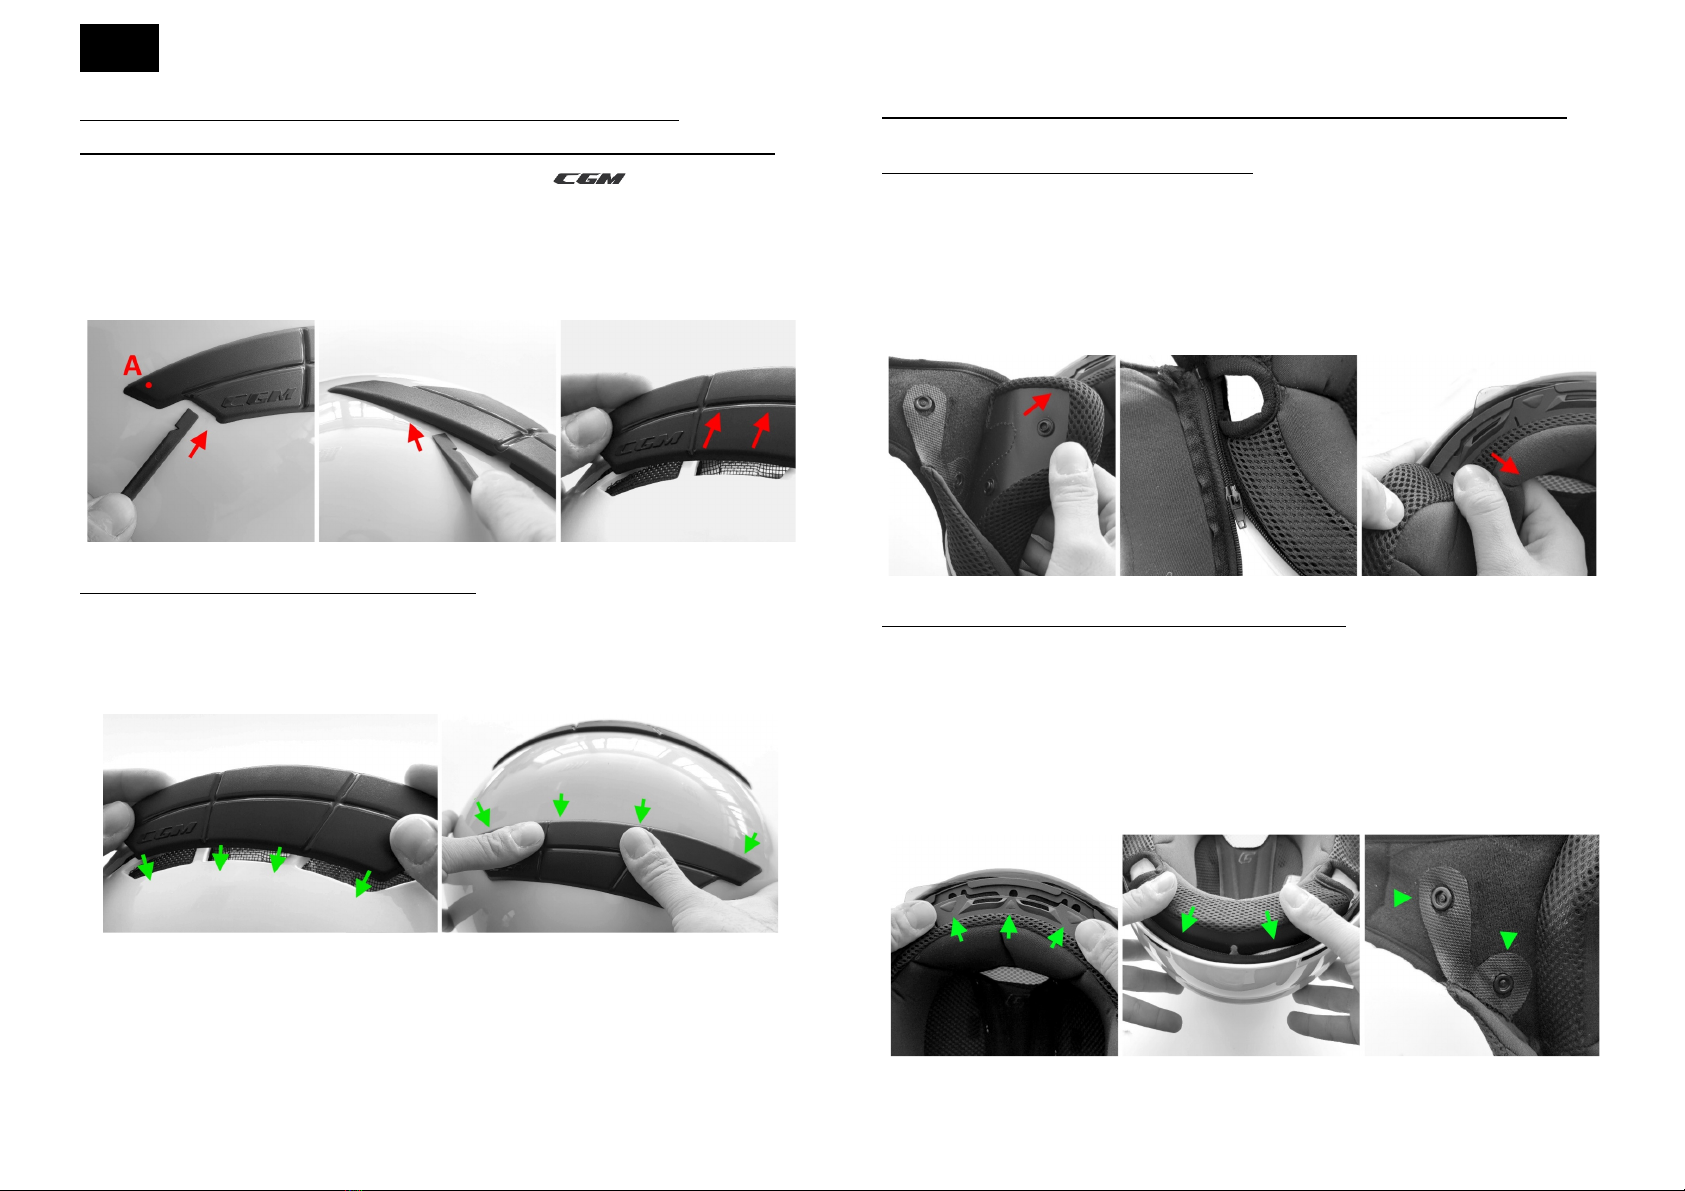
ISTRUZIONI PER LA RIMOZIONE (A) E MONTAGGIO (B) DELLE COPERTURE
Le immagini si riferiscono alla cover sul lato destro del casco. Munirsi di un oggetto sottile in plastica.
A1. Inserire la punta in plastica nella fessura posizionata sotto il logo fino a sbloccare il primo
incastro posizionato nel punto A, come indicato in Figura 1.
A2. Procedere poi a sbloccare i restanti incastri posizionati sotto il lato lungo della cover, quello rivolto
verso il centro della calotta (Figura 2).
A3. Dopo aver liberato i 4 incastri posizionati sotto il lato lungo, sfilare la cover con un movimento c e
va dal lato corto al lato lungo, quindi verso il centro della calotta, come mostrato in Figura 3.
Figura 1. Figura 2. Figura 3.
Per montare la cover procedere come indicato di seguito.
B1. Inserire i 4 incastri posizionati sotto il lato corto facendoli scivolare nei 4 alloggiamenti della griglia
metallica, come mostrato in Figura 4.
B2. Esercitare una pressione in corrispondenza dei 4 incastri posti sotto il lato lungo cella copertura,
come mostrato in Figura 6. Verificare poi c e la cover sia perfettamente a filo con la calotta.
Figura 4.
Figura 5.
NB. Le foto mostrano la cover destra. Sul lato sinistro le immagini sono speculari.
CGM 111
CGM.111-A.01
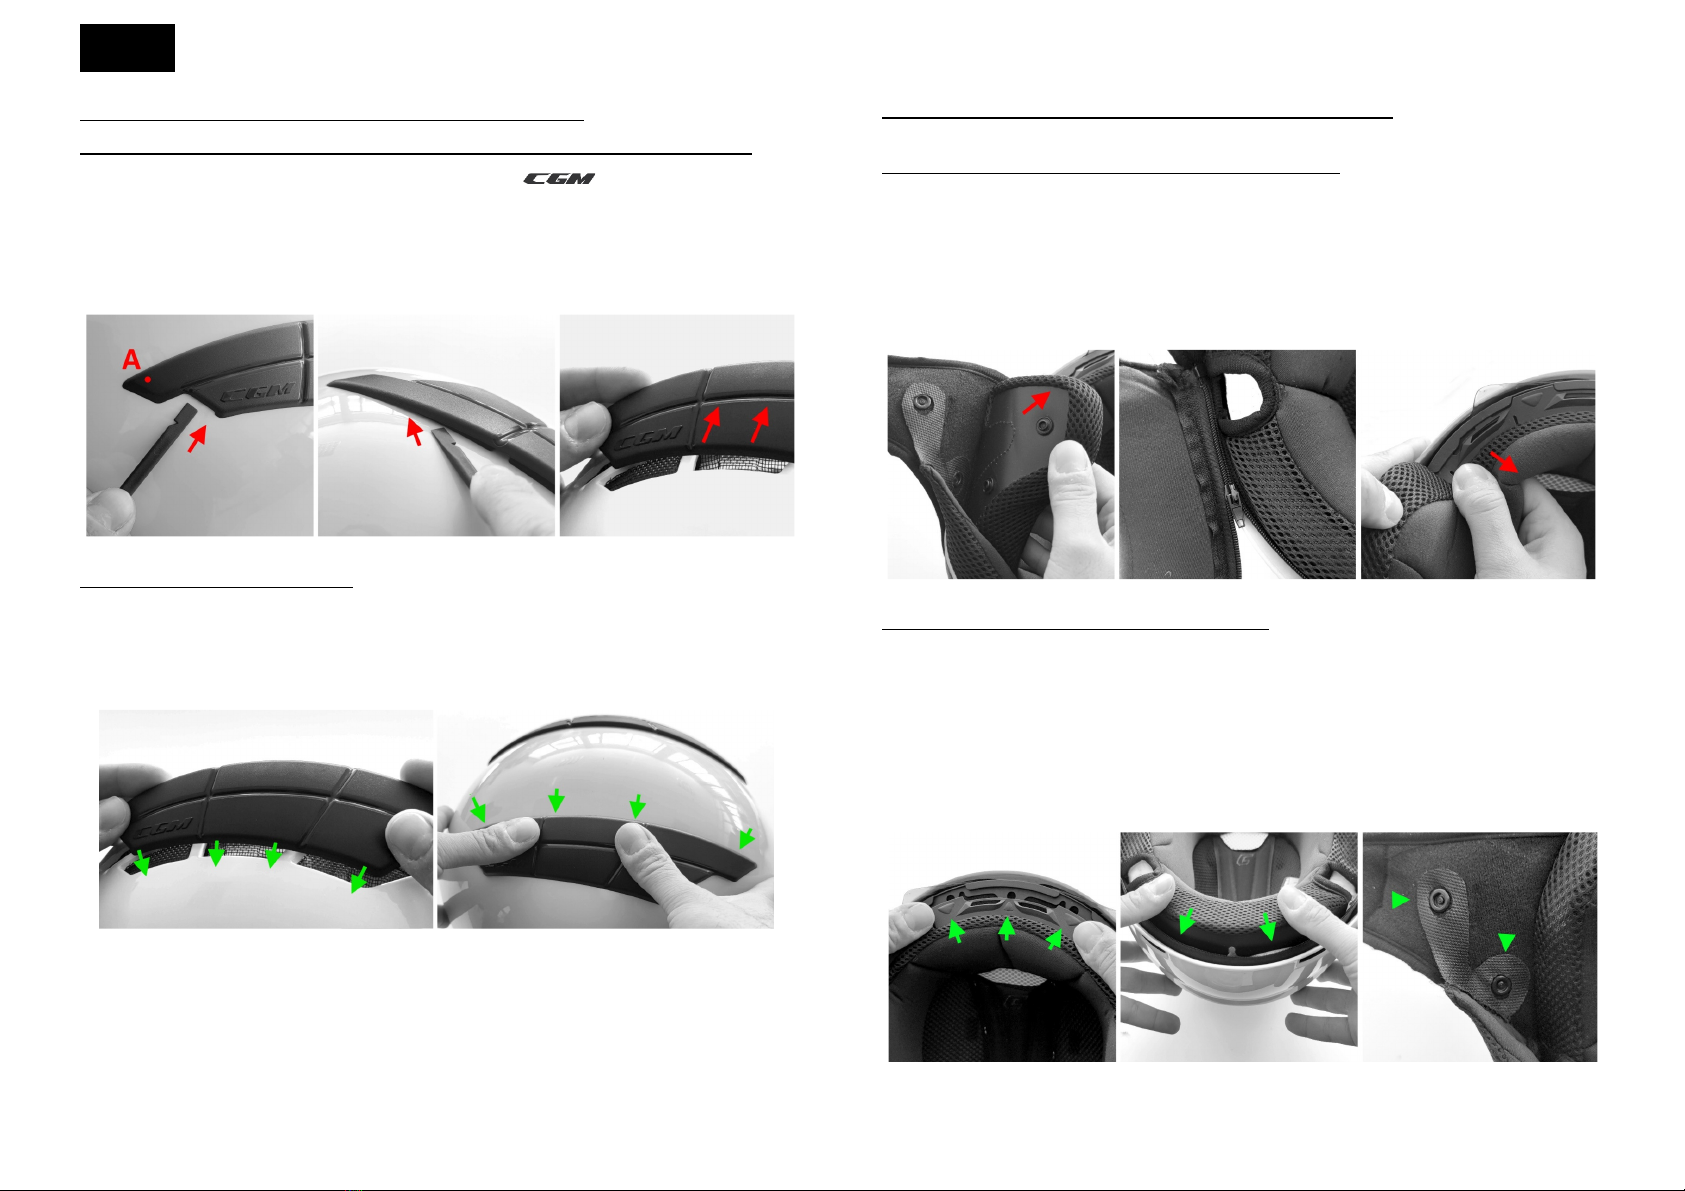
ISTRUZIONI PER LA RIMOZIONE (A) E IL FISSAGGIO (B) DELL’IMBOTTITURA INTERNA
La cuffia centrale e i guanciali ed il collarino possono essere facilmente rimossi per il lavaggio.
Rimuovere prima i guanciali, il collarino e poi la cuffia.
A1. Rimuovere i guanciali sganciando i 2 bottoni automatici e sfilando la pattina in plastica (Figura 7).
A2. Per rimuovere il collarino staccare il velcro fissato sui bottoni dei guanciali e aprire la c iusura lampo
c e lo fissa alla calotta. (Figura 8).
A3. Rimuovere la cuffia partendo dal retro. Sfilare la pattina tra polistirolo e calotta. Esercitando una
leggera trazione verso l’interno del casco, sfilare le guide in plastica all’altezza dei guanciali. Infine,
sganciare la piastrina di fissaggio dal telaietto in plastica esercitando una leggera trazione nei punti di
ancoraggio, iniziando da uno dei due punti esterni come in Figura 9.
Figura 7. Figura 8. Figura 9.
Fissare prima la cuffia, poi il collarino e successivamente i guanciali.
B1. Posizionare la cuffia all’interno del casco con la piastrina di fissaggio rivolta sul lato frontale.
Inserire la piastrina di fissaggio nel telaietto e spingere fino ad agganciare i punti di ancoraggio,
partendo da quelli centrali, come in Figura 10.
B2. Inserire la pattina in plastica tra calotta e polistirolo seguendo la guida come in Figura 11.
B3. Fissare il collarino alla calotta tramite la c iusura lampo e sistemare le asole in velcro attorno ai
bottoni automatici posti sui guanciali esterni, come in Figura 12.
B4. Infine, sistemare i guanciali nella loro sede inserendo la pattina in plastica tra guanciale esterno e
polistirolo. Fissare poi i guanciali con i due bottoni automatici.
Figura 10. Figura 11. Figura 12.
-ENG-
HOW-TO REMOVE (A) AND HOW-TO MOUNT (B) THE COVERS
The figures refer to the cover on the right side of the helmet. Equip yourself with thin plastic tool.
A1. Insert the plastic tip into the slot positioned under the logo until the first joint positioned
at point A is released, as shown in Figure 1.
A2. Then proceed to unlock the remaining joints positioned under the long side of the cover, the one
facing the center of the cover (Figure 2).
A3. fter releasing the 4 joints positioned under the long side, remove the cover with a movement that
goes from the short side to the long side, towards the center of the cap, as shown in Figure 3.
Figure 1. Figure 2. Figure 3.
To mount the cover proceed as follows.
B1. Insert the 4 joints positioned under the short side by sliding them into the 4 slots of the metal grid,
as shown in Figure 4.
B2. pply pressure to the joints under the long side of the cover, as shown in Figure 6. Then check that
the cover is perfectly flush with the shell.
Figure 4. Figure 5. Figure 6.
NOTE. The figures show the right cover. On the left side the images are mirrored.
CGM 111
CGM.111-A.01
HOW-TO REMOVE (A) AND HOW-TO FIX (B) THE INNER LINING
The main liner padding, the cheek pads and the neck roll can be easily removed for washing.
First remove the cheek pads, the neck roll and then the main liner.
A1. Remove the cheek pads by detaching the 2 snap buttons and pulling the plastic flap (Figure 7).
A2. To remove the neck roll, remove the velcro fastened on the buttons of the cheek pads and open the
zipper on the shell (Figure 8).
A3. Remove the main liner starting from the back. Remove the flap between the EPS and the shell. With
a slight pull towards the inside of the helmet, remove the plastic guides near the cheek pads. Finally,
release the fixing plate from the plastic frame by pulling lightly on the anchoring points, starting from
one of the two external points as in Figure 9.
Figure 7. Figure 8. Figure 9.
First fix the main liner padding and then the cheek pads.
B1. Place the main liner padding inside the helmet with the fixing plate facing the front side.
Insert the fixing plate in the frame and push to hook the anchor points, starting from the ones in the
middle, as in the Figure 10.
B2. Insert the plastic flap between the shell and the EPS following the guide as in Figure 11.
B3. Fasten the neck roll to the shell using the zipper and set the velcro slots around the press studs placed
on the outer cheek pads, as in Figure 12.
B4. Finally, place the cheek pad into the designed slot by inserting the plastic flap between the outer
cheek pads and the EPS. Then, fix the cheek pads with the two press studs.
Figure 10.
Figure 11.
Figure 12.
ATTENZIONE
W ARNING
www.cgmitalia.net

Grazie per aver acquistato un prodoo CGM!
La soddisfazione dei nostri clien è importante per noi: se non sei
soddisfao del tuo acquisto o se hai riscontrato qualche problema,
contaaci all’indirizzo info@cgmitalia.net e ci adopereremo per
risolverlo.
IT
Qualità, innovazione, sicurezza e creavità sono i fondamen della filoso-
fia CGM: sempre alla ricerca dell’eccellenza qualitava per offrire prodo
che siano garanzia di sicurezza, tecnologia, comfort, funzionalità e design
innovavo.
Sle e design italiano conferiscono ai prodo il caraere unico e disnvo
pico dei caschi CGM.
La tua sicurezza, la nostra priorità
E’E’ nostra precisa convinzione rendere i requisi di sicurezza, che contraddi-
snguono i nostri caschi, fruo della convergenza tra le specifiche più
avanzate e mai il risultato di un compromesso.
Disegnato in Italia
La progeazione, i deagli di costruzione, la scelta dei materiali, le colora-
zioni, le grafiche ed il design nel suo complesso sono interamente crea,
verifica ed approva dal nostro team.
Omologazione IOmologazione Internazionale
Il nostro obievo non solo è quello di oenere la cerficazione di omolo-
gazione del casco, che lo rende ulizzabile come disposivo di protezione
in tu i paesi dell’unione europea, ma anche di oenere risulta oltre i
limi previs dalla normava vigente.
Performance avanzate
Il nostro team ingegnerisco è sempre alla ricerca di soluzioni innovave
per migliorare l’esperienza di uso dei nostri caschi, ogni tecnologia imple-
mentata è studiata per migliorarne la performance.
IT
Avvertenze
Questo è un casco progeato, sviluppato ed omologato secondo quanto
stabilito dalla vigente normava europea per caschi motociclisci ECE/O-
NU 22.05. È quindi consento l’uso soltanto nei Paesi in cui è in vigore tale
normava.
Leggere aentamente queste indicazioni prima dell’uso.
LeLe colorazioni accese e fluorescen sono parcolarmente delicate e sensi-
bili alla luce. Il produore non può garanre la durevolezza e la qualità di
tali colori nel tempo declinandone la responsabilità.
Scelta della taglia
Il casco deve fasciare perfeamente la testa, senza comprimerla eccessiva-
mente e senza essere doloroso. Solo un casco che calza bene è sicuro.
Una volta indossato il casco, in quanto nuovo, dovrebbe essere leggermen-
te streo sulla linea della circonferenza della testa, dovrebbe comprimere
leggermente la testa senza stringere o fare male, in parcolare su tempie,
fronte e nuca. Dopo averlo tenuto indosso per qualche minuto, scuotendo
la testa con il cinturino aperto, il casco deve muoversi pochissimo e le
guance devono essere leggermente compresse. Nel caso in cui si senta sci-
volare il casco la taglia è grande, se invece si avvertono compressioni dolo
rose la taglia è piccola. Non indossare assolutamente un casco troppo pic-
colo o troppo grande: può essere pericoloso.
Uso correo del casco
Il casco deve assorbire il colpo in caso di caduta e per farlo, assicurando la
massima protezione, è importante che vengano seguite delle semplici
linee guida:
Per un’adeguata protezione, questo casco deve essere ben calzato sulla
testa e ben allacciato. E’ necessario indossare il casco nella giusta posi-
zione, senza calzarlo troppo indietro: deve coprire la fronte.
Accertarsi di regolare bene il cinturino soogola: deve essere sufficiente-
mente streo da evitare che il casco si sfili. Prima di parre assicurarsi
sempre che la fibbia sia chiusa.
IT
Ogni casco che abbia subito un urto violento deve essere sostuito.
Non lasciare il casco vicino alla marmia o altre fon di calore ed in
estate, durante le soste, proteggerlo dai raggi del sole.
Aenzione! Non applicare a questo casco vernici, adesivi, benzina o altri
solven chimici o prodo che possano compromeerne l’affidabilità.
Non manomeere mai il casco e tue le sue par.
T
Tenere le visiere sempre pulite per assicurare una buona visuale. Le visie-
re segnate o danneggiate vanno sostuite subito in quanto non sicure.
Le visiere con dicitura “day me use only” non sono adae ad uso in ore
nourne o in condizioni di scarsa visibilità.
Ulizzare solo ricambi originali CGM per evitare incompabilità e proble-
mi che possano diminuire la sicurezza alla guida.
Pulizia e manutenzione
Per la pulizia della parte esterna della caloa del casco usare acqua epida
con sapone neutro. Asciugare con panni morbidi e non esporre a fon di
calore.
Per pulire la visiera ulizzare una soluzione di sapone neutro ed acqua e-
pida ed asciugare con un panno soffice. Non ulizzare prodo quali alcool,
benzina, solven, oppure altri prodo per la pulizia dei vetri a base d’alco-
ol in quanto possono danneggiare i traamen della visiera.
È
È possibile pulire le par interne estraibili lavandole a mano in acqua
fredda. Lasciare asciugare all’ombra ed a temperatura ambiente. Non u-
lizzare asciugatori elerici in quanto il calore può danneggiare i materiali.
Qualora l’usura e l’invecchiamento siano eviden consigliamo di sostuire
gli interni con ricambi originali CGM. Questo al fine di mantenere il comfort
e la sicurezza nel tempo, in quanto un’imbotura deteriorata può compro-
meere la taglia originale del casco con conseguente perdita della calzata
omale
omale
Durata d’uso
Nonostante CGMITALIA s.r.l si impegni a ulizzare materiali e componen
di alta qualità, ogni casco dovrebbe, a prescindere dal materiale della ca-
loa esterna, essere sostuito dopo 3/5 anni di ulizzo medio.
IT

EN
Thanks for having purchased a CGM product!
The sasfacon of our clients is important for us: if you are not
sasfied of your purchase or if you have found out any problem,
please contact us at the address info@cgmitalia.net and we will
do all our best to resolve that.
Quality, innovaon, safety and creavity are the fundamentals of CGM
philosophy: always researching for quality excellence in order to offer pro-
ducts which are guarantee of safety, technology, comfort, funconality
and innovave design.
Italian style and design give to the products the unique and disncve fea-
ture typical of CGM helmets.
Your safety, our priority
It is our clear convincon to make the safety requirements, which cha-
ractherised our helmets, the result of the convergence among the most ad-
vanced specificaons and necìve the result of a compromise.
Designed in Italy
The project, the construcon details, the chose of the materials, the co-
lours, the graphics and the design in its whole are interely created, verified
and approved by our team.
Internaonal Homologaon
Our target is not only to obtain the helmet homologaon cerficaon
which makes it usable as protecon device in all European Union coun-
tries, but also to obtain results beyond the limits foreseen by the regula-
on currently in force.
Advanced Performance
Our engineering team is always searching for innovave soluons to im-
prove the experience of use of our helmets, each implemented technology
is studied to improve the perfomance.
EN
Warnings
This is a helmet designed, developed and homologated in accordance with
the provisions of the current European regulaons for motorcycle helmets
ECE /ONU 22.05. Therefore, the use is permied only in countries where
such regulaon is in force.
Read these instrucons carefully before use
TheThe bright and fluorescent colours are parcularly delicate and sensible to
light. The manufacturer cannot guarantee durability and quality of these
colours over me and declines responsibility for that.
Choice of size
The helmet must perfectly bandage the head, without compressing it
excessively and without being painful. Only a helmet that fits well is safe.
Once
Once worn the helmet, as new, it should fit slightly ghtened on the line of
the head circumference, it should lightly compress the head without
ghtening or hurng , especially on the temples, forehead and nape. Aer
having worn it for a few minutes, shaking the head with the chin strap
open, the helmet must move very lile and the cheeks must be lightly
compressed. If you feel the helmet slips the size is large, on the contrary, if
you feel painful compressions the size is small. Never wear a helmet that is
too small or
too small or too large: it can be dangerous.
Correct use of the helmet
The helmet must absorb the shock in the event of a fall and to do so, ensu-
ring the maximum protecon, it is important to follow simple guidelines:
For an adequate protecon, this helmet must be fit closely and be secu-
rely aached. It is necessary to wear the helmet in the right posion, wi-
thout pung it too back: it must cover the forehead.
Be sure to well adjust the chin strap: it must be ght enough to prevent
that helmet slips out. Before leaving always make sure that the buckle is
closed.
Any helmet that has sustained a violent impact should be replaced.
EN
Do not leave the helmet near the muffler or other heat sources and in
summer, during stops, protect it from the sunrays.
Warning! Do not apply paint, sckers, petrol or other solvents or pro-
ducts that can compromise the reliability to this helmet. Never tamper
with the helmet and all its parts.
Keep the visors clean at all mes to ensure a good view. Marked or da-
maged visors must be replaced immediately as they are unsafe.
The visors marked "day me use only" are not suitable for use at night or
in condions of poor visibility.
Use only original CGM spare parts to avoid incompabilies and pro-
blems that could reduce driving safety.
Cleaning and maintenance
To clean the outer part of the helmet shell use warm water with mild soap.
Dry with so cloths and do not expose to heat sources.
To clean the visor use a soluon of mild soap and warm water and dry with
a so cloth. Do not use products such as alcohol, petrol, solvents, or other
alcohol-based products to clean glasses as they may damage the visor tre-
atments.
It is possible to clean the removable inner parts washing them by hand in
cold water. Leave to dry in the shade and at room temperature. Do not use
electric dryers as heat can damage materials. If the wear and aging are evi-
dent, we recommend to replace the inner lining with original CGM spare
parts. This in order to maintain comfort and safety over me, as a deterio-
rated padding can compromise the original size of the helmet with conse-
quent loss of opmal fing.
Duraon of use
Although CGMITALIA s.r.l engages to use high quality materials and com-
ponents, each helmet should, regardless of the material of the outer shell,
be replaced aer 3/5 years of average use.
EN
Scaa un selfie indossando un casco #cgmitalia,
taggaci con @cgm_helmets,
oppure inviaci la tua foto a foto@cgmitalia.net,
e diventa protagonista dei nostri canali social!
Take a selfie wearing a #cgmitalia helmet,
tag us with @cgm_helmets,
or send us your picture
or send us your picture to foto@cgmitalia.net,
and be the protagonist of our social media channels!
FOLLOW US!
@cgm_helmets @cgmitalia
CGMITALIA s.r.l.
Zona Industriale Aversa Nord 81030
Gricignano di Aversa (CE) Italia
Tel/fax +39 081 8131743- Mail: info@cgmitalia.net
Web: www.cgmitalia.net
MADE IN CHINA
DESIGNED, DEVELOPED AND IMPORTED IN ITALY BY CGMITALIA s.r.l.
DESIGNED, DEVELOPED AND IMPORTED IN ITALY BY CGMITALIA s.r.l.
La CGMITALIA s.r.l. informa che il paese d’origine indicato si riferisce
unicamente al processo di produzione.
Lo stile, il design, la scelta dei materiali, la finitura e il controllo qualità
sono tutti effettuati in Italia.
Table of contents
Other CGM Motorcycle Accessories manuals


