ChargeXpert ECO-PC001-1603 User manual

1

2
Languages
English 3
Français 14
Deutsch 22
Nederlands 30

3
Table of contents
4
▪Intention for use
▪Product elements
▪Product overview
5
▪Health & safety guidelines
6
▪About the control box
7
▪Preliminary measures prior to charging
▪Operation instruction
8
▪Maintenance care
▪Disposal
▪Technical support
▪European directives
9
▪Technical specification

4
INTENTION FOR USE
Thank you for purchasing this ChargeXpert mobile home charger for electric and plug-in
hybrid vehicles. Please read these instructions and your vehicle's charging instructions
carefully before charging your electric vehicle.
This charger is intended for charging battery/battery powered electric and plug-in hybrid
vehicles with a type 2 connection, via a red 5-pin CEE plug.
This adjustable charger has the ability to charge at 6A, 8A, 10A, 13A and 16A.
Use this product only to charge electric vehicles equipped with a grounded charging port.
Consult your vehicle's instruction manual to determine if the product is suitable for your
vehicle.
CEE CONNECTION
The mobile home charger must be connected to a CEE wall socket suitable for a 5-pole CEE
plug. The CEE wall socket must be correctly installed and earthed in accordance with legal
regulations. Caution! The product must be earthed. If it malfunctions or fails, grounding
ensures that electrical current is dissipated through a path with the lowest resistance to
reduce the risk of electrical shock.
PRODUCT OVERVIEW
Amperage: 6A / 8A / 10A / 13A / 16A
Charging amount: 11 kW
Number of phases: 3
Length cable: 5, 10 or 15 meters
CONTENTS
EV mobile home charger with CEE connection
Users manual
Storage box
PRODUCT SPECIFICATIONS
Adjustable power: 6A / 8A / 10A / 13A / 16A
Charging current: 11 kW
Number of phases: 3
Cable length: 5, 10 or 15 meters

5
OVERVIEW OF COMPONENTS
1. CEE plug
CEE plug. For charging vehicles up to 16A.
2. Charging cable
The charging cable powers the type 2 plug. The length of the cable can vary between 5 and
15 meters.
3. Type 2 plug
Suitable for all types of electric and hybrid vehicles that can be connected to a type 2 plug.
4. Adapter
The adapter connects the two power connectors together. And has the following protective
features; leakage protection, Overvoltage/undervoltage protection, overheat protection and
overload protection. Equipped with an LED information screen.
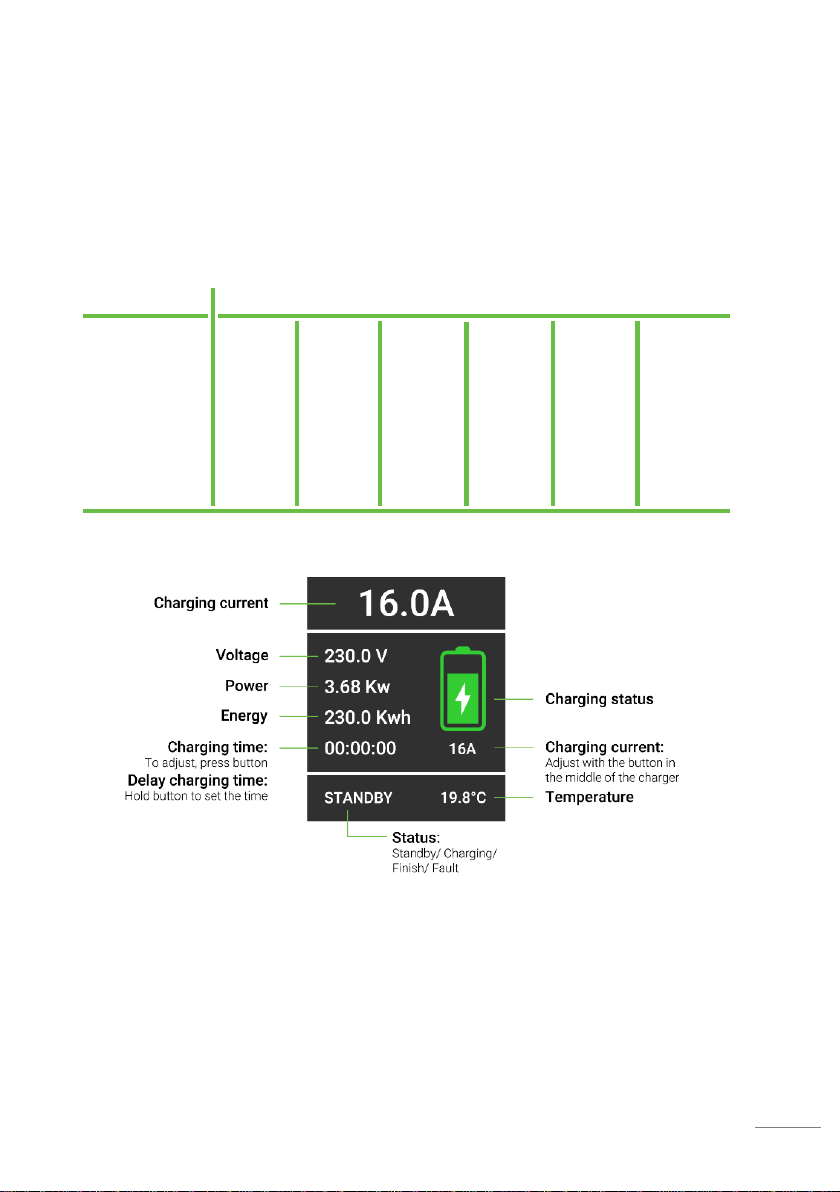
LED/LCD DISPLAY DESCRIPTION
Display LED display: displays charging information
Charge Current Ampere
Voltage Voltage
Power Amount of kW charged to vehicle
Energy Amount of kW charged to vehicle per hour
Charge time Estimated time to charge to 100% battery
Status of charging The battery displays whether it is charging and how much energy is
charged
Charging current Amount of amps charged 6A, 8A, 10A, 13A or 16A
Temperature Temperature of the product

6
IMPORTANT HEALTH & SAFETY GUIDELINES
Danger: Electrical & fire hazard
Danger: Electric Shock & Fire Hazard
The mobile home charger should be correctly connected to the vehicle's plug connector.
Incorrect connection may result in electric shock or fire during charging.
Use only CEE wall socket outlets when charging the electric vehicle.
The CEE wall outlet must be approved according to European standards.
You must adhere to the safety guidelines described in the vehicle manual as of this
document.
Careless use of the product can lead to fire. Incorrect connection or heat that cannot escape
can cause a fire. In case of fire, turn off the main power supply. And use a fire blanket or
foam canister. Caution! Never use water.
This symbol means danger. You are in a situation where physical injury may occur. Consider
the dangers of electrical circuits and standard accident prevention actions before working
with electrical equipment.
This symbol means to exercise caution. You may do something that could result in damage
to the equipment. Which may result in explosion hazard.
Danger: Electrical shock, short circuit, fire or explosion
If the product or CEE wall outlet is damaged or defective do not use it. Connecting a
damaged or defective product may result in short circuit, electrocution, explosion and/or
fire.
Do not use the product when it is damaged. Always check both sides of the cable and
adapter before using the product. Make sure the pins of the connectors fit properly into the
wall outlet.
Always verify that the product is properly connected to the CEE wall outlet. This includes the
connection between the vehicle input and the outlet.
Operating the product while using a damaged product or wall outlet may result in serious
injury or fire.
Never attempt to open the product casing.
Never attempt to repair or service the product yourself.
Never use an adapter to create multiple connections. To connect the product there.
Never attempt to modify or repair any electrical component of this product.
Never touch any electrical component of the outlet input or of the product with a metal
object or your fingers.

7
Keep wall outlets, plug connectors, and the mobile home charger away from moisture,
water, snow, ice, and other liquids. Do not immerse any components of the charger in water.
Although this charger is rated IP65, the health & safety guidelines outlined in this item are to
be adhered to.
Never charge your vehicle during heavy rain, thunderstorm or similar adverse weather
conditions.
Do not insert object(s) and/or fingers into the vehicle's connector.
Use only a dry cloth when cleaning.
Clean the cable only when disconnected from the vehicle and AC power.
This product should not be used by persons not familiar with using the product or by
persons who have not read this document.
This product is not a toy and should be kept out of the reach of children. When the cable is
in use and children are around, strict supervision is necessary.
Use of the mobile connector may interfere with the operation of medical electronic devices
and implants such as pacemakers and defibrillators. Consult the electronic device
manufacturer's information on the possible eects charging may have on such a device
before using the mobile connector.
Make sure the product does not present an obstacle to pedestrians or other road users.
When overheating exceeds 85 degrees Celsius, the charger will go into safety mode. And no
more charging is possible. When the temperature is below 65 degrees Celsius, the charger
will go out of safety mode.
General safety
Do not pull, drag or slide the product over sharp edges or objects.
Never kink, twist or entangle the charging cable.
Do not drive over the plug or cable.
Always handle the charger with care. Never apply unnecessary force or stress to the cable.
Do not use the cable outside the temperature range of -30 °C to +50 °C.
Never use the product if the power cable and/or adapter are visibly damaged.
Does damage occur to the cable or adapter while using the product. Immediately switch off
the earth leakage circuit breaker of the group. And contact a certified electrician. Do not use
the product until the problem is determined and resolved.

8
If at any time you think the equipment is unsafe, turn off the ground fault circuit breaker of
the group in your meter box and contact a certified electrician. Do not use the product until
the problem is determined and corrected.
PRECAUTIONS PRIOR TO CHARGING
Before using this charger to charge your vehicle, follow the steps below to ensure safe use
of the product.
Make sure the charging cable is free from damage, rust and other abnormalities. If it has
damage, rust or other abnormality, do not use it.
Check if the cable is damp. If it is, wipe it dry with a clean, dry cloth and let it dry completely.
Make sure you have the correct cable for your vehicle.
Never use the cable in an environment with flammable substances.
MAINTENANCE CARE
Danger: electrical and fire hazard
Clean the product only with a dry cloth. Do not use cleaning agents or flammable solvents.
ABOUT THE CONTROL BOX
The control box has the following protective features:
▪Leakage protection
▪Over-voltage/under-voltage protection
▪Overheat protection
▪Overload protection
If any of these protective features are enabled, the control box would stop the charging process. Once the
charge has stopped, the control box will perform a self-check to ensure the right operating conditions are
met so that it can restart. If over-voltage or under-voltage has been detected, you will need to disconnect
the cable first. Then reconnect to the correct voltage supply.
Display LED display: Shows all the charging dates:
Power/Voltage/Current/Time/Status
Switch Charging: Indicates that the charge is taking place.
Red light Fault mode
Green light 1 Initial mode
Green light 2 Status 1
Green light 3 Status 2
Green light 4 Status 3
Green light 5 Status 4
9
Setting Ampere
The adapter can be set to 6A, 8A, 10A, 13A or 16A.
Ampere adjustment is done by tapping the middle round button. This is a touchscreen button.
The Ampere voltage (charging current) will change on the LED display.
Note! The charging current can only be adjusted when the mobile charger is not connected to the vehicle.
LED/LCD Display description
Condition LED Display status
Lights Red (fault) Green (1) Green (2) Green (3) Green (4) Green (5)
Initial mode Light off Light on Light off Light off Light off Light off
Waiting Connection Light off Light on Light on Light on Light on Light on
Charging mode Light off Light on Racing light Racing light Racing light Racing light
Charging completed Light off Light on Light on Light on Light on Light on
Fault Twinkle Light off Light off Light off Light off Light off

10
PRELIMINARY MEASURES PRIOR TO CHARGING
Before using this cable to charge your vehicle, please follow the steps below to ensure safe use of the
product.
▪Ensure the charging cable is free from damage, rust and any other abnormality. If it has
damage, rust or any other abnormality, please do not use it.
▪Check to see if the cable has any moisture. If so, please wipe dry with a clean & dry cloth
and allow it to fully dry.
▪Make sure you have the correct cable for your vehicle.
▪Never use the cable in an environment where there is flammable substances.
OPERATION INSTRUCTION
To use the electric vehicle cable, please follow the instructions below:
1. Before using the cable, please refer to your vehicle manual and
familiarize yourself with instructions on how to charge your
vehicle.
2. Completely unroll the charging cable to avoid heat build-up and
tripping.
3. Plug the cable into your mains power supply. You should see the Power LED
(Green), Charging LED (Green) and Fault LED (Red) on the control box
flashing simultaneously which indicates that the control box is performing a
self-check.
4. Once the self-check has been completed, you will only see the Power LED
come on to inform you that it is idle and ready for charge.
5. Insert the other end of the cable into the inlet socket of your
vehicle. Once connected, the Charging LED on the control will begin
to flash to indicate that the charging is in progress.
6. Press the middle button on the charger to adjust the current:
6A/8A/10A/13A/16A.
7. Delay charging function will start once pressing the button for more
than 3 seconds, and it will move from 1 hour to 15 hours when
pressing on the charger continuously.
8. Once the charging is complete, the display box will show both the
Power LED and the Charging LED as fully lit.
9. To stop charging, turn off the main power supply, and then
disconnect the plug from the vehicle inlet. Remove the power plug
from the socket.

11
MAINTENANCE CARE
Danger: Electrical & fire hazard
Only clean the product with a dry cloth. Do not use any cleaning agents or flammable
solvents, such as alcohol or benzene.
DISPOSAL
Disposal of decommissioned appliances must be in accordance with regional laws and
guidelines. Check with your municipality or government agency. Equipment and batteries
should never be disposed of with household waste.
Discarded Electronic Equipment should be delivered to an electronic waste collection point
or disposed of through your dealer.
Dispose of packaging material in the appropriate collection bins for cardboard, paper and
plastic.
TECHNICAL SUPPORT
If you need technical support for your product within the warranty period, please contact us
at:
info@chargexpert.com
Please provide the product name and supplier code (see Technical Specifications) along
with the technical question and proof of purchase.
TECHNICAL SUPPORT
If you require any technical support for your product within the warranty period, contact us
on:
Please provide the product name and supplier code (see technical specifications) along with the
technical query and proof of purchase.

12
EUROPEAN DIRECTIVES
2014/35/EU
2014/30/EU
2011/65/EU + (EU)2015/863
IEC 62196-1 Plugs, socket-outlets, vehicle connectors and vehicle inlets –Conductive
charging of electric vehicles
IEC 62196-2 Plugs, socket-outlets, vehicle connectors and vehicle inlets –Conductive
charging of electric vehicles

13
TECHNICAL SPECIFICATION
Product Mode 2 portable charger
Supplier code ECO-PC001-1603
Rated power 16A / 3 phase
Adjustable power 6A / 8A / 10A / 13A / 16A
Delay charging From 0 to 15 hours
Frequency 50Hz/60Hz
Operation voltage 230VAC ±10% 400VAC ±10%
Insulation resistance >1000mΩ(DC500V)
Terminal temperature rise <50K
Withstand voltage 2000V
Contact resistance 0.5mΩMax
Mechanical life No-load plug in/out >10.000 times
Coupled insertion force 45N<F<100N
Impact of external Can afford 1M drop and 2T-vehicle run over press
Operating temperature -30˚C tot +50˚C
Working altitude <2000M
RCD 30mA AC or optional (30mA AC + 6mA DC)
Housing material PC
Front panel PC
Protection level IP65
Charging outlet Type 2
Charging method Plug & In / Delay charging
Size 255 x 109 x 55 mm
Application site Indoor & outdoor
Safety standard IEC 62752 / IEC 62196
Warranty 1 Year

14
Table des matières
11
▪Fonctionnement
▪Accessoires
▪Description du produit
12
▪Consignes de sécurité
13
▪À propos du boîtier de commande
14
▪Mesures préliminaires avant la recharge
▪Instructions d’utilisation
15
▪Entretien
▪Environnement
▪Soutien technique
▪Directives européennes
16
▪Fiche technique

15
FONCTIONNEMENT
Merci d'avoir acheté ce chargeur mobile ChargeXpert pour véhicules électriques. Ce chargeur est destiné
à la recharge de véhicules électriques avec une prise de type 2 via une prise CEE. Ce chargeur dispose
d'un adaptateur, fournit avec des indicateurs LED, et différentes fonctions de sécurité électroniques.
Ce produit convient à l'utilisation de véhicules électriques alimentés par batterie et de véhicules
électriques hybrides rechargeables équipés d'une connexion de type 2.
Branchement
Le chargeur mobile doit être connecté à une prise CEE. ATTENTION, de nombreuses prises ne sont pas
conçues pour une charge de longue durée de 16A / 11 kW pour, par exemple, recharger un véhicule
hybride et/ou électrique. Par conséquent, vérifiez toujours si le câblage et les composants sont conçus
pour cette puissance. Les conséquences sont souvent visibles sur le long terme, ce qui est d’autant plus
dangereux. Lorsque des câbles et composants sont régulièrement et longtemps exposés à des courants
(trop) élevés, la qualité des câbles et composants se détériore rapidement, ce qui en fait un risque
d'incendie.
Utilisation du câble de rallonge
N'utilisez jamais de câble d'extension 230 V CA lorsque vous utilisez cet appareil. Connectez toujours ce
câble directement à une prise secteur. Il est conseillé de placer le véhicule à proximité de la prise secteur.
Si un câble d'extension est utilisé, assurez-vous qu'il est conçu pour un courant de 16A.
ACCESSOIRES
▪Câble de charge EV
▪Manuel d'utilisation
▪Boîte de rangement
DESCRIPTION DU PRODUIT
Ampérage: 6A / 8A / 10A / 13A / 16A
Courant de charge: 11 kW
Triphasé
Longueur de câble: 5, 10 ou 15 mètres

16
CONSIGNES DE SÉCURITÉ
Avertissement: Risque électrique et d’incendie
Le câble pour véhicule électrique doit être correctement branché à l'entrée de charge du véhicule. Un
branchement incorrect lors de la charge peut causer des décharges électriques ou des incendies.
Seule une prise d'alimentation secteur ou de réseau doit être utilisée lors de la charge de votre véhicule
électrique. Cette prise doit être conforme aux lois et aux normes régionales/nationales.
Vous devez respecter les consignes de sécurité du manuel de votre véhicule et du présent document.
Avertissement: Décharge électrique, court-circuit, incendie ou explosion
Si le produit ou la prise est endommagé ou défectueux, n’utilisez pas le produit. Si cette consigne n’est
pas respectée, un court-circuit, une électrocution, une explosion, un incendie ou des brûlures pourraient
survenir.
▪Ne jamais utiliser le câble de charge s’il est endommagé. Vérifiez toujours les deux bouts du
câble de même que le boîtier de commande avant d’utiliser le produit.
▪Toujours vérifier que le câble est correctement branché aux prises, à la fois à la prise de
charge du véhicule et la prise de courant.
▪Utiliser un câble endommagé peut entraîner un incendie ou des blessures importantes.
▪La gaine du câble, à l'une ou l'autre de ses extrémités, ne doit jamais être ouverte. Si des
réparations sont nécessaires, veuillez trouver un professionnel qualifié.
▪Toujours utiliser la tension correcte lorsque vous utilisez le câble.
▪Ne jamais utiliser une extension avec ce câble.
▪Ne jamais utiliser un adaptateur de prise multiple.
▪Ne jamais tenter de réparer ou modifier le composant électrique de ce produit.
▪Ne jamais toucher les composants électriques de la prise de charge du véhicule ou du câble
électrique du véhicule.
▪Les prises, les connecteurs et le câble électrique doivent être maintenus à l'écart de
l'humidité, de l'eau, de la neige, de la glace et de tout autre liquide. Ne pas immerger aucun
des composants du câble dans l'eau. Bien que le câble soit livré avec un indice de
protection IP65, les mesures de santé et de sécurité indiquées ici sont impératives.
▪Ne jamais essayer de charger votre véhicule lors d'un orage.
▪Ne jamais insérer un objet dans la prise de charge du véhicule ou dans les prises du câble.
▪Utiliser uniquement un linge sec pour le nettoyage.
▪Le câble ne peut être nettoyé que s’il est complètement débranché à la fois du véhicule et
du réseau électrique.
▪Ce chargeur ne doit pas être utilisé par des personnes qui ne sont pas familiarisées avec ce
produit ou qui n'ont pas pris connaissance de ce document.
▪Ce produit n’est pas un jouet et doit être tenu à l’écart des enfants. Si le câble est utilisé en
présence d’enfants, ces derniers doivent être supervisés en tout temps.
▪Lorsque la surchauffe dépasse 85 degrés Celsius, le chargeur passe en mode de sécurité. Il
ne sera plus possible de le charger. Lorsque la température est inférieure à 65 degrés
Celsius, le chargeur sort du mode de sécurité.
Sécurité générale
▪Ne pas faire glisser le câble sur des bords tranchants.
▪Ne jamais plier le câble.
▪Ne pas rouler sur le câble ou la fiche du câble.
▪Toujours manipuler le câble avec soin. Ne jamais exercer une force ou une tension inutile
sur le câble.
▪Ne pas enrouler le câble.
▪Ne pas utiliser le câble en dehors de la température de fonctionnement comprise entre -
30 °C à +50 °C.

17
À PROPOS DU BOÎTIER DE COMMANDE
Le boîtier de commande dispose des caractéristiques de protection suivantes:
▪Protection antifuite
▪Protection contre la surtension et la sous-tension
▪Protection contre la surchauffe
▪Protection contre la surcharge
Si l'un de ces mécanismes de protection est activé, le boîtier de commande mettra fin au processus de
recharge. Lorsque le processus de recharge est interrompu, le boîtier de commande effectue un
autocontrôle afin de vérifier que les conditions de fonctionnement nécessaires sont réunies avant de
redémarrer. Si une surtension ou une sous-tension est détectée, vous devrez débrancher le câble. Vous
pourrez ensuite le reconnecter à la tension d’alimentation correcte.
Affichage Affiche LED: Affiche toutes les dates de charge:
Power/Voltage/Current/Time/Status
Bouton Charging: Indique que la charge est en cours.
Lumière rouge Défaut
Voyant vert 1 Mode initial
Voyant vert 2 État 1
Voyant vert 3 État 2
Voyant vert 4 État 3
Voyant vert 5 État 4
Réglage de l'ampérage
L'adaptateur peut être réglé sur 6A, 8A, 10A, 13A ou 16A.
Le réglage de l'ampérage s'effectue en appuyant sur le bouton C. Il s'agit d'un bouton à écran tactile. Il
s'agit d'un bouton à écran tactile.
La tension en ampères (courant de charge) change sur l'écran LED.
Remarque ! Le courant de charge ne peut être réglé que lorsque le chargeur mobile n'est pas connecté au
véhicule.

18
Description de l’état de l’affichage LED/LCD
Mode État de l’affichage LED
Lumière Rouge (défaut) Vert (1) Vert (2) Vert (3) Vert (4) Vert (5)
Mode initial Éteinte Allumée Éteinte Éteinte Éteinte Éteinte
Connexion en attente Éteinte Allumée Allumée Allumée Allumée Allumée
Mode de charge Éteinte Allumée Ascendante Ascendante Ascendante Ascendante
Charge terminée Éteinte Allumée Allumée Allumée Allumée Allumée
DéfautClignotante Éteinte Éteinte Éteinte Éteinte Éteinte
MESURES PRÉLIMINAIRES AVANT LA RECHARGE
Avant d’utiliser ce câble pour recharger votre véhicule, suivez les étapes ci-dessous afin d’assurer une
utilisation en toute sécurité du produit.
▪Assurez-vous que le câble de recharge n’est pas endommagé ou rouillé et ne présente pas
d’anomalies. Si vous remarquez des dommages, de la rouille ou d’autres anomalies,
n’utilisez pas ce produit.
▪Vérifiez s’il y a de la moisissure sur le câble. Si c’est le cas, essuyez-le avec un linge sec et
laissez-le sécher complètement.
▪Vérifiez que vous avez le bon câble pour votre véhicule.
▪N'utilisez jamais le câble si des substances inflammables se trouvent dans le même
espace.

19
INSTRUCTIONS D’UTILISATION
Pour utiliser le câble pour véhicule électrique, suivez les instructions suivantes:
1. Avant d’utiliser le câble, consultez le manuel du véhicule et prenez
connaissance des instructions concernant la charge de votre
véhicule.
2. Déroulez complètement le câble de charge pour éviter l'accumulation
de chaleur et les trébuchements.
3. Branchez le câble sur votre secteur d'alimentation. Sur votre boîtier de
commande, vous devriez voir le voyant d'alimentation (vert), le voyant de
charge (vert) et le voyant de défaut (rouge) qui clignotent simultanément, ce
qui vous indique qu’un autocontrôle est en cours dans votre boîtier de
commande.
4. Lorsque l’autocontrôle est terminé, seul le voyant d’alimentation s’allumera
pour vous informer qu'il est au repos et prêt pour la charge.
5. Insérez ensuite l'autre extrémité du câble dans la prise d'entrée de
votre véhicule. Lorsque la connexion est établie, le voyant de charge
commencera à clignoter pour indiquer que la recharge est en cours.
6. Pressez le bouton du milieu pour ajuster le courant :
6A/8A/10A/13A/16A.
7. La fonction de charge différée commence lorsque vous appuyez sur
le bouton pendant plus de 3 secondes. La charge sera retardée de 1 à
15 heures lorsque vous appuyez sur le chargeur en continu.
8. Lorsque la recharge est terminée, le voyant d’alimentation et le
voyant de charge s’allumeront complètement.
9. Pour mettre fin à la charge, coupez l'alimentation secteur ; ensuite,
débranchez la fiche de la prise d’entrée du véhicule et retirez la fiche de
la prise d’alimentation.
10.

20
ENTRETIEN
Avertissement: Risque électrique et d’incendie
Nettoyer uniquement le produit avec un linge sec. Ne pas utiliser de produits de nettoyage ou de solvants
inflammables, tels que l'alcool ou le benzène.
ENVIRONNEMENT
L'élimination d’appareils mis hors service doit se faire conformément aux lois et directives nationales et
régionales applicables. Les appareils et les batteries ne doivent pas, en aucun cas, être jetés avec les
ordures ménagères.
▪Confiez les appareils mis hors service à un centre de collecte des déchets électroniques ou à
votre revendeur.
▪Jetez le matériel d'emballage dans les bacs de collecte respectifs pour le carton, le papier et
les plastiques.
SOUTIEN TECHNIQUE
Si, au cours de la période de garantie, vous devez faire appel à une aide technique pour votre produit,
veuillez nous contacter au courriel suivant:
Vous devrez indiquer le nom du produit et le code de fournisseur (voir les caractéristiques techniques), de
même que la preuve d'achat et la nature de votre requête d’assistance technique.
DIRECTIVES EUROPÉENNES
2014/35/EU
2014/30/EU
2011/65/EU + (EU)2015/863
IEC 62196-1 Fiches, prises de courant, connecteurs et entrées de véhicules - Charge
conductive des véhicules électriques
IEC 62196-2 Fiches, prises de courant, connecteurs et entrées de véhicules - Charge
conductive des véhicules électriques
Table of contents
Languages:
Other ChargeXpert Batteries Charger manuals


