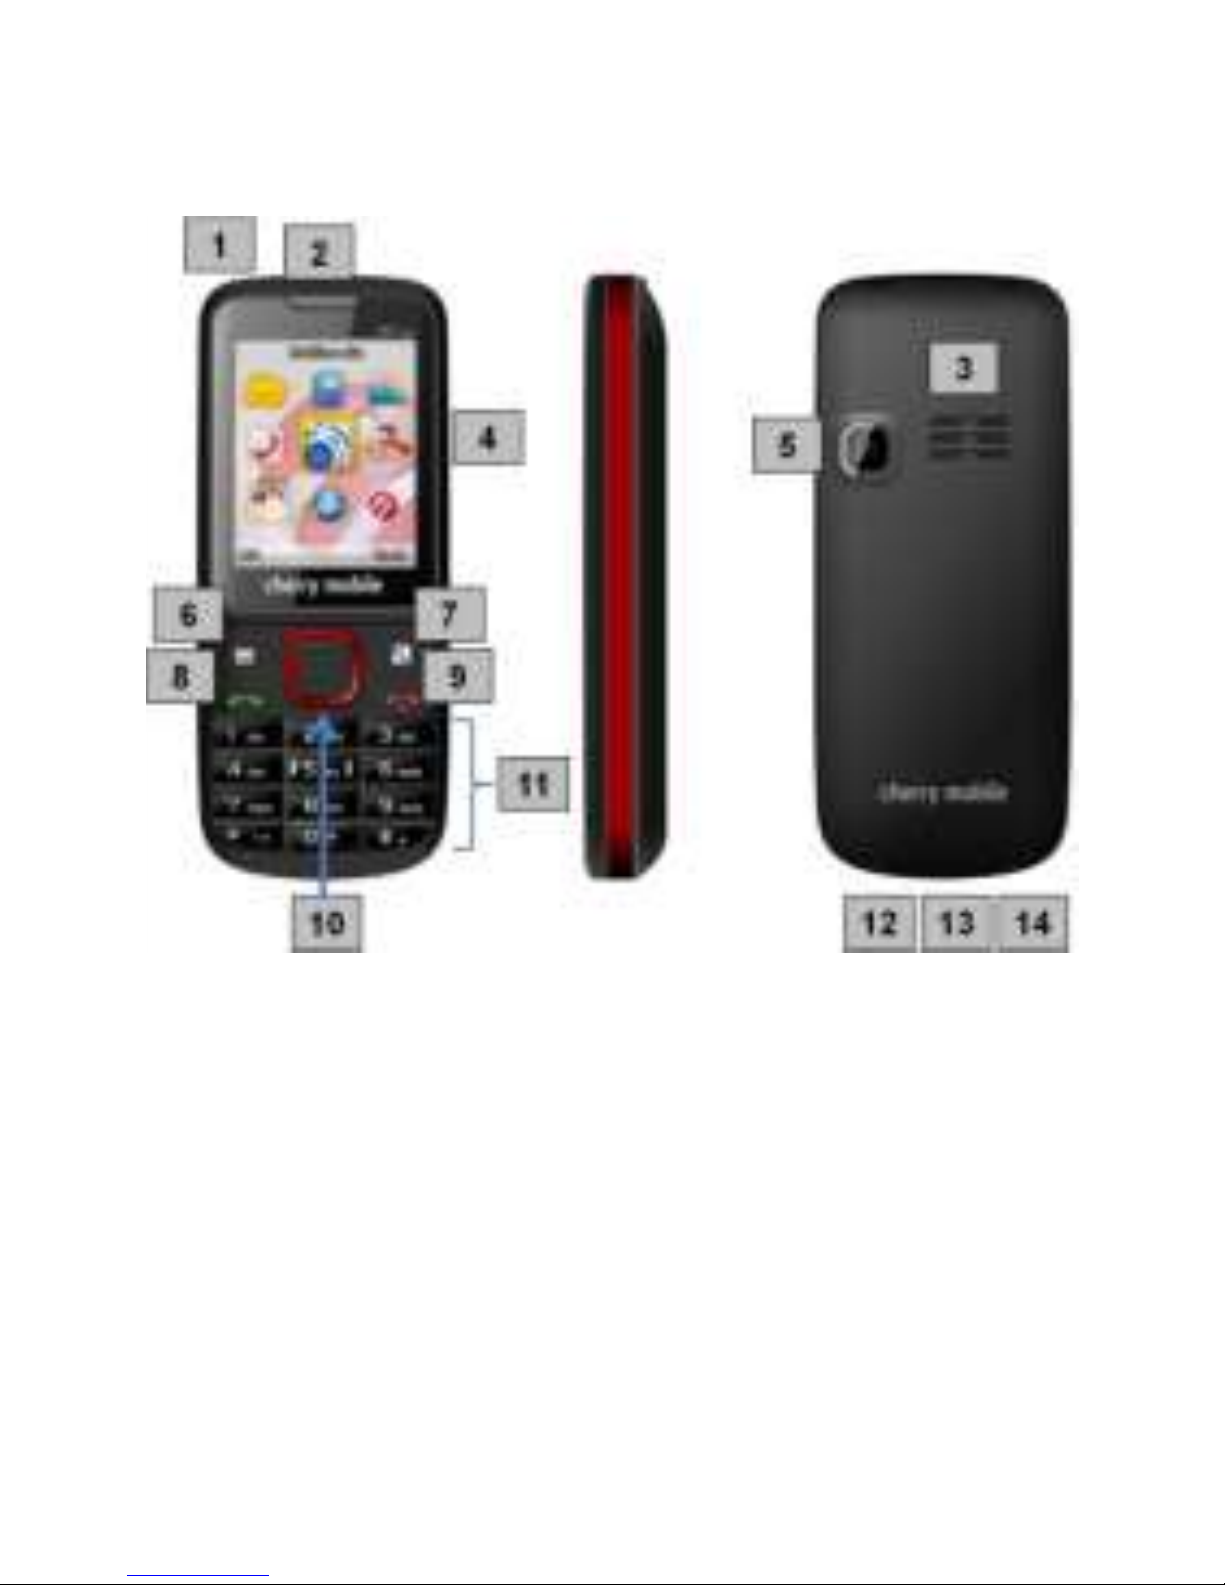
Cherry D11 Mini User manual

1
Cherry Mobile
D11 Mini
User Guide

2
Preface
Please read the following guidelines before using your new
Cherry Mobile D11 Mini Phone. Utmost compliance is highly
recommended for your safety. Non-compliance may pose danger
to you and your mobile phone, and may be illegal.
Cherry Mobile reserves the right to modify technical specifications
without prior notice. Some content in this manual, i.e. software,
images, accessories and more, may vary from that in the actual
device. Please refer to unit for accuracy.
This guide aims to help you get started on your new Cherry
Mobile phone. Aside from the last two parts of this guide i.e.
Section 6 - Important Safety Precautions and Section 7 -
Troubleshooting, you may find the following icons periodically
present to help you make better use of your phone.
- indicates sequence of processes
- presents additional notes on a topic or alternative
options for a feature
- shows further cautionary measures

3
1. Overview
Keys and Shortcuts
1
Flashlight
2
Earpiece
3
Speaker
4
Display
5
Camera
6
Left Soft Key (LSK) –Menu, OK, Options
7
Right Soft Key (RSK) –Names, Back, Clear

4
8
Call Key –Call history, connect to a call
9
Power / End Key –Power On/Off, End, Clear
10
Navigation Keys
Left –File Manager
Right –User Profile
Up –Audio Player
Down –Calendar
Center –Main Menu; OK key
11
Keypad
1 –special characters (.,-?!’@:#$/_1)
2 –abc2
3 –def3
4 –ghi4
5 –jkl5
6 –mno6
7 –pqrs7
8 –tuv8
9 –wxyz9
0 –0 [space]
* –symbols tab
# –shortcut for Silent mode; change input mode
(messaging)
12
Charger slot
13
Headset/USB jack
14
Microphone

5
2. Getting Started
Switch your Mobile Phone ON / OFF
To switch your mobile phone ON, press and hold the Power Key
until an animation appears on the display screen. Make sure the
battery is correctly inserted and charged.
To switch it OFF, press and hold the Power Key until the phone
shuts down.
Install / Remove the SIM Card, Memory Card and
Battery
Install / Remove the SIM Card and Battery
Make sure to switch off the device and disconnect from charger
before installing and removing the SIM card and battery. To install
/ remove the SIM card and battery, perform the following:
1. Slide open the phone’s back cover and pull out the battery.
2. Open the latch of the SIM card slot and carefully insert the
SIM card into place, making sure that the card’s gold plate
is facing down and in proper alignment with the phone’s
metal contacts.
3. Carefully return the battery into its slot and put the cover
back on.
Install / Remove the Memory Card
The Memory Card is a handy mobile storage device that expands
the phone’s storage capacity. To install / remove the memory card,
perform the following:
1. Press and hold the Power Key to shut off the mobile
phone.

6
2. Slide open the phone’s back cover.
3. Carefully pull out the battery from its slot.
4. Open the memory card slot latch and carefully place the
Memory Card into it, making sure that the card’s gold plate
is facing down and in proper alignment with the phone’s
metal contacts. To remove, carefully take out the card out
of the slot and close the latch.
5. Insert the battery into its slot and place the cover back on.
:It is vital that you restart your phone for it to identify with the
newly inserted memory card.
: As the memory card intended for Cherry Mobile D11 Mini is
small, it is advisable to keep it out of children’s reach.
Charge the Battery
1. Plug the charger into the electrical outlet.
2. Connect the end of the charger connector into the mobile
phone’s USB / charging slot.
3. The battery indicator icon will flash until charging is
finished.
4. When charging is complete, i.e. the battery charging icon
stops flashing, disconnect the phone from the charger.
5. Do not forget to unplug the charger from the electrical
outlet.
: You can use the phone while charging, but the charging time
will increase. When you are charging the handset in its Power Off
state, a charging indicator will appear on the screen.
Phone Security
The mobile phone and the SIM card support several passwords in
order to prevent the SIM card and phone from being misused.

7
When you are prompted to enter any of the codes mentioned
below, just type in the correct code and then confirm by pressing
the OK key. To access the phone’s settings for these codes, go to
Menu Settings Security Settings PIN / PIN2.
SIM Security
Local network service providers furnish each SIM card with a
unique set of codes including the PIN, PIN2 and PUK. If the PIN
is incorrectly entered for three successive attempts, the SIM card
will be locked. To unlock the SIM card, you need to input the PUK
or the Personal Unlocking Key. For assistance and further details
regarding PIN, PUK and SIM Lock, please contact your local
network service provider.
Basic Troubleshooting for locked SIM card:
-Enter the correct PUK. You will then be prompted to enter a new
PIN.
-Type in the new PIN and press OK.
-Re-type the new PIN and press OK.
PUK
The PUK code (Personal Unlocking Key) is required to change a
blocked PIN. This code usually comes with the SIM card upon
purchase. Otherwise, contact your local service provider. If you
enter the wrong PUK code for 10 consecutive times, the SIM card
becomes invalid.
Lock / Unlock your Phone
Depending on the screen lock settings, your phone will
automatically lock when left untouched after a period of time. To
unlock, lightly press the LSK followed by the star (asterisk) key.

8
Go to Menu Settings Security Settings Lock screen
by end-key to manually lock the keypad by pressing the End key
during idle mode.
You may choose from the keypad lock modes: normal or
password mode.
To change the screen auto-lock time, go to Menu Settings
Security Settings Auto-keypad lock choose desired
time.
3. Basic Functions
Make and Answer a Call
To make a call, type the number you wish to contact and press
the Call Key. Affix the appropriate codes to avoid inconvenience.
To call a contact whose details are saved in your Phonebook,
press Names scroll up/down to select contact Call Key.
To dial a phone number listed in your recent call logs, press the
Call Key to view all call log entries. Use the navigation keys to
select a number and press Call Key to connect.
Format for international calls:
(+) (Country Code) (complete phone number) then press call key.
: Press the (*) key twice to type "+" and then type the country
code, the area code and the telephone number. Then press the
telephone icon to connect.
Dial an Emergency Call
This phone operates using radio signals, wireless and landline
networks, but cannot guarantee connection in all conditions. To
make an emergency call:

9
Switch your phone on.
Dial emergency number and press Call.
: Some networks may require that a valid SIM card is properly
inserted in the phone before making an emergency call.
: Emergency numbers vary in every country. Emergency calls
may not work in all locations due to network and interference
issues.
It is not advisable to rely solely on wireless phones to make
emergency calls.
Answer / Reject an Incoming Call
To answer an incoming call, press Call Key
To end or reject an incoming call or end an ongoing one, press
Power/End Key.
Adjust the Volume During Call
During a call, you can press the Left and Right Navigation keys to
adjust the volume.
Send and Receive Messages
To create a message, press Menu Message Write
Message New SMS / New MMS type your message.
To send, press Options Send Names Choose contact
OK Send.
: For multiple entries, choose Select (mark entries) OK
Send.

10
To manually enter a number, press Options Send (enter
phone number) OK Send.
To view a message, press Menu Message Inbox
(choose message from list) press Center Key.
Listen to Music
To listen to music, go to Menu Multimedia Audio Player.
Take note of the following to utlilize this feature:
Center Key –plays / stops a track
Left Navigation Key –plays the previous track
Right Navigation Key –plays the next track
Up and Down key –adjusts volume
LSK –displays further options (Music List, Music Mark, Play
Mode and Exit)
RSK –lets you go back to the menu
Listen to FM Radio
To listen to the radio, go to Menu Multimedia FM Radio.
Tap the ( ) to play/stop the FM radio. Tap the ( ) to
search channels.
To automatically search and save radio channels, press Options
Auto Search Yes.
: An earphone, to act as antenna, must be connected for the
radio to work.
To listen to the radio, go to Menu Multimedia FM Radio.
Tap the ( ) to play/stop the FM radio. Tap the ( ) to
search channels.

11
To automatically search and save radio channels, press Options
Auto Search Yes.
: An earphone, to act as antenna, must be connected for the
radio to work.
4. Main Menu
MESSAGES
Write Message –please refer to “Send and Receive Messages”
on page 9.
Inbox –lists all received messages. The Inbox stores messages
from both your SIM cards. There is, however, a limit to its capacity.
When the Inbox becomes full, you must delete some of the
messages in order to continue receiving new ones. Its options
include:
Reply –to reply to a message by SMS or MMS.
Delete –to delete selected message.
Call –to call the sender of the message.
Lock –to keep the message from being erased or moved
Mark –to reply to multiple text messages. You can also use this
to mark messages you wish to delete in the future.
Sort –to sort messages by time, contacts, subject and type.
Delete same number –to delete messages of the same number.
Outbox –stores unsuccessfully sent messages. There is a
separate outbox messages list for SIM.
Drafts –allows you to store and view saved messages. Select
Options to edit/delete or send saved messages from SIM.
Sent –stores all your sent messages. You may opt not to save
messages that you save by pressing Menu Messaging

12
SMS Settings Save Sent Message Off.
Options include:
Templates - provides you with pre-typed message options that
you can use and edit for quick SMS messaging. messages
function.
Voice mail server –contact your network service provider for
more information on voice mail server.
Message capacity - The phone memory can hold up to 50
messages on top of your SIM cards’ capacity.
Settings include:
SMS - SIM1/SIM2 Message Settings: You can change the SMS
settings, such as SIM message center, message validity and
status report. You can also opt to save sent messages and
choose preferred storage for incoming messages.
PHONEBOOK
This menu shows an alphabetical listing of saved contacts in your
phone and SIM card/s. The Phonebook can hold as much as 500
contacts on top of your SIM card’s capacity. Press Options to
access the following:
New, Search, Write Message, Call, Delete, Mark, Copy, Move,
Add to Blacklist.
Other options include:
Speed Dial settings, Caller Id, Memory Status and Single Line
Display.
USER PROFILES
This menu lets you customize your phone’s settings to suit your
activities, lifestyle and environment. The mobile phone is
equipped with multiple user profiles that you can customize tones

13
for incoming calls, messages. The Cherry Mobile D11 Mini is
equipped with five (5) pre-set profile options: General, Silent,
Meeting, Indoor and Earphone. To access these, go to Menu
Profiles. Press Options to Activate, Customize or Rename.
CALL CENTER
The Call Center menu displays details of calls made and received
in your phone. It contains your missed, dialed and received calls,
as well their call duration, call history, and call settings. It tracks
call records in SIM. To access this, go to, Menu → Call Center.
It also lists call timers, call costs and GPRS and text message
counters. To perform actions on a listed call, press the Options
key and choose from the following:
View
Call
Send Message
Add to Blacklist
Edit before call
Delete
:Alternatively, from the Home Screen, press the Call Key to
access the call history.
Call Settings –displays the following options:
Network Selection –allows you to select network manually of
automatically.
Call Divert –lets you forward a call to your phone to another
number. For details, contact your service provider.
Call Barred –allows you to restrict a contact or number from
calling you. For details, contact your service provider.
Call Waiting –allows you to answer a waiting call during an active
call. With this activated, you will be notified of incoming calls even
you have a call in progress. The first call will be put on hold when

14
you opt to answer a waiting call.
Hide ID (Network Service) –allows you to select whether your
identification will be Hidden, Displayed or Displayed by Network
(default set).
Select Line–This function allows you to switch from one line to the
other.
Flight Mode –also known as the “Airplane Mode,” it is advisable
when riding aircrafts. This function, when turned ON, disables all
wireless connection to any network. However, with the flight
mode, you can make use other functions of your device such as
playing music, watching videos and capturing images and videos.
Other Settings include the following:
50 secs warning - allows you to keep track of or limit your calls’
duration by setting mini-alarms that alert you during a call.
Answer/Reject mode –allows you to mechanically reject any
incoming call and send an auto-reply message to the caller
instead. It also lets you enable/disable the ‘any-key answer,’
where any key may be pressed to answer an incoming call.
Auto redial –with this switched on, your phone will automatically
redial the number you are calling, should there be any failure in
connection.
MULTIMEDIA
Camera
This mobile phone is equipped with a standard digital camera that
lets you take photos whenever and wherever you like. Saved
photos are stored in the phone’s memory or in a memory card (if
available).
With the screen on camera mode, press the LSK to customize
details:

15
Gallery –to skip to the image viewer interface
Settings - sets specifications relative to color, exposure, etc.
Storage –lets you choose where to save the captured images
Press the left/right navigation keys to adjust the camera’s
parameters such as image size, mode, brightness, contrast, white
balance, delay (timer), effects and exposure bias.
To capture an image, press the Center Key.
After taking the photo, press the “Back” key to return to the
camera’s viewfinder state, or press the LSK for other options.
Video Recorder
To record a video, go to Multimedia Video Recorder. Saved
video clips are stored in the phone’s memory or in a memory card
(if available).
With the screen on video recorder mode, press the LSK to
customize details:
Video Directory –to skip to the image viewer interface
Settings - sets specifications relative to banding, audio, image
type, etc.
Storage –lets you choose where to save the captured images
Press the left/right navigation keys to adjust the camera’s
parameters such as image size, brightness, contrast and effects.
To start recording a video, press the Center Key. Press the
center key as well to stop recording.
Video Player
This lets you play video files saved in your memory card or phone
memory. Take note of the following to utlilize this feature:
Center Key –plays / stops a video
Left Navigation Key –plays the previous video
Right Navigation Key –plays the next video

16
Up and Down key –adjusts volume
LSK –displays further options (Music List, Music Mark, Play
Mode and Exit)
RSK –lets you go back to the menu
Note: The Video Player plays clips in .avi and .mp4 format.
Audio Player –Please refer to “Listen to Music” on page 10.
Recorder
Record sound and other audio files on your phone by going to
Multimedia → Recorder. To start recording, press Options
Start Recording
You may press options again to view the playlist and settings.
FM Radio –Please refer to “Listen to FM Radio” on page 10.
File Manager
The File Manager menu helps you organize your files in folders
without having to use a computer. You can explore your storage
device and view its capacity, such as the total used space and
free space, etc., on your phone.
TOOLS
Alarm
This mobile phone is geared with an alarm function that you can
set at your chosen time/s. To create an alarm, go to Extras
→Alarm Edit a pre-set alarm. You may set your preferred
specifics i.e. on/off, time, period, ring and reminding mode. Once
an alarm is configured, an icon will appear on the screen. Tap
Edit to modify specifics.
Calendar

17
The Calendar application shows the current date/month and lets
you organize your schedule by allowing you to add, edit, delete
and view events. You may also add appointments and notes as
reminders.
Press the LSK to view the following Options:
Add new schedule –lets you create a new event and add an
alarm to it.
View schedule –lets you view previously stored events.
All schedules –lets you view all events made on your phone.
Clear today’s tasks – lets you erase all scheduled events and
appointments for the day
Clear all –delete all events
Go to date –allow you to jump into a specific date by entering a
specific year, month and day.
Bluetooth
You may establish wireless connection with other compatible
devices with the Bluetooth technology. The Bluetooth may be
used to send and receive different kinds of files. With the
Bluetooth technology and you may establish wireless connection
with a compatible PC to enhance communication. To access this
go to Menu Settings Connectivity Bluetooth. Its
options include:
Open/Close Bluetooth –allows you to switch your Bluetooth
connectivity on or off
Visibility –shows/hides the visibility of the phone’s Bluetooth
Paired Device –lets you view all Bluetooth devices that you can
connect to
Shared folder settings –allows you to let other devices view your
phone’s folders and their content.
My Bluetooth name –allows you to rename your Bluetooth device
Bluetooth file storage –lets you choose where to store received

18
files via Bluetooth
Help –displays information regarding Bluetooth settings
Calculator
This mobile phone is equipped a calculator to facilitate simple
computations using the 4 basic functions. Enter the numbers
using the keypad and choose the desired operation by pressing
the navigation keys. Tap Back to delete the entered numbers and
the Center key to get the output.
Flashlight
The Cherry Mobile D11 Mini is made with a built-in flashlight.
Press and hold the “0” key to turn the flashlight on or off.
SERVICES
The Services menu contains the Internet Service sub-menu and
the SIM ToolKit (STK)
Internet Service (WAP)
This function allows you to browse the Internet on your phone,
however, GPRS charges may be applied by your service provider.
Please consult your network service provider regarding rates and
specific settings. This menu has two sub-options: the Internet
Service and the Surf & Download.
To access Internet Service, go to Services Internet Services.
SIM ToolKit (STK)
The features of your STK are specified by your service provider. If

19
your SIM card supports the STK feature, you will see the STK
menu. You may contact your network service provider for more
information regarding the STK.
CHERRY ZONE
To access, go to Menu Cherryzone. GPRS connection
charges may apply. It also allows you to have access to :
Boxman (Game)
Cherry Shop
Cherry Mobile eWarranty –please refer to page 28 for more
information regarding the eWarranty.
5. Settings
Dual-SIM Settings
Since your phone can work with two SIM cards at a time, this
option lets you choose which SIM to activate at a given time, or to
simultaneously activate both SIM cards. To do this, go to Menu
Settings Dual SIM Settings.
Phone Settings
This menu (Settings Phone Settings choose from options)
lets you configure the following according to your preferences:
Time and date - allows you to set your phone’s time and date
according to zone and format.
Select Language –lets you select your phone’s display
language.

20
Shortcut settings - You may assign different applications to the
Up, Down, Left and Right navigation keys. To do so, go to
Settings Phone Settings Shortcut Settings Choose
from Up/Down/Left/Right key OK or Center KeyChoose
application to assign OK or Center Key.
Auto power on/off –allows you to set a specific time that will
automatically switch your phone on or off. (Note: Before entering
an area where the use of mobile phones is forbidden, make sure
that the scheduled power-on function is deactivated to avoid
inconvenience.)
Power Management –displays the status of your phone’s battery.
Display Settings
This lets you define your phone’s appearance. Under the Display
menu, you can change the settings for the following:
oWall Paper
oIdle Display
oContrast
oBacklight
oKeypad Backlight
oAnimation Effect
Security Settings
Change PIN –changes your current PIN password.
Change PIN2 –Changes your current PIN2 password.
Privacy –allows you to set a password to protect your
messages, call logs, camera, file manager, calendar and U
Disk.
Auto Keypad lock –automatically locks the phone’s keypad.
Table of contents
Other Cherry Cell Phone manuals