Cherry Jazz 4 User manual

1
Mobile Phone
User Manual
Brand:Blood
Model:Jazz 4
FCC ID:AYWJAZZ4

Preface
Please read the followin
g
is hi
g
hl
y
recommended
f
may be illegal.
The Mobile is packed wit
h
Camera, amon
g
others. I
certified b
y
both local an
d
Cherr
y
Mobile reserves
t
manual, i.e. software, im
your unit for accuracy.
This
g
uide aims to help
y
Section 6 - Important S
a
periodicall
y
present to he
Æ- indicat
e
- presen
t
- show
s
2
g
g
uidelines before usin
g
y
our new
f
or
y
our safet
y
. Non-compliance m
a
h
features to satisf
y
y
our needs su
c
t is Wi-Fi and Bluetooth capable a
n
d
international authorities.
t
he ri
g
ht to modif
y
technical speci
f
a
g
es, accessories and more, ma
y
ou
g
et started on
y
our new Mobile
p
a
fet
y
Precautions and Section 7
-
lp
y
ou make better use of
y
our dev
i
e
s sequence of processes
t
s additional notes on a topic or alt
e
s
further cautionar
y
measures
Mobile phone. Utmost compliance
ay
pose dan
g
er to
y
ou and
y
our
m
c
h as Phonebook, Music Pla
y
er, Vi
d
n
d also meets the GSM/GPRS tec
h
f
ications without prior notice. So
m
var
y
from that in the actual devic
e
p
hone. Aside from the last two part
s
-
Troubleshootin
g
,
y
ou will find th
i
ce.
e
rnative options for a feature
to prevent dama
g
e to
y
ou
r
with the followin
g
m
obile phone, and
d
eo Pla
y
er, Di
g
ital
h
nical criteria. It is
m
e content in this
e
. Please refer to
s
of this guide i.e.
e followin
g
icons
r
mobile phone

1. Getting Started
Switch
y
our Mobile Phone
To switch
y
our mobile ph
o
animation appears on the
s
properly.
To switch OFF, press and h
o
Tap
Power Off ÆOK
and t
h
Install / Remove the SIM C
a
Make sure to switch off th
e
batter
y
. To install / remove t
h
1.
Snap open t
h
2.
Carefull
y
ins
down and in
3.
Carefull
y
ret
u
4.
To remove,
c
: If the screen displa
y
s th
a
Install / Remove the Memo
The Memor
y
Card is a han
d
remove the memor
y
card, p
e
1.
Tap and hold
2.
Snap open th
e
3.
Remove batt
e
4.
Carefull
y
inse
proper ali
g
nm
3
ON / OFF
o
ne ON, press and hold the Po
w
s
creen. Make sure the batter
y
is
c
o
ld the Power Ke
y
until a window p
o
h
e phone will shut down.
a
rd and Batter
y
e
device and disconnect from cha
h
e SIM card and batter
y
, perform t
h
h
e phone’s back cover and pull out
ert the SIM card into the SIM car
d
proper ali
g
nment with the phone’s
m
u
rn the batter
y
into its slot and put t
c
arefull
y
slide the card out of the sl
o
a
t the SIM card is locked
permane
n
r
y
Card
dy
mobile stora
g
e device that ex
p
e
rform the followin
g
:
the Power Ke
y
to shut off the mobi
l
e
phone’s back cover.
e
r
y
.
rt the Memor
y
Card into its slot, m
a
ent with the phone’s metal contact
s
w
er Key until an
c
har
g
ed inserted
o
ps up.
r
g
er before installin
g
and removin
h
e followin
g
:
the batter
y
.
d
slot, makin
g
sure that the card’
s
m
etal contacts.
h
e cover back on.
o
t.
n
tl
y
, please consult
y
our network o
p
p
ands the mobile phone’s stora
g
e
l
e phone.
a
ke sure that the card’s
g
old plate i
s
.
g
the SIM card and
s
g
old plate is facin
g
p
erator.
capacity. To install /
s
facin
g
down and in

5.
Return batter
y
6.
To remove, c
a
: It is vital that
y
ou restar
t
Charge the Battery
1.
Plu
g
the char
g
2.
Connect the s
The batter
y
indicator icon wi
stops flashin
g
, disconnect th
: Do not for
g
et to unplu
g
: Onl
y
use Cherr
y
Mobil
e
: You can use the phone
Off state, a char
g
in
g
indicat
o
Switch to Sleep Mode
/
W
a
The Sleep Mode suspends
y
also
g
oes into Sleep Mode
b
display settings.
Lightly press Power Ke
y
to
s
Press the Power Key to Wa
k
To confi
g
ure sleep settin
g
s,
g
: Switchin
g
the Phone to
S
Screen Lock
You can lock
y
our screen f
o
sleep.
4
y
.
a
refull
y
slide the card out of the slo
t
t
y
our phone for it to identif
y
with th
g
er into the electrical outlet.
mall end of the char
g
er connector i
n
ll flash until char
g
in
g
is finished.
W
e phone from the char
g
er.
the char
g
er from the electrical outl
e
e
approved char
g
er and other acce
s
while char
g
in
g
, but charging time
o
r will appear on the screen.
a
ke Up
y
our device to a low power consu
m
by
itself when the displa
y
automatic
a
s
witch to Sleep Mode.
k
e Up / activate your screen displa
y
g
o to
Settings ÆDisplay ÆSle
e
S
leep Mode is a wa
y
to lock
y
our p
h
o
r additional securit
y
. After
y
ou se
t
.
e newl
y
inserted memor
y
card.
n
to the mobile phone’s char
g
in
g
sl
o
W
hen char
g
in
g
is complete, i.e. the
b
e
t after char
g
in
g
.
s
sories.
ma
y
increase. When char
g
in
g
the
m
ption state in order to prolong bat
t
a
ll
y
turns off after a certain period
o
y
.
e
p Æchoose time
h
one.
t
a lock, the screen is locked afte
r
o
t.
b
atter
y
char
g
ing icon
handset in its Power
t
er
y
life. Your device
o
f time, dependin
g
on
r
the displa
y
g
oes to

1.
Go to
Setti
n
2.
Touch the t
y
You can choose amon
g
the
s
Slide
provides no protection,
Face Unlock
lets
y
ou unlock
Pattern
lets
y
ou draw a si
m
Unlock.
PIN
requires four or more n
u
Password
requires four or
password.
: A stron
g
password is
u
symbols.
Unlock Your Phone
Drag the icon to the ri
gh
: To set Screen Lock patt
e
Security Codes
The mobile phone and the
S
any of the codes mentione
d
phone’s settin
g
s for these
ÆChoose which card to l
o
Personal Identification Num
b
Local network service provi
d
the PIN is incorrectl
y
entere
d
To unlock the SIM card,
y
ou
5
ng
s ÆSecurity ÆScreen lock.
y
pe of lock
y
ou want and follow the
s
e lock options:
but lets
y
ou
g
et to the Home scree
y
our tablet b
y
lookin
g
at it. This is
t
m
ple pattern with
y
our fin
g
er to un
u
mbers. Lon
g
er PINs tend to be mo
more letters or numbers. This is t
h
u
suall
y
ei
g
ht or more characters l
o
h
t, dependin
g
on
y
our screen lock
p
e
rn,
g
o to
Menu ÆSettings ÆS
e
S
IM card support several passwor
d
d
below, t
y
pe in the correct code a
codes,
g
o to
Menu [ ] ÆSe
t
o
ck ÆLock SIM CardÆenter SI
M
b
er
(
PIN
)
d
ers furnish each SIM card with a
u
d
for three successive times, the SI
M
need to enter the PUK or the Pers
o
onscreen instructions.
n quickly.
t
he least secure lock option.
lock the tablet. This is sli
g
htl
y
mo
r
re secure.
h
e most secure option, as lon
g
as
o
n
g
, and is composed of alphabu
m
p
attern.
e
curit
y
ÆScreen Lock Æchoos
e
d
s in order to prevent misuse. Wh
e
nd then confirm b
y
tappin
g
the O
K
t
tin
g
s [ ]ÆSecurity ÆSet
M
PIN ÆOK
u
nique set of codes includin
g
the P
I
M
card will be locked.
o
nal Unlocking Ke
y
.
r
e secure than Face
y
ou create a stron
g
m
eric characters and
e
from options.
e
n prompted to enter
K
ke
y
. To access the
up SIM card lock
I
N, PIN2 and PUK. If

6
For further information regarding PIN, PUK and SIM Lock, contact your network service provider.
Basic Troubleshooting for locked SIM card:
-Enter the correct PUK. You will then be prompted to enter a new PIN.
-Type in the new PIN ÆOK.
-Re-type the new PIN ÆOK.
PUK
The PUK (Personal Unlocking Key) code is required in order to modify a blocked PIN. This code usually comes with
the SIM card upon purchase. Otherwise, contact your local service provider.
: If you enter the wrong PUK code for 10 consecutive times, the SIM card will become invalid.

2. Overview
7
1
2
3
4
5
6
7
8
9
10
11
12
Power Key
A
udio Jack
Front Camera
Proximit
y
Sensor
Up/Down Ke
y
LED Flash
Rear Camera
Speaker
Displa
y
Screen
Capacitive Ke
y
s
Microphone
USB/Char
g
in
g
Slot

8
Functions of Capacitive Keys
Menu Key – opens a folder, app or feature; displays further options for a running or ongoing application. Tap and
hold the Home Key to view recently browsed/accessed/used applications
Home Key – returns to the main screen in one touch
Back Key – makes the screen go back one level
Up/Down Keys – turns the volume up or down
Power/Lock Key – switches the phone on or off; locks/unlocks or sleeps/wakes your phone
Touch Control
Your phone is receptive to the following finger gestures:
TAP – selects or launches an item or an app i.e. selecting from the menu, entering characters or text in a field.
TAP & HOLD - activates widgets and offers further options to an application. tap& hold an item on the screen by
touching it and not lifting your finger until an action occurs.
DRAG - tap & hold an item and then, without lifting your finger, move your finger on the screen to reposition it on the
screen.
SWIPE OR SLIDE - lets you scroll the screen up, down, left or right. It is also used when unlocking the screen. Lightly
and quickly touch and slide your finger across the screen without pausing to avoid dragging an item instead.
DOUBLE-TAP - lets you zoom in or out a screen Tap quickly twice on a webpage, map, or other screen to zoom.
PINCH - lets you zoom in or out a screen by placing two fingers on the screen at once and pinching them together (to
zoom out) or spreading them apart (to zoom in).

9
The Home Screen
To move between Home screens, swipe left or right.
Change the Wallpaper:
Tap and hold any clear part of the Screen ÆChoose a wallpaper from Gallery, Live
Wallpapers and Wallpapers.
Add Apps and Widgets to Your Home Screen
Tap Home Key Æ
Tap and hold chosen application/widget to add to the Home Screen.
Drag towards desired position.
Release hold when the Main Screen appears in the background.
Remove Items from Your Home Screen
Tap Home Key to return to the Home Screen.
Tap and hold the item to be removed and drag it towards the [X Remove] icon at the top of the screen.
Auto-Rotate Screen
With the Auto-Rotate Screen turned on, you will be able to view items on the screen vertically or horizontally,
depending on how you hold your phone. Please note that not all screens are covered by the Auto-Rotate Screen
feature.
To turn the Auto-Rotate Screen feature on/off, go to Menu ÆSettings ÆDisplay ÆAuto-Rotate Screen Æ
(uncheck)
You may also drag down the Notifications panel, tap ÆAuto-rotation to activate or deactivate auto-rotate function.
Folders

10
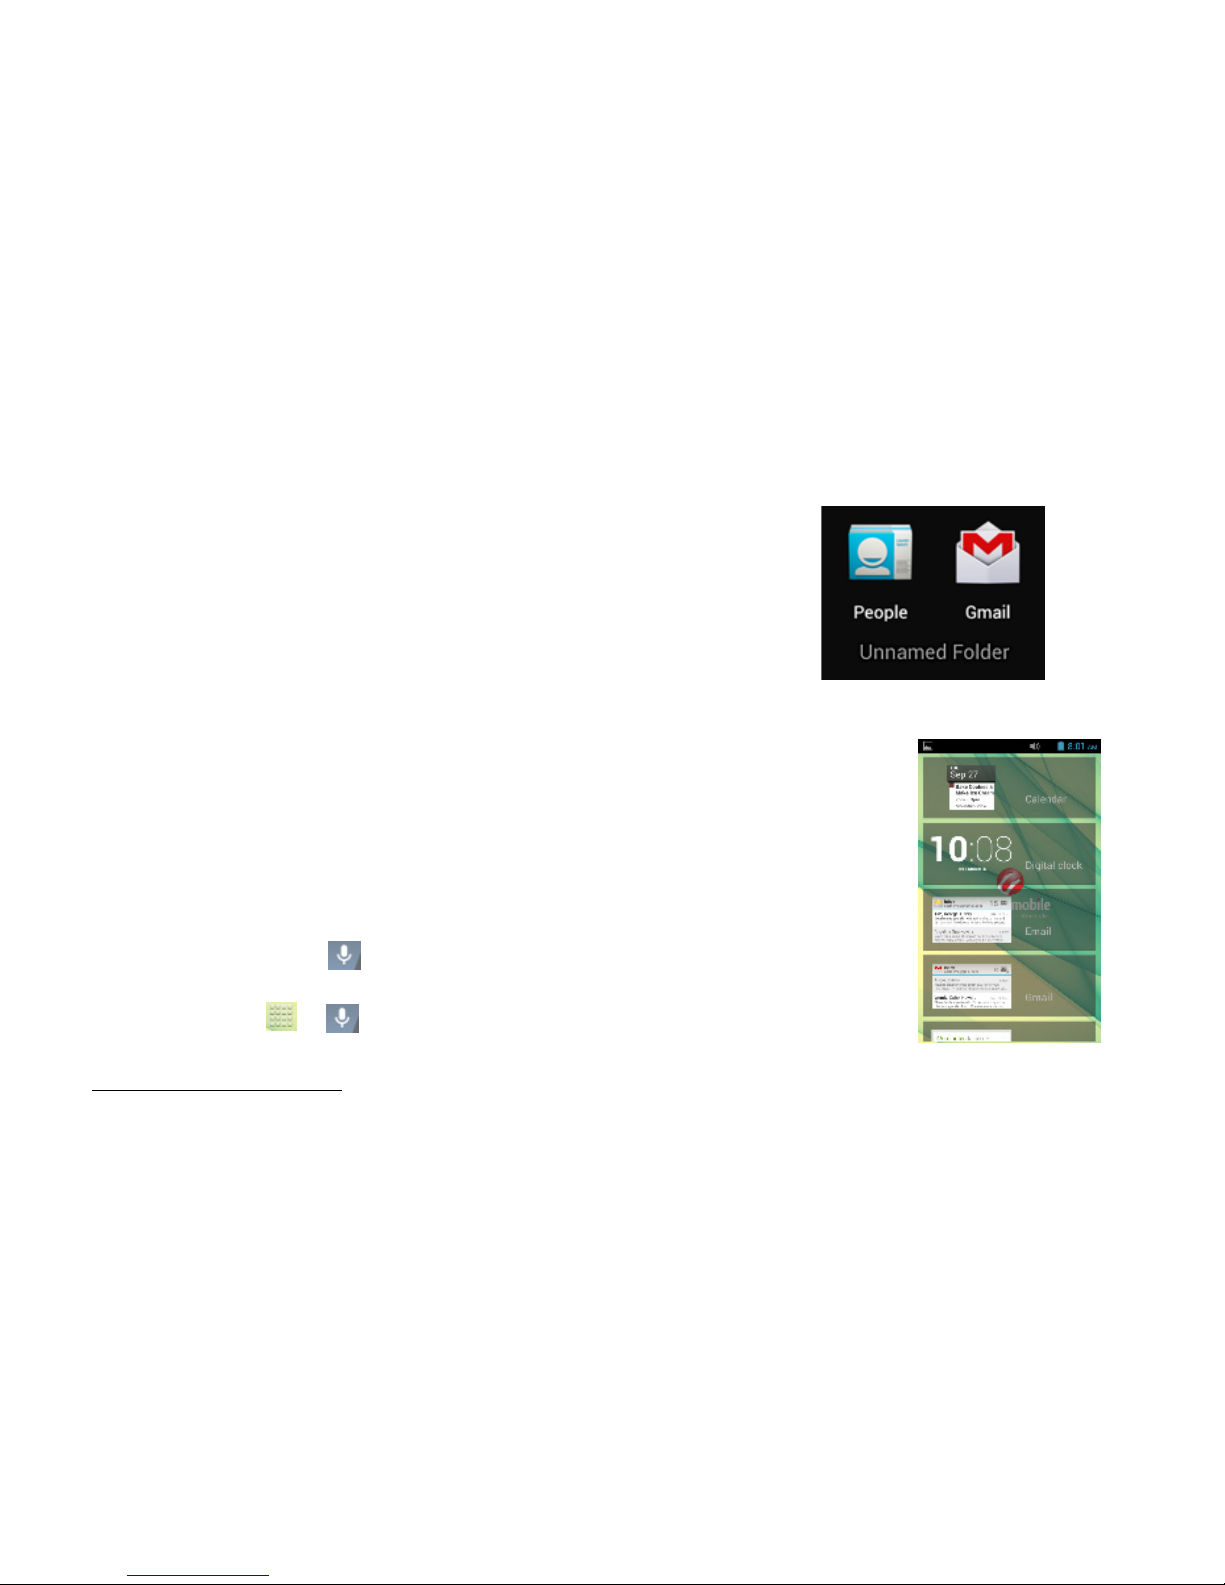
This allows you to organize your applications in folders on the Home Screen. To make a new folder on your Home
screen, tap and hold and drag apps to the Home Screen, and stack them on top of another. They will automatically be
grouped into a folder.
To name folder on Home screen
1. Touch the folder icon on Home screen to open
2. Touch the folder’s title bar to show the name field.
3. Edit the folder’s name and tap Done after renaming.
To remove move applications out of a folder back to the Home Screen
Touch and hold the item in a folder, and then drag it out of the folder.
Using the Home Screen even when locked
While the screen is locked, you may assign several quick access items on the Home
Screen by swiping the screen down.
Swipe left/right to gain quick access. To add items, tap +and choose from list.
Voice Search
Your phone operates via voice command. Search items in your phone or on the Internet
simply by speaking. Tap on any screen that it is visible and follow prompt before
speaking.For texting/typing using speech, go to Messaging on page 15.
You may also go to Æto access voice search.
Status and Notification Icons
To view your phone’s notifications, simply swipe the notifications bar downwards. Below are the possible status icons
you will encounter and their meanings:

11
USB connected Missed call
Meeting mode
Earphone insert
Airplane mode
Signal strength
Alarm set
Signal searching
Battery charge New message
Silent mode
USB debugging connected
Bluetooth icon Wi-Fi network
Data Conn. off
New Wi-Fi network detected
Notifications
The Notifications panel letsyouview notices, warnings and any
new updates in your phone.
To open the Notifications panel
Found on the top part of the screen, swipe the notifications panel (alsoknown as the status bar) downwards.
Swipe upwards to close.
To open a running application from the Notifications panel
From the Notifications panel, touch the icon for the running
application to open it.
To dismiss notifications, tap
Toolkits
ToolKits quickly start applications such as Bluetooth, WLAN and
so on.
•Using two fingers, swipe the Notifications panel
downwards.
•Tap a ToolKit to enable or disable.

12

13
3. Basic Functions
Make and Answer Calls
Make a Call
Option 1: On the Home Screen tap Æchoose the Phone tab Æenter phone number
Ætap .
Option 2: Tap ÆÆenter phone number Ætap .
Option 3: Tap ÆContactsÆtap name of selected contact
: Tap to erase incorrect digits.
Dial an International Call
For international calls, type (+) followed by the country code and then the complete number.
(+) (Country Code) (complete phone number) then tap
: Tap and hold to type "+" and then type the country code, the area code and the telephone number. Then
tap the telephone icon to connect.
Dial an Emergency Call
This phone operates using radio signals, wireless and landline networks, but cannot guarantee
connection in all locations at all conditions. It is not advisable to rely solely on wireless phones
to make emergency calls. To make an emergency call:
1. Switch your phone on.
2. Dial emergency number and tap Call.
: Some networks may require that a valid SIM card is properly inserted in the phone before
making an emergency call. Emergency numbers vary in every country. Emergency calls may
not work in all locations due to network and interference issues.
Answer / Reject an Incoming Call

14
When you receive an incoming call, a notification message appears on the screen.
To accept call, drag towards
To reject, drag towards
Drag towards to send a message instead.
Adjust the Volume
During a call, press the Side Keys to adjust the volume.
Options During a Call
- Launch/Hide Dial Pad
- Turn speakerphone on/off
- Mute
- Put a call on hold
- add current call’s details to contacts.
Manage Contacts
You can add contacts on your phone and synchronize them with the
contacts in your Google account or other accounts that support contact
syncing. To manage your contacts, go to ÆContacts [ ].
- Create contact. Choose storage Æfill out fields Ætap Done.
- Search. Type name or number of contact you wish to find ÆNext.
- Groups. To add a group, tap Ætype group name Æinsert group members ÆDone.
- Favorites. To add contacts to Favorites, tap contact Æ(on the upper right corner of the screen.)
- Send message

Messaging
To create and send messa
ge
¾
Tap the new mes
s
¾
In TO field, t
y
pe t
h
¾
T
y
pe messa
g
e in
t
¾
Tap to insert
s
¾
Tap to send.
: To send MMS, add an
a
automaticall
y
be sent as an
is reverted back to bein
g
se
n
Message Threads
Instead of inbox, outbox an
d
exchan
g
ed with the same n
u
had with a certain number o
r
Delete a thread / message
To erase a messa
g
e tap an
d
To erase an entire thread, t
a
- remo
v
You can speak to enter text
1.
Touch a te
x
2.
Touch the
M
3.
When
y
ou
s
15
e
from home screen, tap
s
a
g
e icon at the bottom left p
a
h
e recipient’s phone number OR ta
p
t
he Type message field usin
g
the
o
s
mile
y
s, etc.
a
ttachment to the text messa
g
e b
y
MMS. Likewise, if the user remove
s
n
t as SMS.
d
sent folders,
y
our phone or
g
ani
z
u
mber are
g
rouped into a convers
a
r
a
g
roup.
d
hold a specific messa
g
e
Æ
Delet
e
a
p and hold a thread
Æ
select conv
v
e select
in most places that
y
ou can enter t
e
t field, or a location in text
y
ou’ve a
l
M
icrophone ke
y
on the onscreen ke
y
s
ee the microphone ima
g
e, speak
w
a
rt of the screen.
p
to search contacts.
o
n screen ke
y
board.
y
tappin
g
and the SMS will
s
the attachment, the messa
g
e
z
es all
y
our messa
g
es into “thread
a
tion-like folder. Tap a thread to vi
e
e
.
ersation/s to erase
Æ
tap
e
xt with the onscreen ke
y
board.
l
read
y
entered in a text field.
y
board.
w
hat
y
ou want to t
y
pe.
s,” where messa
g
es
e
w all messa
g
es
y
ou
- select all

4.
Sa
y
“comm
a
Capture and View Photo o
r
This mobile phone is equip
p
like. To capture ima
g
es,
g
o
t
Capturing an Image
A
im the phone at the sub
j
ec
t
Tap to capture panarom
a
Tap to access capture s
e
Capturing a Video
On Camera mode, tap
Aim the phone at the subjec
t
To start/stop recordin
g
, sele
c
- switch to front camera
- launch settings.
Connect to the Internet
Connect to a wireless netwo
16
a
,” “period,” “question mark,” “excla
r
Video
ed with a di
g
ital camera that lets
yo
o
Æ
.
t
, then tap to take a shot. Slide
a
.
e
ttin
g
s.
t
.
c
t.
.
rk to browse Internet.
mation mark,” or “colon” to enter p
u
o
u take photos and videos whenev
t
o the left to view recent captures.
u
nctuation.
er and wherever
y
ou

Swipe down Notifications
p
ÆÆ
.
Tap Wi-Fi to displa
y
availabl
:If network connection is
and ma
y
prompt
y
ou to ente
r
4. Main Menu
The Main Menu displa
y
s all
icon [ ] from the Home Sc
Bro
w
To
s
Tap
fro
m
Tap
Tap
To
b
To
o
Calculator
This mobile phone is equipp
17
p
anel
ÆÆ
e networks.
successful, the icon will app
e
r
a password before access. Enter
t
the applications
y
our phone has.
Y
reen.
w
ser
s
urf the Internet on
y
our phone,
g
o
t
the address bar
Æ
t
y
pe in desire
d
: To change the homepage, tap
m
options.
to access more functions, suc
h
to view all active browsers.
b
ookmark a pa
g
e, tap
Æ
o
pen new tab, tap +
ed a calculator to facilitate simple
c
e
ar on the status bar.Some Wi-Fi n
t
he correct securit
y
password and t
a
Y
ou ma
y
access the Main menu b
y
t
o
Æ
.
d
URL
Æ
GO
Æ
Settings
Æ
General
Æ
Set
H
h
as bookmarks, histor
y
and others
c
omputations usin
g
the 4 basic fun
c
etworks are secured
a
p “Connect.”
tappin
g
on the Menu
H
omepa
g
e Æchoose
c
tions. To access,
g
o

18
to Æ. Tap on the Calculator’s interface and an advanced panel will pop up for more complex calculations.
Enter the numbers using on-screen keyboard and choose the desired operation. Tap for corrections and to get
the output.
Calendar
The Calendar application shows the current date/month, and lets you organize your schedule
by allowing you to add, edit, delete and view events. You may also add appointments and
notes as reminders. Go to Æ. Tap for options.
Camera
Please see “Capture and View Photo or Video”.
Cherry Fun Club
This contains the latest trends, news and other entertaining information. Go to Æ. Tap
for updates and options. Charges apply.
Clock
This function shows the current time and date, and gives you access to the alarm clock. Go to Æ
Tap to edit alarms. Tap to lanch the world clock. Tap to launch settings and night mode. Tap for
stopwatch. Tap for timer.
Contacts
This menu refers to the directory where all the contacts are stored in alphabetical order. You can view, edit, delete,
send messages and perform various other functions on each contact in your phonebook. The People menu allows you

19
to store, locate and view your saved contacts. Aside from these, People also allows you to copy, edit and delete a
contact. Go to Æ.
: You can also send SMS / MMS or call a contact directly from People, as well as store several details (e-mail,
pictures, phone numbers, etc.) for each contact if saved in the phone’s memory.
For related information, see ‘Manage Contacts’ on page 11.
To import contacts from email to phone or the other way around
Go to Æ.
Tap ÆImport/Export.
Select where to import and export ÆNext
Mark contacts to import/export ÆCopy.
: You may choose “Select All” if you are trying to import/export all your contacts
Downloads
This lets you view a list of downloaded files and apps stored in the internal storage, and those currently being
downloaded. To manage Downloads, go to Æ.
Email
Send and receive e-mails on your phone. Tap ÆÆset up an account by entering an
existing email address and password.
eWarranty
Please refer to page 37 for information on the Cherry eWarranty.

FM
R
To li
s
-
/
/
-
:
ad
j
u
s
Gallery
20
File Manager
The File Mana
g
er
phone and Mem
o
Stora
g
e / SD Car
d
- New folder
- Search ite
m
- displa
y
optio
: You ma
y
also
R
adio
s
ten to the radio, go to Æ.
-
switch to loudspeaker - view
- play/stop FM radio / -
s
- fine tune channel
displa
y
options: Search channels,
Connect headset for the FM ra
d
s
t volume.
lets
y
ou view, open and mana
g
e t
h
o
r
y
card. Go to ÆÆc
h
d
.
m
ns
press and hold a folder or file for
f
channel list
s
earch the channel list
Record, Exit FM Radio
d
io to work.Press side keys to
h
e data saved in
y
our
h
oose from Phone
f
urther options.
Table of contents
Other Cherry Cell Phone manuals