Chicco Goody Plus User manual


3

3
1 1A
2
3A
4B 4C 5
4 4A
2A 3
1B

4
5
9
5A
7
9C
A
B
C
9A
6
8
9D 9E
8A
9B
6A

4
5
1
2
13
9F
11B
13C
13B13A
10
12
a
b
13D 14
12A
11A

6
7
14B14A 14C
17
15
18
17B17A
15A
18A 18B
16

6
7
18C

8
9
IMPORTANTE - LEG-
GEREATTENTAMEN-
TE E CONSERVARE
PER FUTURO RIFE-
RIMENTO.
ATTENZIONE: PRIMA DELL’USO RI-
MUOVERE ED ELIMINARE EVENTUA-
LI SACCHETTI DI PLASTICA E TUTTI
GLI ELEMENTI FACENTI PARTE DELLA
CONFEZIONE DEL PRODOTTO O CO-
MUNQUE TENERLI LONTANI DALLA
PORTATA DEI BAMBINI.
AVVERTENZE
• ATTENZIONE: Non lasciare mai il
bambino incustodito.
• ATTENZIONE: Prima dell’uso as-
sicurarsi che tutti i meccanismi di
bloccaggio siano correttamente
agganciati.
• ATTENZIONE: Per evitare lesioni
o ferimenti assicurarsi che il bam-
bino sia a debita distanza durante
le operazioni di apertura e chiusura
del prodotto.
• ATTENZIONE: Non lasciare che il
bambino giochi con questo pro-
dotto.
• ATTENZIONE: Utilizzare sempre il
sistema di ritenuta.
• L’uso di spartigambe e cinture di
sicurezza è indispensabile per ga-
rantire la sicurezza del bambino.
Utilizzare sempre le cinture di sicu-
rezza contemporaneamente allo
spartigambe.
• ATTENZIONE: Prima dell’uso con-
trollare che i meccanismi di aggan-
cio della seduta, della navicella o
del seggiolino auto siano corretta-
mente agganciati.
• ATTENZIONE: Questo prodotto
non è adatto per correre o pattinare.
• Il veicolo è adatto no a 22 kg o 4
anni, o qualunque limite che si ve-
richi per primo.
• Per bambini dalla nascita no a cir-
ca 6 mesi d’età, lo schienale deve
essere utilizzato in posizione com-
pletamente reclinato.
• Solo i Seggiolini Auto CHICCO
KAILY o CHICCO KIROS I-SIZE con
aggancio FAST IN o la CHICCO SOFT
CARRYCOT possono essere aggan-
ciati al passeggino GOODY PLUS.
• Con la sacca installata sul passeg-
gino; ATTENZIONE: Questo prodot-
to, nella congurazione carrozzina,
è adatto a un bambino che non è
in grado di stare seduto autono-
mamente, di girarsi e di tirarsi su
appoggiandosi alle mani e alle gi-
nocchia. Peso massimo del bambi-
no: 9 Kg. Non aggiungere un altro
materasso sulla parte superiore del
materasso fornito o raccomandato
dal fabbricante. Non lasciare le ma-
niglie di trasporto all’interno della
sacca porta bambini.
• Il dispositivo di parcheggio deve
essere sempre inserito quando si
posiziona e rimuove il bambino.
• Utilizzare il dispositivo di parcheg-
gio ogni qualvolta si sosti.
• Non lasciare mai il passeggino su
un piano inclinato, con dentro il
bambino, anche se con i freni azio-
nati.
ISTRUZIONI D’USO

8
9
• Non sovraccaricare il cestello. Peso
massimo 3 kg.
• Ogni peso attaccato ai manici e / o
sullo schienale e / o sui lati del pas-
seggino potrebbe compromettere
la stabilità del passeggino.
• Non trasportare più di un bambino
alla volta.
• Non applicare al passeggino ac-
cessori, parti di ricambio o compo-
nenti non fornite o approvate dal
costruttore.
• Non usare il prodotto se alcune par-
ti sono rotte, strappate o mancanti.
• Con il seggiolino auto installato sul
passeggino, questo veicolo non
sostituisce una culla o lettino. Se il
bambino necessita di dormire, al-
lora dovrebbe essere collocato in
una navicella, culla o lettino.
• Vericare prima dell’assemblaggio
che il prodotto e tutti i suoi com-
ponenti non presentino eventuali
danneggiamenti dovuti al traspor-
to, in tal caso il prodotto non deve
essere utilizzato e dovrà essere
tenuto lontano dalla portata dei
bambini.
• Nelle operazioni di regolazione, as-
sicurarsi che le parti mobili del pas-
seggino non vengano in contatto
con il corpo del bambino.
• Assicurarsi che gli utilizzatori del
passeggino siano a conoscenza
dell’esatto funzionamento dello
stesso.
• Questo prodotto deve essere utiliz-
zato esclusivamente da un adulto.
• Il prodotto deve essere assemblato
esclusivamente da un adulto.
• Per evitare rischi di strangolamento,
non dare al bambino e non riporre
vicino al bambino oggetti muniti di
corde.
• Non usare il passeggino sulle sca-
le o sulle scale mobili: si potrebbe
perdere improvvisamente il con-
trollo.
• Prestare attenzione quando si sale e
scende un gradino o il marciapiede.
• Se lasciate il passeggino esposto
al sole per molto tempo, aspettate
che si rareddi prima di mettervi il
bambino. L’esposizione prolungata
al sole può causare cambiamenti di
colore nei materiali e tessuti.
• Evitare il contatto del passeggino
con acqua salina per prevenire la
formazione di ruggine.
• Non utilizzare il passeggino in
spiaggia.
• Quando non in uso, il passeggino
va tenuto lontano dalla portata dei
bambini.
CONSIGLI PER LA PULIZIA E LA MANUTENZIONE
Questo prodotto necessita di manutenzione periodica. Le operazio-
ni di pulizia e manutenzione devono essere eettuate da un adulto.
PULIZIA
La seduta del passeggino è sfoderabile (vedi paragrafo SVESTIZIONE
E VESTIZIONE DEL PASSEGGINO). Pulire le parti in tessuto mediante
una spugna umida e del sapone neutro. Pulire le parti in plastica
periodicamente con un panno umido. Asciugare le parti in metallo,
dopo un eventuale contatto con acqua, al ne di evitare il formarsi
di ruggine.
Di seguito sono riportati i simboli di lavaggio ed i relativi signicati:
Lavare a mano in acqua fredda
Non candeggiare
Non asciugare meccanicamente
Non stirare
Non lavare a secco
MANUTENZIONE
Lubricare le parti mobili, in caso di necessità, con olio secco al si-
licone.
Controllare periodicamente lo stato di usura delle ruote e tenerle
pulite da polvere e sabbia. Assicurarsi che tutte le parti in plastica
che scorrono sui tubi in metallo siano pulite da polvere, sporco e
sabbia, al ne di evitare attriti che possono compromettere il corret-
to funzionamento del passeggino.
Tenere il passeggino in un posto asciutto.
30° C

10
11
ISTRUZIONI GENERALI
APERTURA E PRIMO MONTAGGIO DEL PASSEGGINO
ATTENZIONE: Eettuare questa operazione facendo attenzione
che il bambino o altri bambini siano a debita distanza.
ATTENZIONE: Assicurarsi che in queste fasi le parti mobili del pas-
seggino non vengano a contatto con il corpo del bambino.
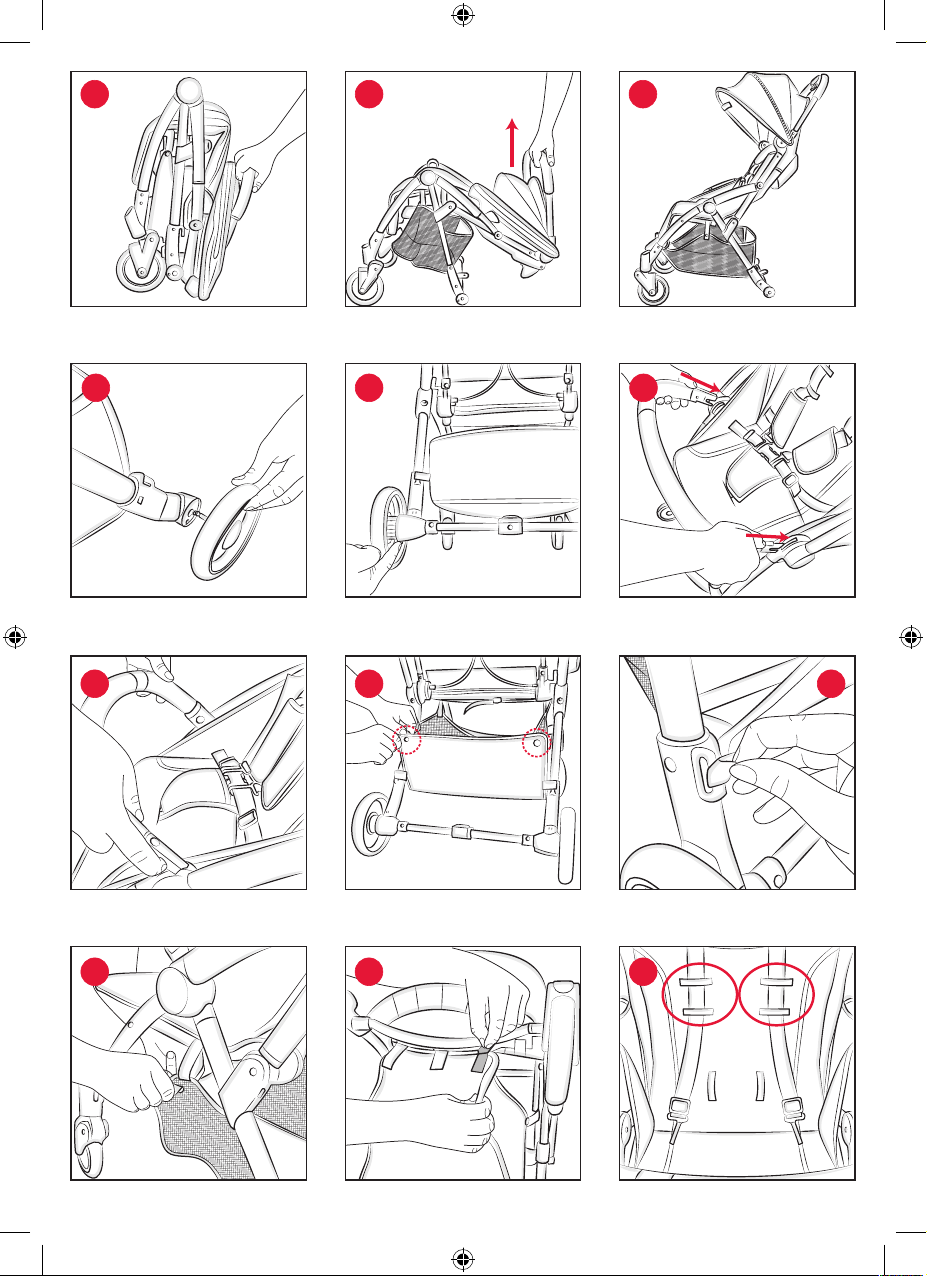
1. Impugnare il maniglione (Fig. 1) e tirare il passeggino verso l’alto
(Fig. 1A) no alla completa apertura della struttura (Fig. 1B).
ATTENZIONE: Prima dell’uso assicurarsi che il passeggino sia bloc-
cato in posizione aperta, vericando che il meccanismo sia eetti-
vamente bloccato.
2. Montare le ruote posteriori inserendo il perno della ruota nell’appo-
sito foro del tubo posteriore, no ad avvenuto bloccaggio (Fig. 2).
Per rimuoverle agire sul tasto localizzato su ciascuna ruota (Fig. 2A).
ATTENZIONE: Prima dell’uso accertarsi che tutte le ruote siano s-
sate correttamente.
3. Installare il manicotto paracolpi inserendolo nelle apposite fessu-
re posizionate sugli snodi del passeggino (Fig. 3). Se fosse neces-
sario rimuoverlo, premere il tasto su entrambi i lati (Fig. 3A).
ATTENZIONE: Il manicotto non deve essere utilizzato per sollevare
il prodotto con il bambino all’interno.
CESTELLO PORTAOGGETTI
Il cestello portaoggetti è già installato. Qualora fosse necessaria la
rimozione, seguire i passaggi descritti di seguito.
4. Il cestello è agganciato al telaio in più punti. Sganciare i 2 bottoni
automatici sulla parte posteriore del cestello (Fig. 4); rimuovere
i nastri laterali sulle gambe posteriori del passeggino (Fig. 4A);
sganciare i bottoni automatici presenti sotto la seduta (Fig. 4B);
aprire i velcri nella parte anteriore sotto il poggia piedi (Fig. 4C).
Per rimontare il cestello eettuare le stesse operazioni in senso in-
verso.
UTILIZZO DELLE CINTURE DI SICUREZZA
Il passeggino è dotato di sistema di ritenuta a cinque punti di an-
coraggio costituito da due spallacci, due asole di regolazione, una
cintura girovita ed uno spartigambe con bbia.
5. ATTENZIONE: Per l’utilizzo con bambini dalla nascita no a circa
6 mesi è necessario utilizzare gli spallacci facendoli prima passare
attraverso le due asole di regolazione (Fig. 5) e la cintura girovita
nelle asole verticali (Fig. 5A).
E’ possibile regolare l’altezza degli spallacci spostandoli nelle asole
presenti sullo schienale.
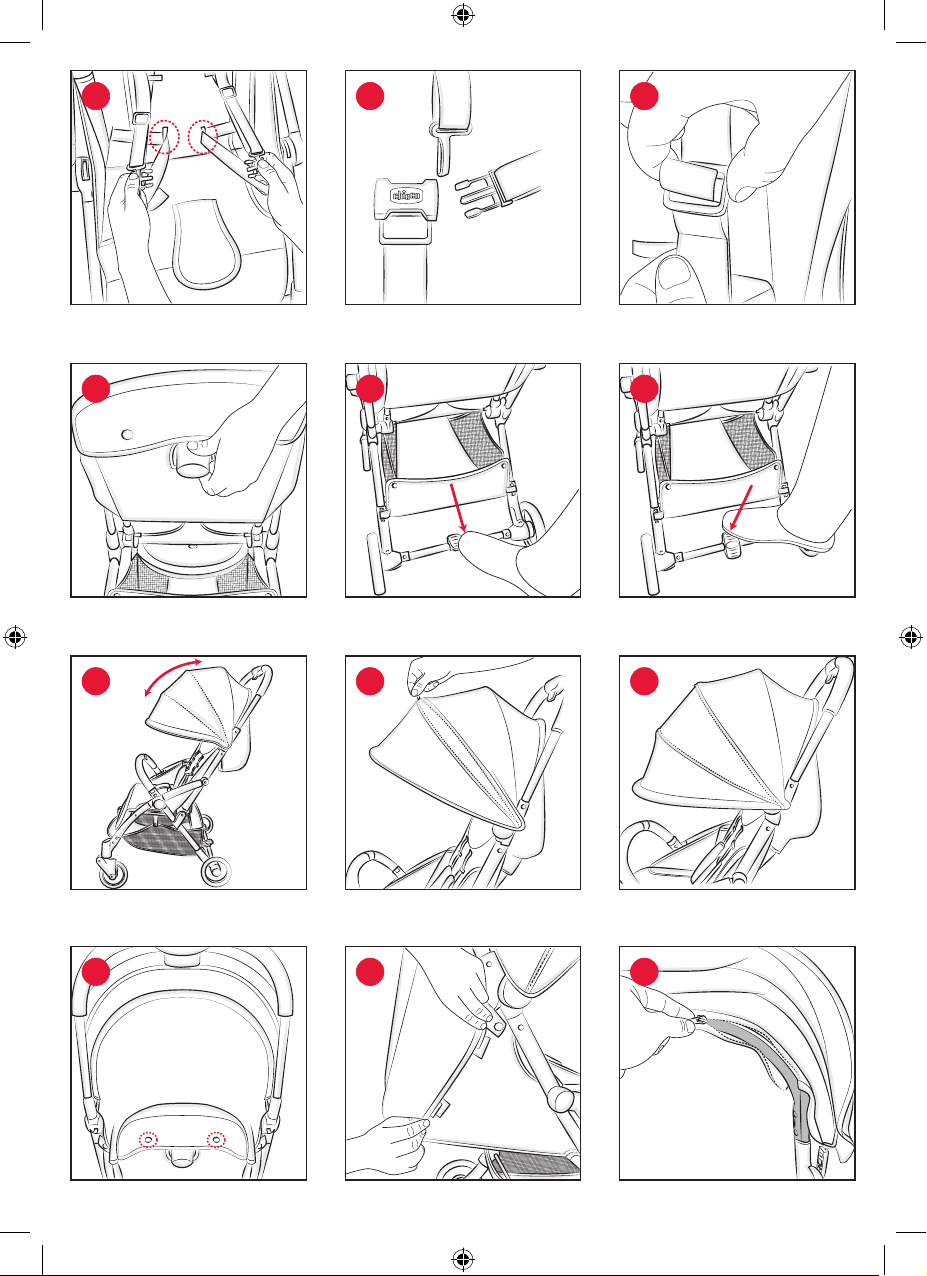
6. Dopo aver adagiato il bambino nel passeggino, allacciare le cintu-
re (Fig. 6) facendo passare le due forchette (A) attraverso la bbia
degli spallacci (B) e poi in quella dello spartigambe (C); regolare
l’altezza degli spallacci così da farli aderire alle spalle del bambino
(Fig.6A).
Assicurarsi che le cinture siano sempre allacciate correttamente. Per
sganciare la cintura, premere e tirare le forchette laterali.
ATTENZIONE: Per garantire la sicurezza del vostro bambino è indi-
spensabile utilizzare sempre le cinture di sicurezza.
Per assicurarsi che le cinture siano agganciate correttamente, una
volta messo il bambino e ssato, tirare con forza la parte nale delle
cinture.
REGOLAZIONE SCHIENALE
Lo schienale è regolabile in 3 posizioni.
7. Per reclinare lo schienale sollevare verso l’alto la maniglia di rego-
lazione posta sul retro dello stesso (Fig. 7). Per alzare lo schienale è
suciente sollevarlo no alla posizione desiderata.
ATTENZIONE: Con il peso del bambino le operazioni possono ri-
sultare più dicoltose.
FRENI POSTERIORI
Le ruote posteriori sono dotate di freni gemellati che permettono
di operare contemporaneamente su entrambe le ruote posteriori
agendo sul tubo di supporto.
8. Per frenare il passeggino, premere verso il basso il pedale posto
centralmente (Fig. 8). Per sbloccare il sistema frenante, premere il
pedale nell’altro senso (Fig. 8A).
CAPOTTA PARASOLE
La capotte è già installata sul passeggino.
9. Per aprire e regolare la capotta agire sull’archetto anteriore (Fig. 9).
E’ possibile estendere la capotta aprendo la cerniera (Fig. 9A-9B).
Agganciare la parte posteriore della capotte allo schienale con
due bottoni automatici (Fig. 9C) e i velcri laterali (Fig. 9D). Qualora
si volesse rimuovere la capotte dal passeggino, aprire la zip che
avvolge il tubo sopra lo schienale (Fig. 9E) e slare su entrambi i
lati l’archetto dallo snodo a cui è agganciato premendo il punto
indicato nella gura 9F e, contemporaneamente tirare verso l’alto.
Concludere l’operazione sganciando i due bottoni posizionati sul
retro dello schienale.
POGGIAGAMBE REGOLABILE
E’possibile utilizzare il poggiagambe in 2 posizioni.
10. Per utilizzare il poggiagambe in posizione orizzontale è su-
ciente spingerlo verso l’alto. Per abbassarlo agire sul tasto posto
sotto il poggiagambe (Fig. 10).
SVESTIZIONE E VESTIZIONE DEL PASSEGGINO
Per rimuovere il tessile della seduta seguire i passaggi descritti di
seguito:
11. Staccare tutti i velcri e i bottoni automatici che legano lo schie-
nale alla capotte (Fig. 11A) e, su entrambi i lati, slare i nastri dagli
agganci plastici che legano lo schienale al tubo impugnatura del
telaio (Fig. 11B).
12. Sui laterali della seduta, rimuovere il velcro (Fig. 12) e slare la lin-
guetta tessile dall’anello plastico posto sulla struttura (Fig. 12A).
Eettuare tale operazione su entrambi i lati del passeggino.
13. Slare la parte tessile del poggiagambe dalla struttura (Fig. 13)
e, conseguentemente, il nastro elastico (Fig. 13A). Staccare il vel-
cro presente sul nastro elastico, posto sotto la seduta, e slare il
nastro stesso dalla bbia (Fig. 13B). Rimuovere la tasca dal tasto
di regolazione dello schienale e tirare tutto il tessile verso l’alto
(Fig. 13C - 13D).
Per vestire il passeggino eseguire le stesse operazioni in senso in-
verso.
CHIUSURA DEL PASSEGGINO
ATTENZIONE: Eettuare questa operazione facendo attenzione
che il bambino ed eventuali altri bambini siano a debita distanza.
Assicurarsi che in queste fasi le parti mobili del passeggino non ven-
gano a contatto con il corpo del bambino.
Prima della chiusura vericare che il cestello portaoggetti sia vuoto.
Il passeggino è dotato di comando di chiusura utilizzabile con una
sola mano.
14. Per chiudere il passeggino, spingere il cursore “A” verso sinistra
e premere contemporaneamente il tasto “B” (Fig. 14); spingere
il maniglione verso il basso ed il passeggino si chiuderà in au-
tomatico. Il passeggino si bloccherà automaticamente in posi-
zione chiusa. Il passeggino, una volta chiuso, sta in piedi da solo
(Fig. 14A-B). Per aumentare la compattezza del prodotto da chiu-
so è possibile ruotare il manicotto paracolpi verso il maniglione
(Fig. 14C).
ACCESSORI
ATTENZIONE: Gli accessori descritti qui nel seguito possono non
essere presenti su alcune versioni del prodotto. Leggere attenta-
mente le istruzioni relative agli accessori presenti nella congura-
zione da Voi acquistata.
KIT SPALLACCI E SPARTIGAMBE
Il passeggino è dotato di spallacci imbottiti e di un morbido spar-
tigambe, in grado di assicurare la sicurezza e la comodità del bam-
bino.
15. Inlare gli spallacci nelle bretelle (Fig. 15) e far passare lo sparti-
gambe nell’apposita imbottitura (Fig. 15A).
ATTENZIONE: Regolare, se necessario, la larghezza del girovita
agendo sulle bbie.
ATTENZIONE: Per garantire la sicurezza del vostro bambino è indi-
spensabile usare sempre le cinture di sicurezza.

10
11
MANTELLINA PARAPIOGGIA
16. Per ssare la mantellina parapioggia fate passare i lacci intorno
ai tubi del passeggino in corrispondenza delle posizioni indicate
in gura 16 (le operazioni vanno eseguite su entrambi i lati del
passeggino).
A ne utilizzo lasciare asciugare all’aria la mantellina qualora si ba-
gnasse.
ATTENZIONE: La mantellina parapioggia non può essere utilizzata
sul passeggino sprovvisto di capotta, poiché può provocare il soo-
camento del bambino.
ATTENZIONE: Quando la mantellina parapioggia è montata sul
passeggino non lasciare mai lo stesso esposto al sole con dentro il
bambino per il rischio di surriscaldamento.
UTILIZZO SEGGIOLINO AUTO SUL PASSEGGINO
Sul passeggino Goody Plus è possibile installare i seguenti elementi
acquistabili separatamente:
• Seggiolino Auto Kaily
• Seggiolino Auto Kiros i-size con aggancio Fast In
Tutti i Seggiolini Auto per l’utilizzo sul passeggino necessitano degli
appositi adattatori venduti a parte.
ATTENZIONE: PER IL MONTAGGIO E/O L’UTILIZZO DEGLI ELEMENTI
SOPRA ELENCATI FARE RIFERIMENTO AI RELATIVI MANUALI.
MONTAGGIO E SMONTAGGIO DELLA SACCA MORBIDA DAL
PASSEGGINO
Il passeggino Goody Plus è compatibile con la Chicco Soft Carrycot.
Per agganciare la sacca porta bambini al passeggino è necessario
rimuovere il manicotto paracolpi, successivamente abbassare com-
pletamente lo schienale e porre in posizione orizzontale il poggia-
gambe.
17. Ruotare il tondino presente sotto la base della sacca no a
completa apertura (Fig. 17-17A); impugnare le maniglie tessili
in posizione di trasporto e posizionare la sacca porta bambini
sul passeggino con la zona dei piedi rivolta verso l’impugnatura
dello stesso (Fig. 17B).
18. Agganciare la sacca al telaio del passeggino utilizzando gli ap-
positi nastri. La sacca è dotata di due nastri con bbia su ciascun
lato. Avvolgere i nastri intorno al tubo del passeggino nelle po-
sizioni indicate in gura 18, chiudere le bbie (Fig. 18A), tirare i
nastri per ottenere un aggancio stabile (Fig. 18B) e richiudere la
seconda sicurezza di bloccaggio (Fig. 18C). Ripetere le operazio-
ni anche sul lato opposto.
ATTENZIONE: Prima dell’utilizzo assicurarsi che la sacca porta bam-
bini sia ben vincolata tirandola verso l’alto.
Per smontare la sacca dal passeggino occorre sganciare le bbie ed
estrarla dalla seduta.
ATTENZIONE: L’aggancio e lo sgancio si possono eettuare anche
con il bambino nella sacca porta bambini; le suddette operazioni,
con il peso del bambino, potrebbero risultare meno agevoli. Si rac-
comanda attenzione nell’eettuare le operazioni di cui sopra.
GARANZIA
Il prodotto è garantito contro ogni difetto di conformità in normali
condizioni di utilizzo secondo quanto previsto dalle istruzioni d’uso.
La garanzia non sarà applicata, dunque, in caso di danni derivanti da
un uso improprio, usura o eventi accidentali. Per la durata della ga-
ranzia sui difetti di conformità si rinvia alle speciche previsioni delle
normative nazionali applicabili nel paese d’acquisto, dove previste.

12
13
IMPORTANT – READ
CAREFULLY AND
KEEP FOR FUTURE
REFERENCE.
WARNING: BEFORE USE, REMOVE
AND DISPOSE OF ALL PLASTIC BAGS
AND PACKAGING MATERIALS AND
KEEP THEM OUT OF REACH OF CHIL-
DREN.
WARNINGS
• WARNING: Never leave the child
unattended.
• WARNING: Ensure that all the
locking devices are engaged be-
fore use.
• WARNING: To avoid injury ensure
that the child is kept away when
unfolding and folding this product.
• WARNING: Do not let the child
play with this product.
• WARNING: Always use the re-
straint system.
• The use of the safety harness is
necessary to guarantee the safety
of your child. Always use the com-
plete safety harness.
• WARNING: Check that the pram
body or seat unit or car seat at-
tachment devices are correctly en-
gaged before use.
• WARNING: This product is not suit-
able for running or skating.
• The vehicle is suitable for children
up to 22 kg or 4 years, or whichever
limit is reached rst.
• It is recommended that the back-
rest should be used in its most re-
clined position for children from
birth to 6 months of age.
• Only CHICCO KAILY or CHICCO KI-
ROS I-SIZE car seats with FAST IN
attachment, or the CHICCO SOFT
CARRYCOT, can be attached to the
GOODY PLUS stroller.
• With the carrycot installed on the
stroller; WARNING: This product in
pram conguration is only suita-
ble for children who cannot sit up
unaided, roll over and cannot push
up on their hands and knees. . Max-
imum weight of the child: 9 Kg. • Do
not add another mattress on the
upper part of the mattress supplied
or recommended by the manufac-
turer. Do not leave the transport
handles inside the carrycot.
• The parking device must always be
engaged when your child is posi-
tioned and removed.
• Use the parking device every time
you stop.
• Never leave the stroller on a sloped
surface, with a child on board, even
with the brakes are on.
• Do not overload the storage bas-
ket. Maximum weight 3 kg.
• Any weight attached to the han-
dles and/or backrest and/or on the
sides of the stroller may aect the
stability of the stroller.
• Do not carry more than one child
at a time.
• Do not use accessories, replace-
ment parts, or any component not
supplied or approved by the man-
ufacturer / distributor.
• Do not use this product if any part
is broken, torn or missing.
INSTRUCTIONS FOR USE

12
13
• For car seats used in conjunction
with a chassis, this vehicle does not
replace a cot or a bed. Should your
child need to sleep, then it should
be placed in a suitable pram body,
cot or bed.
• Before assembly, ensure that the
product and its components have
not been damaged during trans-
portation. In this case, do not use
and keep out of reach of children.
• During adjustment operations, en-
sure that the moving parts of the
stroller do not come into contact
with your child.
• Make sure that the person using
the stroller knows how to operate
it in the safest way.
• This product must only be used by
an adult.
• The product must only be assem-
bled by an adult.
• To avoid all strangulation hazards,
never give children objects with
cords or strings attached, or leave
them close to such objects.
• Never use the stroller on staircases
or escalators: you could suddenly
lose control of it.
• Always pay attention when going
up and down steps or pavements.
• If the stroller is left exposed to di-
rect sunlight for an extended pe-
riod of time, allow it to cool down
before placing your child inside.
Prolonged exposure to direct sun-
light may cause the colour of the
materials and fabric to fade.
• Prevent the stroller from coming
into contact with salt water. It may
cause rusting.
• Do not use the stroller on the beach.
• When not in use, the stroller should
be kept out of reach of children.
TIPS FOR CLEANING AND MAINTENANCE
This product requires periodical maintenance. Cleaning and main-
tenance operations must be performed exclusively by an adult.
CLEANING
The seat of the stroller can be removed (please see the section
FITTING AND REMOVING THE STROLLER LINING). Clean the fabric
parts using a wet terry towel and neutral soap. Periodically wipe the
plastic parts clean with a soft damp cloth. To prevent the formation
of rust, always dry metal parts if they have come into contact with
water.
The washing symbols and relative meanings are indicated below:
Hand wash
Do not bleach
Do not tumble dry
Do not iron
Do not dry clean
MAINTENANCE
If necessary, lubricate the moving parts with dry silicone lubricant.
Regularly check the condition of the wheels and clean o all dust
and sand. To avoid friction that may compromise the correct func-
tioning of the stroller, make sure all plastic parts that run along the
metal tubes are clean of dust, dirt and sand.
Keep the stroller in a dry place.
GENERAL INSTRUCTIONS
OPENING THE STROLLER AND FIRST ASSEMBLY
WARNING: When opening the stroller, make sure that your child or
other children are at a safety distance.
WARNING: Make sure that during these operations the moving
parts of the stroller do not come into contact with your child.
1. Grip the handle (Fig. 1) and pull the stroller upwards (Fig. 1A) until
the structure opens fully (Fig. 1B).
WARNING: Before use, ensure that the stroller is locked in the open
position, checking that the mechanism is eectively locked.
2. Assemble the rear wheels by inserting the pin of the wheel into the
appropriate hole located on the rear tube, until it locks in place (Fig.
2). To remove them, use the button located on each wheel (Fig. 2A).
WARNING: Before use, ensure that the wheels have locked correct-
ly.
3. Install the bumper bar by inserting it into the appropriate slots
located on the joints of the stroller (Fig. 3). Should you need to
remove it, press the buttons on both sides (Fig. 3A).
WARNING: Never use the bumper bar to lift the stroller up with
your child sitting in it.
CARRY-ALL BASKET
The storage basket is already installed. Should you need to remove
it, follow the steps outlined below.
4. The storage basket is attached to the frame at several points. Un-
snap the 2 snap buttons located on the rear of the basket (Fig. 4);
remove the lateral straps on the rear legs of the stroller (Fig. 4A);
unsnap the snap buttons present under the seat (Fig. 4B); open
the velcro straps on the front under the footrest (Fig. 4C).
To reassemble the basket follow the same steps backwards.
HOW TO USE THE SAFETY HARNESS
This stroller has a ve-point safety harness featuring two shoulder
straps, two adjustment holes, a waist strap and a crotch strap with
30° C

14
15
buckle.
5. WARNING: To use it with children from birth to approx. 6 months
of age, you must use the shoulder straps, rst threading them
through two adjusting holes (Fig. 5), and threading the waist strap
through the vertical holes (Fig. 5A).
The height of the shoulder straps can be adjusted by using the dif-
ferent slots found on the backrest.
6. After laying the child in the stroller, fasten the straps (Fig. 6) by
passing rst the two forks (A) inside the shoulder strap buckle (B)
and then inside the crotch strap buckle (C); adjust the height of
the shoulder straps so that they correctly t your child’s shoulders
(Fig. 6A).
Always make sure that the straps are fastened correctly. To unfasten
the strap, press and pull the side prongs.
WARNING: To guarantee the safety of your child, the safety harness
must be fastened at all times.
To make sure that the belts are fastened properly to the anchoring
points, after placing your child inside the stroller, pull the end parts
of the belts rmly.
ADJUSTING THE BACKREST
The backrest can be adjusted to 3 positions.
7. To lower the backrest, lift the adjusting handle located on the rear
of the backrest (Fig. 7). To raise the backrest, simply lift it to the
desired position.
WARNING: The child’s weight can make these operations more
dicult.
REAR BRAKES
The rear wheels have linked brakes, which can be applied simulta-
neously on both rear wheels by using the support tube.
8. To brake the stroller, press down on the pedal located centrally
(Fig. 8). To release the brakes, press the pedal in the opposite di-
rection (Fig. 8A).
SUN CANOPY
The hood is already installed on the stroller.
9. To open and adjust the canopy use the front arch (Fig. 9). The
hood can be extended by opening the zipper (Fig. 9A-9B). Fix the
back of the hood onto the backrest using the two snap fasteners
(Fig. 9C) and the velcro fasteners on the sides (Fig. 9D). If you wish
to remove the hood from the stroller, open the zip that covers
the tube above the backrest (Fig. 9E) and pull both sides of the
arch out from the joint to which it is attached, pressing on the
point shown in Fig. 9F and pulling it upwards at the same time.
Complete the operation by undoing the two buttons on the back
of the backrest.
ADJUSTABLE LEGREST
The legrest can be used in 2 positions.
10. To use the legrest in the horizontal position simply push it up-
wards. To lower it, use the button located under the legrest (Fig.
10).
FITTING AND REMOVING THE STROLLER LINING
To remove the lining from the seat, follow the steps below:
11. Detach all the velcro fasteners and snap buttons that connect
the backrest to the hood (Fig. 11A) and remove the straps on
both sides from the plastic hooks that attach the backrest to the
handle tube of the frame (Fig. 11B).
12. On the sides of the seat, remove the velcro fasteners (Fig. 12)
and slip the fabric tab out from the plastic ring on the frame
(Fig. 12A). Complete this operation for both sides of the stroller.
13. Remove the textile part of the legrest from the frame (Fig. 13)
and then the elastic strap (Fig. 13A). Remove the velcro on the
elastic strap, located under the seat, and remove the strap from
the buckle (Fig. 13B). Remove the pocket from the adjustment
button for the backrest and pull all the fabric upwards (Fig. 13C
- 13D).
To put the lining back on the stroller follow the same steps back-
wards.
FOLDING THE STROLLER
WARNING: When opening the stroller, ensure that your child and
any other children are at a safe distance.
Make sure that during these operations the moving parts of the
stroller do not come into contact with your child.
Before closing the stroller, ensure that the storage basket is empty.
The stroller has a closing device that can be used with one hand.
14. To close the stroller, push switch “A” to the left and simultane-
ously press button “B” (Fig. 14); push down on the handle and
the stroller will close automatically. The stroller will automatically
lock in the closed position. When closed, the stroller stands up
on its own (Fig. 14 A-B). To make the stroller even more compact
when closed, the bumper bar can be turned towards the handle
(Fig. 14C).
ACCESSORIES
WARNING: The accessories described below may not be included
in some product versions. Carefully read the instructions for the ac-
cessories that came with the model you have purchased.
SHOULDER STRAPS AND CROTCH STRAPS
The stroller is tted with padded shoulder straps and a soft crotch
strap to ensure the safety and comfort of your child.
15. For assembly, insert the shoulder straps (Fig. 15) and the crotch
strap in the relevant padding (Fig. 15A).
WARNING: Adjust the waist belt if necessary by pressing on the
buckles.
WARNING: To guarantee the safety of your child, the safety harness
must always be fastened.
RAIN COVER
16. To t the rain cover, fasten the straps around the stroller’s frame
in the positions shown in Fig. 16 (steps to be repeated on both
sides of the stroller).
When you have nished using the rain cover, allow it to dry properly
if it is wet.
WARNING: The rain cover cannot be used on the stroller without
hood, as it may cause suocation.
WARNING: When the rain cover is tted on the stroller, never leave
it exposed to direct sunlight with your child inside, as the tempera-
ture will rise considerably.
USING THE CAR SEAT ON THE STROLLER
On the Goody Plus stroller it is possible to t the following elements,
which can be purchased separately:
• Kaily car seat
• Kiros i-size car seat with Fast In fastening
All car seats for use on the stroller require the special adaptors sold
separately.
WARNING: FOR THE ASSEMBLY AND/OR USE OF THE ITEMS LISTED
ABOVE, REFER TO THE RELEVANT MANUALS.
SOFT CARRYCOT MOUNTING AND REMOVAL FROM THE
STROLLER
The Goody Plus stroller is compatible with the Chicco Soft Carrycot.
To attach the carrycot to the stroller, remove the bumper bar, com-
pletely lower the backrest and place the legrest in the horizontal
position.
17. Turn the rod under the carrycot base until it is completely open
(Fig. 17-17A); hold the textile handles in the transport position
and place the carrycot on the stroller with the foot area facing
the handle of the stroller (Fig. 17B).
18. Fasten the carrycot to the stroller’s frame using the appropriate
straps. The carrycot has two straps with a buckle on each side.
Wrap the straps around the stroller bar in the positions shown in
Figure 18, fasten the buckles (Fig. 18A), pull the straps to ensure
a secure attachment (Fig. 18B) and close the second safety lock
(Fig. 18C). Repeat the operations on the opposite side as well.
WARNING: Before use, make sure that the carrycot is properly at-
tached by pulling it upwards.
To remove the carrycot from the stroller, release the buckles and
remove it from the seat.

14
15
WARNING: The fastening and releasing operations can be carried
out also with your child inside the carrycot; however, these opera-
tions may be more dicult to execute due to the child’s weight. Pay
attention when carrying out the aforementioned operations.
WARRANTY
The product is guaranteed against any conformity defect in normal
conditions of use as stated in the instructions.Therefore, the warran-
ty does not apply in the case of damage caused by improper use,
wear or accidental events. For the duration of warranty on conform-
ity defects, please refer to the specic provisions of national laws
applicable in the country of purchase, where provided.

16
17
IMPORTANT - A LIRE
ATTENTIVEMENT ET
À CONSERVER POUR
CONSULTATION UL-
TÉRIEURE.
AVERTISSEMENT: AVANT L’EMPLOI,
ENLEVER ET ÉLIMINER TOUS LES
SACS EN PLASTIQUE ET ÉLÉMENTS
QUI FONT PARTIE DE L’EMBALLAGE
DU PRODUIT ET LES TENIR HORS DE
PORTÉE DES ENFANTS.
AVERTISSEMENTS
• AVERTISSEMENT: Ne jamais lais-
ser l’enfant sans surveillance.
• AVERTISSEMENT : S’assurer que
tous les dispositifs de verrouillage
sont enclenchés avant utilisation.
• AVERTISSEMENT : Pour éviter
toute blessure, maintenir votre en-
fant à l’écart lors du dépliage et du
pliage du produit.
• AVERTISSEMENT: Ne pas laisser
votre enfant jouer avec ce produit.
• AVERTISSEMENT : Toujours utili-
ser le système de retenue.
• L’utilisation de l’entrejambe et du
harnais de sécurité est indispen-
sable pour garantir la sécurité de
l’enfant. Ne jamais utiliser l’entre-
jambe sans le harnais de sécurité.
• AVERTISSEMENT: Vérier que les
dispositifs de xation de la nacelle,
du siège ou du siège-auto sont
correctement enclenchés avant
utilisation.
• AVERTISSEMENT: Ce produit ne
convient pas pour faire du jogging
ou des promenades en rollers.
• Le véhicule est adapté jusqu'à 22
kg ou 4 ans, ou la limite se vériant
la première.
• De la naissance de l’enfant à ses 6
mois environ, le dossier doit être
utilisé complètement incliné.
• Seuls les sièges-autos CHICCO
KAILY, CHICCO KIROS I-SIZE à xa-
tion FAST IN ou la CHICCO SOFT
CARRYCOT peuvent être accrochés
sur la poussette GOODY PLUS.
• Avec la nacelle montée sur la
poussette ; AVERTISSEMENT : Cet
article, dans la conguration lan-
dau, convient à un enfant qui ne
sait pas s’asseoir seul, rouler sur
lui-même ni se redresser en appui
sur les mains et les genoux. Poids
maximum du bébé: 9 kg. Ne pas
superposer un autre matelas sur
le matelas fourni ou recommandé
par le fabricant. Ne pas laisser les
poignées de transport à l'intérieur
de la nacelle.
• Le système de stationnement doit
être actionné avant de positionner
ou de retirer l’enfant.
• Utiliser le dispositif de stationne-
ment chaque fois que la poussette
est à l’arrêt.
• Ne jamais laisser la poussette sur
un plan incliné avec l’enfant à l’inté-
rieur, même avec le frein actionné.
• Ne pas mettre dans le panier de.
poids supérieur à 3 kg.
• Tout poids suspendu aux poignées
et/ou au dossier et/ou sur les côtés
de la poussette pourrait compro-
mettre sa stabilité.
NOTICE D’UTILISATION

16
17
• Ne pas transporter plus d’un enfant
à la fois.
• Ne pas monter sur la poussette
d’accessoires, pièces de rechange
ou composants non fournis ou non
approuvés par le constructeur.
• Ne pas utiliser la poussette si des
parties sont cassées, arrachées ou
manquantes.
• Une fois le siège-auto xé à la pous-
sette, le dispositif ne remplace pas
un berceau ou un lit enfant. Si votre
enfant veut dormir, il faut l’installer
dans une nacelle, un berceau ou
un lit enfant.
• Avant l’assemblage, vérier que le
produit et tous ses composants ne
présentent aucun dommage dû au
transport; dans le cas contraire, le
produit ne doit pas être utilisé et il
devra être tenu hors de la portée
des enfants.
• Pendant les opérations de réglage,
s’assurer que les parties mobiles
de la poussette n’entrent pas en
contact avec le corps de l’enfant.
• Vérier que les utilisateurs de la
poussette connaissent le fonction-
nement exact de celle-ci.
• Ce produit doit être utilisé unique-
ment par un adulte.
• Le produit doit être monté unique-
ment par un adulte.
• Pour éviter tout risque d’étrangle-
ment, ne pas donner à l’enfant ni
poser près de l’enfant d’objets mu-
nis de cordes.
• Ne pas utiliser la poussette dans les
escaliers ou sur un escalator: elle
pourrait être déséquilibrée.
• Faire attention quand on monte ou
descend le trottoir.
• En cas d’exposition prolongée au
soleil, attendre que la poussette
refroidisse avant d’y positionner
l’enfant. Une exposition prolongée
au soleil peut provoquer des varia-
tions de couleur des matériaux et
des tissus.
• Éviter tout contact de la poussette
avec de l’eau salée pour empêcher
la formation de rouille.
• Ne pas utiliser la poussette à la
plage.
• Lorsque la poussette n’est pas uti-
lisée, la ranger hors de portée des
enfants.
CONSEILS DE NETTOYAGE ET D’ENTRETIEN
Ce produit doit être entretenu régulièrement. Les opérations de
nettoyage et d’entretien doivent être eectuées par un adulte.
NETTOYAGE
L'assise de la poussette est déhoussable (consulter le paragraphe
«COMMENT ENLEVER / REMETTRE LA HOUSSE DE LA POUSSETTE).
Nettoyer les parties en tissu avec une éponge humide et du savon
neutre. Nettoyer régulièrement les parties en plastique avec un chif-
fon humide. Essuyer les parties en métal si elles sont mouillées, pour
empêcher toute formation de rouille.
Les symboles de lavage et leur signication sont décrits ci-dessous:
Laver à la main à l’eau froide
Ne pas blanchir
Ne pas sécher en machine
Ne pas repasser
Ne pas laver à sec
ENTRETIEN
En cas de besoin, lubrier les parties mobiles avec de l’huile sèche
de silicone.
Contrôler régulièrement l’état d’usure des roues, et les tenir à l’abri
de la poussière et du sable. Vérier que toutes les parties en plas-
tique, qui coulissent le long des tubes en métal, ne sont pas cou-
vertes de poussière, de saleté et de sable an d’éviter d’éventuels
frottements pouvant compromettre le bon fonctionnement de la
poussette.
Ranger la poussette dans un endroit sec.
INSTRUCTIONS GÉNÉRALES
OUVERTURE ET PREMIER MONTAGE DE LA POUSSETTE
AVERTISSEMENT: Eectuer cette opération en veillant à ce que les
enfants soient susamment éloignés.
AVERTISSEMENT: Lors de ces phases, s’assurer que les parties mo-
biles de la poussette n’entrent pas en contact avec l’enfant.
1. Saisir la poignée (Fig. 1) et tirer la poussette vers le haut (Fig. 1A)
jusqu'à ouverture complète de la structure (Fig. 1B).
AVERTISSEMENT: Avant d’utiliser la poussette, vérier qu’elle est
bloquée en position ouverte, en contrôlant que le mécanisme est
30° C

18
19
eectivement verrouillé.
2. Monter les roues arrière en insérant l'axe de roue dans le trou ap-
proprié du tube arrière, jusqu’au blocage (Fig. 2). Pour les enlever,
agir sur le bouton situé sur chaque roue (Fig. 2A).
AVERTISSEMENT: avant l’utilisation, s’assurer que toutes les roues
sont correctement xées.
3. Installer l'arceau de sécurité en l'insérant dans les fentes situées
sur les croisements de la poussette (Fig. 3). S'il est nécessaire de
l'enlever, appuyer sur le bouton des deux côtés (Fig. 3A).
AVERTISSEMENT: Ne pas utiliser l'arceau de sécurité pour soulever
la poussette avec l'enfant assis dedans.
PANIER PORTE-OBJETS
Le panier porte-objets est déjà installé. Dans le cas où il faudrait l'en-
lever, suivre les étapes décrites ci-dessous.
4. Le panier est accroché au châssis en plusieurs points. Décrocher
les 2 boutons à pression à l'arrière du panier (Fig. 4) ; enlever les
sangles latérales sur les pieds arrière de la poussette (Fig. 4A);
décrocher les boutons à pression présents sous l'assise (Fig. 4B) ;
ouvrir les velcros à l'avant sous le repose-pieds (Fig. 4C).
Pour remonter le panier, eectuer les opérations précédentes, mais
dans l'ordre inverse.
UTILISATION DES HARNAIS DE SÉCURITÉ
La poussette est munie d’un système de retenue à cinq points d’an-
crage constitué de deux épaulières, de deux boutonnières de ré-
glage, d’une ceinture abdominale et d’un entrejambe avec boucle.
5. AVERTISSEMENT: En présence d’enfants de 0 à 6 mois environ,
il est nécessaire d’utiliser les couvre-harnais en les faisant passer
dans les deux fentes de réglage (Fig. 5) et la ceinture abdominale
dans les fentes verticales (Fig. 5A).
Il est possible de régler la hauteur des épaulières en les déplaçant
dans les fentes présentes sur le dossier.
6. Après avoir installé votre enfant dans la poussette, attacher le har-
nais de sécurité (g. 6) en introduisant les deux attaches (A) dans
la boucle des épaulières (B) puis dans celle de l'entrejambe (C);
ajuster la hauteur des épaulières couvre-harnais de sorte qu’elles
adhèrent aux épaules de l’enfant (Fig. 6A).
Vérier que les ceintures sont toujours xées correctement. Pour
décrocher le harnais, appuyer simultanément sur les fourches laté-
rales et tirer.
AVERTISSEMENT: pour garantir la sécurité de votre enfant, il est
indispensable de toujours utiliser les ceintures de sécurité.
Pour s’assurer que le harnais est bien accroché, après avoir installé et
attaché l’enfant, tirer avec force la partie nale des sangles.
RÉGLAGE DU DOSSIER
Le dossier est réglable sur 3 positions.
7. Pour rabattre le dossier, soulever la poignée de réglage située à
l’arrière du dossier (Fig. 7). Pour relever le dossier, il sut de le sou-
lever jusqu’à la position désirée.
AVERTISSEMENT: le poids de l’enfant peut rendre ces opérations
plus diciles à accomplir.
FREINS ARRIÈRE
Les roues arrière sont équipées de freins jumelés qui travaillent si-
multanément sur les deux roues arrière, en intervenant sur le tube
de support.
8. Pour freiner la poussette, pousser la pédale centrale vers le bas
(Fig. 8). Pour débloquer le système de freinage, appuyer sur la pé-
dale dans le sens opposé (Fig. 8A).
CAPOTE AVEC FILET PARE-SOLEIL
La capote est déjà montée sur la poussette.
9. Pour ouvrir et régler la capote, agir sur l’arceau avant (Fig. 9). Il
est possible d’étendre la capote en ouvrant la charnière (Fig. 9A-
9B). Accrocher l'arrière de la capote au dossier à l'aide de deux
boutons à pression (Fig. 9C) et des velcros latéraux (Fig. 9D). Si
vous souhaitez retirer la capote de la poussette, ouvrir la ferme-
ture éclair qui enveloppe le tube au-dessus du dossier (Fig. 9E) et
déler des deux côtés l'arceau du croisement auquel il est xé en
appuyant sur le point indiqué en gure 9F et, simultanément, tirer
vers le haut. Conclure l'opération en décrochant les deux boutons
situés à l'arrière du dossier.
REPOSE-JAMBES RÉGLABLE
Il est possible d'utiliser le repose-jambes sur 2 positions.
10. Pour utiliser le repose-jambes en position horizontale, il sut
de le relever. Pour l'abaisser, agir sur le bouton situé sous le re-
pose-jambes (Fig. 10).
COMMENT ENLEVER / REMETTRE LA HOUSSE DE LA POUS-
SETTE
Pour déhousser l'assise, suivre les étapes décrites ci-dessous :
11. Détacher tous les velcros et les boutons à pression qui relient
le dossier à la capote (Fig. 11A) et, des deux côtés, déler les
sangles des crochets en plastique qui relient le dossier au tube
de la poignée du châssis (Fig. 11B).
12. Sur les côtés de l'assise, enlever le velcro (Fig. 12) et déler la
languette en tissu de l'anneau en plastique sur la structure (Fig.
12A). Cette opération doit être exécutée des deux côtés de la
poussette.
13. Déler la partie en tissu du repose-jambes de la structure (g. 13)
puis le ruban élastique (g. 13A). Décrocher le velcro sur le ruban
élastique situé sous l'assise et déler le ruban de la boucle (Fig.
13B). Déposer la poche du bouton de réglage du dossier et tirer
tout le tissu vers le haut (Fig. 13C - 13D).
Pour rehousser la poussette, eectuer les opérations précédentes,
mais dans l'ordre inverse.
PLIAGE DE LA POUSSETTE
AVERTISSEMENT: Eectuer cette opération en veillant à ce que les
enfants soient susamment éloignés.
Lors de ces phases, s’assurer que les parties mobiles de la poussette
n’entrent pas en contact avec l’enfant.
Avant la fermeture, s’assurer aussi que le panier porte-objets soit
vide.
La poussette est munie d'une commande de fermeture à utiliser
d'une seule main.
14. Pour plier la poussette, pousser le curseur « A » vers la gauche
et appuyer en même temps sur le bouton « B » (Fig.14); abais-
ser la poignée, la poussette se repliera automatiquement. La
poussette se verrouillera automatiquement en position de fer-
meture. Une fois fermée, la poussette reste debout toute seule
(g.14A-B). Pour augmenter la compacité du produit lorsqu'il est
fermé, l'arceau de sécurité peut être tourné vers la poignée (Fig.
14C).
ACCESSOIRES
AVERTISSEMENT: Les accessoires décrits ci-après peuvent ne pas
être présents sur certaines versions du produit. Lire attentivement
les instructions relatives aux accessoires présents sur le modèle
acheté.
KIT ÉPAULIÈRES ET ENTREJAMBE
La poussette est munie d'épaulières couvre-harnais rembourrées et
d'un entrejambe confortable, capables de garantir la sécurité et la
commodité de votre enfant.
15. Enler les couvre-harnais dans les bretelles (Fig.15) et faire passer
l’entrejambe dans le rembourrage prévu à cet eet (Fig. 15A).
AVERTISSEMENT: Régler, si nécessaire, la largeur de la ceinture ab-
dominale à l’aide des boucles.
AVERTISSEMENT: Pour garantir la sécurité de votre enfant, il est
indispensable de toujours utiliser le harnais de sécurité.
HABILLAGE-PLUIE
16. Fixer l'habillage-pluie en faisant passer les rubans autour des
tubes de la poussette au niveau des positions indiquées dans la
gure 16 (ces opérations doivent être exécutées des deux côtés
de la poussette).
En n d'utilisation, laisser l'habillage sécher à l'air s'il est mouillé.
AVERTISSEMENT: L’habillage-pluie ne peut pas être utilisé sur la

18
19
poussette sans capote, car il pourrait étouer l’enfant.
AVERTISSEMENT: Ne jamais laisser la poussette exposée au soleil
avec l’enfant à l'intérieur lorsque l’habillage-pluie est monté, pour
éviter les coups de chaleur.
UTILISATION DU SIÈGE-AUTO SUR LA POUSSETTE
Il est possible d'installer sur la poussette Goody Plus les éléments
suivants vendus séparément:
• Siège-auto Kaily
• Siège-auto Kiros i-size muni de la xation Fast In
Tous les sièges-auto destinés à être utilisés sur la poussette néces-
sitent des adaptateurs spéciaux vendus séparément.
AVERTISSEMENT: POUR LE MONTAGE ET/OU L'UTILISATION DES
ÉLÉMENTS INDIQUÉS CI-DESSUS, SE REPORTER AUX NOTICES COR-
RESPONDANTES.
MONTAGE ET DÉMONTAGE DE LA NACELLE SOUPLE DE LA
POUSSETTE
La poussette Goody Plus est compatible avec le produit Chicco Soft
Carrycot.
Pour accrocher la nacelle sur la poussette, il faut enlever l'arceau
de sécurité puis abaisser complètement le dossier et placer le re-
pose-jambes en position horizontale.
17. Tourner la tige sous la base de la nacelle jusqu'à ce qu'elle soit
complètement ouverte (Fig. 17-17A); saisir les poignées en tissu
en position de transport et placer la nacelle sur la poussette avec
la zone des pieds tournée vers la poignée de cette dernière (Fig.
17B).
18. Fixer la nacelle au châssis de la poussette à l'aide des sangles pré-
vues à cet eet. La nacelle est munie de deux sangles avec une
boucle de chaque côté. Enrouler les sangles autour du tube de
la poussette dans les positions illustrées en gure 18, fermer les
boucles (Fig. 18A), tirer sur les sangles pour obtenir une xation
stable (Fig. 18B) et refermer le second dispositif de blocage (Fig.
18C). Répéter ces opérations du côté opposé.
AVERTISSEMENT: avant l’utilisation, vérier que la nacelle est bien
xée en la tirant vers le haut.
Pour démonter la nacelle de la poussette, décrocher les boucles et
l'enlever de l'assise.
AVERTISSEMENT: La nacelle peut aussi être accrochée et dé-
crochée même si l’enfant est dedans, avec le poids de l’enfant, les
opérations susmentionnées pourraient toutefois être moins aisées.
Prendre des précautions particulières lors des opérations décrites
ci-dessus.
GARANTIE
Le produit est garanti contre tout défaut de conformité dans des
conditions normales d’utilisation selon les indications gurant sur
la notice d’utilisation. La garantie ne sera donc pas appliquée en
cas de dommages dérivant d’un usage inapproprié, de l’usure ou
d’événements accidentels. En ce qui concerne la durée de la ga-
rantie contre les défauts de conformité, consulter les conditions
prévues par les normes nationales applicables, le cas échéant, dans
le pays d’achat.

20
21
WICHTIG - BITTE
SORGFÄLTIG LESEN
UND FÜR SPÄTERES
NACHLESEN UNBE-
DINGT AUFBEWAH-
REN.
WARNUNG: VOR DEM GEBRAUCH
EVENTUELLE POLYBEUTEL UND
ALLE ELEMENTE, DIE TEIL DER PRO-
DUKTVERPACKUNG SIND, ABNEH-
MEN UND ENTSORGEN SOWIE VON
KINDERN FERNHALTEN.
HINWEISE
• WARNUNG: Lassen Sie das Kind
nie unbeaufsichtigt.
• WARNUNG: Vergewissern Sie sich
vor Gebrauch, dass alle Verriege-
lungen eingerastet sind.
• WARNUNG: Vergewissern Sie sich,
dass das Kind beim Aufklappen
und Zusammenklappen des Wa-
gens außer Reichweite ist, um Ver-
letzungen zu vermeiden.
• WARNUNG: Lassen Sie das Kind
nicht mit dem Produkt spielen.
• WARNUNG: Verwenden Sie immer
das Rückhaltesystem.
• Die Verwendung von Schritt- und
Sicherheitsgurten ist unerläss-
lich für die Sicherheit des Kindes.
Verwenden Sie den Sicherheits-
gurt stets in Verbindung mit dem
Schrittgurt.
• WARNUNG:Vergewissern Sie sich vor
der Verwendung, dass der Kinderwa-
genaufsatz oder der Sitzeinheit oder
die Befestigungselemente des Auto-
sitzes korrekt eingerastet sind.
• WARNUNG:Dieses Produkt ist nicht
zum Joggen oder Skaten geeignet.
• Der Sportwagen ist für Kinder bis
22 kg Körpergewicht oder 4 Jahre
geeignet, je nachdem welche die-
ser Grenzen zuerst erreicht wird.
• Bei Benutzung für Kinder ab der
Geburt bis ca. zum 6. Lebensmonat
muss die Rückenlehne vollständig
zurückgeklappt werden.
• Nur die Autokindersitze CHICCO
KAILY oder CHICCO KIROS I-SIZE
mit FAST IN Befestigung oder CHIC-
CO SOFT CARRYCOT können am
Sportwagen GOODY PLUS befes-
tigt werden.
• Bei am Sportwagen montierter Ba-
bytragetasche;WARNUNG: Dieses
Produkt in der Kinderwagen-Kon-
guration ist nur für ein Kind ge-
eignet, das sich noch nicht selbst
aufsetzen bzw. auf die Seite rollen
oder sich auf Hände und Knie stüt-
zen kann. Maximales Gewicht des
Kindes: 9 kg. Keine weitere Matrat-
ze auf die vom Hersteller gelieferte
oder empfohlene Matratze legen.
DieTragegrie nicht im Inneren der
Babytragetasche lassen.
• Die Haltevorrichtung muss stets
angezogen sein, wenn Sie das Kind
hineinsetzen und herausnehmen.
•Verwenden Sie stets die Haltevor-
richtung, wenn Sie anhalten.
• LassenSie denSportwagen niemals
mit dem Kind darin auf einer schrä-
gen Fläche stehen, selbst wenn die
Bremsen angezogen sind.
• Der Korb darf nicht mitüber 3 kg
GEBRAUCHSANLEITUNG
Other manuals for Goody Plus
2
Table of contents
Languages:
Other Chicco Stroller manuals

Chicco
Chicco GLEE User manual

Chicco
Chicco SPRINT User manual

Chicco
Chicco Cortina Together User manual

Chicco
Chicco CORTINA User manual

Chicco
Chicco SIMPLICITY User manual

Chicco
Chicco STYLEGO up User manual

Chicco
Chicco FULLY User manual

Chicco
Chicco TREVI TWIN User manual

Chicco
Chicco ALYSIA User manual

Chicco
Chicco Presto User manual

Chicco
Chicco Neuvo User manual

Chicco
Chicco TROLLEYme User manual

Chicco
Chicco LITE WAY User manual

Chicco
Chicco ALYSIA User manual

Chicco
Chicco Goody User manual

Chicco
Chicco Urban User manual

Chicco
Chicco Echo User manual

Chicco
Chicco BravoFor2 User manual

Chicco
Chicco London User manual

Chicco
Chicco Corso User manual