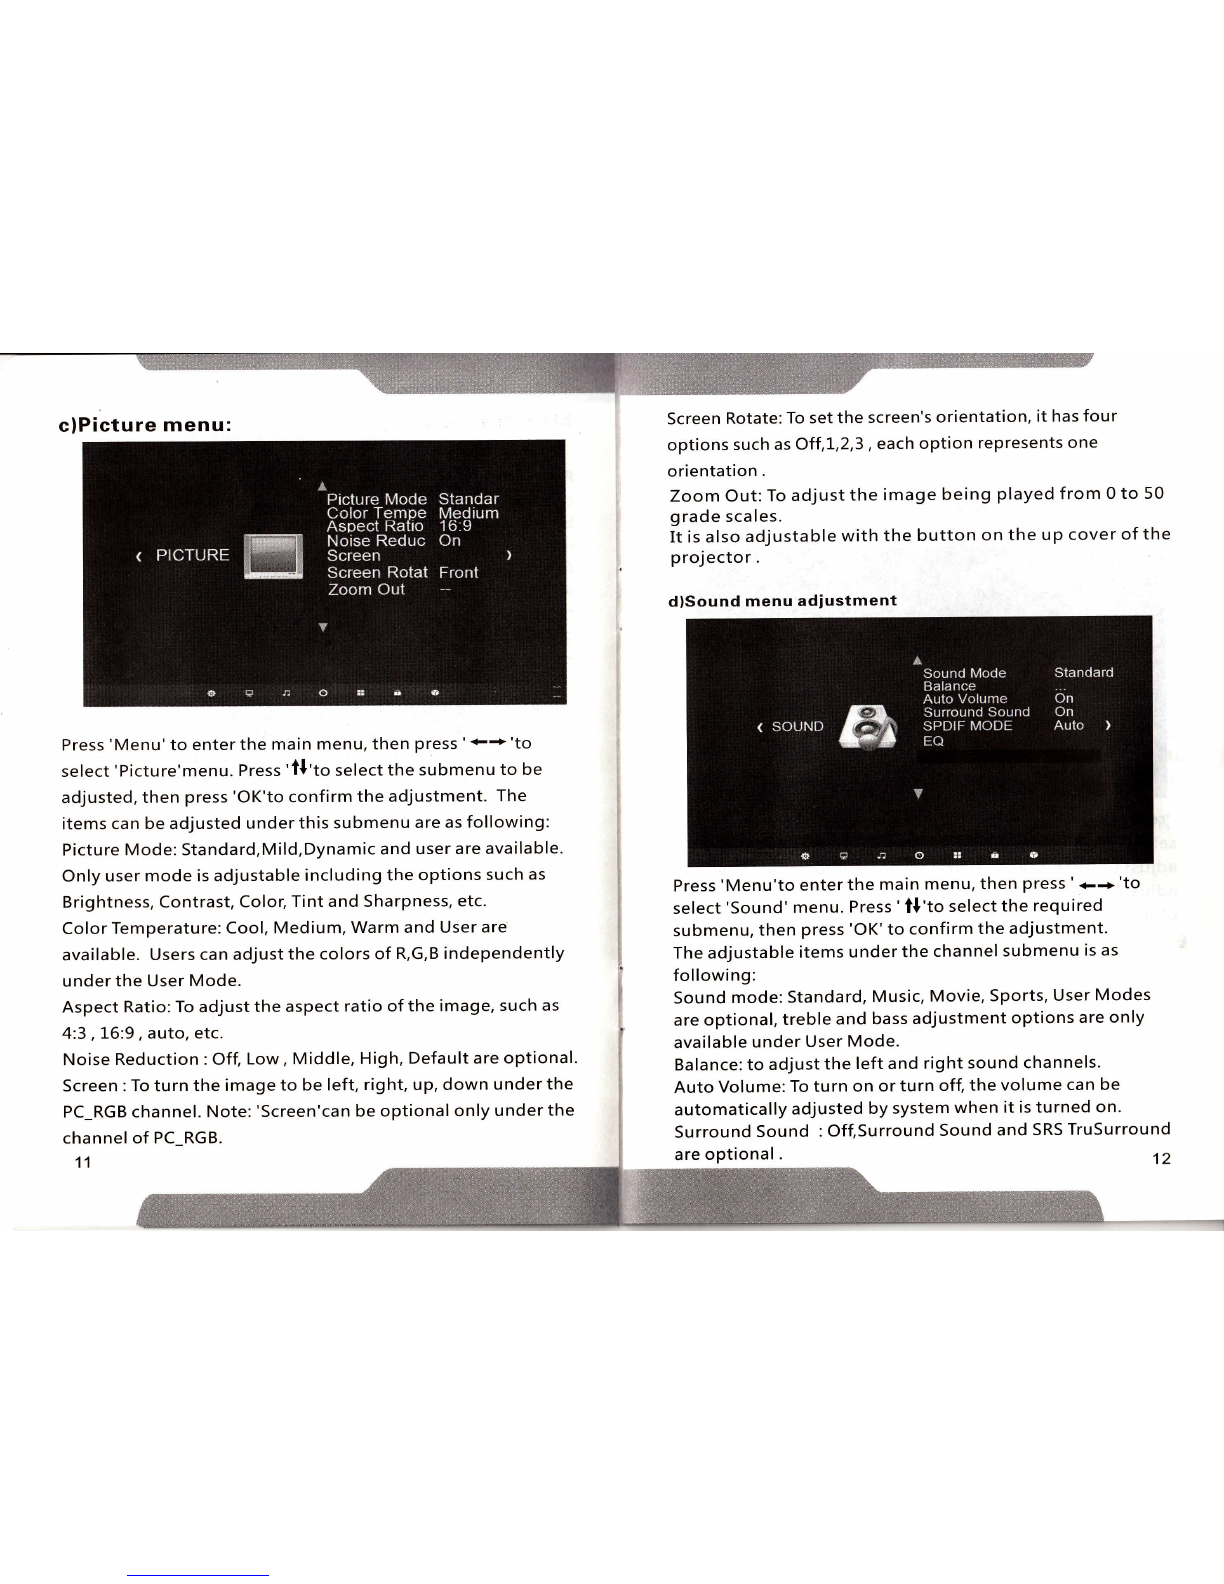
chinavasion UC80 User manual

LTD p roiecto r
User Manua!
uc80
please rea,drthis manual carefully before using

Index(H * )
Attention--- ----1
Specifications ---2
ProductOverview ---- 3
OperationGuide ----- 7
i& H IFe- rZ
*n)fi*X.- 18
Pffiffi'fr'-- 18
*.trtilI*#- ----- zL
*.tr/tn*fF- ----- 28

Thanks for your interest in this projector, please read this manual
book carefully before using.
Safety Tips
oAlways unplug the appliance from the electrical outlet immediately
after using and before cleaning.
oPlease keep the projector dry, do not use it under wet or moist
condition.
oPlease keep the projector away from water, no such apparatus
as vase or cup should be put around the projector'
oDo not put the projector on a unstable surface'
Remarks:
.Please cut down the power when the projector is not in use'
Always unplug the appliance before removing other accessories'
oClose supervision is necessary when this appliance is used by,
on or near children, invalids or disabled persbns'
.Please follow this user manual to use the projector, and use
original accessories or spare parts recommended by the factory '
oNever disassemble or repair the projector personally, if the
projector can't work properly , damaged or dropped into water'
oPlease keep the plug away from heat'
oWhile working, the projector should be kept away from cloth,
sofa or any other material that could have stock the ventilation
holes.
oPlease do not move the projector or the power cable while
it is working.
oTo protect your eyes, please do not look into the lens while
the machine is working.
1
Specifications:
Product Name LED Projector Image System LCD
Native
reso I utio n
800*600 Brig htness 1500 Lumens
Lamp LED Color 16.7K
Aspect Ratio 4 :3116 :9 Operation
Mode
Manual /
Remote
Contrast 700:1 Projection
Distance
1.2-5M
Image size 50-120 inches Power
Consumption
160W
Net Weight 2.8KG Size 300*220*90MM
Input Voltage AC100-240V 50l60HZ 1.7 A
In pul AV/USB/SD/VGA/H DMI/IP/TV
Output Speaker*2 / Headphone

Product Overview
4.lR Receiver
5.Keystone Knob
6.lnterfaces :
Q Headphone lnterface
USBl/USB2: USB lnterface
VGA:Computer lnterface
T.Ventilation holes
8.Power lnput
9. Power Switch
3
I P :Composit Video lnterface
HDMI: HD Interface
IN1'ERNAL LENS
hro
{ rocus }
lO.Lens Focus Dial Handle
11.Front Panel Buttons
L2 13
22 1"9
1-.Height adjustment feet
2.Ventilation Holes
3.Lens
16
L7
1_8
20
12.lnd icator
15. PlaylPause
l8.Backward Selection
21.Main Menu
13.lnput Selection
16. Enter
19. Exit
22.Power Button
14.Up Selection
lT.Forward Selection
20.Down Selection

25
Insta llation
Depending on different requirements, the projector
supports front / rear projection. It can be both put on
desk or ceiling mounted.
While installing, please put the projector on stable desk
or fasten with professional hanger firmly. It should be
put in the place with good ventilation condition. The
ventilation holes should be kept away from anything
that could stock it. Within 30CM, nothing should be put
around the projector.
Projection Size and Distance for reference
Size Distance
50 inches
l-11*62cm 1_9sCM
60 inches
l-33*75cm 235CM
72 inches
l-59*90cm 28OCM
84 inches
186*105cm 325CM
100 inches
2LL*'l,25cm 370CM
120 inches
266*L49cm 435CM
Measurement data for reference only. The actual projection
distance and image size may be slightly different due to the
difference of optical devices. Please refer to the actual subject.
23.Ventilation Holes
24.Speaker
25.Ceiling mounting holes
26.Ventilation Holes
27.AV Input
28.TV Input
o'
Ril\
".J*q4
26 27 28

Remote control f unction
Remarks:
Do not use batteries mixed of old and new ones for the
remote controller, to avoid the bad influence caused by
electricity shortage.
If the remote controller is out of use for a long time, please
remove the battery in case battery leakage corrupt the
remote controller.
While using, please make sure the remote control signal
transmitter is pointed at the projector IR signal reception
window.
Projector Operation Guide
l.Power On/Off
Standby Status: Connect the projector to power, the
indicator will enter Standby Status after it flashes .
Power on: Press the power button on the projector or
remote controller, the indicator lamp will be steady on
after it flashes, the projector starts working.
Power off : Press the power button on the projector or
the remote controller, the indicator lamp will slowly
flash, then it enters standby status.
2. Focusing
Put the projector with lens perpendicular to the screen
or wall, rotate the focusing handle on the up cover until
the picture is clear to finish the focusing. In the process,
you can play programs or turn to OSD menu to coordinate
the focusing adjustment.
3.Menu Operation
a)lnput source selection
3
4
5
6
I
1(
1
2
7
I
l.Power
2.Zoom
3.lnput source selection
4.Mute
5.OSD Menu
6. Previou s
7. N ext
8. Backward
9,Forward
10.oK
11.U P/DOWN/LE FTlRlG HT Button
12.Nu mbers
13.Turn
14. Exit
15.Volume Plus
15.Volume Minus
17. Play/Pa use
18. Repeat
re.-l-
1
1
1
1
1
3
4
5
6
7
I
i
1r
i*
l
,

b) Channel Menu
Press Menu to enterthe main menu, Press'-+' to select
channel menu. Then press' tl 'to select the sub menu to
be adjusted, then press'OK'button to confirm. The sub
menus which can be adjusted under the main menu are as
following:
Auto Tuning: automatically searching the TV programs
Color System: PAL, NTSC, SECAM and Auto
Sound System: DK,l, BG, L, MN
ATV ManualTuning: Manual searching the TV programs
Program Edit: to edit the TV program been saved
NICAM Mode: NICAM Setting
Software Update : Updating the system software
Notice: Only under'TV'channel the'Auto Tuning','Color
System','Sou nd System','ATV Manual Tu ning',' Prog ram
Edit','NICAM Mode'are optional. Under others channel,
only'Software Update' is optional.
Press the input source select button on the projector or
on the remote controller, the input source select menu
comes out, then press the upldown button or the input
source select button to select the channel required, press
Enter or OK button to confirm, the system will switch to
the required channel. The projector has the channels as
following:
TV : Television
PC-RGB : PC
HDMI: HDMI
AV : Video and Audio
IP : Video and Audio
USB: USB
SD: SD card
9

c)Picture menu:
Press'Menu'to enter the main menu, then press'++'to
select'Picture'menu. Press'll'to select the submenu to be
adjusted, then press'OK'to confirm the adjustment. The
items can be adjusted under this submenu are as following:
Picture Mode: Standard,Mild,Dynamic and user are available.
Only user mode is adjustable including the options such as
Brightness, Contrast, Colot Tint and Sharpness, etc.
Color Temperature: Cool, Medium, Warm and User are
available. Users can adjust the colors of R,G,B independently
under the User Mode.
Aspect Ratio: To adjust the aspect ratio of the image, such as
4:3 , L6:9, auto, etc.
Noise Reduction : Off, Low, Middle, High, Default are optional.
Screen : To turn the image to be left, right, up, down under the
PC_RGB channel. Note: 'Screen'can be optional only under the
channel of PC_RGB.
11
Screen Rotate: To set the screen's orientation, it has four
options such as Off,L,2,3, each option represents one
orientation .
Zoom Out: To adjust the image being played from 0 to 50
grade scales.
It is also adjustable with the button on the up cover of the
projector.
d)Sound menu adiustment
Press 'Menu'to enter the main menu, then press ' +.+'to
select 'Sound' menu. Press ' tl'to select the required
submenu, then press 'OK'to confirm the adjustment.
The adjustable items under the channel submenu is as
following:
Sound mode: Standard, Music, Movie, Sports, User Modes
are optional, treble and bass adjustment options are only
available under User Mode.
Balance:to adjust the left and right sound channels.
Auto Volume: To turn on or turn ofl the volume can be
automatically adjusted by system when it is turned on.
Surround Sound : Off,Surround Sound and SRS TruSurround
12
are optional .

SPDIF Mode: To select PCM or Auto Mode
EQ: User can adjust the sound frequency to be 120H2, 500H2,
'l,.2KHz, 7 .SKHz, L2KHz
e)Time Menu Adjustment
Press Menu to enter the main menu, then press ' ++'to
select'Time' menu. Press 'il 'to select the submenu to be
adjusted, then press 'OK'to make the adjustment. The
adjustable items are as following:
Clock, Off Time, On Time, Sleep Timer,Auto Sleep .
f)Option Menu Adjustment
Press Menu to enter main menu, then press '++ 'to select
'Option'menu. Press'll 'to select the required submenu to
be adjusted,then press 'OK'to confirm the adjustment. The
adjustable items under this submenu are as following:
OSD Language: 22 different languages are optionalsuch as
Chinese, English, Spanish, Korean, etc.
Restore Factory Default: all settings will be restored to
factory settings.
Color Range: To select the color range.
Blue Screen: To decide whether to display blue screen when
there is no signalwith TV.
OSD blend: To adjust the transparency of the menu.
ECO Mode: Eco option, balanced, energy-saving and
high performance are optional, this is a specific feature
of Dowlab.
Colorful Mode: Switch of colorful mode, this is also a
specific feature of Dowlab.
,t
t
I
13 14
I

r
Ig)M u ltimed ia Menu Adjustment
After selecting the input source of USB or SD card, the
projector will enter the Multimedia Menu as following :
Ke1 stone Correction
In q)ft ptaremrnl meth(rdt. the imrgt ldll prey,nt lraplzoid tsill Ke}'\hnc Corr&{ion tchnolsg} rctirs b a ki.trl r*
t&hnolrc-r of nomlaliziog the l$jstrd imagc ria digital or opti.d t(hnol0qy-
Before firrmion .\fter Cor6ti{rr
1 erticil DiNtion
Solution:
Find Krtshne Corn(lion ke!. and lurn lell or
right to fin.l the he$ lxEition to achiele th€ eff(t
as sho$n in tho aboy( Fig nfler corr(tion.If tou fail
k, obtain this cffect after turring to the rDst Ieft or
the most right, you \hould .edue the gradirnt in
{cdical dircction. Thc rangc of keJsk}nc CorrKtion
ofth€ prqitrtor is +/-15"
15
Before Cor6'tion After {ltrrection
Horizontal flirection
Solution:
In rhi\ ca\r, Ke\sli,ne ( urr(rli.!il kel i. in a
irvalid state. The reasons ofit are as Iolltlws:
l.Thr p.rie(lor is not placed i, a horizontnl
p(sitidl,'fherciore firstly you sirould plttt the
pnliector in, horizofllal positi{}n.
2.'Ihr pr(fector doN not dead against thc scrttn,
so pl@se make the projector dead against the
central position ofthe srreeD.
Table of contents
Other chinavasion Projector manuals

chinavasion
chinavasion CVSL-E167 User manual

chinavasion
chinavasion CVQF-E158 User manual

chinavasion
chinavasion W0000173 User manual

chinavasion
chinavasion CVAK-E440 User manual

chinavasion
chinavasion CVAK-E232 User manual

chinavasion
chinavasion CVJV-E178 User manual

chinavasion
chinavasion UC40 User manual

chinavasion
chinavasion CVAK-E214 User manual

chinavasion
chinavasion PortiMax HDMI User manual

chinavasion
chinavasion CVYI-E234 User manual