Citizen H874 User manual

1/11
H874 Instruction manual
Thank you for your purchase of this Citizen watch.
Before using the watch, read this instruction manual (PDF) carefully to ensure correct use.
Caliber No. of this watch: H874
You can access the web instruction manual in addition by using the QR code or the URL:
https://www.citizenwatch-global.com/support/html/en/h874/h874.html
Some models may be equipped with enhanced features functions such as slide rules and tachymeters. To see how to use such features and functions, which is
not covered with the instruction manual, and other information, access the CITIZEN support page (
https://www.citizenwatch-global.com/support/
).
ENGLISH
Safety precautions — IMPORTANT
This manual contains instructions that should be strictly followed at all times
not only for optimal use, but to prevent any injuries to yourself, other persons or
property. We encourage you to read the entire booklet (especially, pages
10
and
11
) and understand the meaning of the following symbols:
⿎Safety advisories are categorized and depicted in this manual as follows:
DANGER
Highly likely to cause death or serious injury
WARNING
Can cause serious injury or death
CAUTION
Can or will cause minor or moderate injury or damage
⿎Important instructions are categorized and depicted in this manual as follows:
(Following symbols are examples of Pictograms.)
Warning (caution) symbol followed by prohibited matters.
Warning (caution) symbol followed by instructions that should be followed or
precautions that should be observed.
Features
■
Radio controlled watch
Receives time signals from one of the five signal stations in four regions in
the world and automatically adjusts the time and calendar.
■
Eco-Drive
No periodical battery replacement is needed. This watch is fueled by light.
■
World time
Indicates the time around the world by choosing one of 24 time zones.
■
Moon phase indication
Indicates moon phase calculated through original algorithm, based on time
and date of the watch. Switchable indication for the Northern and Southern
hemisphere.
■
Perpetual calendar
No need for monthly and leap-year date correction until February 28, 2100.
• “Eco-Drive” is an original technology of Citizen.
CONTENTS
Before using this watch........................................................... 2
Band adjustment....................................................................................2
Protective stickers ..................................................................................2
How to use a specially designed crown/button........................................2
Component identification ....................................................... 2
Checking the power reserve .................................................... 3
World time ............................................................................. 3
Checking the time zone setting...............................................................3
Changing the time zone setting..............................................................3
Summer time.......................................................................... 4
Checking the summer time setting .........................................................4
Changing the summer time setting.........................................................4
Receiving the time signal........................................................ 5
Checking the previous signal reception result .........................................5
Receiving the time signal manually ........................................................5
Moon phase indication............................................................ 5
Choosing a hemisphere...........................................................................5
How to read moon phase indication........................................................5
Calibrating moon phase indication .........................................................5
About signal reception............................................................ 6
Types of signal reception ........................................................................6
When receiving the time signal...............................................................6
Poor reception areas...............................................................................6
Note on the time signal ..........................................................................6
Adjusting the time and calendar manually .............................. 7
Charging your watch............................................................... 8
When the watch reaches a low charge state
(insufficient charge warning function).................................................8
Charging time by environment ...............................................................8
Power save function ...............................................................................8
Troubleshooting ..................................................................... 8
Checking and correcting the reference position....................... 9
Resetting the watch - All Reset ...............................................................9
Eco-Drive watch handling precautions....................................10
Water resistance....................................................................10
Precautionary items and usage limitations.............................10
Specifications ........................................................................11

2/11
H874 Instruction manual
Before using this watch
The following three operations must be done before using the watch:
1Checking the current power reserve (page 3)
2Setting the time zone (page 3)
3Checking the reception result of the time signal (page 5)
This watch has a rechargeable cell which is charged by exposing the dial
to light.
Expose the dial to direct sunlight regularly to charge the watch. For
details of charging, see page
8
.
Band adjustment
We recommend seeking the assistance of an experienced watch technician for sizing
of your watch. If adjustment is not done correctly, the bracelet may unexpectedly
become detached leading to loss of your watch or injury (excluding products
containing the band adjustment tool).
Consult an authorized service center. Other shops may charge for, or may not
provide, the service.
Protective stickers
Be sure to remove any protective stickers that may be on your watch (case back,
band, clasp, etc.). Otherwise, perspiration or moisture may enter the gaps between
the protective stickers and the parts, which may result in a skin rash and/or
corrosion of the metal parts.
How to use a specially designed crown/button
Some models are equipped with a specially designed crown and/or push button to
prevent accidental operation.
Screw down crown/button
Unlock the crown/button prior to operate your watch.
Unlock Lock
Screw down
crown
Rotate the crown
counterclockwise until
it releases from the case.
Push the crown in to
the case. With gentle
pressure towards the
case, rotate the crown
clockwise to secure it
to the case. Be sure to
tighten firmly.
Screw down
push button
Rotate the locking screw
counterclockwise, and
loosen until it stops.
Rotate the locking
screw clockwise, and
tighten firmly.
Recessed button
Press the button with a non-marring narrow-tipped object.
• Metal objects may cause marring or scratching of the button.
Component identification
• The illustrations in this instruction manual may differ from the actual appearance
of your watch.
Hands and buttons
Minute hand
Function hand
Hour hand
24-hour hand
Second hand
Button
B
Button
A
Crown
Indication
Lunar age Date
Power reserve
Summer time setting Summer time setting
Reception-in-progress indication/Reception result
indication
Time zone
Northern/Southern
hemisphere
Day of week
• A solar cell is placed under the dial.
Crown's position

3/11
H874 Instruction manual
Checking the power reserve
For details of charging, see “Charging your watch” (page
8
).
1Push the crown in to position 0.
2Press and release the lower right button A.
The function hand indicates the power reserve in levels.
3Press and release the lower right button Ato finish the procedure.
• The hand returns to normal indication automatically in 10 seconds without pressing
the button.
Indication of power reserve in levels
Level
3210
Power
reserve
indication
Duration
(approx.) 180 - 130 days 130 - 70 days 70 - 2 days 2 days
Meaning
Power reserve is
sufficient.
Power reserve is
OK.
Power reserve is
getting low.
Insufficient
charge warning
has started.
OK for normal use Charge immediately.
• The function hand always indicates power reserve while power reserve level is “1”
or “0”.
World time
This watch can indicate the time around the world according to which of 24 time
zones (offsets from UTC — Coordinated Universal Time) is chosen.
• Signals to receive are different depending on the time zone you set.
Checking the time zone setting
1Pull the crown out to position 1.
The second hand indicates the current time zone setting.
Ex: when +9 is set as the time zone
• For time zones and positions of the second hand corresponding to them, see the
table.
2Push the crown in to position 0to finish the procedure.
The watch returns to normal indication.
Changing the time zone setting
1Pull the crown out to position 1.
The second hand indicates the current time zone setting.
2Rotate the crown to select a time zone.
• For time zones and positions of the second hand corresponding to them, see the
table.
• The hands and indication move as you select a different one from the current one.
3Push the crown in to position 0to finish the procedure.
The watch returns to normal indication.
Correspondence of time zones and positions of the second hands
Second hand position Time zone Signal station
49 –11
◆United States50 –10
51 –9
52 –8
United States
53 –7
54 –6
55 –5
56 –4 ◆United States
57 –3
58 –2 ◆Germany
59 –1
0 0 Germany
1+1
2+2
◆Germany3+3
4+4
5+5
◆China6+6
7+7
8+8 China
9+9 Japan
10 +10
◆Japan11 +11
12 +12
• Values on the “Time zone” column mean time difference between UTC and the
standard time of time zones.
• Time zones whose “Signal station” has ◆ mark in the table are out of reception
range and cannot receive its signals. Switching between summer time and standard
time must be executed manually there.
• It may be difficult to receive the time signal properly under certain environmental
conditions which prevent signals to reach.

4/11
H874 Instruction manual
Summer time
About summer time
Summer time is a system adopted in some countries/areas to gain an extra daylight
during summer.
• The summer time period varies depending on the country or area.
• The summer time rules may change depending on the country or area.
About summer time setting
• The standard time signals contain summer time signals, which tells it is summer
time or not now.
• This watch can change summer time/standard time indication automatically by
receiving summer time signals.
• You can set summer time on or off for each time zone.
Checking the summer time setting
1Pull the crown out to position 2.
The second hand indicates the current summer time setting.
Ex.: “SMT AU” is set
Indication of the
second hand
Time currently
indicated Switching summer time and standard time
SMT MA
Summer time
Manual
• Summer time is always indicated
regardless what summer time signals
tell.
SMT AU
Automatic
• When summer time signals tells it is not
summer time, the watch automatically
indicates standard time and setting
status switches to
STD AU
.
STD MA
Standard time
Manual
• Standard time is always indicated
regardless what summer time signals
tell.
STD AU
Automatic
• When summer time signals tells it is
summer time, the watch automatically
indicates summer time and setting
status switches to
SMT AU
.
2Push the crown in to position 0to finish the procedure.
The watch returns to normal indication.
Changing the summer time setting
When standard time signals are available and
automatic switching is preferable
→
Choose “
SMT AU
” or “
STD AU
”.
When standard time signals are not available
and summer time is adopted
→
Choose “
SMT MA
” or “
STD MA
”.
Change the setting to “
SMT MA
” when
summer time starts and to “
STD MA
”
when summer time ends.
When summer time is not adopted
→
Choose “
STD MA
”.
Switching summer time and standard time
1Pull the crown out to position 2.
The second hand indicates the current summer time setting.
2Rotate the crown to select time to be indicated.
• When you rotate the crown, the setting switches from “
SMT
” to “
STD
” or from
“
STD
” to “
SMT
” and time indicated changes correspondingly.
or
3Push the crown in to position 0to finish the procedure.
The watch returns to normal indication.
Changing the way to switch summer time and standard time
1Pull the crown out to position 2.
The second hand indicates the current summer time setting.
2Press and hold the lower right button Afor 2 seconds to choose the way to
switch the setting.
• Each time you press and hold the lower right button
A
for 2 seconds, “
AU
” and “
MA
”
switch alternately.
or
3Push the crown in to position 0to finish the procedure.
The watch returns to normal indication.
For users in North America and Europe
In time zones on the following table, receiving summer time signals in one of them
automatically changes indication to summer time/standard time in the other zones
covered by the same signal station.
• Nevertheless, if you change the summer time setting to “
SMT MA
” or “
STD MA
”
in a time zone, the watch does not change indication automatically in the zone
even after receiving summer time signals.
Signal station Time zone
United States –9/–8/–7/–6/–5
Germany –1/0/+1/+2

5/11
H874 Instruction manual
Receiving the time signal
Checking the previous signal reception result
1Push the crown in to position 0.
2Press and release the lower right button A.
The second hand indicates the result of the last signal reception.
OK
Reception was successful.
NO
Reception failed.
• Press the button again to return to normal indication. The hand returns to normal
indication automatically in 10 seconds without pressing the button.
• If you had operated the crown after the previous signal reception, the second hand
points “
NO
” regardless the reception result.
Receiving the time signal manually
• It takes 2 - 30 minutes to finish signal reception.
1Push the crown in to position 0.
2Press and hold the lower right button Afor 2 seconds.
The second hand indicates the result of the last signal reception.
After that, the second hand points “
RX
” and signal reception starts.
3Put the watch in the place with good conditions for time signal reception.
• Do not move the watch as far as possible while the second hand points “
RX
”.
• The watch returns to normal indication after the reception finished.
To cancel signal reception
Pressing and holding the lower right button
A
for 2 seconds while the second hand
points “
RX
” cancels signal reception and the watch returns to normal indication.
Moon phase indication
Choosing a hemisphere
Waxing and waning of the moon look different depending whether you are in the
Northern or the Southern hemisphere. Change the hemisphere setting according to
the place where you use this watch.
• When using in a place near the equator, choose “
N
” if the moon is found in the
southern sky; choose “
S
” if found in the northern sky.
1Pull the crown out to position 1.
The function hand points the current setting.
N
Northern hemisphere
S
Southern hemisphere
2Press and release the upper right button B.
• Each time you press the upper right button
B
, the setting changes alternately.
3Push the crown in to position 0to finish the procedure.
How to read moon phase indication
Northern
hemisphere
Southern
hemisphere
Lunar age (days
after the last
new moon)
0 About 7 About 15 About 23
Moon phase New moon First quarter
moon Full moon Last quarter
moon
• The moon phase indication does not represent detailed form of the moon. Please
use the indication only as a reference for moon phase.
Calibrating moon phase indication
When you find difference between moon phase indication and actual appearance,
you can adjust the indication within the range of ±2 days.
• It is recommended that the calibration is executed at a new moon or full moon, at
which you can distinguish moon phase easily.
1Pull the crown out to position 1.
The function hand points the current hemisphere setting.
2Press and hold the lower right button Afor 2 seconds.
• Each time you press and hold the lower right button
A
for 2 seconds, moon phase
indication is adjusted as below.
+1 → +2 → −2 → −1 → ±0 → (back to the top)
• Press the lower right button
A
and release immediately to reset calibration value to
±0.
3Push the crown in to position 0to finish the procedure.

6/11
H874 Instruction manual
Note on the time signal
This watch receives time signals from the five signal stations located in four regions
in the world to adjust time, calendar and moon phase indication automatically.
Signal stations Kind of the
time signal Receivable distance
A
Fukushima station (Japan) JJY Approx. 1500km
B
Kyushu station (Japan) Approx. 2000km
C
Fort Collins station (Denver, United States) WWVB Approx. 3000km
D
Mainflingen station (Germany) DCF77 Approx. 1500km
E
Shangqiu station (Henan, China) BPC Approx. 1500km
• The distance of receivable range is only used as an approximate value. The
receivable range is often affected by the following conditions: receiving
environment, time, weather, (lightning), and so on.
A
B
C
D E
About signal reception
Types of signal reception
There are three ways to receive the time signal.
Type Use
Automatic reception The watch receives time signals once a day automatically.
Manual reception (On
demand reception)
You can perform signal reception manually when
required.
Recovery automatic
reception
The watch automatically receives time signals when it
is charged enough after it stopped due to insufficient
charge.
• Even when this watch receives the signal successfully, the accuracy of the displayed
time will be dependent on the reception environment and internal processing.
• This watch keeps ±15-second monthly accuracy even if no time signal is received.
When receiving the time signal
Take off the watch with pushing the crown in to position
0
and place it on a stable
surface where it can receive the signal better, such as next to a window.
• When wire glass is used for the window, open it or
change the reception place.
• The reception antenna is located at the 9:00 position
of the watch. Place the watch with the 9:00 position
facing toward the station.
• Do not move the watch during time signal reception.
• When the second hand is moving once every two
seconds (during insufficient charge warning), time
signal reception is not executed. Charge the watch
before trying reception.
Poor reception areas
It may be difficult to receive the time signal properly under certain environmental
conditions or in areas susceptible to radio noise.
• Extremely hot or cold locations
• Inside vehicles
• Electrical appliances and OA equipment
• Near high-voltage electric cables, railway overhead cables, airports (transmission
facilities)
• Inside reinforced concrete buildings, between tall buildings, mountains, or
underground
• Near mobile phones or smartphones that are in use

7/11
H874 Instruction manual
Setting of month and year for the calendar
Set the year and month for the calendar with the position of the second hand to
indicate date and days of week correctly.
“Month” corresponds to one of the 12 zones shown in the figure below. Each number
means month.
12
1
2
3
4
5
6
7
8
9
10
11
“Year” corresponds to the years since leap year and is indicated with markers in the
zone of each month.
3
Years since leap year:
0
(Leap year)
0
Years since leap year:
1
1
Years since leap year:
2
2
Years since leap year:
3
Year Years since leap
year Second hand position
2020 2024 2028 2032 0
(Leap year) Hour marker
2021 2025 2029 2033 1
1st min. marker
2022 2026 2030 2034 2
2nd min. marker
2023 2027 2031 2035 3
3rd min. marker
Ex.: Position of the second hand when setting June 2023
You can find that the years since leap year of 2023 is "3" from the table and the
second hand must be set to the 3rd minute marker of June zone.
Setting of year for moon phase
Set the year for moon phase with the position of the second hand to indicate moon
phase correctly.
Year Second hand position Year Second hand position Year Second hand position
2023
17
2031
6
2039
14
2024
18
2032
7
2040
15
2025
0
2033
8
2041
16
2026
1
2034
9
2042
17
2027
2
2035
10
2043
18
2028
3
2036
11
2044
0
2029
4
2037
12
2045
1
2030
5
2038
13
2046
2
• For 2047 and after, set the year following the 19-year cycle you can find on the
table above.
Ex.: Position of the second hand when setting 2023
You can find that the second hand must be set to 17 seconds on the table.
Adjusting the time and calendar manually
1Pull the crown out to position 1.
The second hand indicates the current time zone setting.
2Press and hold the upper right button Bfor 2 seconds or more.
The second hand points 23 seconds.
3Pull the crown out to position 2.
The second hand points 0 second and the minute hand slightly moves.
4Press and release the upper right button Brepeatedly to change the hand/
indication to be corrected.
• Each time you press the upper right button
B
, the target changes as follows:
Hour/minute → date → day of week → year/month for calendar → year for moon phase → (back
to the top)
• The hands and indications slightly move when selected to show they become
adjustable.
5Rotate the crown to adjust the hand/indication.
• The hour, minute and 24-hour hands move synchronously.
• Check AM/PM referring to the 24-hour hand.
• Date indication changes to the next as the function hand rotates 5 times.
• When you rotate the crown quickly a few times, the hands and date indication
will move continuously. To stop the rapid movement, rotate the crown in either
direction.
6Repeat steps 4 and 5.
7Push the crown in to position 0in accordance with a reliable time source to
finish the procedure.

8/11
H874 Instruction manual
Charging your watch
This watch has a solar cell under the dial and stores the power
generated by the cell in its built-in rechargeable cell.
The cell is charged by exposing the dial to light such as direct
sunlight or fluorescent lamps.
For optimal performance, be sure to:
• Put the watch in a location where the dial is exposed to bright
light such as by the window even when it is not used.
• Expose its dial to direct sunlight for 5 or 6 hours at least every
week.
• Avoid leaving it in dark places for long periods of time.
CAUTION
• Do not charge the watch at a high temperature (about 60°C (140°F) or higher) as
doing so may cause movement malfunction.
• If the watch is obscured from light by long sleeves frequently, supplemental
charging may be needed to ensure continual operation.
• The watch stops charging automatically after finishing (overcharging prevention
function). The function prevents damage to performance of the watch and
rechargeable cell due to overcharging.
When the watch reaches a low charge state (insufficient charge warning
function)
When the power reserve becomes low, the second hand moves
once every two seconds. This is the insufficient charge warning
function. Be sure to fully charge your watch immediately as
outlined below.
• When the watch is sufficiently charged, the second hand will
move normally.
• If you do not charge the watch for 2 days or longer after the
insufficient charge warning movement has begun, the watch will be depleted of all
power and stop.
During the insufficient charge warning state
The time and date are indicated correctly. However, other functions of the watch
will not be available for use.
Charging time by environment
Below are the approximate charging times when exposing to light continuously.
Please use this table as a reference only.
Environment Illuminance
(lx)
Charging time (approx.)
To work for one
day
To start working
normally when the
cell is discharged
To become fully
charged when the
cell is discharged
Outdoors
(sunny)
100,000
2 minutes 2.0 hours 40 hours
Outdoors
(cloudy)
10,000
11 minutes 2.0 hours 50 hours
20 cm (7-
7/8 inches)
away from a
fluorescent
lamp (30 W)
3,000
40 minutes 4.0 hours −
Interior lighting
500
4.0 hours 17 hours −
•
Exposing to direct sunlight is recommended to charge your watch.
A fluorescent
lamp or interior lighting does not have sufficient illumination to charge the
rechargeable cell efficiently.
Duration without additional charging after charging the watch fully
About 6 months
Power save function
The hands stop automatically to save power when the watch has been kept in a dark
place for a certain period of time and it cannot generate power.
• The watch works normally even while saving power. However, signal reception is
not executed.
• The power save function is not activated when the position of the crown is
1
or
2
.
Canceling the power save function
The power save status ends and the hands return to normal indication as the watch
is operated or the dial is exposed to light and power generation starts.
Troubleshooting
Cannot receive time signals
Symptom Remedies Page
The second hand
does not point
“
RX
”.
Charge the watch previously if required.
8
Push the crown in to position
0
.
5
Check the current reference position of the hands of the
watch and correct it if needed.
9
Reception result
indicated is “
NO
”
after reception.
Check the time zone setting.
3
Check areas where time signals are receivable.
6
Remove the watch and place it on a stable surface where
it can receive the signal better, such as next to a window
facing the signal station.
6
Movement of a hand seems strange
Symptom Remedies Page
The second hand
moves once every
two seconds.
Insufficient charge warning function is active. Power
reserve of the watch is nearly empty. Charge immediately.
8
The second hand
does not move. Push the crown in to position
0
. –
No hands move. Charge the watch under direct sunlight until the second
hand moves normally.
8
The hands start
quick movement
suddenly.
The power save function is canceled. Wait until the
current time and calendar are displayed.
8
Time/calendar is abnormal.
Symptom Remedies Page
Time/calendar is
incorrect.
Check the time zone setting.
3
Check the summer time (DST) setting.
4
Receive the signals to adjust the time and calendar.
5
Adjust the time and calendar manually.
7
Check and correct the reference position of the hands.
9
Time/calendar
becomes incorrect
soon after manual
adjustment.
Check and correct the reference position of the hands.
9
Moon phase
indication is
incorrect.
Check the hemisphere setting.
5
Receive the signals to adjust the time and calendar.
5
Adjust the time and calendar manually.
7
Check and correct the reference position of the hands.
9
Calibrate moon phase indication manually.
5
Summer time
and the standard
time do not switch
automatically.
Change the summer time setting to “
SMT AU
” or “
STD
AU
” and execute signal reception.
4
Execute signal reception in a place where it is summer
time.
5
The standard time
is indicated though
it is summer time.
Receive the time signal manually.
5
Change the summer time setting to “
SMT MA
”.
4
Summer time is
indicated though
it is not summer
time.
Receive the time signal manually.
5
Change the summer time setting to “
STD MA
”.
4

9/11
H874 Instruction manual
Checking and correcting the reference position
If the time or calendar is not shown correctly even after proper reception of the time
info, check whether the reference position is correct.
• If the hands and indication do not reflect the correct reference position, the time
and calendar will not be indicated accurately even if the time info is received.
What is the reference position?
The base position of all hands and calendar to
properly indicate the various functions of this
watch.
• Moon phase indication: Full moon
• Function hand: “S” (Sunday)
• Date indication: midway between “31” and
“1”
• Hour, minute and second hands: 0 hour 00
minute 0 second
• Position of the 24-hour hand: “24”
Correct reference positions
1Push the crown in to position 0.
2Press and hold the upper right button Bfor 10 seconds or more.
The hands and indication start to move to the current reference positions stored
in memory.
• Release the button as the hands start to move.
3Check the reference positions of them referring to the illustration above.
Correct Press and release the upper right button
B
to finish the
procedure.
Wrong Proceed to step 4 and correct the reference position.
4Pull the crown out to position 2.
The moon phase indication slightly moves and reference position of the
indication becomes adjustable.
5Press and release the upper right button Brepeatedly to change the hand/
indication to be corrected.
• Each time you press the button, the target changes as follows:
Moon phase indication → function hand/date indication → hour, minute and 24-hour hands →
second hand → (back to the top)
• The hands and indications slightly move when selected to show they become
adjustable.
6Rotate the crown to adjust the hand/indication.
• The hour, minute and 24-hour hands move synchronously.
• Rotate the crown clockwise to adjust reference position of the function hand and
date indication.
• Date indication changes to the next as the function hand rotates 5 times.
• When you rotate the crown quickly a few times, the hand/indication will move
continuously. To stop the rapid movement, rotate the crown in either direction.
7Repeat steps 5 and 6.
8Push the crown in to position 0.
9Press and release the upper right button Bto finish the procedure.
The watch returns to normal indication.
Resetting the watch - All Reset
When the watch does not work properly, you can reset all the settings. If the power
reserve is insufficient, charge the watch first.
Be sure to perform the following operations after All Reset.
1Correct the reference positions.
After All Reset, the watch is in the reference position adjustment mode. Refer
to step 5 and after on page
9
.
2Set the time zone.
See page
3
.
3Adjust the time and calendar.
When adjusting them by receiving signals manually → page
5
When adjusting them manually → page
7
1Pull the crown out to position 2.
The second hand and the function hand indicate the summer time setting and
power reserve respectively.
2Press and release the upper right button Bfor 2 seconds.
The second hand points to 0 second.
3Press and hold buttons Aand Bat the same time for 4 seconds or more and
release them.
The hands and indication start moving and All Reset is executed. Wait until
movement of the hands and indication stops.
The setting values after All Reset
Time 0:00:00 AM
Month and year for the
calendar
January of the second year since a leap year (second hand
position: 7 seconds)
Date 1
Day of week S (Sunday)
World time Time zone 0
Summer time “
STD AU
” at all time zone
Northern/Southern
hemisphere Northern hemisphere
Year for moon phase 2010 (second hand position: 4)
Lunar age 15 (full moon)
Calibration value for moon
phase indication ±0

10/11
H874 Instruction manual
Eco-Drive watch handling precautions
<Always Make Sure to Recharge Frequently>
■ Long sleeves may inhibit light transmission to your watch. This may result in your watch loosing
charge. In these cases supplemental charging may be necessary.
■ When you take off the watch, try to place it in as bright a location as possible. This will ensure
optimal operation.
CAUTION Recharging Precautions
• Do not charge the watch at a high temperature (about 60°C (140°F) or
higher) as doing so may cause the movement to malfunction.
Ex.:
-Charging the watch too close to a light source which generates a large
amount of heat such as an incandescent lamp or halogen lamp. When
charging under an incandescent lamp, be sure to leave 50 cm (19-11/16
inch) or more between the lamp and the watch to avoid exposing the
watch to excessive heat.
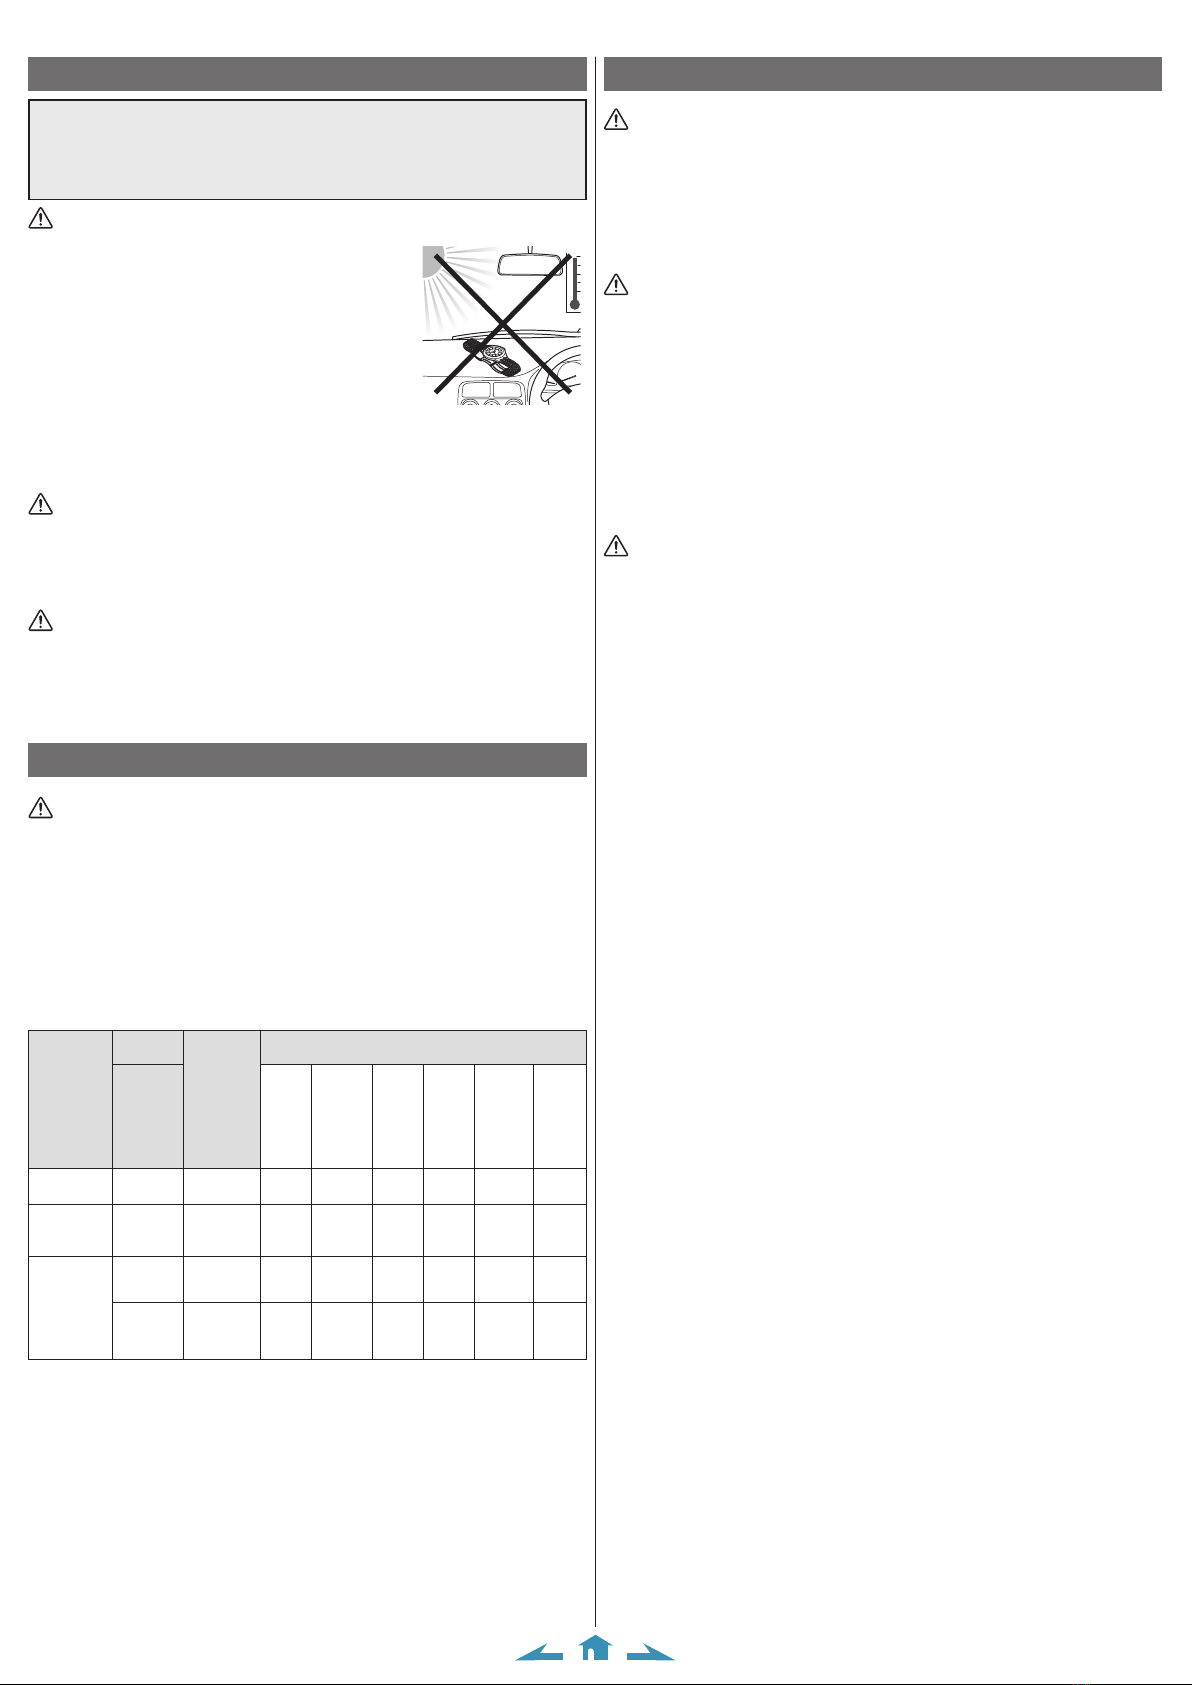
-Charging the watch in a location where the temperature may become
extremely high such as on the dashboard of a vehicle.
<Replacement of Rechargeable Cell>
• This watch utilizes a special rechargeable cell that does not require periodical replacement.
However power consumption may increase after using the watch for a number of years due to wear of
internal components and deterioration of oils. This may cause stored power to be depleted at a faster rate.
WARNING Handling of Rechargeable Cell
• The rechargeable cell should never be removed from the watch. If for any reason it becomes necessary
to remove the rechargeable cell from the watch, keep out of the reach of children to prevent accidental
swallowing. If the rechargeable cell is accidentally swallowed, consult a doctor immediately.
• Do not dispose of the rechargeable cell with ordinary garbage. Please follow the instructions of your
municipality regarding collection of batteries to prevent the risk of fire or environmental contamination.
WARNING Use Only the Specified Battery
• Never use a battery other than the rechargeable cell specified for use in this watch.
Although the watch structure is designed so that it will not operate when another type of battery is
installed, if a conventional watch battery or other type of battery is installed in the watch and the watch
is recharged, there is the risk of overcharging which may cause the battery to rupture. This can cause
damage to the watch and injury to the wearer. When replacing the rechargeable cell, always make sure to
use the designated rechargeable cell.
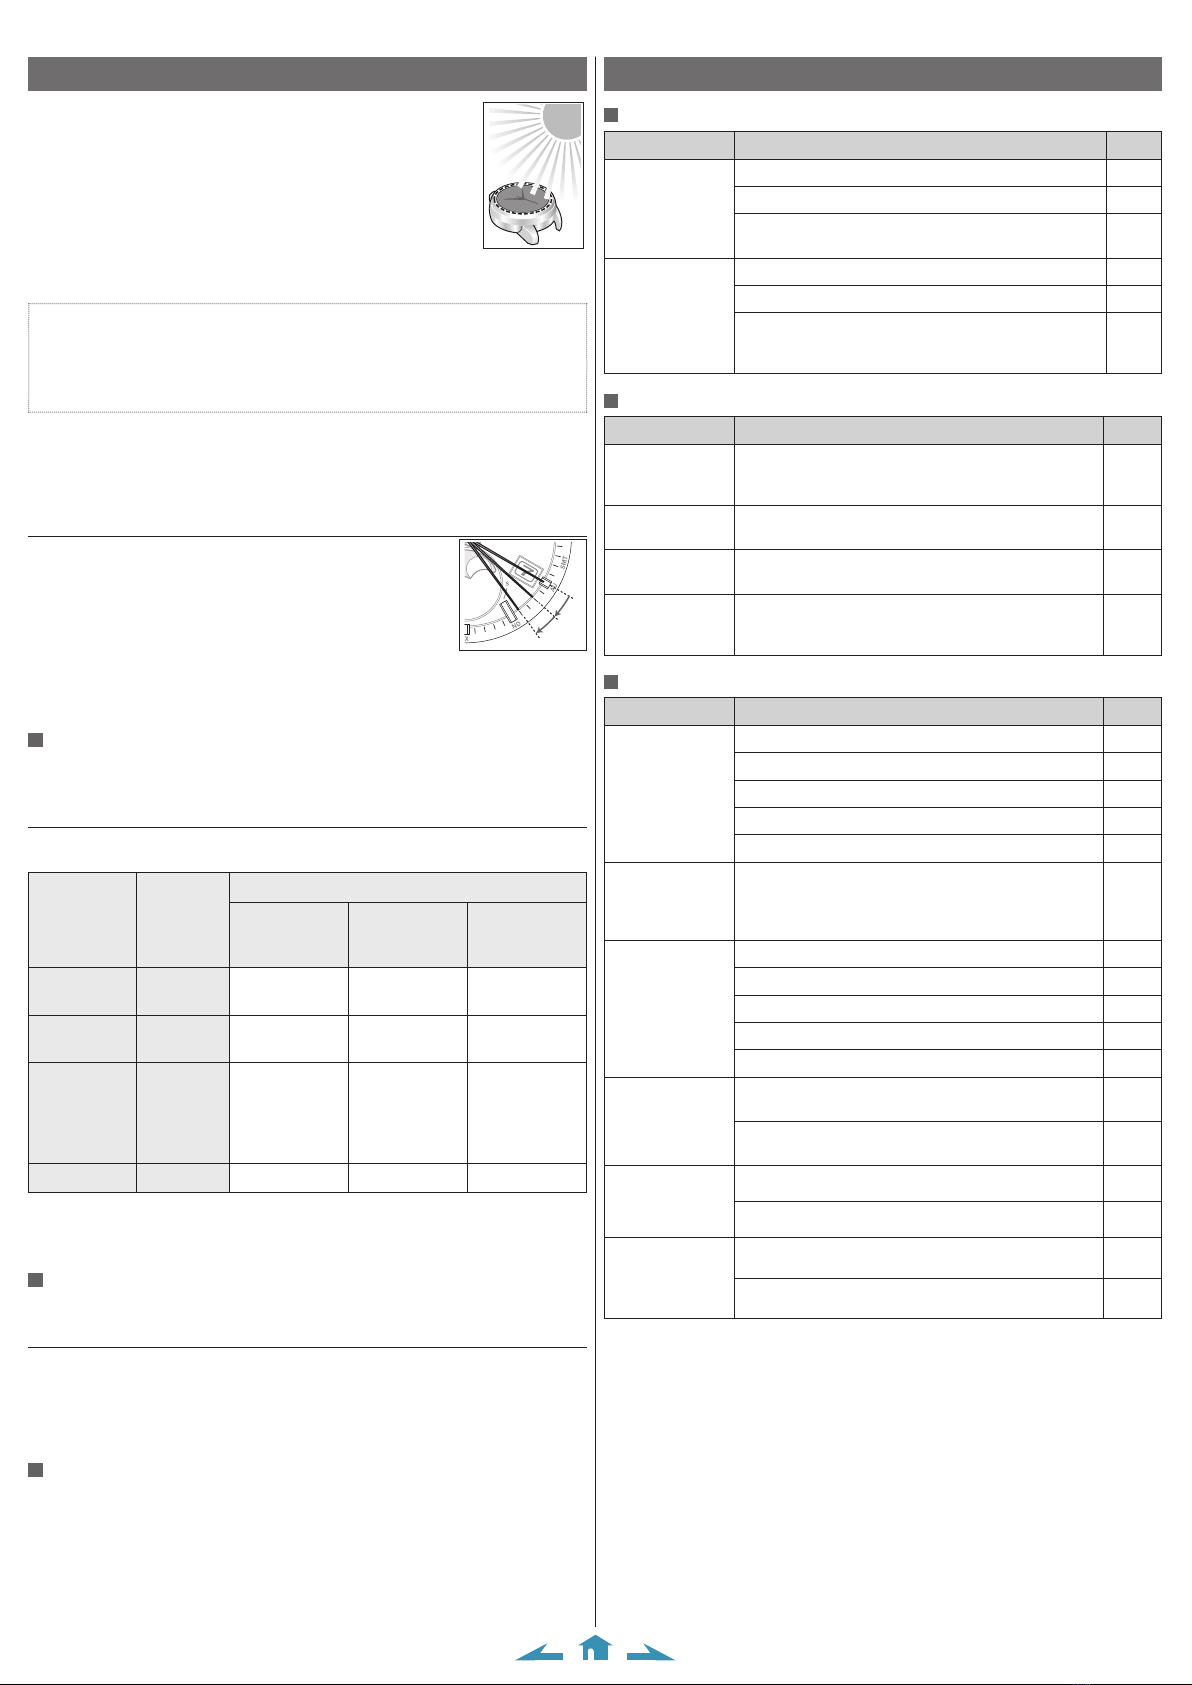
Water resistance
WARNING Water resistance
• Refer to the watch dial and/or the case back for the indication of the water resistance of your watch. The
following chart provides examples of use for reference to ensure that your watch is used properly. (The
unit “1bar” is roughly equal to 1 atmosphere.)
• WATER RESIST(ANT) ××bar may also be indicated as W.R.××bar.
• Non-water resistant models are not designed to come into contact with any moisture. Take care not to
expose a watch with this rating to any type of moisture.
• Water resistance for daily use (to 3 atmospheres) means the watch is water resistant for occasional
accidental splashing.
• Upgraded water-resistance for daily use (to 5 atmospheres) means that the watch may be worn while
swimming, but is not to be worn while skin diving or scuba diving.
• Upgraded water-resistance for daily use (to 10/20 atmospheres) means that the watch may be worn while
skin diving, but not while scuba diving or saturated diving using helium gas.
Name
Indication
Specification
Water-related use
Dial or Case
back
Minor
exposure
to water
(washing
face,
rain,
etc.)
Swimming
and
general
washing
work
Skin
diving,
marine
sports
Scuba
diving
using an
air tank
Saturation
diving
using
helium gas
Operate
the crown
or button
when the
watch is
wet
Non-water
resistant −Non-water
resistant
NO NO NO NO NO NO
Everyday-use
water resistant
watch
WATER RESIST
Water-
resistant to 3
atmospheres
OK NO NO NO NO NO
Upgraded
everyday use
water resistant
watch
W. R. 5 bar
Water-
resistant to 5
atmospheres
OK OK NO NO NO NO
W. R. 10 bar
W. R. 20 bar
Water-resistant
to 10 and 20
atmospheres
OK OK OK NO NO NO
Precautionary items and usage limitations
CAUTION To Avoid Injury
• Be particularly careful when wearing your watch while holding a small child, to avoid injury.
• Be particularly careful when engaged in strenuous exercise or work, to avoid injury to yourself and others.
• Do NOT wear your watch while in a sauna or other location where your watch may become excessively
hot, since there is the risk of burns.
• Be careful when putting on and taking off your watch, since there is a risk of damaging your fingernails,
depending on the manner in which the band is fastened.
• Take off your watch before going to bed. It may cause an unexpected injury or a rash.
CAUTION Precautions
• Always use the watch with the crown pushed in (normal position). If the crown is of the screw lock-type,
make sure it is securely locked.
• Do not operate (use the crown and/or buttons) the watch when it is wet. Water may enter the watch
causing damage to vital components.
• If water enters the watch or the watch fogs up and does not clear up even after a long time, consult your
dealer or an authorized service center for inspection and/or repair.
• Even if your watch has a high level of water resistance, please be careful of the following.
-If your watch is immersed in sea water, rinse thoroughly with fresh water and wipe with a dry cloth.
-Do not pour water from a tap directly onto your watch.
-Take off your watch before taking a bath.
• If seawater enters the watch, place the watch in a box or plastic bag and immediately take it in for repair.
Otherwise, pressure inside the watch will increase, and parts (crystal, crown, push button, etc.) may come
off.
CAUTION When Wearing Your Watch
<Band>
• Leather bands and rubber (urethane) bands will deteriorate over time due to perspiration or dirt.
In addition, they are made of natural material and will be worn, deformed and discolored over time. It is
recommended to replace the band periodically.
• The durability of a leather band may be affected when wet (fading, peeling of adhesive), owing to the
properties of the material. Moreover, wet leather may cause a rash.
• Do not stain a leather band with substances containing volatile materials, bleach, alcohol (including
cosmetics). Discoloration and premature aging may be occurred. Ultraviolet light such as direct sunlight
may cause discoloration or deformation.
• It is recommended to take off the watch if it gets wet, even if the watch itself is water-resistant.
• Do not wear the band too tightly. Try to leave enough space between the band and your skin to allow
adequate ventilation.
• The rubber (urethane) band may be stained by dyes or soil present in or on clothing or other accessories.
Since these stains may not be removable, caution is required when wearing your watch with items that
tend to easily transfer color (articles of clothing, purses, etc.). In addition, the band may be deteriorated by
solvents or moisture in the air. Replace with a new one when it has lost elasticity or become cracked.
• Please request adjustment or repair of the band in the following cases:
-You notice an abnormality with the band due to corrosion.
-The pin of the band is protruding.
• We recommend seeking the assistance of an experienced watch technician for sizing of your watch. If
adjustment is not done correctly, the bracelet may unexpectedly become detached leading to loss of your
watch or injury (excluding products containing the band adjustment tool).
Consult an authorized service center. Other shops may charge for, or may not provide, the service.
<Temperature>
• The watch may stop or the function of the watch may be impaired in extremely high or low temperature.
Do not use the watch in places where the temperature is outside the operating temperature range as stated
in the specifications.
<Magnetism>
• Analog quartz watches are powered by a step motor that uses a magnet. Subjecting the watch to strong
magnetism from the outside can cause the motor to operate improperly and prevent the watch from
keeping time accurately.
Do not allow the watch to come into close proximity to magnetic health devices (magnetic necklaces,
magnetic elastic bands, etc.) or the magnets used in the latches of refrigerator doors, clasps used in
handbags, the speaker of a cell phone, electromagnetic cooking devices and so on.
<Strong Shock>
• Avoid dropping the watch or subjecting it to other strong impact. It may cause malfunctions and/or
performance deterioration as well as damage to the case and bracelet.
<Static Electricity>
• The integrated circuits (IC) used in quartz watches are sensitive to static electricity. Please note the watch
may operate erratically or not at all if exposed to intense static electricity.
<Chemicals, Corrosive Gasses and Mercury>
• Do not use the watch in environment with chemicals or corrosive gasses. If paint thinner, benzene or
other solvents or products containing these solvents (including gasoline, nail-polish remover, cresol,
bathroom cleaners and adhesives, water repellent, etc.) are allowed to come into contact with the watch,
they may discolor, dissolve or crack the materials. Be careful when handling these chemicals. Contact with
mercury such as that used in thermometers may also cause discoloration of the band and case.
<Protective Stickers>
• Be sure to remove any protective stickers that may be on your watch (case back, band, clasp, etc.).
Otherwise, perspiration or moisture may enter the gaps between the protective stickers and the parts,
which may result in a skin rash and/or corrosion of the metal parts.

11/11
H874 Instruction manual
CAUTION Always Keep Your Watch Clean
• Rotate the crown while it is pressed in fully and press the buttons periodically so they do not become
stuck due to accumulations of foreign matter.
• The case and band of the watch come into direct contact with the skin. Corrosion of the metal or
accumulated foreign matter may result in black residue coming from the bracelet when exposed to
moisture or perspiration unnoticed soiling such as that caused by perspiration. Be sure to keep your watch
clean at all times.
• The case and band of the watch come into direct contact with the skin. In rare circumstances,
accumulated dirt, foreign matter may cause irritation with the skin. If you think there is something
wrong, discontinue wearing the watch immediately and consult your physician.
In the case of accumulation of sweat or dirt on a metal band or case, clean thoroughly using a brush and
neutral detergent. In the case of a leather or rubber (urethane) band, wipe clean using a dry cloth.
• Leather bands may become discolored by perspiration or dirt. Always keep your leather band clean by
wiping with a dry cloth.
Caring for Your Watch
• Wipe any dirt or moisture such as perspiration from the case and crystal with a soft cloth.
• For a metallic, plastic or rubber (urethane) watchband, wash any dirt off with water. Remove the small
amounts of dirt trapped between the crevices of the metallic band with a soft brush.
• For a leather band, wipe off dirt using a dry cloth.
• If you will not be using your watch for an extended period of time, carefully wipe off any perspiration,
dirt or moisture and store in a proper location, avoiding locations subject to excessively high or low
temperatures and high humidity.
When Luminous Paint is used for your watch
The paint on the dial and hands helps you with reading the time in a dark place. The luminous paint stores light
(daylight or artificial light) and glows in a dark place.
It is free from any radioactive substance or any other material harmful to a human body or environment.
• The light emission gradually becomes weaker as time passes.
• The duration of the light (“glow”) will vary depending on the brightness, types of and distance from a
light source, exposure time, and the amount of the paint.
• The paint may not glow and/or may dissipate quickly if exposure to light was not sufficient.
Specifications
Model H874 Type Analog solar-powered watch
Timekeeping
accuracy
(without reception)
Average monthly accuracy: ±15 seconds when worn at normal
operating temperatures between +5°C (41°F) and +35°C (95°F)
Operating
temperature range ‒10°C (14°F) to +60°C (140°F)
Display functions
• Time: Hours, minutes, seconds, 24-hour
• Calendar: Date, day of week
• Moon phase indication
Duration
• Fully charged to fully discharged: About 6 months
When power save functions all the day: approximately 2.5 years
• Power reserve upon insufficient charge warning function:
Approximately 2 days
Battery Rechargeable cell (lithium button cell), 1pc.
Additional
functions
• Solar power function
• Overcharging prevention function
• Insufficient charge warning function (two-second interval
movement)
• Power reserve indication (in four levels)
• Energy saving function (power save feature)
• Receiving time signal (automatic, on demand, automatic recovery)
Signal stations: Japan (East/West)/USA/Germany/China
• Automatic signal station selection function (for Japan standard
signals only)
• Confirming reception status (RX)
• Indicating the result of the last reception (OK/ NO)
• World time (24 time zones)
• Summer time (automatic/manual switching between summer time
and standard time)
• Perpetual calendar (until February 28th, 2100)
• Automatic moon phase calculation
• Moon phase appearance switching function (Northern/Southern
hemisphere)
• Moon phase calibration function (manual)
• Antimagnetic performance/Impact detection function/Automatic
hand correction function
Specifications and contents are subject to change without prior notice.
Table of contents
Other Citizen Watch manuals

Citizen
Citizen 9800 User manual

Citizen
Citizen F900 User manual

Citizen
Citizen B876 Operating manual

Citizen
Citizen 6P25 User manual

Citizen
Citizen 0S2A User manual

Citizen
Citizen G67X User manual

Citizen
Citizen U60 User manual

Citizen
Citizen E650 User manual

Citizen
Citizen MOVEMENT CAL GP00 User manual

Citizen
Citizen G82 User manual

Citizen
Citizen CTZ-B6813 User manual

Citizen
Citizen C660 User manual

Citizen
Citizen H240 User manual

Citizen
Citizen C460 User manual

Citizen
Citizen C100 Manual

Citizen
Citizen CB1 Series User manual

Citizen
Citizen H33 Series User manual

Citizen
Citizen H82 User manual

Citizen
Citizen JM8XXX User manual

Citizen
Citizen F335 User manual