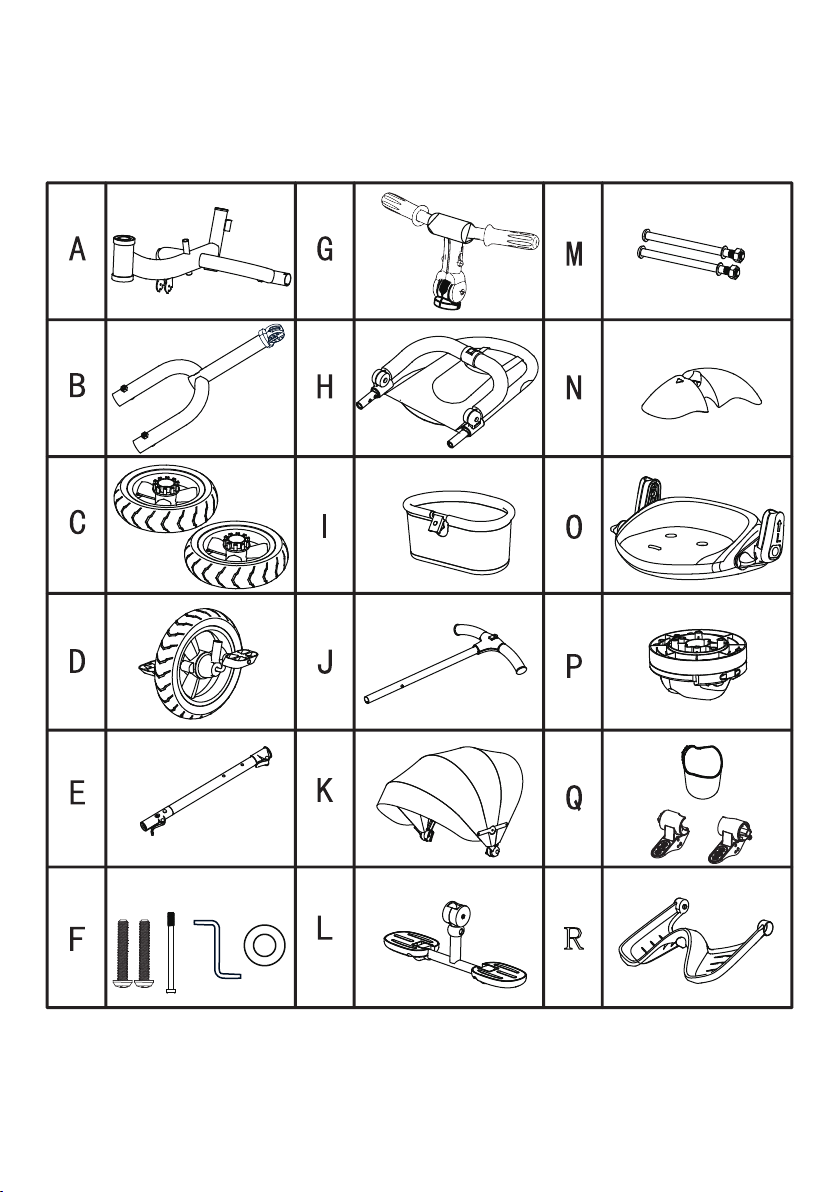
Coccolle corso User manual

RO Tricicleta pentru copii
Manual de instructiuni / Hasznalati utmutato /
Manuale di instruzioni / User’s manual
IT Triciclo per bambini
R
HU Tricikli
EN Baby Tricycle

1
1
2
23 4
1.

Second step
First step
D
C
B
B
A
N
N
M M
Q-2
scew
screw nut, shim
screw
2.

First step
Third step
A
O
P
click
Second step
Second step
H
O
4
L
L

K
H
R
O
R
6
E
J
click
click

Pull

lock
unlock
Push
3.

4.

RO
1. Acest produs este destinat copiilor cu varsta cuprinsa intre 9 luni si 4 ani.
Atentionari
2. Inainte de utilizare, cititi cu atentie aceste instructiuni si pastrati-le pentru referinte viitoare.
4. Aveti grija ca membrele parintelui sa nu fie prinse in timpul montarii produsului.
7. Suruburile cu care este fixat acest produs trebuiesc verificate periodic si stranse in caz ca
acestea slabesc pe parcursul utilizarii.
8. Acest produs poate fi utilizat in 2 feluri: poate fi folosit de copil cu ajutorul pedalelor sau poate
fi impins de parinte.
2. Inainte de fiecare utilizare, verificati ca toate componentele sa fie bine si strans fixate.
Fixarea este elementara in utilizarea tricicletei, elementele nefixate pot rani copilul!
3. Nu supraincarcati produsul!
4. Nu folositi produsul in medii excesiv de reci, calde sau umede.
1. Dupa despachetare, ambalajele trebuiesc aruncate sau reciclate dupa caz.
3. Tineti produsul departe de foc si de surse directe de caldura.
5. Nu va jucati cu acest produs pe strada!
Ingrijire si mentenanta
6. Greutatea maxima pe care acest produs o poate suporta este de 30 kg.
5. Evitati lovirea produsului de obiecte tari.
6. Nu este necesar sa spalati produsul: este suficient sa stergeti tricicleta cu o carpa umeda.
7. Evitati rugina partilor metalice prin lubrifierea periodica a acestora.
8. Atentie! Acest produs poate fi asamblat de catre un adult.
B. Furca fata
F.
1 Surub M8*38
C. Roti spate
1. Lista piese
A. Cadru
D. Roata fata
E. Tija auxiliara – parte inferioara
2 Surub M8*110
L. Suport picioare
I. Cos spate
O. Sezut
M. Ax roti
2 Frane
K. Copertina
J. Tija auxiliara – parte superioara
3 Cheie 5M-6M
4 Garnitura 8§
H. Spatar
N. Aparatoare de noroi
P. Fixator sezut
Q.
1 Suport pahare
R. Suport picioare bebelusi
G. Ghidon

RO
- introduceti partea superioara a tijei auxiliare (J) in partea inferioara a tijei auxiliare (E) pana
cand auziti sunetul click. Inserati apoi in cadru (A) si fixati cu ajutorul unui surub.
- introduceti copertina in partile laterale ale sezutului.
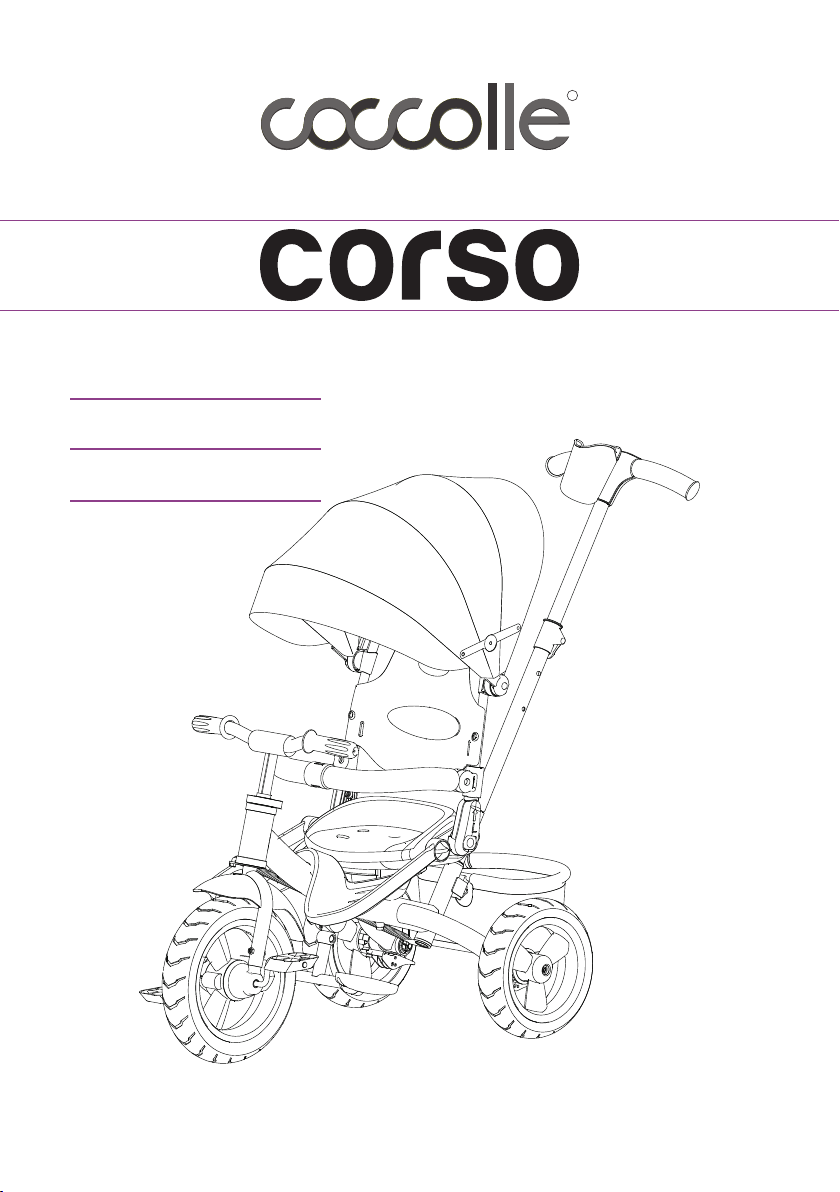
3. Functii
- frana dubla - ghidon pliabil
- puneti suportul de pahar pe tija auxiliara.
- sistemul roata libera - sezut reversibiL
- indepartati surubul de plastic din partea laterala a sezutului (A), apoi inserati acolo suportul de
picioare pentru bebelusi in acea canelura; fixati cu ajutorul unui surub (3N*M).
- introduceti cosul din spate (I) in partea din spate a cadrului finalizand fixarea cu un surub.
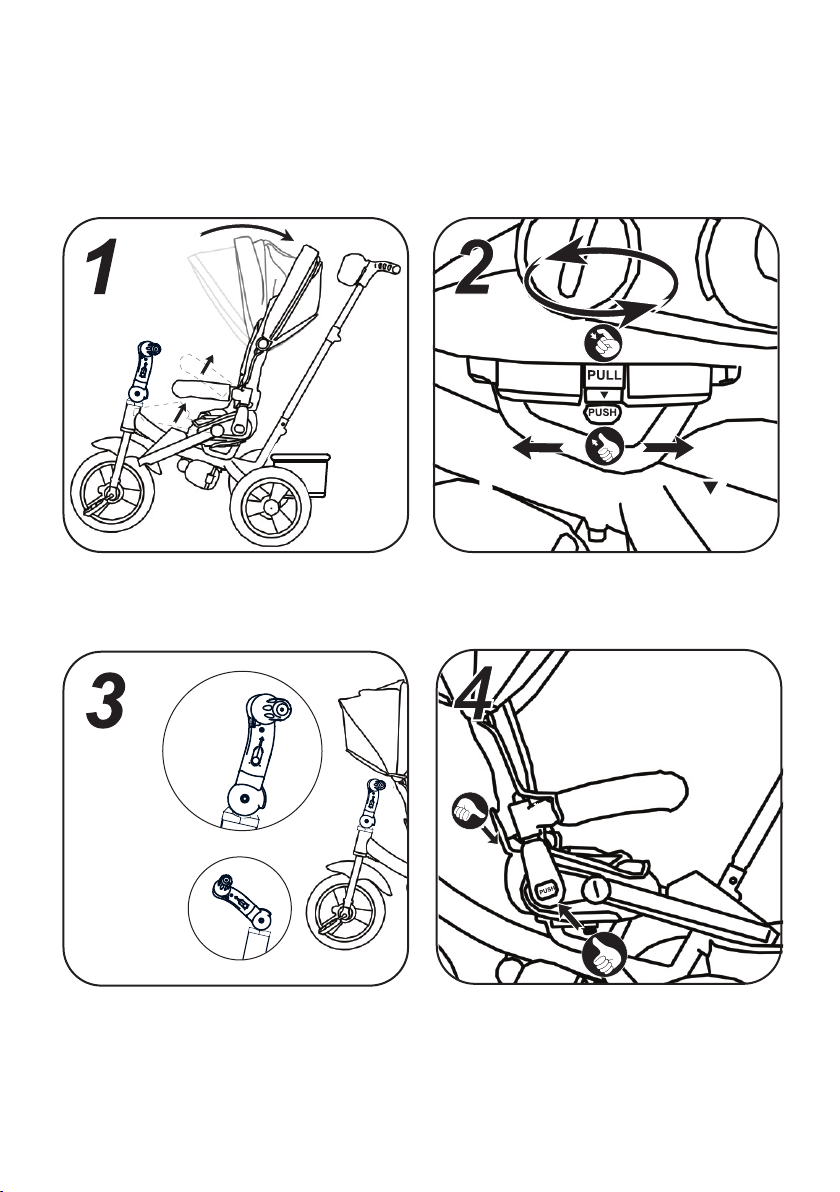
Pas 6
- suport de picioare pliabil - copertina ajustabila
- scoateti surubul de pe suportul de picioare (L), apoi puneti suportul pe cadru (A) fixand cu
ajutorul surubului (3NM).
- introduceti spatarul (H) in sezut (O) pana auziti sunetul click.
- introduceti roata fata in cadru (A) apoi strangeti cu ajutorul unui surub (F2).
Pas 4
- introduceti aparatoarea de noroi (N) in furca fata (B), utilizand pentru fixare un surub (3N*M).
Pas 5
- introduceti ghidonul (G) in furca fata (B), apoi strangeti cu un surub M5*35 pana auziti sunetul
click.
Pas 1
- scoateti surubul de pe roata din fata (D), apoi introduceti furca fata (B) in roata din fata (D)
fixand cu ajutorul unui surub (5N*M).
Pas 2
- fixati fixatorul de sezut (P) pe sezut (O) cu ajutorul unui surub M8*110 (F3) si garnitura (F4).
Puneti apoi sezutul pe cadru (A). Finalizati fixarea cu ajutorul unui surub M8*38 (F2).
Pas 3
2.
- slabiti surubul de sub cadru (A), apoi inserati frana (Q2), garnitura, roata spate (C), axul rotilor
din spate (M) in furca spate. Fixati cu surubul si cheia. Verificati rotirea rotilor din spate pentru a
va asigura ca se rotesc corect si sunt bine fixate.

HU
F.
J. Toló kar szár - also
4 lezárás 8§
1 Pohártartó
E. Toló kar szár - felso
R. Bebi lábtartóval
Q.
L. Lábtartóval
2 Fék
A. Váz
G. Kormány
H. Háttámla
I. Hátsó tároló kosár
D. Első kerék
1 csavar M8*38
B. Első villa
2 csavar M8*110
K. Kupola
M. Kerek tengely
O. Ülés ( ülésbetéttel és biztonsági övvel )
1.
C. Hátsó kerekek
3 csavarkulcs 5M-6M
N. Első sárvédő
P. Ülés fixáló
7. Mielőtt használni kezdenék a triciklit, a szülő figyelmesen olvassa el a használati utasítást és
őrizze meg azt. A nem előírásszerű használat veszélyeztetheti a gyermek egészségét.
1. 1,5 és 3 év közötti gyermekek számára ajánlott, 30 kg-os súly alatt.
2. Mielőtt a gyermek használni kezdi a triciklit, a szülő tanítsa meg a következőkre: pedálok
használata, kormányzás, tekerés, le- és felszállás. Ha a gyermek nem tud egyedül biciklizni, a
szülő fogja meg a toló kart. Ez idő alatt a gyermeket védje a biztonsági keret. Tanítsa meg
gyermekének, hogy menet közben ne tegye le a lábát, mert az balesetveszélyes.
4. Triciklit sima felületen ajánlott használni. Tilos lépcsőn, lejtők, tavak, utak és utcák, valamint
egyeletlen felületeken használni, ellenkező esetben a gyermek megsérülhet. Biciklizés közben
ne tolja a gyermeket.
5. Maximális terhelhetőség 20 kb. Kizárólag gyermekek számára alkalmas. Tilos túlterhelni,
mert a tricikli megsérülhet.
FIGYELMESEN OLVASSA EL ÉS ŐRIZZE MEG A HASZNÁLATI UTASÍTÁST!
3. Figyelem! Ha a gyermek biciklizik, a szülő minden esetben tartsa szemmel.
6. Figyelem! Miután kicsomagolta a triciklit, a műanyag zacskókat és egyéb csomagoló
anyagokat távolítsa el, hogy azok játék közben ne okozzanak sérülést a gyermeknek.

HU
2.
- tegye be az elso kereket a vazban (A) azutan biztositsa egy csavarral (F2).
Lépés 5
- tegye a pohartatot a tolo karra.
3. Funkciok
- tegye be a felso tolo kar reszet (J) az also reszeben (E) medig egy click halatszik. Ezutan
tegye be a vazban (A) es bisztositsa egy csavarral.
- tegye be kupolat az oldalso ules resezereire.
- tegye be a hatso tarolo kosart (I) a vaz hatso reszeben; bisztositsa egy csavarral.
- tegye be a sárvédőt (N) az első villa (B) használyon egy csavart (3N*M).
Lépés 1
- távolítsa el a csavart az első kerekrol (D) es azutan tegye az első villat (B) az elso kereben
(D), biztositja egy csvaral (5N*M).
Lépés 3
- tegye be a kormanyt (G) az elso villaban (B), azutan biztositsa egy csavarral M5*35 amedig a
click halszik.
Lépés 2
- csavarlja ki a vaz allati csavart (A), azutan tegye a be a feket (Q2), a lezarast, hatso kerekeket
(C), a kerek tengelyt (M) a hatso villaban. Biztositja a csavarrale es a csavarkulcsal. Ellenorize
hogy a hatso kereket helyesen forognak es jol vanak biztositva.
- erositse az ules fixalot (P) az ulesre (O) egy csavar M8*110 (F3) es egy lezaras (F4)
segitsegevel. Tegye az ulest a vazra (A). Fejezze be egy csavarral M8*38 (F2).
- tegye be a hattamla (H) az ulesben (O) meddig halatszik egy click.
Lépés 4
- vegye ki a csavart a labtartorol (L), azutan tegye a labtartot a vazra (A) es bisztositsa egy
cvarral (3NM).
- tavolitsa el a plasztic csavart ami az oldalso vaz (A) reszen van; oda tegye be a bebi labtartot;
bisztositsa egy csavarral (3N*M).
Lépés 6
- osszehajhato labtarto - allithato kupola
- szabad kerek funkcio - reverzibilis ules
- dupla fek - oszzehajhato kormany

IT
3. Conservare le presenti istruzioni per riferimento futuro.
8. Controllare sempre che tutti i componenti siano serrate propriamente.
2. Prima di ogni utilizzo, controllare che tutte le parti siano strette propriamente.
4. Non sovraccaricare il prodotto.
Avvertenze!
7. Peso massimo: 30 kg
C. ruota posteriore
1. Il prodotto è compatibile per bambini con eta compresa tra 37 mesi e 72 mesi.
2. prima di utilizzare, leggere attentamente il manuale di uso, se non sono seguite le istruzioni,
si puo mettere in pericolo la sicurezza de vostro bambino
4. Tenere il prodotto lontano dal fuoco.
5. Il prodotto deve essere installato da un adulto. Fare attenzione ale mani e ai piedi durante la
instalazione. Non lasciare il bambino giocare nella prossimità del prodotto durante il montaggio.
6. Non usare il prodotto su la strada.
1. Dopo il disimballaggio, disperdere il imballaggio negli appositi contenitori specifici.
Avvertenze e Manutenzione:
3. Se i componenti non sono correttamente serrati possono mettere in pericolo la sicurezza del
bambino
8. Questo prodotto può essere utilizzato in due modi:
- Dal genitore spingendo il manubrio di direzione quando il bambino è troppo piccolo per
guidare un triciclo.
- dal bambino, quando è abbastanza grande per guidare un triciclo.
9. Il triciclo deve essere utilizzato con cautela perché richiede la capacità di essere maneggiata
senza a causare incidenti al bambino o al altre persone.
10. Deve essere installata da un adulto.
6. Non lavare con detergente o un panno umido poiché ciò potrebbe danneggiare la finitura
lucida.
7. Pulite le saldature con oli naturali per prevenire la formazione di ruggine.
1. Istruzioni di montaggio:
5. Evitare l'uso in un ambiente molto caldo, freddo o umido.
A. Telaio
B. Forcella anteriore
D. ruota anteriore
F.
F-1. Vite M8*38
F-2. Vite M8*110
E. Asta di spinta (basso)
F-3. Chiave 5M-6M
F-4. Distanziale
2 Parti del freno 2
R. Poggiapiedi anteriore
H. Schienale
L. Poggiapiedi centrale
M. Asse posteriore
Q.
1 Tazza
P. Ritenzione Sedile
N. Parafango
G. Manubrio
O. Sedile
I. Cestello posteriore
J. Barra di spinta (verso l'alto)
K. Tettuccio

IT
1. Togliere la vite di plastica sul lato del sedile (A), quindi inserire il poggiapiedi anteriore
anteriore in esso e serrare con il vite di plastica (3N * M).
Passo 6
Passo 2
3. Fissare la ritenzione sedile (P) nella sede (O) con M8 * 110 vite (F-3) (5N * M) e il distanziale.
Inserire quindi il sedile sul telaio (A), serrare con la vite M8 * 38 (F-2) (3N * M).
1. Inserire lo schienale (H) nel sedile (OF) fino a sentire "clic".
1. Inserire la ruota anteriore nel telaio (A) e poi serrare con l'anello di fissaggio 25 mm (F-2).
Passo 4
2. Togliere la vite e la plastica del poggiapiedi (L). quindi inserire il poggiapiedi nella parte
inferiore del telaio (A) ultimo serrarli con vite e plastica (3N.M).
2. Fasi di montaggio
1. Svitare la vite sotto il telaio (A). quindi inserire il freno (Q-2) spessore ruota posteriore (C) e
l'asse posteriore (M) nella forcella posteriore del telaio. Infine, serrare con chiave e vite.
Assicurarsi che la ruota posteriore può girare liscio.
Passo 1
Passo 5
2. Inserire il tettuccio (K) nel supporto del sedile.
Passo 3
1. Inserire il parafango (N) nella forcella anteriore (B) e quindi serrare con vite (3N * M).
2. Togliere la vite sulla ruota anteriore (D), quindi inserire la forcella anteriore (B) nella ruota
anteriore (D). Infine stringere con vite (5N * M).
2. Inserire il manubrio (G) nella forcella anteriore (B) e poi serrarli con la vite M5 * 35 (3N * M)
fino a sentire "clic".
5. Tettuccio regolabile
3. Ruota libera
1. Inserire la asta di spinta superiore (J) nella asta di spinta in basso (E) fino a sentire "clic".
Quindi mettere il set di barra di spinta nel telaio (A) fino a quando non si sente "clic" . Stringere
con chiave (3NM)
4. Schienale regolabile
6. Tettuccio estensibile
3. Funzioni
1. Poggiapiedi centrale pieghevole
2. Freno
2. Inserire il cestello posteriore (I) nel lato posteriore del telaio, quindi serrare con vite in
plastica.
7. Modalità spinta
8. Modalità guida

EN
Warnings!
5. Please don't use the product on public roads and highways.
8. The screws on the product needs fastening at assembly and regular checking afterwards.
Maintenance!
1. After unpacking, please remove any packaging and protective material from the proximity of
the child. Choking hazard involved.
2.Before each use check that all screws and parts are properly tightened.
3. Please make sure that all spare parts are properly assembled- danger implied.
4. Do not overload.
6. Maximum load: 30 kg.
5. Avoid usage in wet, cold or hot environment.
6. Avoid crashes with other objects.
7. Metal spare parts should only be wiped with dry cloths, do not wash with water or wet cloths.
8. Use oil for joint parts to avoid the appearance of rust.
1. The product is suitable for children aged 9-48 months old.
9. The tricycle can be used in two ways:
2. Before using it, an adult should read the instructions carefully because otherwise the child is
at harm's risk. Please keep the instructions for future reference.
3. Please keep away from fire!
4. Adult installation is recommended. Bear in mind that a wrongfully installed product may harm
child's limbs.
7. When using the product via adult push, the child should have the feet on the footrest and not
on the pedals.
- pushing by the parent
11. Adult installation only!
10. Never leave the child unattended.
- pedaling by the children's feet

EN
1. Parts name
A.Frame
B.Front fork
F-4.∮8 shim
Step 2
N.Fender
J.Pushbar (up)
Q-1.Cup
Step 5
2.Insert the handlebar (G)into the front fork(B).then tighten them up with M5*35 screw (3N*M)
until hear “click”.
3.Fix the Seat Fixture(P) into the seat (O)with M8*110 screw(F-3)(5N*M) and∮8 shim.
Then insert the seat onto the frame(A). last tighten them up with M8*38 screw(F-2) (3N*M).
1.Insert the fender(N) into the front fork(B).then tighten them up with screw(3N*M).
E.Pushbar (bottom)
F-1.M8*38 screw
H.Back rest
K.Canopy
P.Seat Fixture
Q-2.Brake parts 2
1.Insert the front wheel into the frame(A).then tighten them up with 25mm fastening ring(F-2).
1.Insert the back rest(H) into the seat(O) until hear “click”.
2.Take off the screw and plastic on the foot rest(L).then insert the foot rest into the downside of
the frame(A),last tighten them up with screw and plastic(3N.M).
O.Seat
Step 3
D.Front wheel
F-2.M8*110 Screw
C.Rear wheel
L.Middle foot rest
F-3.5M-6M wrench
M.Rear axle
R.Front foot rest
G.Handlebar
2. Assemble step
Step 1
2.Take off the screw on the front wheel(D),then insert the front fork(B) into the front
wheel(D).last tighten them up with screw(5N*M).
I.Rear basket
1.Loose the screw under the frame(A).then insert the brake(Q-2).shim.rearwheel(C).
rear axle(M) into the rear fork of the frame in turn.Last tighten them up with wrench and screw.
Make sure the rear wheel can turn smoothly.
Step 4
1.Take off the plastic screw on the side of seat(A).then insert the Front foot rest in it. tighten
them up with plastic screw(3N*M).
2.Insert the canopy(K) into the holder of seat.

EN
5. Adjustable canopy
7. Push mode
3.Insert the cup into the up pushbar(J).
1.Insert the up pushbar(J) into the down pushbar(E) until hear “click”. then put pushbar set into
the frame(A) until hear “click”.tighten them with wrench(3N*M)
3. Function
1. Foldable middle foot rest
3. Free wheel
Step 6
2.Insert the rear basket(I) into the rear side of the frame then tighten them with plastic screw.
2. Brake
4. Adjustable back rest
6. Extendable canopy
8. Ride mode
Table of contents
Languages:
Other Coccolle Bicycle manuals
Popular Bicycle manuals by other brands

Evinci
Evinci TUI+ quick start guide

Kinderkraft
Kinderkraft AVEO user manual

Standard Bearer Machines
Standard Bearer Machines RUNGU Electric Juggernaut Mid-Drive owner's manual

Bicycles4u
Bicycles4u City Zoom owner's manual

Stromer
Stromer ST1 User's manual supplement

Velovolt
Velovolt City Ebike operating instructions