COMPRO S500 - STARTUP User manual

VideoMate S500
DVB-S USB 2.0 TV Tuner Box
Start Up Guide
Compro Technology, Inc.
www.comprousa.com

ii
Copyright © 2001-2008. Compro Technology, Inc. No part of this
document may be copied or reproduced in any form or by any means
without the prior written consent of Compro Technology, Inc.
Compro, VideoMate, Poladyne, Play with Power, and the Compro
logo are trademarks of Compro Technology, Inc. Other names and
marks are trademarks of their respective owners.
Compro makes no warranties with respect to this documentation and
disclaims any implied warranties of merchantability, quality, or fitness
for any particular purpose. The information in this document is subject
to change without notice. COMPRO reserves the right to make
revisions to this publication without obligation to notify any person or
entity of any such changes.
Compro Technology, Inc.
Tel. +886 2 2918 0169, Fax +886 2 2915 2389
3/F, No.12, Alley 6, Lane 45, Pao Shin Road
Hsintein City, Taipei, Taiwan.
www.comprousa.com

1
Table of Contents
Table of Contents........................................................ 1
About This Guide ........................................................ 2
About VideoMate S500 DVB-S Tuner Box ................ 2
VideoMate S500 USB 2.0 Box Contents.................... 4
VideoMate S500 TV Box Connectors ........................ 5
Software Installation ................................................... 6
Remote Shut Down ..................................................... 7
Remote Control Key Definition and Use ................... 8
ComproDTV ................................................................. 9
ComproDVD 2............................................................ 19
Troubleshooting........................................................ 20

2
About This Guide
This manual tells you how to install and use your VideoMate S500 DVB-S USB
2.0 Tuner Box. More information is available on the User’s Guides in the
programs or on the CD.
About VideoMate S500 DVB-S Tuner Box
VideoMate S500 lets you watch and record free-to-air satellite TV broadcast
on your PC. It features a TV tuner for satellite TV broadcast, remote power off,
Digital Video Recording (DVR) functions, scheduled recording at anytime,
crystal video quality, intelligent TV viewing, and a multi-function remote
Control.
Additionally, VideoMate S500 also provides a Video capture function so that
you can transfer videos from video devices, such as video cameras, to your
PC.
MINIMUM SYSTEM REQUIREMENTS
Your PC must meet or exceed the following system requirements to watch TV
on your PC.
zPIII 1.7 GHz CPU for SDTV viewing
z512 MB RAM
zSound Box or on-board sound chip
zGraphics Box or on-board graphics chip supports DirectX 9.0
zAvailable USB 2.0 port
zCD-ROM driver for software installation.
zWindows XP SP2, Vista 32 bit
(Not support 64 bit version of XP and Vista system)
z50 MB free disk space for basic software installation.
zDigital Satellite TV Dish and LNB

3
RECOMMENDED SYSTEM REQUIREMENTS
To use all the features of VideoMate S500 USB 2.0 Box, your PC should meet
the following requirements.
zP4 3.0 GHz CPU for HDTV viewing, recording, and PIP/POP feature
z1.0 GB RAM
zSound Box or on-board sound chip
zGraphics Box or on-board graphics chip supports DirectX 9.0
zAvailable USB 2.0 port
zCD-ROM for software installation
zWindows XP SP2, Vista 32 bit
(Not support 64 bit version of XP and Vista system)
zUpdate the latest drivers of VGA, motherboard, and sound box from
vendors.
z50 MB free space for software installation
zDigital Satellite TV Dish and LNB
Note
The VideoMate S500 DVB-S USB TV Box not support 64 bit version of
Windows XP and Vista system.

4
VideoMate S500 USB 2.0 Box Contents
IR Remote Control
(batteries included)
VideoMate S500
USB 2.0 Box
Power AdapterSoftware CD
Start Up
Guide
USB 2.0 cable
5
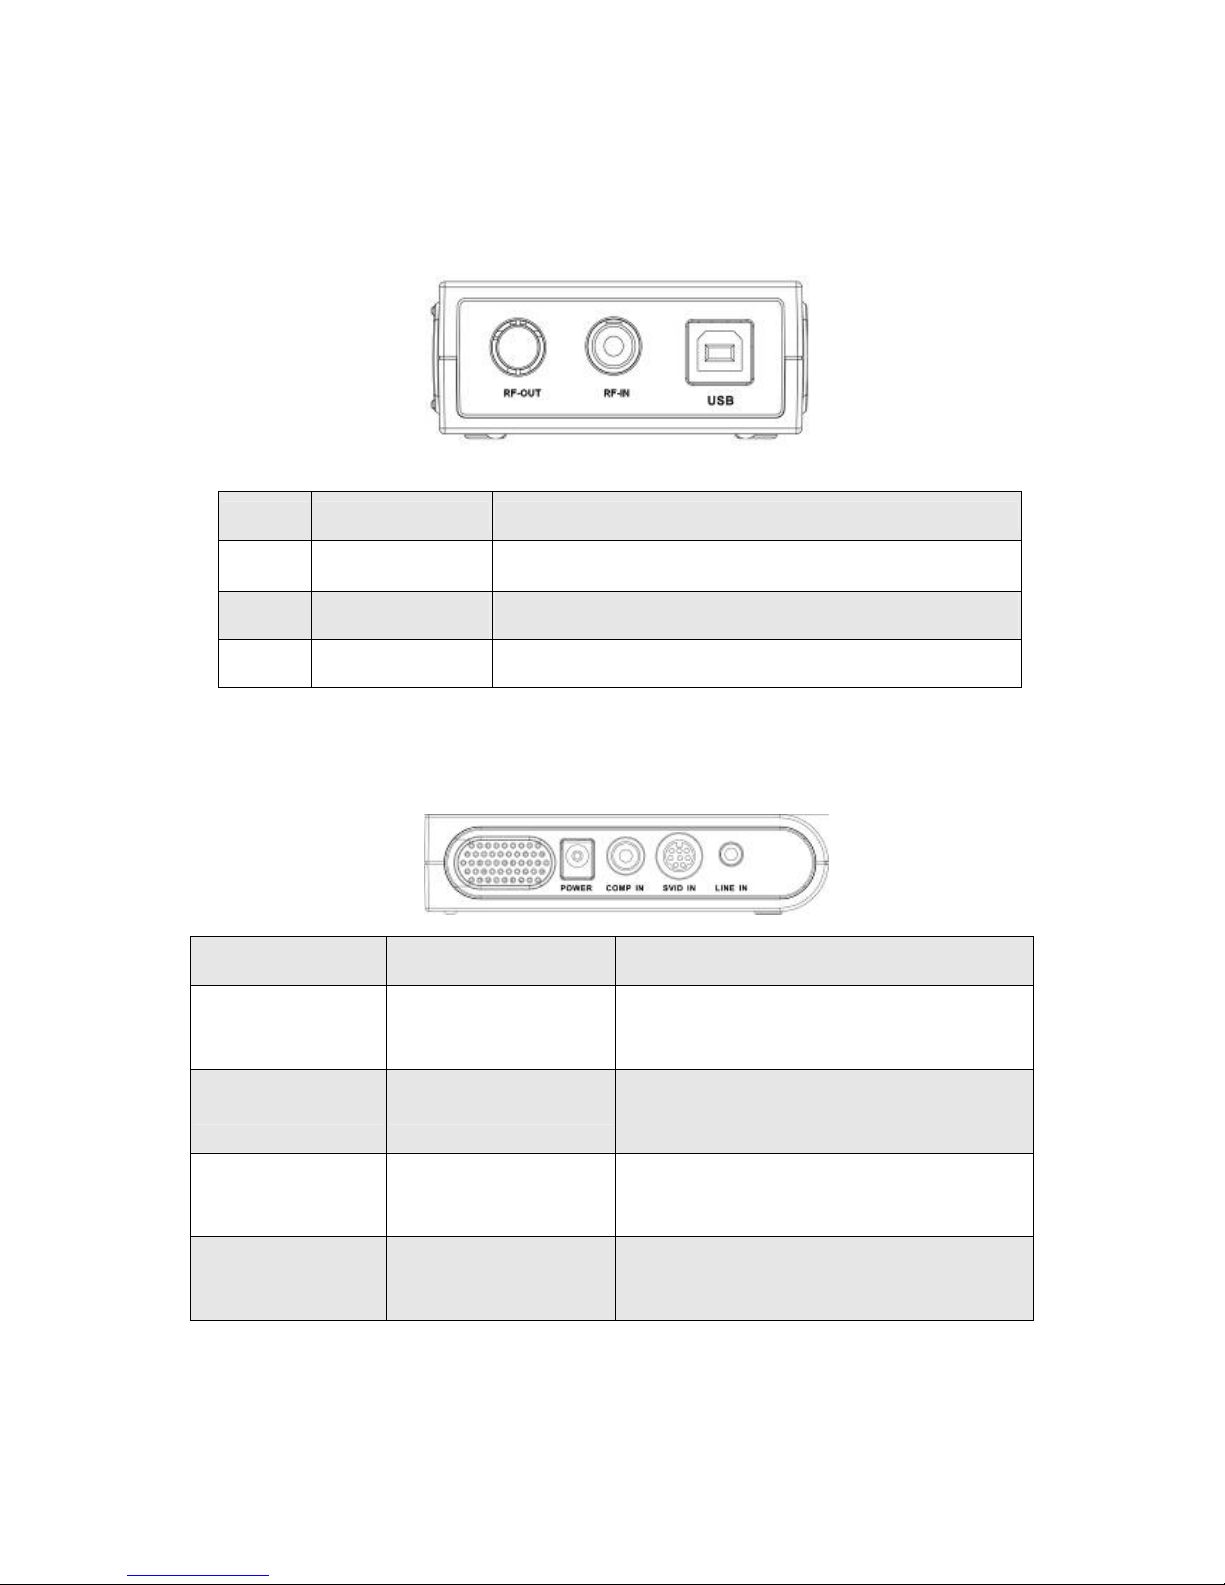
VideoMate S500 TV Box Connectors
BOX Back View
BOX Side View
Name Function Description
RF-OUT RF Connector RF Signal out
RF-IN RF Connector RF Signal in
USB USB Connector To connect TV BOX and the PC with USB 2.0 cable
Name Function Description
POWER Power Connector To use DC 12V 1A adapter to provide
enough power
COMP IN Composite video in Composite video in connector, can
connect to DVD, V8, Video Recorder
SVID IN S-Video input
connector Video input connector can connect to
video recorder, DVD, V8
LINE IN Stereo sound input
connector
Sound input connector can connect to
video recorder, DVD, V8

6
Software Installation
Please power up your desktop or laptop PC and follow the steps to install the
driver and software.
Step 1. Please put the software CD into your optical drive. The software will
auto running the setup program. (If you didn’t see the software auto
start, please running the “Setup.exe” in the disk.)
Step 2. You can choose to install the “full installation” to install all the software
(VideoMate S500 driver, ComproDTV, Compro IP Sink, ComproDVD 2)
or choose by your own. We suggest you to use “full Installation”.
Step 3. Please follow the instruction to install the software
Step 4. Please press “next ” to install software such as ComproDTV
Step 5. After installation, please press “Finish” to restart the PC.
Step 6. After restart the PC, please connect the S500 and PC with USB 2.0
Cable. Windows will detect VideoMate S500 immediately and start to
install the software in the driver CD.
Step 7. Plug in the satellite cable.
Step 8. Please launch the ComproDTV to enjoy it.
Note
Please plug the power adaptor to the VideoMate S500 USB TV box. It’s
necessary to use external power for VideoMate S500.
7
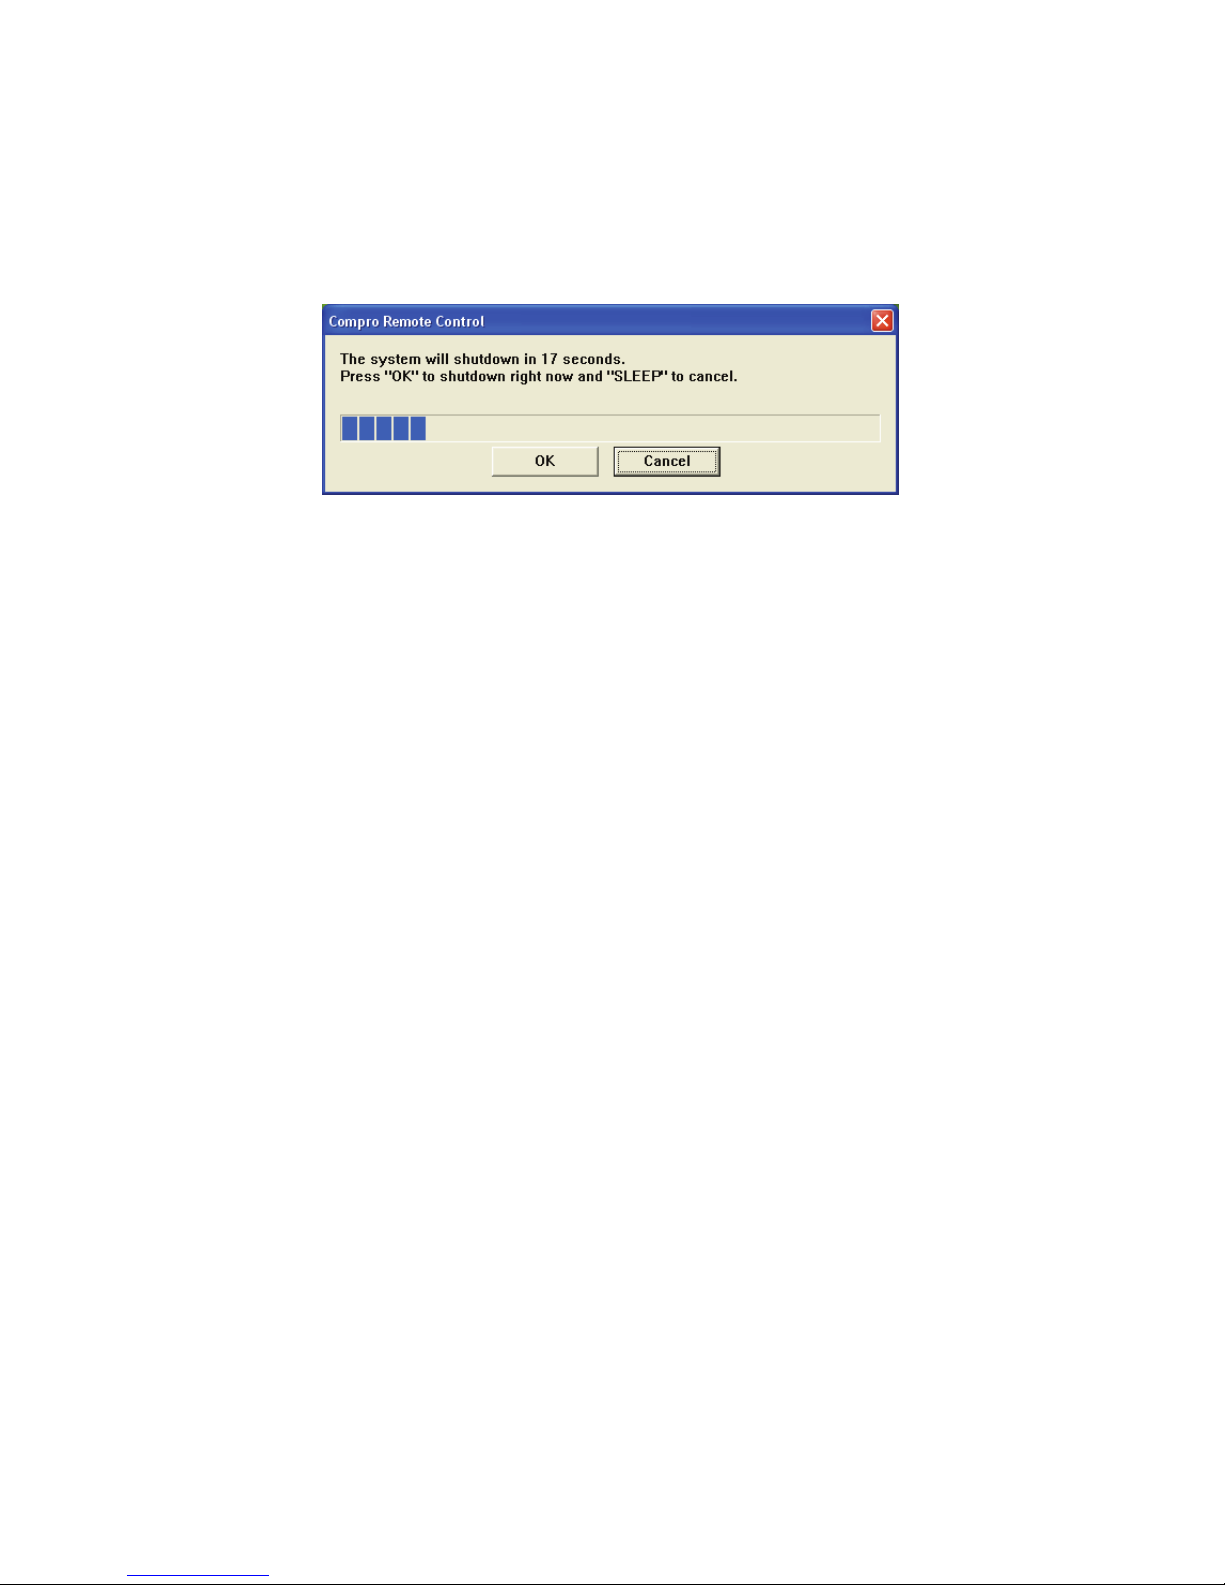
Remote Shut Down
There are two situations for the operation.
When not watching TV, i.e. no ComproDTV running:
Just press the SLEEP button on the remote keypad, you will see a dialog as
shown below. Program will countdown 20 seconds to shutdown the computer.
If you don’t want to shut down the computer, please press the SLEEP button
again, in other words, pressing the SLEEP key a second time is the same as
pressing the “Cancel” button. You may also use your mouse to press the
cancel button. Press OK to immediately shutdown the computer.
When watching TV, i.e. ComproDTV is running:
Just press the SLEEP button on the remote keypad repeatedly, you will see the
text on the screen turns to SLEEP OFF, SLEEP ON - 30 MINUTES, SLEEP
ON - 1 HOUR, SLEEP ON - 2 HOURS, and SHUTDOWN. When the text
shows SHUTDOWN, the program will countdown 20 seconds to shutdown the
computer. If you don’t want to shutdown the computer, please press the
SLEEP button again.
8
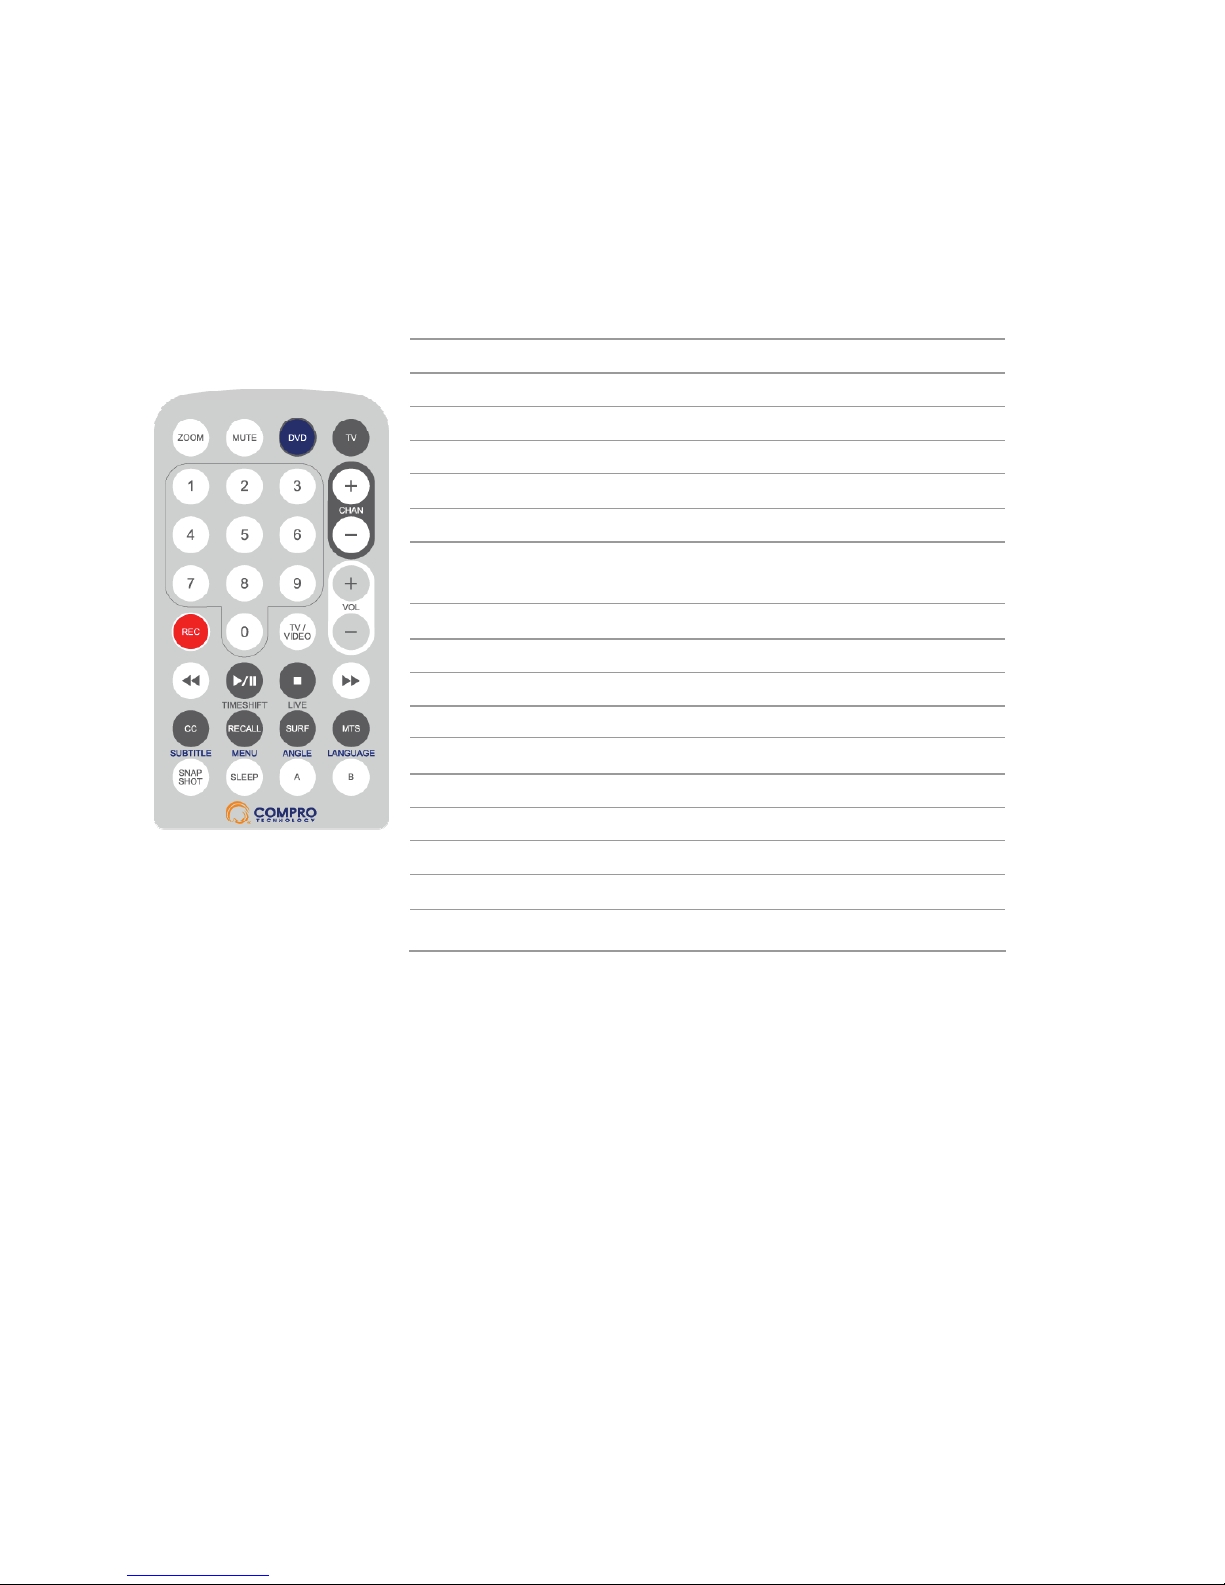
Remote Control Key Definition and Use
Icon ComproDTV 2 ComproDVD 2
ZOOM Zoom In/Out
DVD Start/Stop ComproDVD 2
TV Start/Stop ComproDTV 2
CHAN Switch channels Not used
VOL Volume Volume
REC Record Snapshot
TV/VIDEO TV/ S-Video Add to
bookmark
Backward Replay Rewind
Play/Pause Timeshifting Playback
Stop Stop Stop
Forward Advance Forward
CC Closed caption Select language
RECALL Previous channel Not used
SURF Channel surf DVD angle
MTS Mono/Stereo/SAP Select language
Snapshot Snapshot Not used
SLEEP Sleep function AB repeat
This manual suits for next models
1
Table of contents
Other COMPRO TV Tuner manuals

COMPRO
COMPRO S350 - STARTUP User manual

COMPRO
COMPRO X100 - START UP GUIDE User manual

COMPRO
COMPRO U900 - START UP GUIDE User manual

COMPRO
COMPRO E900F - STARTUP User manual

COMPRO
COMPRO E600F User guide

COMPRO
COMPRO H900 - STARTUP User manual

COMPRO
COMPRO U750F - START UP GUIDE User manual

COMPRO
COMPRO H900F - STARTUP User manual

COMPRO
COMPRO X800 - START UP GUIDE User manual

COMPRO
COMPRO M505 - STARTUP User manual


