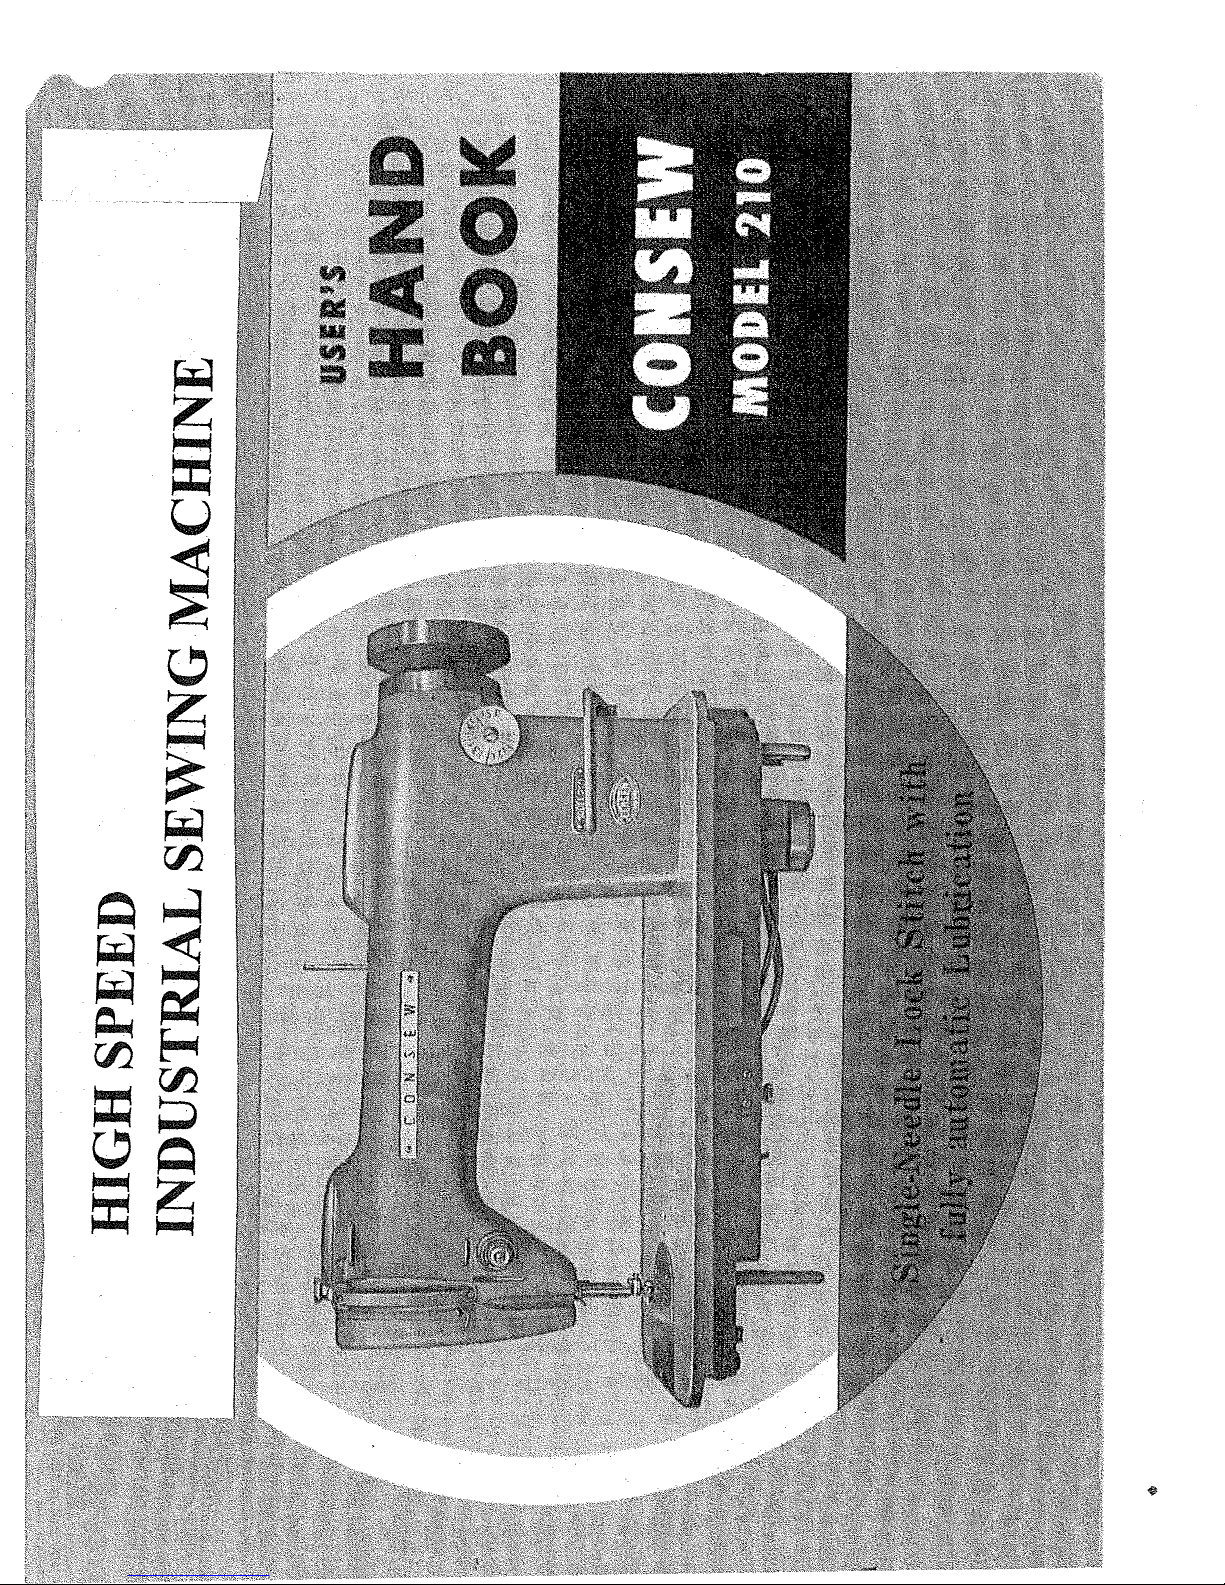
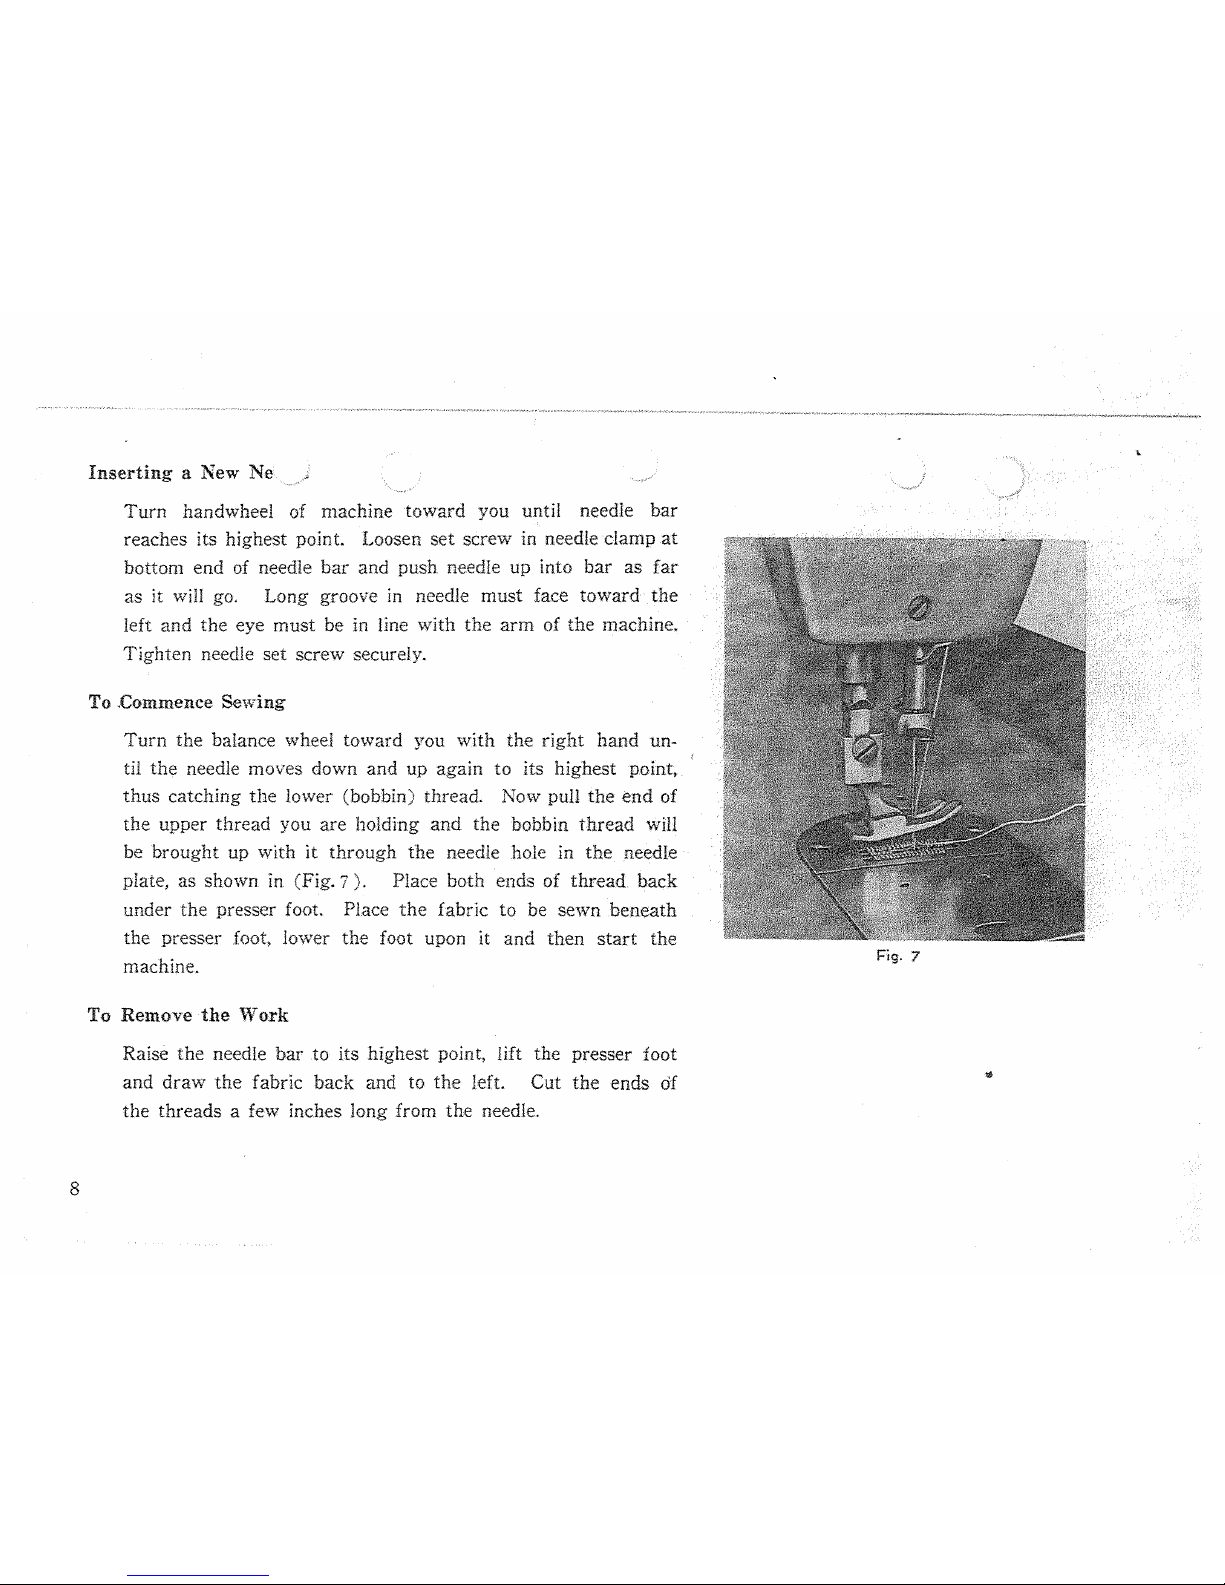
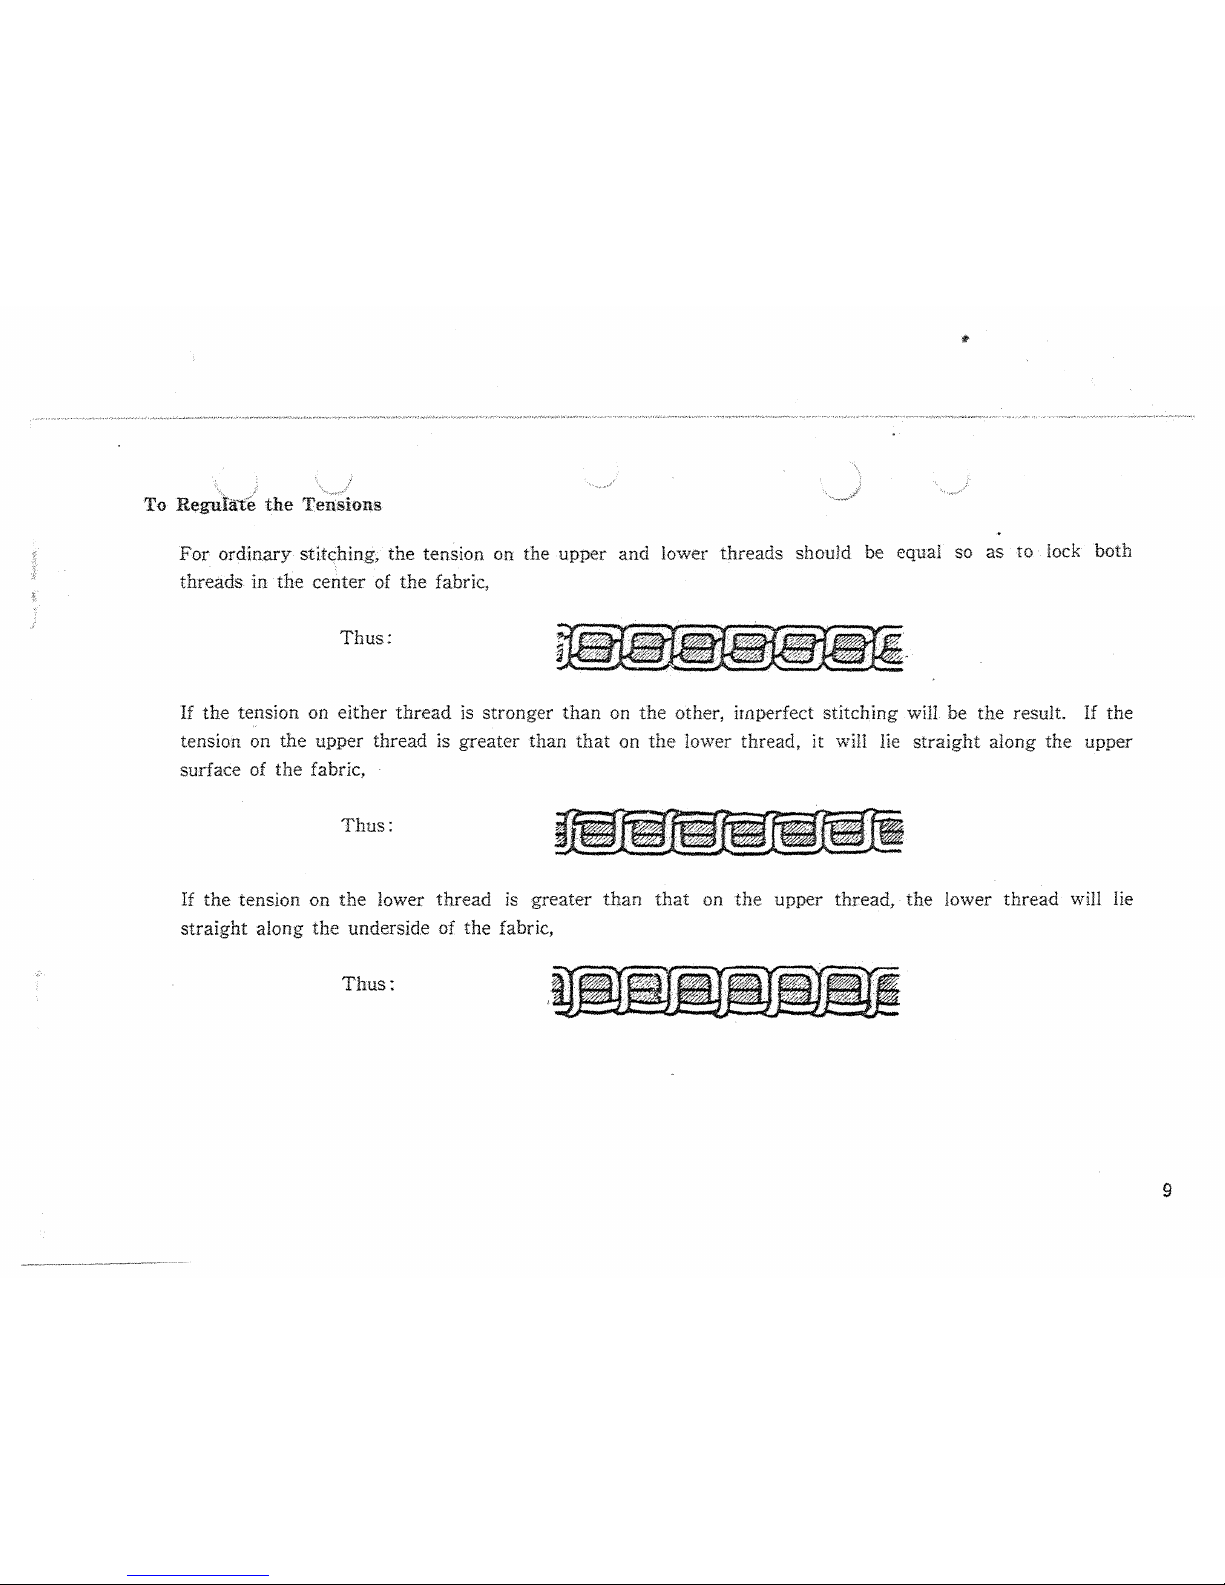
Consew 210 Instruction Manual

From the library of: Superior Sewing Machine & Supply LLC

"'
Description:
1.
Stitch
J{egulator
2.
Tacking
Lever
3.
Oil level
Indicator
4.
Knee Lifter Lever
o.
Needle
Clamp
6.
Tension
Regulator
(upper
thread)
7.
Thread
Take-up
lever
8.
Pressure
Regulator
9.
Oil
Feed
Window
"'
/
~
/
//
!=!g.
l
~j
1
From the library of: Superior Sewing Machine & Supply LLC

CHARACTERIST[
2
L
The
CONSEW
Model
2JO
machine
for
sewing
light,
rnedium,
and
heavy-weight
material
is
ali-gear
driven
-
and
automatically
lubricated
at
every
bearing
with
separately
adjustable
oil
feed
for
the
rotary
hook. All
bearings
are
diamond
bored
sleeve
types,
except
for
needle
bearings
at
the
thread
take-up.
2.
Drop
Feed
design
with
a
maximum
stitch
length
6
to
the
inch.
3.
The
belt
groove
in
the
machine
handwheel
has
an
eHective
diameter
of
2%o"
when
using
~(.:;;"
wide
"V"
belting.
For
;7-iH"
dia
round
belting
the
effective
diameter
.is
2:%,'~.
4.
Maximmn
presser
Foot
lift is %
1
u.
'#:
::>.
Needle
style
16
;<
257
(all sizes)
IMPORTANT
NOTE:
Do
not
operate
machine
for
any
reason
whatsoever
unless
oil
reservoir
has
been
filled
and
machine
has
been
oiled
according
to
instructions
on
page
5.
Maxmmn
operating
speed
is
4,500
stitches
per
minute
How
to
set
up
For
purposes
of
shipment
the
machine
and
its
oil
pan
are
separated.
Unpack
rnachine
with
great
care
to
pre\·ent
loss
of
any
assembly
part
and
to
prevent
the
entry
of
foreign
matter
into
the
head
and
the
oil pan.
Attach
to oil
pan
corners
the
four
Z-shaped
straps
using
two
shoulder
screws
each.
Loosen
adjustment
screws
at
bottom
of
straps
until
there
is
clearance
between
screw
heads
and
rubber
pads
at
underside
of
oil
pan.
(Fig. 2)
$
From the library of: Superior Sewing Machine & Supply LLC

The
)an fits
..
o
standard
size
table
cut-o~
,
(19/t
x
7%,
..
)
and
is
supported
at
the
four
corners
without
screws
or
bolts.
The
weight
of
the
head
alone suffices
for
accurate
seating.
Note
that
the
oil
pan
must
setUe
down
easily into
the
cut-out
vv.irhout
use
of force.
If
necessary
rasp
the
edges
of
the
cut-out
and
those
of
the
corner
supports.
No
felt
pads
are
required
on top of
these
corner
sup-
ports.
They
should be rernoved, if
the
machine
is
to
be instal.led
into
an
old table.
To
level the oil
pan
within
the
table
cut-out,
put
rnachine
head
in place,
having
inserted
the
hinge
hooks
into
the
bed
beforehand.
With
the
machine
head
resting
on
the
neoprene
rubber
oil
pan
gttsket,
turn
adjustment
screws
(Fig. 2)
until
er pee
Oran",
oiug
Od
i~;:e{
~.naJca:~or
Fig. 2
top
of
machine
bed
projects
evenly
above
the
surface
of
the
table
top.
The
machine
hinges
rnust
not
support
the
head
except
when
it is
tilted
back.
Insert
plunger
"P"
into
its
seat
inside
the
oil
pan
(Fig. 3)
and
assemble
knee
lifter
lever
and
pad
to
its
component
parts
at
the
front
of
the
oil
pan.
Adjust
stops
of
knee
lifter
mechanism
so
that
there
is
only
a little
play
before
it
starts
to
lift
the
presser
foot
and
that
it
is
raised
all
the
way
without
any
strain
on
the
lifter
parts
and
without
tendency
to
lift
the
entire
head.
3
From the library of: Superior Sewing Machine & Supply LLC

4
The
Lubrication
,tern
Oiling
of
the
operating
parts
of .Model
210
machine
is
entirely
automatic.
Oil is
contained
in
_the
oil
pan
at
the
bottom
of
the
machine
head
and
is
circulated
from
there
to
all
parts
which
require
lubri-
cation
and
cooling.
The
oil
pan
should
be
filled
with
good
quality
sewing
machine
oil,
either
ordinary
or
stainless
type,
of
a
grade
similar
to SAElO, to
the
level
indicated
by
the
word
"High"
inside
the
pan.
The
upper
red
line of
the
oil level
indicator
(2), (Fig.
1)
~hows
the
corresponding
oil level.
Check
oil level daily
and
never
allow
it
to
fall
bellow
the
lower
red
line of
the
oil level
indicator
or
below
the
"low''
mark
inside
the
oil
pan.
Oil is filled
directly
into
the
oil
pan
when
the
head
is tilted
back.
Total
oil
capacity
is
approximately
n1z
pints
(24
n.
ounces.)
To
remove
accumulated
impurities
from
the
lubricating
oil, a
magnet
has
been
included
with
the
ma-
chine.
Remove
it
from
the
accessory
box
and
place
it
along
the
circular
flat
rim
at
the
bottom
of
the
oi.l
pump
(see
Fig. 3).
At
this
location,
the
largest
flow of oil
passes
the
magnet
wlth
most
efficient
cleaning
as
a result.
NOTE:
Before
operating
a
new
machine
or
one
which
has
been
standing
idle
for
a
period
of
several
weeks,
remove
the
arm
cover
plate
right
next
to
the
pressure
regulator
(7).
Soak
with
oi1
the
four
oil
wicks
now
exposed
and
replace
cover.
After
a few
minutes
of
operation
the
automatic
oiling
systern
will
do
the
lubricating.
From the library of: Superior Sewing Machine & Supply LLC

':;..,
The
olf
supply
for
the
rotating
hook
can
be
controlled
through
adjustment
of
the
needle
valve "V"
at
the
underside
of
the
machine
bed
(Fig. 3). While
this
valve is
adjusted
at
the
factory
to
feed
the
correct
<UllOtlntof lubricant,
operating conditions
may
require either
an
in-
crease
or
a decrease
in
the oil flow
to
the hook.
To
determine
the
amount
of
oil
supplied to
the
hook, hold a piece
o.f
tissue
or
similar paper
under
the
hook
and
operate
n:1achine.
After
a
very brief
period
of
operation a
slight
trace
of oil should become visible
on
the
paper.
If
not, check
flow
and
adjustment
of needle valve.
Also, remove from on screen 1
'S''
at
bottom of
oil
pump
·~o~'
any
accumulation
of
lint
or
other
foreign
matter,
at
the
same
time
Hft
the
mag~
net
from
the
rim
of
the
on pump, wipe
it
clean
and
replace
it.
Fig. 3
5
From the library of: Superior Sewing Machine & Supply LLC

6
Threading
the
mach
Turn
handwheel toward you until needle
(10)
reaches its
high~
est point and take-up lever (7) is near the end
of
its upward
travel,
as
shown
on
Fig.
4.
Lead thread from hole of spool
pin (1) through three holes in thread guide (2), ·then down-
ward through guard
(3)
and between and around tension discs
(
4)
from right to
left
Upward into thread take-up spring (5)
and down under slack thread regulator (6), up and through
guard
(3)
into eye of take-up lever
(7)
from right to Ieft,
down through
thread
guides
(8
and 9) into thread guide
(10)
and from left to right through the eye of the needle. Pull two
to three inches of thread through the eye of
the
needle.
Remaval
of
bobbin case
Turn
handwee1 toward you until needle reaches its highest
point. Open slide plate by pulling
it
to the left. Pass left
hand under table into opening on oil pan. With left thumb
and .index finger open the hinged latch (L) (Fig. 5)
at
the front
of the bobbin case. Grasp latch
and
pull bobbin case
and
.
bobbin from rotary hook. While the latch is held open, the
bobbin will be retained in the bobbin case. Release of the
latch and
turning
of the open side
of
the bobbin case down.
ward will cause the bobbin to drop out.
Fig. 4
From the library of: Superior Sewing Machine & Supply LLC

.tl''''~'"''t<
'~
;,'::
,-;~~·~~,
'.
Threadi
?nd
Ins;
.ng
the
Bobbin
Case
Hold the bobbin between the thumb and forefinger of your
right
hand
and
pull out a length of two or three
inches of thread. Holding the bobbin case in your left hand,
turn
the open side up and place the threaded
bobbininto it. -
Fig.
5~1
Fig. 5-2 Fig.
5-3
With the right hand guide the thread into the slot in the edge of the bobbin case.
Then pull the
thread
to
the left, under the tension spring
and
into the delivery eye.
In order to keep the bobbin frorn dropping out of the case when
it
is
turned
with
the
open side down, always keep the hinged latch
at
the
front of the bobbin case open.
Take
the threaded bobbin case by the latch and place
it
on the center
stud A (Fig. 6) of the bobbin case holder. Release latch andpress bobbin
case onto center stud until
the
latch catches the undercut thereon with
a click
that
can
be heard. Permit two to three inches
of
bobbin
thread
to
hang
down freely.
Be
sure to push slide plate to the right before
.
starting
to sew.
L
A
Fig. 6 7
From the library of: Superior Sewing Machine & Supply LLC

8
Inserting
a New Ne
-~
Turn
handwheel of machine
toward
you until needle bar
reaches its highest point. Loosen
set
screw
in
needle
damp
at
bottom end
of
needle
bar
and push needle up into
bar
as far
as it will go. Long groove
in
needle must face
toward
the
left and the eye must be in line with
the
arm
of the :machine.
Tighten needle set screw securely.
To .Commence Sewing
Turn
the balance wheel toward you with the right hand un-
til
the
needle moves down and up again to its highest point,
thus
catching
the
lower (bobbin) thread. Now pull the
end
of
the upper thread you are holding
and
the bobbin thread will
be brought up with
it
through the needle hole
in
the
needle
plate, as shown in (Fig. 7). Place both ends of thread back
under
the
presser foot. Place
the
fabric to be sewn beneath
the presser foot, lo\ver the foot upon it and then
start
the
machine.
To Remove
the
'Work
Raise
the
needle
bar
to
its highest point, lift the presser
ioot
and
draw
the fabric back and to
the
left. Cut
the
ends
of
the threads a few inches long from the needle.
•
Fig. 7
~
From the library of: Superior Sewing Machine & Supply LLC

fi'·
,,/
To
Regulate
the
Tensions
For ordinary stitching, the tension on the upper and lower threads should be equal so as
to
lock both
threads in the center
of
the fabric,
Thus:
If
the tension on either
thread
is stronger
than
on the other, imperfect stitching
wiU
be the result.
If
the
tension on the upper thread
is
greater than
that
on
the
lower thread, it wlll lie
straight
along the upper
surface
of
the fabric,
Thus:
If
the tension on the lower thread is greater
than
that
on
the
upper thread, the lower thread will lie
straight along
the
underside of the fabric,
Thus:
9
From the library of: Superior Sewing Machine & Supply LLC

10
A.
Tension
of
tl~
:pper
(N
e)
thread
Before adjusting the tension of
the
upper thread, be certain
that
the
presser foot
is
let down and not
in
lifted position.
Turn
serrated
nut
"N" on tension device to the right to increase tension ar:d to the left,
If
you desire to decrease it.
B.
Tension
of
the
lo,ver
(bobbin)
thread
The
tension of the lo\ver thread
is
regulated by the screw on
the
bobbin
case tension spring (see Fig. 9).
Use
the
small
driver to tighten the screw slightly to increase the ten-
sion, or loosen it to slacken the tension.
Fig. 8
Fi9. 9
To
Regulate
.the
Pressure
of
the
Presser
Foot
N
Screw
The
pressure of the presser foot on the material
is
regulated by
the Regulator Screw
(R)
(Fig. 10) on top of the machine.
Turn
this regulator
to
the left to decrease it.
Do
not employ more
foot pressure than is required to feed
the
material properly.
Fig.
lO
,.,
From the library of: Superior Sewing Machine & Supply LLC

How
to
1st
the
1gth
of
Stitch
and
to
do
'.-.
.king
The
stitch length is regulated
by
turning dial (D)
at
the front
of the machine (Fig. 11). When number
HO"
on dial appears
uppermost, the machine does not feed.
Turning
dial counterclo-
ckwise will gradually increase the stitch length until the maxi-
mum is reached
\Vhen
number 5
is
on top. As the
stitch
length
is increasedt
it
can be noticed
that
tacking lever (T) slowly mo.
ves in upward direction.
When shortening
the
stitch length,
it
will be found of
advantage
to depress lever (T) slightly
as
dial (D) is being turned clock*
wise.
To
do tacking for
the
purpose of locking
the
ends of
seams, rapidly depress
and
release lever
(T)
as
the
needle ap-
proaches
the
edge of
the
materiaL
ill
Fig.
11
11
From the library of: Superior Sewing Machine & Supply LLC

1t
The
Bobb.in Winde1
12
The
bobbin winder
is
mounted on the table top with its pulley
in
front of the driving belt so
that
the
pulley will separate from the belt
after
the bobbin has been wound
with
sufficient
thread
(Fig.
1'2)
~
Fig
..
1.2
1 Push bobbin on bobbin winder spindle as far as it will go.
2.
Pass thread from thread
stand
do\vnward through eye in tension bracket,
then
between
and
around
the
back of
the
tension discs. Bring thread forward toward bobbin and wind
from
below
.in
clockwise direct-
ion several times around bobbin.
3.
Push bobbin winder lever downward until wheel contacts the drive belt
and
.start
machine.
4.
After bobbin is filled with thread. release will cause wheel to disengage from belt
and
winding will stop.
Cut thread
and
remove bobbin from bobbin winder spindle.
5.
Adjustment screw
can
be turned in or out to increase or decrease the
amount
of
thread
wound on the
bobbin.
When fine thread is wound on bobbins, use light tension.
It
is
regulated by
turping
the
knurled
nut
on
the
tension bracket
at
the
rear of
the
bobbin winder. Bobbin can be wound while
the
machine is sewing.
-·
From the library of: Superior Sewing Machine & Supply LLC

Adjustme
1f
the
:
~
lifter
The
knee lifter mechanism is assembled to the
oil pan of the machine except th,at for shipping
purposes lever
(J)
and
knee
pad
(K)
are dis.
·,
'
assembled. After
the
oH
pan
has been positioned
in
the table top and the head set in place and
locked to the
oil
pan, insert lever
and
knee pad
as shown in Fig.
13.
Tighten their respective
set screws when in most comfortable position
for the operator. While lever (J) is shown
in-
serted from the left, it can also be inserted from
the right whenever more knee space is desired.
Set stops of knee lifter mechanism
so
that
there
is only little play before
it
starts
to
lift
the press-
•
er foot
and
to
a.How
raising of the presser foot
aH
the
way
but
not beyond
the
maximum.
This
wm
avoid
any
possible strain on
the
lifter
mechanism and
the
related
parts
of the head
itself. Fig. 13
13
From the library of: Superior Sewing Machine & Supply LLC

It
A,,..
USTMENT
OF
TEntSION
RELEASE
Tbe machine
is
normally adjusted
at
the
factory so
that
the
tension of the upper thread will be released when
the presser foot is raised in excess of 17/64".
Jf
it
is desired to effect thread tension release with a lesser lift
su_!:h
as when sewing very thin materials,
this
adjustment can be made
by
the user.
To
change the timing of the thread tension reiease, proceed
as
foHows :
14
1.
Remove face plate from mach.ine making sure
that
its gasket will not be damaged under
any
circum-
stances.
2.
Do
not wipe blue-colored sealing compound from the gasket
nor from any of the contact surfaces of the face plate
and
the arm.
:3.
Loosen screw A (Fig. 14) to adjust regulating
arm
B.
Set
the height of arm B
so
that
there
wHI
be upper
thread
tension when the presser foot
!s
lifted for tacking.
The
upper thread tension must
be
cornpletely released only when
the presser foot is in fully raised position.
4.
Tighten screw A securely and replace face plate making
certain
that
all its screws are tightened uniformly.
Fig.
14
From the library of: Superior Sewing Machine & Supply LLC

Sizes of Needles
14
16
&
17
18
19
21
NEEDLE
AND
TH.READ
CHART
Classes of Work
Shirtings, Sheetings. Calicoes, Muslins, Silks, Dress
Goods and
aU
classes of general work
All
kinds of Heavy Calicoes, Light W
ool.en
Goods.
Heavy Silk, Seaming, Stitching etc.
Tickings, Upholstery, Woolen Goods, Trousers,
Boys' Clothing. Cloaks, etc.
Heavy Woolens, Tickings, Bags, Heavy Coats.
Trousers
and
Heavy Clothing generally
Bags, Coarse Cloths & Heavy Goods
Sizes of Cotton,
Linen or Silk
60
or
80
Cotton
A and B Silk
40 to 60 Cotton
C Silk
30
to
40
Cotton
DSilk
24
to
30
Cotton
E Silk
60
to
80
Linen
16
to
20
Cotton
40
to
60
Linen
15
From the library of: Superior Sewing Machine & Supply LLC

..
0
....
('4
...
1&1
Q
0
~
~
11.1.1
Cl)
z
0
u
From the library of: Superior Sewing Machine & Supply LLC

PART
NO.
1002
HED
ONl~
Y
PART
NAME
1005
GASKET
FOR
1.4~3
!000
SCREW
FOR
1133
1010
CtlAR.L>
FOR
TARE
Uf"
LEVER
tOll
GASK.r;T
FOR
1010
1012
SCREW
FOR
1010
1013
THREAD
CUIPE
WITH
THREE
HOLES
1014
SET
SCR~W
FOR
10t3
1015
COVER
PLATE
FOR
OIL
WELL
1016
CASKE'l~
FOR
1015
1017
SCtU:W
FOR
lOIS
1018
BACK
COV£R
?LATE
!019
GASKET
FOH
1018
1020
SCREW
FOR
1018
1023
GAS
Kl":T
FOR
1302
1024
SCREW
FOR
l302
1025
FRAME
FOR
1026
1026
Oil
..
GAUCI-;
WfNOOW
1027
PACK!N(~
f~OR
102&
1028
SCREW
FOR
1025
1029
NA:-.tE
Pt.ATE
1030
SCREW
FOW
1029
1035
PLUG
FOR
BED
UOLE
1040
THRUST
WA$HEH.
FOR
1041
1041
PRESSER
BAR
ONLY
1042
HINGED
FOOT
COMPLETE
1043
SGRBW
r·oR
1042
10114
PRF.:SSER
SPRING
OUTER
1045
I"RESSER
SPRI~C
INNER
104.6
BUSHtNG
FOR
1041
1041
SET
SCREW
FOI{
1046
&
1057
1048
PRESSER
BAR
GUfl)E
RMAGKET
1019.
THKF.AD
REGULATOR
1050
SCREW
FOR
1049
&
1423
1051
PRESSER
BAR
UFTER
lOS3
SET
SCREW
FOR
1048
1054
NEEDLE
BAR
ONLY
lOSS
NEEDLE
BAR
L'PPEH
HUSH1NG
1057
NEEDt.B
BAR
LOWJ:,;R
BUSHJNG
1058
THREAO
Cl.JIDS
FOR
1.057
1059 NI::J::Dt.F.
CLAMP
COMPLETE
lOtiO
Nf:fo:DL£
CLAMP
SODY
1061
THREAD
CUrDE
FOR
1060
1062
SCREW
FOR
1060
1063
SCREW
FOR
iOOl
1064
NEEDLE
to67A
·E
OIL
WICK
1069
TAKE
tJ.f-'
LE~:R
BODY
1070
TAKE
UP
LE.VF:R U
NK
1071
HINGED
STUD
FOR
1070
1072
SF.T
SCREW
FOR 1071
1073
NEEDLE
BAR
CRANK
1G76
NEEDLE
BAR
CRA:.IK
CONNECriON
107?
NEEIJLB
BAR
BRACKJ:.:T
1078
CLAMP
SCREW
FOH
1077
1079
SLIDING
BLOCK
FOR
1077
1083
CUIOE
TURE
FOR
1067H
108..'>
?RRSSER
BAR
UFTER
LEVJ::R
10~
H!NG£
SCREW
FOR
lOSS
1091
LOCK
Nt.rr
FOH
lOSS
1093
HJNCE
SCHJ:.:W
f'OR
l431
1094
SPRlNG
f-~OR
1431
I095
KNF.E
LIFTER
LINK
1096
UNK
SCREW
FOR
1095
1097
KNEE
LtFTER
PULL
ROO
1098
NUT
FOR
1097
1099
FE:L
T WASHl::R
FOR
1097
HOl
.SI:::T SC:RF.W
FOR
1405
PART
NO
ll02
ll03
t104
1105
1106
1107
1HJ8
1109
llll
lll2
1114
015
1116
1117
1128
1129
1134
1136
11:n
1138-
1141
1152
11.'):~
ll!i!>
115<
1157
llSI:!
1159
1160
1161
ll62
1163
llfi4
1165
1166
1167
1166
1169
1170
1172
11n
1174
1175
1176
1177
llt<l
1183
ll86
1187
1188
1189
1190
1192
11-<J::l
1194
ll9S
1196
1198
1199
1202
1203
1204
1205
1206
1207
1209
1210
12J2
CON
SEW
PART
NAME
St::T SCR!-::w
FOR
14!:10
RETAl.'\IEH
PLATE
FOH
liM
Oil.
WICK
FOR 1480
SPRING
FOR
1104
SCRF.W
1-"0H
1103
TO?
SHAFT
FRONT
PACKlNC;
SCRE\~'
FOR
ll07
TOP
SHAFT
FR()NT
HUSHING
TOP
SHAI-"r
CENTF:k
BUSH!NC
TOP
SHAFT
REAR
SUSUl~C
PACKt~C
FOR
130S
CAr>
SCREW
FOR
1305
TOP
SHAFT
OIL
STOPPt-;H
SET
SCH~W
FOR
1305
~CRC:W
FOR
1206
NtJT
FOR
1128
SCREW
FOR
1418
& 1419
TOP
SHAt~r
Gfo:AR
Sf.:'l'
!:>CK~W
FOR
CAM
&
GEAR
SET
SCREW
FOR
1l36
SET
SCREW
FOR
1157
VERTICAL
:-:iHAf.~T
UPPER
GEAR
V!--:WrtCAt..
SHAFT
LOWER
GEAR
VF.RTIC.<\1..
SHAFT
UPPER
BUSHlNG
\'ERTtCAI..
SHAFT
J.OW
I::H:
Hl!!-)HlNG
HOOK
SHAVT
GEAR
HO()K
~HAFT
ONLY
HOOK
SHAFT
FRON
I'
DUSHlNG
SE7
SCREW
FOR
1159 & • JH>l
HOOK
SHAF'T
HEAH
RUSHlNC
FELT
FOR
1158
SET
SCRJ-:W
FOR
1162
OlL
DEFLECTOR
FOH
llS9
SET
SCREW
FOR
11&'
ROTATING
HOOK
ASSEMBLY
HOOK
RETAINER
SCREW
FOR
1167
BOBBlN
CASF.
ASSl::MBL.Y
BOBRJN
FF.ED
ROCK
SHAFT
FEED
ROCK
ARM
HINCED
PIN
FOR
ll73
REAR
St:SHIN\.
FOR
1172
FRONT
Bt:SHIN<;
fo·oR 1172
SE'r
SC~EW
FOR
1176
Ct
•.AM P
SCHF:W
rm~.
1456
F'l-:F.n
BAR
SHAFT
SCREW
FOR
18SJ
THRUST
W
ASHEH
f'OR
118.3
OIL
WlCK
H0L1)F.R
SCREW
FOR
118$
HUBBHR
FLANGE
FEED
LIFTING
BF.l.l.
CRANK
JOT!':T
SCREW
FOR
1!~2
NUT
f'OH. 1193
SET
SCHEW
FOR
1192
FE.!!O
UFTJ~G
SHAFT
CUMP
.SCREW
FO!-t
1608
BLlntNG
BLOCK
FOH 1335
SCREW
FOR
1414
OlL
WICK
SUPPORT
SCREW
FOR
1203
OlL
WlCK
FOR
1-'E}',i)
SHAFT
otL
WtCK
CONTH.OI.
BAND
VIN\'t.
SLEEVE
F'ot~
120S
TENSrON
BARHEL
TENSIOt\'
Dl!'iC
CHECK
$PH:lNG
PAPT
NO.
1213
1214
1215
1216
1218
1219
1226
1227
1232:A
l2.1.3A
12338
1233C
1235
1235
1237
1239
1240
1241
1242
1243
1244:
1245
1247.
1248
1.249
1251
1252
1253
1254
1255
1266
1257
1259
1261
l264
l26S
1268
1269
1.2'70
1271
1272
1273
12:74
1275
lZ76
1277
12:78
1.279
1280
1281
1282
1283
1284
130l
1302
1304
1305
1306
1307
1308
1309
1314
l31.5
l320
1321
1326
1328
1335
MODEL
210,
210A
&
2108
PART
NA.ME
PACKING
FOR
1472
TENSION
REL£ASE
PIN
TENSION
RELEASE
WASHER
TE:-.ISION
SPRJNG
SET
.SGRF.:W
FOR
1475
SCRJo:W
FOR
OU.
I"UMP
SCREW
FOR
1440
MAGNET
OIJ.
HOSE
XIPPLE
ott.
HOSl-~
•A!
OIL
HOSE
18:
OIL
HOSE
IC.'
OIL
Rk:GUI...A.TOR
COMPLETE
011.
Rt-:<;ULATOR
BODY
OIL
REGULATOR
PL\TE
OIL
REGULATING
VALVE
SPRlNC
FOR.
1239
HRACKJ:o:T !-'OR 1242
KNEE
I..IFTER
RELEASE
LEVER
HINGE
SCREW
FOR
1242
BBD
LEG
FRONT
REI)
LI<:(;.
HEAR
NUT
FOR
1466
OIL
PAX
ONLY
011.
PAN
(;ASKET
PACKIN(J
'F'OR
1464
OIL
CAUGE
WINDOW
FRAME.
f.OR
1252
PACKING
FOR
1252
011. GAUGF.
COVER
SCREW
FOR
1253
KNEE
LI'F'TER
PLUNGER
SET
SCREW
FOR
KJI..'EF.
UFTER
SPRING
FOR
1451
KNEE
LJFTJ:::R
PAD
GUIDE
SLEEVE
FOR
1097
OIL
PAN HOLDJNC
SCREW
NUT
FOR
1208
OIL
PAN
CUSHION
RlJSBEH
SCREW
FOR
1465
ACC!':SSORY
BOX
$?001.
HOLDER
SOBBJN
WiNDER
ASSEMBLY
BED
HlNCE
COMPLETE
CLOTH
GUIDi::
CLOTH
GtJWF.
THUMB
SCREW
$CR.t::W
DRJVER.
LARGE
SCREW
DRJVER.
SMALL
WRENCH,
URGE
WRENCH,
SMALL
NCBDL£S
WOOD
SCREW
FOR
l274
WASHER
FOR
121:13
ARM
ONLY
TOT'
COVER
PLATE
ONLY
TOP
SHAFT
ONLY
HANO
WHEEL
Ff.:F.l'>
CAM
GUIDE
FOR
FEED
FORK
SET
SCREW
FOR
1306
.FBJ::D
FORK
F'BEP
RE:CUI..ATOR
UNK
AOJl!STINC
WASHER
FOR
1193
PACKING
FOR
1346
SOFT
PLUG
FOR
1346
CAP
SCRBW
FOR
1606
OIL
SF.AL
FOR
1602
r"F.ED BAR
PART
NO.
1336
1337
1340
1.341
1342
1:-~4::1:
1345
1346
13-\7
1348
1351
13$2
1353
1354
1355
l401
1402
1405
1407
140&
1411
1412
14,13
1414
1417
1418
l4l9
1420
1421
1422
1423
1424
1425
1426
1429
1430
1431
1432
1433
1434
1435
1436
1437
1438
1439
1440
1441
1442
1443
1444
1445
1446
1447
1448
1449
1450
1-451
HS2
14.53
1454
1455
l4SS
14.57
1458
1459
1460
1461
~ART
NAME
FEED
RECULATOR
DIAL
SHAJ.~T
OIL
SI:::AL
FOH
1336
FEED
Ri::::C>tJLATOR
DtAL
LOCK
scm:;w
FOR
1340
STOP
PI:\'"
FOR
1340
SPRING
FOR
1342
l"~E~W
REGULATOR
FOH.K
FULCRUM
SHAFT
FOR
1345
BUSHING
FOR 1345
OIL
SEAL
FOR
1347
FEED
REGULATOR
DIAL
BUSHlNG
011.
SEAL
FOR
I3Sl
CAP
SCRBW
FOR
1314
TOP
COVER
f"LA
TE
CRANK
ROD
COMPLETE
THREAD
GUIDE.
RIGHT
SET
SCREW
FOR
1401
TAKE
UP
LEVER
CRA."''K
HlNGE
SCREW
FOR
14.31
OIL
WICK
RETAfNER
THREAD
TENSlON
RELEA$1:::'
OIL.
WlCK
RETAINER
SPRING
FOR
1411
SHAFT
FOR
1411
0%1.
HOSE
CL!P
OIL
HOSE
SUPPORTER
lA)
Ott.
HOS£
SUPPORTER
'{
Bl
OIL
REGVJ...ATING
PL.ATE
CLAMP
SCREW
FOR
1451 & 1452
NEF.lH.f:
S!?.E
PI.ATJ:.:
ADJUST
PLATE
FOR
TENSION
RELEASE
CLAMP
SCREW
FOR
1480
SPRING
WASHER
FOR
1168
snm
FOR
tt99
'PLUG
FOH
SCREW
HOLE
PRESSURE
REGULATOR BAR
KNEE
LIFTER
LEVER
KNEE
UFTER
BAR
FACE
COVER
PLATE
PLUG
FOR
1433
VERTICAL
SHAFT
ONLY
OIL
PUMP'
BODY
OIL
PUM:F•
lMPELER
OIL
PUMP
COVER
OIL
PUMP
FILTER
FRAME
FOR
143~
OIL
FEED
TUBE
COMP
U:TE
OJL
RETURN
CAM
SHAFT
PIN
FOR
1442
SPRING
FOR
1443
SCREW
FOR
1444
SET
SCREW
FOR
1442
SPRiNG
JCINT
COLLAR
FOR
1447
KNEE
UFTER
SHAFT
KNEE
lJ
F"'fER
ARM
KNEE
UF"l"ER
LOWER
I..EVER
KNEE
UFTER
ARM
JOXNT
ADJUST
SGREW
FOR
1448
NUT
FOR
1453
ADJUST
SCREW
FOR
1451
FEED
BAR
BELL
CRANK
SET
SCREW
FOR
1183
CAP
SCREW
FOR
1459
THRUST
WASHER
FOR
1460
BEARING
P.OLL.ERS
COMPLETE
SET
SCREW
FOR
1462
PART
NO.
PART
NAME
1462
OlL
STOPPER
1463
PRESSURE
RECULATOH
SCREW
1464
ORAI:-.
P(.UG
1465
OlL
'PAN
SUPPORT
1466
HED
LEC.
Rl
CHT
1467
THRUST
WASHER
FOR
14BO
14SS
KNEE
LIFTER
PLATE
1469
SPOOL
PIN
COMPLETF.
1470
NUT
FOR
1469
1471
SPOOL
Pt
N
1..;72
TENSJON
COMPLETE
1473
TENSION
ADJUSTING
KNOB
1474
RATCHET
FOR'
1473
1475
TENSION
STUD
,477
EXPORTATION
MARK
1479
KNEE
LIFTER
CONTROLLl-:R
1480
TAKE
UP
LEVER
COMPLETF.
1481
THREAD
GUlDE.
U:.FT
1482
SET
SCREW
F'OR
1481
1483
LOWER
Ct.A.M?
FOR
1484
1484
OlL
RETURN
TUBE
1485
MACHINE
HEAD
COVER
1487
RUBBER
CAP
FOR
lOSS
1468
SCREW
FOR
1483
14.89
RUBBER
CAP
FOR
1172 & 1196
1490
WASHER
FOR
14-37
l6Ql
FEED
REGULATOR
ARM
1002
REGULATOR
SHAFT
1603
STOP
RING
FOR
1604
1604
SPRING
FOR
1602
1505
CLUMP
SCREW
FOR
1606
1606
PEEO
REGULATOR
HAND
LEVER
1607
BRIDCE
FOR
1309
1008
FEED
UFTlNC
BELL
ARM
1851
NEEDLE
?
LATE
1852
SUDE
PLATE
1853
FEED
OOC
1854
SET
SCREW
FOR
1607
PART
TO
BE.
USEO
MOCE.L...
21
OA
ONLY
1501
TAKE
UP
LEVER
COMPLETE
1502
NEEDLE
BAR
1503
SET
SCREW
FOR
1504
1504
NEEDLE
1505
NEEDLES
PART
TO
BE
USEO
MODEl....
2108
ONI...Y
1506
TAKE
UP
LEVER
COM?LCTE
1507
RETAINER
PLATE
FOR
OIL
WICK
lSOS
ADJUSnNG
PLATE
FOR
Tt:NSlON
RELEASE
1509
NEEDLE
BAR
LOWER
BUSH:rNC
1510
HINGED
FOOT
COMPLETE
1511
NEEDLE
PLATE
1512
FEED
DOC
15U
ROTATING
HOOK
ASSEMBLY
1515
NEEDLE
Dl412
From the library of: Superior Sewing Machine & Supply LLC

MAIN
office
131
W.
25th Street
New York,
NY
l000 I
Tel: 212-741-7788
Fax: 212-741-7787
e-mail: [email protected]
Consolidated Sewing
Machine Corp.
Website: www.consew.com
Miami,FL
4013 N.W. 79th Avenue
Miami, FL 33166
Tel: 305-471-0200
Fax: 305-471-0243
e-mail: [email protected]
Los Angeles,
CA
2320 South Hill Street
Los Angeles,
CA
90007
Tel: 213-745-8844
Fax: 213-745-8855
e-mail: [email protected]
From the library of: Superior Sewing Machine & Supply LLC
Table of contents
Other Consew Sewing Machine manuals

Consew
Consew P2339RB Technical manual

Consew
Consew CN2053R-1A User manual

Consew
Consew 199R User manual

Consew
Consew 146RBL-1A User manual

Consew
Consew 7360RA TCWL (E) User manual

Consew
Consew 733R-5 Use and care manual

Consew
Consew 244B Manual

Consew
Consew 347R-1A-WS User manual

Consew
Consew 3421UX5-2 User manual

Consew
Consew 206RBL User manual

Consew
Consew P1541S-CC Technical manual

Consew
Consew 223 User manual

Consew
Consew 2206RB-14-7DD User manual

Consew
Consew 315R-2 Parts list manual

Consew
Consew 7360R-7DD Guide

Consew
Consew 206RB-5 User manual

Consew
Consew 7360R Parts list manual

Consew
Consew CN3115RB-1 User manual

Consew
Consew 104-1T User manual

Consew
Consew 30 Use and care manual