Contro l4 C4-TSMC7-EN-BL User manual

™• Two(2)screws(included)tosecuretheTouch
Screentothedock
Accessories
• Control4PoweroverEthernetInjector
(AC-POE1-B),soldseparately
• InternationalPowerSupply(C4-TSIPS,forUK,EU,
andAU)
Specifications
Screen 7”16:9WXGAColorLCDModule
Resolution:800x480
Brightness:400nits(withoutTouch
Screen)
Wireless -BuiltInIEEE802.11b/g/nWirelessLAN
-IntegralAntenna(b/g/nsupported)
-Authentication:WEP,WPA,WPA2
Dimensions
(WxHxD)
7.5”(190.5mm)x5”(127mm)x.075”
(19.05mm)(withoutchargingdock)
Weight 1.75lbs.(.793kg)
Network -WiFi(802.11b/g/n)wirelessaccess
point(WAP)alreadyconguredto
communicatewithaControl4Controller
(e.g.,HC-300).
-Wireless-Nisrecommendedforvideo.
Note:Intercomusage.802.11bisnot
recommendedorsupportedforvideo
intercom.
Front and Rear Panel Descriptions
Figure1.FrontView
1 Camera.UsedforvideoIntercomwithanother
compatibleControl4deviceinanotherroom.
2 Programmable Buttons (4).Usedtoprogram
Supported Models
• C4-TSMC7-EN-BL-7”PortableTouchScreen
withCamera,Black
• C4-TSMC7-INT-7”PortableTouchScreenwith
Camera,InternationalVersion
Box Contents
CarefullyunpacktheControl4®7”PortableTouch
ScreenwithCameraandensurethefollowingitems
areincludedinthebox.
CAUTION! Donotapplyexcessivepressure
totheTouchScreendisplayduringhandling.
Doingsocancrackthescreenanddamage
theTouchScreen.
• Control47”PortableTouchScreenwithCamera
Dock
• DCPowerAdapter(onlyusethepowersupply
provided)
• (Optional)Two(2)screwsforsecuringthedock
totheTouchScreen
• WarrantyCard
Requirements
• Phillipsheadscrewdriver
7”PortableTouchScreen
withCamera
SetupGuide
4
1
2
7
10
35
6
2
8
9
10
1

™
varioushomeautomationactivitiesinComposer
programming.
3 Power Button.UsedtopowertheTouchScreen
onoro.See“TouchScreenModes.”
4 Touch Screen.ThefrontfaceoftheTouchScreen.
5 Reset/Restore Pinhole.Usedtoresetorrestore
thefactorydefaults.
6 Speaker.UsedforIntercompurposes.
7 Headphone Jack (3.5 mm).Usedtoconnect
headphonesforintercompurposes.
8 Camera LED Indicator.Indicatesifthecamerais
on.Greenindicatesthecameraison.
9 Power LED Indicator.Indicatesifthepowerison.
10 Microphones.UsedtospeakintotheTouch
ScreenwhenIntercomisused.
Power and Network Connections
BeforeyoubegintoinstallthisTouchScreen,you’ll
needtomakeafewdecisions:
1 WillyourcustomersbeusingtheTouchScreen
asaportabledevice(docknotattached)orwith
thedockattached?See“PortableorTabletop
InstallationOptions”and“PowerManagement
BestPractices”fordetails.
2 WilltheDCPowerAdapter(included)orPower
overEthernet(soldseparately)beused?See
“PortableorTabletopInstallationOptions”for
details.
LED Indicators
TheLEDsontheTouchScreenindicatethestatusof
thepowersupply,batterycharge,booting,andsoon,
asdescribedinthenexttable.
7”Portable
TouchScreen
withCamera
SetupGuide
LED Color Touch Screen Status
O -Notcharging
-Screensavermode,blank
-Screensavermode,charging
Red -O,charging
Green -On,notcharging
-Suspend/asleep,notcharging
Green(blinking) -Booting,notcharging
Green(fastblinks) -Restoring,notcharging
Orange -On,charging
-Suspend/asleep,charging
Orange(blinking) -Bootingwhilecharging
Orange(fast
blinks)
-Restoringwhilecharging
NOTES:(1)IfthedeviceisOFF,pressPower.
Ifthedeviceisasleep,pressanybuttonortap
thescreen.(2)Thedevicemustbeconnected
toapowersupplyforatleastsix(6)hoursso
thebatterycanfullycharge.(3)Ifthebattery
poweriscriticallylow,youcanstillturnonthe
deviceaslongasthedockispluggedintothe
poweradapterorPoE.
Figure2.TopView
Figure3.BottomView
Headphone Jack
Power/Charging LED
Reset/Restore
Pinhole
Microphones
Camera LED
Power Button
2

Using the Touch Screen as a Portabie Device
Usethe7”PortableTouchScreendockasthe
dockingstationfortheTouchScreen(seeFigure6).
NOTE:YoumustsetupforWiFiiftheTouch
Screenwillbeusedasaportabledevice.See
“ConguretheNetworkSettings.”
1 Placethe7”PortableTouchScreendockonaat
surface.
2 Power.Thisdevicecanbepoweredusingeither
anEthernetconnectororaPoEconnector.
a Insertthepowercableintothepowerjack
slotonthebackofthedevice(seeFigure6).
b Plugthepowercordintoawalloutlet.
c TouseEthernet,plugtheRJ-45connector
intothePoEconnectorandthenintothe
EthernetjackonthebackoftheTouch
Screendock(seeFigure6).
NOTE:IfyouuseEthernetandundockthe
TouchScreen,youwillloseconnectivity.
Figure6.BackViewwithPowerConnections
NOTE:Thepowercordanglestotherightand
isheldbytheretainingclip.Whenyouinsert
thepowercord,italsosnapsintotheretaining
clip.
3 InserttheTouchScreenintoitsdock.
4 WakeuptheTouchScreenbyeithertouchingthe
screenorbypressinganybutton.
Figure4.RightView
Figure5.BackViewwithDockandConnectors
Portable or Tabletop Installation
Options
Youcanusethe7”PortableTouchScreenwith
Cameraasaportabledevicethatyoucarrywithyou
asyoumovearoundthehouse,oryoucanscrewthe
TouchScreenintothedock.
• IfyouintendtousethedeviceONLYasa
tabletop,youcanuseeitheranEthernetoraWiFi
connection.
• IfyouintendtousetheTouchScreenasa
portabledeviceandremovetheTouchScreen
fromitsdock,youmustuseaWiFiconnection.
TousetheTouchScreenasaportabledevice,follow
theinstructionsnext.
TousetheTouchScreenasatabletopdevice(using
thetwo(2)screwsprovided)followtheinstructions
in“UsingtheTouchScreenasaTabletopDevice.”
Ethernet, PoE Power Jack Retaining Clip
Touch Screen Touch Screen Dock
Programmable
Buttons
(on right and left sides)
Speaker
3

5 WakeuptheTouchScreenbyeithertouchingthe
screenorbypressinganybutton.
6 (Optional)YoucanpermanentlymounttheTouch
Screenanddocktoatabletopbyscrewingthe
baseontoaatsurface(screwsnotincluded).
SeeFigure7.
Touch Screen Modes
TheTouchScreenusesthefollowingmodes:
• O.Thescreen,theACPowerindicator,andthe
batteryindicatorarealldark(theTouchScreen
hasnopower).Topowerupthedevice,ensure
thatthebatteryischarged,orthatthedock’s
powercordisconnectedtothedockandthe
TouchScreenisproperlyseatedinthedock.
• Suspend.Thescreenisdark.butthePower
indicatorislit.Towakeupthedevice,pressany
buttonortaptheTouchScreen.See“Power
ManagementBestPractices”fordetails.
• Screensaver.Thescreensaverisrunning.Towake
upthedevice,tapthescreen.
• Wake.Thescreendisplaysanythingotherthana
screensaver.ToforcethedeviceintoSleepmode,
pressandreleasethePowerbutton.
Configure the Network Settings
Youmustcongurethenetworksettingsonthis
TouchScreensoitcancommunicatewiththeother
devicesintheControl4system.
Tocongurethenetworksettingsforthisdevice:
1 Ifusingawirelessnetwork,ensurethattheWiFi
WAPisonthesamenetworkastheControl4
Controllerinthesystem.
2 Gatherthefollowingwirelessnetwork
informationfromyourWAP:
• SSID(ServiceSetIdentier).
• WEP/WPA/WPA2securitykey,ifenabled.
• IPAddressingRequirements:ThedefaultisDHCP
(withdynamicaddresses).Ifyouneedtousea
staticIPaddress,youmustprovideanetworkIP
addressforthisdevice.
3 OntheTouchScreen,tapMore>Settings>
Network.Ifyouwanttousewireless,under
Wireless,selectEnable;otherwise,skiptoStep4.
Using the Touch Screen as a Tabletop Device
1 Placethe7”PortableTouchScreendockonaat
surface.
2 Power.Thedevicecanbepoweredusingeither
anEthernetconnectororaPoEconnector.
a Insertthepowercableintothepowerjack
slotonthebackofthedevice(seeFigure6).
b Plugthepowercordintoawalloutlet.
c TouseEthernet,plugtheRJ-45connector
intothePoEconnectorandthenintothe
EthernetjackonthebackoftheTouch
Screendock(seeFigure6).
3 YoucanattachtheTouchScreentothedock
usingthescrewsprovidedtopreventtheTouch
Screenfrombecomingdisconnectedand
nonfunctionaleverytimeitisremovedfromthe
dock.
WARNING:PowerotheTouchScreenbefore
insertingthescrews.
ToattachtheTouchScreentothedock:
1 Removethetwo(2)rubberprotectorsfromthe
screwholesonthebottomoftheTouchScreen’s
dock.
2 InserttheTouchScreenintoitsdock.
3 TurntheTouchScreenanddockupsidedown
andinsertthetwo(2)screws(included).
4 ScrewthedocktotheTouchScreen(Figure7).
Figure7.BottomView:DockandScrewHoles
Screw Holes to attach
Touch Screen to DockTouch Screen
Dock Screw Holes for
Permanent Mount
4

Followthesestepstocongureawirelesssetup:
a Ifyoudon’tseethenetworkyouwant,select
Other.
b AtNetworkName,selecttoaddtheSSID
ornameofthewirelessnetworkwhenthe
keyboardappears.
c AtSecurity,selectNone,WEP,orWPA.
d AtPassword,typethepasswordgivento
youbythepersonwhosetupthecustomer’s
wirelessnetwork(Control4Dealer).
e SelectConnect.NoticethattheIPsettings
change.
4 TheIPaddressissettoDHCPbydefault.Ifyou
needtosetastaticIPaddress,completethe
followingsteps;otherwise,youarenishedwith
thesesteps.
a OntheNetworkpage,tapStatic (see Figure
8).
Figure8.StaticIPAddress
b Selecteachboxoneatatime,andtypethe
address:IPAddress,SubnetMask,Default
Gateway,PreferredDNS,andAlternateDNS.
c Whenthekeyboardappears,typethe
address,andthentapDone.
d TapOKtoreturntotheNetworkpage.
YoucannowconnecttoaControl4Directorrunning
onaControl4deviceonthenetwork.
Connect to Director from the Touch
Screen
NOTES:(1)TheTouchScreen’scontrolsare
auto-populatedbyaprojectontheController
towhichitconnects.Ifthesubsystembuttons
arenotlit,andnodefaultroomdisplayson
theTouchScreen,youarenotconnectedto
aController.(2)Ensurethatthedevicesare
addedtoComposerandidentiedinthe
project.See“CongureinComposer”for
details.
1 OntheHomepage,tapMore>Settings.
2 TapDirector.
3 IftheDirectorpagedoesnotdisplay,theDirector
viewhasprobablybeendisabled;youmust
provideapasswordtoenableit.
• Ifyouneedthepassword,contactyourControl4
DealerifyouaretheInstaller.
• Ifyouhavethepassword,tapConfig>Disable
View,enterthepassword,andthentapDirector
todeselectit.TaptheDirectorbuttonagain,and
viewtheDirectorpage.
4 IntheDirectorlistofIPaddresses,taponyour
Controller’sIPaddress.Thescreendisplaysyour
currentconnections(Figure9).
Figure9.ControllerAddress
5 VerifythattheName,IPAddress,anddefault
location(room)displayontheTouchScreento
ensureallofthecorrectconnections.
Configure in Composer
UsingComposerPro,addthedriverforthe7”
PortableTouchScreenwithCameratoyourproject.
SeeComposer Pro Getting Started ontheControl4
Dealerwebsite fordetails.
1 StartComposerandconnecttoaDirector.
2 AddtheTouchScreenobjecttotheproject:
a IntheSystemDesignView(defaultview)
projecttree(leftpane),highlighttheroom
wheretheTouchScreenresides.
5

b UnderMyDrivers,double-click Portable 7”
Touch Screen V2.
3 Identifythedevice:
a ClicktheConnections>Networktab.
b IntheIPNetworkConnectionslist(center
pane),highlightPortable 7” Touch Screen V2,
andthenclickIdentify.
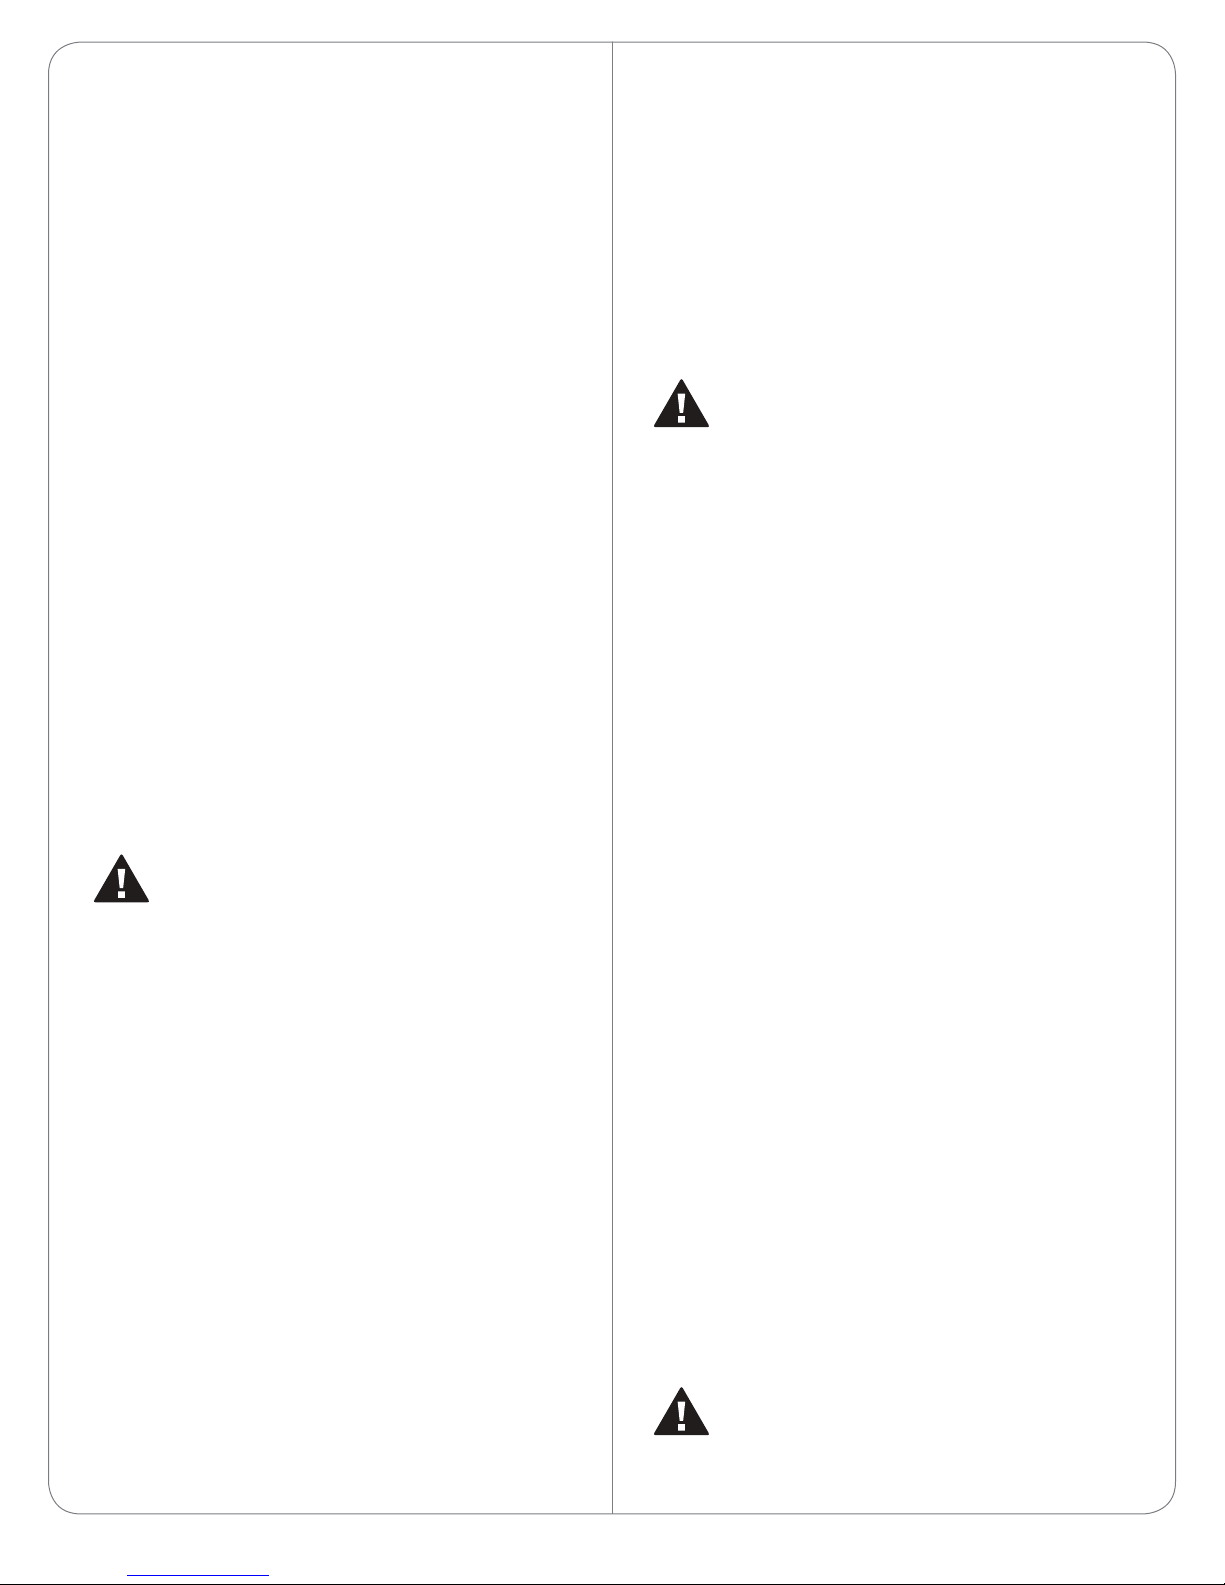
c Whenprompted,gototheTouchScreenand
pressthebottombuttonontherightside,as
indicatedontheIdentifyscreeninComposer,
toidentifythedevicetothenetwork.
d WhentheaddressdisplaysinComposer,click
Close.
Power O
TopowerotheTouchScreen,pressandholdthe
Powerbuttonforatleastve(5)seconds,andthen
waitafewmoresecondsforthedevicetoturno.
Battery Instructions
Battery Charging
• Forsafetyreasons,thebatteryisshippedonly
partiallycharged.Whenyouarereadytousethe
TouchScreen,fullychargethebatteryinitsthe
dockforatleastfour(4)hours.
• IfyouremovetheTouchScreenfromthedockfor
longperiodsoftime,theTouchScreenturnso.
Inthiscase,inserttheTouchScreenintothedock
againtorechargetheTouchScreen.ARedor
OrangeLEDindicatesthatit’scharging.See“LED
Indicators”formoredetailsabouttheLEDs.
Power Management Best Practices
ReadthefollowingguidelinesforTouchScreenusein
andoutofthedockorwhenIntercomisused.
• Askyourcustomerhowtheywillbeusingthis
TouchScreen.Willtheybeusingitasaportable
ortabletop?Ifportable,willtheybemovingit
aboutthehousemostofthetime?Willtheybe
usingIntercomwiththisdevice?Theseareafew
thingstoconsiderduringinstallation.
• ThePowerManagementoption(More>Settings
>Power Management)ontheNavigatorsettings
doesnotapplywhenthisTouchScreenisinits
dock.
• WhentheTouchScreenisoutofitsdock,you
canusethePowerManagementsettings.
• IfyousettheTouchScreentoaSuspend
option,whiletheTouchScreenisinthismode
andsomeonetriestocontactthisscreenvia
Intercom,theywon’tbeableto.Inthiscase,turn
Suspendo(setittoNever).
• ThedefaultsettingsareNeverfor‘TurnBacklight
O’andAfter 3 minsfor‘Suspend.’Typically,the
batterywilllastforabout13hourswiththese
settings.
Herearesomeotherexamplesandhowmuch
batterypowerisconsumedinthesesettings:
-If‘TurnBacklightO’issetto3 minsand
‘Suspend’issettoNever,thebatterywilllasthalf
aslongasthedefaultsettingsduetoincreased
batteryuse.
-If‘TurnBacklightO’isoand‘Suspend’iso,
thebatterywilllastaboutaquarteraslongas
thedefaultsettingsduetoincreasedbatteryuse.
FormoreinformationaboutPowerManagementand
Intercomuse,seetheControl4 System User Guideon
theControl4website.
Cleaning the Touch Screen and Dock
1 Unplugthepowerjackfromthedock.
2 Useasoft,dampclothtowipeothesurface.
Troubleshooting
Ifyouexperienceoperationalproblemswiththe
TouchScreen,readthefollowingsectionsforsystem
troubleshooting.Ifproblemspersist,pleasecontact
yourControl4DealeroryourControl4representative.
Battery Operation Problems
Ifbatteryislow...
• Rechargethebatteryassoonaspossible.
• DocktheTouchScreen(ifusingasaportable),
andcontinuetousetheTouchScreeninitsdock
untilfullycharged.
IftheTouchScreenturnsoautomatically...
• Checkwhetherthebatterypowerislowor
completelydrained.
6

• Checkwhetherthesystemisin‘Suspend’mode
(see“TouchScreenModes”).
• Tapthescreentocheckwhetherthedisplaywill
activate.
• PlugintheDCpoweradapterorPoEcableto
chargethebattery.
IftheTouchScreendoesn’tturnonwhenit’snot
connectedtothedock...
• Thebatterypowermaybetoolowtorunthe
TouchScreen.Tryconnectingittothedockto
rechargeit.
Display Problems
Ifthescreenappearsblank...
• Presstheany buttonortaptheTouchScreento
wakeitup.
System Operation Problems
IftheTouchScreenisnotresponding...
• AlwaystrytopowertheTouchScreenobefore
resettingtheTouchScreen.Resetthedeviceby
pressingtheReset/Restorepinholeonthetop
ofthescreen.Youmayneedtouseanunbent
papercliptopressthebutton.
CAUTION!Themicrophoneholeslooksimilar
totheReset/Restorepinhole.Insertinga
paperclipintothesepinholeswillpermanently
damagethemicrophones.SeeFigure2.
• Unplugthedockandplugitbackin.
• IfpressingtheReset/Restorepinholebutton
doesnotsolvetheproblem,asalastresort,
performafactoryrestore.Pressandholdthe
Reset/Restorepinholebutton(seeFigure2for
thelocation)untilthePowerLEDbeginstoblink
rapidly.Thiswillresetallcongurations.The
factoryrestoreprocessmaytake3-5minutesto
complete.
IftheTouchScreenisdamaged...
• ContacttheControl4DealerorResellerfrom
whomyoupurchasedtheTouchScreen.
Ifyouhavenetworkconnectionproblems...
• Viewthesystem’swirelessstatusbycheckingthe
WiFiindicatorontheTouchScreen’sNavigator.
• Makesureyou’veprovidedtherequirednetwork
congurationinformationdescribedin“Congure
theNetworkSettings.”
• Ensurethatthesamekeyisbeingusedonthe
TouchScreenandattheWAP.
• MakesuretheWAPisconnectedtotheproper
networkjackwhileitisfunctioninginthenetwork
infrastructuremode.
Warnings
WARNING!Toavoidbodilyharm,understand
andfollowthesesafetyprecautionsbefore
operatingthisTouchScreen:
-Usingworn-outordamagedpowercords
mayresultinelectricshockorre.
-AlwayscontactanauthorizedControl4
serviceproviderforassistanceifanyrepairor
adjustmentisrequired.
Avertissement!Pouréviterdesdommages
physiques,comprenezetsuivezcesmesures
desécuritéavantd’actionnerl’écrantactile
Control4®sansl:
-Utilisantuséouendommagélescordonsde
secteurpeuventavoircommeconséquence
ladéchargeélectriqueoulefeu.
-Entrezencontactavectoujoursun
fournisseurdesservicesControl4®autorisé
pourl’aidesin’importequelleréparationou
ajustementestexigée.
Warnung!UmKörperverletzungzu
vermeiden,verstehenSieundfolgenSie
dieseSicherheitsanweisungenbevorSieden
drahtlosenControl4®TouchScreenbetreiben:
-UnterVerwendungabgedroschenen
oderbeschädigtkannNetzanschlusskabel
ElektroschockoderFeuerergeben.
-TretenSieimmermiteinemautorisierten
Control4®DiensterbringerfürUnterstützung
inVerbindung,wennirgendeineReparatur
oderJustageangefordertwird.
CAUTION!Toavoiddatalossorequipment
damage,understandandfollowthesesafety
precautionsbeforeoperatingthisTouch
7

Screen:
-DonotuseorplacetheTouchScreennear
sourcesofheatorexposeittodirectsunlight
foranextendedperiodoftime.Storeitina
coolanddryplace.
-Donotusepensorsharpobjectstowriteon
thescreen.
Attention!Pouréviterlapertededonnéesou
lesdommagesauxéquipments,comprenez
etsuivezcesmesuresdesécuritéavant
d’actionnerleControl4®7”;Écrantactiletenu
danslamain:
-Nelaissezpaslepaquetdebatterieentrer
encontactavecd’autresobjetsenmétal.
-N’utilisezpasouneplacezpasl’écrantactile
prèsdessourcesdechaleurounel’exposez
pasàlalumièredusoleildirectependantune
périodeprolongée.
-Stockez-ledansunendroitfraisetsec.
N’employezpaslesstylosoulesobjets
pointuspourécriresurl’écran.
Vorsicht!UmDatenverlustoder
Ausrüstungsschadenzuvermeiden,verstehen
SieundvordemBetriebdesControl4®7”
folgenSiedieseSicherheitsanweisungen;
TouchScreen:
-LassenSiedenBatteriesatzmitanderen
MetallgegenständennichtinVerbindung
treten.
-BenutzenSieodersetzenSiedenTouch
ScreennichtnaheQuellenderHitzeoder
setzenSieihndirektemTageslichtwährend
einesausgedehntenZeitabschnittsaus.
SpeichernSieesineinemkühlenund
trockenenPlatz.
-BenutzenSienichtFedernoderscharfe
Gegenstände,umaufdenSchirmzu
schreiben.
IMPORTANT!Donotusepensorsharpobjects
tonavigateormakeselectionsontheTouch
Screen.Toselectanitemorscrollthrougha
list,useyourngertip.
Important!N’employezpaslesstylosoules
objetspointuspourdirigeroupourfairedes
choixsurl’écran.Pourchoisirunarticleouun
rouleauparuneliste,employezvotreboutdu
doigt.
Wichtig!BenutzenSienichtFedernoder
scharfeGegenstände,umoderVorwähleren
aufdemSchirmzubildenzusteuern.Um
einEinzelteilodereineRolledurcheineListe
vorzuwählen,benutzenSieIhreFingerspitze.
IMPORTANT!Improperuseorinstallationcan
causeLOSS/DAMAGEOFPROPERTY.
Important!L’utilisationoul’installationinexacte
peutcauserLOSS/DAMAGEDEPROPRIÉTÉ.
Wichtig!UnsachgemäßerGebrauchoder
InstallationkönnenLOSS/DAMAGEDER
EIGENSCHAFTverursachen.
IMPORTANT!Usingthisproductinamanner
otherthanoutlinedinthisdocumentvoids
yourwarranty.Further,Control4isNOTliable
foranydamageincurredwiththemisuseof
thisproduct.See“Warranty.”
Important!Utilisantceproduitenquelque
sorteautrequedécritdanscedocumentvide
votregarantie.Deplus,Control4n’estpas
responsabled’aucundommageencouruavec
l’abusdeceproduit.Voyezque«Warranty.»
Wichtig!DasVerwendendiesesProduktesin
gewissemSinneandersalsumrissenindiesem
DokumenthebtIhreGarantieauf.Weiterist
Control4NICHTfürirgendeineBeschädigung
verantwortlich,diemitderFehlanwendung
diesesProduktesgenommenwird.SehenSie,
daß“Warranty.”
WARNING!Toreducetheriskofreor
electricalshock,donotexposethisapparatus
torainormoisture.
Avertissement!Pourréduirelerisquedufeuou
dechocélectrique,n’exposezpascetappareil
àlapluieouàl’humidité.
8

©2012 Control4. All rights reserved. Control4, the Control4 logo, the Control4 iQ logo and the Control4 certified logo are registered trademarks or trademarks of Control4 Corporation in
the United States and/or other countries. All other names and brands may be claimed as the property of their respective owners.
control4.com| ™
Warnung!UmdieGefahrdesFeuersoderdes
elektrischenSchlageszuverringern,setzenSie
diesenApparatnichtRegenoderFeuchtigkeit
aus.
Regulatory/Safety Information
ToreviewregulatoryinformationforyourparticularControl4
products,seetheinformationlocatedontheControl4websiteat:
http://www.control4.com/regulatory/.
Patent Information
ProtectedunderU.S.Patents7,335,845,7,106,261andlicensedunder
U.S.Patents5,905,442and5,982,103
Warranty
Limited2-yearWarranty.Refertohttp://www.control4.com/warranty.
About this Document
PartNumber:200-00238,RevA,1/13/2012
9
This manual suits for next models
1
Table of contents
Other Contro l4 Touchscreen manuals

Contro l4
Contro l4 C4-FP C Series User manual

Contro l4
Contro l4 T4 Series User manual

Contro l4
Contro l4 T3 Series User manual

Contro l4
Contro l4 T3 Series User manual

Contro l4
Contro l4 T4 Series User manual

Contro l4
Contro l4 T4 Series User manual

Contro l4
Contro l4 T4 Series User manual

Contro l4
Contro l4 C4-TW7C0-BL User manual
Popular Touchscreen manuals by other brands

Carrier
Carrier equipment touch Installation and setup guide

Elo TouchSystems
Elo TouchSystems ESY15i1 user manual

Avalue Technology
Avalue Technology HID-2100 user manual

TREND
TREND IQView8 installation instructions

Beetronics
Beetronics 7HD7M user manual

Elo TouchSystems
Elo TouchSystems SELF SERVICE STAND Assembly instructions