manuals.online logo
Brands
  1. Home
  2. •
  3. Brands
  4. •
  5. Cornwell Tools
  6. •
  7. Outdoor Cart
  8. •
  9. Cornwell Tools Pro Series User manual

Cornwell Tools Pro Series User manual

CTBMM100BR, -BK, -BL, -NY, -RG, -RD Rev. 7/21/15
OWNER'S MANUAL
CTBMM100BR, Bk, Bl, Ny, RG, RD
Pro Series Service Cart
• Read and follow all instructions in User's Manual.
• Do not load carts beyond rated capacity:
Maximum Total Net Load ........................................500 Lbs.
Top and Bottom Shelf .................................... 150 Lbs. each
Small Top Drawers ........................................... 30 Lbs. each
Center and Bottom Drawers ............................ 70 Lbs. each
PLEASE NOTE: Loading cart beyond rated capacity may
cause structural damage to the cart as well as personal
and/or property damage. Please educate your customers to
the "dangers of overloading".
• Lock lid and drawers before moving. • Apply brake on locking
casters anytime cart is in place. • Do not pull cart. Push from
handle on end to move. • Units can tip or fall causing damage or
personal injury. • Cart is designed to roll easily on at surfaces
and should not be used on uneven or inclined surfaces. • Do
not open more than one loaded drawer at a time. • Do not stand
on or step in drawers. • Keep children away from unit. • Wear
gloves when lifting edges. • This product may contain one or
more chemicals known to the State of California to cause cancer
and birth defects or other reproductive harm. Wash hands
thoroughly after handling. • Failure to heed these warnings may
result in personal injury and/or property damage.
WARNING
Copyright © Professional Tool Products, 2015
All rights reserved
HARDWARE SPECIFICATIONS
TOOLS NEEDED FOR ASSEmbLy:
• 2 - 14mm Combination Wrenches
• 13mm Socket or Universal Socket
• 4" Extension
• 1/4" Ratchet
1a x 32 pcs.
1b x 4 pcs.
2 x 72 pcs.
3 x 56 pcs.
4 x 4 pcs. 9 x 16 pcs.
CTBMM100BR, -BK, -BL, -NY, -RG, -RD 2 Rev. 7/21/15
Due to the weight of this cart we recommend that TWO PEOPLE work
together on the assembly. This cart weighs approximately 170 lbs,
please use caution during assembly.
Step 1: Locate the key tied to the bottom tray. Using the key, open
the lid and remove the caster box from the bottom drawer.
Once removed make sure all drawers are completely
closed and the inside lever is in the locked position. Close
the top lid and lock.
Step 2: Lay out a work surface using the protective foam provided.
Once this surface is secure gently turn the cart onto its lid.
(logo will be facing the foam)
Step 3: (Before assembling the legs, remove the cable tie holding
the bumper in place) Insert the front leg (#7), labeled FL
or FR into top lip of the cart. Then place the Front bumper
(#14 with Cornwell Logo) over the leg aligning the center
bolt holes. With holes aligned insert stove bolt (#1a) and
finger tighten with nyloc nut and washer
Step 4: Install back leg (#7) labeled BL or BR and bumper (#14
without logo) following the same procedure as above.
Note: Make sure the back leg is inside the hinge rivet.
Otherwise the holes will not line up during assembly!!!
ASSEMBly INSTRUCTIONS
Step 8: Insert bottom shelf (#23) between the four legs flat side
facing up towards the ceiling. Insert sixteen stove bolts
(#1a) and completely tighten.
Step 5: Repeat steps 3 & 4 to mount the legs on the opposite side.
Step 6: Completely tighten the 8 bolts just inserted.
Step 7: Insert bottom shelf (#23) between the four legs flat side
facing up towards the ceiling. Insert sixteen stove bolts
(#1a) and completely tighten.
1a
23
1a
1a 14
7
1a
14
7
CTBMM100BR, Bk, Bl, Ny, RG, RD
Pro Series Service Cart
CTBMM100BR, -BK, -BL, -NY, -RG, -RD 3 Rev. 7/21/15
Troubleshooting Points during CTBMM100 Assembly.
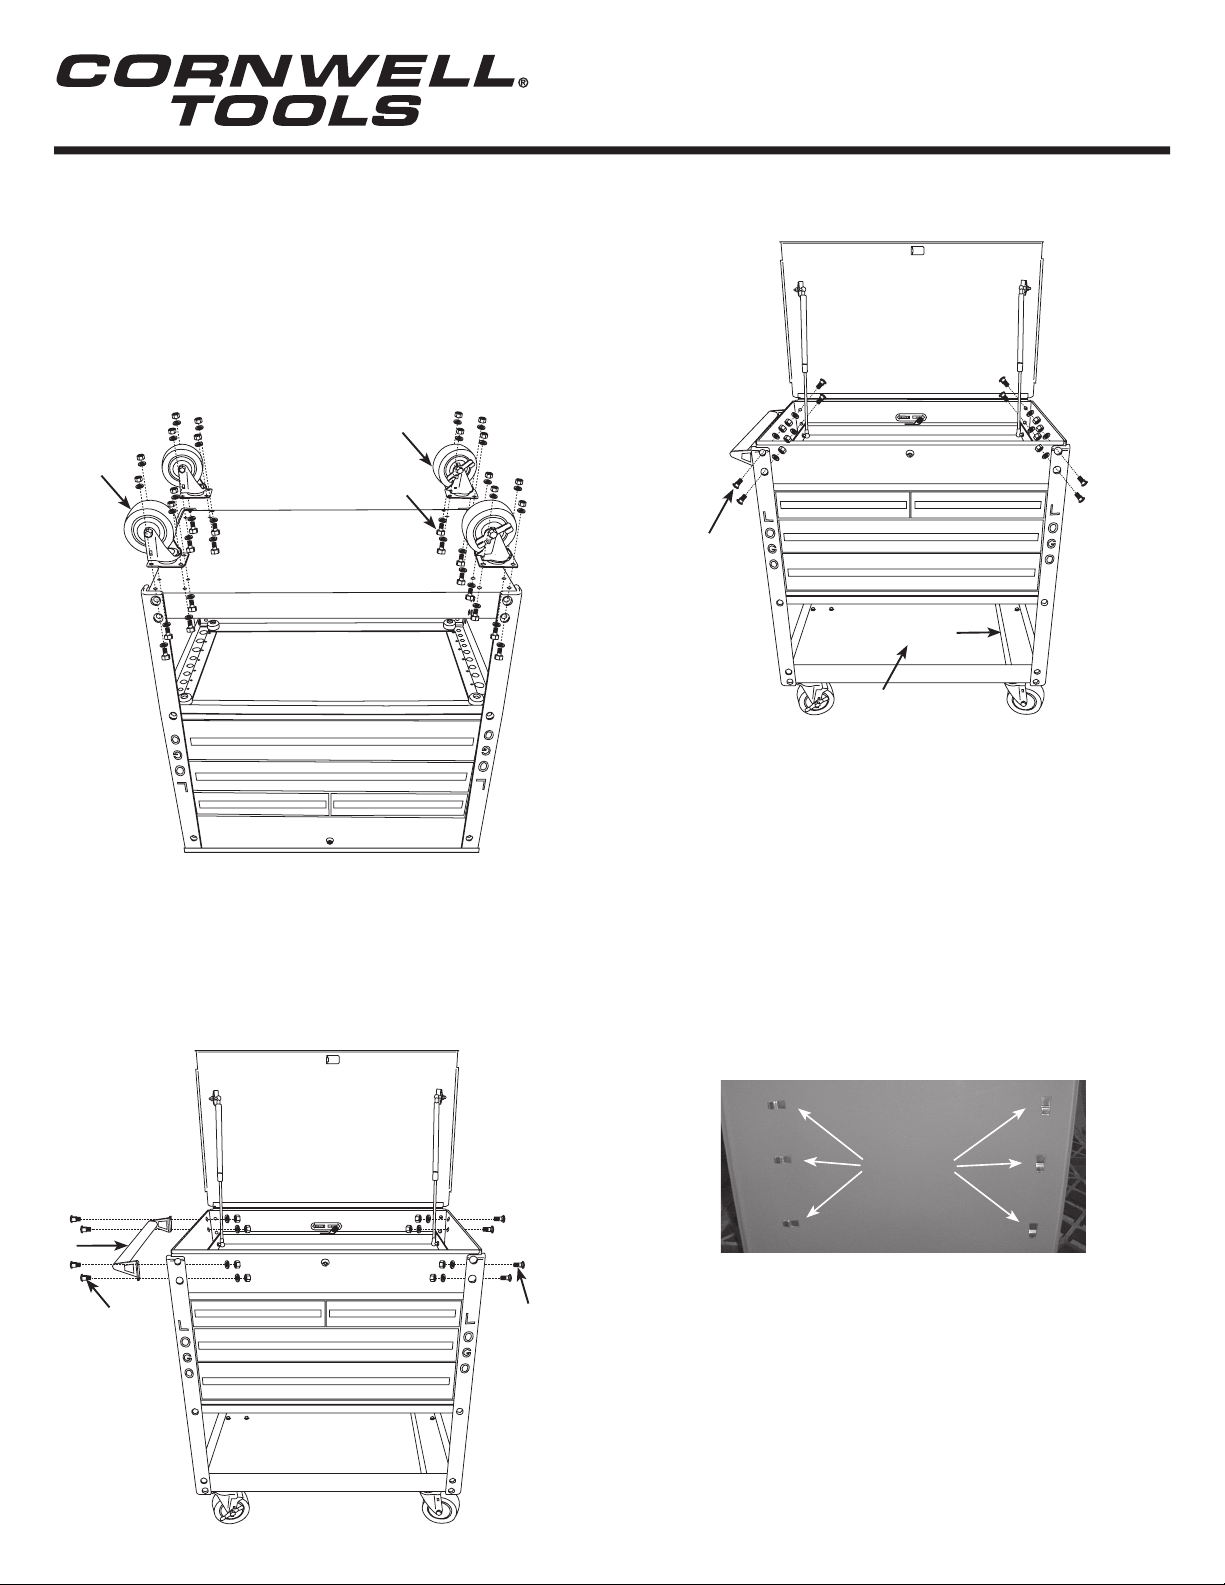
Problem: Drawers appear not to fit, do not slide in accurately and bump the
cart sides.
Solution: The roller bearing slides must be fully engaged into the mounting
slots on all drawers. They potentially could fall out of position while turning
the cart on its lid, back, or onto its casters.
Remove the drawer that is out of position. The drawer is removed by the two
clips on the roller bearing slides.
Simply push the roller bearing slide back down into position.
Insert the drawer back onto the roller bearing slides.
Problem: Back Lock/Unlock Switch does not engage the drawer.
Solution: The inside Lock/Unlock slide potentially could fall out of its groove
while turning the cart on its lid, back, or onto its casters during assembly.
Unscrew the four screws that are holding the Lock/Unlock slide in place.
Once the screws are removed simply place the latch back onto the slide and
tighten the four screws back down.
Problem: Back Lock/Unlock Switch does not engage the drawer.
Solution: The inside Lock/Unlock slide potentially could fall out of its groove
while turning the cart on its lid or back onto its casters.
Unscrew the four screws that are holding the Lock/Unlock slide in place.
Once the screws are removed simply place the latch back onto the slide and
tighten the four screws back down.
10
12
9
Mounting Slots
Step 13: Insert the remaining 8 stove bolts (#1a).
Step 14: Using 13mm socket completely tighten all fasteners!!
Step 15: Insert spray can holder divider (#19) into provided cut
away on the bottom shelf (#23). (Optional)
ASSEMBly INSTRUCTIONS
Step 8: Mounting casters: Put the four casters in place. The two locking
casters (#12) should be on one side of the cart and the two
non locking casters (#10) should be on the other (Left or right
side NOT front or back). Using the 16 bolts (#9), washers and
fasteners (located in separate Caster bag) completely tighten
the casters to the bottom tray using a 13mm socket and 14mm
combination wrench for the bolt head. (Note: Bolt head and one
washer should be on the inside of the bottom shelf, nyloc nut
and one washer will be on the caster side.)
Step 9: Carefully turn cart onto its casters
Step 10: Open top lid using the key provided
Step 11: Mount push handle (#6) to the same side of the cart with
the locking casters using the four stove bolts (#1b) provided.
Finger tighten at this time.
Step 12: Insert the 4 Stove bolts (#4) provided to the opposite side of the
cart. Note: This stove bolt is shorter due to not having to pass
through a handle or bumper.
1a
23
19
(Step 11) (Step 12)
6
1b 4
TROUBlESHOOTING
CTBMM100BR, Bk, Bl, Ny, RG, RD
Pro Series Service Cart
CTBMM100BR, -BK, -BL, -NY, -RG, -RD 4 Rev. 7/21/15
Item # Part # Description QTY.
1a * M8x22 Bolt 32
1b * M8x28 Bolt 4
2 * M8 Washer 72
3 * M8 Locking Nut 56
4 * M8x22 Bolt 4
5 RSMM100HB Handle Brackets/Pair 1
6 RSMM100HDL Handle 1
7 RSMM100LG-BR (burgundy) Leg/each 4
RSMM100LG-BK (black)
RSMM100LG-BL (blue)
RSMM100LG-NY (yellow)
RSMM100LG-RG (orange)
RSMM100LG-RD (red)
8 RSMM100SRP-BR (burgundy)
Screwdriver/Prybar Holder/each 2
RSMM100SRP-BK (black)
RSMM100SRP-BL (blue)
RSMM100SRP-NY (yellow)
RSMM100SRP-RG (orange)
RSMM100SRP-RD (red)
9 * M8x19 Bolt (for casters) 16
10 RSSWCS 5" Swivel Caster (non-locking)/each 2
11 RSMM100RP-BR (burgundy) Reinforced Piece /each 2
RSMM100RP-BK (black)
RSMM100RP-BL (blue)
RSMM100RP-NY (yellow)
RSMM100RP-RG (orange)
RSMM100RP-RD (red)
12 RSSWLCS 5" Swivel Caster with lock/each 2
13a RSMM100DH Drawer Handle/each 2
13b RSMM100SDH Short Drawer Handle/each 2
14 RSMM100BP Set of 4 Bumpers 1
15 * Screw for Drawer Handles 12
16 RSLKN Lock with Keys
17 RSGP Gas Piston /each
RSRBS Roller Bearing Slides/pair
19 RSMM100SCD-BR (burgundy) Spray Can Divider 1
RSMM100SCD-BK (black)
RSMM100SCD-BL (blue)
RSMM100SCD-Y (yellow)
RSMM100SCD-RG (orange)
RSMM100SCD-RD (red)
20 CTB100MMLDBRL (burgundy) 3-1/4" Half Drawer Left 1
CTB100MMLDBKL (black)
CTB100MMLDBLL (blue)
CTB100MMLDNYL (yellow)
CTB100MMLDRGL (orange)
CTB100MMLDRDL (red)
20a CTB100MMLDBRR (burgundy) 3-1/4" Half Drawer Right 1
CTB100MMLDBKR (black)
CTB100MMLDBLR (blue)
CTB100MMLDNYR (yellow)
CTB100MMLDRGR (orange)
CTB100MMLDRDR (red)
21 CTB100MMLD2BR (burgundy) 3-1/4" Drawer 1
CTB100MMLD2BK (black)
CTB100MMLD2BL (blue)
CTB100MMLD2NY (yellow)
CTB100MMLD2RG (orange)
CTB100MMLD2RD (red)
22 CTB100MMLD3BR (burgundy) 5-1/4" Drawer 1
CTB100MMLD3BK (black)
CTB100MMLD3BL (blue)
CTB100MMLD3NY (yellow)
CTB100MMLD3RG (orange)
CTB100MMLD3RD (red)
Item # Part # Description QTY.
23 CTB100MMSBR (burgundy) Bottom Shelf 1
CTB100MMSBK (black)
CTB100MMSBL (blue)
CTB100MMSNY (yellow)
CTB100MMSRG (orange)
CTB100MMSRD (red)
PART DRAWINGS
5
Push Handle
Bracket
6
Push Handle 7
Legs (4)
8
Pry Bar
Holder (2)
14
Bumper (4)
2 with logo, 2 without
10
Non-Locking
Caster (2)
11
Front & Back
Bracket 12
Locking Swivel
Caster (2)
Narrow Side
Small Lip
13b
Short Drawer
Handle (2)
13a
Drawer
Handle (2)
19
Paint Can
Holder Divider
23
2
1a
14
13a
13b
10
19
12
9
8
7
6
5
1b
34
Front Right Bumper
21
22
20
20a
11
PARTS lIST
* Available in RSMM100BK Bolt Kit.
Also available: RSSCPK Service Cart Polishing Kit, RSDET8PK Ball Bearing Slide Detents (Pk of 8)
CTBMM100BR, Bk, Bl, Ny, RG, RD
Pro Series Service Cart

This manual suits for next models

6

Other Cornwell Tools Outdoor Cart manuals

Cornwell Tools MMWC2XL User manual

Cornwell Tools

Cornwell Tools MMWC2XL User manual

Cornwell Tools CRCS2DRW User manual

Cornwell Tools

Cornwell Tools CRCS2DRW User manual

Cornwell Tools Pro CTBMM500 Series User manual

Cornwell Tools

Cornwell Tools Pro CTBMM500 Series User manual

Cornwell Tools Pro CTBMM500CAR User manual

Cornwell Tools

Cornwell Tools Pro CTBMM500CAR User manual

Cornwell Tools MMWUWC4 User manual

Cornwell Tools

Cornwell Tools MMWUWC4 User manual

Cornwell Tools CTBMM500NGBKE User manual

Cornwell Tools

Cornwell Tools CTBMM500NGBKE User manual

Cornwell Tools Pro Series User manual

Cornwell Tools

Cornwell Tools Pro Series User manual

Cornwell Tools CTB-MM700BR User manual

Cornwell Tools

Cornwell Tools CTB-MM700BR User manual

Cornwell Tools Pro CTBMM500ANNWHE User manual

Cornwell Tools

Cornwell Tools Pro CTBMM500ANNWHE User manual

Cornwell Tools Pro CTB5DSTWHBLE User manual

Cornwell Tools

Cornwell Tools Pro CTB5DSTWHBLE User manual

Cornwell Tools Pro CTBMM500BKNGE User manual

Cornwell Tools

Cornwell Tools Pro CTBMM500BKNGE User manual

Popular Outdoor Cart manuals by other brands

Gorilla Carts GOR4G-COM manual

Gorilla Carts

Gorilla Carts GOR4G-COM manual

ALTUS HN installation instructions

ALTUS

ALTUS HN installation instructions

Ergotron Styleview SV22-92026 Set-up&Go Guide

Ergotron

Ergotron Styleview SV22-92026 Set-up&Go Guide

Espina ESP301 instruction manual

Espina

Espina ESP301 instruction manual

SUSPENZ 22-1166 quick start guide

SUSPENZ

SUSPENZ 22-1166 quick start guide

Perrot RollcarTV-3 operating instructions

Perrot

Perrot RollcarTV-3 operating instructions

Spectrum Industries VR30 quick start guide

Spectrum Industries

Spectrum Industries VR30 quick start guide

VONROC TT502 Series instructions

VONROC

VONROC TT502 Series instructions

Gima LAUNDRY TROLLEY 3 user manual

Gima

Gima LAUNDRY TROLLEY 3 user manual

Spectrum Industries Impression 30 Imaging Laptop Cart owner's manual

Spectrum Industries

Spectrum Industries Impression 30 Imaging Laptop Cart owner's manual

Pragma axi AG22 instruction manual

Pragma

Pragma axi AG22 instruction manual

MSH equipment Ecologic Trolley 16 manual

MSH equipment

MSH equipment Ecologic Trolley 16 manual

Clarke GWC1 quick start guide

Clarke

Clarke GWC1 quick start guide

Sunjoy L-PS158PST-5 Assembly instructions

Sunjoy

Sunjoy L-PS158PST-5 Assembly instructions

Alladin Temp-Rite CONVECT-RITE III CR3C20 Series Installation, operation & service manual

Alladin

Alladin Temp-Rite CONVECT-RITE III CR3C20 Series Installation, operation & service manual

BCP SKY2567 instruction manual

BCP

BCP SKY2567 instruction manual

Weber Q Cart manual

Weber

Weber Q Cart manual

Coaster 181382 Assembly instructions

Coaster

Coaster 181382 Assembly instructions

manuals.online logo
manuals.online logoBrands
  • About & Mission
  • Contact us
  • Privacy Policy
  • Terms and Conditions

Copyright 2025 Manuals.Online. All Rights Reserved.