Costway OP3553 User manual

www.costway.com
THIS INSTRUCTION BOOKLET CONTAINS IMPORTANT SAFETY INFORMATION. PLEASE READ AND KEEP FOR FUTURE REFERENCE.
Visit us: www.costway.com
Follow Costway
Please give us a chance to make it right and do better!
Contact our friendly customer service department for help first.
Replacements for missing or damaged parts will be shipped ASAP!
USER’S MANUAL
solar shower
OP3553

2 3
www.costway.comwww.costway.com
Contact Us!
Do NOT return this item.
Contact our friendly customer service department for help first.
E-mail
US: cs.us@costway.com
UK: cs.uk@costway.com
Before You StartBefore You Start
Please read all instructions carefully.
Retain instructions for future reference.
Seperate and count all parts and hardware.
Read through each step carefully and follow the proper order.
We recommend that, where possible, all items are assembled near to the
area in which they will be placed in use, to avoid moving the product
unnecessarily once assembled.
Always place the product on a flat, steady and stable surface.
Caution: Read the warnings carefully. Avoid kids get touch of small parts or
plastic bag.
When using tools, care must be taken not to scratch and/or damage plating and painting.
We recommend using a cloth between wrench and shower parts to avoid
scratching and/or damage.
We recommend installing the shower to a solid surface to insure stability and safety.
CONTENTS
Qty–Description Qty–Description
1–Main Unit 4–Expansion Nuts with Bolts
1–Extension Pipe 1–Teflon Tape
1–Shower Head 1–Inlet Fitting
1–Coupler
Before you begin, please check to ensure you have all the parts.
Read ALL the directions before beginning.

4
www.costway.com
5
www.costway.com
STEP1 STEP 2 STEP 3 STEP 4
Make sure the shower head and
handle are on the same vertical line. FIGURE 2 FIGURE 1
Tightly wrap the thread
with Teflon tape more
times to avoid leaking
ASSEMBLING THE SHOWER
1. Locate the ‘Showerhead fitting’ and wrap 5 to 7 times with Teflon tape provided.
2. Carefully thread the coupler onto the ‘Showerhead Fitting’ and tighten until snug.
DO NOT OVERTIGHTEN. SEE FIGURE 1.
3. Select the shorter end of the extension pipe and wrap 3 to 5 times with Teflon
tape provided. Then thread shower head onto taped end of pipe until snug.
DO NOT OVERTIGHTEN. SEE FIGURE 1.
4. Tightly wrap the threads on the remaining end of the extension pipe with
Teflon tape 8 to 10 times.Carefully thread wrapped end of extension pipe into the
coupler of the shower until snug. DO NOT OVERTIGHTEN.
NOTE: If the ‘Showerhead’ is pointing up, simply rotate until it is pointing down.
5. Install the on/off handle and fix the handle by the screw provided. Install the blue
and red cover. Blue stands for cold water and Red for hot water.
Make sure blue is on the left and red is on the right side.
6. Connect the two piece of shower as FIGURE 2 shows. It is recommended
that two person do the assembly. It is much easier.
7. Attach a garden hose to the ‘Inlet Port’ of the shower and a water supply.
SEE FIGURE 4.
NOTE: In case of leaks at either coupler from step 1 or 2, remove from fitting,
wrap threading 3 to 4 more times with Teflon tape and reattach. SEE FIGURE 1.
FIGURE 3
FIGURE 4
A
B
1/23/4
MOUNTING THE SHOWER: CONCRETE/MASONRY INSTALLATION ONLY
1. Choose a location for shower that receives the most direct sunlight.
2. Use the main unit to mark the position of the mounting holes to be drilled
into concrete/masonry for bolts. SEE FIGURE 3.
3. Remove shower. Drill ”diameter holes,1 ” deep, using the marks just created.
4. Insert Expansion Nuts into holes. Place the bolt inside the expansion nut and
TAP with a hammer to slightly expand the nut.
5. Remove Bolt and place the base plate/lower tube over the holes and secure
to surface with bolts and washers provided.
NOTE: Base plate will appear loose until shower is fully secured to the surface.
Do not use tools totighten them, that will irreversibly damage the shower.

6
www.costway.com
7
www.costway.com
INITIAL SET UP OF THE SHOWER
1. Turn and lift shower handle to FULL ON HOT position.
2. Turn on water supply to garden hose to fill shower. Shower will take about 2 minutes tofill.
NOTE: Filling tube with valve in hot position ensures no air pockets are trapped in shower. This procedure is used
for initial set up only.
3. When water flows from shower head, turn shower handle off. Turning the shower off allows the water to begin
heating.
4. Shower is ready to absorb sunlight and heat your water.
NOTE: Depending on available sunlight and outside temperature, it may take up to 3 hours or longer to fully heat
the water. Using the shower too soon will yield less heated water. A recently used shower (that has not been
emptied) will take less time as it will have retained some hot water.
USING THE SHOWER
WARNING: WATER TEMPERATURE IN SHOWER MAY REACH OVER 130oF (55oC)! WE
RECOMMEND OPENING HANDLE IN THE MIDDLE POSITION BETWEEN HOT AND
COLD, THEN SETTING TO DESIRED TEMPERATURE. ALWAYS START YOUR SHOWER
COOL TO AVOID INJURY.
1. Simply lift the handle to its ON position and you are ready to enjoy your sun-warmed water!
NOTE: The faucet connected to garden hose must be turned on for shower to run.
2. Turn off water supply to shower when done.
WARNING: IF SHOWER HAS NOT BEEN USED FOR MORE THAN THREE DAYS, WE
RECOMMEND RUNNING the SHOWER FOR 2 MINUTES TO REMOVE STAGNANT
WATER. STAGNANT WATER IN WARM ENVIRONMENT CAN PROVIDE A GROWTH
ENVIRONMENT FOR HAZARDOUS BACTERIA.
OFF SEASON DISASSEMBLY
1. Turn off and disconnect garden hose.
2. Open handle and water will drain from the inlet port.
DO NOT USE SALT OR OTHER ANTI-FREEZING METHODS.
THIS WILL VOID THE PRODUCT WARRANTY.
CARE AND MAINTENANCE
Wipe shower off after use.
WARNING: FOR YOUR SAFETY
DO NOT use the solar shower with base in high wind conditions. Wind may cause the shower to become unstable
and fall over hurting you, children or property.
THIS IS NOT a recreational device. DO NOT climb on, hang from solar shower or stand on base. Use only as
intended.
CAUTION: IMPORTANT SAFETY INFORMATION - KEEP SMALL PARTS,
HARDWARE AND PLASTIC BAGS OUT OF THE REACH OF CHILDREN.
Thank you for choosing our solar shower product. In order to use our products properly and get the most satisfaction
and pleasure, please pay attention to the following details.
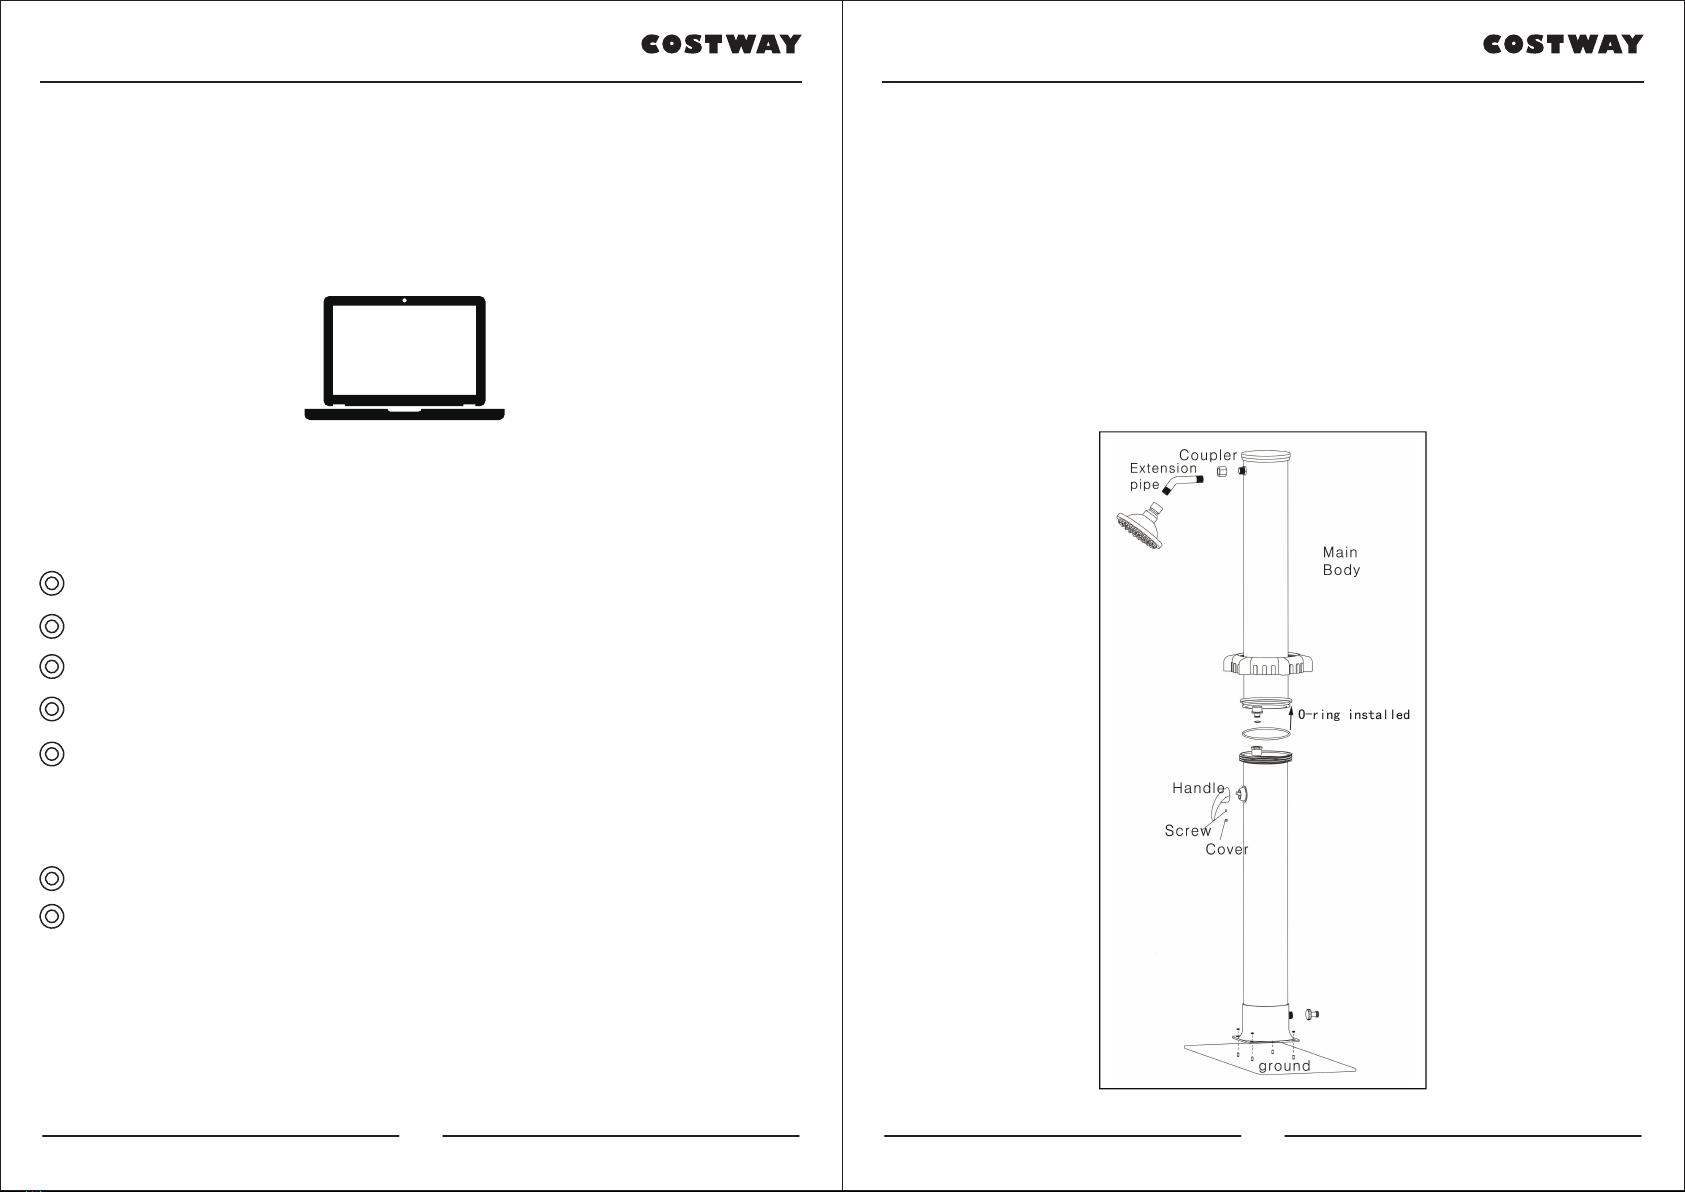
1. The solar shower must be installed on solid ground (concrete floor) or concrete base to make sure its stabilization
and safety for user.
2. The solar shower is equipped with base plate, which has 4 prefabricated holes for screws installation on solid
ground or portable base.
3. For easy installation, please separately buy our portable base. Just screw the solar with the base and you could
enjoy the warm water. Make sure the screws are fixed tightly. The filled solar shower is heavy and could be
dangerous in case is falls.
4. Please install the solar shower at the location where has the most sunshine.
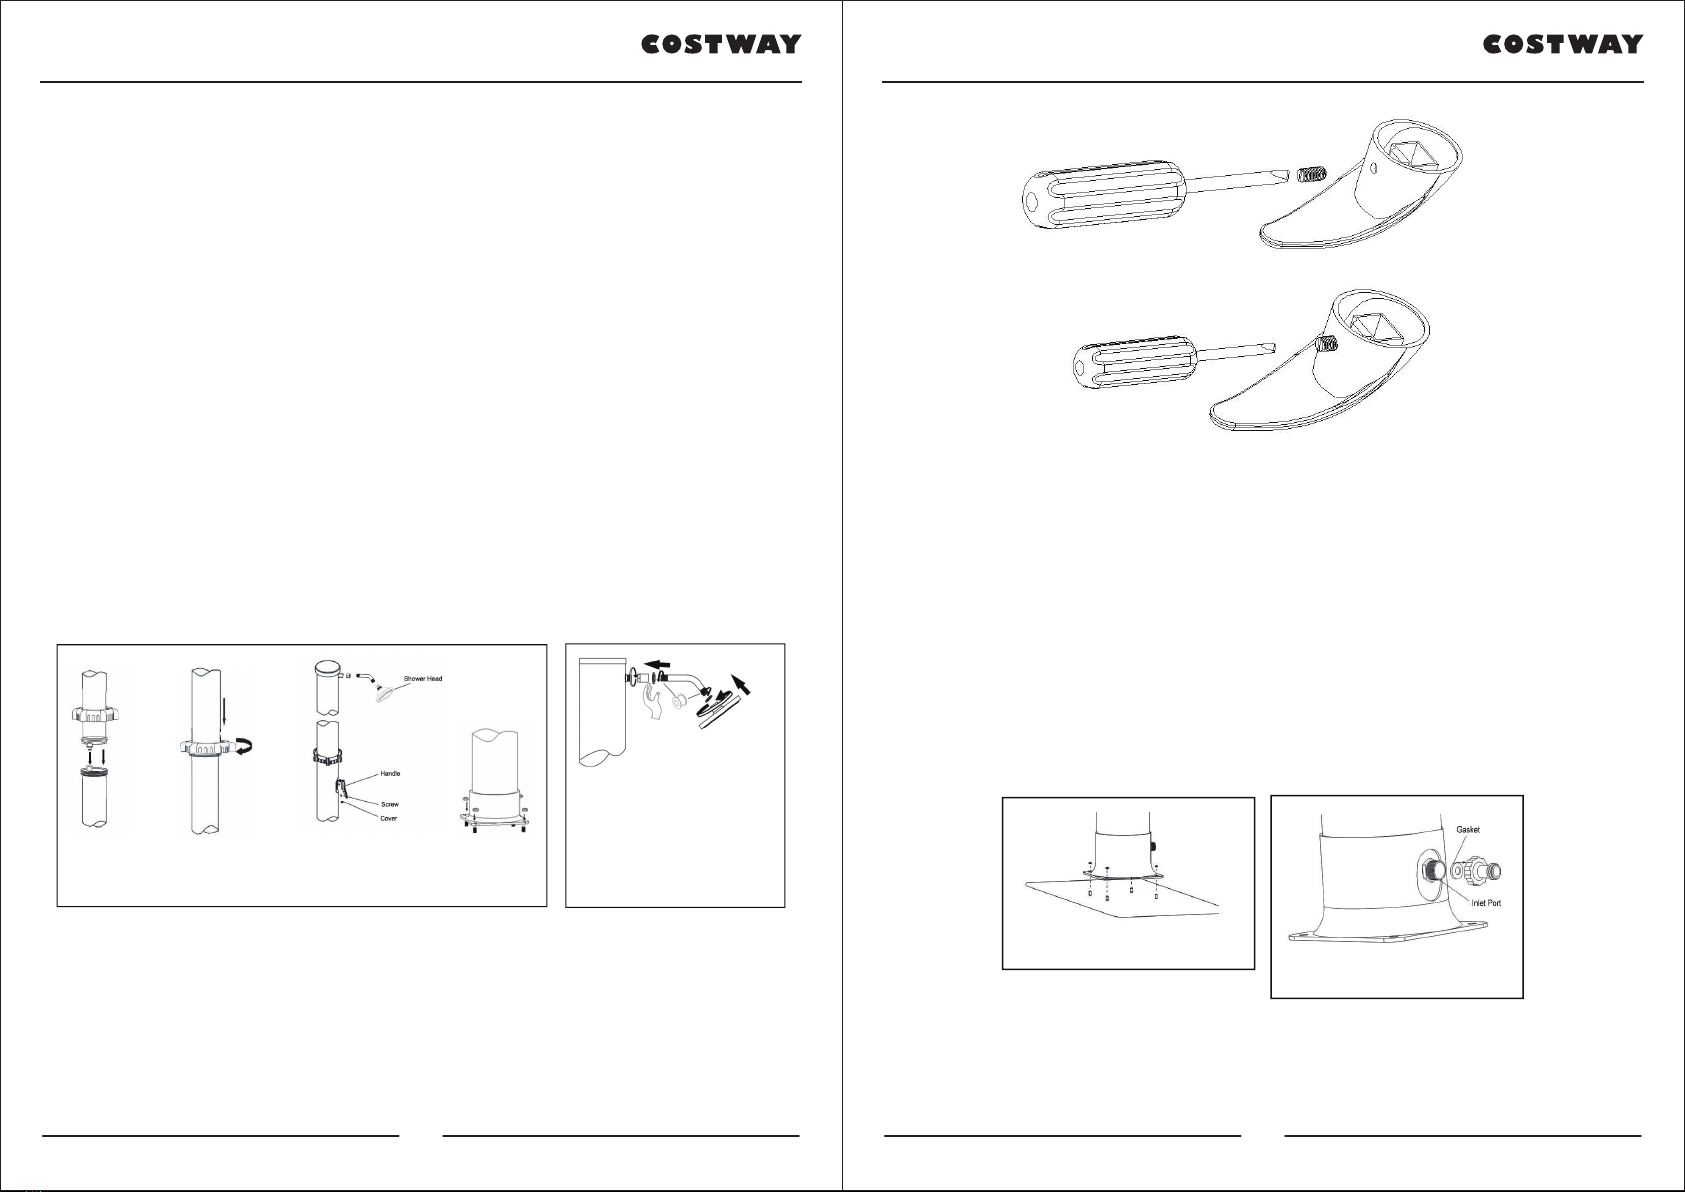
5. Please connect inlet of the solar shower to tap water system of your home. It is better to have the inlet of solar
shower connected to your garden tap then to the tap water system. To fill up the shower, you must open the hand
mixer in position “cold”. Observe the shower while filling, do not overfill.
6. Please pay attention that it is necessary to have a tap installed before the inlet of solar shower.
7. To prevent the scalding from the hot water, pay extra attention to the following.
Before turning on the solar shower, please make sure the valve is at the cold
water position (blue), then turn on the valve and gradually adjust the water
toward the hot water position (red), until reach the most comfortable
temperature.
8. Warning! Under the exposure of the very strong sun radiations, the water temperature coming from the solar
shower may reach 60 °C or 140 °F.
9. For optimal performance of your new shower, it should always be connected to your garden tab with the tab half
open to have sufficient pressure.
Remark for off-season storage protection:
After the pool season, please clean the solar shower with soft cloth.
1. Please close the garden tap which is connected to the inlet of solar shower. And please make the cold and hot
water valve in “OPEN” position, to make sure that all water in solar shower can be drained out from the shower head
on top area.
2. While the solar shower is under the dry and frozen environment, the cold and hot water valve should be in “OPEN”
position. The damage caused by frozen temperature will not be covered by our warranty.
3. During times of possible frost, not water is allowed inside the shower. It will damage it .
4. Store the shower dry and safe from environmental influences.
Warning:
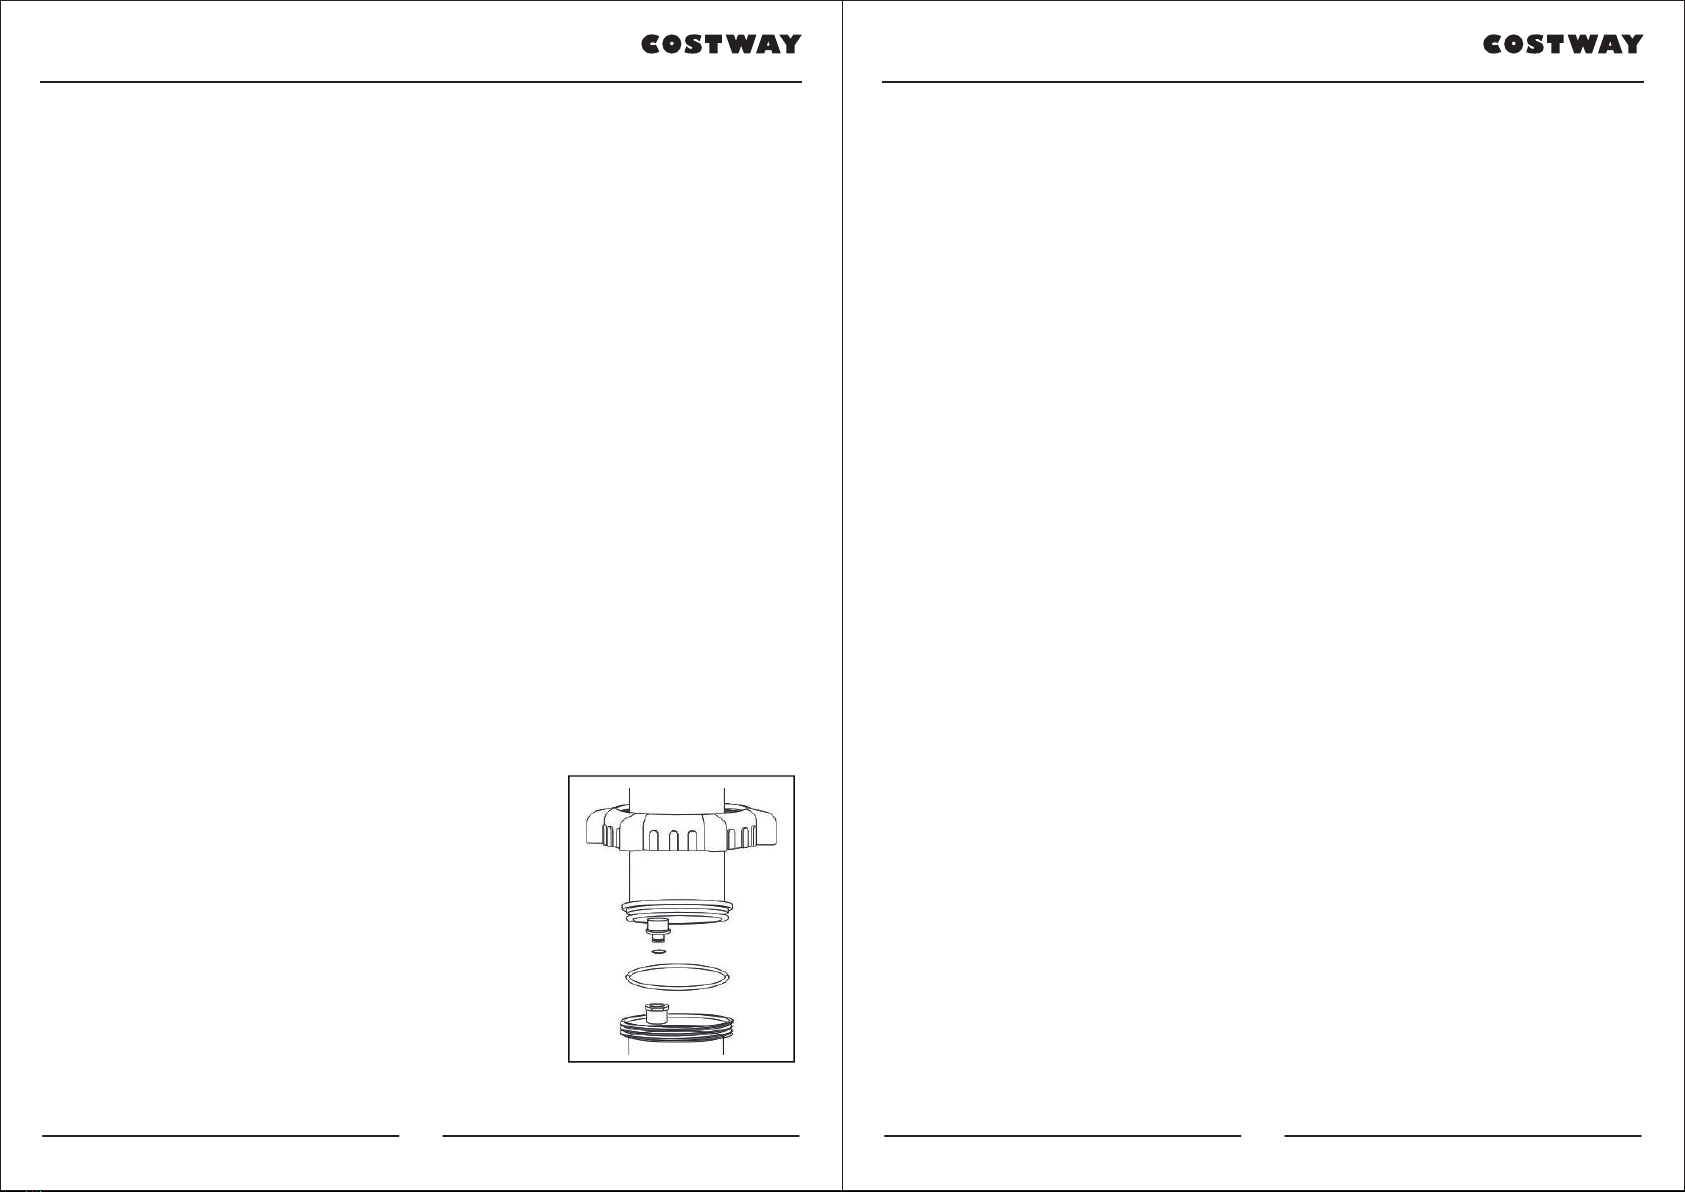
The damage caused by using mud water, salt water or frozen temperature will not be covered by our warranty. In
case the shower leaks water, please recheck the proper connection of the shower head and foot shower. Especially
check the handle. A loose handle will cause water to enter the shower and it will unload itself by dripping from the

8
Welcome to visit our website and purchase our quality products!
Reward Points
Exclusive Customer Service
Personalized Recommendaons
Permanent Shopping Cart
Order History
We would like to extend our hearelt thanks to
all of our customers for taking me to assemble
this product and giving us valuable feedbacks.
www.costway.com
Your suggestions and comments for COSTWAY are really important to us!
We sincerely solicit you to go back to our shop and leave a good rating in just a
simple click. It would be quite encouraging if you could kindly do so like below:
February 24, 2019
Great products so far. Fast delivery, easy setup, and working without any issues.
Great products so far
With your inspiring rating, COSTWAY will be more consistent to offer you
EASY SHOPPING EXPERIENCE, GOOD PRODUCTS and EFFICIENT SERVICE!
US office: Fontana, California
UK office: Ipswich
www.costway.com
Table of contents
Other Costway Bathroom Fixture manuals
Popular Bathroom Fixture manuals by other brands

EQUATION
EQUATION SI81-A instruction manual

Helvex
Helvex PREMIER UH-3005-WOA installation guide

Dreamline
Dreamline PRISM PLUS installation instructions

HAFA
HAFA IglooPro 1450355 quick start guide

Pulse Shower Spas
Pulse Shower Spas Bonzai 1017-B owner's manual

Orbital Systems
Orbital Systems Panel Quick installation guide