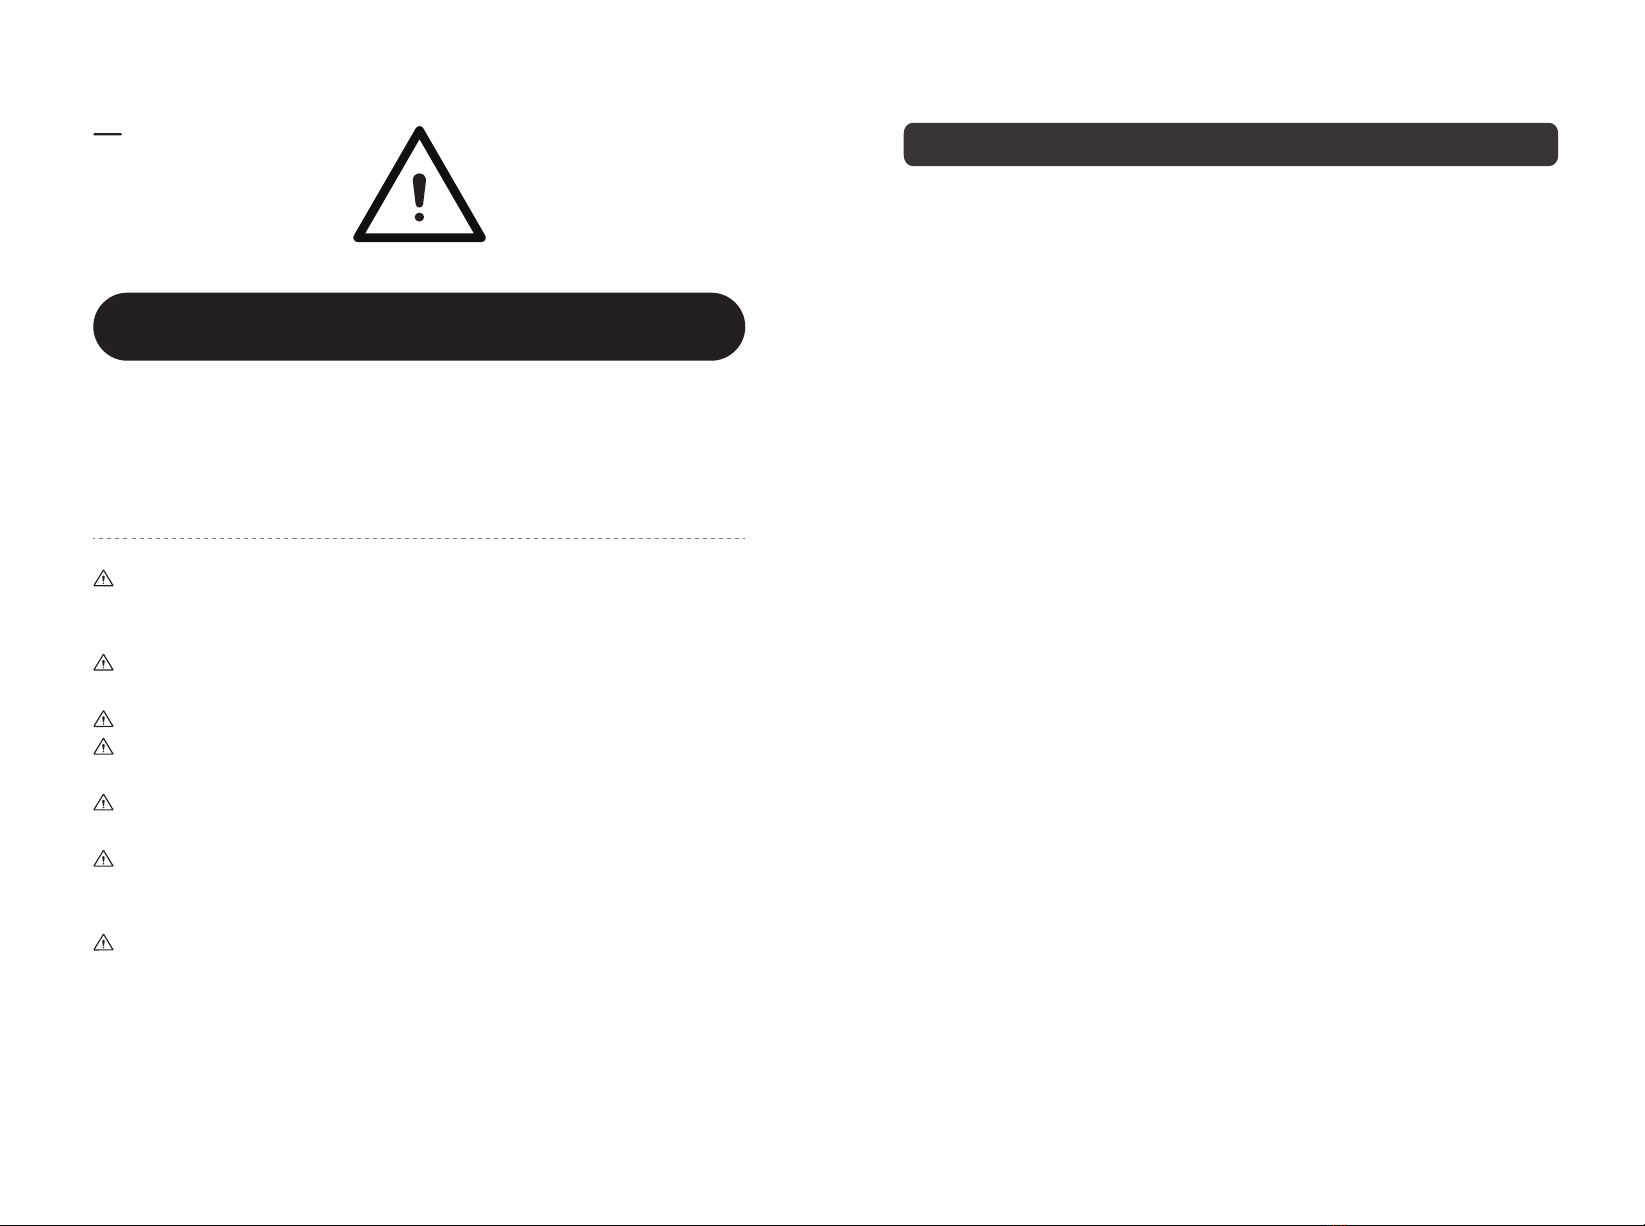
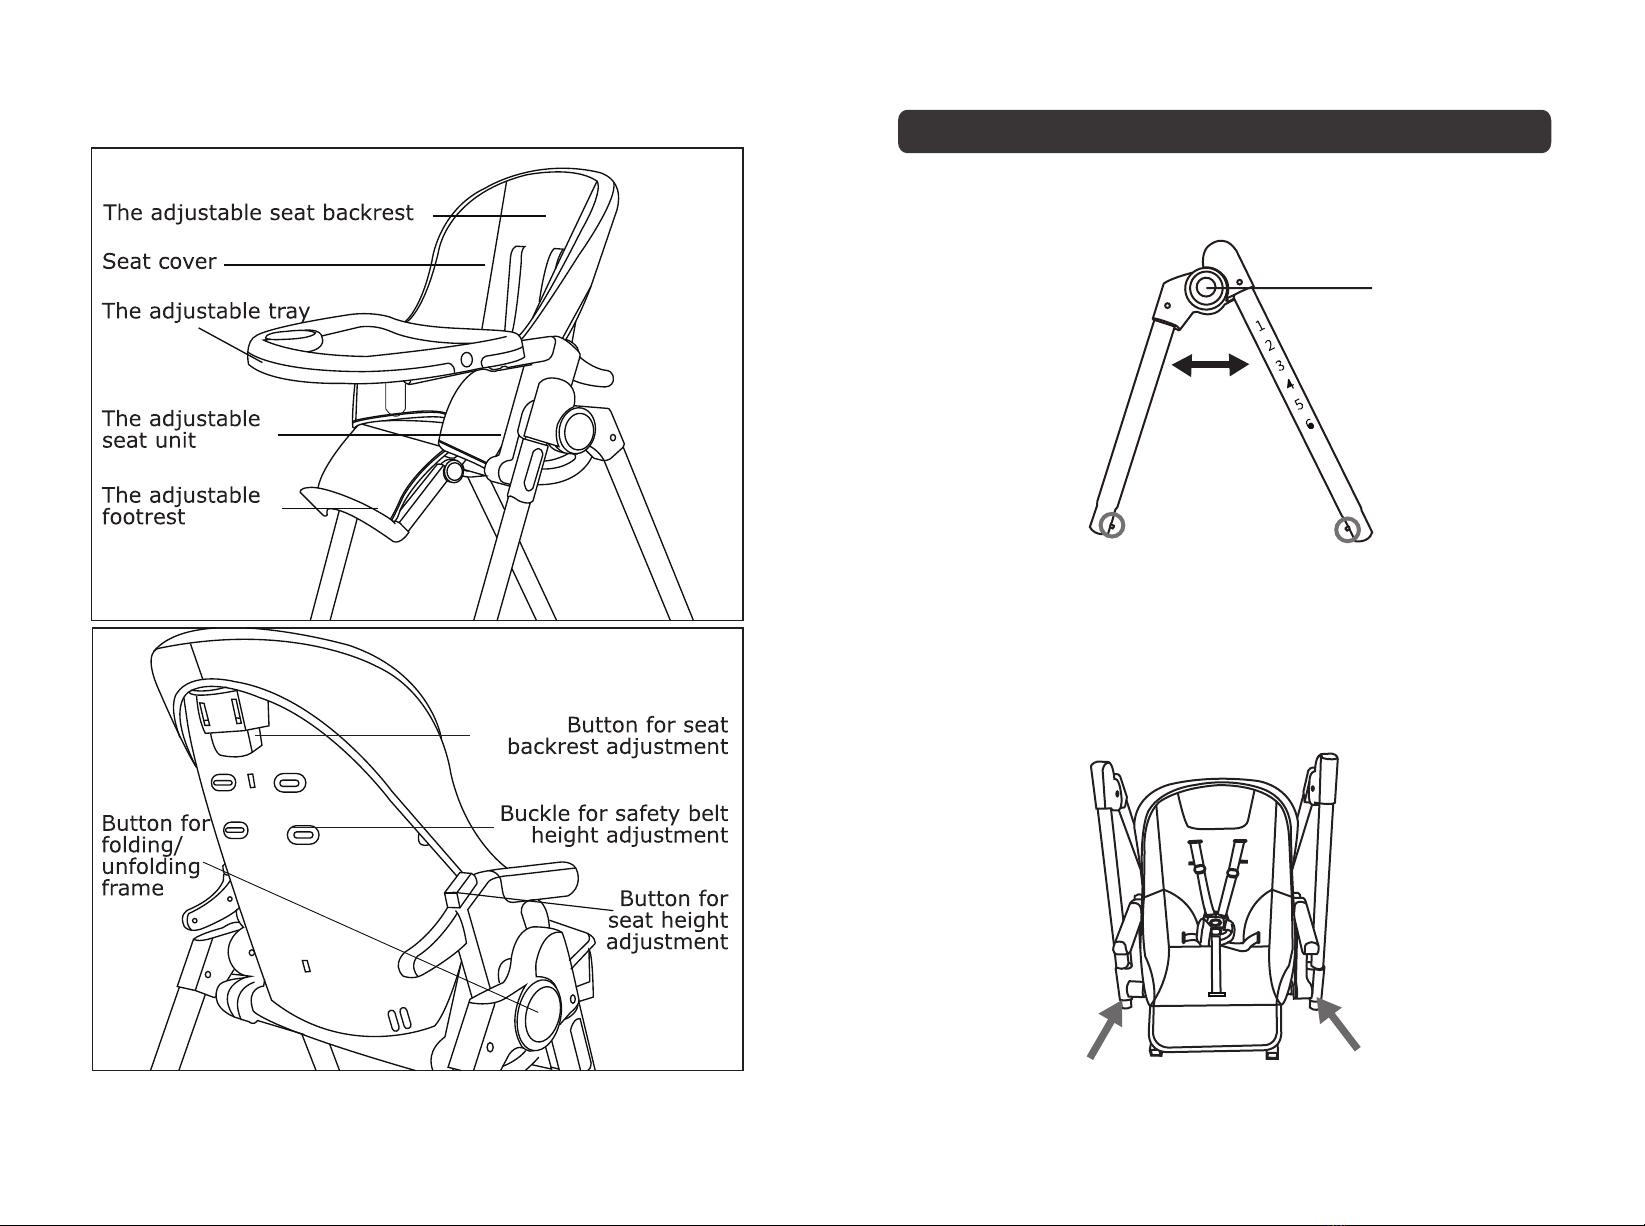
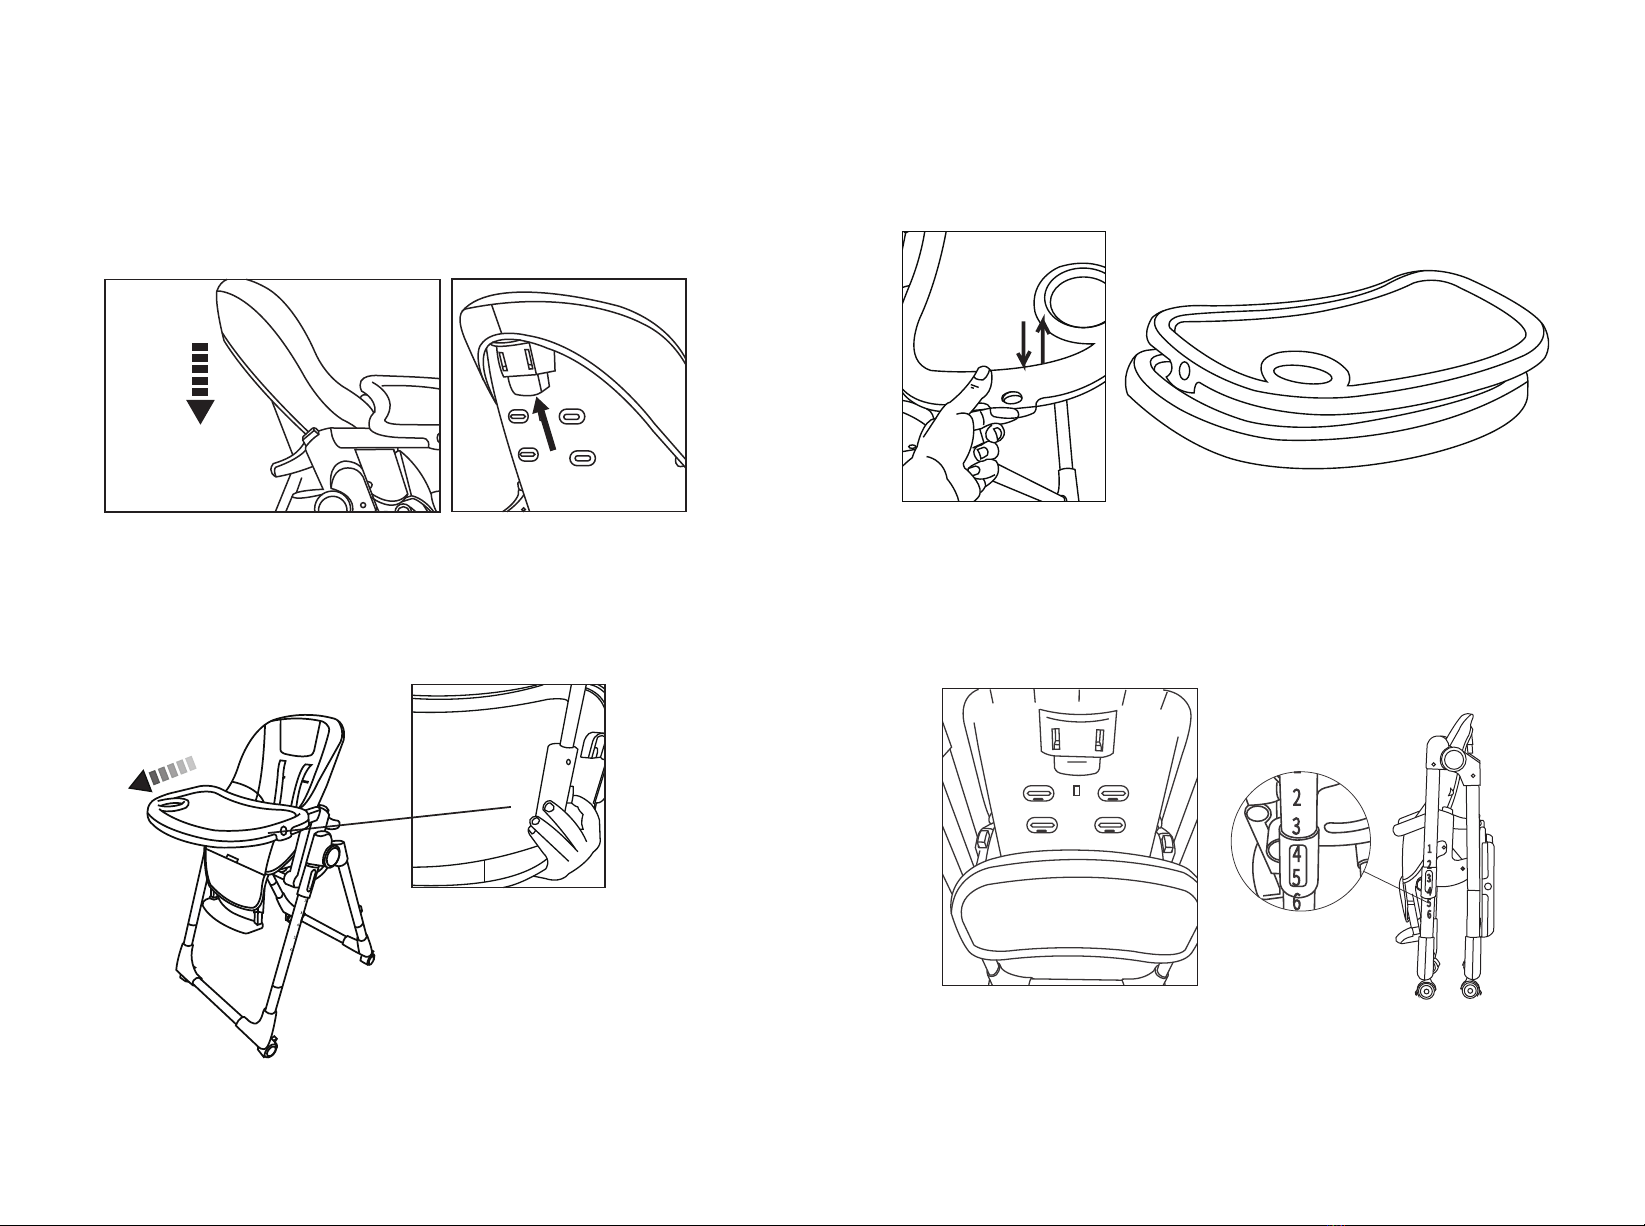
Costway AD10025 User manual

AD10025
Folding High Chair
Chaise Haute Pliable
THIS INSTRUCTION BOOKLET CONTAINS IMPORTANT SAFETY INFORMATION. PLEASE READ AND KEEP FOR FUTURE REFERENCE.
If you're having difficulty, our friendly
customer team is always here to help.
USA office: Fontana AUS office: Truganina
GBR office: Ipswich FRA office: Saint Vigor d'Ymonville
AUS:cs.au@costway.com
GBR:cs.uk@costway.com
FRA:cs.fr@costway.com

IMPORTANT! READ CAREFULLY AND KEEP FOR FUTURE REFERENCE.
WARNING
• Stay near and watch child during use.
• The child should be secured in the high chair at all times by the restraining
system, both in the reclined and upright positions.
• It is recommended that the high chair be used in the upright position only by
children capable of sitting upright unassisted.
• When unfolding, adjusting or folding the highchair, ensure to keep any
children away from the chair.
• Always have the child sitting in the chair in sight.
• Never allow the child to stand up while in the chair.
• When it is not used, the highchair must be kept away from the reach of
children.
• Always place the highchair on a horizontal , stable surface. Never place the
highchair near stairs or steps.
• Do not let other children playing unattended close to the highchair or climb on
it.
• Be aware of the risk of tilting when your child can push its feet against a table
or any other structure.
• This product is intended for children able to sit up unaided, aged between 6
and 36 months. Max Weight Capacity: 15kg (33 lbs).
• Product located under a window could be used as a step by the child and
cause the child to fall out of the window.
WARNING: NEVER LEAVE THE CHILD UNATTENDED!
WARNING: ALWAYS USE THE RESTRAIN SYSTEM AND CORRECTLY
FITTED.
WARNING: FALLING HAZARD: CHILDREN HAVE SUFFERED SEVERE HEAD
INJURIES INCLUDING SKULL FRACTURES WHEN FALLING FROM HIGH
CHAIR.
FALL CAN HAPPEN SUDDENLY IF CHILD IS NOT RESTRAINED PROPERLY.
WARNING: DO NOT USE THE PRODUCT UNLESS ALL COMPONENTS ARE
CORRECTLY FITTED AND ADJUSTED!
WARNING: THIS HIGH CHAIR SHOULD ONLY BE USED BY A CHILD WHO IS
CAPABLE TO SIT UPRIGHT UNAIDED.
WARNING: DO NOT MOVE OR LIFT THIS PRODUCT WHILE THE CHILD IS
INSIDE.
WARNING: TRAY IS NOT DESIGNED TO HOLD CHILD IN HIGH CHAIR.
WARNING: DO NOT USE THIS PRODUCT IF ANY PARTS IS BROKEN, TORN
OR MISSING!
WARNING: NEVER USE ON AN ELEVATED SURFACE.
WARNING: BE AWARE OF THE RISK POSED BY OPEN FIRE AND OTHER
SOURCES OF STRONG HEAT (E.G. ELECTRIC BAR HEATERS, GAS FLAMES
ETC.) IN THE VICINITY OF THE PRODUCT!
WARNING: FAILING HAZARD. PREVENT YOUR CHILD FROM CLIMBING ON
THE PRODUCT.
Danger! Keep all small parts and packaging materials for this product
away from babies and children, otherwise they may pose a choking
hazard.
The product must be installed and used under the supervision of an
adult.
Read through each step carefully and follow the proper order.
Remove all packaging, separate and count all parts and hardware
before installation.
Please ensure that all parts are correctly installed, incorrect installation
can lead to a danger.
We recommend that, where possible, all items are assembled near the
area in which they will be placed in use, to avoid moving the product
unnecessarily once assembled.
Ensure a secure surface during installation, and place the product
always on a flat, steady and stable surface.
Before You Start
Please read all instructions carefully and keep it for future reference.
EN
General Warnings
02 03

CLEANING
SEAT TRAY WITH TRAY COVER
UPPER LEG (LEFT) UPPER LEG (RIGHT)
FOOTREST WHEELS
LOWER LEG (FRONT) LOWER LEG (REAR)
WITH BRAKE
MAINTENANCE
1.The product requires regular maintenance to keep it in good working condition.
2.Regular check all parts of the product to ensure that they are operating
correctly and avoid signs of wear or damage.
3.Moving parts may be lubricated with a light silicone oil.
4.Do not use this product if any part is broken, torn or missing and only use
spare parts provided by the manufacturer.
CLEANING
Chair: Wash with clean and damp cloth and mild soap. Do not use strong
detergents as they may damage the plastic parts.
Seat cover and belts: Wash in hands, do not bleach, do not tumble-dry, do not
dry clean.
PARTS LIST
Chair: Wash with clean and damp cloth and mild soap. Do not use strong
detergents as they may damage the plastic parts.
Seat cover and belts: Wash in hands, do not bleach, do not tumble-dry, do not
dry clean.
04 05

ASSEMBLY AND FUNCTION
1.High Chair Assembly
(1) Assembly of upper legs: Press the button to unfold right and left
upper legs. (Fig.1)
Press the spring pin, then insert the right upper leg into the hole
on one side of the seat.
Press the spring pin, then insert the left upper leg into the hole on
the other side of the seat. (Fig.1-1)
(Fig.1)
(Fig.1-1)
leftright
button
spring pin
06 07

(Fig.2)
(Fig.3)
brake
(Fig.1) (Fig.1-1)
(Fig.4)
(2) Assembly of lower legs:
Finish assembly of upper legs, lift the seat unit to the top position.
Then fix the front lower leg in front of seat and fix the rear lower leg at the rear.
(Fig.2) Both front and rear lower legs are fitted correctly when they are secured
by spring pins.
(4) Assembly of tray:
There are two buttons at the back of the tray, sliding these two buttons, at the
same time inserting the tray to the armrest, make sure that it is securely
mounted. (Fig.4)
(5) Assembly of wheels:If need to
use wheels, please insert the
wheel into reserved hole at the
bottom of the wheel seat .(Fig.5)
(1) Press the two side buttons at the same time to unfold/fold the frame (Fig.1),
the frame will be unfolded/folded in a correct position when you hear a click.
(Fig.1-1)
(3) Assembly of footrest:
There are two buttons at the back of footrest, press these two buttons, then insert
the footrest into the leg-rest plastic tube of the seat at the same time. (Fig. 3) Also
you can adjust the footrest length by pressing these two buttons.
2.Function
08 09

(4) In order to wash the tray, you can remove its top cover by releasing two snap
joints. (Fig.4)
(Fig.4)
Two buttons at the
back of tray
(Fig.2)
(Fig.3) (Fig.5)
(2) The backrest of the chair can be set in different positions. To adjust the
backrest, hold and press the Button for seat backrest adjustment, tilt the
backrest, then release the button, the backrest will be placed in the desired
position when you hear a click sound. (Fig.2)
(5) The tray can be attached to the rear legs to save space.
When the tray put onto the frame, the lowest seat position can be only to the fifth
position. (Fig.5)
(3) The tray can be set in two positions by sliding two buttons at the same time.
(Fig.3)
10 11

(Fig.8)
(Fig.7-1)
(Fig.6)
(Fig.7-2)
(6) The seat can be set at 6 different
heights.
To lower the seat, simultaneously press the
Button for seat height adjustment on both
sides and set to the selected position.
To lift the the seat, no need to press the
Button, just lift the seat to the selected
position. (Fig.6)
Belts of safety harness can be adjusted and mounted in two positions depending
on the height of the child. (Fig.7-2)
(8) The footrest can be set in three different positions by pressing the two side
buttons. (Fig.8)
(7) To fasten the safety belts, connect the shoulder and waist belts (step 1), then
snap them into the crotch belts clasp (step 2).
To disconnect the safety belts, press the release button in the middle of clasp.
Sliding the buckle can adjust the belt length so that the harness can fit your child
comfortably. (Fig. 7-1)
12 13

(9) When using the chair, please brake the wheels in order to prevent accidents.
(Fig.9)
(10) The wheels are 360° rotatable and easy to move.
(Fig.9)
14 15
Avant de Commencer
Veuillez lire attentivement toutes les instructions et les conserver pour la référence ultérieure.
FR
Avertissements Généraux
Danger ! Éloignez toutes les petites pièces et le matériel d’emballage
des bébés et des enfants pour éviter un risque d’étouffement.
Le produit doit être installé et utilisé sous la surveillance d’un adulte.
Lisez attentivement chaque étape et suivez le bon ordre.
Retirez tous les emballages, séparez et comptez toutes les pièces et
le matériel avant l’installation.
Assurez-vous que toutes les pièces sont correctement installées, une
installation incorrecte peut entraîner un danger.
Nous recommandons que, dans la mesure du possible, tous les
articles soient assemblés à proximité de la zone dans laquelle ils
seront utilisés, afin d'éviter de déplacer inutilement le produit une fois
assemblé.
Assurez une surface sûre pendant l’assemblage et placez le produit
toujours sur une surface plane et stable.

16 17
IMPORTANT ! LISEZ ATTENTIVEMENT ET CONSERVEZ CE MANUEL
POUR LA RÉFÉRENCE ULTÉRIEURE.
AVERTISSEMENT
• Restez près de l'enfant et surveillez-le pendant l'utilisation.
• L'enfant doit être maintenu en permanence dans la chaise haute par le système
de retenue, aussi bien en position inclinée qu'en position verticale.
• Il est recommandé que la chaise haute ne soit utilisée en position verticale que
par des enfants capables de s'asseoir sans aide.
● Lorsque vous dépliez, ajustez ou pliez la chaise haute, veillez à éloigner les
enfants de la chaise.
● Les enfants doivent être sous la surveillance de leurs parents.
● Ne permettez jamais à l’enfant de se lever lorsqu’il est dans la chaise.
● Lorsque ce produit n’est pas utilisé, il doit être tenu hors de portée des
enfants.
● Placez toujours la chaise haute sur une surface horizontale et stable. Ne
placez jamais la chaise haute à proximité d’escaliers ou de marches.
● Ne laissez pas d’autres enfants jouant sans surveillance à proximité de la
chaise haute ou monter dessus.
● Faites attention au risque de basculement lorsque votre enfant peut pousser
ses pieds contre une table ou toute autre structure.
● Ce produit est destiné aux enfants capables de se tenir assis sans aide, âgés
de 6 à 36 mois. Capacité de Charge Maximale : 15 kg
● L’objet situé sous une fenêtre pourrait être utilisé comme marchepied par
l’enfant et provoquer la chute.
AVERTISSEMENT : NE LAISSEZ JAMAIS L’ENFANT SANS SURVEILLANCE !
AVERTISSEMENT : UTILISEZ TOUJOURS LE SYSTÈME DE RETENUE ET
INSTALLEZ CORRECTEMENT.
AVERTISSEMENT : RISQUE DE CHUTE : DES ENFANTS PEUVENT ÊTRE
SUBI DES BLESSURES GRAVES À LA TÊTE, Y COMPRIS DES FRACTURES
DU CRÂNE, EN TOMBANT DE LA CHAISE HAUTE. LA CHUTE PEUT SE
PRODUIRE SOUDAINEMENT SI L’ENFANT N'EST PAS RETENU
CORRECTEMENT.
AVERTISSEMENT : N’UTILISEZ PAS LE PRODUIT SI TOUS LES
COMPOSANTS NE SONT PAS CORRECTEMENT INSTALLÉS ET RÉGLÉS !
AVERTISSEMENT : CETTE CHAISE HAUTE NE DOIT ÊTRE UTILISÉE QUE
PAR UN ENFANT CAPABLE DE SE TENIR ASSIS SANS AIDE.
AVERTISSEMENT : NE PAS DÉPLACER OU SOULEVER CE PRODUIT
LORSQUE L’ENFANT EST DEDANS.
AVERTISSEMENT : LE PLATEAU N’EST PAS CONÇU POUR MAINTENIR
L'ENFANT DANS LA CHAISE HAUTE.
AVERTISSEMENT : N’UTILISEZ PAS CE PRODUIT SI UNE PIÈCE EST
CASSÉE, DÉCHIRÉE OU MANQUANTE !
AVERTISSEMENT : NE JAMAIS UTILISER SUR UNE SURFACE SURÉLEVÉE.
AVERTISSEMENT : TENEZ CE PRODUIT À L’ÉCART DU FEU ET D'AUTRES
SOURCES DE CHALEUR INTENSE !
AVERTISSEMENT : DANGER DE CHUTE : EMPÊCHEZ VOTRE ENFANT DE
GRIMPER SUR LE PRODUIT.
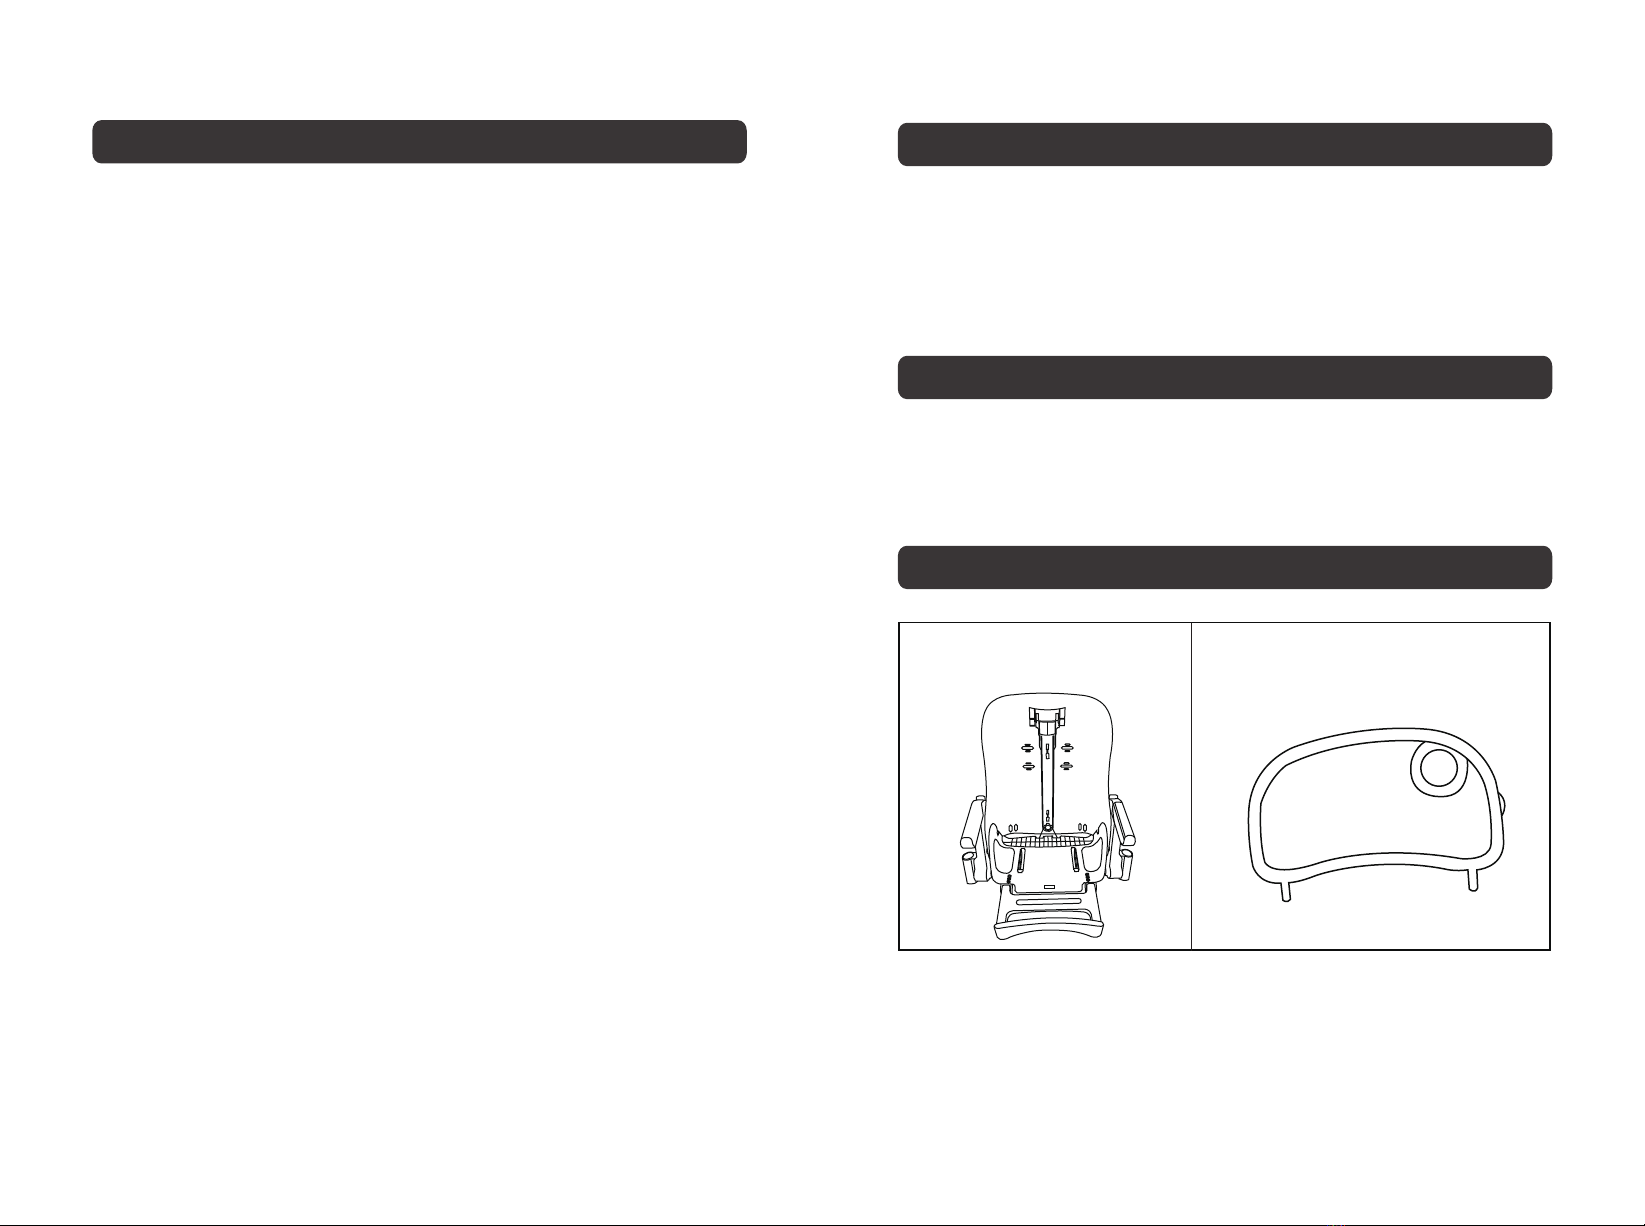
CLEANING
Siège
Plateau avec couvercle
ENTRETIEN
1. Le produit nécessite un entretien régulier pour le maintenir en bon état
d’utilisation.
2. Vérifiez régulièrement toutes les pièces du produit pour détecter tout signe
d'usure ou de dommage.
3. Les pièces mobiles peuvent être lubrifiées avec une huile de silicone légère.
4. N'utilisez pas ce produit si une pièce est cassée, déchirée ou manquante et
utilisez uniquement les pièces de rechange fournies par le fabricant.
NETTOYAGE
Chaise : Lavez la chaise avec un chiffon propre et humide et un savon doux. Ne
pas utilisez de détergents puissants car ils pourraient endommager les pièces en
plastique.
Housse de siège et ceintures de sécurité : lavez à la main, ne pas utilisez d'eau
de Javel, ne pas séchez au sèche-linge, ne pas nettoyez à sec.
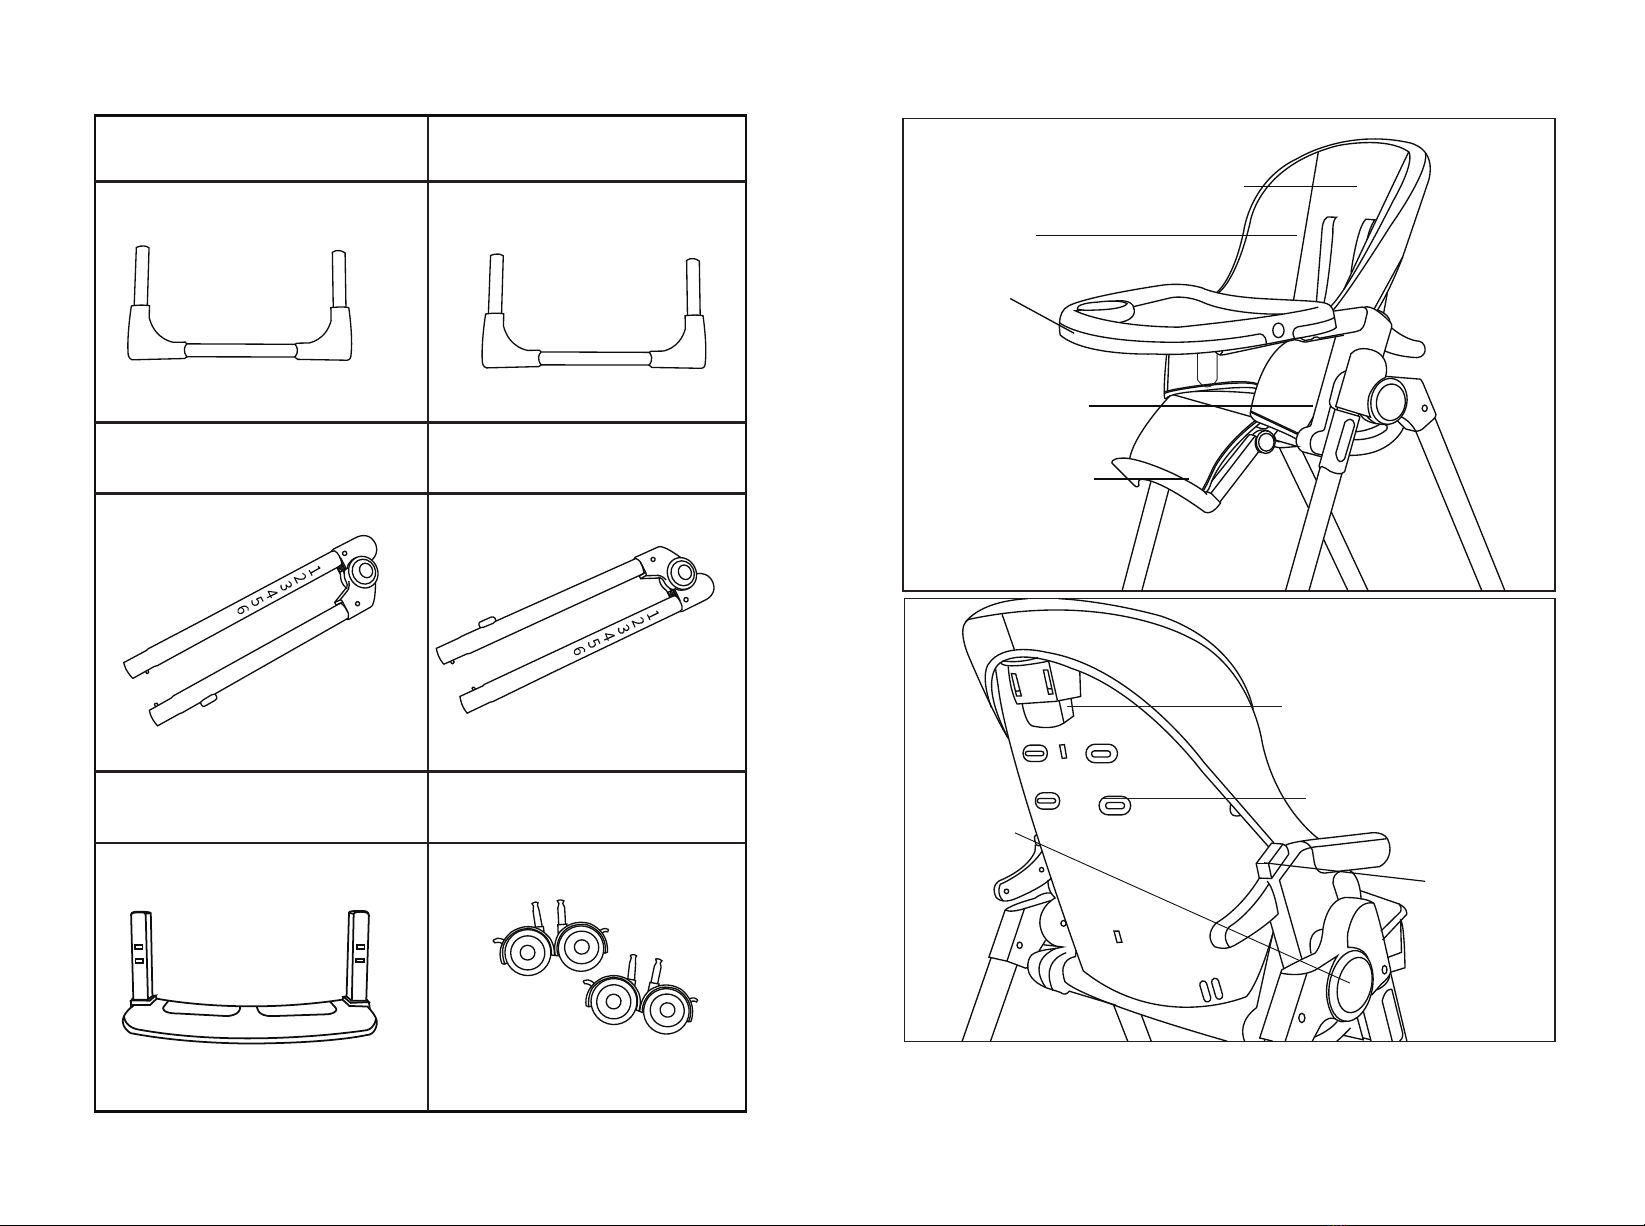
LISTE DES PIÈCES

Pied supérieur gauche Pied supérieur droite
Repose-pied Roues
Pied inférieur avant
Pied inférieur arrière
avec frein
Dossier réglable
Housse de
siège
Plateau
réglable
Siège réglable
Repose-pied
réglable
Bouton
pour le
pliage/
dépliage
du
châssis
Bouton de réglage
du dossier
Boucle de réglage de la
hauteur de la ceinture
de sécurité
Bouton de
réglage de la
hauteur du
siège
18 19

ASSEMBLAGE ET FONCTION
1. Assemblage de la chaise
(1) Assemblage des pieds supérieurs : Appuyez sur le bouton pour
déplier les pieds supérieurs droit et gauche. (Fig.1)
Appuyez sur la goupille à ressort, puis insérez le pied supérieur
droit dans le trou situé d'un côté du siège.
Appuyez sur la goupille à ressort, puis insérez le pied supérieur
gauche dans le trou situé de l'autre côté du siège. (Fig. 1-1)
(Fig.1)
(Fig.1-1)
gauchedroite
Bouton
Goupille à ressort (Fig.2)
(Fig.3)
frein
(2) Assemblage des pieds inférieurs :
Après avoir terminé l’assemblage des pieds supérieurs, soulevez le châssis de
siège en position haute. Ensuite, fixez le pied inférieur avant à l'avant du siège et
fixez le pied inférieur arrière à l’arrière. (Fig.2) Montez les pieds inférieurs avant
et arrière correctement à l’aide des goupilles à ressort.
(3) Assemblage du repose-pied :
Il y a deux boutons à l’arrière du repose-pied, appuyez sur ces deux boutons,
puis insérez le repose-pied dans le tube en plastique du siège en même temps.
(Fig. 3) Vous pouvez également régler la longueur du repose-pied en appuyant
sur ces deux boutons.
20 21

Deux boutons à
l’arrière du plateau
(Fig.3)
(Fig.2)
(Fig.4)
(2) Le dossier peut être réglé dans les positions différentes. Pour régler le
dossier, maintenez et appuyez sur le bouton de réglage du dossier, inclinez le
dossier, puis relâchez le bouton, le dossier sera placé dans la position souhaitée
lorsque vous entendrez un déclic. (Fig.2)
(3) Le plateau peut être placé dans deux positions en faisant glisser deux
boutons en même temps. (Fig.3)
(4) Montage du plateau : Il y a deux boutons à l’arrière du plateau, faites glisser
ces deux boutons, insérez le plateau à l'accoudoir en même temps jusqu’à la
fixation. (Fig.4)
(5)Assemblage des roues : Si
vous avez besoin d'utiliser des
roues, veuillez insérer la roue
dans le trou réservé au bas du
siège de la roue (Fig.5).
(1) Appuyez sur les deux boutons latéraux en même temps pour déplier/plier le
cadre (Fig.1), le cadre sera déplié/plié dans une position correcte lorsque vous
entendrez un clic. (Fig.1-1)
2. Fonction
22 23
(Fig.1) (Fig.1-1)

(4) Afin de laver le plateau, vous pouvez retirer son couvercle supérieur en
déverrouillant les deux loquets. (Fig.4)
(Fig.4)
(Fig.7-1)
(Fig.6)
(Fig.5)
(5) Le plateau peut être fixé aux pieds arrière pour économiser de l'espace.
Lorsque le plateau est posé sur le cadre, la position la plus basse du siège ne
peut être que jusqu'à la cinquième position (Fig.5).
(6) Le siège peut être réglé à 6 hauteurs
différentes.
Pour abaisser le siège, appuyez sur le
bouton de réglage de la hauteur du siège
des deux côtés et réglez-le sur la position
sélectionnée.
Pour soulever siège, il n’est pas nécessaire
d’appuyer sur le bouton, il suffit de soulever
le siège à la position sélectionnée. (Fig.6)
(7) Pour attacher les ceintures de sécurité, reliez les ceintures d'épaule et de rein
(étape 1), puis enclenchez-les dans le fermoir des ceintures d'entrejambe (étape
2). Pour déconnecter les ceintures de sécurité, appuyez sur le bouton de
déverrouillage au milieu du fermoir. Le glissement de la boucle permet d'ajuster
la longueur de la ceinture afin que le harnais puisse s'adapter confortablement à
votre enfant. (Fig. 7-1)
ceinture bretelle
boucle
bouton de relâchement
insérez
étape 1 étape 2
24 25

(Fig.8)
(Fig.7-2)
Position deux
Position un
Les ceintures de sécurité peuvent être réglées et montées dans deux positions
selon la taille de l’enfant (Fig. 7-2)
(8) Le repose-pied peut être réglé dans trois positions différentes en appuyant
sur les deux boutons latéraux (Fig.8).
(9)Lorsque vous utilisez le fauteuil, veuillez freiner les roues afin d'éviter tout
accident. (Fig.9)
(10)Les roues peuvent pivoter à 360°, ce qui facilite le déplacement.
(Fig.9)
26 27

28
Instructions De Retour / Réclamation De Dommages
Dans le cas où un retour est requis, l'article doit être retourné dans sa boîte
d'origine. Sans cela, votre retour ne sera pas accepté.
NE PAS jeter la boîte/l'emballage d'origine.
Prenez une photo des marquages de la boîte.
Prenez une photo des dommages (le cas échéant).
Envoyez-nous un e-mail avec les images demandées.
Une photo des marquages (texte) sur le côté de la boîte est requise au cas où une
pièce serait nécessaire pour le remplacement. Cela aide notre personnel à
identifier votre numéro de produit pour s'assurer que vous recevez les bonnes
pièces.
Une photo des dommages est toujours requise pour déposer une réclamation et
obtenir rapidement votre remplacement ou votre remboursement. Assurez-vous
d'avoir la boîte même si elle est endommagée.
Envoyez-nous un e-mail directement depuis le marché où votre article a été
acheté avec les images ci-jointes et une description de votre réclamation.
FR
In case a return is required, the item must be returned in original box. Without this
your return will not be accepted.
DO NOT discard the box / original packaging.
Take a photo of the box markings.
Take a photo of the damaged part (if applicable).
Send us an email with the images requested.
A photo of the markings (text) on the side of the box is required in case a part is
needed for replacement. This helps our staff identify your product number to
ensure you receive the correct parts.
A photo of the damage is always required to file a claim and get your replacement
or refund processed quickly. Please make sure you have the box even if it is
damaged.
Email us directly from marketplace where your item was purchased with the
attached images and a description of your claim.
EN
Return / Damage Claim Instructions
Table of contents
Languages:
Other Costway High Chair manuals

Costway
Costway BB5552 User manual

Costway
Costway BB5693 User manual

Costway
Costway AD10038 User manual

Costway
Costway AD10034 User manual

Costway
Costway BB5656 User manual

Costway
Costway BB5692 User manual

Costway
Costway AD10040GR User manual

Costway
Costway AD10039 User manual

Costway
Costway AD10016 User manual

Costway
Costway BE10019 User manual