COVANA Evolution User manual


EVOLUTION COVER page -1
COVANA
SPA COVER MANUFACTURER
OWNER'S MANUAL
MANUAL NO. 240799
REVISION 2
240799 OWNER'S MANUAL REVISION 2

page-2EVOLUTION COVER
EVOLUTION COVER
MANUAL NO. 240799
First edition 2021-01-01
REVISION DESCRIPTION DATE
0 OWNER'S MANUAL NEW RELEASE 2021-01-01
1 GENERAL REVISION 2021-04-16
2 CONNECTION PLATE ASSEMBLY PROCEDURE ADDED 2021-06-01
240799 OWNER'S MANUAL REVISION 2

EVOLUTION COVER page-3
INTRODUCTION 5
CONGRATULATIONS FOR THE PURCHASE OF YOUR NEW COVANA COVER 5
IMPORTANT INFORMATION 6
SAFETY 6
DRUGS AND ALCOHOL 6
SAFETY INSTRUCTIONS 6
MODIFICATIONS TO THE COVER 9
POSITION OF THE KEYSWITCH 10
LABELING 11
RISK OF ELECTROCUTION 11
INFORMATION ON THE ELECTRICAL CABLES 11
KEY SWITCH DIAGRAM 12
TECHNICAL SPECIFICATION LABEL 12
NO STEP LABEL 13
AVOID DROWNING LABEL 13
DO NOT STEP ON THE COVER LABEL 13
MAINTENANCE INFORMATION LABEL 13
CENTER LABEL 13
TOP LABEL 13
GLOSSARY 14
INSTALLATION PROCEDURE 19
TOOLS REQUIRED 19
PREPARATION FOR THE INSTALLATION 19
DELIVERY 21
SECURE THE PERIMETER 22
UNPACKING PROCEDURE 22
ASSEMBLY PREPARATION 26
HARDWARE IDENTIFICATION TABLE 32
LIFTING MECHANISM INSTALLATION 33
TESTING THE COVER 39
WIPER INSTALLATION 40
NON-PERMANENT MOUNTING PLATE 41
SEAL INSTALLATION 42
ELECTRICAL CONNECTIONS 45
LIMIT SWITCH ADJUSTMENT 48
INSTALLATION CHECKLIST (CUSTOMER COPY) 50
INSTALLATION CHECKLIST (INSTALLER COPY) 51
OPERATE THE COVER 53
RAISING/LOWERING THE COVER WITH THE KEY SWITCH 53
MANUAL OPERATION OF THE COVER 53
USING THE ESCAPE HATCH 54
240799 OWNER'S MANUAL REVISION 2

page-4EVOLUTION COVER
ELECTRICAL DIAGRAMS 55
WIRING DIAGRAM (NORTH AMERICA) – 60 HZ, 120 VAC OPERATOR 56
WIRING DIAGRAM (EUROPE) – 50 HZ, 230 VAC OPERATOR 58
MAINTENANCE 60
WINTERIZING 60
WASHING THE COVER 60
POST GREASING 61
CHAIN LUBRICATION 63
PERIODIC MAINTENANCE TABLE 64
TECHNICAL SPECIFICATIONS 65
COVANA COVER FRONT ELEVATION PLAN 65
FRAME DIMENSION AND FOOT PRINT 66
LONG SIDE (LS) MODEL (8 FEET ONLY) 68
CONCRETE SLAB LAYOUT OPTION 69
ELECTRICAL SPECIFICATIONS 70
TROUBLESHOOTING 71
COVANA LIMITED WARRANTY 74
WARRANTY COVERAGE 74
LIMITATIONS 76
EXCLUSIONS 76
DISCLAIMER AND LEGAL RIGHTS 76
240799 OWNER'S MANUAL REVISION 2

EVOLUTION COVER page-5
INTRODUCTION
As part of its ongoing commitment to improve the quality, reliability, durability and safety of its products, Covana
is proud to present this edition of the cover Owner's Manual.
The various sections that make up this manual will provide you with the most recent information allowing you to
understand the operation of the cover, its installation and its maintenance in order to obtain complete
satisfaction and to ensure maximum safety and comfort for users.
CONGRATULATIONS FOR THE PURCHASE OF YOUR NEW COVANA COVER
Thank you for choosing our product. The Covana cover you have chosen is the result of excellent engineering,
attention to detail and a great deal of pride. With proper care and attention, your cover will last many years and
offer great performance.
Although our products are built to last, we strongly recommend that you register your cover at the time of
purchase to ensure an adequate follow-up process.
In fact, registering the cover allows us to quickly reach you in the unlikely event a safety notice has to be issued.
Your product and safety are a top priority for us at Covana.
You will need your original sales receipt as proof of purchase to obtain warranty service and the work must be
performed by a certified technician. If your cover is ever to malfunction, your product registration will allow us to
access necessary information in a timely manner.
Experience the benefits of registering your cover at www.covana.com/warranty.html.
Please take a few minutes to read all the instructions before you use your new cover. This owner's manual
indicates how your cover works, how to install it and how to care for it, so you will get the most from your cover
for many years.
For service and advice, do not hesitate to call your local authorized Covana dealer.
FIGURE 1: EVOLUTION COVER MODEL
240799 OWNER'S MANUAL REVISION 2

page-6EVOLUTION COVER
IMPORTANT INFORMATION
Danger, Warning, Caution and Note are used
throughout this manual to emphasize important
points when necessary:
DANGER
Directs the user's attention to unsafe practices
which could result in serious personal injury or
death.
WARNING
Directs the user’s attention to unsafe practices
which could result in serious personal injury or
severe damage to the cover.
CAUTION
Directs the user’s attention to unsafe practices
where personal injury is not likely but damage to
cover components could occur.
NOTE
Indicates supplementary information essential to
the proper operation of the cover or proper
installation or proper maintenance.
The lifespan of your new cover depends on the kind
of attention it receives. Pay close attention to the
warnings, cautions and notes.
Read the various notices and instructions attached
to the equipment.
Keep this manual in a safe location.
Illustrations in this manual are used for reference
only and may differ from the actual cover; however,
key components addressed in the manual are
represented as accurately as possible.
Before reproducing or copying this manual, in
whole or in part, written consent must be obtained
from Covana.
SAFETY
The cover was designed, tested and certified to be
installed over a spa and under important installation
instructions issued by Covana. Any other type of
usage will void the warranty and product
certification.
The extra load maximum weight provided in the
TECHNICAL SPECIFICATIONS section of this
manual is a provision for environmental outcomes,
such as a small amount of leftover snow or damp
leaves that temporarily accumulate on the cover
and evenly distributed on the surface of the cover.
The cover was not designed to support any
additional load or people walking or standing on its
lid. Failure to observe this instruction will void the
cover’s warranty and nullify its certification.
The power safety cover meets ASTM F1346- 91
requirements.
DRUGS AND ALCOHOL
WARNING
The use of drugs or alcohol while operating the
cover is strictly prohibited. The impairment of
judgment, vision or hearing might affect the safety
of other people or result in death.
SAFETY INSTRUCTIONS
WARNING
KEEP THESE INSTRUCTIONS IN A SAFE
LOCATION.
REVIEW THESE INSTRUCTIONS REGULARLY.
NOTE
READ AND FOLLOW ALL INSTRUCTIONS.
240799 OWNER'S MANUAL REVISION 2

EVOLUTION COVER page-7
DANGER
lTo reduce the risk of injury, do not allow
children to use this product unless they are
supervised at all times.
lFailure to follow all the instructions may result
in injury or even death.
lDo not allow people to climb or walk on the
cover at any time.
lDo not allow children to have access to the
cover operation without supervision.
lNever operate the cover until all people and
objects are removed out of the spa.
lDo not operate the cover in extreme wind. See
section Technical specifications for the wind
limitations.
WARNING
lBe sure to keep the keyswitch out of the reach
for children.
lDo not put any type of fabric or plastic sheet,
such as a tarpaulin or canvas, on the cover.
This may overheat the cover and result in the
deformation or delamination of the cover
panels.
lInspect the cover periodically. It should raise
smoothly and evenly. Contact your Covana
dealer if any unusual mechanical sound is
heard during cover operations.
DO'S
lRemove the key from the key switch after
operating the cover. Store the key in a secure
location when not in use. Users must bring the
key in the spa with them to prevent the
unauthorized operation of the cover.
lNever leave the key into the key switch.
lCheck the cover frequently for any sign of
deterioration.
lHave any repairs, adjustments or mechanical
work performed by a certified Covana dealer as
soon as possible when you notice any
malfunction.
lCompletely lower the cover when it is not in use
or if the spa is not being monitored.
lThe cover should only be operated by an adult.
lThis product can be operated by an 8-year-old
or older child and persons with reduced
physical, sensory or mental capabilities or lack
of experience and knowledge ONLY if they are
supervised by an adult or have received
instructions regarding safe use of the cover.
lChildren must not play with the product.
Cleaning and user maintenance must not be
performed by children without supervision.
240799 OWNER'S MANUAL REVISION 2

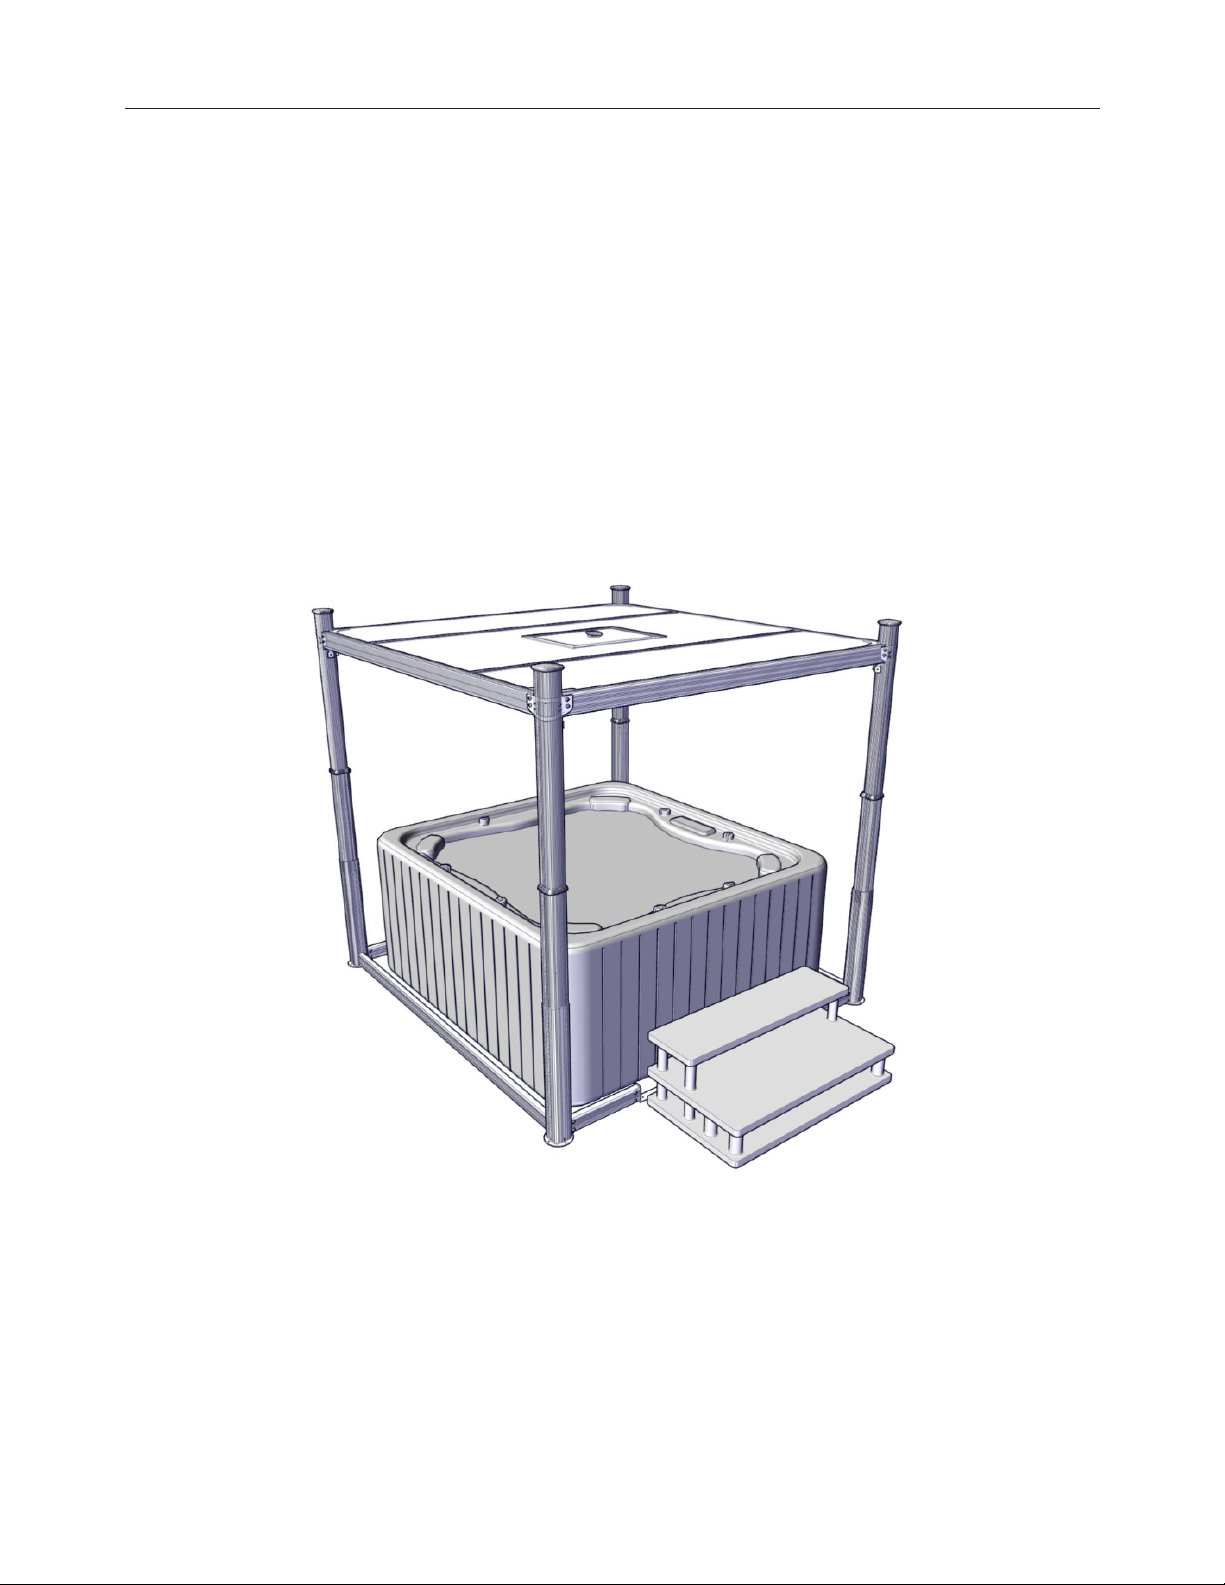
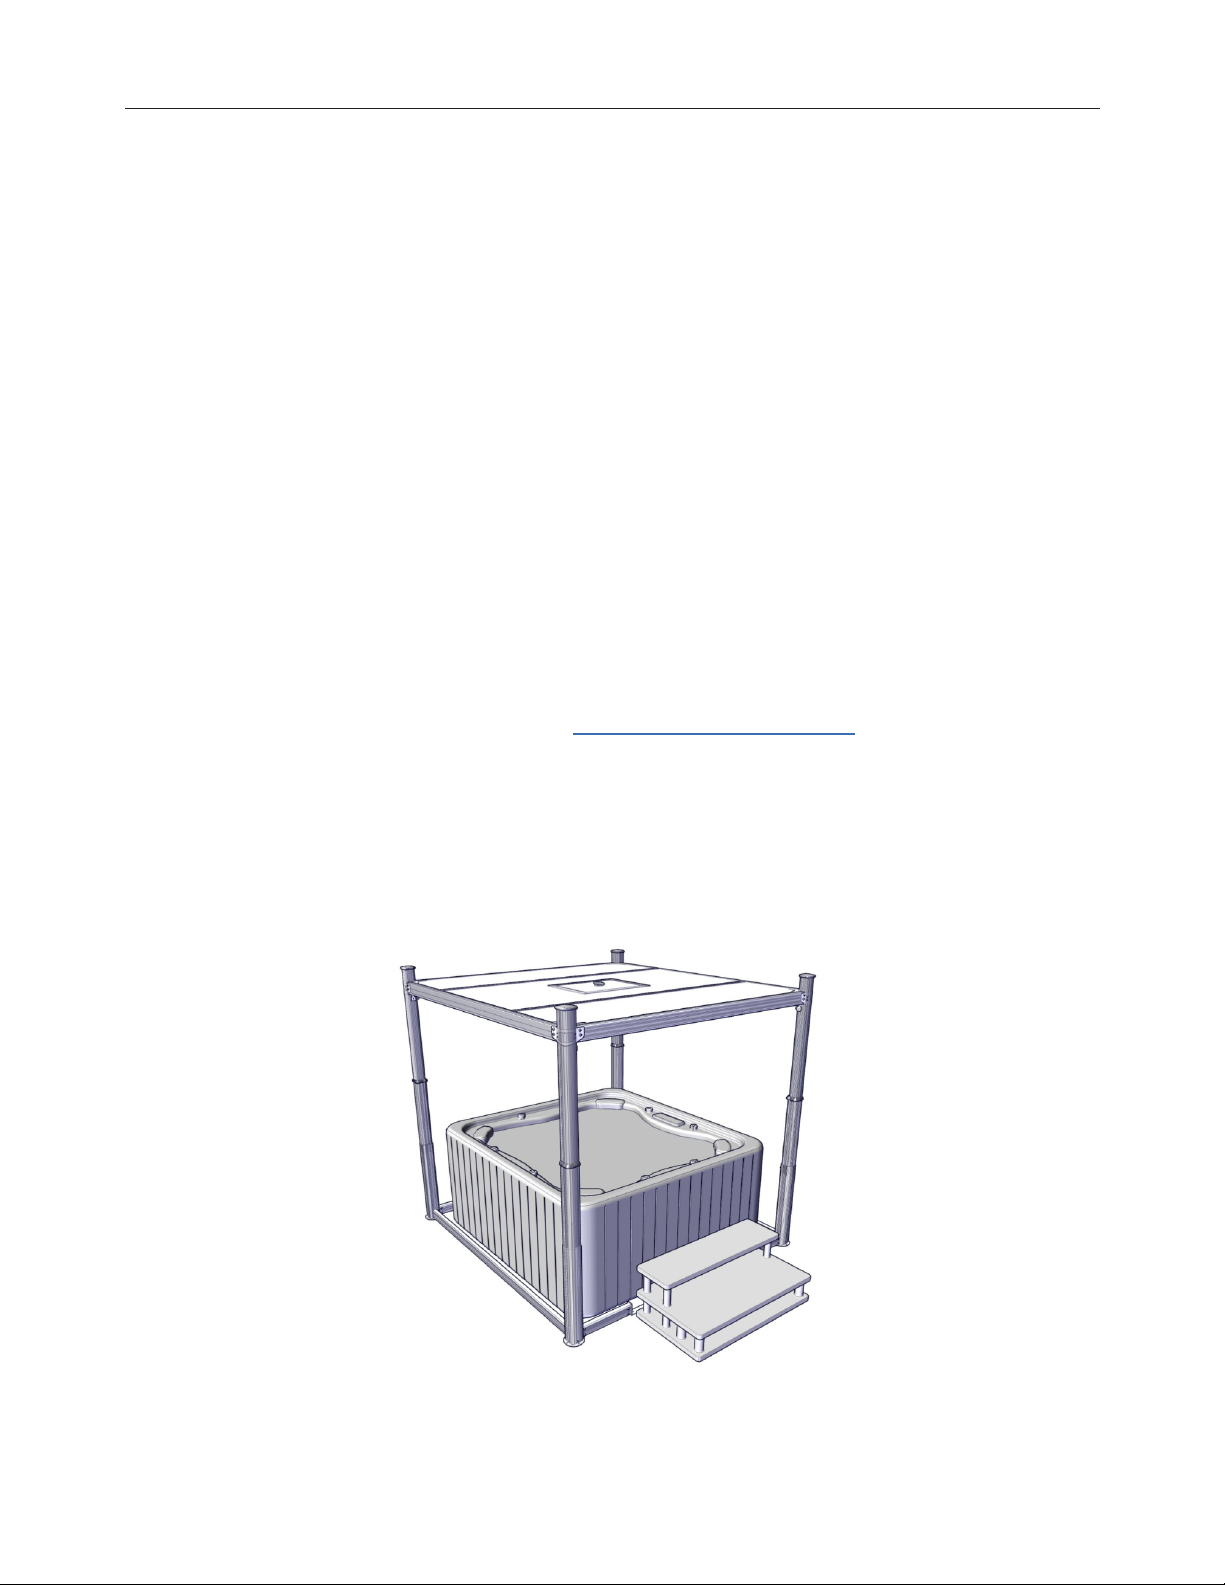
page-8EVOLUTION COVER
DON'T
lDo not operate the unit before all mechanical
and electrical connections are completely
installed.
lDo not step on or stack anything on the
operator cover.
lDo not operate the cover while somebody is in
the spa.
lDo not climb, walk or stand on the cover panels
at any time.
lDo not keep the cover open for more than 12
hours. This may cause the cover permanent
deformations.
lDo not converge or directly reflect sunlight on
the cover. This could cause permanent
damage.
lDo not wash the cover with harsh chemicals or
cleaners.
lDo not use a pressure washer to clean any
component of the cover. This could result in
premature wear or damage.
lDo not use an extension cord to supply
electrical power to the cover. The extension
cord may not be properly grounded, and the
connection is an electrical shock hazard. An
extension cord may cause a voltage drop,
which may cause the motor to overheat.
CAUTION
lBe sure to follow all instructions in this manual
and use only accessories and tools approved
by Covana.
lDo not rotate or slide the cover using its edges.
This may damage the edge components.
lAfter removing a component, always keep it in
a safe location on a clean and level surface to
ensure proper functionality.
CAUTION
lAll four jacks of the cover must be properly
anchored to the foundation using the anchoring
holes of the jack base plate. The optional non-
permanent mounting plates can be used when
anchoring jacks is not possible, but under strict
condition. See NON- PERMANENT
MOUNTING PLATE section for more details.
lThis product mainly contains steel, plastic,
fiberglass, foam, copper and die- cast
aluminum. Please recycle properly according
to the local rules.
lThe gearbox contains oil and other materials.
Please recycle properly according to the local
rules.
lThe jack stroke is limited by two limit switches.
These switches are pre-adjusted at the factory.
The down- limit switch should never be
readjusted. The up- limit switch should be
readjusted only to reduce the maximum height
of the cover to avoid possible contact with
environment. Please refer to the LIMIT
SWITCH ADJUSTMENT section in this manual
before making any adjustments. An improper
adjustment can result in damage to the
operator and/or to the cover.
RISK OF ELECTROCUTION
CAUTION
All electrical work should be done by a certified
electrician, otherwise the certification and
warranty will be voided. Furthermore, any
modifications to the electrical components will
also void the warranty.
Failure to comply with these instructions may result
in death by electrocution or serious injury.
240799 OWNER'S MANUAL REVISION 2

EVOLUTION COVER page-9
DANGER
lDisconnect or turn off and secure all power
supplies before starting any intervention on the
cover.
lA circuit breaker needs to be incorporated into
the fixed wiring at the time of installation. This
circuit breaker must be accessible to the user
or service technician to turn the power off for
future maintenance or repair.
lOnly a certified electrical contractor may
perform any electrical maintenance on the
cover. The wiring must comply with all
applicable local electrical regulations.
lThe operator must be connected to a circuit
that is protected by a dedicated ground fault
circuit interrupter (GFCI) that complies with all
applicable local electrical codes and
regulations.
lInstall the cover in such a way that drainage
directs water away from the electrical and the
mechanical components at the base.
lDo not connect any auxiliary components to
the electrical system of the cover unless they
have been approved by Covana.
lReplace electrical components with original
components provided or approved by Covana.
Ask your dealer for replacement parts.
lTo reduce the risk of electrical shock, replace a
damaged electrical cord immediately. Failure
to do so may result in death or serious personal
injury due to electrocution.
DANGER
lDo not bury the electrical wires into the ground
unless using a direct-burial underground cable.
Not respecting this precaution may result in
death, or serious personal injury due to
electrocution.
ELECTRICAL WARNING
WARNING
lTo reduce the risk of electrical shocks, the
green-colored terminal or the terminal marked
“g,” “gr,” “ground,” “grounding” or with a ⏚
symbol that is located inside the supply
terminal box or compartment must be
connected to the grounding connection
provided in the electric supply service panel
with a continuous copper wire equivalent in
size to the circuit conductors supplying the
equipment.
lTwo lugs marked “bonding lugs” are provided
on the external surface or on the inside of the
supply terminal box or compartment. To reduce
the risk of electric shock, connect the local
common bonding grid in the area of the cover.
Use terminals with an insulated or bare copper
conductor not smaller than No. 6 AWG (4.11
mm / 13.30mm2).
lAll field- installed metal components, such as
rails, ladders, drains or other similar hardware,
within 10 ft. (3 m) of the spa must be bonded to
the equipment grounding bus with copper
conductors not smaller than No. 6 AWG (4.11
mm / 13.30mm2). (NEC art. 680.)
MODIFICATIONS TO THE COVER
WARNING
Any modifications to the cover, such as
mechanical, electrical or aesthetic modifications,
may cause the cover to operate in an unwanted or
dangerous way. Furthermore, these modifications
are not permitted and might void the warranty and
certification.
The cover has been designed, tested and certified
for the only purpose of covering and securing a
spa. Any installation that differs partly or entirely
from this purpose will void the warranty and
certification.
240799 OWNER'S MANUAL REVISION 2

page-10 EVOLUTION COVER
POSITION OF THE KEYSWITCH
WARNING
The keyswitch must be permanently installed and located 5 ft. (1.5 m) away from the spa and 5 ft. (1.5 m)
above the deck or ground level.
Make sure the user has a clear view of the cover when operating it.
Furthermore, the keyswitch should be located in an area where no water downpour or debris could fall on it .
FIGURE 2: POSITION OF THE KEYSWITCH
240799 OWNER'S MANUAL REVISION 2

EVOLUTION COVER page-11
LABELING
This section shows the location of all safety labels.
They are positioned on various components for
your safety.
WARNING
Removing any labels on the cover will void
product certification.
All labels should always remain visible.
It is the owner’s responsibility to ensure that these
labels are always visible and should never be
removed.
RISK OF ELECTROCUTION
This label warns you for the risk of electrocution. It
is located on the operator.
FIGURE 3: RISK OF ELECTROCUTION
INFORMATION ON THE ELECTRICAL
CABLES
These labels inform you about the risk of
electrocution with the presence of water
accumulations.
The labels are located on the power cable near the
keyswitch.
FIGURE 4: WATER ACCUMULATION RISKS
240799 OWNER'S MANUAL REVISION 2

page-12 EVOLUTION COVER
KEY SWITCH DIAGRAM
This label shows you how to turn the key into the
key switch to lift up or lower the cover.
The label is located on the keyswitch.
FIGURE 5: KEY SWITCH DIAGRAM
TECHNICAL SPECIFICATION LABEL
These labels show you the important technical
specifications. They are located on the operator
cover.
The European label is used for the units sold in
Europe and the North American label is used for the
units sold in North America.
NOTE
These labels also show the serial number of the
cover.
FIGURE 6: TECHNICAL SPECIFICATION LABEL FOR
EUROPEAN UNITS
FIGURE 7: TECHNICAL SPECIFICATION LABEL FOR
NORTH AMERICAN UNITS
240799 OWNER'S MANUAL REVISION 2

EVOLUTION COVER page-13
NO STEP LABEL
This label warns you not to step on this area of the
unit.
The label is located on the top of the operator cover.
FIGURE 8: NO STEP LABEL
AVOID DROWNING LABEL
This label warns you about the risk of drowning.
The label is located inside the cover.
FIGURE 9: AVOID DROWNING LABEL
DO NOT STEP ON THE COVER LABEL
This label is a message to remind you not to step on
the cover. The labels are located on the end of the
C-channels of the cover.
FIGURE 10: DO NOT STEP ON THE COVER LABEL
MAINTENANCE INFORMATION LABEL
This label gives you information where to get more
information about the cover maintenance
procedures. The label is located on one of the C-
channels.
FIGURE 11: MAINTENANCE INFORMATION LABEL
CENTER LABEL
This label is located on the 94.6''(240 cm) long C-
channel.
FIGURE 12: CENTER LABEL
TOP LABEL
This label is located on the I-Beams and the escape
hatch opening.
FIGURE 13: TOP LABEL
240799 OWNER'S MANUAL REVISION 2

page-14 EVOLUTION COVER
GLOSSARY
PART IMAGE FUNCTION
Sleeve all-weather seal This all-weather seal protects sleeves from damage due
to weather.
Contour seal The contour seal makes sure there is uniform contact
between the cover panels and the spa.
Contour seal installation
clip
Contour seal installation clips are used during the
installation process to make sure the seal is installed
properly.
Contour seal connector The seal connector is used to link both ends of the
contour seal.
Outer corner bracket The outer corner bracket fastens the cover to the
sleeves.
Drive shaft The drive shaft transmits the power from the operator to
the non-motor-side jacks.
240799 OWNER'S MANUAL REVISION 2

EVOLUTION COVER page-15
PART IMAGE FUNCTION
Foot bracket The foot bracket provides a solid footing of the cover and
is attached to the bottom of the jack.
Spa entrance U-frame
link
This link is installed under the entrance steps of the spa.
It links the two non-motor-side posts.
Keyswitch The keyswitch is used to operate the cover. It has a key
switch installed on.
Foam spacer The foam spacer is used for the installation process to
protect the spa from direct contact with the cover.
Limit switch
The limit switches are located on the operator. Refer to
the LIMIT SWITCH ADJUSTMENT section for further
details.
Motor frame The motor frame is composed of two motor-side jacks
and the operator.
240799 OWNER'S MANUAL REVISION 2

page-16 EVOLUTION COVER
PART IMAGE FUNCTION
Jack Jacks are a very important component of the cover.
They allow the cover to lift up and down.
Operator The operator powers and controls the lifting mechanism
of the cover.
Sleeve The sleeves are aluminum extrusions to hide and
protect the jacks.
U-frame The U-frames protect the lifting mechanical components
and connect all four posts at the bottom.
Jack lock screw (A)
The jack lock screw (A) prevents the non- motor side
jacks from extending. Do not remove this screw until the
driving shaft is connected.
Follow installation steps carefully.
A: Jack lock screw
B: Top plate screw
C: Bushing
D: Alignment bracket (red)
240799 OWNER'S MANUAL REVISION 2

EVOLUTION COVER page-17
PART IMAGE FUNCTION
C-channel The C-channel is the outer frame of the cover panels.
Inner corner bracket The inner corner bracket links the C-Channels. It creates
the frame of the cover panels.
Escape hatch The escape hatch is a removable panel component of
the middle cover panel.
I-beam The I- beams are the aluminum extrusions installed
between the cover panels.
I to C spacer The I to C spacer is used to prevent over tightening of
the I to C connection plates.
240799 OWNER'S MANUAL REVISION 2

page-18 EVOLUTION COVER
PART IMAGE FUNCTION
Wiper bracket The wiper bracket is attached under the I-beams. This
component ensures the waterproofing of the cover.
I-to-C connection plate
(short)
The short I-to-C connection plate is installed between
the I-beams and C-Channels.
240799 OWNER'S MANUAL REVISION 2
Other manuals for Evolution
5
Table of contents
Other COVANA Spa Accessories manuals

COVANA
COVANA LEGEND User manual

COVANA
COVANA Evolution User manual

COVANA
COVANA OASIS COVER User manual

COVANA
COVANA EVOLUTION COVER User manual

COVANA
COVANA Oasis Cover Standard User manual

COVANA
COVANA HORIZON User manual

COVANA
COVANA LEGEND User manual

COVANA
COVANA OASIS User manual

COVANA
COVANA legendX User manual
Popular Spa Accessories manuals by other brands

Cover Pools
Cover Pools Autosave owner's manual

HoMedics
HoMedics JetSpa JET-1 Instruction manual and warranty information

Spa Electrics
Spa Electrics R6 quick start guide

Gecko
Gecko BAHAMA SPAS Quick reference card

Moretti
Moretti MOPEDIA RS826 instruction manual

Leisure Concepts
Leisure Concepts Covermate III Eco installation instructions