Cowon PLENUE R2 User manual

USER’S GUIDE ver. 1.0 EN
R2

Product specification may change without notice.
Images contained in this manual may differ from the actual product.
THANK YOU FOR PURCHASING A COWON PRODUCT.
We do our utmost to deliver DIGITAL PRIDE to our customers.
This manual contains information on how to use the product and the precautions to take during use.
If you familiarize yourself with this manual, you will have a more enjoyable digital experience.
2

Introduction to website
+ The address of the product-related website is http://www.COWON.com.
+ You can download the latest information on our products and the most recent firmware updates from our website.
+ For first-time users, we provide an FAQ section and a user guide.
+ Become a member of the website by using the serial number on the back of the product to register the product. Y
ou will then be a registered member.
+ Once you become a registered member, you can use the one-to-one enquiry service to receive online customer advice. Yo
u can also receive information on new products and events by e-mail.
General
+ COWON® and PLENUE® are registered trademarks of our company and/or its affiliates.
+ This manual is copyrighted by our company, and any unauthorized reproduction or distribution of its contents, in whole or in part, is strictly pr
ohibited.
+ Our company complies with the Music Industry Promotion Act, Game Industry Promotion Act, Video Industry Promotion Act, and other relevant la
ws and regulations. Users are also encouraged to comply with any such laws and regulations.
+ As soon as you purchase the product, visit the website (http://www.COWON.com), and become a registered member. Y
ou will benefit from various member services.
+ This manual is based on product specifications, and various exemplary texts, illustrations, pictures, detailed functions and H/W and S/W sp
ecifications contained herein can be altered without any prior notice by the copyright owner.
BBE information
+ BBE Sound, Inc. owns the license to the BBE name and information as applied to this product, in
compliance with USP4638258, 5510752 and 5736897.
+ BBE and the BBE symbol are registered trademarks of BBE Sound, Inc.
3
COPYRIGHT NOTICE

Using the Product 19
Playback Screen
Music Selection
Playback Settings
Detailed Settings
Basic
Use
Power Connection and Charging
Connecting and Disconnecting from the PC
Inserting and Removing the microSD Card
12
Additional
Product Specification
25
Using Headphone Mode
Sound Source LED Indicator
Troubleshooting
27
Connecting to Balanced audio Port
Using Bluetooth
Firmware Upgrade
4
Before you start! 5
Precautions
Package Contents
Names of Parts and Functions
Buttons
CONTENTS

+ Do not use this product for other purposes than those described i
n this manual.
+ Handle manual, product package materials, accessories, etc with
care to prevent cuts and injuries to your body.
+ Do not view videos, pictures and texts stored in your player while drivin
g a vehicle for your safety. Operating other features of the player is also
dangerous and may cause fatal accidents while driving.
+ The wearing of earphones while operating a vehicle, exercising, or
walking may impair, mask or prevent recognition of emergency
signals, alarms, and announcements. Doing so may also be unlawful
depending on the region.
+ Do not use detergent or other chemicals on the product surface a
s it may cause fading. In this case, wipe the soiled area carefully wi
th a soft cloth.
+ Do not expose the player in either cold weather of under 0˚C(32˚F) or h
ot temperature over 40˚C(104˚F) such as inside automobiles. This may
cause fatal damages to your player.
+ Do not expose the player to water or keep it in a damp or humid loc
ation for an extended period of time. If the player is damaged from
moisture as described above, product failure is then classified as a u
ser’s misuse.
+ Take extra care not to apply external shock or pressure when using
PRECAUTIONS
Before You Start!
As these precautions are provided for the correct use of the product as well as user safety, be sure to familiarize yourself with t
hem. The company will not be held responsible for any accident that may occur due to the failure to heed these precautions.
The following information applies to all products manufactured or produced by our company.
5
products with displays(LCD, AMOLED, or Touch Pad). Warranty
may be voided if damage occurs due to the aforementioned circ
umstances.
+ Do not attempt to disassemble the player. Disassembly will void the
warranty and the unit will be permanently disqualified from any warr
anty services.
+ Do not mix directions when connecting cables to your player or PC.
Connecting cables incorrectly may damage your player or PC. Also,
do not bend or press connection cables with heavy objects.
+ Be sure to avoid charging the product in the vicinity of a heating ap
paratus or in a high-temperature environment. To minimize the risk
of damage or fire, never cover the device with any objects (blanke
t, towel, etc.) or block the natural heat dissipation while charging o
r during operation.
+ If you smell something burning or feel excessive heat while using the p
roduct, press the RESET button to stop operation and
contact the place of purchase.
+ Touching the player with wet hands may cause damages and
malfunctions. Handle the power plug only with dry hands (othe
rwise an electric shock may occur).
+ Listening at high volume(85dB and above) for an extended period of t
ime may harm your hearing.

PRECAUTIONS
6
Before You Start!
+ For your protection, use the player in a well lit area where LCD s
creen will not overly strain your eyes.
+ Using the player in places with high occurrences of static electricity
may cause malfunctions.
+ This product can be connected via Bluetooth up to a distance of ab
out 10 meters. The following conditions may cause noise, signal inte
rruption, or abnormal operation:
- If signal transmission is interrupted (holding the product in hand,
placing the product in a bag, etc.)
- If signal is obstructed by an obstacle (person, metal, wall, etc.)
- If other wireless devices are being used in the vicinity (wireless LAN,
microwave oven, smartphone, etc.)
+ In case of using this device primarily for a storage device, it is recom
mended to back up all data before use. Our company is not respon
sible for any loss of data, for any reason.
+ All data stored in the player may become deleted when being service
d. Our company is not responsible for any loss of data that occurs du
ring repair. Be sure to back up data to a safe place before sending yo
ur device for repairs.
+ Keep the player in cool and ventilated places, away from direct s
unlight as it may cause deformation and damages to internal cir
cuitry or LCD screen.
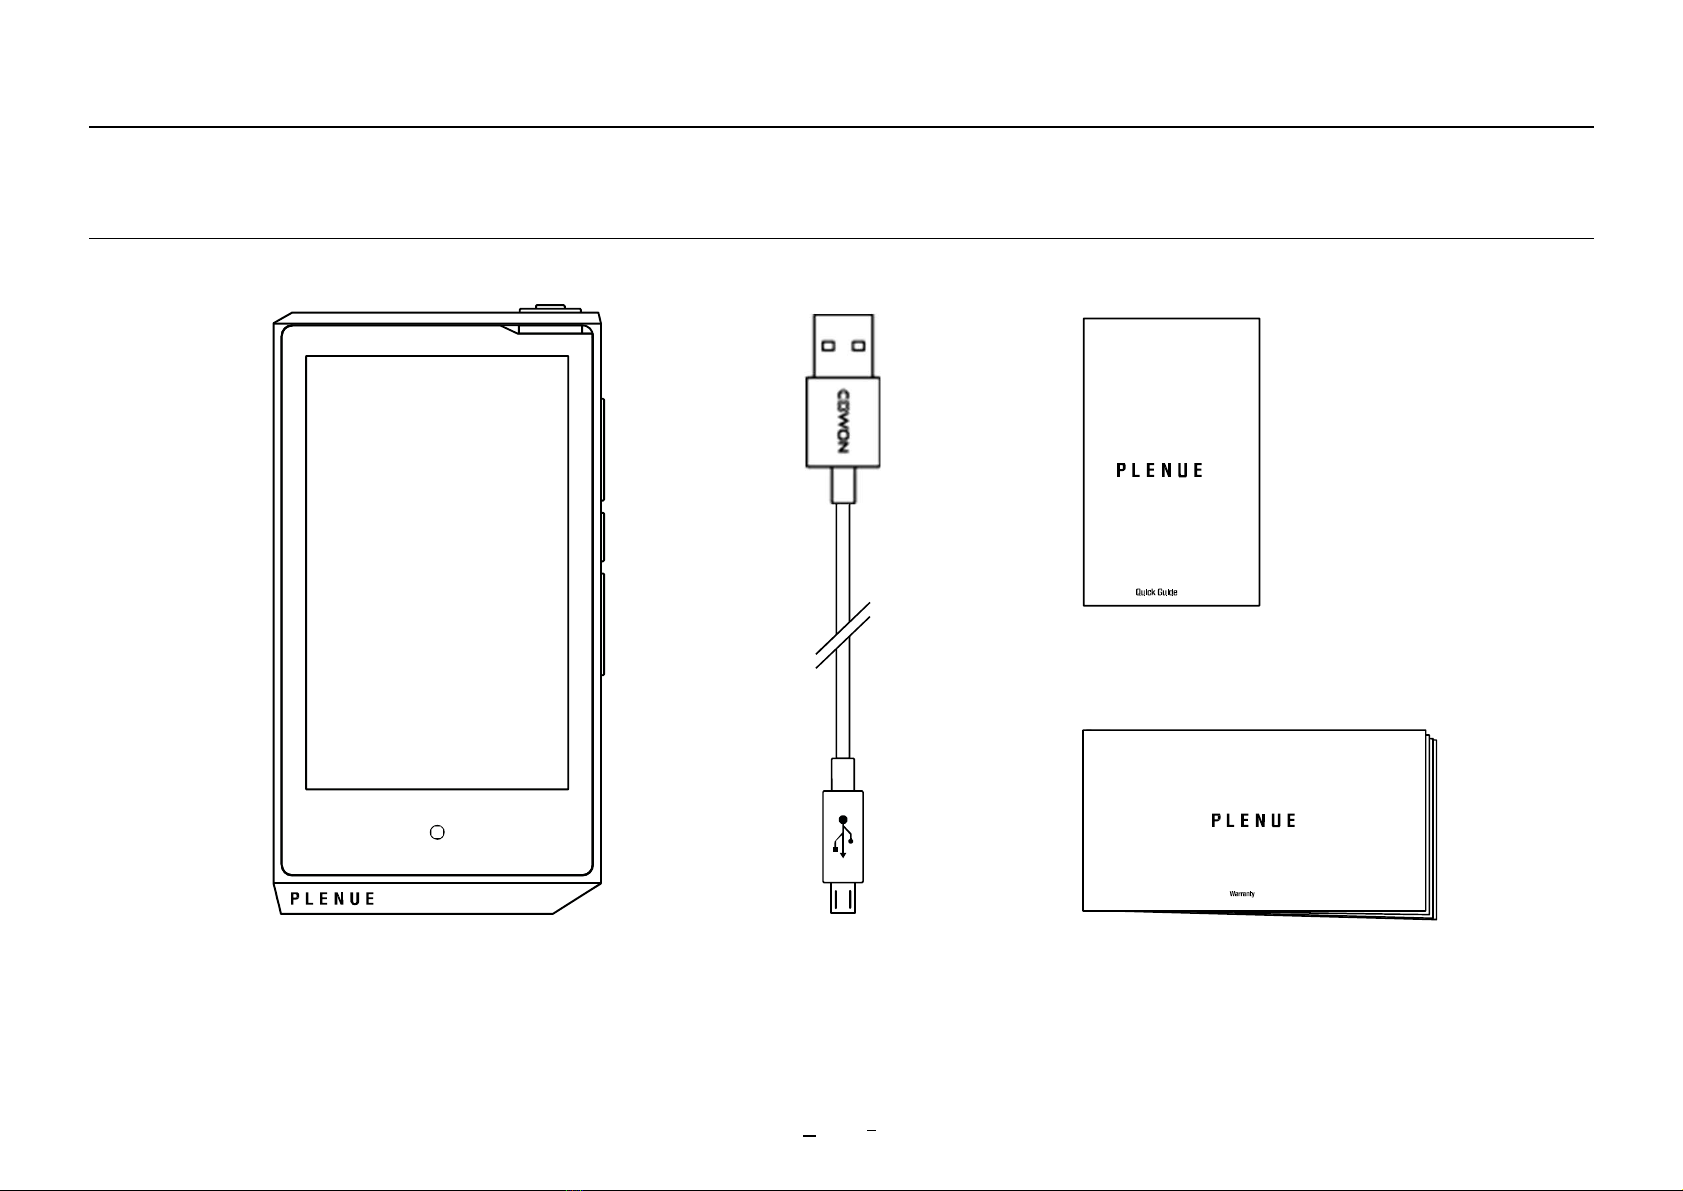
+ For your safety, be sure to always use genuine cables provided by o
ur company.
+ If you are using a product that comes with an AC power adaptor,
please use the genuine charger offered by COWON.
+ When connecting to a PC, use only USB ports on the mother
board or a USB Host card. Using an external USB hub may not
guarantee proper operation(e.g. USB ports on a keyboard or an
external USB hub).
+ When formatting the built-in memory, select the file system specified
in the manual(e.g. FAT32 / FAT16 / NTFS).
+ Be sure to disconnect the power supply to the PC and USB power
adaptor during lightning or thunder storm, to prevent danger to the
user or the risk of fire hazards.
+ Keep the player away from magnets and direct magnetic fields, as
they can cause malfunctions.
+ Do not drop or expose the product to hard impact. This may result
in malfunctions and/or unit failure, voiding the warranty.
+ If you find any abnormalities with the battery such as swelling, press
the RESET button immediately to stop the operation and contact the
place of purchase.
+ The price of the product may fluctuate due to unexpected
commercial conditions. Our company is not obligated to provide
cash compensation for any reason.
+ <For MAC OS users>
‘EJECT’ procedure must be performed when removing the product
from the Mac.

PRECAUTIONS
7
Before You Start!
+ NOTE: This equipment has been tested and found to comply with t
he limits for a Class B digital device, pursuant to part 15 of the FCC
Rules.
These limits are designed to provide reasonable protection against
harmful interference in a residential installation.
This equipment generates, uses and can radiate radio frequen
cy energy and, if not installed and used in accordance with the
instructions, may cause harmful interference to radio
communications. However, there is no guarantee that interference
will not occur in a particular installation.
If this equipment does cause harmful interference to radio or televi
sion reception, which can be determined by turning the equipment
off and on, the user is encouraged to try to correct the interference
by one or more of the following measures:
- Reorient or relocate the receiving antenna.
- Increase the separation between the equipment and receiver.
- Connect the equipment into an outlet on a circuit different from that t
o which the receiver is connected.
- Consult the dealer or an experienced radio/TV technician for help.

* Actual package contents may differ from the above images.
PACKAGE CONTENTS
Before You Start!
PLENUE R2 WarrantyMicro USB Cable
ver. 1.3W
R2
ve r. 1. 0 W
8
Quick Guide

NAmES OF PARTS AND FUNCTIONS
Before You Start!
VolumeUp(+)
Volume Down(−)
Play / Pause
REW / Previous Track
FF / Next Track
Multi Button
Touch Display
Micro USB Port
Earphone Jack / Optical Output
Balanced Audio Port
microSD Card Slot
9
LED
Power Button LED

10
1) Turn on Lock Screen to disable the touch screen.
Locked screen can be adjusted in ‘Settings ► System ► Locked screen’.
2) If the screen is turned off while the product is turned on, the LED w
ill blink white.
3) If the buttons or touch screen do not respond during use, press and
hold the volume + and − buttons to reset for 6 seconds or more.
4) Multi Button can be adjusted in ‘Settings ► System ► Multi Button’.
* All Physical buttons can be locked except the Power button. ‘
Button lock’ can be adjusted in ‘Settings ► System ► Button lock’
BUTTONS
Before You Start!
01
Power On / O f f
Press and hold the button to turn on the product.
While turned on, press and hold the button to turn off the product.
Display On / O f f 1), 2)
Press the button briefly to turn on/off the screen.
04
Previous Track / next Track
Press briefly to select the previous or next track.
Rewind / fast forward
Press and hold to rewind or fast forward.
05
Multi Button 4)
Touch the Multi Button to quickly navigate to the playback, playlist, s
ettings, or volume control screens.
02
Volume UP / DOWn 3)
Adjusts the volume in 140 levels. Each level adjusts the volume by 0.5d
B. Press and hold the button to quickly raise or lower the volume.
03
Play / Pause
Press the button to play the track. While playing, press the button to
pause the track.

BUTTONS – VOLUME CONTROL SCREEN
Before You Start!
Adjust the 140-step volume control by swiping up or down on the volume control screen.
Each level adjusts the volume by 0.5dB.
If the Multi Button’s function is set to volume adjustment under system settings, you will be
redirected to the volume control screen when touched.
Alternatively, touch the volume icon on the top status bar during music playback to be r
edirected to the volume control screen.
* Listening at high volume(85dB and above) for an extended period of time may harm y
our hearing.
11

1. Micro USB cable connects the PC and Micro USB port.
2. The LED indicates the status of the battery charge. (Red : Charging, Green : ChargingComplete)
- PLENUE R2 can also be charged with an authentic Micro USB DC adapter for smart phones. If 5V/2A or higher Micro USB DC adapters a
re used, charging will be finished in approximately 3 hours. The charging time may vary if the product is in use while charging.
- Be sure to connect the device directly to a USB port located on the back of the PC. The device may be unable to establish a co
nnection or be charged as the power supply from a front USB port or a non-powered external USB hub may be unstable.
- Fully charge the product before using it for the first time or after a period of disuse.
- For your safety, do not charge the product in an enclosed space such as under a blanket or inside a bag. Charge the product in an op
en space.
POWER CONNECTION AND CHARGING
Basic Use
12

- The maximum number of files and folders that can be recognized by
the product: 70,000 / 70,000(microSD)
- Disconnect the product after performing ‘Safely remove hardware’ f
unction.
- The following message may appear randomly, but it does not indicate
that the product is malfunctioning. Please tryagain.
- If your operating system does not display the‘Safe To Remove
Hardware’window, disconnect the player after all transfer opera
tions are completed.
- Only simple file transfer operation is available for Linux and
Mac OS.
CONNECTING AND DISCONNECTING FROm THE PC
Basic Use
1. Use the Micro USB cable to connect PLENUE R2 to your PC.
2. Press and hold the button to turn on the product.
3. The connection image appears on the PLENUE R2 screen.
4. Also make sure to check My Computer or Windows Explorer to see if
PLENUE R2 is properly connected to the PC.
5. Use PLENUE R2 to copy the track you wish to listen to.
6. When done, click the icon on the system tray to safely remove PLE
NUE R2 from the PC.
7. Click the popup message.
8. Make sure that PLENUE R2 has been safely disconnected, then
remove it from the PC.
13

1. Properly place the microSD Card in the microSD card slot as
shown in the picture. Gently press the card to insert it.
2. When the database is automatically refreshed, the music files on
the microSD card can be viewed.
3. When removing the microSD card, turn off the power then press
the microSD card again to remove it.
* For data protection, always turn off the power before removing the
microSD card.
PLENUE R2 provides ‘Headphone mode’ to increase output for use
with high impedance headphones.
1. Turn Headphone Mode on and off in ‘Settings ►Music ►
Headphonemode’.
2. The icon in the upper right corner changes based on Headphone
mode.
* When Headphone mode is turned on, the output will increase,
so please use caution.
INSERTING AND REmOvING
THE microSD CARD
USING HEADPHONE mODE
Basic Use
Color Sound Source
Cyan Normal Sound
Magenta
HD Sound
(Sound sources in excess of 48kHz or 24bit or greater)
Yellow DSD / DXD
SOUND SOURCE l E D INDICATOR
The PLENUE R2's LED light changes color according to soundsource.
14

PLENUE R2 has a high quality balanced line-out port that outputs + and - audio signals.
1. Connect balanced cable-supporting headphones (or a in-ear headphones) to the balanced l
ine-out port (2.5mm).
2. Connect the receiver to the balanced audio port and check the icon status in the upper- r
ight corner of the screen. ( )
* The status icon in the upper-right corner of the screen will change when a receiver is connected to
the unbalanced audio port. ( )
* Balanced and unbalanced output cannot be generated at the same time.
CONNECTING TO BAlANCED AUDIO PORT
Basic Use
Pin Arrangement of
Balanced AudioPort
R−
R+
L+
L−
15

USING BlUETOOTH
Basic Use
You can connect to a Bluetooth-supported device to listen to music. Bluetooth settings are located under ‘Settings ►Bluetooth’.
- You can select a connected device to terminate the Bluetooth connection.
- Select ▶to terminate a device pairing.
- If a password or PIN is required when pairing, select the button, and then enter “0000” when prompted.
1. Enable Bluetooth. 2. Search for device to be paired.
+ Place device within
1 meter of product.
+ Search ends automatically
after 50 seconds.
3. Select and connect to
discovered device.
4. Select ►to edit the na
me of the connected device.
1
2
16

USING BlUETOOTH - C A l l AlARm
Basic Use
While the PLENUE R2 is connected to your smartphone, you will receive notifications for incoming calls during music playback.
- The call alarm function is only available when connected to a wired receiver.
- If you answer a call on your smartphone, the Bluetooth connection between your phone and the PLENUE R2 will be terminated.
1. Select the Call Alarm button to
change to call alarm mode.
( ►)
2. Enable Bluetooth on your
smartphone and pair with the
PLENUE R2.
3. If you receive a call during music pla
yback, an alarm will sound and the top
icon will change. ( ►)
17

The firmware uses built-in programs in the hardware and upgrades to improve product capabilities and fix bugs in the softwar
e. PLENUE R2 may use the firmware to adjust product performance or methods of use without prior notice, and minor malfun
ctions in the firmware may occur.
How to upgrade the firmware
1. Download the latest firmware from the SUPPORT section of the website (http://www.COWON.com).
2. Use the Micro USB Cable to connect PLENUE R2 to the PC.
3. Unzip the downloaded firmware and copy it to the root folder of PLENUE R2.
4. Once the product is safely disconnected, remove the Micro USB cable.
5. When you turn on the product, the firmware upgrade process will start.
6. When firmware upgrade is complete, turn on the power and go to ‘Settings ► System ► Information’ to check the version of the in
stalled firmware.
18
- Fully charge the player before upgrading the firmware.
- Do not turn the player off before the firmware update has been completed. It may damage the product, and will void any warranty.
- Back up any important data before the firmware upgrade as any data stored on the device may be deleted during the process.
- Our company is not responsible for any loss of data, for any reason.
FIRmWARE UPGRADE
Basic Use

PLAYBACK SCREEN
Using the Product
①Play / Pause the track.
②Press briefly to go to the previous track. Press and hold to rewind.
③Press briefly to go to the next track. Press and hold to fast forward.
④Drag the bar to the desired pbeoint in the track.
⑤Navigate to the Music Selection Screen.
⑥Go to the volume control screen.
⑦Adjust the playback settings.
⑧If this icon is displayed, click on the album artwork to see the lyrics in the album
information screen.
⑨Enable looping.
⑩Enableshuffling.
⑪Choose to play a track, all tracks, or a folder.
8
4
1
3
5 7
9
2
10 11
6
19

MUSIC SELECTION
Using the Product
Select a folder, artist, or album to view the corresponding track list.
View track lists by folder.
View track lists added to Favorites.
View all tracks saved in the product.
View track lists by artist.
View track lists by album.
View track lists by genre.
View track lists by CUE/SACD.
View track lists by new files.
* In the Track List Screen, press and hold to navigate to the Initial Track List
Screen.
20
Other manuals for PLENUE R2
2
Table of contents
Other Cowon Media Player manuals

Cowon
Cowon Q5W 80GB User manual

Cowon
Cowon PLENUE D User manual

Cowon
Cowon PLENUE D User manual

Cowon
Cowon iAUDIO T2 User manual

Cowon
Cowon plenue D3 User manual

Cowon
Cowon X7 User manual

Cowon
Cowon IAUDIO7 User manual

Cowon
Cowon S9 User manual

Cowon
Cowon X7 - V1.1 User manual

Cowon
Cowon iAUDIO U7 User manual