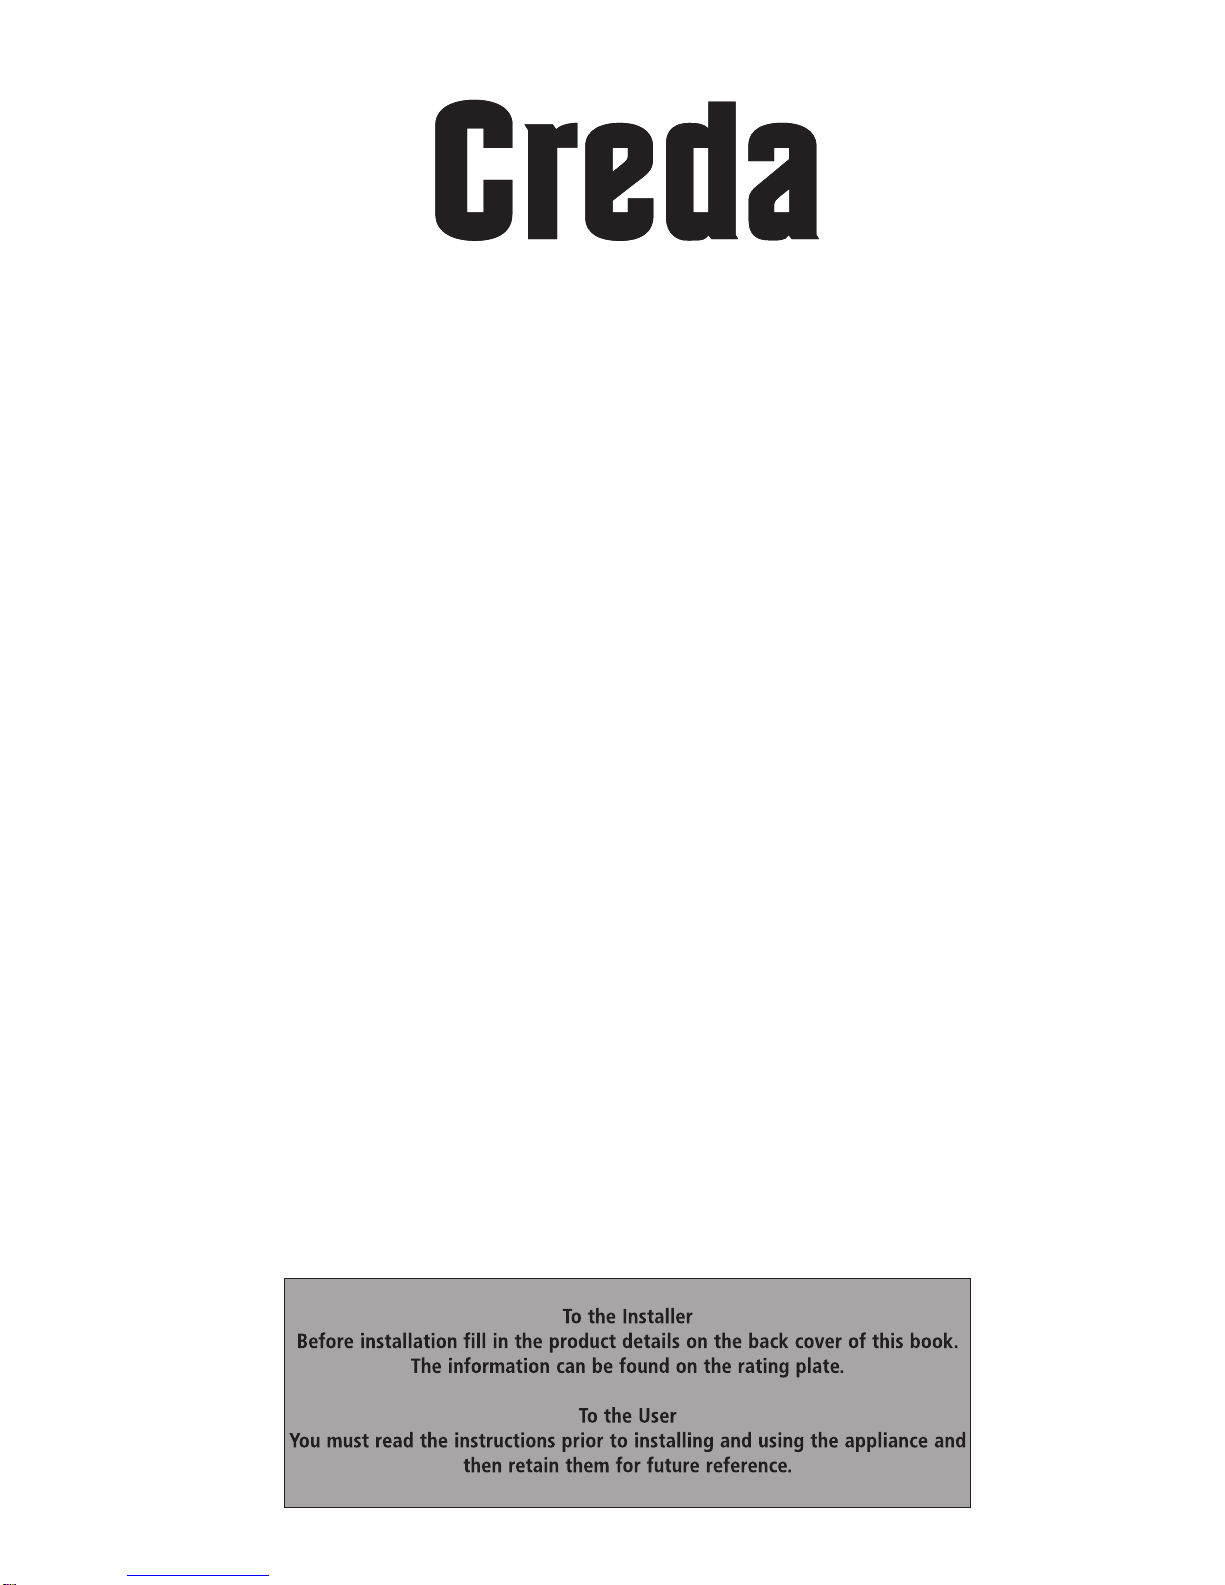
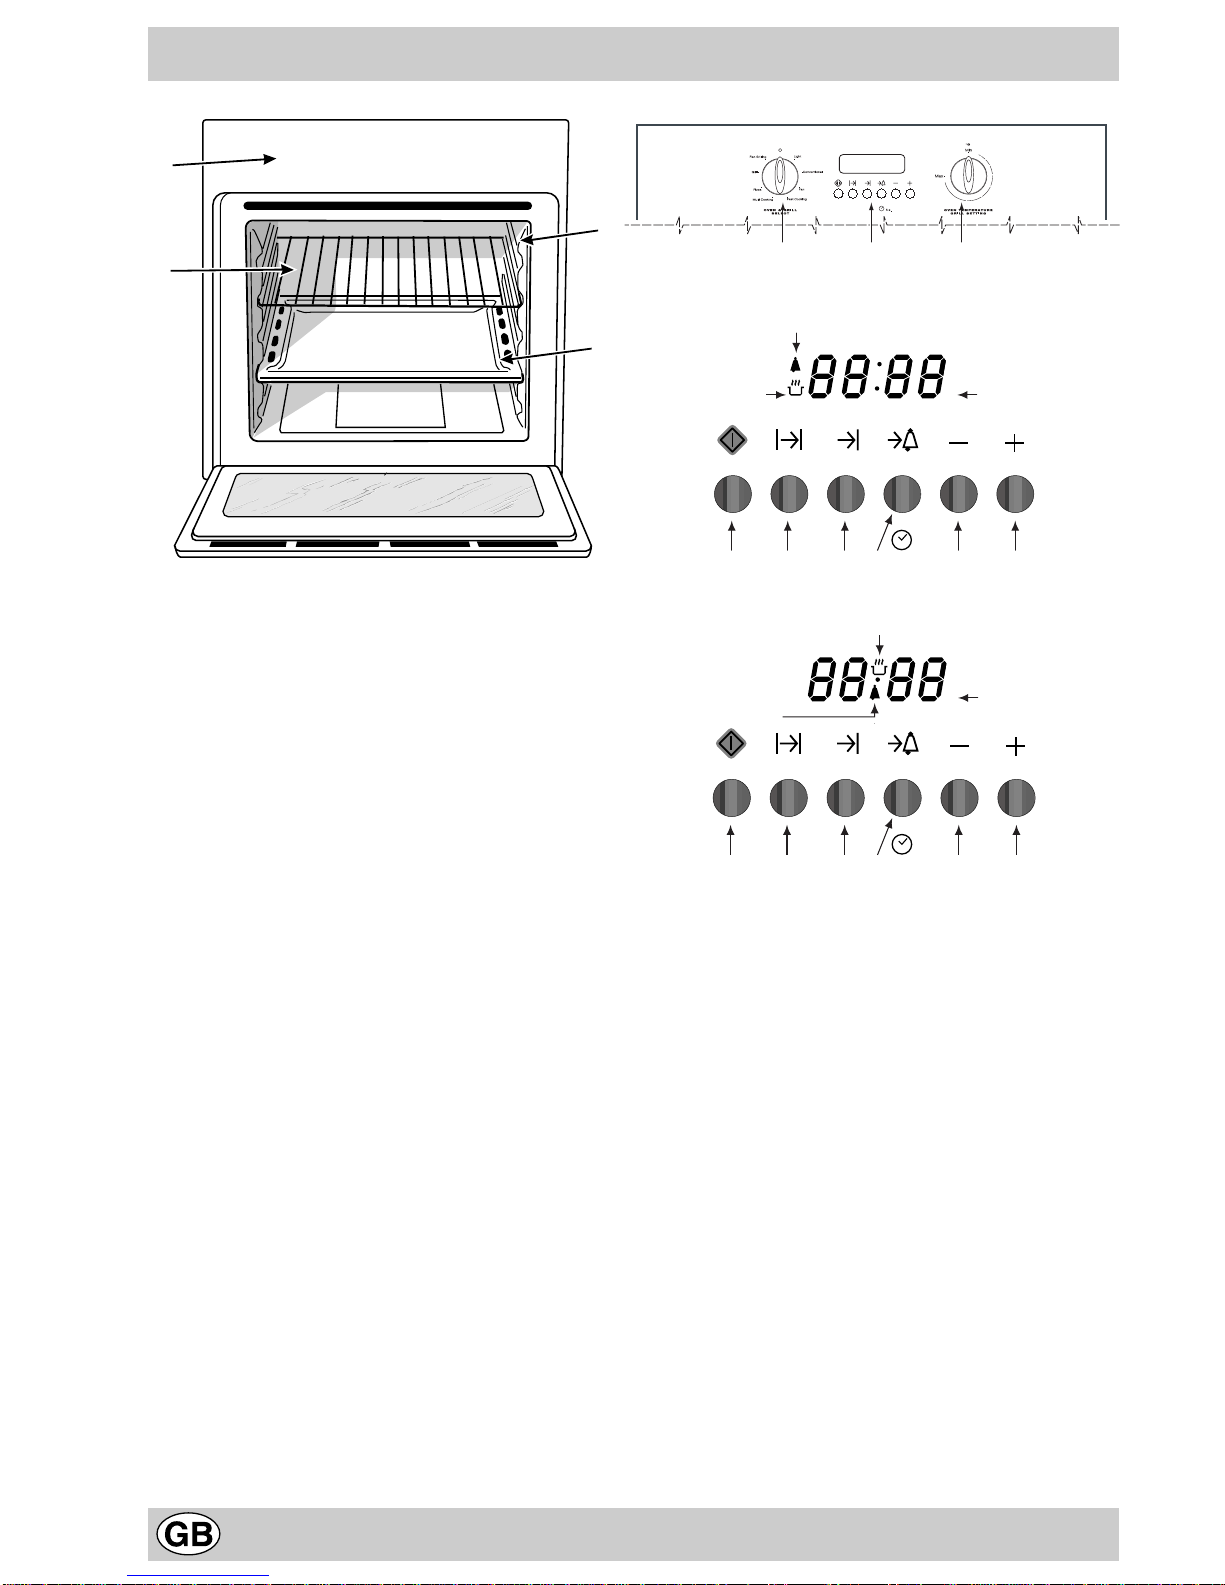
Creda S077E User manual

Instructions for Installation and Use
Electric Multifunction Oven
Model S077E


3
CONTENTS
Introduction
For Your Safety
Know your Oven
The Controls
Cooking Advice
Cooking Chart
Care and Cleaning
Installation
Electrical Connection
Key Contacts
4
5
6
7-9
10-11
12
13
14
15
Back Cover
Retention of this Instruction Book
ThisInstructionBookmustbekepthandyforreferenceasitcontainsimportantdetailsonthesafeandproperuseofthe
appliance.
Ifyousellorpasstheappliancetosomeoneelse,ormovehouseandleaveit behind, make sure this Book is alsoprovided
sothenewowner can become familiar with the applianceandsafetywarnings.
IftheBook is lost or damageda copy may be obtainedfrom:
GDALTD.,MorleyWay,Peterborough,PE29JB

4
Yournewelectric oven is guaranteed* and willgivelasting service. This guarantee is only applicableifthe appliance has
beeninstalled in accordance withtheinstallationinstructionsdetailed in this booklet.
Tohelpmakebestuseofyourcookingequipment,pleasereadthis booklet carefully.
Theovenisdesignedspecificallyfor domestic use and responsibility will not be accepted foruseinanyotherinstallation.
Introduction
Tohelp removethe'new'smell, heattheemptyoven tomaximumtemperaturefor aminimumoftwo tothreehours,keeping
the door/s closed. Ensure that the room is well ventilated (eg. open a window or use an extractor fan) and that persons
whomay be sensitive to the odour avoid anyfumes. Itissuggestedthatanypetsbe removed from the room until the smell
has ceased.
Thisodouris due to any temporary finishonoven linings and elements and anymoistureabsorbed by the insulation.
Note: When the oven is first used, an odour may be omitted - this will cease after a short period of use.
* The guarantee is subject to the provisions that the appliance:
(a) Has been used solely in accordance with this booklet.
(b) Has been properly connected to a suitable supply voltage as stated on the rating plate, attached to the
appliance.
(c) Has not been subjected to misuse or accident or been modified or repaired by any person other than the
manufacturersauthorised employee or agent.
(d) Has been correctly installed.

5
For Your Safety
ALWAYS:
- make sure you remove all packaging and literature from
insidethe appliance before switching on for the firsttime.
- check the soundness of the appliance after it has been
unpacked.
- make sure you understand the controls before using the
appliance.
- keep children away from the appliance during use, as
surfaceswillgetextremelyhotduringandaftercooking.Care
shouldbetakentoavoidtouchingtheheatingelementsinside
theoven during use.
-makesurethecontrolsareturnedoffwhenyouhavefinished
cookingand when not in use.
-gripthehandleinthecentrewhenopeningthedoor.
- stand back when openign the door to allow any build up
ofsteamor heat to disperse.
-usedry, good quality oven gloves whenremovingitems.
- take care to avoid heat/steam burns when operating the
controls.
- switch off the electricity supply at the wall switch, and
allowtocool,beforecleaningorperformingmaintenance..
- make sure the shelves are in the correct position before
switchingontheoven.
-keepthedoorpartiallyopenwhengrilling.
-keep the door closed when the appliance is not in use.
- keep the appliance clean as a build up of grease or fat
fromcooking can cause a fire.
-followthe basic principles of food handling and hygiene to
preventthepossibilityofbacterialgrowth.
-keepanyventilationslotsclearofobstructions.
NEVER:
- attempt to install or repair the appliance without the
assistanceof qualified personnel.
-operate the grillwith the doorclosed (except whenusing
therotisserie)as this may cause the appliance to overheat.
-remove the oven shelves whilst the ovenis hot.
-allow anyone to sit or stand on any part of the appliance.
-store items above the appliancethatchildrenmayattempt
toreach.
-heatupunopened food containers, as pressure can build
upcausingthecontainertoburst.
-use the appliance to heat up anything other than food.
-use the appliance as a room heater.
-use the grill to warmplates.
-dryitemson the oven doors.
-installtheappliancenexttocurtainsofothersoftfurnishings.
-allowchildrento play with or tamper with thecontrols.
-usesteamcleaners.
-use the oven forstorage purposes.
-useflammableliquids near the appliance.
-useadapters,multiple sockets and/or extension leads.
- pull on the appliance or the supply able to unplug it from
theelectricaloutlet.
-allowpowercablesofotherappliancestocomeintocontact
withhot parts of this appliance.
- expose the appliance to atmospheric agents, such as
rainorsunlight.
- operate the appliance with wet hands.
-operate the appliance whenbarefoot.
When used properly your appliance is completely safe but as with any electrical product there are certain
precautions that must be observed.
PLEASE READ THE BELOW PRECAUTIONS BEFORE USING YOUR APPLIANCE.
Tomaintaintheefficiencyandsafety of this appliance, we recommend you do the following:
-only call the Service Centres authorised by themanufacturer.
- always use genuine spare parts.

6
Know your Oven
A. ControlPanel
B. Functionselector
C. Temperaturecontrol
D. Electronicprogrammer- Allowsyoutoprogrammethe
desiredcooking modebyselectingthe cooking timeand
theend cooking time. It canalso be used asa timer.
F. GrillPan or BakingTray
G. Oven Shelf
H. Guidesfor sliding theshelf or grillpan/baking tray in
andout
1. Cookingstart
2. Cookingtime
3. Endcooking time
4. MinuteMinder
5. Decrease / Buzzer volume
6. Increase / Temperature display
7. MinuteMinder indicator
8. Pre-heating (mflashing) or cooking (mon) under
wayindicator
9. Programmingcomplete indicator
BDC
G
A
F
H
5 s.
A
U
T
O
1
7
2 3 4 5 6
89
5 s.
A
1
8
2 3 4 5 6
79

7
The Controls
The7 Chefs oven combines the advantages of a convec-
tionoven with those of fan assisted models in a single ap-
pliance.
It is extremely versatile allowing you to choose easily and
safelybetween 7 different cookingmodes.Thevariousfea-
turesoffered bytheoven areselectedbymeans ofthefunc-
tionselector “B”situatedonthecontrol panel.
Setting the digital clock
The time can only be set on the clock when the function
selector“B”isinposition0.
Afterthe appliance has beenconnected to the powersup-
ply,orafter a power failure, theclock display will automati-
callyresetto0:00 andbegin to blink. 0.00.
Pressbutton sor tto increase or decrease the time.
Upon releasing these buttons, the time set will be memo-
rised,butyoustillhaveanother3secondstocontinueyour
modification.
Any changes to the time can be made by pressing button
randholdingit down, until the timeappears back on the
display and then pressing button sor t. Upon releas-
ingthese buttons, the timeset will be memorised,and you
stillhave another 3 secondstocontinueyourmodification.
The oven light
Setthe function selector “B” tothe 8 symbol toturniton.It
lightstheovenandstaysonwhenanyoftheelectricalheating
elementsin the oven come on.
Pleaseremember that once cooking isover, the oven light
willstayon until the function selector “B”is set back to posi-
tion0or until the oven has cooled down sufficiently.
Cookingwithout the Programmer
Whenfunctionselector“B”isin position0,temperaturecon-
trol “C” and buttons o, p, qand tare disabled.
Set the function selector “B” to the desired cooking mode
andtherecommendedcookingtemperaturewillappearon
the display (which is independent from the position of
the temperature control “C”).
Ifthevalueofferedisnottheoneyourequire,youcanchange
thetemperature, 10° ata time, byturning the temperature
control“C”.
Eachcookingmodeis alsoassociatedwitharecommended
cooking time, which can be decreased down to 2 min or
increased up to 9h59min, by pressing the pbutton, fol-
lowed by sand/or t. Upon releasing button oor ,
the cooking time set will be memorised, but you still have
another3 secondstocontinue yourmodification.
Keepin mind that, in the case of nonprogrammedcooking,
thesetcookingtimedoesnotincludethetimerequiredforthe
oventoheatup to the appropriate temperature.
Notice:the cooking start will automaticallybepostponedby
2 minutes when you press the qbutton. To cancel this
setting,set thefunctioncontrol“B”backtoposition0.
Tostart cooking, press theo:button.for safety reasons,if
you fail to do the above within one minute after you have
setthefunctioncontrol “B”, theword-ENDwill come up on
thedisplay and the buttonswill be disabled. Toenable the
buttonsagain,justsetthefunctioncontrol“B”back to posi-
tion0.
Oncecookinghasstarted,theovenbeginsthepre-heating
phase, during which icon mflashes on the display and
thecooking temperature set comesuptoo.
Whenit is reached,you will hearthree consecutive beeps
andiconmwill come on permanently. Now you can place
thefoodtobecookedinside the pre-heated oven.
Note:The pre-heating phaseis not foreseenfor the FAST
COOKING and GRILL modes, and the oven will
consequentlystartcookingimmediately after button ois
pressed.
Pleaseremember that when cooking isunderway,youcan
always:
• modifythe cookingmode(byturning the functioncontrol
“B”) without this affecting the temperature andcooking
timeset;
• Checkthe selected temperature bypressingbutton t.
• modifythetemperature(byturningthetemperaturecontrol
“C”);
• modify the cooking time (by pressing button pand
hen sor tto increase or decrease the amount of
time).
• stop it at any time by setting the function selector “B”
back to 0.
When the set cooking time is up, a buzzer will sound, and
will stop doing so after 1 minute or if you press any button
whatsoever.The word -END will appear, the control panel
and the temperature control “C” will be disabled until the
functionselector “B”issetto position0.

8
The Controls
Keep warm phase
Tokeep food you have just cooked warm, the oven keeps
theinternalfan on at the end of all cooking modes that fore-
seetheuse of the fan. The forcedcirculationof air will stop
when knob “B” is set to position 0 or when the oven has
cooleddown.
The Cooking Modes:
Convection
Position the temperature selector “C” between 40°C and
250°C.
Thetopandbottomheatingelementsareused.Inthismode,
the coolest part of the oven is the centre. The convection
ovenisbestforcookingdishesmadeupofseveralingredi-
ents,e.g. tender veal strips with rice, braised meats,stews,
goulash etc.) and dishes that need to cook slowly and re-
quirebasting ortheadditionof liquidandcookingusing cov-
ered casserole dishes for oven baking. When cooking in
convection mode, only use one baking tray or shelf at a
time,otherwise the heatdistribution will beuneven. Using
the different shelf position available, you can balance the
amountof heatbetweenthetop and thebottomofthe oven.
Select from among the various shelf positions based on
whether the dish needs more or less heat from the top.
Fan Mode
Position the temperature control “C”: between 40°C and
250°C.
Therearheatingelementandthefancomeon,guaranteeing
delicateheatdistributeduniformly throughouttheoven.
Thismode is ideal for baking and cooking delicate foods -
especiallycakes that need torise - and forthe preparation
ofcertaintartletson3shelvesatthesametime.Hereare a
few examples: cream puffs, sweet and savoury biscuits,
savourypuffs,Swissrollsandsmall portions of vegetables
augratin,etc…..
“Fast cooking” Mode
Position the temperature control “C”: between 40°C and
250°C.
Allthe heatingelementsandthe fancomeon,guaranteeing
constantheatdistributeduniformlythroughouttheoven.
Thismodeisespeciallyrecommendedforcookingpre-packed
foodquickly (as pre-heating is not necessary), suchas for
example: frozen or pre-cooked food) as well as for a few
“home-made”dishes.
Thebestresultswhencookingusingthe“Fastcooking”mode
areobtainedif you use one cookingshelf only (the second
from the bottom), please see the table entitled “Cooking
Advice”.
Multi-cooking Mode
Position the temperature control “C”: between 40°C and
250°C.
Alltheheatingelementsandthefan,will comeon.Since the
heatremainsconstantand uniformthroughoutthe oven,the
aircooksand browns food uniformly over its entire surface.
With this mode, you can also cook various dishes at the
sametime,aslongastheir respectivecookingtemperatures
arethe same. A maximum of 2 shelvescan be used at the
sametime,followingtheinstructionsinthesectionentitled:
“CookingOnMoreThanOneShelf”.
ThisMulti-cookingmodeisparticularlyrecommendedfordishes
requiringa gratin finish or for those requiringconsiderably
prolonged cooking times, such as for example: lasagne,
pastabakes, roast chicken and potatoes,etc… Moreover,
theexcellent heatdistributionmakes itpossibletouse lower
temperatureswhen cooking roasts. This resultsinlessloss
ofjuices, meat which is moretender and a decreasein the
lossofweightfortheroast.TheMulti-cooking modeisespe-
ciallysuited forcookingfish,which canbepreparedwith the
additionof a limited amount of condiment, thus maintaining
theirflavourandappearance.
TheMulti-cooking mode is also perfectforbakingleavened
cakes.
Moreover,this mode canalsobeused to thawquicklywhite
orredmeat and bread by setting the temperature control to
80 °C. Defrosting - this mode can be used to thaw more
delicate foods, set the temperature control to 60°C or use
onlythecoldaircirculationfeaturebysettingthetemperature
controlto0°C.
Pizza Mode
Position the temperature control “C”: between 40°C and
250°C.
The bottom and circular heating elements, as well as the
fan,will come on. Thiscombination rapidly heats theoven
due to the large amounts of power used by the appliance
(2800 W), which results in the production of considerable
heatcomingmostlyfromthebottom.
Thepizzamodeisidealforfoodsrequiringhightemperatures
tocook, like pizzas and large roasts. Only use one baking
tray or shelf at a time. However, if more than one is used,
these must be switched halfway through the cooking
process.
Grill
Positionthetemperature control “C”:between 1 and 5.
(1being the minimum setting and5beingthemaximum).
Thetop centralheatingelementand the rotisseriecomeon.
Theextremelyhighand directtemperatureofthegrill makes
it possible to brown the surface of meats and roasts while
locking in the juices to keep them tender. The grill is also
highlyrecommendedfordishes thatrequirea hightempera-
tureonthe surface: beef steaks, veal, rib steak, filets, ham-
burgersetc...
Alwaysleave the ovendoor ajar duringcooking, except
whenusingthe rotisserie.
Somegrillingexamplesareincludedin the“CookingAdvice”
section.
Fan Grilling Mode
Position the temperature control “C”: between 40°C and
250°C.
Thetop central heating element,the fan and therotisserie
comeon.
Thiscombination of features increases the effectiveness of
theunidirectionalthermal radiation of the heating elements
throughforcedcirculationoftheairthroughouttheoven.This
helpspreventfoodfromburningonthesurface, allowingthe
heat to penetrate right into the food. Excellent results are
achieved with kebabs made with meats and vegetables,
sausages,ribs,lambchops,chickeninaspicysauce,pork
chops,swordfish,tuna steaks etc.
Allcookingusingthe“Gratin”mustbedonewiththeoven
doorshut.

9
The Controls
Burn-freesystem
Whenusingtherotisserie,rememberthat the oven is fitted
witha special system which allows the food to continue to
rotate even when the cooking time is up. This will prevent
thethermalinertia of the oven from affecting in any way the
qualityof thefoodcookedin rotisseriemode.
Please remember that once cooking is over, the spit will
continuetorotateuntil thefunctionselector “B”isset backto
position0oruntiltheovenhascooleddownsufficiently.
Minute Minder Feature
Thetimer can onlyoperate with theoven switched offand
thefunction selector “B”settoposition0.
Pleaserememberthatthe timerdoesnot controlthestarting
or stopping of the oven, it merely sounds a buzzer when
the time is up and can be interrupted at any time just by
pressinganybutton.
To set the timer, briefly press button rand then make
adjustments using sor t.
Uponreleasingbuttonsor t,the time set is memorised
but you still have another 3 seconds to continue making
any changes. The display will reset to show the time and
countdown will begin immediately. The nicon will remind
youtheMinuteMinderison.
Once the countdown is over, a buzzer will sound, and will
stopdoing so after1minuteor if youpressanybuttonwhat-
soever.
Please remember that the countdown is reset and the n
iconcomes offoncecookingstarts.
Buzzervolume
The volume of the buzzer can be adjusted, either with the
ovenswitched off or evenduring cooking, just bypressing
buttonsuntil you attain the desired tone.
How to set a programme to automatically switch off
andon:
Toprogramme the cooking mode, followthe instructions below:
•selectthe cookingmodebyturning functionselector“B”,
andturnthetemperature control“C”torequired setting.
•selectthe cooking time by pressing buttonp.Therec-
ommendedcooking time will appear on the display, and
it can be altered by pressing sor tuntil the desired
cookingtime comes up. Upon releasingthebuttons,the
cooking time set will be memorised, but you still have
another3secondstocontinueyourmodification.Remem-
berthat, in thiscase,thevalue entered alsoincludesthe
timerequired for the oven toreachthedesiredtempera-
ture.
•selectthe end cooking time by pressing buttonq. The
currentend cooking time is displayed. This is calculated
byaddingthecooking time previously set to the current
time. Press button sor tuntil the display shows the
timeyou want the foodto be ready. Uponreleasing the
buttons,the end cookingtimesetwill be memorised,but
youstill haveanother3seconds to continueyourmodifi-
cation.
•press button oto activate the programme. For safety
reasons, if button ois not pressed within one minute
afteryou have set function selector“B”,the word -END
willcomeupon the display and the buttons willbedisa-
bled.To enablethebuttonsagain, just setknob“B”back
toposition 0.
When awaiting a delayed start, indicated by icon “A”/
”Auto”, the display will remind you of the end cooking
timealternatedwiththetemperatureset.Duringthiswait,
you may not make any changes to the settings made
exceptfor thosepertainingtothe temperatureandcook-
ingmode.
Note: ifthe oven is alreadyhot, the light andthe fan on
theinsidewillstay onuntilit hascooleddown sufficiently.
Tocancel a cookingschedule already programmed
Tocancel any programming you have made, setthe func-
tionselector “B”to position “0”.
The cancellation will be confirmed by the word -OFF that
appears for 3 seconds on the display.
Coolingventilation
In order to cool down the exterior of the appliance, some
models are equipped with a cooling fan which comes on
automaticallywhenthe oven is hot.
Whenthe fan ison,anormal flow ofaircanbeheard exiting
betweentheoven door and the controlpanel.
Note: When cooking is finished, the fan stays on until
the oven cools down sufficiently.
Note: In “Fast Cooking” mode, the fan comes on
automaticallyonlyoncetheovenis hot.
Notice:theappliance isfittedwithadiagnosissystemwhich
detectsanymalfunctions.Theuseris informed of the latter
bymessagessuch as “Fn Fm” that comeupon the display
(
nandm = singledigit numbers
).Inthesecases, you need
tocall for technical assistanceas the oven isfaulty.

10
Cooking Advice
The oven offers a wide range of alternatives which allows
you to cook any type of food in the best possible way.
Withtime youwilllearnto makethebestuse ofthisversatile
cookingappliance and the followingareonlyaguide, which
maybe varied according toyour own personal taste.
Cooking on More Than One Shelf
If you have to cook food on several shelves, use either
the“fan”mode or the “Multi-cooking”mode,astheseare
the only modes that allow you to do so.
When cooking delicate food on more than one shelf, use
the“fan”mode, which allows you to cook on 3 shelves at
thesametime (the 1st, 3rd and 5th from the bottom). Some
examples are included in the “Cooking Chart”.
Whencookingotherfoodonseveralshelves,usethe“Multi-
cooking”mode keeping the followingsuggestionsinmind:
• The oven is fitted with 5 shelves. During fan assisted
cooking,use two of the threecentralshelves;thelowest
andhighestshelvesreceivethehot airdirectlyandthere-
foredelicate foodstuffs could beburntontheseshelves.
• As a general rule, use the 2nd and 4th shelf from the
bottom,placing the foodstuffs thatrequire greater heat
on the 2nd shelf from the bottom. For example, when
cookingmeatroaststogether with other food, place the
roaston the 2nd shelf position from thebottom and the
moredelicate foodonthe4th shelf positionfromthebot-
tom.
• When cooking food that require differing times and
temperatures, set a temperature that is somewhere
betweenthe two temperatures required, place the more
delicate food on the 4th shelf position from the bottom
andtake thefoodrequiringless timeoutofthe ovenfirst.
• Usethe baking tray on the lower shelf position and the
shelfontheupper;
Using the “Fast Cooking” Mode
Functional,fast and practical for thoseof you who use
frozenorpre-cookedfoodalongwithotherfooditems.You
willfinduseful suggestions in the “Cooking Chart” .
Using the Grill
The“7Chefs”ovenoffersyouseveraldifferentgrillingmodes.
Use the “grill” mode, with the oven door ajar, placing
thefoodin the centre of thegrill pan (situated on the3rdor
4th shelf from the bottom).
When using this mode, we recommend you set the tem-
peraturecontrolto the highest setting. Lower temperatures
canalso be set,simplybysetting the temperaturecontrolto
thetemperaturerequired.
Setting “Fan grilling”,isextremelyuseful forgrilling foods
rapidly, as the distribution of heat makes it possible not
only to brown the surface, but also to cook the bottom
part.
Moreover, it can also be used for browning foods at the
end of the cooking process, such as adding that gratin
finish to pasta bakes.
When using this mode, place the shelf on the 2nd or 3rd
shelfposition from the bottom (see cooking table) then, to
preventfatandgreasefromdrippingontothebottomofthe
ovenand thus smoke from forming,place a baking trayon
the1st shelf positionfromthebottom.
Important: always cook in “Fan grilling” mode with
the oven door shut. This will allow you both to obtain
excellent results and to save on energy (approximately
10%).
When using this mode, we advise you to set the tempera-
ture control to 200°C, as it is the most efficient way to use
the grill, which is based on the use of infrared rays. How-
ever, this does not mean you cannot use lower tempera-
tures, simply by adjusting the thermostat knob to the de-
siredtemperature.

11
CookingFish and Meat
When cooking white meat, fowl and fish, use temperature
settingsfrom180 °C to 200 °C.
Forredmeat that should be welldone on the outside while
tenderandjuicyintheinside,itisagoodideatostartwitha
hightemperaturesetting(200°C-220°C)forashorttime,then
turntheoven down afterwards.
In general, the larger the roast, the lower the temperature
setting.Placethemeatonthe centre of the shelf and place
thegrillpan/bakingtraybeneathittocatchthefat.
Makesurethattheshelfisinsertedsothatitisinthecentreof
the oven. If you would like to increase the amount of heat
frombelow,usethelowshelfpositions.
CookingPizza
For best results when cooking pizza, use setting for “
Pizza Mode”:
• Preheattheoven for at least 10 minutes
• Usea light aluminium pizza pan, placing it on the shelf
supplied with the oven. If the baking tray is used, this
will extend the cooking time, making it difficult to get a
crispycrust;
• Donot open the oven doorfrequently while the pizzais
cooking;
• If the pizza has a lot of toppings (three or four), we
recommend you add the mozzarella cheese on top
halfwaythroughthe cooking process.
• If cooking on more than one shelf (up to 2), we advise
you to use the Multi-cooking Mode as the Pizza Mode
would heat the bottom shelf more than the others.
Cooking Advice
BakingCakes
When baking cakes, always preheat the oven. Make
sure you wait until the oven has preheated thoroughly.Do
not open the oven door during baking to prevent the cake
fromdropping.In general, if:
Cooked well on the inside but sticky on the
outside
Use less liquid, lower the temperature, and increase
the cooking time.
The pastry sticks to the pan
Grease the pan well and sprinkle it with a dusting of
flour or use greaseproof paper.
Pastry is too dry
Increase the temperature by 10°C and reduce the
cooking time.
Pastry dropped
Use less liquid or lower the temperature by 10°C.
Pastry is too dark on top
Place it on a lower rack, lower the temperature, and
increase the cooking time.
I used more than one level (in the function
"ventilated oven") and they are not all at the same
cooking point
Use a lower temperature setting. It is not necessary to
remove the food from all the racks at the same time.
Pastry has dropped
Placeiton a lowershelf,lower the temperatureand
It is cooked well on the inside but sticky on the
Usea lowertemperature setting. Itis notnecessary toremove
thefood from all the shelves at thesame time.
You used more than one shelf (in the fan assisted oven
mode) and they are not all at the same cooking point.

12
Cooking Chart
Setting made Type of food Weight
(in kg) Position of
the rack from
the oven
bottom
Preheating
time (min.) Thermostat
setting Cooking
time
(min.)
1 Traditional
a
Duck
Roast veal or beef
Pork roast
Biscuits (short pastry)
Tarts
1
1
1
-
1
3
3
3
3
3
15
15
15
15
15
200
200
200
180
180
65-75
70-75
70-80
15-20
30-35
2 Baking
u
Tarts
Fruit cakes
Plum cake
Sponge cake
Stuffed pancakes (on 2 racks)
Small cakes (on 2 racks)
Cheese puffs (on 2 racks)
Cream puffs (on 3 racks)
Biscuits (on 3 racks)
Meringues (on 3 racks)
0.5
1
0.7
0.5
1.2
0.6
0.4
0.7
0.7
0.5
3
2/3
3
3
2-4
2-4
2-4
1-3-5
1-3-5
1-3-5
15
15
15
15
15
15
15
15
15
15
180
180
180
160
200
190
210
180
180
90
20-30
40-45
40-50
25-30
30-35
20-25
15-20
20-25
20-25
180
3 Fast
cooking
v
Frozen food
Pizza
Courgette and prawn pie
Country style spinach pie
Turnovers
Lasagne
Golden Rolls
Chicken morsels
0.3
0.4
0.5
0.3
0.5
0.4
0.4
2
2
2
2
2
2
2
-
-
-
-
-
-
-
Max
200
220
200
200
180
220
12
20
30-35
25
35
25-30
15-20
Pre-cooked food
Golden chicken wings 0.4 2 - 200 20-25
Fresh Food
Biscuits (short pastry)
Plum cake
Cheese puffs
0.3
0.6
0.2
2
2
2
-
-
-
200
180
210
15-18
45
10-12
4 Multi-
cooking
b
Pizza (on 2 racks)
Lasagne
Lamb
Roast chicken + potatoes
Mackerel
Plum cake
Cream puffs (on 2 racks)
Biscuits (on 2 racks)
Sponge cake (on 1 rack)
Sponge cake (on 2 racks)
Savoury pies
1
1
1
1+1
1
1
0.5
0.5
0.5
1.0
1.5
2-4
3
2
2-4
2
2
2-4
2-4
2
2-4
3
15
10
10
15
10
10
10
10
10
10
15
230
180
180
200
180
170
190
180
170
170
200
15-20
30-35
40-45
60-70
30-35
40-50
20-25
10-15
15-20
20-25
25-30
5 Pizza
w
Pizza
Roast veal or beef
Chicken
0.5
1
1
3
2
2/3
15
10
10
220
220
180
15-20
25-30
60-70
6 Grill
d 2
Soles and cuttlefish
Squid and prawn kebabs
Cod filet
Grilled vegetables
Veal steak
Cutlets
Hamburgers
Mackerels
Toasted sandwiches
1
1
1
1
1
1
1
1
n.° 4
4
4
4
3/4
4
4
4
4
4
-
-
-
-
-
-
-
-
-
5
5
5
5
5
5
5
5
5
8-10
6-8
10
10-15
15-20
15-20
7-10
15-20
2-3
With rotisserie (where
present)
Veal on the spit
Chicken on the spit
Lamb on the spit
1.0
1.5
1.0
-
-
-
-
-
-
5
5
5
80-90
70-80
70-80
7 Gratin
e x
Grilled chicken
Cuttlefish 1.5
1.5 2
210
10 200
200 55-60
30-35
With rotisserie (where
present)
Veal on the spit
Lamb on the spit
Chicken (on the spit) +
potatoes (roasted)
1.5
1.5
1.5
-
-
-
-
2
10
10
10
10
200
200
200
200
70-80
70-80
70-75
70-75
N.B.: cooking times are approximate and may vary according to personal taste. When cooking using the grill or
gratin, the dripping pan must always be placed on the 1st oven rack from the bottom.
Cooking
Function Shelf position
from bottom of
the oven.
Convection
(on 2 shelves)
(on 2 shelves)
(on 2 shelves)
(on 3 shelves)
(on 3 shelves)
(on 3 shelves)
(on 2 shelves)
(on 2 shelves)
(on1 shelf)
(on 2 shelves)
(on 2 shelves)
NB.Thecooking times shownin this chartare approximate andmayvary accordingtopersonal taste.
Fan
Fangrilling

13
Care and Cleaning
Beforcarryingoutanycleaningandmaintenancetoyour
applianceyoumustdisconnectitfromthepowersupply.
Insidethe oven
Werecommend you clean youroven each time youuse it,
especiallyaftercookingroasts.Infact,itisadvisabletoprevent
foodresiduefrombuildingupduringcooking:theresiduewould
be re-cooked each time the oven is used and would char
andreleasesmokeandunpleasant odours.
Oven exterior
Cleanthe enamelled or stainless steel exterior surfaces of
your oven using a sponge soaked in soapy water, making
sureyourinseanddrythesethoroughly,withoutusingabrasive
orcorrosiveproductswhichcoulddamagethem.
Stainlesssteel
Rinsestainlesssteelpartsanddry themthoroughlyusinga
soft cloth. Use a specific non-abrasive product to remove
tougherstains,
DONOTusealuminiumfoiltoline thebottomoftheoven.
Toavoidhavingtocleanthebottomoftheoven,youmaybe
temptedtolineitwithsomealuminiumfoil.Westronglyadvise
againstthis. The aluminiumfoil sheet in directcontact
withtheheated enamelcoating couldmeltand damage
theenamelcoating insidethe ovenirreversibly.
Cleaningtherotisserie andotheraccessories
The rotisserie can be removed completely thanks to the 2
wingnuts.Theelementscomprisingtherotisserieassembly
shouldbecleanedtogetherwiththeotheraccessories(dripping
pan, grid) in the sink using a damp sponge and ordinary
detergentoreveninyourdishwasher.
Rubber Seal
Thereisarubber sealsurroundingtheovenopening which
guaranteesitsperfectfunctioning. Checktheconditionofthis
seal on a regular basis. If necessary, clean it using warm
wateranddrythoroughly.
DONOTuseabrasiveproductsorobjectstodoso. Should
thesealbecomedamaged,pleasecontactHotpointService
(see KEY CONTACTS, back page). We recommend you
avoidusingtheovenuntilithasbeenrepaired.
Replacing the Oven Lamp
• Disconnect the oven from the power supply by means
ofthe omnipolar switchusedtoconnect the applianceto
theelectrical mains;orunplugthe applianceiftheplug is
accessible.
• Removetheglasscoverofthelamp-holder;
• Remove the lamp and replace with a lamp resistant to
hightemperatures(300°C) with the following character-
istics:
- Voltage:230/240V
- Wattage 25W
- TypeE14
• Replacethe glass cover and reconnect the ovento the
power supply.
Disassembling the oven door
The oven door can easily be removed to clean the space
betweenthe bottomofthedoor andthefrontof theoven.To
disassemblethedoor,proceedasfollows:
-opentheovendoorfully,
-liftupandturnthesmallleverssituatedonthetwohinges,
-shutthedoor,butnotcompletely,
-grip the door on the two external sides and pull it towards
you,pullingitoutofitsseat.
Reassemblethedoor by following the aboveprocedures
inreverseorder.
132

14
Theappliance must be installed onlyby a qualified per-
son in compliance with the instructions provided. The
manufacturerdeclinesallresponsibility forimproperinstalla-
tion which may harm persons and animals and damage
property.
Important: Thepowersupplyto the appliance must be cut
offbefore any adjustments ormaintenanceworkisdone on
it.
Installation of Built-in Ovens
Inorder to ensure that the built-in appliance functionsprop-
erly,thecabinetcontainingitmustbeappropriate.Thefigure
belowgives thedimensionsofthe cut-outforinstallationun-
derthecounterorina wall cabinet unit.
In order to ensure adequate ventilation, the back panel of
thecabinetunitmustberemoved.Installingthe ovensothat
itrestsontwo strips of wood is preferable. Iftheovenrests
ona continuous, flat surface,there must be anaperture of
at least 45 x 560 mm.
Thepanelsoftheadjacentcabinetsmustbemadeofheat-
resistantmaterial. Inparticular,cabinetswith a veneerexte-
rior must be assembled with glues which can withstand
temperaturesofup to 100 °C.
In compliance with current safety standards, contact with
theelectricalpartsof the oven must not be possibleonceit
hasbeeninstalled.
Allparts which ensure the safe operation of the appliance
mustbe removable onlywith the aidof a tool.
Forthecorrectcentringofyour appliance,positionthe4tabs
onthe sides of the ovenincorrespondencewiththe4 holes
ontheperimeteroftheframe. Inparticular,ifthecabinetside
panel:
•is 20 mm thick: the removable part of the tab must be
removed(Fig.A);
•is18mmthick: use the first groove, which isfactory-set
(Fig.B);
•is16mm thick: use the second groove (Fig.C)
Fig.A Fig. B
Fig.C
To fasten the oven to the cabinet, open the door of the
oven and attach it by inserting the 4 wood screws into the
4 holes located on the perimeter of the frame.
595 mm.
595 mm.
24 mm. 545 mm.
5 mm.
567 mm.
23 mm.
593 mm.
45 mm.
558 mm.
N.B.: Installation in compliance with the consumption declaration
595 mm.
595 mm.
24 mm. 545 mm.
5 mm.
567 mm.
23 mm.
575-585 mm.
558 mm.
595 mm.
45 mm.
min.
45 mm.
min.
560 mm.
45 mm.
Installation

15
Thisapplianceconforms to the following EEC Directives:
LowVoltageEquipment
73/23/EEC
93/68/EEC
ElectromagneticCompatibility
89/336/EEC
93/68/EEC
Inner dimensions of the oven:
width 43.5cm
depth 40.0cm
height 32.0cm
Voltage and frequency of power supply:
230-240V
50-60Hz
2250-2400W
ENERGY LABEL
Directive 2002/40/EC on the label of electric ovens
NormEN50304
Energyconsumption for Natural convection
heating mode: aConvection
DeclaredenergyconsumptionforForcedconvectionClass
heatingmode:uFan
Electrical Connection
Electrical connection
The electrical connection to the mains must be made on
the appliance. The power voltage and frequency are as
indicated on the rating plate.
WARNING:THIS APPLIANCE MUST BE EARTHED.
Mounting the power supply cable
Toopen theterminalboard:
•Usingascrewdriver,presson the tabs situated on each
side of the terminal board cover.
•Pull open the terminal board cover.
To mount the power supply cable, proceed as follows:
•Unscrewthecableclampscrewandthecontactscrews
L-N-6.
• Fastenthewiresbeneaththescrewheadsusingthefollowing
colourscheme:Blue(N)Brown(L)Yellow-Green6
• Fasten the power supply cable in the corresponding
cable clamp and close the cover.
ElectricalConnection:
Voltage Frequency:230V-1+N 50Hz
Fuse Section: 16A
Supplycable: 3x1.5mm2
You can connect your oven to the system means of a
terminalboard. Refer to above information for the
minimal cable sections and the calibration of the
protective elements according to the connection.
If the appliance is installed with a junction box, an
omnipolar circuit breaker - with a minimum contact
opening of 3mm - should be installed between the
applianceand the mains.
Power cable supply connection to the electrical
mains:
We recommend you use a power supply cable which is
longenough to allow you to take the oven out of its recess
in the event of maintenance operations (only use HAR - H
05- RRF quality cablesfitted with a plugconforming to the
regulationsin force.
The plug must be accessible at all times.
Unplug the appliance before all operations, even when
replacing the oven lamp.
Using the appliance without correct earthing is highly
dangerous.
IMPORTANT:
Afterconnectingthe appliance to the flexiblecable, tighten
all the screws on the terminal board.
42
NL

195.039.635.01 September 2003 Part no. FP142 - 01
Over 1200 trained specialists, directly employed by us, ensure that you can have complete confidence in
both the appliances and services we offer.
Repair Service and Information Desk
UK: 08709 066 066
(Open 8 to 8 Mon - Fri, 8 to 6 Sat, 10 to 4 Sun & Bank Holidays)
www.theservicecentre.co.uk
Republic of Ireland: 1850 302 200
Note: Our operators will require the following information:
Modelnumber:
Serialnumber:
Extended Warranties
UK: 08709 088 088
(Open 8 to 8 Mon - Sun)
www.theservicecentre.co.uk
Republic of Ireland: 1850 502 200
Genuine Parts and Accessories
UK: 08709 077 077
(Open 8-30 to 5-30 Mon - Fri & 9 to 12 Sat)
www.theservicecentre.co.uk
Republic of Ireland: (01) 842 6836
General Domestic Appliances Limited, Morley Way, Peterborough, PE2 9JB.
Key Contacts
After Sales Service
Table of contents
Other Creda Oven manuals

Creda
Creda EUROPA S230G Technical manual

Creda
Creda HB48164 Product guide

Creda
Creda HB48428 User manual

Creda
Creda D010E Guide

Creda
Creda HB49124 User manual

Creda
Creda C80BISMFBL User manual

Creda
Creda HB49134 Quick guide

Creda
Creda WRIGHTON 48165 Quick start guide

Creda
Creda SO11GB User manual

Creda
Creda S036E User manual

Creda
Creda Single Oven Product guide

Creda
Creda HBE230 Product guide

Creda
Creda C60CDOW User manual

Creda
Creda S077EE User manual

Creda
Creda REFLECTION Operating and maintenance manual

Creda
Creda 49134 Product guide

Creda
Creda HB48293 User manual

Creda
Creda Double Oven Parts list manual

Creda
Creda Continental User manual

Creda
Creda HB48423 User manual