CULLMANN CUlight FR 36S User manual

FR 36S
for Sony
FR36_BDA_Sony 171005.indd 27 06.10.2017 15:13:25

2928
Foreword
Thank you for purchasing this product.
This CUlight FR 36S camera ash applies to SONY series camer-
as and is compatible with TTL autoash. With this TTL compatible
ash, your shooting will become simpler. You can easily achieve
a correct ash exposure even in complex light-changing environ-
ments. This camera ash features:
• GN36 (m ISO 100, @105mm).
• Fully support Sony TTL camera ash. Workable as Master or
Slave unit in a wireless ash group.
• With built-in 2.4GHz wireless remote system to support trans-
mitting and receiving.
• Provided multiple functions, include manual ash, multi ash,
HSS (up to 1/8000s), second curtain sync, FEC, etc.
• Support with firmware upgrade
ForYour Safety
Always keep this product dry. Do not use in rain or in damp
conditions.
This product contains high-voltage electronic parts. Touching
the high-voltage circuit inside it may result in electric shock.
Do not disassemble. Should repairs become necessary, this
product must be sent to an authorized maintenance center.
Stop using this product if it breaks open due to extrusion,
falling or strong hit. Otherwise, electric shock may occur if you
touch the electronic parts inside it.
Do not re the ash directly into the eyes (especially those of
babies) within short distances. Otherwise visual impairment
may occur. When taking pictures for babies, keep the ash unit
at least 1 meter (3.3 feet) away from them. Using bounce ash
to reduce light intensity is also recommended.
Do not use the ash unit in the presence of ammable
gases, chemicals and other similar materials. In certain
circumstances, these materials may be sensitive to the strong
light emitting from this ash unit and re or electromagnetic
interference may result.
Do not leave or store the ash unit in places where the
ambient temperature reads over 50°C (e.g. in automobile).
Otherwise the electronic parts may be damaged.
FR36_BDA_Sony 171005.indd 28-29 06.10.2017 15:13:25

3130
CUlightTTL Camera Flash
Conventions used in this Manual
• This manual is based on the assumption that both the camera
and camera ash’s power switches are powered on.
• Reference page numbers are indicated by “p.**”.
• The following alert symbols are used in this manual:
The Caution symbol gives supplemental information.
The Note symbol indicates a warning to prevent shooting
problem.
Contents
Foreword ....................................28
For Your Safety ...............................29
Name of Parts ................................32
Body ........................................32
Control Panel..................................32
LCD Panel ....................................33
What’s in the Box of CUlight FR 36S? ..............34
Separately Sold Accessories .....................34
Attaching to a Camera.........................34
Power Management...........................35
Flash Mode: TTL Autoash .....................35
TTL Mode ....................................35
FEC: Flash Exposure Compensation.............36
High-Speed Sync ............................36
Second-Curtain Sync ...........................36
Flash Mode – M: Manual Flash ..................37
Flash Mode – Multi: Stroboscopic Flash..........38
Wireless Flash Shooting:
Radio (2.4G) Transmission .....................39
Wireless Settings ..............................39
Setting Master Unit’s Flash Mode .................40
Setting the Communication Channel ...............40
TTL: Fully Automatic Wireless Flash Shooting .......41
M: Wireless Flash Shooting with Manual Flash.......42
Multi: Wireless Flash Shooting with Manual Flash ....42
Other Applications............................44
Auto Focus Assist Beam ........................44
Bounce Flash .................................44
Creating a Catchlight............................45
ZOOM: Setting the Flash Coverage
and Using the Wide Panel .......................45
C.Fn: Setting Custom Functions ................46
Protection Function ...........................47
Firmware Upgrade ............................48
Technical Data................................49
Troubleshooting ..............................50
Compatible Camera Models....................51
Maintenance .................................51
Declaration of Conformity .....................51
FR36_BDA_Sony 171005.indd 30-31 06.10.2017 15:13:25

3332
Name of Parts
• Body
01. Catchlight Panel
02. Built-in Wide Panel
03. Flash Head
04. Optic Control Sensor
05. Hotshoe
06. LCD Panel
07. Lock Ring
08. Battery Compartment
09. USB Port
• LCD Panel
(1) TTL Autoash
Flash mode
(2) M Manual Flash
(3) Multi Flash
(4) Radio Transmission Shooting
• Master Unit
Flash exposure
compensation amount
Zoom: zoom display (Page 45)
TTL: TTL autoash
: High-speed
sync (Page 36)
Focus length
(Page 45)
M: Manual ash
Manual ash output
Multi: Stroboscopic ash
Flash frequency
Number of ashes
Slave
Firing group
Master Channel
05
12
13
14
19
20
11
10
15
• Slave Unit
01
02
08
03
04
• Control Panel
11. <MODE > Mode Selection
Button
12. <ZOOM > Zoom Selection
Button
13. < SYNC> High-Speed Sync
Button
14. <SLAVE> S1/S2 Optic Slave
Triggering Selection Button
(in non-wireless mode)
15. < > Power Switch
16. < > Test Button / Flash
Ready Indicator.
20. Select Dial
21. <SET> Set Button
06
9
07
FR36_BDA_Sony 171005.indd 32-33 06.10.2017 15:13:26

3534
What’s in the Box of CUlight FR 36S?
1. Flash unit 2. Mini stand 3. Protection case 4. Diffuser 5. Instruc-
tion manual
• Separately Sold Accessories
The product can be used in combination with the following
separately sold accessories:
1. CUlight 2.4 GHz Trigger Kit RT 500S & RR 500S
2. CUlight 2.4 GHz Transmitter RT 500S
3. CUlight 2.4 GHz Receiver RR 500S
4. CUlight Softbox Kit with Flashgun Holder SB 40-40 Kit
5. CUlight Softbox Kit with Flashgun Holder SB 60-60 Kit
6. CUlight Light Stand LS 2000 (216 cm)
7. CUlight Light Stand LS 2500 (308 cm)
Attaching to a Camera
1Attach the Camera Flash.
• Slip the camera ash’s
mounting foot into the
camera’s hotshoe all the
way.
2Secure the Camera Flash.
• Rotate the lock ring on
the mounting foot until it
locks up.
3Detach the Camera Flash.
• Rotate the lock ring on the
mounting foot until it is
loosened.
Power Management
Use Power Switch to power the ash unit on or off. Turn off
if it will not be used for an extended period of time. Setting as a
master ash, it will turn the power off automatically after a certain
period (approx. 60 seconds) of idle use. Pressing the camera
shutter halfway or pressing any ash button will wake up the
ash unit. Setting as a slave ash, it will enter sleep mode after
a certain period (adjustable, 60 minutes by default) of idle use.
Pressing any ash button will wake it up.
C.Fn
Disabling Auto Power Off function is recommended
when the ash is used off camera. (C.Fn-ST, Page 46)
Flash Mode:TTL Autoash
This ash has three ash modes: TTL, Manual (M), and Multi
(Stroboscopic). In TTL mode, the camera and the ash will work
together to calculate the correct exposure for the subject and the
background. In this mode, multiple TTL functions are available:
FEC, HSS, second curtain sync, etc.
* Press < MODE > Mode Selection Button and three ash modes
will display on the LCD panel one by one with each pressing.
TTL Mode
Press < MODE > Mode Selection Button to enter TTL mode. The
LCD panel will display < TTL >.
•Press the camera release button halfway to focus.
•When the shutter button is fully pressed, the ash will re a
preash that the camera will use to calculate exposure and ash
output the instant before the photo is taken.
Display “HI”: When the ash output value is up to the maximum
value, “HI” will be displayed and blinking for 3 seconds. Adjust
the camera’s parameters if underexposure appears.
Display “Lo”: When the ash output value is up to the minimum
value, “Lo” will be displayed and blinking for 3 seconds. Adjust
the camera’s parameters if overexposure appears.
FR36_BDA_Sony 171005.indd 34-35 06.10.2017 15:13:26

3736
FEC: Flash Exposure Compensation
With FEC function, this ash can adjust from -3 to +3 in 1/3rd
stops. It is useful in situations where minor adjusting of the TTL
system is needed based on the environment.
Setting FEC:
1Press the SET Button
and the ash exposure
compensation amount will
be highlighted on the LCD
panel.
2Turn the Select Dial to set
the amount.
•“0.3”means 1/3 step,
“0.7”means 2/3 step.
•To cancel the ash expo-
sure compensation, set
the amount to “+0”.
3Press < SET> button again
to conrm the setting.
High-Speed Sync
High Speed Sync (Hss ash) enables the ash to synchronize with
all camera shutter speeds. This is convenient when you want to
use aperture priority for ll-ash portraits.
Press the <SYNC> button to turn on high-speed sync ash and
< > is displayed. Then, adjust the camera’s shutter to achieve
high-speed sync ash.
•With high-speed sync, the faster the shutter speed, the
shorter the effective ash range.
•Multi ash mode cannot be set in high-speed sync mode.
•Over-temperature protection may be activated after 15
consecutive high-speed sync ashes.
Second-Curtain Sync
With a slow shutter speed, you can create a light train following
the subject. The ash res right before the shutter closes.
•Set Sony camera to Rear mode.
M: Manual Flash
The ash output is adjustable from 1/1 full power to 1/128th
power in 1/3rd stop increments. To obtain a correct ash expo-
sure, use a hand-held ash meter to determine the required ash
output.
1Press < MODE> button so
that <M> is displayed.
2Turn the Select Dial to
choose a desired ash
output amount. In
high-speed sync mode, the
adjustable ash range is
1/16~1/1.
Flash Output Range
The following table makes it easier to see how the stop changes
in terms of f/stop when you increase or decrease the ash output.
For example, when you decrease the ash output to 1/2, 1/2-0.3,
or 1/2- 0.7, and then increase the ash output to more than 1/2,
1/2+0.3, 1/2+0.7, and 1/1 will be displayed.
Figures displayed when reducing ash output level
1/41/2
1/1
1/1-0.3
1/2+0.7
1/1-0.7
1/2+0.3
1/2-0.3
1/4+0.7
1/2-0.7
1/4+0.3
······
······
Figures displayed when increasing ash output level
In the M mode, high-speed sync and second curtain sync
functions can be achieved.
Optical S1 Secondary Unit Setting
In M manual ash mode, press the <SLAVE > button so that
this ash can function as an optic S1 secondary ash with optic
sensor. With this function, the ash will re synchronously when
the main ash res, the same effect as that by the use of radio
triggers. This helps create multiple lighting effects.
Optical S2 Secondary Unit Setting
Press the < SLAVE> button so that this ash can also function as
an optic S2 secondary ash with optic sensor in M manual ash
mode. This is useful when cameras have pre-ash function. With
this function, the ash will ignore a single “preash” from the
main ash and will only re in response to the second, actual ash
from the main unit.
•S1 and S2 optic triggering and off camera high-speed
mode are only available in M manual ash mode.
FR36_BDA_Sony 171005.indd 36-37 06.10.2017 15:13:27

3938
Multi: Stroboscopic Flash
With stroboscopic ash, a rapid series of ashes is red. It can be
used to capture a multiple images of a moving subject in a single
photograph.
You can set the ring frequency (number of ashes per sec.
expressed as Hz), the number of ashes, and the ash output.
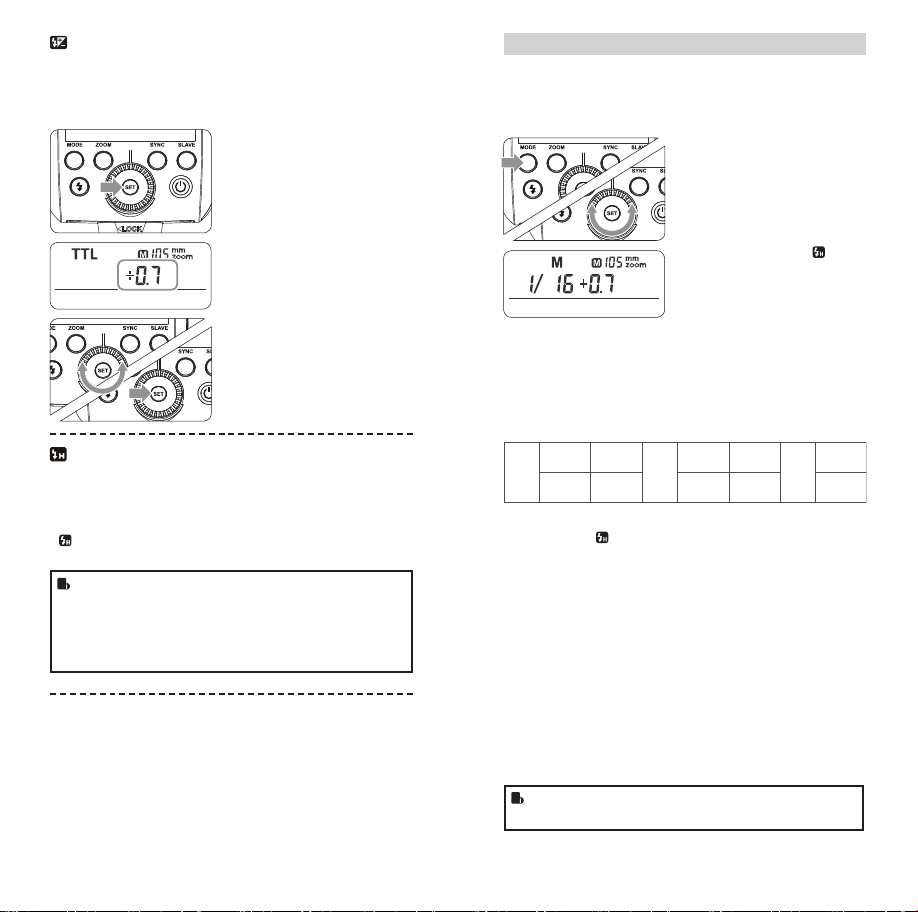
1Long press the < MODE >
button for 2 seconds so that
<Multi > is displayed.
2Turn the Select Dial to
choose a desired ash
output.
3Set the ash frequency and
ash times.
•Press the SET Button to
select the ash frequency.
Turn the Select Dial to set
the number.
•Press the SET Button
again to select the ash
times. Turn the Select Dial
to set the number.
Calculating the Shutter Speed
During stroboscopic ash, the shutter remains open until the
ring stops. Use the formula below to calculate the shutter speed
and set it with the camera.
Number of Flashes / Flash Frequency = Shutter Speed
For example, if the number of ashes is 10 and the ring frequen-
cy is 5 Hz, the shutter speed should be at least 2 seconds.
•To avoid overheating and deteriorating the ash head, do
not use stroboscopic ash more than 10 times in succes-
sion. After 10 times, allow the camera ash to rest for at
least 15 minutes. If you try to use the stroboscopic ash
more than 10 times in succession, the ring might stop
automatically to protect the ash head. If this happens,
allow at least 15 minutes’ rest for the camera ash.
•Stroboscopic ash is most effective with a highly reec-
tive subject against a dark background.
•Using a tripod and a remote control is recommended.
•Stroboscopic ash can be used with“bulb”.
•If the number of ashes is displayed as “--”, the ring
will continue until the shutter closes or the battery is ex-
hausted. The number of ashes will be limited as shown
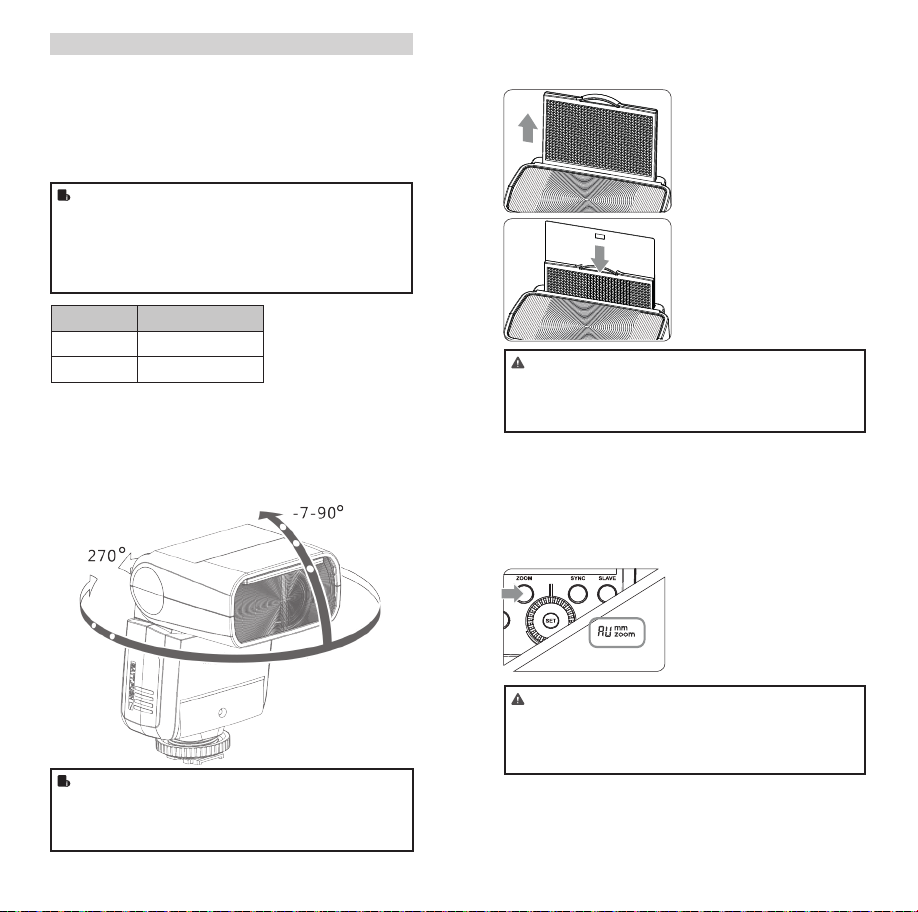
by the following table.
Maximum Stroboscopic Flashes:
1/4
1/8
1/16
1/32
1/64
1/128
1
7
14
30
60
90
90
2
6
14
30
60
90
90
3
5
12
30
60
90
90
4
4
10
20
50
80
90
5
4
8
20
50
80
90
6-7
3
6
20
40
70
90
8-9
3
5
10
30
60
80
10
2
4
8
20
50
70
2
4
8
16
30
40
Hz 60-99
20-50
2
4
8
12
20
40
Flash
output
Wireless Flash Shooting:
Radio (2.4G)Transmission
•You can set up three slave groups for TTL autoash shooting.
With TTL autoash, you can easily create various lighting effects.
•Any ash settings for the slave units on the master ash in TTL
mode will be automatically sent to the slave units. So the only
thing you need to do is to set the master unit for each slave group
without any operation for the slave units at all during the shooting.
•This ash can work in TTL / M/ Multi /OFF ash modes when
set as a master unit.
The CUlight FR 36S ash unit is fully compatible with other items
from the CULLMANN CUlight product range.
As a master unit, CUlight FR 36S can control the following slave
unit models: CUlight FR 60S, CUlight RR 500S
As a slave unit, CUlight FR 36S can be controlled by the follow-
ing master unit models: CUlight FR 60S, CUlight RT 500S
•Even with multiple slave units, the master unit can control
all of them via wireless.
•In this user manual, “master unit” refers to the camera
ash on a camera and “slave unit” will be controlled by
the master unit.
1. Wireless Settings
You can switch between normal ash and wireless ash. For
normal ash shooting, be sure to set the wireless setting to OFF.
Master Unit Setting
1Long Press the < SYNC >
button for 2 seconds so that
< > is blinking. Turn the
Select Dial until the < >
is displayed on the LCD
panel, which means the
master unit.
FR36_BDA_Sony 171005.indd 38-39 06.10.2017 15:13:28

4140
Slave Unit Setting
1Long Press the < SYNC >
button for 2 seconds so that
< > is blinking. Turn the
Select Dial until the < >
is displayed on the LCD
panel, which means the
slave unit.
2. Setting Master Unit’s Flash Mode
1Press the <SLAVE> Button
to choose the group from
M/A/B/C. Then, press the
<MODE > Button so that
the master unit can work
in OFF/TTL/M ash mode.
Choose one of them as the
ash mode of master unit.
2Press the < MODE> Button
for 2 seconds to switch to
Multi mode.
3. Setting the Communication Channel
If there are other wireless ash systems nearby, you can change
the channel IDs to prevent signal interference. The channel IDs of
the master unit and the slave unit(s) must be set to the same.
1Long press the < SLAVE>
Button for 2 seconds until
the channel IDs is blinking.
Turn the Select Dial to
choose a channel ID from
1 to 16.
MODE ZOOM SYNC SLAVE
SET
MODE ZOOM SYNC SLAVE
SET
2Press the < SET> button to
conrm.
4.TTL: Fully Automatic Wireless
Flash Shooting
Autoash Shooting with One Slave Unit
1Master Unit Setting
•Attach a CUlight FR 36S
camera ash on the
camera and set it as the
master unit. (Page 39)
•M/A/B/C can be set as
TTL mode independently.
2Slave Unit Setting
•Set the CUlight FR 36S
that to be controlled as
the wireless slave unit.
(Page 40)
•The slave unit can be set
as A/B/C.
3Check the communica-
tion channel
•If the master unit and slave
unit(s) are set to a different
channel, set them to the
same channel. (Page 40)
4Position the camera and
ashes
•Position the camera and
ashes as the picture
shows. (Page 43)
5Check that the ash is
ready
•Check that the master
ash ready indicator is
lightened.
•Check that the slave
ash ready indicator is
lightened.
6Check the ash operation
•Press the master unit’s
Test Button< >.
•Then, the slave unit will
re. If not, adjust the slave
unit’s angle toward the
master unit and distance
from the master unit.
•The slave unit might be out of order or re an unwanted
ash due to the nearby wi routers or other 2.4G equip-
ments. If in this case, please adjust the ash’s channel or
turn off the 2.4G equipments.
MODE ZOOM SYNC SLAVE
SET
FR36_BDA_Sony 171005.indd 40-41 06.10.2017 15:13:29

4342
5. M:Wireless Flash Shooting
with Manual Flash
This describes wireless (multiple shooting) using manual ash.
You can shoot with a different ash output setting for each slave
unit (ring group). Set all parameters on the master unit.
1Setting the ash mode
to < M>
•Press the < MODE >
Button to set the ash to
M mode.
2Setting ash output
•Turn the Select Dial to set
the ash output of the
groups.
3Taking the picture
•Each group res at the set
ash ratio.
6. Multi:Wireless Flash Shooting
with Manual Flash
1Setting < Multi > strobo-
scopic ash.
•Long press the < MODE >
button for 2 seconds so
that <Multi > is displayed.
Long press the < MODE >
button for 2 seconds again
to exit.
2Setting ash output/ash
frequency/ash times.
•Setting the ash output/
ash frequency/ash
times of the groups in the
M mode. Setting the multi
ash mode. (see Page 38)
•A, B and C group can only
control the ON/OFF of the
slave unit by pressing the
<MODE > Button.
Using a ash (master/slave) with a radio transmission wireless
shooting function make it easy to shoot with advanced wireless
multiple ash lighting, in the same way as TTL autoash shooting.
The basic relative position and operation range are as shown in
the picture. You can then perform wireless TTL autoash shooting
just by setting the master unit to < TTL >.
Slave/Master Unit‘s Positioning and Operation Range
Autoash Shooting with One Slave Unit
•Use the supplied mini stand to position the slave unit.
•Before shooting, perform a test ash and test shooting.
•The transmission distance might be shorter depending
on the conditions such as positioning of slave units, the
surrounding environment and whether conditions.
Transmission distance is about 100m.
Wireless Multiple Flash Shooting
You can divide the slave units into two or three groups and
perform TTL autoash while changing the ash ratio (factor). In
addition, you can set and shoot with a different ash mode for
each ring group, for up to 3 groups.
•Auto Shooting with Two Slave Groups
•Auto Shooting with Three Slave Groups
FR36_BDA_Sony 171005.indd 42-43 06.10.2017 15:13:30

4544
Other Applications
Auto Focus Assist Beam
In poorly-lit or low-contrast shooting environments, the built-in
auto focus assist beam will automatically light on to make it easier
for autofocus. The beam will light up only when autofocus is dif-
cult and get out as soon as the autofocus becomes correct.
If you want to turn off the auto focus assist beam, set the “AF” to
“OFF” on the C.Fn settings.
•If the wall or ceiling is too far away, the bounced ash
might be too weak and result in underexposure.
•The wall or ceiling should be a plain, white color for high
reectance. If the bounce surface is not white, a color
cast may appear in the picture.
•Point the ash head straight ahead and then upward by
90°. The catchlight will not appear if you swing the ash
head left or right.
•For best catchlight effect, stay 1.5m/4.9ft away from the
subject.
Creating a Catchlight
With the catchlight panel, you can create a catchlight in the
subject’s eyes to add life to the facial expression.
1Point the ash head upward
by 90°.
2Pull out the wide panel. The
catchlight panel will come
out at the same time.
3Push the wide panel
back in.
•Push in only the wide
panel.
•Follow the same proce-
dures as for bounce ash.
ZOOM: Setting the Flash Coverage
and Using the Wide Panel
The ash coverage can be set automatically or manually. It can be
set to match the lens focal length from 24mm to 105mm. Also,
with the built-in wide panel, the ash coverage can be expanded
for 14mm wide-angle lenses.
In Manual Zoom mode, press
the < ZOOM > button.
•Turn the Select Dial
to change the ash
coverage.
•If < AU > is displayed, the
ash coverage will be set
automatically.
•If you set the ash coverage manually, make sure it
covers the lens focal length so that the picture will not
have a dark periphery.
•When the low battery indicator is displayed, the ZOOM
can not be adjusted, it will constantly be 24mm.
Bounce Flash
By pointing the ash head toward a wall or ceiling, the ash will
bounce off the surface before illuminating the subject. This can
soften shadows behind the subject for a more natural-looking
shot. This is called bounce ash.
To set the bounce direction, hold the ash head and turn it
to a satisfying angle.
•When not attaching to the camera, the auto focus assist
beam of CUlight FR 36S does not light up.
•When using on digital mirrorless cameras (e.g.
ILCE6000L, a7RII, etc.), the auto focus assist beam of
CUlight FR 36S does not light up.
•Only when using on DSLR cameras (e.g. a99, a77II, etc.),
the auto focus assist beam of CUlight FR 36S does light up.
Position Effective Range
Center 0.6~4m
Periphery 0.6~2.5m
FR36_BDA_Sony 171005.indd 44-45 06.10.2017 15:13:30

4746
Using the Wide Panel
Pull out the wide panel and
place it over the ash head as
shown. The ash coverage will
then be extended to 14 mm.
•The catchlight panel will
come out at the same time.
Push the catchlight panel
back in.
Low Battery Warning
If the battery power is low,
< > will appear and blink on
the LCD panel. Please replace
the battery immediately. When
the low battery indicator is
displayed, the ZOOM can not
be adjusted, it will constantly
be 24mm.
C.Fn: Setting Custom Functions
The following table lists the available and unavailable custom
functions of this ash.
1. Press the < ZOOM > Button for 2 seconds until C.Fn menu is
displayed.
2. Turn the Select Dial to select the Custom Functions.
3. Press the <SET > Button and the Setting No. blinks.
4. Turn the Select Dial to set the desired number. Pressing the
<SET > Button will conrm the settings.
5. Press the <ZOOM> Button to exit.
Protection Function
1. Over-Temperature Protection
•To avoid overheating and deteriorating the ash head, do not re
more than 30 continuous ashes in fast succession at 1/1 full power.
After 30 continuous ashes, allow a rest time of at least 10 minutes.
•If you re more than 30 continuous ashes and then re more
ashes in short intervals, the inner over-temperature protection
function may be activated and make the recycling time over 10
seconds. If this occurs, allow a rest time of about 10 minutes,
and the ash unit will then return to normal.
•When the over-temperature protection is started, is shown on
the LCD panel.
Number of ashes that will activate over-temperature
protection:
Power Output Level Number of Flashes
1/1 30
1/2 +0.7 40
1/2 +0.3 50
1/2 60
1/4(+0.3,+0.7) 100
1/8(+0.3,+0.7) 200
1/16(+0.3,+0.7) 300
1/32(+0.3,+0.7) 500
1/64(+0.3,+0.7) 1000
1/128(+0.3,+0.7)
Number of ashes that will activate over-temperature pro-
tection in high-speed sync triggering mode:
Power Output Times
1/1 15
1/2(+0.3,+0.7) 20
1/4(+0.3,+0.7) 30
1/8(+0.3,+0.7)
1/16(+0.3,+0.7) 40
2. Other Protections
The system provides real-time protection to secure the device
and your safety. The following lists prompts for your reference:
Prompts on
LCD Panel
Meaning
E1 A failure occurs on the recycling system so that the ash
cannot re. Please restart the ash unit. If the problem still
exists, please send this product to a maintenance center.
E2 The system gets excessive heat. Please allow a rest time
of 10 minutes.
E3 The voltage on two outlets of the ash tube is too high.
Please send this product to a maintenance center.
E9 There are some errors occurred during the upgrading pro-
cess. Please using the correct rmware upgrade method.
C.Fn Custom Functions
Custom Func-
tion Signs
Function Setting No. Settings &
Description
ST Auto sleep
(standby)
ON ON
OFF OFF
AF AF-assist beam ON ON
OFF OFF
BL Backlighting
control
10 sec. Off in 10 sec.
OFF Always off
ON Always lighting
FR36_BDA_Sony 171005.indd 46-47 06.10.2017 15:13:31

4948
Firmware Upgrade
This ash supports rmware upgrade through the USB port.
Update information will be released on our ofcial website.
•USB connection line is not included in this product. The
USB port is a standard Micro USB socket. Common USB
connection line is applicable.
Checking the version: Press the <MODE > Button and the turn
the ash on. Then, the rmware update version (e.g. Version 1.0
will read U-1.0) will be displayed on the LCD panel.
Technical Data
Model CUlight FR 36S
• Type
Compatible Cameras Sony DSLR and DSLM cameras
Guide No. (1/1 output @ 105mm) 36 (m ISO 100)
Flash Coverage 24 to 105mm
• Auto zoom (Flash coverage set
automatically to match the lens
focal length and image size)
• Manual zoom
• Swinging/tilting ash head (bounce
ash): 0 to 270° horizontally and -7°
to 90° vertically
Flash Duration (t0.1) 1/350 to 1/20000 seconds
• Exposure Control
Exposure control system TTL autoash and manual ash
Flash exposure compensation (FEC) Manual. FEB: ±3 stops in 1/3 stop
increments (Manual FEC can be
combined.)
Sync mode High-speed sync (up to 1/8000
seconds), rst-curtain sync, and
second-curtain sync
Multi ash Provided (up to 90 times, 99Hz)
• Wireless Flash (2.4G radio transmission)
Wireless ash function Master, Slave, Off
Controllable slave groups 3 (A, B and C)
Transmission range (approx.) ≤30m
Channels 16 (1~16)
• Auto Focus Assist Beam
Effective range (approx.) Center: 0.6~4m
Periphery: 0.6~2.5m
• Power Supply
AA batteries Ni-MH batteries (recommended) or
2*LR6 alkaline batteries
Recycle time Approx. 0.1-2.2 seconds (eneloop
Ni-MH batteries of Panasonic). Red
LED indicator will light up when the
ash is ready.
Full power ashes Approx. 210 (2500mA Ni-MH
batteries)
Power saving Power off automatically after approx.
90 seconds of idle operation. (60
minutes if set as slave)
• Sync Triggering Mode Hotshoe, optic triggering
• Dimensions
W x H x D 140*62*38 mm
Weight without battery 200g
FR36_BDA_Sony 171005.indd 48-49 06.10.2017 15:13:31

5150
Maintenance
•Shut down the device immediately should abnormal operation
be detected.
•Avoid sudden impacts and the product should be dedusted
regularly.
•It is normal for the ash tube to be warm when in use. Avoid
continuous ashes if unnecessary.
•Maintenance of the ash must be performed by our authorized
maintenance department which can provide original accesso-
ries.
•Unauthorized service will void the warranty.
•If the product had failures or was wetted, do not use it until it is
repaired by professionals.
•Changes made to the specications or designs may not be
reected in this manual.
Declaration of Conformity
CULLMANN GERMANY GmbH herewith declares, that this
device is in compliance with the basic requirements and all other
applicable regulations of the directive 1999/5/EC. You nd the
declaration of conformity acc. to the R&TTE directive 1999/5/EC
under www.cullmann.de.
Troubleshooting
If there is a problem, refer to this Troubleshooting Guide.
The Camera Flash cannot be charged.
• The battery is installed in the wrong direction.
Install the battery in the correct direction.
• The camera ash’s internal battery is exhausted.
If < > appears and blinks on the LCD panel, replace the
battery immediately.
The Camera Flash does not re.
• The camera ash is not attached securely to the camera.
Attach the camera’s mounting foot securely to the camera.
• The electrical contacts of the Camera Flash and camera are
dirty.
Clean the contacts.
The power turns off by itself.
• After 90 seconds of idle operation, auto power off took effect if
the ash is set as master
Press the shutter button halfway or press any ash button to
wake up.
• After 60 minutes of idle operation, the ash unit will enter sleep
mode if it is set as slave.
Press any ash button to wake up.
Auto zoom does not work.
• The camera ash is not attached securely to the camera.
Attach the camera ash’s mounting foot to the camera.
The ash exposure is underexposed or overexposed.
• You used high-speed sync.
With high-speed sync, the effective ash range will be
shorter. Make sure the subject is within the effective ash
range displayed.
• You used Manual Flash mode.
Set the ash mode to TTL or modify the ash output.
Photos have dark corners or only parts of the target subject
are illuminated.
• The focal length of lens exceeds the ash coverage.
Check the ash coverage you set. This ash unit has the ash
coverage between 24 and 105mm, which ts medium-format
cameras. Pull the wide panel out to extend the ash coverage.
Compatible Camera Models
This ash unit can be used on the following Sony DSLR camera
models:
α7RII , α7R , α58 , α99 , ILCE6000L
•This table only lists the tested camera models, not all
Sony DSLR cameras. For the compatibility of other cam-
era models, a self-test is recommended.
•Rights to modify this table are retained.
FR36_BDA_Sony 171005.indd 50-51 06.10.2017 15:13:31
Table of contents
Other CULLMANN Camera Flash manuals

CULLMANN
CULLMANN CUlight FR 60F User manual

CULLMANN
CULLMANN D 3500 User manual

CULLMANN
CULLMANN MRF 3500 User manual

CULLMANN
CULLMANN CUlight FR 36 C User manual

CULLMANN
CULLMANN CuLight FR 36MFT User manual

CULLMANN
CULLMANN CUlight FR 60C User manual

CULLMANN
CULLMANN CUlight FR 36F User manual

CULLMANN
CULLMANN 34 AF DIGITAL User manual

CULLMANN
CULLMANN CUlight FR 36N User manual

CULLMANN
CULLMANN CUlight FR 60S User manual