manuals.online logo
Brands
  1. Home
  2. •
  3. Brands
  4. •
  5. curt
  6. •
  7. Automobile Accessories
  8. •
  9. curt 18410 User manual

curt 18410 User manual

CURTMFG.COM •PRODUCT SUPPORT: 877.287.8634 •18410-INS-RA •08/29/2022 •ECN9913 •PAGE 1
Product Registration and Warranty
CURT stands behind our products with
industry-leading warranties. To get copies
of the product warranties, register your
purchase or provide feedback, visit:
warranty.curtgroup.com/surveys
Weight Carrying Capacity
1 bike 45 lbs.
2 bikes 90 lbs.
INSTALLATION MANUAL 18410
Level of Difficulty
Easy
Installation difficulty levels are based on time
and effort involved and may vary depending on
the installer level of expertise, condition of the
vehicle and proper tools and equipment.
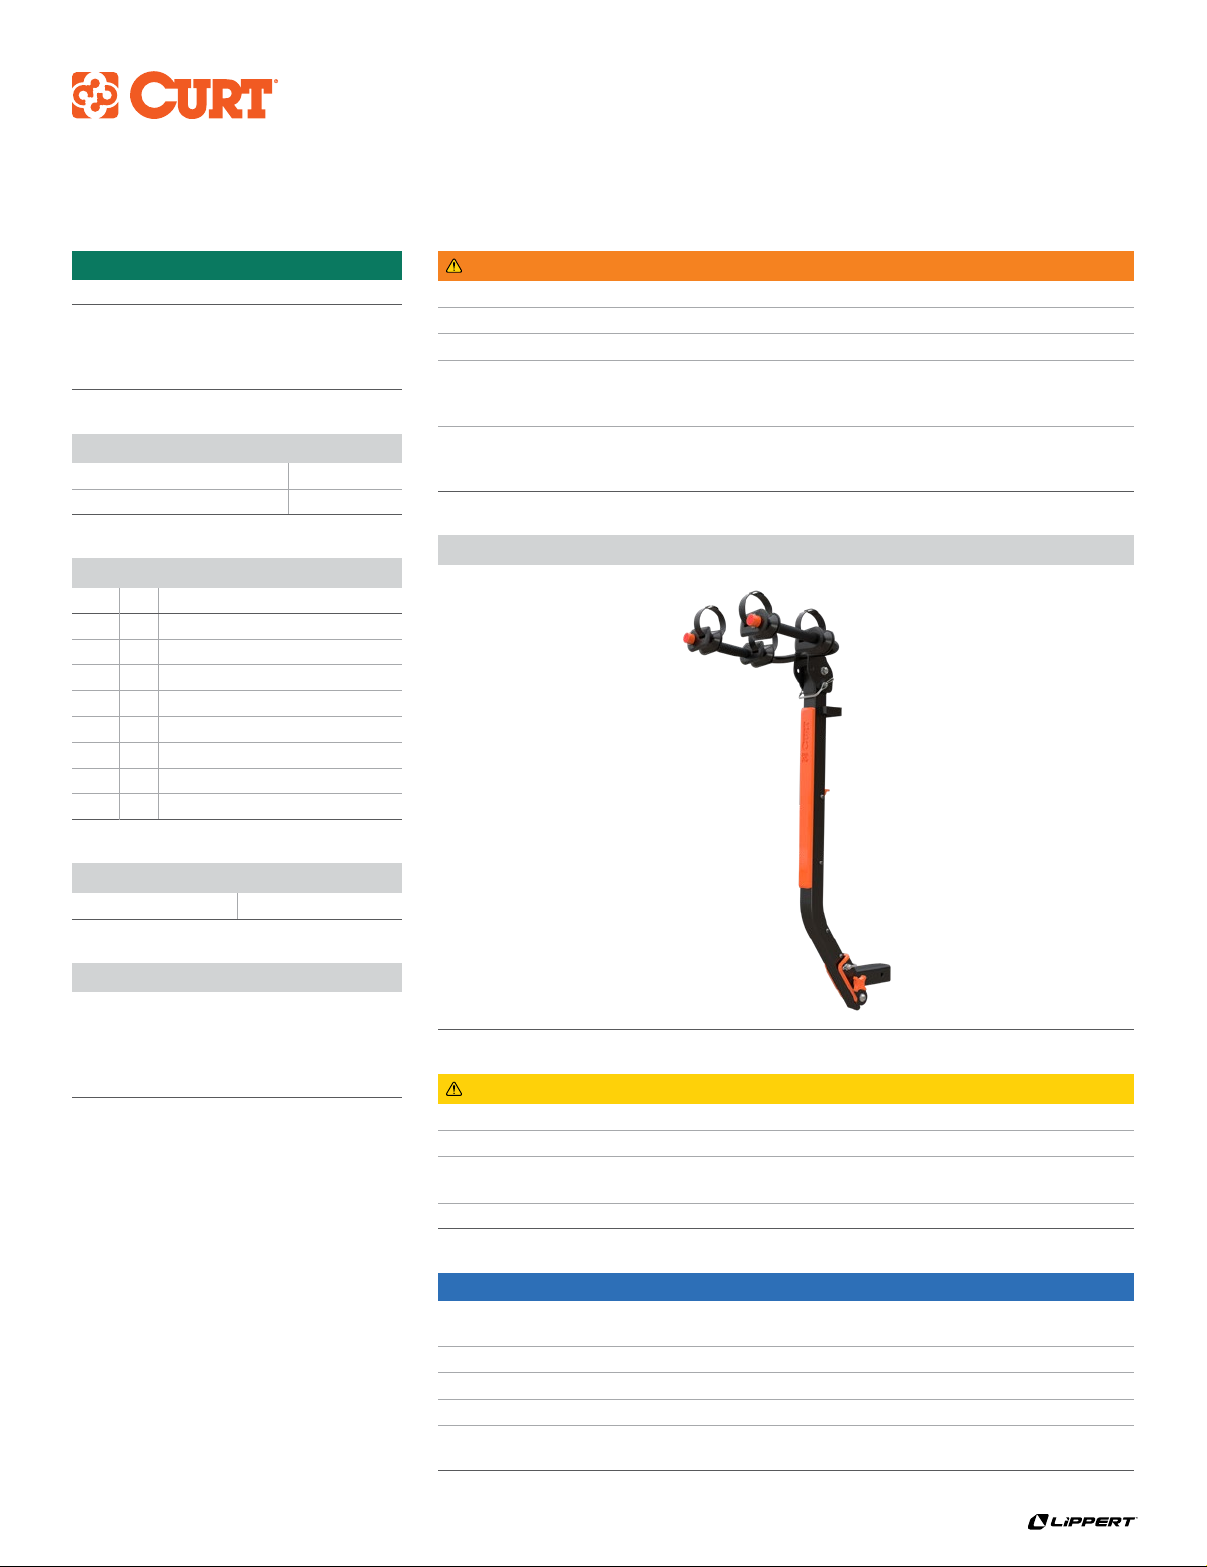
Product Photo
WARNING
Never exceed the vehicle manufacturer's recommended towing capacity.
Never exceed the product's weight capacity.
Do not modify or use this accessory for purposes other than for which it was designed.
It is the user's responsibility to adhere to all state and federal laws regarding
obstruction of vehicle lighting (i.e. brake lights, taillights, turn signals
and backup lights) and license plate when using this accessory.
A support strap is required when the rack is used with an 1-1/4" receiver hitch.
Failure to use a support strap could result in injury and / or property
damage and will void the warranty of the bike rack and trailer hitch.
NOTICE
Visit www.curtmfg.com for a full-color copy of this
instruction manual, as well as helpful videos, guides and much more!
Before you begin installation, read all instructions thoroughly.
Proper tools will improve the quality of installation and reduce the time required.
Remove this accessory before entering automatic car washes.
Periodic inspection of your product should be performed
to ensure all hardware and / or components remain secure.
CAUTION
This product is not designed for off-road use.
Do not install this product on a trailer or towed vehicle.
When transporting heavier bikes such as e-bikes and tilting the rack for rear vehicle
access is necessary, a team lift may be required to prevent injury and / or product damage.
Always be mindful of accessories extending beyond vehicle when operating.
Tools Required
Torque wrench Socket, 3/4"
Parts List
Item Qty Description
1 1 ActiveLink™bike rack
2 1 ActiveLink™shank assembly
3 1 Anti-rattle bolt, 1/2"-13
4 1 Flat washer, 1/2"
5 1 Lock washer, 1/2"
6 1 Hair pin clip
7 1 Anti-rattle handwheel
8 4 Hook and loop strap
CURTMFG.COM •PRODUCT SUPPORT: 877.287.8634 •18410-INS-RA •08/29/2022 •ECN9913 •PAGE 2
ASSEMBLY
8
7
6
5
4
3
2
1
Parts List
Item Qty Description
1 1 ActiveLink bike rack
2 1 ActiveLink shank assembly
3 1 Anti-rattle bolt, 1/2"-13
4 1 Flat washer, 1/2"
5 1 Lock washer, 1/2"
6 1 Hair pin clip
7 1 Anti-rattle handwheel
8 4 Hook and loop strap
CURTMFG.COM •PRODUCT SUPPORT: 877.287.8634 •18410-INS-RA •08/29/2022 •ECN9913 •PAGE 3
Step 2
Remove the clevis pin from the
ActiveLink shank's channel (#2).
Insert the ActiveLink rack assembly (#1)
into the ActiveLink shank (#2), resting the
tube's notch on the bolt and sliding the
latch into the shank's notch as shown.
Step 1
Insert the ActiveLink shank (#2) into the vehicle
receiver tube. Secure with anti-rattle bolt (#3),
flat washer (#4) and lock washer (#5).
Tighten bolt firmly until no movement
of the shank is noticed, not to exceed
64 ft-lbs. Do not over-tighten.
Install hair pin clip (#6).
Clevis pin
Step 3
Insert the clevis pin into the
ActiveLink shank (#2), snapping
the wire loop onto the pin.
Thread the anti-rattle hand wheel (#7) into
the ActiveLink shank and tighten until no
movement of the rack's support tube is noticed.
NOTICE
Over-tightening the hand wheel
may damage the shank's insert.
CURTMFG.COM •PRODUCT SUPPORT: 877.287.8634 •18410-INS-RA •08/29/2022 •ECN9913 •PAGE 4
Step 6
Adjust the frame cradles to desired positions.
Position bike frame onto cradles.
Pass the hook and loop strap (#8) through the
opening in each cradle. Pass the strap over the
bike frame, through the strap's ring and secure.
Repeat for additional bike if desired.
Step 5
If the ActiveLink rack is used with an
1-1/4" receiver, a support strap is required
to be used as shown (sold separately).
Failure to use a support strap
with 1-1/4" receivers could result
in injury and / or product damage.
Step 4
Remove the clevis pin from the
ActiveLink rack assembly (#1).
Rotate the rack's arm assembly upward,
aligning the holes in the plate with those
in the square tube as shown.
Re-insert the clevis pin.
CURTMFG.COM •PRODUCT SUPPORT: 877.287.8634 •18410-INS-RA •08/29/2022 •ECN9913 •PAGE 5
Step 8
To return to the upright position, rotate
the rack upward until the latch snaps
over the ActiveLink shank's (#2) slot.
Re-install the clevis pin, tighten
the hand wheel and re-install the
support strap if previously installed.
Step 9
The ActiveLink rack's arm assembly
can be folded for transport or storage.
Convenient handle can be used
for tilting, carrying and storage
as well as a cable lock secure point.
Step 7
To tilt the rack for rear vehicle access, first
undo the support strap (if used) from step 5.
Loosen the anti-rattle hand wheel (#7)
and remove the clevis pin from the shank.
While supporting the rack, push upward
on the latch release lever and allow
the rack to rotate downward.
A tab on the underside of the ActiveLink
shank (#2) will engage with the bike
rack's tube to prevent disconnection.
Do not transport the bike
rack in the tilted position.

Other curt Automobile Accessories manuals

curt 13490 User manual

curt

curt 13490 User manual

curt 11232 User manual

curt

curt 11232 User manual

curt 18112 User manual

curt

curt 18112 User manual

curt SWAY CONTROL User manual

curt

curt SWAY CONTROL User manual

curt 16315 User manual

curt

curt 16315 User manual

curt 58909 User manual

curt

curt 58909 User manual

curt 16028 User manual

curt

curt 16028 User manual

curt 13119 User manual

curt

curt 13119 User manual

curt 58902 User manual

curt

curt 58902 User manual

curt 45952 User manual

curt

curt 45952 User manual

curt 52040 User manual

curt

curt 52040 User manual

curt 11354 User manual

curt

curt 11354 User manual

curt 17510 User manual

curt

curt 17510 User manual

curt 60607 User manual

curt

curt 60607 User manual

curt 70118 User manual

curt

curt 70118 User manual

curt R16 5TH User manual

curt

curt R16 5TH User manual

curt 56093 User manual

curt

curt 56093 User manual

curt 13454 User manual

curt

curt 13454 User manual

curt 13532 User manual

curt

curt 13532 User manual

curt 55513 User manual

curt

curt 55513 User manual

curt 18087 User manual

curt

curt 18087 User manual

curt 70130 User manual

curt

curt 70130 User manual

curt 16993 User manual

curt

curt 16993 User manual

curt 16994 User manual

curt

curt 16994 User manual

Popular Automobile Accessories manuals by other brands

iSimple CarConnect owner's manual

iSimple

iSimple CarConnect owner's manual

Rosco STSW1001 Series Installation & user manual

Rosco

Rosco STSW1001 Series Installation & user manual

CAMPARK R10 manual

CAMPARK

CAMPARK R10 manual

HALE MM-03 Driver manual

HALE

HALE MM-03 Driver manual

Hamron 010937 operating instructions

Hamron

Hamron 010937 operating instructions

Dometic KTG smartCI 2.0 operating manual

Dometic

Dometic KTG smartCI 2.0 operating manual

Prorack K618 Fitting instructions

Prorack

Prorack K618 Fitting instructions

APA 23480 manual

APA

APA 23480 manual

Spracht Aura Mobile BT MCP-2014 quick start guide

Spracht

Spracht Aura Mobile BT MCP-2014 quick start guide

Dakota Digital VHX-84B-REG Instrument Installation

Dakota Digital

Dakota Digital VHX-84B-REG Instrument Installation

Polaris 2879954 quick guide

Polaris

Polaris 2879954 quick guide

MONSTER MOBILE AIRTALK User guide & warranty information

MONSTER MOBILE

MONSTER MOBILE AIRTALK User guide & warranty information

Warn 79815 installation instructions

Warn

Warn 79815 installation instructions

Whispbar K602 Fitting instructions

Whispbar

Whispbar K602 Fitting instructions

Link G5 VOODOO PRO quick start guide

Link

Link G5 VOODOO PRO quick start guide

Whispbar K664 manual

Whispbar

Whispbar K664 manual

STO N SHO SNS 125 Installation procedures

STO N SHO

STO N SHO SNS 125 Installation procedures

Whispbar K368 Fitting instructions

Whispbar

Whispbar K368 Fitting instructions

manuals.online logo
manuals.online logoBrands
  • About & Mission
  • Contact us
  • Privacy Policy
  • Terms and Conditions

Copyright 2025 Manuals.Online. All Rights Reserved.